 Understanding Contracts
This chapter provides an overview of contracts and discusses how to:
Define general contract information.
Define contract lines.
Select products to add to a contract line.
Define contract billing options.
Add attachments.
Create amendments.
Create ad hoc product lines.
Generate order lines.
Understanding ContractsIn Contracts, a contract consists of two levels: the contract header and the contract line. The contract header relates one-to-many with the contract line. The contract header is where you enter the agreement information relevant to all the products and services that you are licensing through the contract. Agreement information may include customer information, terms and conditions, contract sign dates, and so forth. Also stored at the header level is any administrative information, such as notes and support teams, that are associated with the entire contract.
The contract line relates many-to-one with the contract header. You add products that you are licensing to the customer in accordance with contract terms and conditions to contract lines. You can add multiple lines to each contract. You link contract lines to billing and revenue plans. Each contract line has its own status, which enables you to add all products associated with a contract during contract setup and then to manage each contract line as appropriate to the line in accordance with the terms and conditions of the contract.
This section discusses:
Contract classifications.
Contract headers.
Contract lines.
Contract line statuses.
Products on contract lines.
 Prerequisites
Before creating contracts, you must complete the contract setup components.
See Also
Contract ClassificationsSelect a value for the contract classification when creating a new contract. The contract classification displays on the contract header and cannot be changed. The contract classification selection determines the way that fields and pages are displayed in the Contracts application.
Contract classification values include:
|
Standard |
Classification for a standard contract. |
|
Internal |
Classification for a contract that supports interunit billing. You have the ability to process interunit bills by selecting Internal in the Contract Classification field. The following rules apply to internal contracts:
You can process interunit bills by selecting Internal in the Contract Classification field. |
|
Government |
Classification for a government contract. With a classification of Government, all of the features and fields specific to government contracts become active. Using the core features of Contracts in combination with the features of government contracts, you can perform the following functions:
See PeopleSoft Contracts for Government Contracting PeopleBook. |
|
Federal Reimbursable Agreement |
Classification for a reimbursable contract. This option appears only if you selected the Federal Reimbursable Agreement check box on the Contracts - Installation Options page. This option is designed for U.S. federal government customers. |
Note. Once you specify a contract classification and create a new contract, you cannot change the contract classification value. Contract classification is not under amendment control. If you create a contract with the wrong classification, you must create a new one with the correct contract classification.
Contract HeadersThe contract header serves two primary functions in the Contracts application. First, the header captures agreement information for a specific contract. Second, the header provides a simple and flexible format that enables you to tailor the structure of the contracts to match the business model. Based on the selections that you make at the header level, the Contracts application can support multiple contractual relationships, including individual contracts, multiple contracts per customer, one contract per service provided, and one contract for multiple services.
The following sections discuss how to use the field settings and options on the contract header to create interdependencies between contracts, and what the default hierarchy is for fields on the contract header.
Understanding Contract Classes
You specify the contract class on the contract header. To support a broad range of contractual relationships, Contracts uses two contract classes: a master contract and a standard contract. These classes are used in conjunction with the contract types that you establish on the Define Contract Type page. Contract types enable you to categorize contracts for reporting purposes and to limit the contracts to which certain milestones can be applied.
Note. Do not confuse contract class with contract classification. The contract classification selection, chosen when creating a new contract, determines the way that fields and pages display in the Contracts application.
Standard contracts are the primary contract class; at a minimum, you must set up standard contracts. The standard contract contains all agreement information for a specific contract. Additionally, the standard contract is linked to the contract lines that contain the contract line details for the contract; only standard contracts can have contract lines attached to them.
You can link a standard contract to a master contract, or assign the standard contract a parent contract. By assigning a standard contract to a master or by assigning a parent contract, you create a parent-child relationship between the two contracts. This parent-child relationship can aid you in contract tracking and reporting. No processing is driven off of the parent-child relationship.
On the standard contract, you can override any values copied over from an existing standard contract, master contract, or contract template.
Master contracts can be used in conjunction with standard contracts to support a broad range of relationships. A master contract contains high-level agreement information that is applicable to a series of contracts. For example, you might use master contracts to relate several standard contracts together for reporting or to create default header information to be used when creating new standard contracts.
Creating master contracts can increase the efficiency and accuracy of the contract information by reducing the amount of information that you need to enter when setting up a new standard contract. For example, to set up multiple contracts for a customer, you could set up a generic master contract for the customer and then copy the master information to create several standard contracts based on the specific contract lines. All the header terms and conditions set up at the master level are copied over to the standard contracts. If you license additional products or services to that customer, you have the option of associating the new standard contract with an existing master. This setup enables you to easily query (by using PeopleSoft Query or a different query tool) the database to find all contracts related to a single master. Please note that you cannot associate billing or revenue plans with master contracts.
A standard contract can be linked to a master at any time before the contract is set to Active processing status. For example, you may have several existing standard contracts in the contracts system that you want to associate with each other. By assigning these to a master, you can take advantage of the grouping and reporting features provided by the master contract. Linking a standard contract to a master contract does not affect the agreement information that exists on the standard contract.
Note. You cannot link a standard contract to a master if the standard contract is already saved to Active processing status.
A master contract cannot be linked to another master contract. However, you can associate a master contract with a parent contract. The parent contract with which you associate the master contract can be either a master contract or a standard contract.
Using the Parent-Child Relationship
Contracts enables you to create parent-child relationships between any two contracts. In addition to the parent-child relationship that exists between master and standard contracts, you can create a parent-child relationship between two master contracts or between two standard contracts. Contracts can support a complex array of hierarchical contract structures. How you use the parent-child functionality is dictated by the structure of your company’s contract system.
These examples discuss how you might use parent-child relationships to structure a contracts system:
You use only standard contracts.
You have licensed a set of products and services to a customer’s East Coast branch. The customer expands to the West Coast, and wants to license an additional set of products and services for its new location. You create a new standard contract by copying the existing contract to capture the terms and conditions that were established on the existing contract. You can then designate the original contract as the parent to enable grouping of the two contracts for viewing and reporting.
You have a single master contract that covers the general terms and conditions required to do business with your company.
You then issue subsequent standard contracts that focus on the specific products and services that you are licensing. After you set up the master contract, you can create standard contracts by copying from the master. After the information is transferred to the standard contract, you can add additional header information to the standard contract, overwrite the header values that were brought over from the master contract, and add contract line detail information to the standard contract.
You have a single master contract that covers the general terms and conditions required to do business with your company.
You create additional master contracts for each customer, wherein you capture any contractual information that is specific to that customer. You then issue subsequent standard contracts that focus on the specific products and services that you are licensing. In this scenario, you assign the single master contract as the parent to each of the customer-specific masters. Continuing with this example, you issue an additional standard contract for a customer site with a standard contract already in place. In this scenario, you can create the new standard contract from the existing standard contract, and assign the existing standard contract as the parent to the new standard contract. The new standard contract will be implicitly linked to the single master—individual customer master—and explicitly linked to the existing standard contract.
You will often have multiple contracts that use the same set of standard information. One way to reduce the amount of data that you need to enter into the contracts system is to open a new contract header, enter the information once, and then save the contract header as a contract template. To designate a contract as a template, the contract must not be:
Active.
Designated as a master or a parent.
Linked to a master or a parent.
When you save a contract header as a template, the contract status field becomes unavailable for entry. This happens because the contract status drives Application Engine processes, and no Application Engine processes can occur against templates. After you save a template, you can use the template to create new contracts.
Creating a Contract from an Existing Contract
Using an existing contract as the basis for a new contract reduces the amount of data that you need to enter into the contract, speeding up entry time and reducing keying errors.
Any existing contract, regardless of contract status and contract type, can be used as the basis of the new contract. If you select a contract that has undergone amendment processing, you copy from the latest iteration of that contract.
When you create a contract from an existing contract, all contract header fields from the existing contract are copied into the new contract. These items are not copied into the new contract:
Notes.
Support team information.
Billing plans.
Revenue plans.
After the contract information is copied to the new contract, you can add additional information and overwrite existing information.
Note. If you copy from a contract containing billing and revenue templates, the system creates the billing and revenue plans in the new contract. The system bases the new billing and revenue template defaults on the current product setup in the copy from contract.
Note. If you copy from a contract with a classification of government or internal, the system copies eligible lines only.
Contract LinesAfter you create a contract header in Contracts, you can begin adding contract lines to the contract. A contract line corresponds to an individual product that you are licensing. To set up a contract line, you first select a product onto a contract line.
When you select a product onto a contract line, the information that you defined for that product is stored on the contract line. The system uses the information that you defined for the contract header and for the product to create a set of defaults for that contract line. You can override much of this default information at the line level, and add additional details, such as applying specific discounts or surcharges. For contract lines that are service related, you associate the contract line with a list of Project Costing project and activity IDs, and a rate set or plan.
For amount-based contract lines, the system prices the contract line based on the pricing that you established for the product, either from the product's list price or Enterprise Pricer. You can adjust the pricing for the contract line as required. You must navigate to the Amount Allocation page to validate the pricing for the contract. The Amount Allocation page is where you ensure that the sum of the contract lines equals the contract’s negotiated amount, and that any contract discounts or surcharges have been fully allocated across the contract lines.
After you save a contract line with Active status, you can assign the contract line to a billing plan and a revenue plan. The billing plan and revenue plan represent the entitlements, cash and revenue, that you receive upon fulfilling the contract obligations.
The process flow for setting up a contract line consists of these steps:
Add the product to the list of contract lines on the Contract - Lines page.
If a contract line has a prepaid balance associated with it, enter the prepaid balance information on the Prepaid Balances - Prepaids page.
For all contract lines except those with a Recurring price type, the system populates the unbilled accounts receivable (AR) group box on the Accounting Distribution page with the unbilled AR account that was defined for the contract's product group.
If no unbilled AR account was defined for the product group, the system applies the unbilled AR account that was defined for the contract’s Contracts business unit.
Note. This unbilled AR is also populated for rate-based lines for use when the contract line is assigned to a value-based billing plan.
For contract lines with a price type of Amount or Percent, the system automatically populates the revenue (and deferred revenue if you selected the Deferred Revenue Recognition option on the related contracts product group) group boxes on the Accounting Distribution page when you save a contract line with a line status of Active.
For contract lines with a price type of Rate, revenue distribution codes are stored on the Accounting Distribution page for revenue forecasting purposes.
However, the actual revenue distributions are established on the Accounting Rules page. These rules can be established across all Project Costing ChartFields and projects, or specifically for one project with different rules for each Projects ChartField combination.
For contract lines with a price type of Recurring, the system automatically populates the revenue (and deferred revenue if you selected the Deferred Revenue Recognition option on the related contracts product group) group boxes on the Accounting Distribution page.
For recurring contract lines, Billing manages revenue and handles deferred revenue processing.
From the Contract - Lines page, you can navigate to other components to perform these activities:
For renewable products, create a renewal plan and cycle.
For rate-based contract lines, either link the product to existing Project Costing projects and activities or create new projects and activities.
For other products, either link the product to an existing Project Costing project and activity or create a new project and activity.
After you select all of the products onto contract lines, perform these activities on all contract lines with a line status of Active:
Define the contract pricing by allocating the contract header negotiated amount and any discounts across the active contract lines.
Assign all active contract lines to a revenue plan.
Assign all active contract lines to a billing plan.
See Also
Setting Up Products and Product Groups
Entering Accounting Distributions
Contract Line StatusesEach contract line has its own status field. The contract line status field works in conjunction with the contract status field on the Contract - General page. A contract line is eligible for application processing when both the contract status and the contract line status are set to Active. You do not need to set all contract lines to active before the contract status is set to Active. This enables you to capture on contract lines, during contract setup, commitments for products that can be exercised at a future date. Having individual contract line status enables you to manage the status of individual contract lines during the life of a contract. For example, if a contract has 10 contract lines and one of those lines needs to be cancelled, you can cancel just that line.
Every contract line is associated with a contract status of Pending, Active, Renewed, or Cancelled. Here is a summary of each of these line statuses, and a list of the attributes associated with each status:
|
Pending |
Enables you to capture commitments for contract lines that can be exercised at a future date. Pending lines are not included in the contract header negotiated amount and cannot be assigned to a revenue plan or a billing plan. Contract lines that are in Pending status have these attributes:
|
|
Active |
Appears as the line status default when you create a contract line. Active contract lines are included in the contract header negotiated amount and can be assigned to a revenue plan or a billing plan. Contract lines that are in Active status have these attributes:
|
|
Renewed |
Indicates that the contract line is associated with a renewal package and that the renewal cycle package for the line is set to ready. After the status is set to Renewed, all data fields on the line are no longer available for entry. Contract lines in Renewed status have these attributes:
|
|
Cancelled |
Occasionally, you might need to drop or cancel a line on a contract. For amount-based contract lines, change the line status to Cancelled. This removes the line from processing. For rate-based contract lines that do not have any billing or revenue processed, before you can change the line status to Cancelled, you must unassign any billing plans or revenue plans that are associated with the line. Rate-based contract lines that have billing or revenue processed cannot be cancelled. If you need to cancel a line whose status is set to Renewed, manage the cancellation on the renewal cycle itself instead of on the line. You can cancel a contract line in a pending or active contract. However, if the contract is active, you must create an amendment to cancel the contract line. While in while in amendment mode on the Contract - Lines page, change the line status to Cancelled. Contract lines that are in Cancelled status have these attributes:
|
The flow for the contract line status is basic:
The contract line status values can never move backwards—with the exception of moving an Active line to Pending on a contract with a Pending processing status.
Only the system can change the status to Renewed.
This diagram shows the flow between status values and functionality for each line status value:
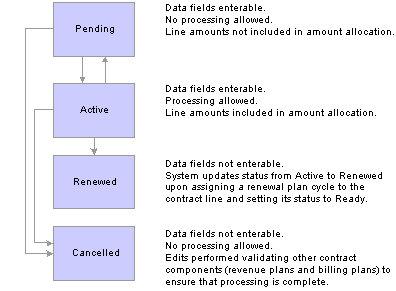
Contract line processing statuses
Saving the Line Status as Active
The system’s edit checking does not prohibit you from saving a contract line with incomplete or invalid data. However, before you can set the contract to an active processing status, you must have completed these activities:
Completed all required fields for the contract line.
Entered the start and end dates if the line is marked as renewable.
If the contract line has discounts or surcharges associated with it, the distribution code information must be completed; ChartField combination edits validate the distribution codes.
Note. While not a prerequisite for contract activation, contract lines with a price type of Rate must have at least one project and activity associated with the line in order to price, bill, and recognize revenue for Project Costing transactions.
Moving the Line Status to Renewed
The contract line status can only be set to Renewed by the system as part of the renewal process flow.
Moving the Line Status to Cancelled
Before you can set the contract line status to Cancelled, no (additional) Pending or Ready amendments can be related to the line.
In addition, for rate-based contract lines, the following conditions must be met:
No billing plan can be assigned to the line.
If the line is assigned to a billing plan, you must set the billing plan status to Pending or Cancelled, and then unassign the line from the billing plan. If processing has already occurred against an assigned billing plan, the line cannot be cancelled.
No revenue plan can be assigned to the line.
If the line is assigned to a revenue plan, you must set the billing plan status to Pending, Reversed, or Cancelled, and then unassign the line from the revenue plan. If processing has already occurred against an assigned revenue plan, the line cannot be cancelled.
If you are cancelling an Active contract line that is associated with an active project and activity in Project Costing, the system generates a warning. If you need to process additional transactions for any of the active projects and activities currently associated with the contract line that you are cancelling, you must remove those associated projects and activities from the contract line and associate them with another contract line. Otherwise, you can update the project status to Closed or the activity processing status to Inactive for the currently active projects and activities.
Additional Rules for Contracts with Prepayments
Two additional conditions exist for rate-based lines on contracts containing prepayments for which the prepayments have a status of Pending or Active:
The contract must contain at least one Active rate-based line.
You cannot cancel a rate-based line that is associated with a prepayment.
Products on Contract LinesWhen you select a product onto a contract line, the system creates a single contract line. Products or services are often sold as part of a product kit. A product kit is a collection of products. When you select a product kit onto a contract, the system creates an individual contract line for each product within the product kit.
Setting up product groups, defining attributes to contract product groups, defining products, defining the product's list price, and associating a product to a product group are discussed in the chapter about structuring contracts.
See Setting Up Products.
This section discusses:
Product kits
Service (rate-based) products
Accounting distributions
A product kit consists of multiple products and services. When you select a product kit onto a contract, the contract lines created for the products within that product kit inherit the attributes defined for the product kit.
Contracts does not distinguish between contract lines created by the selection of an individual product onto a contract line and contract lines created by the selection of a product kit of products onto contract lines.
The integration of Contracts and Project Costing enables you to associate the scope of the service product captured in Contracts with the expenses and billable hours that are captured in Project Costing as work is performed. You must associate contract lines representing service products with a Project Costing business unit, rate, project ID, and activity ID on the Related Projects page. From this page, you first associate the contract line with a single Project Costing business unit.
Next, specify a rate selection and rate for the contract line. Contracts provides you with four rate selection options: Rate Set, Contract Rate Set, Rate Plan, and Contract Rate Plan. The available rate sets or rate plans depend on the rate selection option chosen.
Note. The Rate Set and Rate Plan selection options refer to rate sets and plans with a rate type of Standard.
The advantage of linking to a standard rate set in Project Costing is that you can associate the contract line to the most current standard practice rates. You might select this option for a contract involving rate-based consulting services, for which the consulting rates that you charge are the standard practice rates at the time that work is performed.
The advantage of linking to a contract-specific rate set in Project Costing is that you can create a consistent set of rates that will not change during the life of the contract unless you explicitly change them for that contract. You might select this option for a contract involving rate-based consulting services, for which the customer agrees to provide consulting services for a set amount that will not change during the life of the project.
The advantage of linking to a standard rate plan in Project Costing is that you can associate the contract line to multiple current standard rates. Together, these rates can enable the full costing, billing, and revenue recognition of project transactions, for such areas as indirect costs, overhead expenses, and general and administrative expenses.
The advantage of linking to a contract-specific rate plan in Project Costing is that you can create a consistent combination of standard and contract rate sets. This combination of rate sets can represent the most current, standard practice rates. Or, they can represent rates that will not change during the life of the contract unless you explicitly change them for that contract line.
After you associate a rate to the contract line, you can link a contract line to one or more combinations of existing or new projects and activities. Contract lines that represent fixed-fee products can only be assigned to a single project and activity combination.
See Working with Project Costing.
Upon saving a contract line, the system creates the accounting distribution. Accounting distributions are discussed in the Understanding Accounting Distributions chapter.
See Understanding Accounting Distributions.
See Also
Defining Contracts Installation Options
Setting Up Accounting for Projects
Common Elements Used in This Chapter
|
Amendment Number |
Displays the current amendment number and date of the amendment if the contract was amended through amendment processing. |
|
Amend Contract |
Click this button on an active contract to make adjustments to the current contract by creating an amendment. If a pending amendment exists, click to edit the existing, pending amendment. When you click this button, the system transfers you to amendment mode, and the button name changes to View Current. |
|
View Current |
In amendment mode, this button appears on the pages of the contract component. Click to view and edit the current contract. When you click this button, the button name changes to Amend Contract. |
|
Contract Number |
The contract number that you entered appears at the top of the page. If automatic numbering is enabled and you select a value of NEXT, the system generates a contract number. The contract number is a unique number used to identify a contract. The parameters that you establish for a contract number affect all components of the contract. |
|
Contract Status |
Displays a user-defined value that provides a visual indicator of where the contract is within the contract life cycle. This element also controls what processing can occur against the contract. When you define a new contract, the default contract status that you established appears; you can select a different contract status. If you select a contract status that is mapped to a different contract processing status, the system performs edit checking to ensure that the contract is eligible for the new processing status that you selected. |
|
Go To |
Click one of the links to navigate to key contract areas that you can assign before activating the contract: Billing Plans: Click to assign lines for this contract to new or existing billing plans. Revenue Plans: Click to assign lines for this contract to new or existing revenue plans. Milestones: Click to edit existing milestones and add new milestones to this contract. Renewals: Click to assign renewable contract lines to renewal plans. Amount Allocation: Click to apply the contract negotiated amount, plus any discounts, to fixed-amount contract lines. This link is not available for active contracts. More: Click the drop-down arrow in this list box to access the additional contract links. |
|
More |
|
|
Processing Status |
Displays the processing status corresponding to the selected contract status. |
|
Sold To Customer |
Displays the name and customer ID of the customer to whom this contract was sold. A sold to customer can be associated with multiple ship to and bill to customers, enabling you to associate different contract lines with different ship to customers and different billing plans with different bill to customers. |
Defining General Contract InformationDefining a contract header is the first step in setting up a new contract. You create new contracts from within the add mode on the Contract - General page. There are three methods that you can use to create a new contract:
Add a new contract header and complete all the fields.
Create a new contract from an existing contract template.
Create a new contract by copying from an existing contract.
When creating a new contract header, you can create the header as a standard contract, a master contract, or a contract template. Standard is the default contract class unless you are copying from an existing master contract.
The contract header fields are available to edit until you activate the contract. When you activate the contract, all header fields, with the exception of status, become display-only. Any changes to the contract entry components must then be made through amendment processing.
This section discusses how to:
Set up and manage contract header information.
Select an existing contract from which to copy.
Define the sold to address.
See Also
Pages Used to Define General Contract Information
|
Page Name |
Object Name |
Navigation |
Usage |
|
CA_HDR_PNL |
Customer Contracts, Create and Amend, General Information, Contract - General |
Set up and manage contract header information. |
|
|
CA_COPY1_PNL |
Click the Copy From Contract button on the Contract - General page. |
Select an existing contract to copy from as the basis of the new contract. If you select a contract that has undergone amendment processing, you copy from the latest iteration of that contract. When you create a contract from an existing contract, all contract header fields from the existing contract, and optionally all contract lines including those created by templates, are copied into the new contract that you are creating. The attributions of the new contract lines populate from the current product setup. |
|
|
CA_CONTACT_PNL |
Click the Sold To Address link from the Go To drop-down list box on the Contract - General page. |
View and optionally select a different address for a contract’s sold to customer. |
Setting Up and Managing Contract Header InformationAccess the Contract - General page.
|
Copy From Contract |
Click to select an existing contract from which to copy. When you copy from an existing contract, you import the header level information and, optionally, the contract lines, which were defined for the contract from which you are copying. This button appears only when you create a new contract. |
|
Add to My Contracts |
Click to add the current contract to the My Contracts page. This button does not appear when you create a new contract. |
|
Description |
Enter a description for the contract. |
|
Contract Admin (contract administrator) |
Select an administrator for this contract. |
|
Region Code |
Select a region code, which enables you to break your business out into smaller or larger areas for operational purposes. |
|
Contract Type |
Used for reporting and for determining what milestones may be applied to a contract's revenue plans and billing plans. |
|
Exchange Rate Type |
Select an exchange rate type to establish the default currency conversion rate for this contract. |
|
Contract Signed |
Enter the date on which the contract was signed. You must enter a value in this field before you can assign the contract a status that is mapped to an Active processing status. |
|
Processing Status |
Displays the processing status corresponding to the selected contract status. |
|
Amendment Status |
Displays the current amendment status, if you have amended this contract through amendment processing. |
|
Business Unit |
Establishes defaults for billing and accounting data for a Contracts business unit. |
|
Contract Classification |
Select a value for the contract classification when creating a new contract. The contract classification displays on the contract header and cannot be changed. Values for the Contract Classification field include: Standard, Internal, Government, and Federal Reimbursable Agreement. |
|
Last Amended |
Displays the amendment date, if you have amended this contract through amendment processing. The amendment date is the date on which the last amendment was processed. It is not the date of the last amendment entered, because the last amendment entered may still be pending. |
|
Start Date |
Appears by default from the contract line if a start date was defined. The system retrieves the start date from the earliest start date of all the contract lines that were defined for the contract on the Contract - Lines page. The system uses this date to initiate billing for products with recurring price types. The system also uses this date to begin renewal processing for renewable products. |
|
End Date |
Appears by default from the contract line if an end date was defined. The system retrieves the end date from the latest end date of all the contract lines that were defined for the contract on the Contract - Lines page. The system uses this date for processing of renewable products. |
|
Last Update Date/Time |
Displays the date and time that the last user updated the contract. |
|
Last Update User ID |
Displays the user ID of the last user to update the contract. |
Other Information
|
Select to designate this contract as a template. You can then use this template when creating subsequent contracts. Only header-level information is associated with templates. |
|
|
Select to designate this contract as a master. This check box is not available on active contracts. |
|
|
Legal Review Complete |
Select to indicate that the legal group has reviewed this contract. This check box is informational only. |
|
Credit Check Complete |
Select to indicate that a credit check was completed for this customer. This check box is informational only. |
|
Contains Cotermination Lines |
Select if this contract contains renewable contract lines that are to be renewed on a separate target contract. |
|
Select a parent contract to create a parent-child relationship with another contract. |
|
|
Master Contract |
To link this contract to a master contract, select a master contract. If you have designated this contract as a master by selecting the Master check box, this field is unavailable. |
|
Legal Entity |
Organizational or legal owner of the contract. The system populates this field with the value associated with the Contracts business unit. |
|
Enter the sold to customer's purchase order (PO) number associated with this contract. The PO is used in billing processing and placed on the bill header. |
|
|
Proposal ID |
Enter the proposal ID associated with this contract. This field is informational only. |
If you have Grants installed, these additional fields appear on the page.
|
Click to create an award. |
|
|
View Award Profile |
Click to access the associated award profile. This link appears only if a contract has an award profile associated with it. |
The Contract Amounts region displays the high-level contract amounts.
|
Equals the total negotiated value of the fixed-amount contract products. You can either enter this value here or on the Negotiated Amount page. When the system processes amendments that change the contract amount, the system updates this total negotiated amount. |
|
|
Discounts/Surcharges |
Displays the sum of all discounts that you have associated with fixed-amount contract products before amendment processing. If discounts or surcharges are changed during amendment processing, the system updates this total. |
|
Displays the sum of any prepaid amounts for service products that are to be applied to the contract but were not included in the negotiated amount of the contract. |
|
|
Total |
Displays the sum of the values in the Negotiated Amount, Discounts/Surcharges, and Non-inclusive Prepaids fields. |
|
Estimated (less Prepaids) |
Displays the sum of the estimated amounts on the contract lines, less any non-inclusive prepaids. |
|
Estimated Total |
Displays the sum of the values in the Total and Estimated (less prepaids) fields. If you have not selected the Allocation is complete check box on the Amount Allocation page, a message stating *Allocation Not Complete appears. Note. A contract with amount-based contract lines cannot be activated until allocation is complete. |
See Also
PeopleSoft Enterprise Grants PeopleBook
Selecting an Existing Contract from Which to CopyAccess the Copy From Contract page.
|
Contract |
Select the contract number of the contract that you want to use as the basis for the contract that you create. |
|
Copy Lines |
Select this check box to copy the contract lines in addition to the contract header- level information. |
Note. If you copy from a contract with a classification of government or internal, the system copies eligible lines only.
Defining the Sold To AddressAccess the Sold To Address page.
|
Contact |
Displays the contact for the selected address sequence number. You may select a different contact. |
Defining Contract LinesFor each product that you select onto a contract, the system generates a new contract line with an active status. The system populates the contract line with information that you defined for the contract on the Contract - General page and for the product on the Contract Products page. On the Contract - Lines page, you can change product attributes to make it specific to the contract line, but you cannot change any attributes that uniquely define the product. For example, you can change the contract line’s negotiated amount, but you cannot change the list price of the contract product.
This section lists common elements and discusses how to:
Add general contract line information.
Add contract line details.
Review the ship to address.
Review amount details.
Define deferred revenue.
Define renewals.
Common Elements Used in This Section
|
Product |
Displays the product associated with the contract line. |
|
Line |
Displays the contract line number. |
|
Price Type |
Displays the price type that was defined for the product on the Product Definition page. Values include: Amount, Percent, Rate, and Recurring. |
Pages Used to Define Contract Lines
|
Page Name |
Object Name |
Navigation |
Usage |
|
CA_OBLIGATIONS |
Customer Contracts, Create and Amend, General Information, Contract - Lines |
Add products to a contract. Each product appears on the contract as a distinct contract line number. From this page you can view or access all details defined for a contract line. |
|
|
CA_HDR_DTL2 |
Select |
View contract header details such as contract description, contract type, contract classification, and business unit. |
|
|
CA_SHIPADDR_PNL |
Select Ship To Customer Name on the Contract - Lines page: Detail tab. |
Update the ship to customer, ship to address, or ship to contact. |
Adding General Contract Line InformationAccess the Contract - Lines page.
Enter all the products associated with a specific contract. Each contract line represents a unique contract product that is associated with its own accounting distributions and can be assigned to individual revenue and billing plans. In addition, multiple contract lines can share the same billing and revenue plans. Some restrictions apply.
|
Add Contract Lines |
Click to select existing products and define new products to add to this contract. You can add lines only to a contract that has a processing status of pending; this button is unavailable for entry after the contract is set to an active processing status. When the contract is active, you can add only new lines as part of an amendment. |
|
Add Default Kit |
Select to add a default product kit to the contract. You must have a default product kit defined for the contract's contract type to use this default feature. This button is unavailable for entry after the contract is set to an active processing status. |
Contract - Lines page: General Tab
|
Description |
Displays the description for the product that was defined on the Contracts Product page. You can accept the default description or change it here. |
|
Start Date |
Enter the start date for the contract line. The system uses this date to initiate billing for products with recurring price types. The system also uses this date to begin renewal processing for renewable products. The system displays the earliest start date from all contract lines that are defined for the contract on the Contract - General page. |
|
End Date |
Enter an end date for the contract line. The system uses this date for the processing of renewable products. This field is display only. The system displays the latest end date from all contract lines that are defined for the contract on the Contract - General page. |
|
Status |
Select a line status, which controls what processing can occur against a contract line. Values are: Pending, Active, Cancelled, or Renewed. When in amendment mode, you can change a contract line's status to Cancelled. |
Adding Contract Line DetailsAccess the Contract - Lines page: Detail tab.
|
Billing Plan |
Click the billing plan status to access the Billing Plan General page. This link appears only if the billing plan is assigned to a contract line. |
|
Revenue Plan |
Click the revenue plan status to access the Rev Rec Plan (revenue plan) page. This link appears only if the revenue plan is assigned to a contract line. |
|
Contract Terms |
Click to access the Related Projects page to manage projects and activities associated with this contract line. See Related Projects page. |
|
Accounting |
Click the Distribution link to access the Accounting Distribution page to manage the accounting distributions for this contract line. If an error occurs during processing, an Action Required link appears instead of the Distribution link. Errors may occur for three reasons:
See Accounting Distribution page. |
|
Internal Notes |
Click to access the Internal Notes page to add or view notes related to this contract line. See Internal Notes page. |
|
Ship to Customer Name |
Click to access the Ship To Address page to manage the ship to customer information for this contract line. Defaults are based on the sold to customer that you selected on the Billing Options page. You can select an alternate ship to ID. See Ship To Address page. |
See Also
Entering Accounting Distributions
Reviewing the Ship To Address
Access the Ship To Address page.
|
Ship To Customer |
Displays a default value based on the sold to customer that you selected on the Billing Options page. You can select an alternate ship to ID for a pending contract. |
|
Address Sequence Number |
Displays the number corresponding to the ship to customer ID that you selected for this contract line. You can select an alternate address sequence number. |
|
Contact |
Displays the contact for the selected address sequence number. You may select a different contact. |
Reviewing Amount DetailsAccess the Contract - Lines page: Amount Detail tab.
View the pricing information for a contract line. The system updates these fields to reflect any changes that you make to the price detail for contract lines on the Amount Allocation page.
|
% (percent) |
For a product ID with a price type of Percent, displays the percent that you defined on the Contract Products page. |
|
% of (percent of lines or total) |
For a product ID with a price type of Percent, you can designate the contract line to be a percentage of the full contract negotiated amount or a percentage of one or more amount-based contract lines. For percent-based contract lines that are a percentage of one of more amount-based lines, click the % of link to access the Percent Based Pricing page, where you can review the pricing details for that line. |
|
List Price |
For a product ID with a price type of Amount, displays the list price that you defined on the Contract Products page. |
|
Quantity |
Enter the quantity for the product that you added to the contract line. |
|
UOM (unit of measure) |
For product IDs with a price type of Percent, Amount, or Recurring, the unit of measure appears by default for the contract line. If the product has multiple UOMs defined, the system retrieves the first one. If the product does not have a UOM associated with it, then this field remains blank. You can accept the default UOM or change it here. Once you select a UOM, the system calculates the price and you can no longer change the UOM. |
|
Negotiated Amount |
The system updates this field to reflect any changes that you make to the negotiated amount for this contract line on the Amount Allocation page. |
|
Discounts/Surcharges |
Click to view the discounts or surcharges associated with this contract line. This link is available for amount-based contract lines only. |
|
Net Amount |
The system updates this field to reflect the line's negotiated amount minus the associated discounts entered on the Amount Allocation page. |
|
Limit Amount |
Displays the limit amount for this contract line, if you entered one. Only contract lines with a price type of Rate have limits. |
See Also
Defining Deferred RevenueAccess the Contract - Lines page: Deferred Revenue tab.
|
Deferred Revenue |
Select to enable deferred revenue for this contract line. Booking to deferred revenue enables you to post to the general ledger revenue that you expect to realize in a future accounting period. If the contract is in Pending status, you can enable deferred revenue by selecting this check box. If the contract is in Active status, you cannot change this setting and you must use amendment processing. This field is available for amount-based and recurring contract lines. You initially establish the deferred revenue option when setting up the contract product groups. You can override the product group deferred revenue option on the contract line if you selected the Deferred Revenue Override check box on the Contracts Definition - Processing Options page for the associated contracts business unit. Note. If you did not select the Deferred Revenue Override check box on the Contracts Definition - Processing Options page for the associated contracts business unit, you cannot change the default contract product group value that appears in this field. |
|
Deferred Revenue Status |
Displays the status of the deferred revenue for this contract line. |
|
Deferred Revenue Acctg Date (deferred revenue accounting date) |
Select the deferred revenue accounting date for this contract line. The Deferred Revenue process does not process any contract line until you specify its deferred revenue accounting date. In addition, any related revenue processes do not process until the deferred revenue process is run. Note. This field appears on the page only if deferred revenue is selected for the contract line. Note. This field does not appear for recurring contract lines. |
Defining RenewalsAccess the Contract - Lines page: Renewals tab.
|
Renewable |
If the product that you selected onto this contract line was defined as renewable, this check box is selected. If this contract line is renewable, you must define values for this contract line in the Start Date and End Date fields on the Contract - Lines page: General tab. |
|
Source Renewal |
Displays the renewal plan number when you associate a contract line with a renewal cycle. |
|
Cycle |
Displays the cycle for the source renewal plan. A renewal plan can have multiple cycles. |
|
Target Renewal |
For renewal contract lines, when you associate a contract line with a renewal plan number and cycle and then set the cycle status to Done, the system:
|
|
Cycle |
Displays the cycle for the target renewal plan. Click the cycle number to review the details for this renewal cycle. A renewal plan can have multiple cycles. |
|
Create Plan |
If a contract line is renewable but is not yet associated with a renewal plan, you can click this button to associate this contract line with a renewal plan. Note. If you have not yet entered a start and end date, the system asks you to enter those values before you can associate the contract line with a renewal plan. |
See Also
Selecting Products to Add to a Contract LineThis section discusses how to:
Select products to add to a contract line.
Review pricing and components of fixed-fee product kits.
See Also
Setting Up Products and Product Groups
Pages Used to Select Products onto Contract Lines
|
Page Name |
Object Name |
Navigation |
Usage |
|
Add Contract Lines |
CA_OFFERING_SRCH |
Click the Add Contract Lines button on the Contract - Lines page. |
Search for and select existing products to be added to a contract. From this page you can also create and add ad hoc products to a contract line. |
|
Price Product Kit |
CA_PKG_PNL |
Select a fixed-fee product kit template on the Add Contract Lines page and click Add Contract Lines. |
Review the pricing and components of the fixed-fee product kits that you are selecting onto the contract. This page is not used with rate-based product kits. |
Selecting Products to Add to a Contract LineAccess the Add Contract Lines page.
Search Products
Use the Search Products group box to search for predefined contract products. Optionally, filter the search using this search criteria:
|
Product Group |
Select a product group. Product groups are optional; if they are set up, they provide a logical grouping of products. |
|
Product |
Search for products by entering all or part of a product name. |
|
Price Type |
Select a price type of Amount, Rate, Percent, or Recurring. |
|
Physical Nature |
Select Goods or Services. |
|
Select this check box to search for product kits only. |
|
|
Select this check box to search for renewable products only. |
|
|
Search |
When you click Search, the system carries out the search based on the search criteria that you entered, and populates the Products group box with all products meeting the criteria. |
In the Search Results group box, the system displays the products that meet the search criteria.
To add a product to the contract, select the check box and click Add Contract Lines. When you select multiple products, the system adds each selected product to the contract as a new contract line.
Access the Add Contract Lines page: General tab.
|
A Y in this column indicates that the product is a product kit. When you select a product kit and click Add Contract Lines, the system transfers you to the Price Product Kit page, where you can define the price for each product within a product kit. |
|
|
*Fee Type |
Displays the fee type for contracts with a classification of Government. For contracts with a classification other than Government, the value of None displays in this field. See Understanding Creating Cost-Plus Government Contract Lines. |
|
Renewable |
A Y in this column indicates that the product is renewable. |
|
Appears by default if a renewal action was defined for the product. Accept the default value or change it here. Values include Automatic and Manual. This field is available if you selected the Renewable check box in the Search Criteria section of this page. |
|
|
Quantity |
Displays the quantity for the product. The value in this field defaults to 1. If you wish to specify a quantity other than 1, you can enter a new value here. |
|
UOM |
For product IDs with a price type of Percent, Amount, or Recurring, the unit of measure appears by default for the contract line. If the product has multiple UOMs defined, the system retrieves the first one. If the product does not have a UOM associated with it, then this field remains blank. You can accept the default UOM or change it here. Once you select a UOM, the system calculates the price and you can no longer change the UOM. |
Access the Add Contract Lines page: Templates tab.
|
Add a revenue plan template or override the existing revenue plan template before adding the contract line to the contract. |
|
|
Add a billing plan template or override the existing billing plan template before adding the contract line to the contract. |
|
|
Add a billing plan detail template or override the existing billing plan detail template before adding the contract line to the contract. |
|
|
Add a renewal plan template or override the existing renewal plan template before adding the contract line to the contract. |
|
Billing Plans |
Select this check box to enable the system to create a billing plan when adding the contract line to the contract. Clear this check box if you do not want the system to create a billing plan when the contract line is added to the contract. |
|
Revenue Plans |
Select this check box to enable the system to create a revenue plan when adding the contract line to the contract. Clear this check box if you do not want the system to create a revenue plan when the contract line is added to the contract. |
|
Renewal Plans |
Select this check box to enable the system to create a renewal plan when adding the contract line to the contract. Clear this check box if you do not want the system to create a renewal plan when the contract line is added to the contract. |
|
Billing Plans |
Select this check box to combine multiple contract lines with the same billing plan template into one billing plan. To keep each contract line and its respective billing plan separate, clear this check box. Note. To combine like billing plans, you must have the same billing plan template and billing plan detail template. |
|
Revenue Plans |
Select this check box to combine multiple contract lines with the same revenue plan template into one revenue plan. To keep each contract line and its respective revenue plan separate, clear this check box. Note. Contract lines must have the same price type in order to share revenue plans. Contracts with a classification of Government containing cost-plus contract lines with a fee type other than None cannot share revenue plans. |
|
Add Contract Lines |
Click to add any currently selected products to the contract. |
|
Click to access the Create Adhoc Product page, where you can create a custom product to use on this contract. |
|
|
Return to Contract Lines |
Click to return to the Contract - Lines page. |
Reviewing Pricing and Components of Fixed-Fee Product KitsAccess the Price Product Kit page.
Product Kit Price
|
Price |
Displays the list price for fixed-amount products. You may accept this default or enter a new price. |
Product Kit Components
|
Product Component ID |
Displays the ID for each product component. |
|
Contract Price % (contract price percent) |
Displays any percentages defined for the product. Each product component is priced as a percentage of the product kit price. |
|
OK |
Click to create contract lines for each product kit. |
Defining Contract Billing OptionsThis section discusses how to:
Enter billing options.
Select a billing address.
Pages Used to Enter Billing Options
|
Page Name |
Object Name |
Navigation |
Usage |
|
Billing Options |
CA_HDR_BILLOPT |
Click the Billing Options link in the Go To drop-down list box on any page in the contract component. |
Enter billing option defaults for the contract. These billing options appear by default onto the billing plans created for contract lines within this contract. You can override these options at the billing plan level. |
|
Billing Address |
CA_BILLADDR_PNL |
Click the Bill To Address link on the Billing Options page. |
Review and optionally select the default billing address to be used for a contract. |
Entering Billing OptionsAccess the Billing Options page.
Billing uses a hierarchical system of defaults to determine billing options. The billing plan is the most specific level of this hierarchy and where you specify billing options that are not overridden by defaults at a higher level. If the billing options do not change from one contract to the next for the business, then you can take full advantage of the hierarchical system of defaults that you set up in Billing without having to further define these values on the contract’s billing plans.
The Contracts Billing Options page is a place to enter defaults that are copied to all new billing plans created for the contract. This enables you to avoid having to repeat the same entry of billing option default overrides on multiple billing plans for the same contract.
Many of the values that you define here are defaults that you can override on the Billing Plan - Billing Plan General page. Values left blank at the billing plan level are defaulted from a higher level within the Billing system of defaults onto bills.
Billing Options
|
Bill To Customer |
The default ID for the bill to customer appears by default in the customer field. You may select a different bill to customer ID. Note. For contracts with a contract classification of Internal, you must select an interunit Bill To Customer for this field. |
|
Bill To Address |
Click to view the address and contact associated with the address sequence number. |
|
Billing Business Unit |
Appears by default from the value that you specified for the contract business unit. You may select a different Billing business unit. Only Billing business units pointing to the same General Ledger business unit as the Contracts business unit appear in the list of valid values. |
|
Bill Type |
The ID appears by default from the value that you specified for the Contracts business unit, and is used by Billing to categorize the activity being billed. You can override the bill type on the billing plan. |
Billing Default Overrides
|
Payment Method |
Indicates the type of payment, including check,credit card, Direct DebitDraft, and Electronic Fund Transfer. You can also define your own payment methods. |
|
Payment Terms |
Indicates the terms to which the customer should adhere when making a payment of invoices from Billing. |
|
SubCustomer 1 and SubCustomer 2 |
Values for these fields appear by default according to the subcustomer information defined for the bill to customer. Subcustomers enable you to record history and aging information for a subset of the business with a customer or for a cross-section of the business across different customers. The values that you select for SubCustomer 1 and SubCustomer 2 may not be overridden at the billing plan level. |
Grants Information
This group box appears only if you have installed Grants:
|
Cost Reimbursable |
Select if you want cost reimbursable as the method of payment. |
|
Letter of Credit |
Select if you want letter of credit as the method of payment. |
|
Letter of Credit ID |
If the method of payment is letter of credit, enter a reference number for this contract. Note. If you do not select Letter of Credit, this field does not appear on the page. |
|
Cost Sharing Detail |
Select this check box to enable the system to generate a Cost Sharing Detail report for this contract bill when the bill is printed. |
|
Salary Detail |
Select this check box to enable the system to generate a Salary Detail report for this contract bill when the bill is printed. |
See Also
Establishing Default Levels for PeopleSoft Billing Options
Selecting a Billing AddressAccess the Billing Address page.
|
Bill To Contact |
Displays the bill to contact for the selected address sequence number. You may select a different bill to contact. |
Adding AttachmentsThis section discusses how to add attachments to contracts.
Page Used to Add Attachments
|
Page Name |
Object Name |
Navigation |
Usage |
|
Attachments |
CA_ATTACHMENTS |
Click the Attachments link in the Go To drop-down list box on any page in the contract component. |
Attach to the contract document files such as letters, spreadsheets, or drawings, or view or delete already attached files. |
Adding Attachments to Contracts
|
Amendment Date |
If this contract was amended, displays the last applied amendment number and date of the amendment. |
|
Attached File |
Enter the name of the attached file. |
|
Description |
Enter a description for the attachment. |
|
Line |
Enter a contract line number to indicate that the attachment relates to a specific contract line. |
|
|
Click this button to add an attachment. Then browse to the location of the wanted file, and click Upload. The file is copied to the server where the project information resides. You may add multiple attachments to a contract. |
|
|
To delete an attachment, click this button in the row where the document that you want to delete is listed. |
|
|
To view an attachment, click this button in the row where the document that you want to view is listed. |
Note. You must have a File Transfer Protocol server set up to use the Document Attachment feature.
See Also
Defining an FTP Server for Document Attachments
Creating Amendments
See Amending Contracts.
Creating Ad Hoc Product LinesThis section discusses how to create ad hoc product lines.
Page Used to Create Ad Hoc Products
|
Page Name |
Object Name |
Navigation |
Usage |
|
Create Adhoc Product |
CA_PROD_ADHOC |
Click Create Adhoc Product on the Add Contract Lines page. |
Create ad hoc product lines for use on the contract. |
Creating Ad Hoc Product Lines
Access the Create Adhoc Product page.
Enter a name and description for the ad hoc product. Enter other pertinent information for the ad hoc product line:
|
Product Group |
Select a product group for the ad hoc contract line. |
|
Price Type |
Select a price type for the ad hoc contract line. Values are Amount, Percentage, and Rate. You cannot create recurring ad hoc contract lines. |
|
Revenue Method |
Select a revenue method. Values are Apportionment, As Incurred, Billing Manages Revenue, Milestone, and Percent Complete. |
|
Percentage |
If the price type is Percentage, enter the default percentage for the contract line. |
|
Applies to |
If the price type is Percentage, select the parameter for the value that you entered in the Percentage field. Values include:
|
|
Product Tax Group |
Product tax groups help you identify specific related tax charge information associated with individual charge codes when you take advantage of either of the third-party tax solutions that the PeopleSoft system supports—Taxware or Vertex. Tax Group is not required. Note. Product tax groups are not used if you install the delivered Billing tax solution. |
|
Transaction Type |
(Optional) If you have Taxware or Vertex installed, select a transaction type. |
|
Transaction Sub Type |
(Optional) If you have Vertex installed, select a transaction sub type. |
|
Renewable |
Select this check box to create a renewable ad hoc product. |
|
Renewal Action |
Select a renewal action for the ad hoc product. This field appears on the page only if you select the Renewable check box. Values include:
|
|
Third Party Product |
Select this check box if you are using third-party software for the ad hoc line. |
Generating Order Lines
This section discusses how to create sales orders.
Understanding Sales Order GenerationContract lines with valid sales order products can be passed into a sales order in Order Management. In addition, new orders can be created or lines can be added to existing orders. If the Product Use field displays General Use, then the product can be used on both contract lines and sales orders. If the value in the Product Use field is Contracts only, the system does not enable you to pass the contract line into the sales order.
Note. Data cannot be synchronized between Contracts and Order Management. Therefore, if you make a change to the contract or order in one application, you must manually make the change in the other application to synchronize the contract and the order.
See Also
PeopleSoft Working With Customers and Orders 8.9 PeopleBook
Page Used to Generate Order Lines
|
Page Name |
Object Name |
Navigation |
Usage |
|
Sales Order |
CA_ORDER_LINES |
|
Create sales order lines from the associated contract lines. |
Creating Sales Orders
|
Line |
For products that are designated for use by both Contracts and Order Management, displays the contract line number of each active line of the contract number that you selected. |
|
(select) |
Select the check box next to the contract lines that you want to link to a sales order. When you click the Apply button, this contract line is linked to the new or existing sales order. |
|
Product ID |
Displays the product name of each active line for the contract number that you selected. |
|
Order No (order number) |
When you attach a contract line to an order, displays the order number. |
|
Net Amount |
Displays the net amount for each active line of the contract number that you selected. |
|
Ship To Customer |
Displays the ship to customer for each active line of the contract number that you selected. |
|
Ship From Location |
Displays the ship from location for each active line of the contract number that you selected. |
Select an Order
|
Existing Order |
Select to add the selected contract line to an existing sales order. |
|
New Order |
Select to create a new sales order for the selected contract line. |
|
OM Unit (Order Management business unit) |
Select an Order Management business unit to apply to the contract line for use on the sales order. |
|
Purchase Order |
Displays the associated purchase order reference number, if applicable. |
|
Apply |
Select to generate an order for the selected contract lines. |