Defining Application-Specific User Preferences
Use the User Preferences component (OPR_DEFAULT) to define PeopleSoft application-specific user preferences.
Use the OPR_DEFAULT_FIN component interface to load data into the tables for this component.
|
Page Name |
Definition Name |
Usage |
|---|---|---|
|
OPR_DEF_TABLE_AM1 |
Establish date default values, transaction loader processing options, interface table transaction edit options, and property pagelet defaults for a user. |
|
|
OPR_DEF_TABLE_IT1 |
Define user preferences that are specific to IT Asset Management. |
|
|
OPR_DEF_TABLE_BI1 |
Define default user preferences that are specific to Billing. |
|
|
OPR_DEF_TABLE_CA1 |
Define default user preferences that are specific to Contracts. |
|
|
OPR_DEF_TABLE_GL1 |
Set up user defaults for General Ledger. |
|
|
OPR_DEF_TABLE_IN1 |
Define preferences for Inventory users. |
|
|
RE_OPR_DFLTS |
Define default lease administration preferences for Lease Administration users. |
|
|
OPR_DEF_TABLE_MG1 |
Maintain the default server by user ID. Configure a default server to run the Update Pick Plan and Automatic Material Release process (SFCONREL). |
|
|
Orders - Quotations Page |
OPR_DEF_TABLE_OM2 |
Click the Orders - Quotations link on the User Preferences page to set up the default business unit for quotation processing pages for a user. You can also specify a beginning sequence code for your quotations. |
|
Orders - Other Page |
OPR_DEF_TABLE_OM3 |
Click the Orders - Other link on the User Preferences page to set up defaults for users who are entering returned material authorizations (RMAs). |
|
OPR_DEF_TABLE_OM1 |
Set up business unit, order source, and order group defaults for a user who enters sales order information. You can also specify a beginning sequence code for your sales orders. |
|
|
OPR_DEF_TBL_PYCYCL |
Define default output destinations for the Pay Cycle Manager and the Express Payment Manager components (PYCYCL_MGR and EXP_PYCYCL_MGR, respectively). These default values are not required to perform any pay cycle process. |
|
|
OPR_DEF_TABLE_PL1 |
Select a default planning instance. A planning instance is a set of data (business units, items, supplies, and demands) constituting the inputs and outputs of a supply plan. |
|
|
OPR_DEF_TABLE_PC1 |
Assign default parameters for transaction processing and set up data entry defaults. |
|
|
OPR_DEF_TABLE_PM1 |
Define options and authorizations for procurement users. |
|
|
Procurement - Contract Process Page |
OPR_DEF_CNTRCT_SEC |
Define contract process preferences by specifying the default contract status and authorized actions for a user. See the User Preferences – Procurement Page. |
|
OPR_DEF_VRBT_SEC |
Define rebate manager maintenance authorization and access rights for vendor rebate agreements. |
|
|
Procurement - Request for Quote Process Page |
OPR_DEF_RFQ_SEC |
Click the Request for Quote Process link on the Procurement page to specify the default request for quote (RFQ) status and authorized actions for a user, including the ability to select the vendors to which an RFQ is dispatched. |
|
OPR_DEF_TABLE_AP1 |
Specify user voucher authorities, online voucher processing, and quick invoice configuration options for a user. |
|
|
Procurement - Voucher Styles Page |
VCHR_AUTHORITY_SEC |
Click the Security for Voucher Styles link on Payables Online Vouchering page to define user authority (security) for each of the voucher styles. Selections determine whether the user has the authority to add or modify different types of vouchers. You must be in the Update/Display mode to select the Allow Claim Voucher check box. |
|
OPR_DEF_RECV_SEC |
Define receiver and RTV user preferences. |
|
|
OPR_REQ_AUTH |
Authorize users to initiate and update requisitions for applicable requesters. Define a user's requisition processing authority in relation to applicable requesters. |
|
|
OPR_PO_AUTH |
Authorize users to create and update purchase orders for applicable buyers. Define a user's purchase-order processing authority in relation to applicable buyers. |
|
|
OPR_DEF_TABLE_VND1 |
Authorize users to perform supplier maintenance functions (enter, approve, deactivate). |
|
|
User Preferences - Document Tolerance Exceptions Override Page |
OPR_DEF_DOC_TOL |
Provide authority to users to override document tolerances. |
|
OPR_DEF_TABLE_TD1 |
Define default user preferences for promotions management. |
|
|
OPR_DEF_TABLE_AR1 |
Define the default group unit, deposit unit, and address that is associated with a user. |
|
|
OPR_DEF_TABLE_AR2 |
Specify write-off tolerances and discount tolerances. |
|
|
OPR_DEF_TBL_SS |
Create strategic sourcing user preferences and defaults. |
|
|
OPR_DEF_TABLE_FO1 |
Define general user preferences for Staffing Front Office and Pay/Bill Management. |
|
|
Staffing - Job Data Page |
OPR_DEF_TABLE_FO2 |
Define Staffing Front Office and Pay/Bill Management values to be supplied by default to the Job Data section of the Applicant setup pages. |
|
OPR_DEF_TABLE_CS |
Define user authorizations for managing contract documents through their life cycles and to grant the types of controls that the user who is defined in the User ID field can perform on documents. |
|
|
OPR_DEF_TABLE_WM1 |
Define default maintenance management preferences. |
|
|
MIN_USER_TASK_OPT |
Define user preferences for Mobile Inventory Management. |
|
|
OPR_DEF_TABLE_MIN |
Define user preferences for Mobile Inventory Management fluid page. |
Use the Asset Management - User Preferences page (OPR_DEF_TABLE_AM1) to establish date default values, transaction loader processing options, interface table transaction edit options, and property pagelet defaults for a user.
Navigation:
This example illustrates the fields and controls on the Asset Management - User Preferences page. You can find definitions for the fields and controls later on this page.

This example illustrates the fields and controls on the Asset Management - User Preferences page. You can find definitions for the fields and controls later on this page.
Field or Control |
Description |
|---|---|
Field Drilldown Group Id |
Select a drill-down group to be used by online reporting when filtering data. |
Date Default Values
Field or Control |
Description |
|---|---|
Accounting Date |
Supply a default date on which you want this transaction distributed to the general ledger. The accounting date is validated against the open periods that you establish for Asset Management in the FIN_OPEN_PERIOD table to determine to which period the system posts. The difference between the transaction date and the accounting date determines whether any prior period depreciation must be calculated. For example, suppose that a computer was acquired and placed in service on March 15, 2006 but was not entered in Asset Management until August 1, 2006. All general ledger periods prior to August are closed. In this case, Asset Management automatically calculates depreciation starting in March and posts it to the general ledger in August. |
Transaction Date |
Supply a default date for asset transactions or leave this field blank to use the system date. Note: The transaction date must always be prior to or equal to the accounting date. |
Edit Options for Interface Transactions
Field or Control |
Description |
|---|---|
Edit Review AP/PO Information |
Select the options for this user for editing the Review AP/PO Information component. The available options are:
Note: Some fields cannot be edited because of the Interface Type and Load Type. Only for Load Status of NEW, the fields can be edited. |
Edit Review Transactions Info |
Select the options for this user for editing the Review Transactions component. The available options are:
Note: Some fields cannot be edited because of the Interface Type and Load Type. Only for Load Status of NEW, ERR and HLD, the fields can be edited. |
Edit Unitization Information |
Use this field to manage user editing privileges of the asset unitization details on the Unitize - TO Asset page.
|
Edit Consolidation Information |
Use this field to manage user editing privileges of the asset consolidation details on the Consolidate - TO Asset page.
|
To Default Distribution Only |
Select this option to consolidate interface lines with different ChartFields to a single ChartField distribution. If you do not select this option, interface lines with different ChartFields will be consolidated into a single asset ID with multiple ChartField distributions. |
Note: When the interface status is in the status of Errored, On Hold, or Pending, the options to edit the transaction tables come into effect. Depending on the load type, some fields may not be editable even when the All option has been selected. For example, you cannot enter proceeds or removal costs in an FAD (Financial Addition) transaction because those fields are related to retirements.
Auto-Run Transaction Loader
Field or Control |
Description |
|---|---|
Asset Management Integration |
Select to add transactions from Maintenance Management to the transaction loader process (AMIF1000). |
Impairment/Revaluation Process |
Select to always run impairment and revaluation processing when running the transaction loader process. See Understanding Adjusting, Transferring, Reversing, and Evaluating Assets |
Asset Retirement Obligations |
Select this option to enable automatic always run Asset Retirement Obligation transaction processing when you click the Generate ARC button from either the ARO Measurement page or from the ARO Measurement in Mass – Process Parameters page when running the transaction loader process (AMIF1000). |
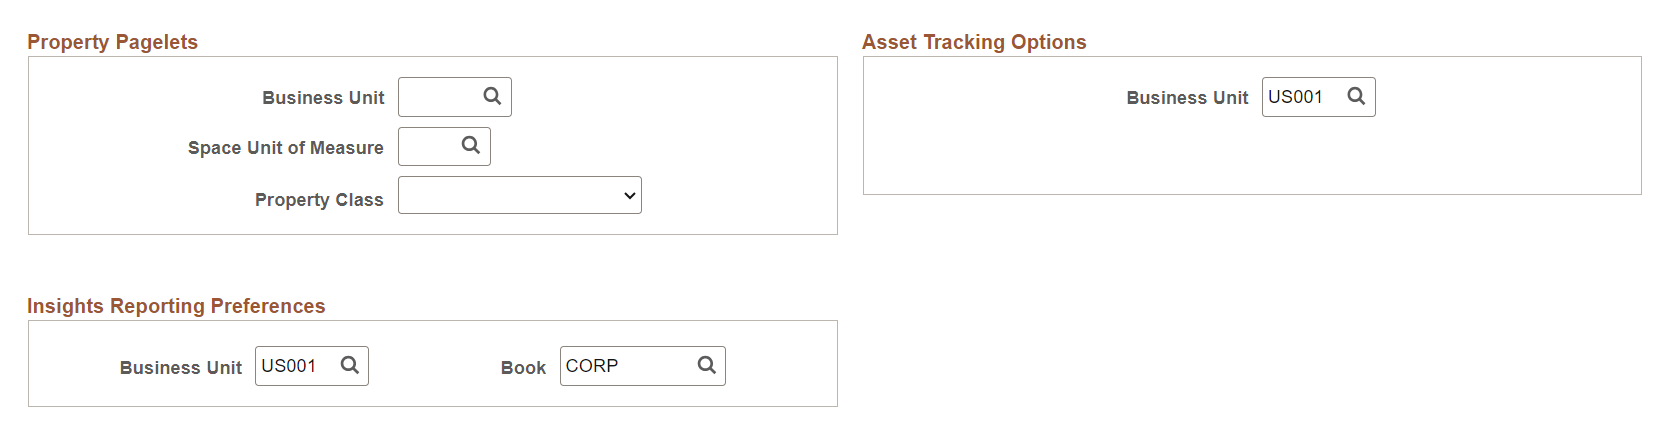
Property Pagelets
Field or Control |
Description |
|---|---|
Business Unit |
Select the business unit. This user will then have access to property assets from within the selected business unit. |
Space Unit of Measure |
Select the default unit of measure to access when a user is working with space allocations. The available options are: Acres Feet Hectares Meters |
Property Class |
Select the property class to be commonly used by default for this user ID when he or she is working with property assets. The available options are: Area Building Floor Site Space |
Asset Tracking Options
Field or Control |
Description |
|---|---|
Business Unit |
Select a default business unit to use with the Scan Asset, Scan By Location, and Find Asset pages:
|
Insights Reporting Preferences
Use this section to specify default Business Unit and Book filter values for the Asset Management Insights dashboards.
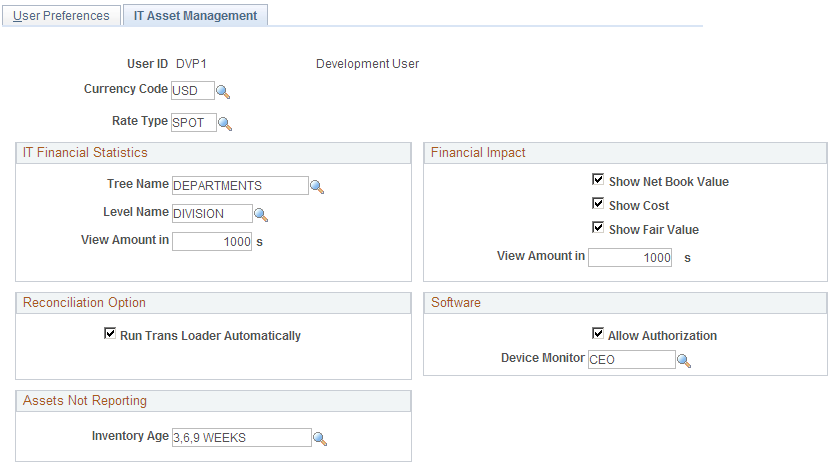
Use the User Preferences - IT Asset Management page (OPR_DEF_TABLE_IT1) to define user preferences that are specific to IT Asset Management.
Navigation:
This example illustrates the fields and controls on the User Preferences - IT Asset Management page. You can find definitions for the fields and controls later on this page.
Field or Control |
Description |
|---|---|
Currency Code |
Enter a currency code to be used by financial values, statistics, and reports for a given user within IT Asset Management. The currency code at the User ID level overrides the currency code that is supplied at the Installation Options level for this user. |
Rate Type |
Enter a rate type to be used by financial values, statistics, and reports for a given user within IT Asset Management. The rate type at the User ID level overrides the rate type that is supplied at the Installation Options level for this user. |
IT Financial Statistics
Field or Control |
Description |
|---|---|
Tree Name |
Select a default tree to be used by the user within the application pages and for reporting within IT Asset Management. |
Level Name |
Select a default tree level within the tree to be used in reporting within IT Asset Management by user. |
View Amount in |
Select to present financial statistics within the application as rounded amounts based on the designation in this field according to the user's preference. If this field is blank, the financial statistics will be presented as whole numbers. |
Financial Impact
Field or Control |
Description |
|---|---|
Show Net Book Value |
Select to display the net book value (NBV) of assets within the application pages and portal pagelets in IT Asset Management for a given user. The NBV is used for financial impact analysis in compliance with regulatory requirements. |
Show Cost |
Select this option to display the cost basis of assets within the application pages and portal pagelets in IT Asset Management for a given user. The cost basis is used for financial impact analysis in compliance with regulatory requirements. |
Show Fair Value |
Select to display the fair value of assets within the application pages and portal pagelets in IT Asset Management for a given user. The fair value is used for financial impact analysis in compliance with regulatory requirements. |
View Amount in |
Select to present financial impact amounts within the Assets not Reporting and Manage Exceptions pagelets as rounded amounts based on the designation in this field according to user preference. If this field is blank, the financial impact will be presented as whole numbers. |
Reconciliation Option
Field or Control |
Description |
|---|---|
Run Trans Loader Automatically |
Select to invoke the Transaction Loader process automatically. When Manage Exceptions processes asset additions, Transaction Loader must be run to complete the additions. Selecting this option automatically runs the Transaction Loader and processes the additions. |
Software
Field or Control |
Description |
|---|---|
Allow Authorization |
Select to enable a user to authorize employees for software titles from the Discover Software Inventory Detail page. |
Device Monitor |
Select the software device group to be used as the default value in the Software Device Monitor portal pagelet. This effectively assigns to users the device group (within the enterprise software device group hierarchy) that they will see on the Software Device Monitor pagelet. |
Assets Not Reporting
Field or Control |
Description |
|---|---|
Inventory Age |
Select the default inventory age for both the Assets Not Reporting Inquiry and the Assets Not Reporting portal pagelet. |
Use the User Preferences - Billing page (OPR_DEF_TABLE_BI1) to define default user preferences that are specific to Billing.
Navigation:
Note: Before you define user preferences, you must configure your default process scheduler servers.
Field or Control |
Description |
|---|---|
Server Name |
Select the server with the default output destination that you want the system to use when you run Billing processes from a button. |
Job Run Opt |
Select a job run option, which determines whether multiprocess jobs run with or without the Currency Conversion, Load AR Pending, Pre-load, Load GL Interface, Commitment Control, and Federal Invoice Formats 1080 and 1081 processes, when you initiate multiprocess jobs from a button. Options are: No Load: Select to run the processes in the job except for the Currency Conversion, Load AR, Pre-load, Load GL, Commitment Control, and Standard Form 1080 and 1081 processes. Print/Load: Select to run all of the processes in a multiprocess job, including Currency Conversion, Load AR, Pre-Load, Load GL, Commitment Control, and Federal Invoice Formats 1080 and 1081. Note: The system initiates the Commitment Control process only if commitment control is enabled on the Installation Options - Installed Products page. The system does not print Federal Invoice Formats 1080 and 1081 for Direct Invoice jobs. |
Print Listing |
Enables the printing of reports that are produced by the PeopleSoft Billing Load AR, Load GL, and Generate AP Voucher (generate accounts payable voucher) processes whenever you initiate these processes from a button. The Load AR, Load GL, and Generate AP processes write summary information to the message log, regardless of whether the process generates a printed report. On the Message Log page, you can view the summary information that is written to the message log, such as what input parameters were used in a particular process run and how many bills it processed. You can also review process summary information for the Load AR and Load GL processes on the Load AR Pending Items page, the Accounting Entries By Journal - Accounting Entry page, and Accounting Entries By Invoice - Accounting Entries page. |
Web, File, or Printer |
Displays the invoice destination. |
Output Destination |
Specify the path to the file or printer. Note: The system does not use the billing job defaults when you initiate processes from a process menu. Use the Schedule Process Request page to specify output type and destination. |
You can initiate Billing processes from a button in the Bill Entry, Bill Inquire, and Bill Summary components as well as from the Direct Invoice Test page.
Note: If you are running a multiprocess job from a button, you can specify only one output destination for all processes within the job. You cannot vary the output destination for individual processes within a job.
In Inventory, you can initiate Billing processes by clicking a link on the Shipping/Issues Order Summary page. When you initiate the process, you can select process options such as the server name and output destination.
Single Action and Direct Invoicing Alternates
Single Action Invoice and Direct Invoice multiprocess jobs comprise groups of processes that you submit to the server as a unit. Billing delivers an alternate set of corresponding Single Action and Direct Invoicing multiprocess jobs that run only up to invoice printing, enabling you to run the remaining processes at another time.
The alternate set of corresponding Single Action and Direct Invoicing multiprocess jobs do not include the following processes:
Currency Conversion (BICURCNV).
Load AR Pending Items (load accounts receivable pending items) (BILDAR01).
Billing Pre-load (BIPRELD).
Load GL Interface (load general ledger interface) (BILDGL01).
Federal Invoice Formats SF1080 and SF1081 Report (BISF108X).
Commitment Control Budget Processor (FSPKBDP3).
Single Action and Direct Invoice Jobs and Corresponding Alternates
The following table lists multiprocess jobs that include certain processes and the corresponding alternate jobs that do not include the processes.
|
Multiprocess Jobs That Include BICURCNV, BILDAR01, BIPRELD,BILDGL01, FSPKBDP3, and BISF108X |
Initiated From |
Corresponding Alternate Jobs That Do Not Include BICURCNV, BILDAR01, BIPRELD, BILDGL01, FSPKBDP3, and BISF108X |
|---|---|---|
|
DIRCTIVC |
Shipping/Issues page |
DIRCTIV2 |
|
BIDIRIVC |
Direct Invoice Test page |
BIDIRIV2 |
|
BIINIU |
Shipping/Issues page |
BIINIU2 |
|
BIJOB03, BIJOB03K |
Bill Entry, Bill Inquiry, and Bill Summary pages |
BIJOB08 |
Note: BIJOB03K includes commitment control only if you enabled commitment control at the installation level.
Field or Control |
Description |
|---|---|
Currency Code |
Displays the default currency code that is used when you enter data for functions that are unrelated to the business unit. These functions include accumulations, billing charge codes, and discount and surcharge IDs. |
See the product documentation for PeopleTools: PeopleSoft Process Scheduler.
Use the User Preferences - Contracts page (OPR_DEF_TABLE_CA1) to define default user preferences that are specific to Contracts.
Navigation:
This example illustrates the fields and controls on the User Preferences - Contracts page. You can find definitions for the fields and controls later on this page.
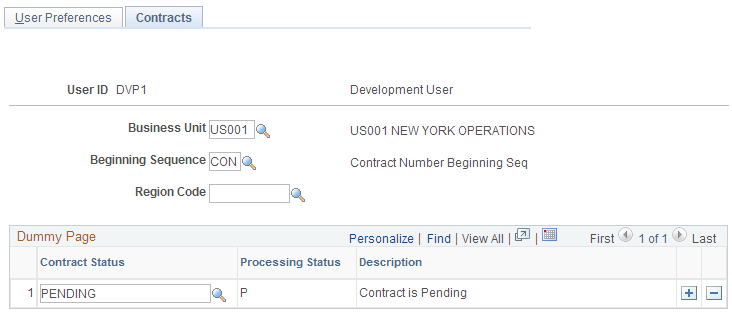
Note: If you have enabled contract status security, you must define the list of contract statuses to which this user is authorized to set a contract.
Field or Control |
Description |
|---|---|
Business Unit |
To minimize data entry on contract processing pages, select the default Contracts business unit that this user will use most frequently. |
Beginning Sequence |
Select the three-character value that the system will use as a prefix for system-generated contract numbers for this user. For example, contracts for the western region might begin with WES. |
Region Code |
Select the default region code for setting up new contracts for this user. Contracts uses region codes to enable you to categorize your contracts by region, for example, East, West, North, and South. Region codes in Contracts are informational only. |
Contract Status Authorizations
Field or Control |
Description |
|---|---|
Contract Status |
If you selected to enforce contract status security on the Contracts Definition - BU Definition page, define the list of contract statuses to which this user can change the contract status. If contract status security is enabled, this user is able to change the contract status only to contract status values that you've specified here. Select the contract statuses to which this user can change a contract. |
Processing Status |
When you select a contract status, the system displays the processing status to which the contract status is mapped. |
Description |
Displays the contract status description. |
Use the User Preferences - General Ledger page (OPR_DEF_TABLE_GL1) to set up user defaults for General Ledger.
Navigation:
This example illustrates the fields and controls on the User Preferences - General Ledger page.
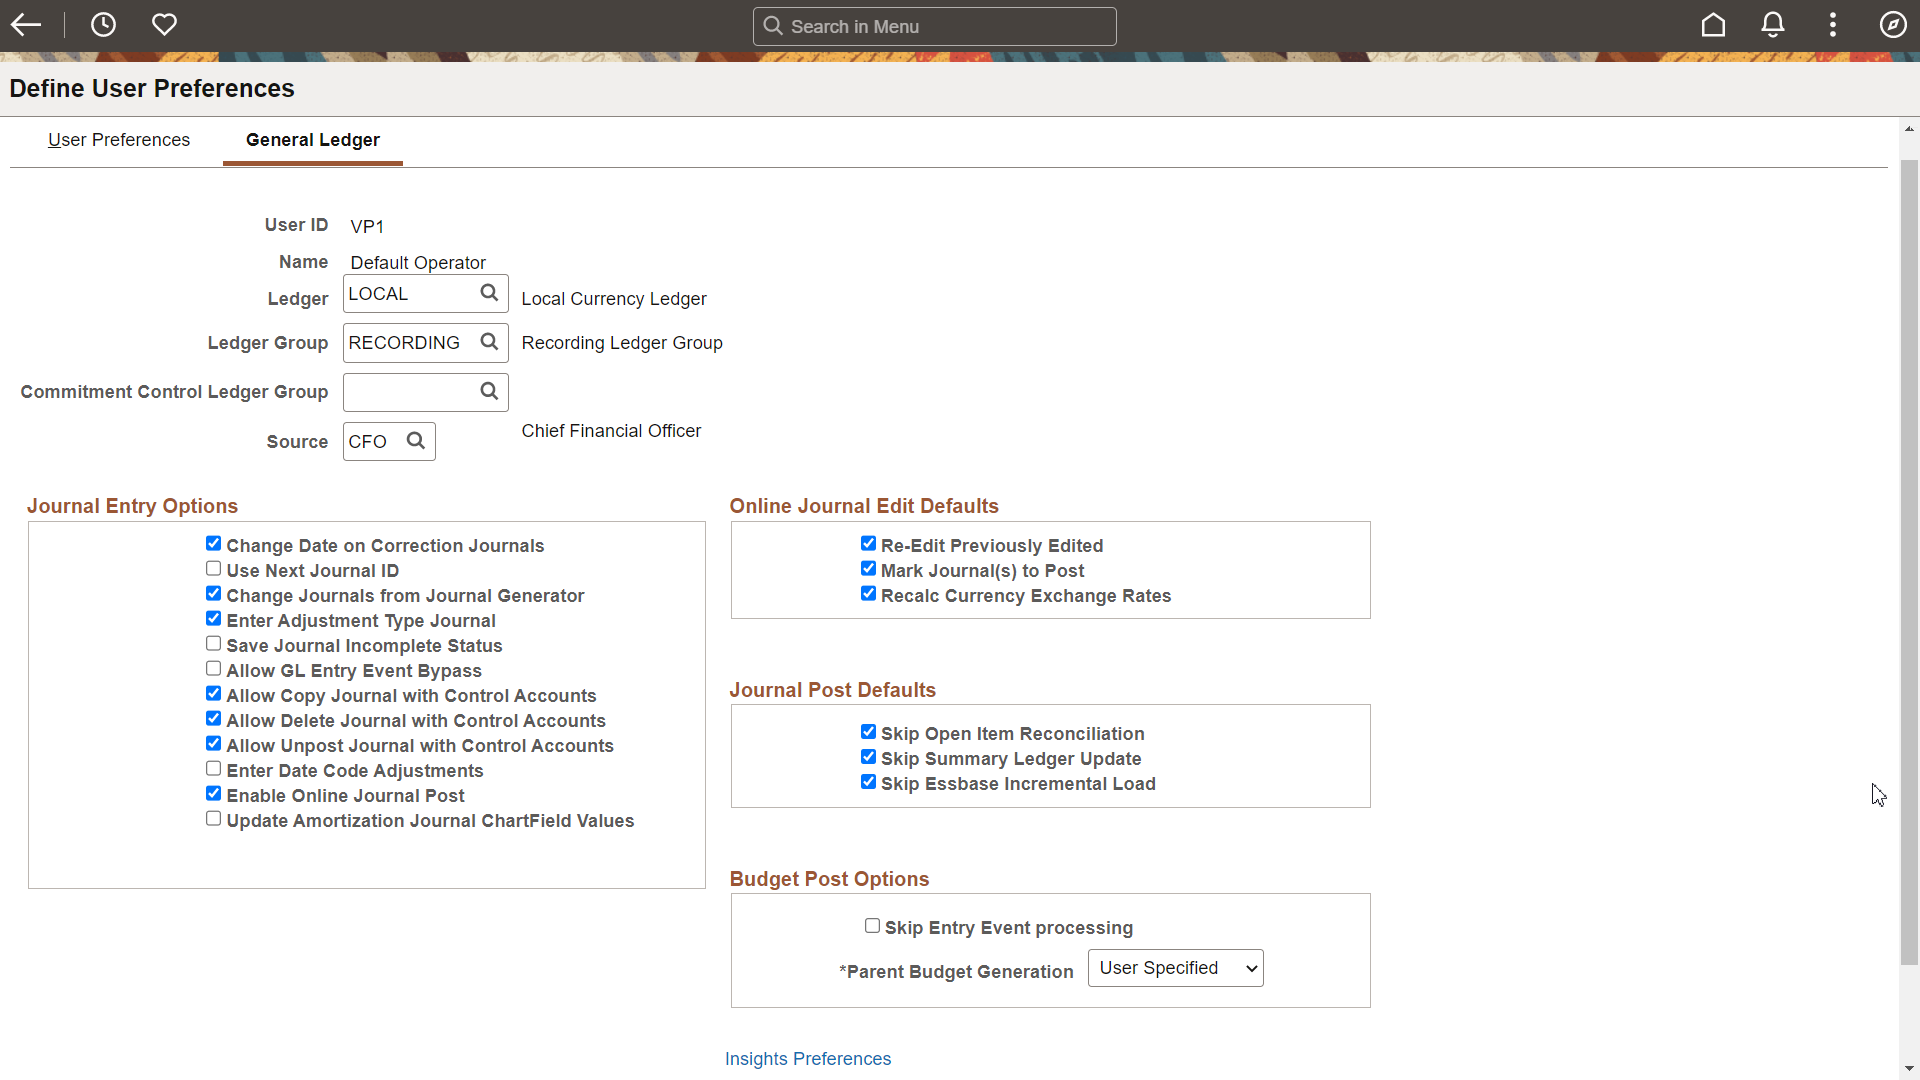
Select the ledger, ledger group, Commitment Control Ledger Group, and source to be used as defaults for a user. Journal sources available for selection is based on the user access that is defined in the Journal Source Security by User Page and Journal Source Security by Role Page.
Journal Entry Options
Field or Control |
Description |
|---|---|
Change Date on Correction Journals |
Select to change the journal date in the corrections journal (which is on the Journal Suspense Correction page). |
Use Next Journal ID |
Select to limit this user ID to the NEXT journal ID that is automatically entered by the system during online journal entry. If this option is selected, the Journal ID field becomes unavailable to this user ID, and the user cannot manually enter a journal ID. |
Change Journals from Journal Generator |
Select to allow a specific user to update the ChartField and amounts on the Journal Entry page for a journal that was created by the Journal Generator process. Warning! If you select Change Journal from Journal Generator, and then you change the ChartField values and reedit the journal, you can create inconsistencies between the subsystem data and the general ledger data. Also, for journals that are generated for a subsystem that supports commitment control, the journal will not be budget checked again even though the ChartField values or the amounts are changed. |
Enter Adjustment Type Journal |
Select to allow a specific user to enter a Book Code adjustment type journal. Note: This option is used for the Book Code feature, not the Adjusting Entry feature. |
Save Journal Incomplete Status |
When you select this option for a specific user and the user adds a new journal, the selected option appears on the Journal Header page of various journal entry options. This option enables the user to save journal entry transactions with an incomplete status and prevents them from being edited or posted until they are complete. Note: The option is a default option. When it is deselected, it does not prevent the user from seeing the option on the header, but the user cannot set the default journal header status to incomplete. |
Allow GL Entry Event Bypass |
Select to enable the user to bypass selecting entry events in PeopleSoft General Ledger journal entry, even if they are required on the Installation Options - Entry Event page. |
Allow Copy Journal with Control Accounts |
Select to allow journals that contain Control Accounts to be copied. This applies to online or batch journal copy. |
Allow Delete Journal with Control Accounts |
Select to allow journals that contain Control Accounts to be deleted. This applies to online or batch journal delete. |
Allow Unpost Journal with Control Accounts |
Select to allow journals that contain Control Accounts to be unposted. Note: Accounts are designated as Control Accounts on the Account page and generally represent a summarization of detail from a feeder application (such as PeopleSoft Payables) that is posted by PeopleSoft to the general ledger. The intent is that these accounts can only be updated by the Journal Generator or a load process from a spreadsheet or third-party system to prevent manual posting to the account, thereby altering a control balance that is used for reconciliation of subledger to general ledger. Be aware that if you allow posting to Control Accounts in General Ledger by selecting the options above, the Control Account balance in the subledger may not match the control account balance in the general ledger. |
Enter Date Code Adjustments |
Select to enable a user to enter date code adjustments for journal entries. The Date Code is displayed on journal lines only for users with the Enter Date Code Adjustments check box selected. If the user is enabled to enter date code adjustments, and the Date Code is enabled for the ledger group, the user can flag the journal entry as a Date Code Adjustment on the Journal Entry - Header page. |
Enabled Online Journal Post |
Select this check box to indicate that the user can select the Post Journal option from the Process field on the Create/Update Journal Entries - Lines Page. |
Update Amortization Journal ChartField Values |
Select to enable a user to update ChartField values on the Amortization Journal – Stage Journal Page and the Journal Entry page for the actual amortization journals created. |
Online Journal Edit Defaults
Field or Control |
Description |
|---|---|
Re-Edit Previously Edited |
Select to reedit journals marked as valid. When this option is deselected, valid journals are not edited again when you run Journal Edit from the Journal Entry page by clicking the Edit button. Note: PeopleSoft General Ledger uses these defaults whenever you edit journals from the Journal Entry pages by clicking the Edit button. |
Mark Journal(s) to Post |
Select to mark valid journals with a process request status of Post. If this option is not selected, it prevents batch journals from being marked to post. Note: It is important to note that if a user does an online post from the Journal Entry - Lines page, posting is allowed regardless of whether this option is selected or not. To approve journal entries using PeopleSoft Workflow, you should deselect this option. For more information about using PeopleSoft Workflow, see Understanding Configurable Workflow. For more information about approving journal entries, see Understanding the Journal Entry Approval Process |
Recalc Currency Exchange Rates |
Select to reprocess foreign currency conversion at the journal line level. |
Journal Post Defaults
Field or Control |
Description |
|---|---|
Skip Open Item Reconciliation |
Select to bypass open items for a specific user ID during the online journal post process, allowing the user to reconcile the open items at a later time by using the Open Item Maintenance page. |
Skip Summary Ledger Update |
Select to bypass summary ledger updates for a specific user ID during the online journal post process. |
Skip Essbase Incremental Load |
Select to bypass the Essbase Incremental Load for a specific user ID during the online journal post process. |
Budget Post Options
Field or Control |
Description |
|---|---|
Skip Entry Event Processing |
Select to enable a specific user to post the budget that is associated with a journal entry or allocation without generating entry events through the Entry Event Processor. This may occur when an error occurs in a transaction; however, the entry event processing is correct. |
Parent Budget Generation |
Select to enable a specific user to generate parent budget impacts when posting child budget journals. This option determines how the Generate Parent Budget(s) option on the Commitment Control - Budget Journals - Enter Budget Journals - Budget Header page acts. Available options are:
|
Insights Preferences
Select the Insights Preferences link to access the Insights Preferences Page.
Use the User Preferences - Inventory page (OPR_DEF_TABLE_IN1) to define preferences for Inventory users.
Navigation:
Order Key Defaults
Enter default values to be used in prompts for the order keys in Inventory.
Field or Control |
Description |
|---|---|
Demand Source |
Select a demand source. Options are based on the PeopleSoft applications that you have installed, and can include: IN: Material stock requests originating in Inventory. OM: Sales orders originating in Order Management. PL: Planning requisitions originating in Supply Planning. PO: (not used). PR: Purchasing requisitions originating in Purchasing. RT: Return-to-vendor requests originating in Purchasing. SF: Production requests from the shop floor, originating in Production Management. WM: Work order. |
Source Bus Unit (source business unit) |
The business unit from which the demand originated. |
Auto Numbering
Field or Control |
Description |
|---|---|
MSR Beginning Sequence and Receiver Beginning Sequence |
Enter values if you plan to use automatic numbering to manage your stock requests and item numbers. |
Putaway Default
Field or Control |
Description |
|---|---|
Flag Items for Auto-Putaway |
Select to use the auto-putaway function that is provided with Inventory. |
Schedule Process Defaults
Field or Control |
Description |
|---|---|
Server Name |
The default server that is used when processes are initiated automatically from Inventory pages instead of through Process Scheduler. |
Use the User Preferences - Lease Administration page (RE_OPR_DFLTS) to define default lease administration preferences for Lease Administration users.
Navigation:
Access the Lease Administration page (Set Up Financials/Supply Chain, Common Definitions, User Preferences, Define User Preferences, Lease Administration, Lease Administration - User Preferences).
This example illustrates the fields and controls on the Lease Administration - User Preferences page. You can find definitions for the fields and controls later on this page.
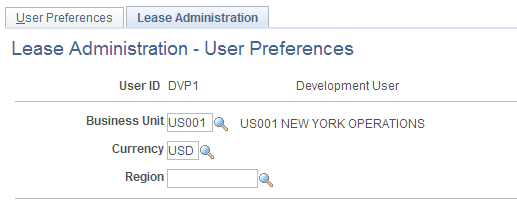
Information that you enter on this page applies solely to the specific user ID that is identified at the top of the page. You can select default values to help minimize data entry.
Field or Control |
Description |
|---|---|
Business Unit |
Select the business unit that you want as the default for the system when creating leases and viewing pagelets. |
Currency |
Select the currency to which you want the system to default when creating leases and viewing pagelets. |
Region |
Select the region to which you want the system to default when creating new leases and viewing pagelets. |
Use the User Preferences - Manufacturing page (OPR_DEF_TABLE_MG1) to maintain the default server by user ID.
Configure a default server to run the Update Pick Plan and Automatic Material Release process (SFCONREL).
Navigation:
Field or Control |
Description |
|---|---|
Server Name |
Select a default server to run the Update Pick Plan and Material Release process (SFCONREL). This process can be run only on a server. When you review the production pick plan, you can optionally release the material after you've confirmed the pick plan. |
Use the User Preferences - Orders - Sales page (OPR_DEF_TABLE_OM1) to set up business-unit, order-source, and order-group defaults for a user who enters sales order information.
You can also specify a beginning sequence code for your sales orders.
Navigation:
Order Defaults
Select options as defaults for the sales order for the user ID.
Field or Control |
Description |
|---|---|
Order Management BU (order management business unit) |
Specify the business unit to default on the sales order. |
Default Order Source Code |
Specify the source of the order for the user. |
Beginning Sequence |
Select the default prefix for the sales order number. |
Default Order Quantity |
Specify the order quantity to default to the sales order. |
Ship From INV BU ship from inventory business unit) |
Select the Inventory business unit where the order will typically be picked up. This option is used in the counter sales environment where the customer will come to the location and take the order with them. |
Cash Drawer ID |
Select the cash drawer that the user will be using. |
Price Adjustment Reason |
Select a reason code for price adjustments. This option is used for margin adjustments to default a reason code so that the user doesn't have to enter a code for each product that is adjusted. |
Order Owner |
Select the owner for the order. The field is used for counter sales. |
Printer Path |
Select a printer path to print a Pick Plan report. Note: You can print a Pick Plan report when the Display Pick Report on Screen check box is not selected on the Order Entry Features page. |
Sales Order Display
This section shows how information is initially displayed during sales order entry based on the default for the business unit.
Field or Control |
Description |
|---|---|
Customer Address |
Init (initial): Display the customer address on the Order Header Page only when entering a new order header or displaying an existing order header from the add or search page. |
Header Summary, Header Information Area, Purchase History Area, Price Summary Area, Order Summary, margin Adjustments, Line Express Entry Tab, Bill To Area, Bill-to Customer Options, Sold To Area, Sold-To Customer Options, Ship To Area, Ship-to Customer Options, Line Filter, and Line Actions |
Select to move by default the display of information in the designated areas of the Order Entry Form page. During order entry, you can open or close the area as needed. Options are: Collapsed: The section appears in a collapsed mode. Default: The Header Summary, Header Information Area, Price Summary,Order Summary, Line Express Entry Tab, Bill to Area, Sold To Area, Ship To Area and Line Actions appear in the open mode. The Purchase History Area, Margin Adjustments, Bill-to Customer Options, Sold-To Customer Options, Ship-to Customer Options, and Line Filter appear in the collapsed mode. Open: The section appears in an open mode. |
Use the User Preferences - PayCycle page (OPR_DEF_TBL_PYCYCL) to define default output destinations for the Pay Cycle Manager and the Express Payment Manager components (PYCYCL_MGR and EXP_PYCYCL_MGR, respectively).
These default values are not required to perform any pay cycle process.
Navigation:
Output Destination
Field or Control |
Description |
|---|---|
Server File Destination |
Enter a default output destination for files. When you are specifying the server file destination, a meta string (such as %%OutputDirectory%%) is not permitted. You must specify a full directory path followed by a backslash (for example, C:\TEMP\). Note: Make sure that you do not specify the root directory of a shared drive, as it is not supported by this functionality. |
Server Destination Printer |
Enter a default output destination printer. |
Server |
Select a server. |
Email ID Financial Gateway integration email notification |
Specify a recipient email address for payment error notifications. This field is limited to 70 characters. You can enter multiple email addresses, separated by a comma (,). This is helpful in the following situations:
|
Note: If these default values are not specified, the output destination will be required to be entered for every report process that is initiated from the Pay Cycle Manager and Express Check components (PYCYCL_MGR and PYMNT_EXPRESS, respectively).
Use the Planning page (OPR_DEF_TABLE_PL1) to select a default planning instance.
A planning instance is a set of data (business units, items, supplies, and demands) constituting the inputs and outputs of a supply plan.
Navigation:
Access the Planning page (Setting Up Financials/Supply Chain, Install, Installation Options, Planning).
Field or Control |
Description |
|---|---|
Default Planning Instance |
Displays the default planning instance for the user. A planning instance is a set of data (business units, items, supplies, and demands) constituting the inputs and outputs of a supply plan. |
Order Key Separator |
Displays a character that is used by the system to format the display for a single field that contains a line, schedule, and kit number for sales orders and quotes in Supply Planning grids. |
Use the User Preferences - Project Costing page (OPR_DEF_TABLE_PC1) to assign default parameters for transaction processing and set up data entry defaults.
Navigation:
This example illustrates the fields and controls on the User Preferences - Project Costing page (1 of 2).
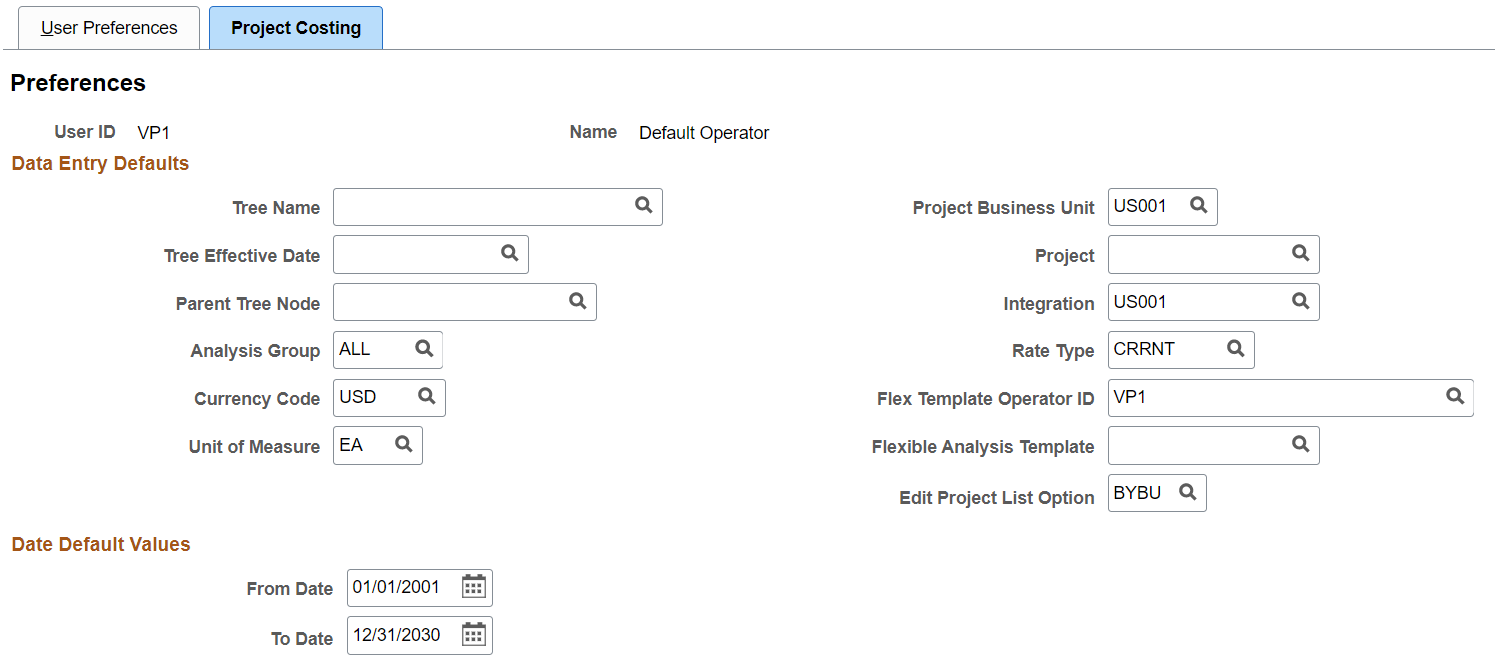
This example illustrates the fields and controls on the User Preferences - Project Costing page (2 of 2).
Information that you enter on this page applies solely to the specific user ID that is identified at the top of the page. You can select default values to help minimize data entry.
Data Entry Default Values
Field or Control |
Description |
|---|---|
Tree Name, Tree Effective Date, and Parent Tree Node |
Enter values that appear by default when you assign projects to trees. |
Project Business Unit |
Enter a value that appears by default in project business unit search fields in the Project Costing application. |
Project |
Enter a value that appears by default in project search fields. |
Integration |
Enter the integration template that appears by default in the Integration field on the Project Definitions - General Information page when you create projects. |
Analysis Group |
Enter a value that appears by default when you search for transactions on the Transaction List page. |
Rate Type |
Enter the default conversion rate that the system uses when you add transactions by using the Add Transactions page and the incoming transaction rate type for the business unit is Source. |
Currency Code |
Enter a value that appears by default in the Source Currency field when you add transactions by using the Add Transactions page. |
Flexible Analysis Template |
Enter the default template that specifies how flexible analysis data appears on the Flexible Analysis page. |
Edit Project List Option |
Select an option to specify how projects appear for selection on the My Projects page. Available options are: BYBU: By business unit. BYTR: By project tree. |
Date Default Values
Field or Control |
Description |
|---|---|
From Date and To Date |
Enter a date range that appears by default when you search for transactions. |
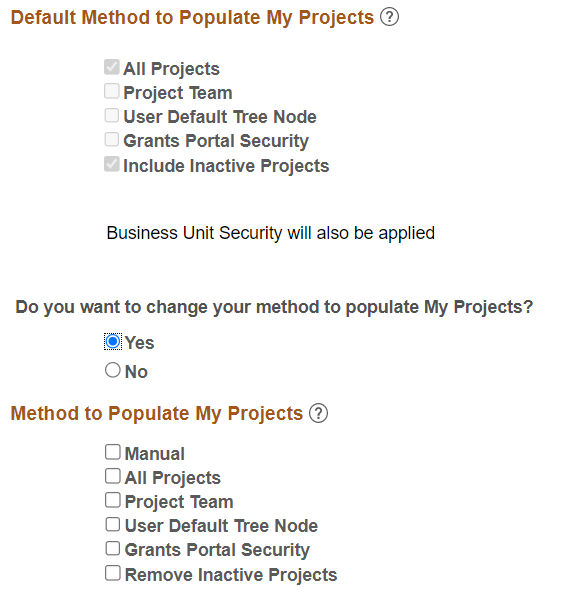
Default Method to Populate My Projects
Options for populating My Projects are impacted by selections at the Installation Options - Project Costing Page.
Use this section to view the Auto Populate Options that were selected on the Installation Options - Project Costing Page. This section appears only when Auto Populate, Allow Override is selected for the Method to Populate My Projects field. This section is display-only and is intended to help the user determine whether they want to override the installation-level options. To override the installation level option, use the My Projects Options section of the page.
Method to Populate My Projects
Use this section to select Auto Populate Options for the user and override installation-level options. This section appears only when Auto Populate, Allow Override is selected for the Method to Populate My Projects field on the Installation Options - Project Costing Page.
Manual: Select to indicate that you want to maintain your projects list manually. When selected, the Populate My Projects process will bypass your user ID and all other options in this section are not available.
All Projects: Select to indicate that the Populate My Projects process should select all projects.
Project Security: Select to indicate that the Populate My Projects process adds projects to the user’s project list that he/she is authorized to access, if project security is enabled.
Project Team: Select to indicate that the Populate My Projects process should select all projects where the user is a team member.
If a person is added to a team in error, then the project must be removed manually. Projects that have ended must be removed manually as well.
User Default Tree Node: Select to indicate that the Populate My Projects process should select all projects under the default tree node identified on the user’s preferences to add to their project list.
Grants Portal Security: Select to indicate that the Populate My Projects process should select all projects that a user is authorized to access according to the Grants Portal Security - Project Level setting to add to their project list.
This option is only available when Grants is an installed product.
Note: Similar to Project Team option, if a project is removed from a tree or the grants portal security or the tree is changed, you need to manually remove projects from My Projects.
Include Inactive Projects: Select to indicate that inactive projects are to be included in project lists.
Inactive projects do not appear by default.
Remove Inactive Projects: Select to indicate that the Populate My Projects process should remove inactive projects from your projects list. This option is available only if the organization has selected Include Inactive Projects as a default setting on the Installation options page.
You cannot select this option in conjunction with the Include Inactive Projects option because they are contradictory.
Use the User Preferences - Procurement page (OPR_DEF_TABLE_PM1) to define options and authorizations for procurement users.
Navigation:
This example illustrates the fields and controls on the User Preferences – Procurement Page. You can find definitions for the fields and controls later on this page.

Field or Control |
Description |
|---|---|
Location |
Enter the default location where requested items should be delivered when they are received from the vendor. |
Origin |
Enter the default origin of this user's POs. The origin is used for reporting purposes. |
Requester |
Enter the name of the requester for whom this user will be authorized to enter requisitions. |
Buyer |
Enter the name of the buyer for whom this user will be authorized to enter POs. |
|
G-Invoicing |
Click this link to enter the following Preparer information for G-Invoicing.
These three parameters are required to be passed in the 7600EZ API and should be defaulted for G-Invoicing AP Reversal Vouchers. |
Use the Contract Process page (OPR_DEF_CNTRCT_SEC) to define contract process preferences by specifying the default contract status and authorized actions for a user.
Navigation:
Click the Contract Process link on the User Preferences - Procurement page.
This example illustrates the fields and controls on the Contract Process page. You can find definitions for the fields and controls later on this page.
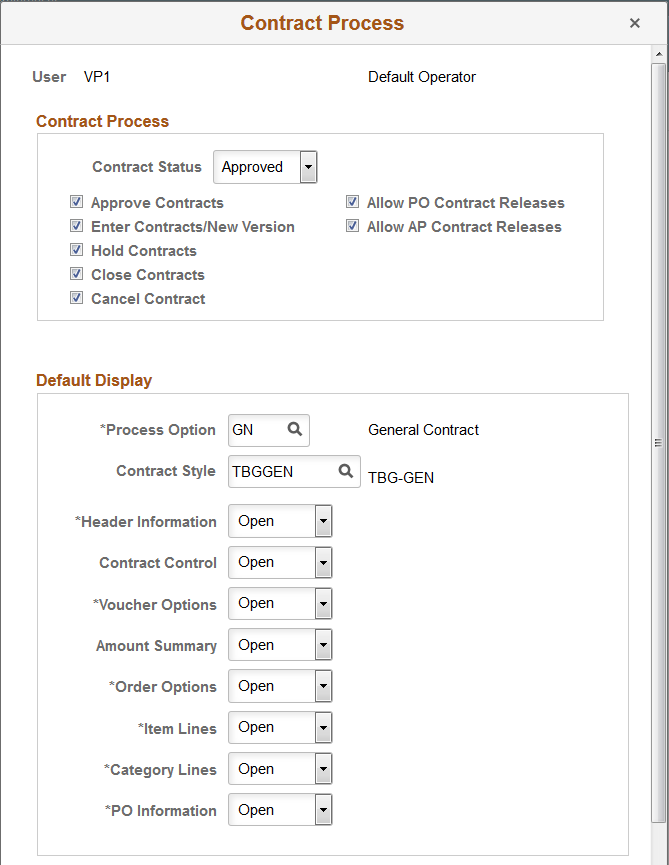
Use this page to specify the default contract statuses and authorized actions for a user and to define how the system initially displays the collapsible areas on the Contract page.
Contract Process
Field or Control |
Description |
|---|---|
Contract Status |
Select the status at which you want this user to open contracts. When the user creates a contract, the status appears by default based on the value you select. |
Approve Contracts |
Select to provide the user the authority to approve procurement contracts. |
Enter Contracts/New Version |
Select to provide the user the authority to create contracts and new contract versions. |
Hold Contracts |
Select to provide the user the authority to place procurement contracts on hold. |
Close Contracts |
Select to provide the user the authority to close procurement contracts. |
Cancel Contract |
Select to provide the user the authority to cancel procurement contracts. |
Allow PO Contract Releases (allow purchase order contract releases) |
Select to provide the user the authority to release purchase order contracts. |
Allow AP Contract Releases (allow accounts payable contract releases) |
Select to provide the user the authority to release accounts payable contracts. |
Default Display
Use this grid to define how the system initially displays the collapsible areas on the Contract page. The system applies display settings by expanding and collapsing group boxes as you indicate on this page. Group boxes appear based on the contract process type. So, for example, if the system is applying display options to a contract with a process type of Prepaid Voucher, then only the Header, Amount Summary, and Add Items group boxes are expanded or collapsed.
Field or Control |
Description |
|---|---|
Process Option |
Select a contract process option that you want to set up as default for the user. Contract process options enable you to determine a specific contract process for use throughout the contract's life cycle. You can use other process options, but the value you choose here defaults on the Contract Entry page (for the selected user). Values include:
|
Contract Style |
Select a contract style that you want to set up as the default style for this user. You can use other contract styles, but the value you choose here defaults on the Contract Entry page. |
Header Information, Contract Control,Voucher Options,Amount Summary,Order Options,Item Lines, Category Lines, and PO Information |
Select a group box option that you want to apply for this user. The value you select controls how the group box initially appears on the Contract page. Valid values for the group boxes are:
|
Use the User Preferences - Procurement - Rebate Authorizations page (OPR_DEF_VRBT_SEC) to define rebate manager maintenance authorization and access rights for vendor rebate agreements.
Navigation:
Click the Rebate Authorizations link on the User Preferences – Procurement page.
Rebate Agreement Defaults
Field or Control |
Description |
|---|---|
Rebate Agreement Status |
Select the default status for the rebate manager when you are creating vendor rebate agreements. Statuses are Approved and Open. |
Allowed Rebate Agreement Actions
Select the check box next to the specific actions that you want the rebate manager to have.
Rebate Manager Access
Field or Control |
Description |
|---|---|
Unrestricted Rebate Manager |
This check box is deselected by default. Select this check box if you want this rebate manager to have unrestricted access to all vendor rebate agreements. This manager can view, modify (perform all the actions checked), process, and analyze all vendor rebate agreements. |
For more information, see PeopleSoft Purchasing: Defining Supplier (Vendor) Rebate Agreements.
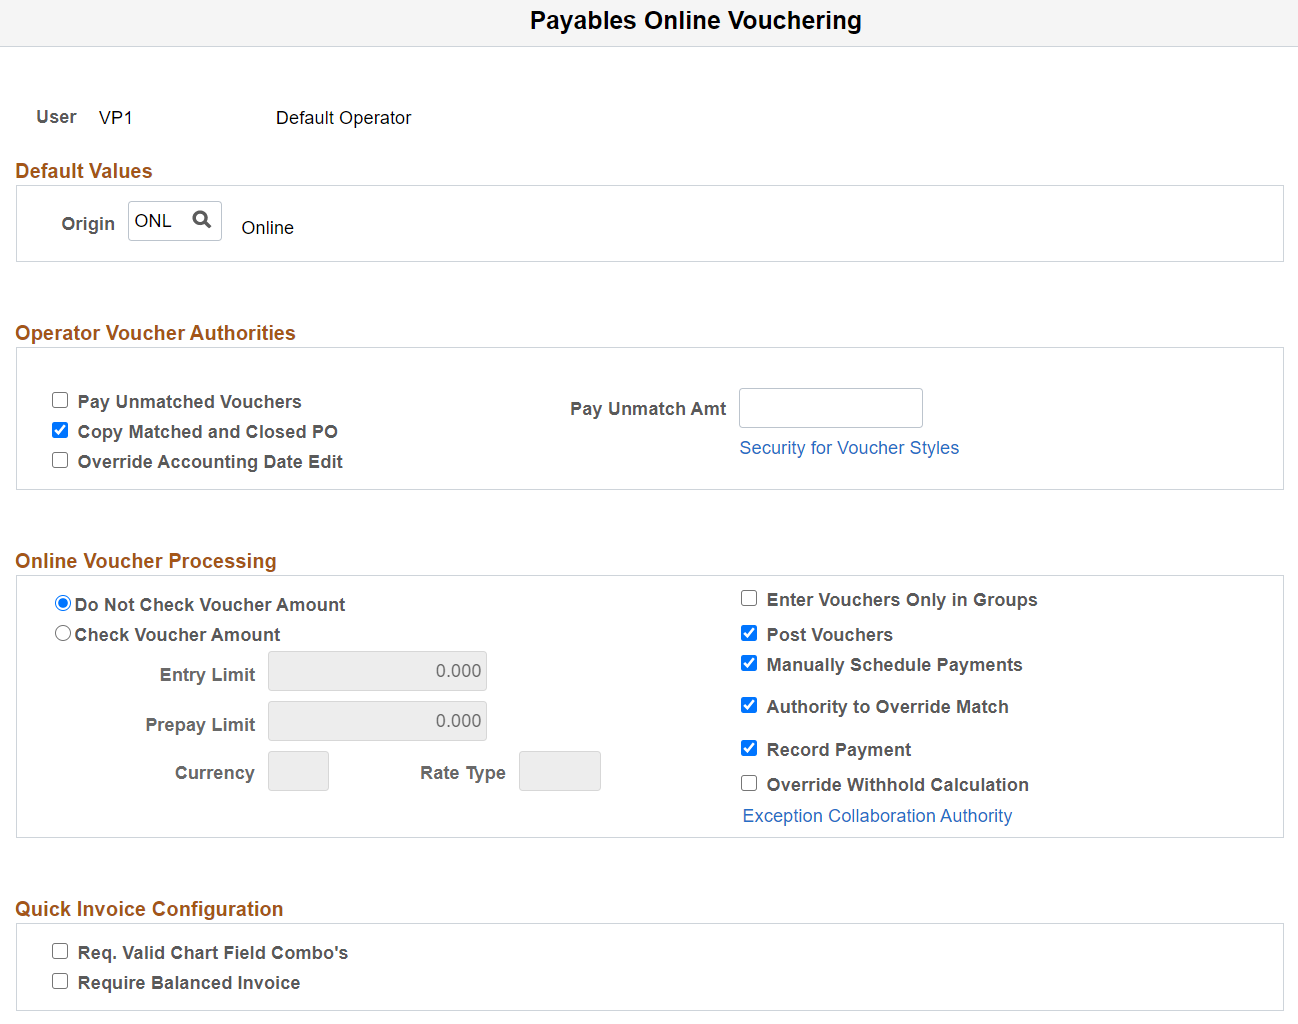
Use the User Preferences - Procurement - Payables Online Vouchering page (OPR_DEF_TABLE_AP1) to specify user voucher authorities, online voucher processing, and quick invoice configuration options for a user.
Navigation:
Click the Payables Online Vouchering link on the User Preferences - Procurement page.
This example illustrates the fields and controls on the Procurement - Payables Online Vouchering page. You can find definitions for the fields and controls later on this page.
Field or Control |
Description |
|---|---|
Origin |
Select the voucher origin for this user. The system tags all vouchers that are entered by this user with this origin, and uses the processing settings for this origin when it processes the voucher. |
Pay Unmatched Vouchers and Pay Unmatch Amt (pay unmatched amount) |
Select Pay Unmatched Vouchers to give users the authority to pay vouchers that have not been matched up to the maximum amount that is specified in the Pay Unmatch Amt field. Authorized users must select the Pay UnMatched Voucher check box on the Voucher Attributes page in the Voucher component (VCHR_EXPRESS) for the system to select the voucher during the Pay Cycle Application Engine process (AP_APY2015). Note: If you select the Pay Unmatched Voucher option, vouchers with the following match statuses (MATCH_STATUS_VCHR) are available for payment: T (ready), E (exception), D (dispute), O (overridden), and C (credit note). If you do not select the Pay Unmatched Voucher option, only vouchers with the match status of M (matched) or N (no match) are available for payment. |
Copy Matched and Closed PO (copy matched and closed purchase orders) |
Select to enable the user to copy matched and closed POs. Note: If this option is selected for your user preferences and you create a voucher that references a PO that has a matched line (because an earlier voucher also referenced the PO) and an unmatched line, then when you copy the PO to the voucher, the matched PO line copies with both the amount and the quantity at zero. |
Override Accounting Date Edit |
Select to enable the user to override the accounting date edit option on the Procurement Control - General Controls page. |
Security for Voucher Styles |
Click to access the Voucher Styles page, where you can define the user authority for each of the voucher styles by selecting the appropriate check boxes. |
Do Not Check Voucher Amount and Check Voucher Amount |
Select one of these options to determine whether the system performs an edit during online voucher entry against the voucher gross amount. Voucher build will also perform an edit against the voucher gross amount based on the selected option. |
Entry Limit |
If you selected Check Voucher Amount, specify the voucher entry limit amount for this user. When you specify the entry limit, you must also specify its currency and a rate type. |
Prepay Limit |
If this user has the authority to prepay vouchers, you can specify a maximum amount for each prepayment that the user can enter. You must also specify a currency and a rate type for the prepayment. |
Currency |
Specify a currency for the entry limit or prepay limit amount. |
Rate Type |
Specify a rate type for conversion to the transaction currency that is entered on the voucher. |
Enter Vouchers Only in Groups |
Select to enable the user to enter only vouchers that are attached to a control group ID as defined on the Control Group Information page. |
Post Vouchers |
Select to enable the user to post approved vouchers. |
Manually Schedule Payments |
Select to enable the user to schedule payments manually, overriding the system's automatic payment scheduling. If you do not select this option, the user is unable to modify any of the scheduled payment information on the Voucher - Payments page. |
Authority to Override Match |
Select to enable the user to override the match status of a voucher. If the voucher requires matching, the user has the authority to change the voucher match status to Not Applicable. In addition, if the Matching Application Engine process (AP_MATCH) has been run but the process encountered match exceptions or errors, the user can override the match exceptions. When the exceptions are overridden, the user can rerun the Matching process; the Matching process updates the voucher match status to Matched. Note: The Matching process still generates workflow notifications for exceptions to the user even if the Authority to Override Match option is not selected. However, the user is not able to override the match status. |
Record Payment |
Select to enable the user to manually record payments for a voucher. When this option is deselected, the user is unable to specify Record as a payment action on the Payments page of the Voucher component. Note: You must also select the Manually Schedule Payments option to be able to record payments for a voucher. |
Override Withhold Calculation |
Select to enable the user to override the timing of the withholding calculation on the Withholding page of the Voucher component. Withholding calculation can be at payment time or voucher posting time based on the withholding entity setting. |
Exception Collaboration Authority |
Click to access the Match Exception Collaboration Authority page. The Exception Collaboration Authority page has the following options available:
For more information, see Understanding Match Exception Collaboration Center |
Req. Valid Chart Field Combo's (require valid ChartField combinations) |
Select this check box for the system to automatically validate ChartField combinations on Quick Invoice vouchers. If the ChartField combination is invalid, the system prevents the user from saving the voucher. |
Require Balanced Invoice |
Select this check box for the system to automatically perform balancing algorithms on Quick Invoice vouchers. If the vouchers are out of balance, the system prevents the user from saving the voucher. |
The AP Operator Profile report (APY0003) displays accounts payable user defaults by SetID.
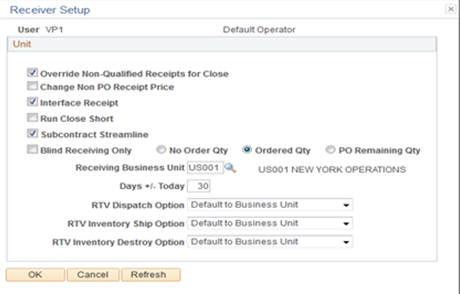
Use the User Preferences - Procurement - Receiver Setup page (OPR_DEF_RECV_SEC) to define receiver and RTV user preferences.
Navigation:
Click the Receiver/RTV Setup link on the User Preferences - Procurement page.
This example illustrates the fields and controls on the User Preferences - Procurement - Receiver Setup page. You can find definitions for the fields and controls later on this page.
Field or Control |
Description |
|---|---|
Override Non-Qualified Receipts for close |
Select to enable the user to force close Non-Qualified receipts. |
Change Non PO Receipt Price (change non purchase order receipt price) |
Select to enable the user to change the receipt price for an item on a non-purchase order receipt. |
Interface Receipt |
Select to automate the passing of inventory and asset information through the Receiver Interface Push process (PO_RECVPUSH). |
Run Close Short |
Select to call the Close Short Process (PO_CLSSHORT) automatically during the Receiver Interface Push processing (PO_RECVPUSH). |
Subcontract Streamline |
Select this check box if you want the Subcontract Streamline check box to appear selected by default for a subcontracted purchase order receipt for this user. The user will be able to override this field setting for a subcontracted purchase order receipt. The system determines whether to perform subcontract streamlining (purchase order receipt and production completion for the production ID in a single step) from the receipt. Streamline processing for subcontract RTVs enables you to process RTVs if completions have been performed on the associated receipt. The system includes negative production completion and production scrap for operations being returned against the subcontract. If this check box is deselected, the Subcontract Streamline check box will appear deselected for a subcontracted purchase order receipt for this user. The user will not be able to change this field setting for the subcontracted purchase order receipt. That is, this assumes subcontract streamlining is not enabled for this user. |
Blind Receiving Only |
Select to prevent the receiver from seeing the order quantity or the remaining quantity from the purchase order. The receiver needs to count the items before entering the quantity received. When you select this check box, the No Order Qty, Ordered Qty, and PO Remaining Qty check boxes are deselected. |
No Order Qty (no order quantity) |
Select to prevent the receiver from seeing the purchase order quantity. The receiver must specify the actual quantity that is received by doing a live count of the items. |
Ordered Qty (ordered quantity) |
Select to use the purchase order quantity as the default quantity received. |
PO Remaining Qty (purchase order remaining quantity) |
Select to use the remaining quantity (original order quantity minus previously received quantities) on the purchase order as the default quantity received. |
Receiving Business Unit |
Select the user's default receiving business unit. This business unit can be overridden during the receiving process so that you can receive goods into any valid Purchasing business unit. |
Days +/- Today |
Enter the number of days plus or minus the current system date to be used as default search criteria on receiving pages when you are selecting purchase order schedules against which to receive. |
RTV Dispatch Option (return to vendor dispatch option) |
Select the dispatch method as this user's preference for the return to vendor functionality. This functionality provides a default value for dispatching the RTV to the Supplier. RTV dispatch option values include: Default to Business Unit: Select to use the dispatch option that is defined at the business-unit level. You define the business unit RTV dispatch option value using the Business Unit Options tab on the Purchasing Definition page. When processing RTV options, the system initially checks the user preference and then the business unit when you select the Default to Business Unit option. Manual: Select to indicate that the Dispatch processing for the RTV must be performed manually. Often collaboration must take place between procurement personnel and another group before a RTV line can be dispatched. For example, you might have to verify the disposition of goods with warehouse personnel before dispatching the RTV. |
RTV Inventory Ship Option (return to vendor inventory ship option) |
Select the return to vendor ship option that you want to use as this user's default value for the Inventory Process field on the RTV line. This option will only be used by the RTV function when the disposition on the RTV line has a value of Ship. The system determines the ship option default value by first checking the user preference ship option value. If the user preference value is Manual, Express, or Fulfillment then the system uses the value as the default value. If the user preference value is Default to Business Unit, the system uses the ship option value defined at the business-unit level. RTV Inventory ship option values are: Default to Business Unit: Select to use the inventory ship option that is defined at the business-unit level. Express: Select to use the RTV express option to process Purchasing and Inventory data collection transactions at the same time. This means that the user can perform Inventory issue (automatic issue) action from within the Purchasing RTV component. If the RTV line disposition is Ship, the system creates a material stock request with a status of Shipped to update inventory. Note: The value of Express will not be defaulted onto the RTV line if the RTV line is associated with an Inventory business unit which is defined as a Warehouse Management System (WMS) type. You define the warehouse setting using the Use External Warehouse Control check box on the Business Unit Options page for Inventory. Fulfillment: Select to set the user's preference to perform Inventory fulfillment processing for RTV transactions. This enables the user to create an Inventory material stock request transaction and to process it through Inventory fulfillment processing. The Fulfillment value is only valid for RTV processing when RTV line disposition is Ship. Manual: Select to indicate that the RTV ship transaction must be completed manually. This option requires that the inventory Express Issue function be used to ship the items to the supplier. When you use the Manual Inventory Ship option, the system does not perform RTV express functions. The user must use the Inventory Express Issue component to issue inventory returns that are being shipped to the vendor. |
RTV Inventory Destroy Option (return to vendor inventory destroy option) |
Select the return to vendor destroy option that you want to use as this user's default value for the Inventory Process field on the RTV line. This option is only used by the RTV function when the disposition on the RTV line has a value of Destroy. The system determines the destroy option default value first by checking the user preference destroy option. If the user preference value is Manual or Express then the system uses that default value. If the user preference value is Default to Business Unit, the system uses destroy option defined at the business-unit level. RTV Inventory destroy option values are: Default to Business Unit: Select to use the inventory destroy option setting at the business-unit level. Express: Select to use the RTV express option to process Purchasing and Inventory data collection transactions at the same time. This means that the user can perform Inventory adjustment (automatic adjustment) actions from within the Purchasing RTV component. Manual: Select to indicate that the RTV destroy transaction must be completed manually. This option requires that the Inventory Adjustment function be used to update inventory for the items being returned to the vendor. |
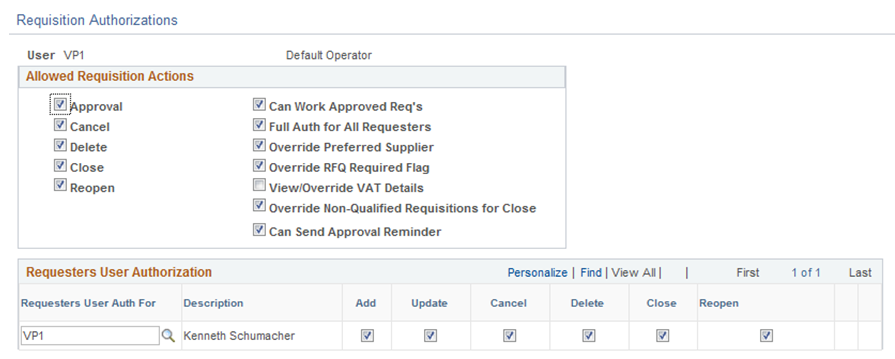
Use the User Preferences - Procurement - Requisition Authorizations page (OPR_REQ_AUTH) to authorize users to initiate and update requisitions for applicable requesters.
Define a user's requisition processing authority in relation to applicable requesters.
Navigation:
Click the Requisition Authorizations link on the User Preferences - Procurement page.
This example illustrates the fields and controls on the Requisition Authorizations Page. You can find definitions for the fields and controls later on this page.
Field or Control |
Description |
|---|---|
Can Work Approved Reqs (can work approved requisitions) |
Select to enable a user to change a requisition that has already been approved. |
Full Auth for All Requesters (full authority for all requesters) |
Select to give the user authority to add, update, cancel, delete, and close requisitions for all requesters. If you select this option, you don't need to configure the rest of this page. |
Override Preferred Vendor |
Select to enable a user to change the default vendor on a requisition line. If this authority is not selected, the user is unable to manually suggest a vendor. |
Override RFQ Required Rule Flag |
Select to enable a user to override the RFQ Required Rule option that was previously specified for a requisition in the requisition component. |
View/Override VAT Details (view or override value-added tax details) |
Select to view and override VAT details within the requisition component. |
Override Non-Qualified Requisitions for Close |
Select to enable a user to close requisitions that are nonqualified for close. |
Can Send Approval Reminder |
Select to enable a user to send reminders to pending approvers of requisitions. |
Requesters User Authorization
Field or Control |
Description |
|---|---|
Requesters User Auth For (requesters user authority for) |
Requesters for whom this user can work requisitions. Select the requester that you want to designate as the user's default requester by selecting the check box to the left of the requester's name. |
Add, Update, Cancel, Delete, Close, and Reopen |
Select to enable the user to add, update, cancel, delete, close, and reopen requisitions for this requester. |
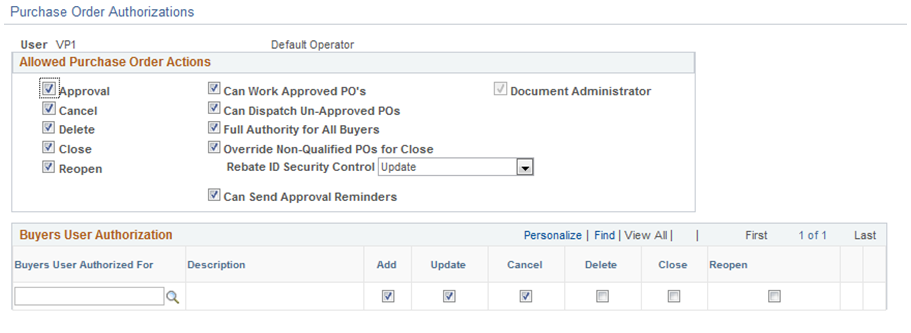
Use the User Preferences - Procurement - Purchase Order Authorizations page (OPR_PO_AUTH) to authorize users to create and update purchase orders for applicable buyers.
Define a user's purchase-order processing authority in relation to applicable buyers.
Navigation:
Click the Purchase Order Authorizations link on the User Preferences - Procurement page.
This example illustrates the fields and controls on the User Preferences - Procurement - Purchase Order Authorizations page. You can find definitions for the fields and controls later on this page.
Allowed Purchase Order Actions
Field or Control |
Description |
|---|---|
Can Work Approved POs (can work approved purchase orders) |
Select to enable a user to change a purchase order that has already been approved or dispatched. |
Can Dispatch Un-Approved POs |
Select to enable a user to dispatch purchase orders with a status of pending approval. |
Full Authority for All Buyers |
Select to give the user authority to add, update, cancel, delete, and close purchase orders for all buyers. If you select this option, you don't need to configure the rest of the page. |
Override Non-Qualified POs for Close |
Select to enable a user to close purchase orders that are nonqualified for close. |
Rebate ID Security Control |
Select the vendor rebate agreement security control option for purchase orders. Options are:
|
Can Send Approval Reminder |
Select to enable a user to send reminders to pending approvers of purchase orders. |
Buyers User Authorization
Field or Control |
Description |
|---|---|
Buyers User Authorized For |
Select the buyers for whom this user can enter purchase orders. |
Add, Update, Cancel, Delete, Close, and Reopen |
Select to enable the user to add, update, cancel, delete, close, and reopen requisitions for this buyer. |
Use the Procurement - Supplier Processing Authority Page (OPR_DEF_TABLE_VND1) to authorize users to perform supplier maintenance functions (enter, approve, deactivate).
Navigation:
Click the Supplier Processing Authority link on the User Preferences - Procurement page.
This example illustrates the fields and controls on the Procurement - Supplier Processing Authority page.
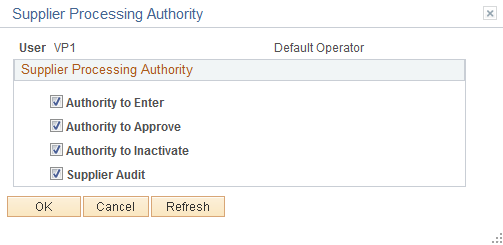
Select Authority to Entercheck box to authenticate the user to create or update the Supplier details. The Supplier Audit check box is selected by default. You can set up audit at SetID level or supplier level if the check box is selected. If the check box is not selected, then users cannot set up audit but can inquire the supplier audit and run the audit log report.
Use the supplier audit configuration template to select the desired fields to audit and to set the Reason flag which requires Reason Code and comments to be captured.
Supplier Audit Template has H-Grid (Hierarchical Grid) for Supplier Address, Phone Information, and Supplier Contact Phone fields where it allows the user to enable and disable the audit and reason flag for the main field. When saved, it will enable the audit and reason flag for dependent fields attached to main field. One default Template ID is allowed per SetID.
Use the User Preferences - Document Tolerance Exceptions Override page (OPR_DEF_DOC_TOL) to provide authority to users to override document tolerances.
Navigation:
Click the Doc Tolerances link on the User Preferences - Procurement page.
Field or Control |
Description |
|---|---|
Override Purchase Order to Requisition Exceptions |
Enables you to override document tolerance exceptions that are generated when an encumbrance exceeds the preencumbrance during document tolerance checking. |
Override Voucher to Purchase Order Exceptions |
Enables you to override document tolerance exceptions that are generated when an expenditure exceeds the encumbrance during document tolerance checking. |
Use the User Preferences - Promotions Management page (OPR_DEF_TABLE_TD1) to define default user preferences for promotions management.
Navigation:
Field or Control |
Description |
|---|---|
Bank SetID, Bank Code, and Bank Account |
Select the values to use as defaults in the payments process. When you create a claim with a payment method of field draft, the system provides the bank code and bank account values that are defined here. (You can override these values.) You then use the payment interface to send this claim to Payables, and the system creates a voucher or payment. |
National Allowance Prefix, Promotions Prefix, and Claims Prefix |
Select the prefixes. The system uses these prefixes in the automatic numbering process when creating national allowances or customer promotions or when processing claims. You create the prefix values when you define number types on the Automatic Numbering page. When you create the claim number type, you are creating the values for the claims prefix. The values for the national allowance prefix and promotions prefix are tied to the promotion code number type. |
Field or Control |
Description |
|---|---|
View Product Cost? |
Select to enable the user to view product cost details in PeopleSoft Promotions Management. If you have access to view product cost details, you can consider this data as a determining factor in analyzing planned versus actual customer promotion metrics. |
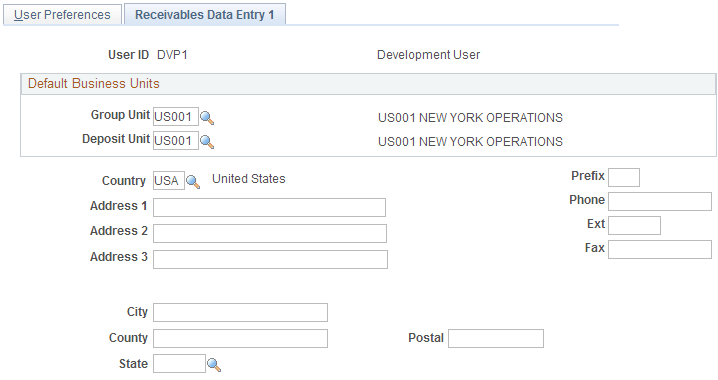
Use the User Preferences - Receivables Data Entry 1 page (OPR_DEF_TABLE_AR1) to define the default group unit, deposit unit, and address that is associated with a user.
Navigation:
This example illustrates the fields and controls on the User Preferences – Receivables Data Entry 1 page. You can find definitions for the fields and controls later on this page.
Field or Control |
Description |
|---|---|
Group Unit and Deposit Unit |
Enter values that become the user's default values for business units. Although the user can override these default values, you can minimize data entry by entering the user's most frequently used business unit. The system uses the group unit and deposit unit as the default business unit for online pending groups, deposits, and worksheets. |
Use the address fields to store addresses for followup letters. The address information that you enter on this page is not validated against any table.
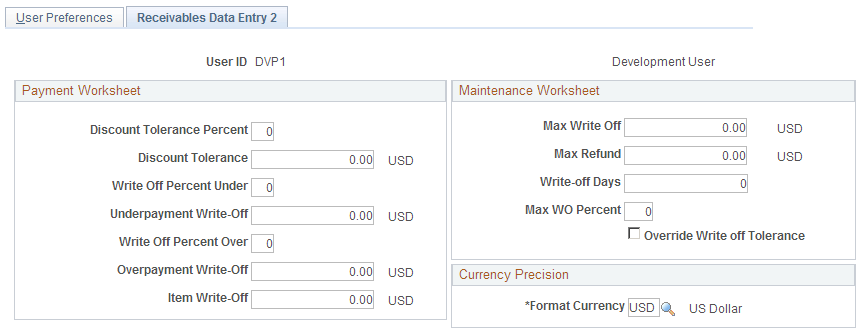
Use the User Preferences - Receivables Data Entry 2 page (OPR_DEF_TABLE_AR2) to specify write-off tolerances and discount tolerances.
Navigation:
This example illustrates the fields and controls on the User Preferences – Receivables Data Entry 2 page. You can find definitions for the fields and controls later on this page.
Payment Worksheet
Enter the write-off tolerances and discount tolerances for the payment worksheet.
Field or Control |
Description |
|---|---|
Discount Tolerance Percent andDiscount Tolerance |
Enter the percent and amount to use to calculate the discount tolerance. These tolerances enable the user to enter an unearned discount amount that is less than or equal to the value that you enter. Enter the additional percentage that the user can add to the payment terms. For example, if an item is 700.00 and the discount terms are 2 percent for 10/Net30, the normal discount would be 14.00. If you enter 10 in the percent field, the user can take up to an additional 10 percent of the discount amount, which is 1.40. The total discount would be 15.40. However, the total discount can never be more than the value in the amount field. |
Write-Off Percent Under andUnderpayment Write-Off and Write-Off Percent Overand Overpayment Write-Off |
Enter the percent and amount that define the maximum write-off for underpayments and overpayments. These values apply only to write-offs (such as Entry Types WAU and WAO). These values do not apply to adjustments or deductions associated with overpayments or underpayments (these are not write-offs). The user can enter a write-off amount as long as the amount does not exceed the specified write-off percentage of the payment. |
Item Write-Off |
Enter the highest amount that this user can write off when the user writes off an amount for an individual item on a payment worksheet. |
Maintenance Worksheet
Enter the write-off tolerances for the maintenance worksheet.
Warning! If you do not define write-off tolerances for the user, the system uses zero for the user's write-off tolerances, and the user cannot write off items.
Field or Control |
Description |
|---|---|
Max Write Off (maximum write-off) |
Enter the maximum amount that the user can write off for either an individual item or for the remaining balance for a normal group or match group. The user can write off an amount below the maximum amount as long as it does not exceed the percentage of the original amount for the item. For example, if you enter an amount of 25.00, the user can write off amounts up to 25.00. However, if you enter a maximum write-off percentage of 10 percent, and the total original amount of an item is 240.00, the user cannot write off more than 24.00. For no limit, enter all 9s. |
Max Refund (maximum refund) |
Enter the maximum refund amount that a user can create. |
Write-off Days |
Enter the minimum age of an item before a user can write it off on the maintenance worksheet. For no limit, enter 0. |
Max WO Percent (maximum write-off percent) |
Enter the maximum percentage of an item that this user can write off. For no limit, enter 100. |
Override Write off Tolerance |
Select to enable the user to write off items or amounts that do not meet the write-off tolerances that are defined for the business unit, customer, or entry reason as long as the write-off meets the user's write-off tolerances. If the user's write-off action exceeds the tolerances in the business unit, customer, or entry reason levels, the system issues only a warning. |
Currency Precision
Field or Control |
Description |
|---|---|
Format Currency |
Enter the currency for the write-off tolerance amounts for conversion purposes. The system uses this currency to calculate the tolerance amounts for an item. |
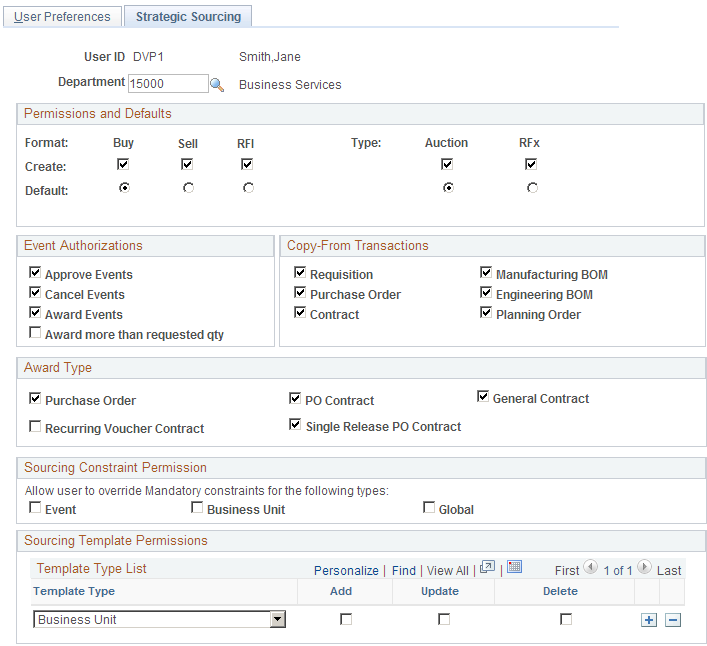
Use the User Preferences - Strategic Sourcing page (OPR_DEF_TBL_SS) to create strategic sourcing user preferences and defaults.
Navigation:
This example illustrates the fields and controls on the Strategic Sourcing page. You can find definitions for the fields and controls later on this page.
Field or Control |
Description |
|---|---|
Permissions and Defaults |
Set up the formats and types of events that the user can create and that are defaults. You can give the user permission to create buy, sell, or RFI events of auction or RFx types. |
Event Authorizations |
Select the event actions that are authorized for the selected user ID so that the user can approve, cancel, award events, or award more than the requested quantity. Note: If you are integrating with Purchasing, you must have the authority to enter and approve vendors using the Procurement User Preferences - Vendor Processing Authority page. Selecting the option to award events here does not mean that you have access to Purchasing vendor pages, but it enables you to actually post an award on the Award Details page. Also, you must have the authority to create POs and contracts in Purchasing to award events to a PO or contract. |
Copy-From Transactions |
You can use requisitions, manufacturing BOMs, POs, engineering BOMs, contracts, or planning orders as the basis of Strategic Sourcing events. While creating events, you can copy from any transactions that are selected on the user preferences page. |
Award Type |
If you select the Award Events option in the Event Authorizations region, you must select at least one Award Type option. The user will have access to create only the documents selected here. Options are:
Note: To award purchase orders or contracts, users must have access on the User Preferences – Procurement page to create contracts and purchase orders. If the Allow Vendor Creation at Award option is selected in the Strategic Sourcing business unit definition, the user must also have the appropriate vendor processing authority on the Procurement – Vendor Processing Authority page to enter and approve vendors. See PeopleSoft Strategic Sourcing, "Analyzing Bids and Awarding Events," Posting Awards. See PeopleSoft Strategic Sourcing, "Setting Up Business Units in PeopleSoft Strategic Sourcing." |
Sourcing Constraint Permission |
Select the constraint types for which you want to allow overwriting of default mandatory constraints. Options are:
During the posting of the award, the system will check the user's permissions. If one or more default mandatory constraints have been violated, the following will occur:
Note: If you manually add a mandatory constraint to an event, the system does not prevent you from posting an award if that constraint was violated. Only mandatory constraints are passed as default constraints onto an event. These mandatory constraints are based on the default rules, and the system checks to determine whether the award can proceed. |
Template Type |
Select the sourcing template type to enable for the selected user ID. Values are:
Select the appropriate check box to give the user access to add, update, or delete templates. |
Use the User Preferences - Staffing - General Preferences page (OPR_DEF_TABLE_FO1) to define general user preferences for Staffing Front Office and Pay/Bill Management.
Navigation:
Click the Staffing - General Preferences link.
This example illustrates the fields and controls on the Staffing - General Preferences page. You can find definitions for the fields and controls later on this page.
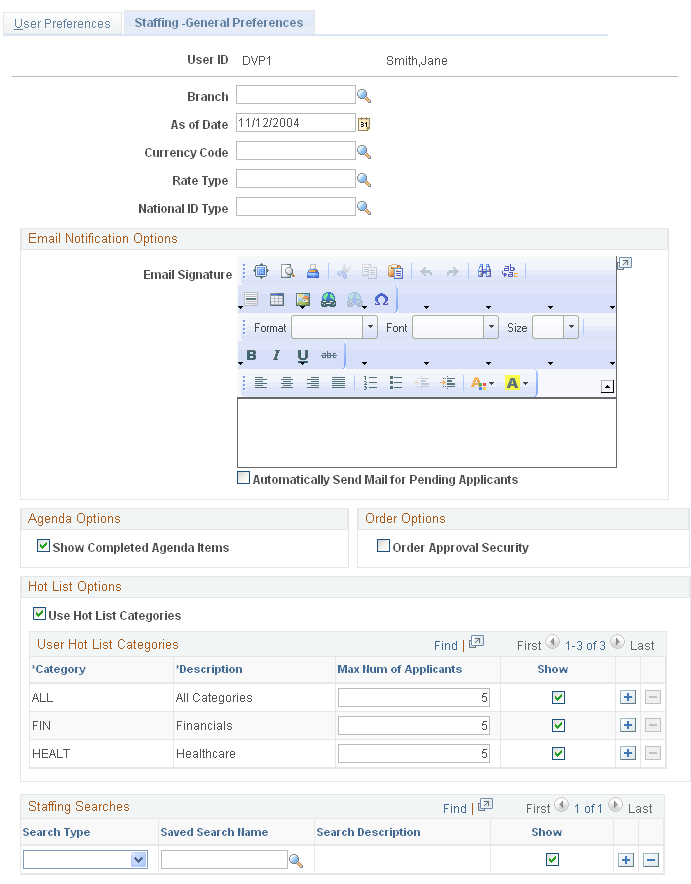
Field or Control |
Description |
|---|---|
Branch |
Enter the staffing branch to be associated with the user ID. |
As of Date |
Select a date to be used on some reports to populate the AsOfDate variable. |
Currency Code |
Select an option that the system will use to automatically default to the Customer - General Information page (Customers, Customer Information, General Information) when adding a new customer. |
Rate Type |
Select an option that the system will use to automatically default to the Customer - General Information page (Customers, Customer Information, General Information) when adding a new customer. |
National ID Type |
Select a default format for the applicant and employee pages to track a person's tax identification number, such as social security number or social insurance number. |
My Searches |
Set up the searches you want to appear on the My Searches pagelet. You can also define this by clicking the Customize button on the pagelet. |
Email Notification Options
Field or Control |
Description |
|---|---|
Email Signature |
Enter a signature to be used on emails that are sent using the Send Email page. |
Automatically Send Mail For Pending Applicants |
Select to indicate that the system should automatically send an e-mail to the applicant when a user changes the applicant’s status to Valid or Invalid. This procedure is performed by using the Action button on the Pending Applicants pagelet. |
Agenda Options
Field or Control |
Description |
|---|---|
Show Completed Agenda Items |
Select to indicate that the completed items initially appear in the agenda pages. This option only applies when Staffing Front Office is installed. |
Order Options
Field or Control |
Description |
|---|---|
Order Approval Security |
This option indicates whether a user can save orders with a status of Approved. When this check box is deselected, users can save only orders with a status of Pending Approval. Orders pending approval can only be saved with a status of Draft and cannot have assignments created. Consider using this feature with the order customer self-service component. For example, you may not want to give order approval access to the user IDs that are granted to your customers. |
Hot List Options
Field or Control |
Description |
|---|---|
Use Hot List Categories |
Select this check box to set up categories for the Hot List. When this option is selected, the system displays the User Hot List Categories grid. Set up hot list categories using the Hot List Categories page. |
User Applicant Hot List Categories |
Enter a value in the Maximum Number of Applicants to determine how many applicants the system should display on the pagelet. Select the Show check box to determine if the category is to be displayed on the pagelet. The All category represents system data and displays all the hot elements in pagelets regardless of categorization. Use the add a new row icon to define a new hot list category. If a user defines their own hot category on this page, they must enter the category code, description, maximum number of applicants, and whether to show the category on the pagelet. The user can delete the category as well. Hot list categories can also be defined using the Hot List Categories page. |
Staffing Searches
Field or Control |
Description |
|---|---|
Search Type |
Select a search type. |
Saved Search Name |
Select a search name. |
Show |
Select to indicate that you want this search type to appear on the My Searches pagelet. |
User Hot List Categories
Specify user specific categories to be displayed on the Applicant Hot List pagelet.
This grid only appears if you select the Set Up for Applicant Hot List Category check box.
Field or Control |
Description |
|---|---|
Category |
Enter a title for the category. |
Description |
Enter a description for the category. |
Max Num of Applicants |
Enter the maximum number of applicants to display in the Applicant Hot List pagelet. |
Show |
Select to show the category in the grid displayed when adding applicants to the hot list. |
Note: You cannot delete any categories that have applicants attached to them.
Use the User Preferences - Staffing - Job Data page (OPR_DEF_TABLE_FO2) to define Staffing Front Office and Pay/Bill Management values to be supplied by default to the Job Data section of the Applicant setup pages.
Navigation:
Click the Staffing - Job Data link.
This example illustrates the fields and controls on the User Preferences - Staffing - Job Data page. You can find definitions for the fields and controls later on this page.
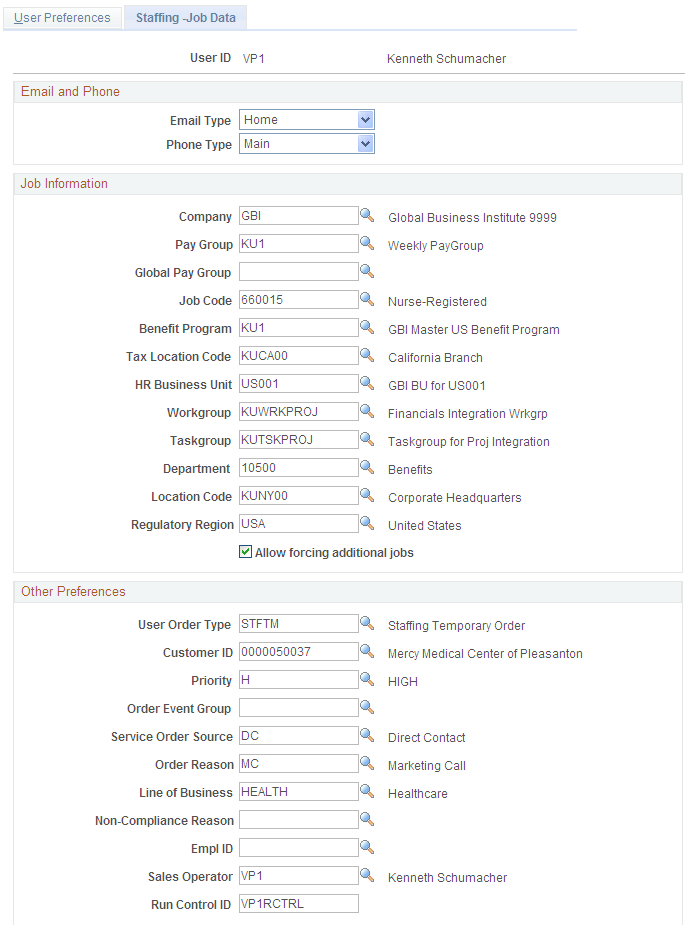
Email and Phone
Field or Control |
Description |
|---|---|
Email Type |
Select Business, Campus, Dorm, Home, or Other to indicate which email address type to default when adding applicants to the system. |
Phone Type |
Select a type, such as Business, FAX, or Main, to indicate the preferred phone number type to default when adding applicants to the system. |
Job Information
The values entered in the following fields will be used as defaults when you are adding applicants, orders, and new reports to the system. Users can override or keep these default values. After the applicant is hired, if Pay/Bill Management is installed, the applicant field values will be used to create the employee job record in HRMS, driving the process by which the employee should be paid.
Field or Control |
Description |
|---|---|
Company |
Enter a default value for the company to be associated with the applicants that you add to the system. The company is the employer or legal entity who hires the employee. |
Pay Group |
Enter a default value for the Payroll for North America pay group to be associated with the applicants that you add to the system. Payroll for North America may have several pay groups, for weekly, bimonthly, and monthly pay, for example. Each organization has its own set of valid paygroups. |
Global Pay Group |
Enter a default value for the Global Payroll pay group to be associated with the applicants that you add to the system. Note: This field is applicable only if Pay/Bill Management and Global Payroll are installed. |
Job Code |
Enter a default value for the job code to be associated with the applicants that you add to the system. |
Benefit Program |
Enter a default value for the benefit program to be associated with the applicants that you add to the system. In HRMS, you may define several benefit programs based on the different types of benefits that your company extends to its employees. |
Tax Location Code |
Enter a default taxing location to be associated with the applicants that you add to the system. This information is used by Payroll for North America to determine how taxes should be withheld. |
HR Business Unit (human resources business unit) |
Enter a default business unit to associate with the applicants that you add to the system. This information applies only when Pay/Bill Management is installed. |
Workgroup |
Enter a default workgroup to associate with the applicants that you add to the system. Workgroups are used by the Time and Labor application, among other things, to determine which Time and Labor rule programs to apply to reported time, which time reporting codes are available to employees in the group, and whether time entry approval is required. This information applies only when Pay/Bill Management is installed. |
Taskgroup |
Enter a default taskgroup to associate with the applicants that you add to the system. Taskgroups are used by the Time and Labor application, among other things, to determine which task-related information should be captured when you are entering time into the system. This information applies only when Pay/Bill Management is installed. |
Department |
Enter a default department ID to associate with the applicants that you add to the system. |
Location Code |
Enter a default location code to associate with the applicants that you add to the system. |
Regulatory Region |
Enter a default regulatory region to associate with the applicants that you add to the system. This information applies only when PeopleSoft Pay/Bill Management is installed. |
User Order Type |
Enter a user order type to associate with new orders. |
Customer ID |
Enter a customer ID to associate with new orders and history items. |
Priority |
Enter a priority to associate with new orders. |
Order Event Group |
Enter an order event group to associate with new orders. |
Service Order Source |
Enter a service order source to associate with new orders. |
Order Reason |
Enter an order reason to associate with new orders. |
Line of Business |
Enter a line of business to associate with new orders. |
Non-Compliance Reason |
Enter a non-compliance reason to associate with new reports. |
Empl ID |
Enter an employee ID to associate with new reports. |
Sales Operator |
Enter a sales operator to associate with new orders and reports. |
Run Control ID |
Enter a run control ID to use for running reports. |
Field or Control |
Description |
|---|---|
Allow forcing additional jobs |
Select to enable power users to override the system logic that reuses employee job records across different assignments. This option is applicable only when Pay/Bill Management is installed. |
Use the User Preferences - Supplier Contract Management page (OPR_DEF_TABLE_CS) to define user authorizations for managing contract documents through their life cycles and to grant the types of controls that the user who is defined in the User ID field can perform on documents.
This page is enabled only for users who have administration rights for authored contracts, and those users can approve library sections and set configurator status.
Navigation:
. Click the Supplier Contract Management link.
. Click the Supplier Contract Management link.
This example illustrates the fields and controls on the User Preferences - Supplier Contract Management page.
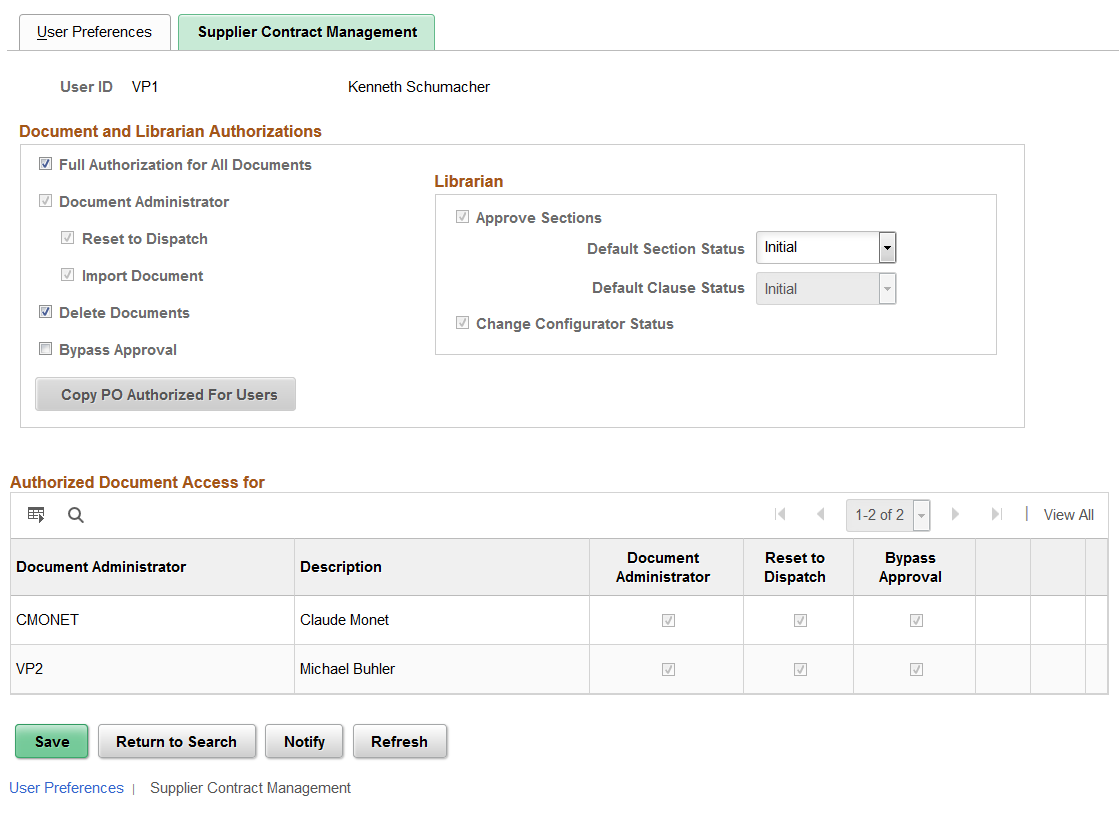
Use this page to determine how a user can manage a document through its life cycle and to grant the types of controls that the user can perform on documents. This page is enabled only for users who have administration rights for authored contracts, can approve library sections, and can determine the status of a configurator.
Your application administrator enters this setup information for document administrators and librarians.
Document and Librarian Authorizations
Use this section to grant security to the document administrators and librarians who manage section approvals, status changes for configurators, and import documents.
Field or Control |
Description |
|---|---|
Full Authorization for All Documents |
Select to grant a user the authority to perform all tasks that are listed on this page. This user is considered a super user with the ability to perform all actions on contracts that are in the system. When you select this option the Document Administrator fields become display only and cannot be edited. If you do not select this check box, then you can select individual authorizations for document tasks. |
Document Administrator |
Select this option to indicate that the user has administrative authority to author supplier contract documents. As a document administrator, a user can generate, re-create, refresh, check out, edit, and check in documents. You can select one or all tasks in this group box. Document administrators can also control the life cycle of a contract for authors, by submitting contracts for collaboration and approvals. Depending on how you are using document types, document administrators may include only contract specialists or may include a broader list of users who generate documents. |
Delete Documents |
Select this option to indicate that the user has the authority to delete supplier contract documents. This option grants or restricts the ability of document owners and super users to delete documents once they are created. This option is available when either the Full Authorization for All Documents or Document Administrator option is selected. |
Bypass Approval |
Select this option to indicate that the user can bypass approvals. In other words, the document can be automatically approved by this administrator. If your organization uses supplier contract approvals, there are steps required to approve a document. However, if necessary, a user can expedite the document if this option is selected for their user ID. When users have the authority to push a document through the approval process, a Bypass Approval button appears on the Document Management Page. This option is available when either the Full Authorization for All Documents or Document Administrator option is selected. |
Reset to Dispatch |
Select to indicate that the user can reset a document to a Dispatched status. After a document has been completed between a supplier and customer, it is in an Executed status. At that status, the Reset to Dispatch button is available on the Document Management Page. This feature is useful if you want to perform minor changes, such as correct typographical errors, in the current version of the document without processing an amendment. |
Copy PO Authorized for Users(copy purchase order authorized for user) |
Click to copy buyer IDs from the Purchase Order Authorization or Buyers User Authorization grid to the Authorized Document Access for grid. These IDs belong to users who are authorized to perform purchase order tasks for the current user. This button is available when the Full Authorization for All Documents check box is not selected and the Purchase Order check box is selected as a valid transaction source (Enabled Transaction Source section ) on the Installation Options - Supplier Contract Management Page. When you click this button, the system checks for users who are defined in the Buyers User Authorization grid for the user whose preferences you are defining. If user IDs exist in the grid, the system copies those user IDs to the Authorized Document Access for grid box. After the user IDs are copied, you can select the authorization access that you want to provide to the users. |
Librarian
Use this section to set default values for librarians. The default values apply to the user ID that you select at the top of the page.
Field or Control |
Description |
|---|---|
Approve Sections |
Select to indicate that a librarian can approve a section, making the section available to use in documents. The status of a section can be changed or Approved using the Section Definition Page. |
Default Section Status |
Select a status that indicates when the librarian can create a new section. This saves time when submitting the section for approval. Values include Approved and Initial. This field is available when the Approve Sections check box has been selected. When this value is Approved, and the librarian checks out and changes an approved section, the system does not change the status to Initial. Instead, the status remains Approved. |
Default Clause Status |
Select a status that indicates when the librarian can create a new clause. This saves time when not using clause approvals because the librarian can change the status of a clause to Approved by default. Values include Approved and Initial. This field is not available when the Clause Approval option is selected on the Installation Options - Supplier Contract Management Page. In this case, the default value is Initial because all clauses must be submitted for approval. When this value is Approved, and the librarian checks out and changes an approved clause, the system does not change the status back to Initial. Instead, the status remains Approved. |
Change Configurator Status |
Select to indicate that the user can update the status of a document configurator. Configurator statuses can be changed on the Document Configurator Definition Page. |
Authorize Document Access for
Use this section to add document administrator user IDs for the current user (listed at the top of the page). This section enables the user to act on behalf of the users in the Document Administrator column. If the user in the Document Administrator column is away from the office, then the current user (listed at the top of the page) has the authority to perform tasks for the individual’s documents.
Note: You can copy user IDs from the Purchase Order Authorizations page to populate this section using the Copy PO Authorized for Users button.
Field or Control |
Description |
|---|---|
Document Administrator (column) |
Select additional users for whom the current user (listed at the top of the page) can act on behalf of and perform certain document tasks. Use the corresponding check boxes to define the authorities for the selected user. Note: Only Document Administrators appear in the lookup. |
Document Administrator (check box) |
Select to indicate that the selected user has document administrator privileges for the documents belonging to the document administrator. This means that the selected user can generate and edit documents that belong to the document administrator as if he or she were the administrator. |
Reset to Dispatch |
Select to indicate that the selected user can change a processed document to Dispatch for the documents that belong to the document administrator. |
Bypass Approval |
Select to indicate that the selected user can bypass approvals and expedite a document for documents that belong to the document administrator. |
Use the Maintenance Management page (OPR_DEF_TABLE_WM1) to define default maintenance management preferences.
Navigation:
This example illustrates the fields and controls on the User Preferences – Maintenance Management page. You can find definitions for the fields and controls later on this page.
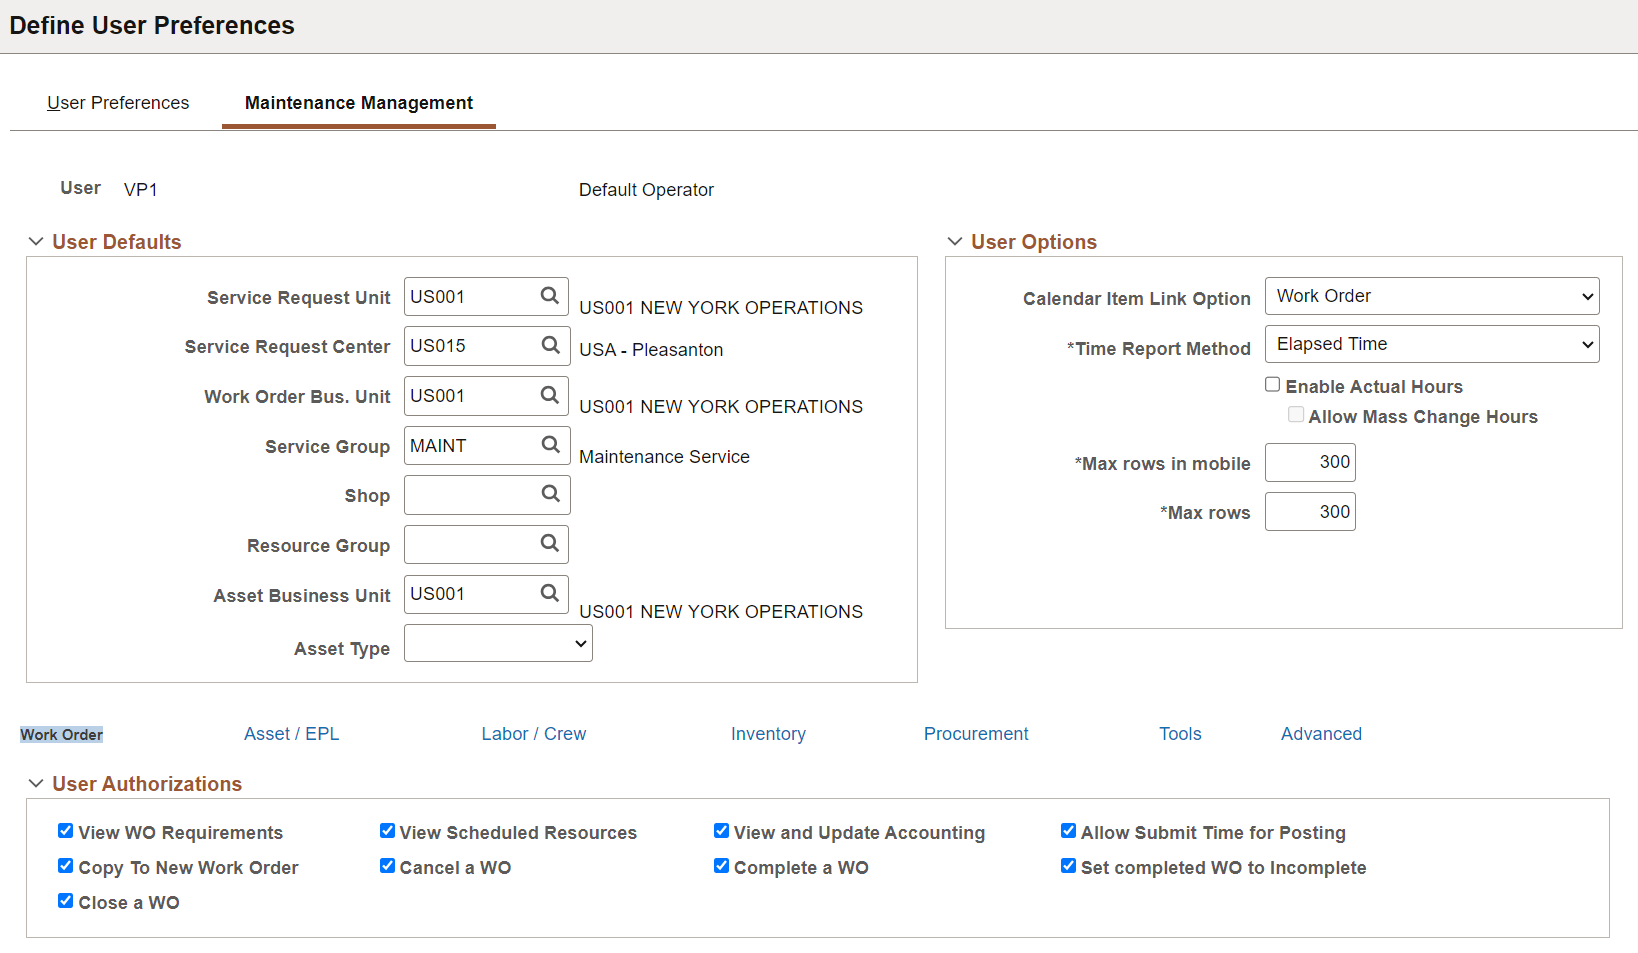
User Defaults
Field or Control |
Description |
|---|---|
Service Request Business Unit |
Select the business unit that you want to serve as the default service request business unit value when this user creates a service request. Normally business unit is not exposed to self-service users and they can never override it; however, agents creating new service requests via the Agent Service Request component may override the business unit default. |
Service Request Center |
Select the Service Request Center that you want to serve as the default value whenever this user creates a service request. Users can override this value in the service request. |
Work Order Business Unit |
Select the business unit that you want to serve as the default work order business unit value when this user creates a work order without a service request. Users can override this value at the work order level. This is also the default business unit for the Task Search page used by the Technician Workbench, the Work Order Workbench, the Crew Scheduling Workbench, and the Labor Assignment Workbench. Note: Work orders that are created from service requests derive the work order business unit from the Problem Tree setup, not from user preferences. |
Service Group |
Select the Service Group to serve as the default value for a work order created by this user. Users can override this value at the work order level. |
Shop |
Select the shop to serve as the default value for a work order created by this user. Users can override this value at the work order level. |
Resource Group |
Select the resource group value to use as the default value in the work order. Note: The Resource Group is used in the Matching process to match members in the group to demand for resources. This default value is normally set up for users who schedule work orders and use the matching process. Note: This option only applies to the Time Entry page of the Technician Workbench. It does not apply to time entered on the Work Order Completion component. |
Asset Business Unit |
Select the business unit that you want to serve as the default Asset Management business unit value in a work order for this user. Users can override this value in the work order. |
Asset Type |
Select the asset type to display as the default value in the work order, which is used to search for assets to maintain or repair in the work order. You can override this value in the work order. |
User Options
Field or Control |
Description |
|---|---|
Calendar Item Link Option |
Select the component that you want to access when you select a work order assignment link on a resource's calendar. When you click on a work order task assignment on a resource's calendar, the link takes this user to either the Work Order or the Technician Workbench, depending on selecting either:
|
Time Report Method |
Select the format by which this user records their time worked on work order tasks on the Technician Workbench Time Entry page. Options are: Elapsed Time: Select to report time as the total hours worked per day. Punch Time: Select to report times by entering start times and end times. |
Enable Actual Hours |
Select to enter the actual labor hours for work order tasks on the Technician Workbench page. When the Enable Actual Hours check box is selected, the Technician Workbench page displays the Actual Hours tab with fields for specifying the employee ID, Craft, Actual Start Date, Actual Start Time, Actual End Date, Actual End Time, and Actual hours. |
Allow Mass Change Hours |
Select to enable the Actual Hours option on the Technician Workbench - Mass Change page. This check box is enabled only if the Enable Actual Hours check box is selected. |
Max rows in mobile |
Enter the maximum number of rows of the Fluid Quick Work Order search results grid to be displayed on a mobile. |
Max rows in PM Mass Update |
Enter the number of rows to be displayed in the PM Schedule Mass Update grid. The default value is 300 rows and the maximum value is 999999. |
User Authorizations – Work Order
Field or Control |
Description |
|---|---|
View WO Requirements (view work order requirements) |
Select this check box to enable this user to view work order requirements by enabling access to the Labor, Inventory, Purchase/On-hand, and Tools links in the Requirements page of the Work Order component. If you do not select this check box, then the Labor, Inventory, Purchase/On-hand, and Tools links are not available on the Requirements page of the Work Order component Note: This user can only view this information if any of the Schedule Labor, Schedule Inventory, or Schedule Tools options in a work order's business unit are selected. |
View Scheduled Resources |
Select this check box to enable this user to view work order resource schedules in the Schedules page of the Work Order component and to enable drill down to it from the Crew Schedule Inquiry page. Note: This user can only view this information if any of the Schedule Labor, Schedule Inventory, or Schedule Tools options in a work order's business unit are selected. |
View and Update Accounting |
Select this check box to enable this user to view and update the accounting ChartField distributions on the Schedules page for labor, inventory, purchase/on-hand, and tools in the Work Order component. Selecting this check box also enables users to view and update the ChartField distributions on the Tools Cost tab of the Tool Usage page in the Technician Workbench and the Work Order Completion component. Selecting this check box also enables access to the distribution templates for the Inventory, Labor, and Purchase/On-Hand Schedules in the Work Order component. However, these options are not available in the Technician Workbench or the Work Order Completion component. |
Allow Submit Time for Posting |
Select this check box to enable a user to select the Submit Time for Posting button in the Time Entry page of the Technician Workbench and Work Order Completion page. This check box is selected by default. If you do not select this check box this user will be prevented from submitting work order task time entries to Expenses for posting. The user can still enter time. In addition, selecting this option enables the user's manager or supervisor to edit the time entry, if necessary, and then submit it to posting. If you do not select this check box, the Submit Time for Posting button does not appear on the Time Entry page in the Technician Workbench or on the Work Order Completion component for this user. |
Copy to New Work Order |
Select this check box to enable this user to copy an existing work order to a new work order. Note: The Copy button in the work order is not visible unless this check box is selected. |
Cancel Work Order |
Select this check box to enable the selected user to manually cancel a work order. |
Complete a WO (complete a work order) |
Select this check box to enable this user to change the status of a work order to Complete in the Work Order component, the Technician Workbench, and the Work Order Completion component. Note: This option only applies to a manual close does not enable this user to perform the WO_CLOSE batch close process. |
|
Set completed WO to Incomplete (set completed work order to incomplete) |
Select this check box to enable a user to reverse a work order status from Complete to Incomplete (Open) online. |
Close a WO (close a work order) |
Select this check box to enable this user to close a work order online. Note: This option only applies to a manual close and does not enable this user to perform the WO_CLOSE batch close process. |
User Authorizations – Asset/EPL
Field or Control |
Description |
|---|---|
Authorized to Set Asset Action |
Select this check box to enable specific users to select the Asset Action for a task on the Requirements page of the work order. The Asset Action dropdown list enables you to install, retire, and replace assets. |
Authorize Cost Recovery Claim |
Select this check box to enable this user to create a warranty claim. If you do not select this check box, the Warranty Claim link is not available on the Schedules page of the Work Order component. |
Override Capital Limit |
Select this check box to enable this user to override the capitalization limit on the Task Accounting component, which is set up on the Maintenance Management, Setup, Capitalization Rules component for the asset used in a work order. The user can increase or decrease the minimum amount that it costs to repair an asset in a work order task before it can be capitalized by Project Costing. Note: If you do not select this check box, the capitalization limit cannot be accessed by this user. |
Allow Planned Downtime |
Select this check box to enable a user to enter planned downtime for an asset specified for a work order task. Users can enter planned and actual downtime for an asset via the Downtime Entry component, a link at the work order task level in the Work Order Component, and a link at the work order task level on the Technician Workbench . When the work order is closed, the asset downtime updates the Asset Maintenance History. This information can be useful for creating warranty claims based on the downtime of an asset. If you do not select this check box, the downtime Planned tab does not display, and users can only enter the actual downtime. Note: Downtime entries are not updated to Warranty Claim processing. |
Allow Update Non-specific EPLs(allow update non-specific equipment parts lists) |
Select this check box to enable the Add to EPL button for this user, which appears above the Inventory and Purchase/On-Hand grids on the Requirements and Schedules pages in the Work Order and Express Work Order components, and the Requirements grid in the Work Order Task Template component. Equipment Parts List (EPL) templates are set up in PeopleSoft Asset Management (Set Up Financials/Supply Chain, Product Related, Asset Management, Service and Repair) based on categories of assets (asset type, asset subtype, manufacturer's ID, and model). An EPL template lists the parts that are used to maintain and repair assets falling under these asset categories. Non-specific EPL templates refer to any EPL template that is not selected as the default EPL template for the asset that is selected for a work order task. When this user selects an asset for the work order task and clicks the Add To EPL button for one or more selected Inventory or Purchase/On-Hand task rows, the Add to Equipment Parts List page appears. This page lists one or more non-specific EPL templates, which were set up for one or more asset categories that apply to the asset selected for the task. For example, these three EPL templates are set up under the asset type, Facilities, and the asset subtype, HVAC/Heating.
The Asset ID MMFACTLTY0009 is an Air Conditioner Unit that is categorized under the asset type, Facilities, and asset subtype, HVAC/Heating. When you select the asset ID MMFACTLTY0009 for a work order task, define and select one or more inventory item rows that you want to add to one or more EPL templates, and click the Add to EPL button. All three of these EPL templates will appear on the Add to Equipment Parts List page. The user adds the one or more inventory items selected for the task to one or all of the EPL templates by selecting the check box for each EPL template row and clicking the Add to EPL button. |
Allow Update Asset Default EPL |
Select this check box to enable this user to access the Add to EPL button, which appears above the Inventory and Purchase/On-Hand grids in the Work Order and Express Work Order components, and above the Inventory and Purchase/On-Hand Requirements grid in Work Order Task Template component. You can set up asset definitions in PeopleSoft Asset Management and select a default EPL template for each asset. If the Allow Update Asset Default EPL check box is selected, and this user selects one of these assets, defines and selects one or more inventory or purchase on-hand rows, and clicks the Add to EPL button, the default EPL template defined for the selected asset displays as preselected on the Add to Equipment Parts List page. Important! If you select both the Allow Update Non-specific EPLs and the Allow Update Asset Default EPL buttons, then both the asset default EPL and any non-specific EPLs will appear on the Add to Equipment Parts List page as long as the selected asset has a default EPL selected in its definition. See Setting Up Work Order Templates. |
User Authorizations – Labor/Crew
Field or Control |
Description |
|---|---|
View and Update Labor Rates |
Select this check box to enable this user to view and update the labor rates in the work order. When this option is selected the user can override any default rates from a business unit, shop, or craft. Note: You cannot update labor cost and bill rates in the Work Order Completion component. |
Schedule Labor |
Select this check box to enable a user, such as a craft supervisor, to schedule labor resources for a work order task. This check box must be selected for anyone responsible for scheduling labor resources in your organization. |
Update Crew Schedule Metrics |
Select this check box to enable specific users to manually update the crew schedule compliance on the Crew Schedule Compliance Revision page of the Crew Schedule Metrics component and enables selection of the Update Schedule Metrics check box on the Maintenance Schedule Completion Report Request page of the Schedule Completion Report. |
Allow Override Metrics |
Select this check box to allow the confirmation of metrics on past or current periods for the crew selected on the Crew Scheduling Workbench. |
Report Crew Assgnmt Completion (report crew assignment completion) |
Select this option to enable specific users to access the Report Completed Hours and Report Completed Date fields. It enables users to update the Completed Hours and Completed Date fields on the Report Crew Assignment Time component, which is accessible through the Technician Workbench or the Crew Assignments grid of the Crew Scheduling Workbench. |
Report Crew Carryover Hours |
Select this check box to enable specific users to access the Report Carryover Hours Action and update the Carryover Hours field on the Report Crew Assignment Time component, which is accessible through the Technician Workbench. |
User Authorizations – Inventory
Field or Control |
Description |
|---|---|
Authorized to Enter Inventory |
Select this check box to enable this user to select and enter inventory items in the work order. Note: If you leave this check box blank, the Inventory link on the Work Order component's Requirements and Scheduling pages, the Express Work Order page, and the Work Order Workbench are unavailable for selection. This setting overrides the selections in the work order business unit and/or shop. |
Allowed to Reserve Inventory |
Select this check box to enable this user to create online, immediate reservations by selecting a Reserve button in the Work Order component. Selecting the Reserve button enables the user to override the Commit and Reservation Rule default hierarchy and reserve selected items in the work order task immediately. The default hierarchy is based on how the rules are specified in the business unit, shop, and work order type, |
Run Picking Plan |
Select this check box to enable this user to select the Picking Plan button to generate a picking plan. Note: The Picking Plan button in the Schedules page of the work order, on the Technician Workbench, and the Work Order Completion component is not available for selection unless this check box is selected. |
Picking Plan Run Control |
Click this link to access Inventory's Process/Output Options page where you must set up pick plan run control data, which is used to allocate parts selected in Maintenance Management to Inventory and runs an SQR (structured query report) to create the picking plan list. |
User Authorizations – Procurement
Field or Control |
Description |
|---|---|
Authorized to Procure |
Select this check box to enable this user to select various procurement options within the Purchase/On Hand schedule page of the Work Order component. If this option is not selected, the user will not be able to procure items from a work order. |
User Authorizations – Tools
Field or Control |
Description |
|---|---|
View and Update Tools Rates |
Select this check box to enable a user to view and update the cost rate and billing rate for tools in the work order, the Technician Workbench, and the Work Order Completion component. If this check box is left blank, these rates become unavailable to access. |
Schedule Tools |
Select this check box to enable a user, such as a tools supervisor, to schedule tools for a work order task. This check box must be selected for anyone responsible for scheduling tools in your organization. |
User Authorizations – Advanced
Field or Control |
Description |
|---|---|
Allow Access to Search Views |
Select this check box to enable a user to select the View button on the Technician Workbench to access the Task Search page and search for and access any task based on the search criteria entered on the Task Search page. If you do not select this check box, the View button does not appear on the Technician Workbench page for this user. In this case, the technician (user) only has access to specific work order tasks based on predefined views. |
Allow Access to Other's Tasks |
Select this check box to enable a technician to access another technician's work order task in the Technician's Workbench. Selecting this check box enables a user, other than the assigned user, to remove or change the technician's user ID from the Assigned To field on the Task Search page and search for more than one user's assigned tasks. If this check box is not selected, the Assigned To field on the Task Search page associated with the Technician Workbench defaults to the assigned technician and cannot be modified. Note: Selecting this check box only applies to the Technician Workbench and not the Work Order Completion component. Any user with access to the Work Order Completion component can enter time for multiple employees assigned to one or more tasks associated with a selected work order. |
Allow Access to WO Security (allow access to work order security) |
Select this check box to enable a user, who is responsible for managing the access of resources to work orders, to click the Technician Work Order Access link on the Miscellaneous page of the Work Order component in order to display the Work Order Access page. If a work order is created with a business unit that has Shop or Shop and Resource Pool selected as the Technician WO Security option on the Definition page of the business unit, then this user can add or remove shops on the Work Order Access page of any work orders created with this business unit. The shop used to create the work order is automatically added to the list and cannot be removed. Resources assigned to any shops listed on the Work Order Access page of a work order have access to the work orders and work order tasks on the Work Order, Express Work Order, and Technician Workbench components. See Setting Up a Work Order Business Unit. See Using the Work Order Miscellaneous Page |
Apply WO Access Security apply work order access security |
Select this check box to restrict the access of this user to specific work orders, work order tasks, and express work orders associated with business units that have Technician WO Security set up for a resource pool, a shop, or a shop and a resource pool. If this check box is not selected, this user has full access to any work order and work order tasks on the Work Order, Express Work Order, and Technician Workbench components, depending on the user's PeopleSoft Security setup for these components. Note: To enable a specific technician to have access to the work order tasks on the Technician Workbench that are assigned to other technicians, you must also select the Allow Access to Other's Tasks check box. See Business Unit Setup Options. |
Use the User Preferences – Mobile Inventory page (MIN_USER_TASK_OPT) to define user preferences for Mobile Inventory Management.
Navigation:
This example illustrates the fields and controls on the User Preferences – Mobile Inventory: Guided Count page. You can find definitions for the fields and controls later on this page.
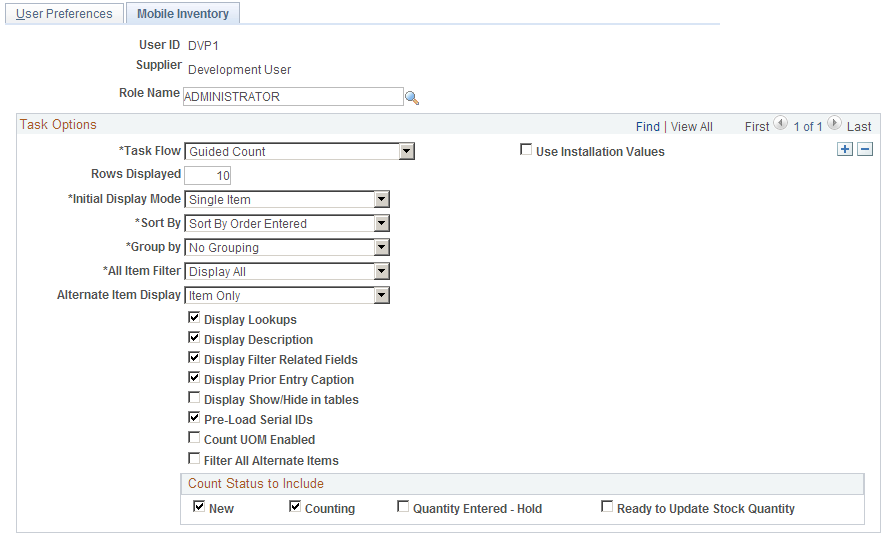
Mobile Inventory Management pages enables you to tailor PeopleSoft Mobile Inventory Management pages for an individual user. User preferences pages are optional in Mobile Inventory Management. When a user ID does not have this page defined or when the Use Installation Values check box is selected, the system uses the values defined for installation values.
User preferences can be defined for these task flows in Mobile Inventory Management:
Adjustments
Bin to Bin Transfer
Delivery, Delivery Cart
Express Issue
Count by Location, Count by Item, Guided Count, and Manual Count
Item Stock Inquiry
Par Count
Perform Putaway
Receiving Ad Hoc and Receiving PO
For additional information about each task flow and the fields that appear for each task flow:
Use the User Preferences – Mobile Inventory Fluid page (OPR_DEF_TABLE_MIN) to define user preferences for Mobile Inventory Management fluid page.
Navigation:
This example illustrates the fields and controls on the User Preferences – Mobile Inventory: page. You can find definitions for the fields and controls later on this page.
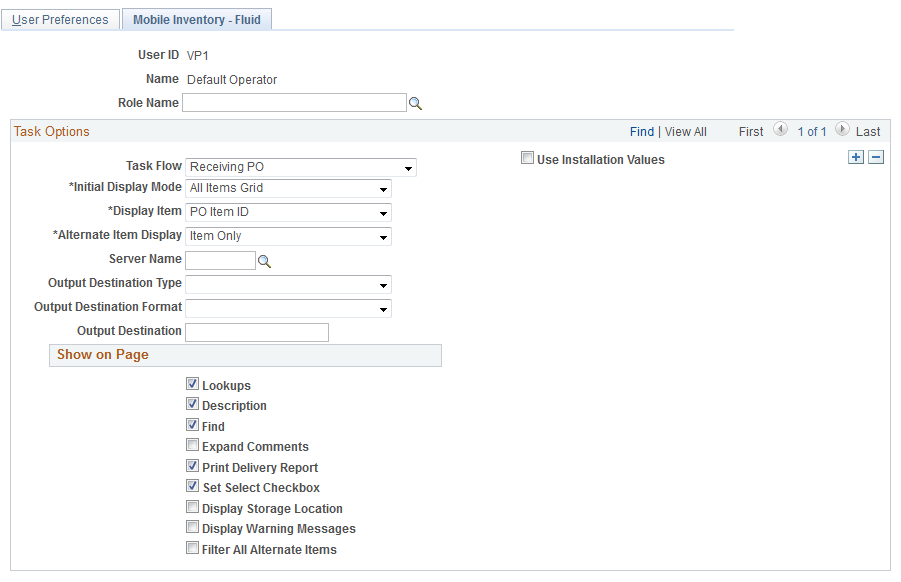
Use the Receiving PO and Receiving Ad Hoc task flows to set up printer default values. These values are used by the Receiving PO and Receiving Ad Hoc components when printing the Mobile Receipt Delivery report.
Field or Control |
Description |
|---|---|
Initial Display Mode |
Select a view to indicate how items display immediately after the search page. |
Display Item |
Select an item to display. The available items are:
|
Alternate Item Display |
Select an option that indicates how an item, alternate item, or both are displayed when an alternate item is specified for the transaction. |
Server Name |
Select a Process Scheduler Server Name that will be used for running the print delivery report. |
Output Destination Type |
Select an output destination type as printer to direct the delivery report to the printer. |
Output Destination Format |
Select a output destination format for printing the delivery report. |
Output Destination |
Select the Printer to print the receipt delivery report . |
For additional information about PeopleSoft Mobile Inventory Management:
See Understanding How to Receive Stock in PeopleSoft Inventory Using Mobile Receiving.