(Fluid) Adding a Person
To create a person record, use the Add a Person component (PERSONAL_DATA_FL). Use the CI_PERSONAL_DATA component interface to load data into the table for this component.
The following videos provide an overview and demonstration of how to use the fluid Person Data modification feature:
Video: Image Highlights, PeopleSoft HCM Update Image 47: Person Data Modernization
Video: Person Data Modernization
These topics provide an overview of identification assignment, the Add Person, Modify Person, or organizational relationship component layouts, and discuss how to add a person in fluid.
|
Page/Section Name |
Definition Name |
Usage |
|---|---|---|
|
HC_HR_PERS_ADD_FL_GBL (this is the cref for the tile) |
Create a new Person Data record without adding an organizational instance. |
|
|
SRCH_PERSON_FL |
Perform a search for duplicate employee/person IDs (with the ability to view or modify existing person records) and add a person record without a job organizational relationship. |
|
|
HR_CREATE_DTL_SCF |
Enter a person's ID or employment record number. |
|
|
PERSONAL_DATA_FL |
Enter personal details, contact information, and regional information about a person in fluid. |
|
|
N/A (See the Person Data page) |
Enter name and other biographical information. |
|
|
Name Page |
HR_NM_DIS_SCF |
View how the system pages will show the display, formal, and full name. |
|
HR_NM_EDIT_SCF |
Update or add name information and view or add attachments to support the change. |
|
|
HR_BIO_PD_SCF |
Record details about a person's education level, marital status, gender and orientation details, and add supporting attachments. |
|
|
HR_GENDER_DTL_SCF |
View gender field value descriptions |
|
|
HR_NID_PD_SCF HR_NID_PD_VW_SCF |
Enter national ID information for a person and add supporting attachments. |
|
|
N/A (See the Person Data page) |
Enter or edit a person's contact information. |
|
|
Add Another Address Page Edit Address Page |
HR_ADD_ADDRESS_SCF HR_ADDRESS_SCF |
Add or manage addresses for a person and add supporting attachments. |
|
HR_ADD_PHONE_SCF |
Enter or edit a person's phone number information. |
|
|
HR_PERS_EMAIL_SCF |
Enter or edit a person's email information. |
|
|
N/A (See the Person Data page) |
Enter country-specific personal information. |
|
|
HR_PERS_BRA_SCF |
Add details about a person's ethnicity, blood type, education, residency, and so forth. |
|
|
CAN_SLF_ID_DATA_FL |
(CAN) Enter identification information for Canada. |
|
|
PERSON_USA_SCF |
Enter Medicare, citizenship, military information, and add supporting attachments. |
|
|
N/A (See the Person Data page) |
Identify a checklist of tasks to perform after adding this person. |
|
|
N/A (See the Person Data page) |
Enter information for custom steps that use drop zones embedded in your activity guide process. |
|
|
N/A (See the Person Data page) |
View error and warning messages related to the Person Data validation process, if any. |
|
|
PERSONAL_DATA4_FL |
View the proposed information you are adding for a person record. |
|
|
PERSON_DATA_SUB_FL |
Confirm that a person record was successfully created. You can also initiate the process to add or modify person data, creating or view organizational relationships, manage a person's checklist, or view or modify job data for an existing person. |
|
|
Update Personal Data-Future Page |
PRCSRUNCNTL |
Run this process shortly after midnight to update the Personal Data component. The process will update data with new, effective information that is not currently in the component. The Update Personal Data-Future process runs the HR_PERSDATA application engine program. |
When you access the Add Person or one of the Create <Organizational Relationship> components, the system may request you enter an employee ID on the Request Details Page.
Note: The Empl ID and Empl Record fields will appear only if configured on the Person and Job Installation - Person and Organization Page to not be hidden.
There are two ways to assign IDs:
Automatically
If you use automatic ID assignment, the system adds IDs sequentially as you add new people.
The system maintains the last assigned ID on the Installation Table - Last ID Assigned Page.
Note: If configured to hide the employee ID upon entry, the system will use the automatic method of assignment.
Manually
You enter the IDs, using any system that you choose for the organization. With manual entry, you don't need to assign IDs sequentially.
Assigning IDs manually is the only way that you can include alphabetical characters in the IDs.
Important! To avoid maintaining two different sets of IDs, it is recommended that you use only one method to assign them: either always assign them manually or always let the system assign them.
The Manage Human Resources Dashboard consists of several tiles that enable the HR administrator to add and maintain person, organizational relationships, and job data via fluid tiles and components.
Many of the Manage Human Resources tiles and pages use activity guides to provide a simplified and streamlined approach to completing a business process. These fluid tiles access components and pages that appear within the context of an Activity Guide Composer process.
**This topic discusses the Add Person, Create <Organizational Relationship>, Organizational Relationship, and Modify Person component layouts, which have a similar layout. For information on the Manage Job layout, see The Activity Guide Composer Framework for the Manage Job Component.
Note: The text "<Organizational Relationship>" is used throughout this documentation to represent "Employee", "Contingent Worker", or "Person of Interest".
Activity Guide Page Layout - Page Header (Sub-Banner)
The fluid person and organizational relationship components use a horizontal non-sequential activity guide template to render the guided process.
The top (sub-banner) shows the page (step) navigation at the top.
This example illustrates the Person Data layout in fluid and consists of the Person Data and Summary pages.

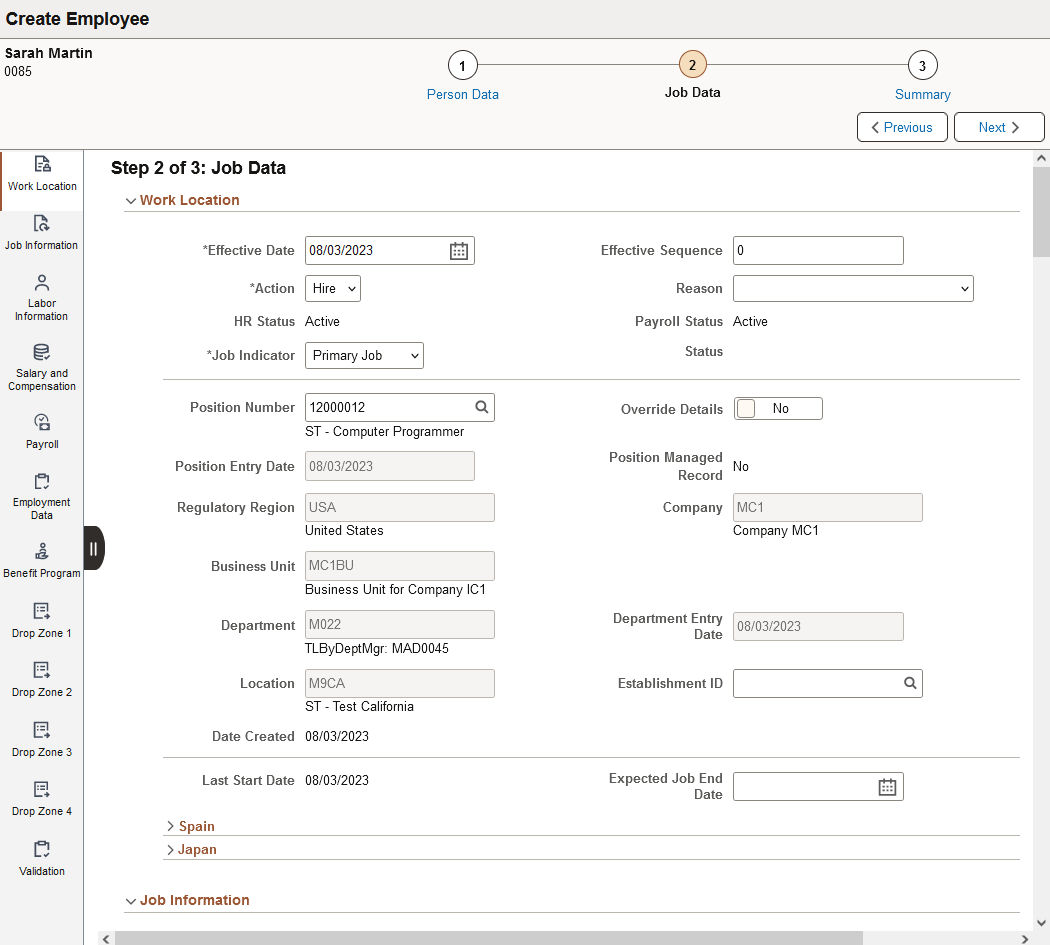
This example illustrates the Create Employee layout in fluid and consists of the Person Data, Job Data, and Summary pages.
In addition to the horizontal page steps that appear within the sub-banner, the activity guide may also display the following buttons:
|
Field or Control |
Description |
|---|---|
|
Next button |
Select this button to initiate the Validation process for a page. This will check for entry errors or warnings. If the process does not find errors or warnings, or you choose to ignore the warning messages, the activity guide moves you to the next page in the horizontal process. For Person Data, that would be the Summary page. For the creation of an organizational relationship (employee, contingent worker, or person of interest), the process would move to the Job Data page. |
|
Previous button |
The Previous buttons appears on Job Data and Summary pages to allow you to navigate back to a previous step and make changes, as needed. |
Section Navigator and Sections
The left panel displays sections within a page step. Quickly navigate to a section within the page by selecting the section in the left panel.
The Person Data page provides quick access to these page sections:
The Job Data page provides quick access to these page sections:
Job Data Page - Attachments Section (when attachments are enabled)
The Summary page shows proposed changed you have entered on these pages and allows you to submit transaction.
Delivered Templates for Person and Organizational Relationship
The PeopleSoft HCM application delivers the following templates and page steps for these tiles and pages to add or modify persons and create organizational relationships:
|
Tile/Component |
Description |
Template |
Category |
Pages (Steps) |
|---|---|---|---|---|
|
Add a Person record only. Note: You can add a relationship at a later point of time using the Organizational Relationship tile. |
PERSON2 (Person) |
HR_PERSDATA (Person) |
|
|
|
Modify the Person record only. |
PERSON2 (Person) |
HR_PERSDATA (Person) |
|
|
|
Add a new Person and Job Data record with an employee relationship in the system. |
HRPJORG |
Manage Person & Org Relationship (HR_PERSONORGREL) |
|
|
|
Add a new person with a continent worker relationship in the system. |
HRPCWRJ (Create Contingent Worker) |
Manage Person & Org Relationship (HR_PERSONORGREL) |
|
|
|
Add a new Person and Job Data record with a person of interest relationship (with a job) in the system. |
HRPPOIJ |
Manage Person & Org Relationship (HR_PERSONORGREL) |
|
|
|
Add an organizational relationship for a person already in the system (employee, contingent worker, or person of interest with a job). |
ADDORG1 (Add Job Relationship) |
Add Job Relationship (HR_JOBREL_ADD) |
|
Note: You must be assigned the Job Data AG Administrator role to add or modify these activity guide templates.
To understand or set up templates using the Activity Guide Composer, see the Understanding the Activity Guide Composer documentation.
Administrators use the Add Person tile to create a new person record without adding an organizational instance.
Note: The following must be in place to see and access this tile and pages:
--The Fluid Person and Manage Relationship check box must be enabled on the Person and Job Installation - Person and Organization Page.
--You must be assigned the HR Admin Add Person role.
Navigation:
The Add Person tile is delivered as part of the fluid Manage Human Resources Dashboard.
This example illustrates the Add Person tile
Select this tile to begin the process to create a new person record.
Add Person Flow in Fluid
Use the following steps to perform the fluid-based approach to quickly create and process a new person transaction:
This diagram shows the high-level functional pages and steps to add a person using the fluid pages.
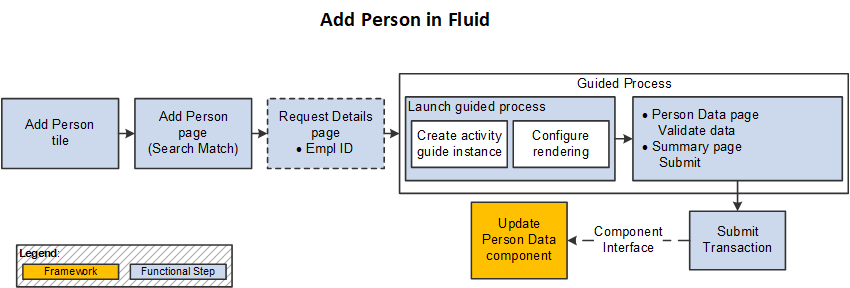
Select the Add Person Tile to begin the process ().
Use the Add Person Page to perform the Search/Match process to find potential Person Data matches in the system for this person or initiate the process to add a new person record.
When using Search/Match, one of the following will occur:
No Duplicate Found: the process will continue with the Add Person process and will move to either the Request Details or Person Data page, depending on your installation settings.
Duplicate Found: the page will display the Potential duplicates grid for you to review duplicate person information. Options are available to view and add organizational relationships for a person or view or edit existing person data. If there is no person match, select the Add Person button to continue with the Add Person process.
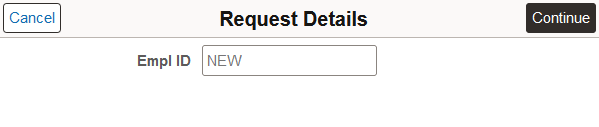
The Request Details Page appears when the employee ID entry is configured to display.
Enter an ID or leave the field blank to have the system automatically assign the person's ID (see Understanding Identification Assignment).
For configuration settings, see Person and Job Installation - Person and Organization Page.
Select to continue to the Add Person activity guide process.
There are two steps in this activity guide:
The Add Person - Person Data Page to enter person details.
The Add Person - Summary Page to review the data.
Submit the information to add the Person Data record.
Note: The Add Person process does not use Approvals.
See also Fluid Add or Modify Persons, Create Organizational Relationships, and Manage Job Data Architectures.
Use the Add Person page (SRCH_PERSON_FL) to perform a search for duplicate employee/person IDs (with the ability to view or modify existing person records) and add a person record without a job organizational relationship.
Note: A person added from this page will be assigned the organizational relationship of Person of Interest - Other.
Navigation:
Select the Add Person Tile on the Manage Human Resources home page.
Note: You can also access this page from the Create Employee Tile, Create Contingent Worker Tile, and Create Person of Interest Tile, but the title varies to reflect the transaction you are performing.
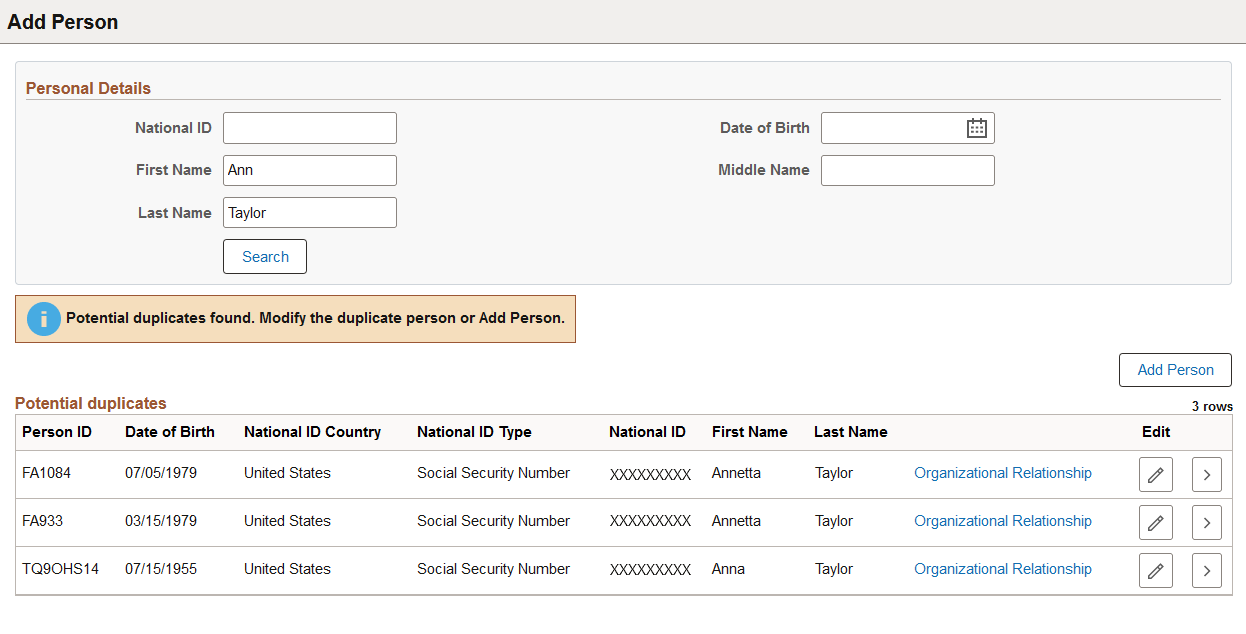
This example illustrates the Add Person page.
The search uses the logic delivered by the Search/Match framework. Configuration for Search/Match is available from .
|
Field or Control |
Description |
|---|---|
|
Person Details group box |
Enter key field values that may identify a person, then select the Search button to initiate the Search/Match process. |
|
Search button |
When you have entered search criteria, select this button to initiate the search match. When the process finds possible matches, the page will display the Potential duplicates grid. When the search criteria is blank, or no potential matches are found, one of the following pages will open depending upon your Person and Job Installation - Person and Organization Page settings: When you enter person details that do not return a match, the values you entered will be added to the Person Data page by default. For example, if you add the person's first and last name and date of birth, the corresponding fields will auto populate with these same values. |
|
Add Person, Create Employee, Create Contingent Worker, or Create Person of Interest button |
The name of the button will vary based on the tile you used to access the this page. A button to add a person or organizational relationship will appear after you have performed a search match. Select this button to access the Person Data pages and begin the process to add the person. |
Potential duplicates
This grid box appear after you have entered Personal Details field values, selected the Search button, and the process has identified possible matches in the system.
The grid displays a list of likely Person Data records in the system that may match the person you are trying to add.
|
Field or Control |
Description |
|---|---|
|
Organizational Relationship link |
Select this link to access the (Fluid) Organizational Relationship Page to view a summary of a person's organizational relationships. You must have security access for this person to view the organizational relationship. |
|
|
Select this button to access the Person Data page (Modify Person component) in correction mode and make edits to a Person Data record already in the system. You must have security access for this person to edit the personal data. |
|
|
Select to access the Personal Data page in view mode to verify if this is the same person. You must have security access for this person to view personal data. |
 (Edit) button
 (View Person Details) button
Use the Request Details page (HR_CREATE_DTL_SCF) to enter a person's ID or employment record number.
Note: Availability of this page and what it displays is determined by the Person and Job Installation - Person and Organization Page settings for hiding the employee ID or record number. When the configurations are set to hide both the employee ID and employment record number, this page will not appear.
Navigation:
Select one of the following buttons from the Add Person Page.
Search (when search match is not used)
Add Person
Note: You can access this same page from the Create Employee Page (Create Employee button), Create Contingent Worker Page (Create Contingent Worker button), and Create Person of Interest Page (Create Person of Interest button).
This example illustrates the Request Details page when accessed from the Add Person tile.
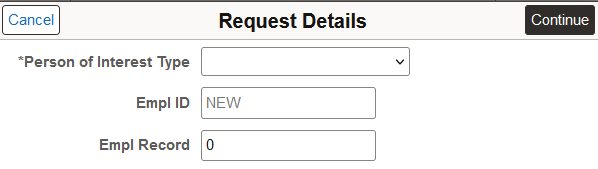
This example illustrates the Request Details page when accessed from the Create Person of Interest tile.
Use the Person and Job Installation - Person and Organization Page to configure if you want to hide or show the following fields.
|
Field or Control |
Description |
|---|---|
|
Person of Interest Type |
This field is available when you access the page from the Create Person of Interest tile. Select a person of interest type that is associated with a job. |
|
Empl ID (employee ID) |
This field is available when you access the page from the Add Person or Create <Organizational Relationship> tiles when the Allow hiding of Employee ID entry check box is deselected on the setup configuration page. (Auto ID assignment) If you are adding a new person and are using system-assigned IDs, the field displays the value NEW and assigns the ID after you save the Person Data record. (Manual ID entry) Enter an ID. The Person Data page displays the value you entered in the banner when you access the page. |
|
Empl Record (employment record) |
This field is available when you access the page from the Create <Organizational Relationship> tiles when the Allow hiding of Employee Record entry check box is deselected on the setup configuration page. Leave blank to have the system automatically enter the next sequential employment record number, or you can enter your own number. |
Use the Person Data page (PERSONAL_DATA_FL) to enter personal details, contact information, and regional information about a person in fluid.
Navigation:
Select the Continue button from the Request Details Page.
Select one of the following buttons from the Add Person Page (or Create <Organizational Relationship> pages) when the Empl ID and Empl Record fields are hidden.
Search (when search match is not used)
Add Person
Create Employee
Create Contingent Worker
Create Person of Interest
This example illustrates the Person Data layout in Fluid.
Use the Section Navigator panel on the left or the horizontal scroll to navigate through the different sections of this page.
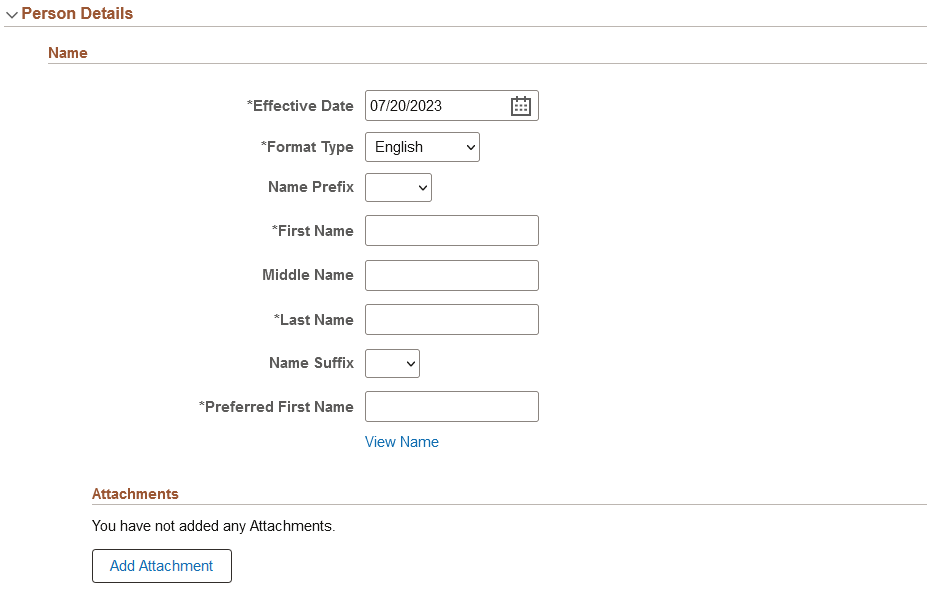
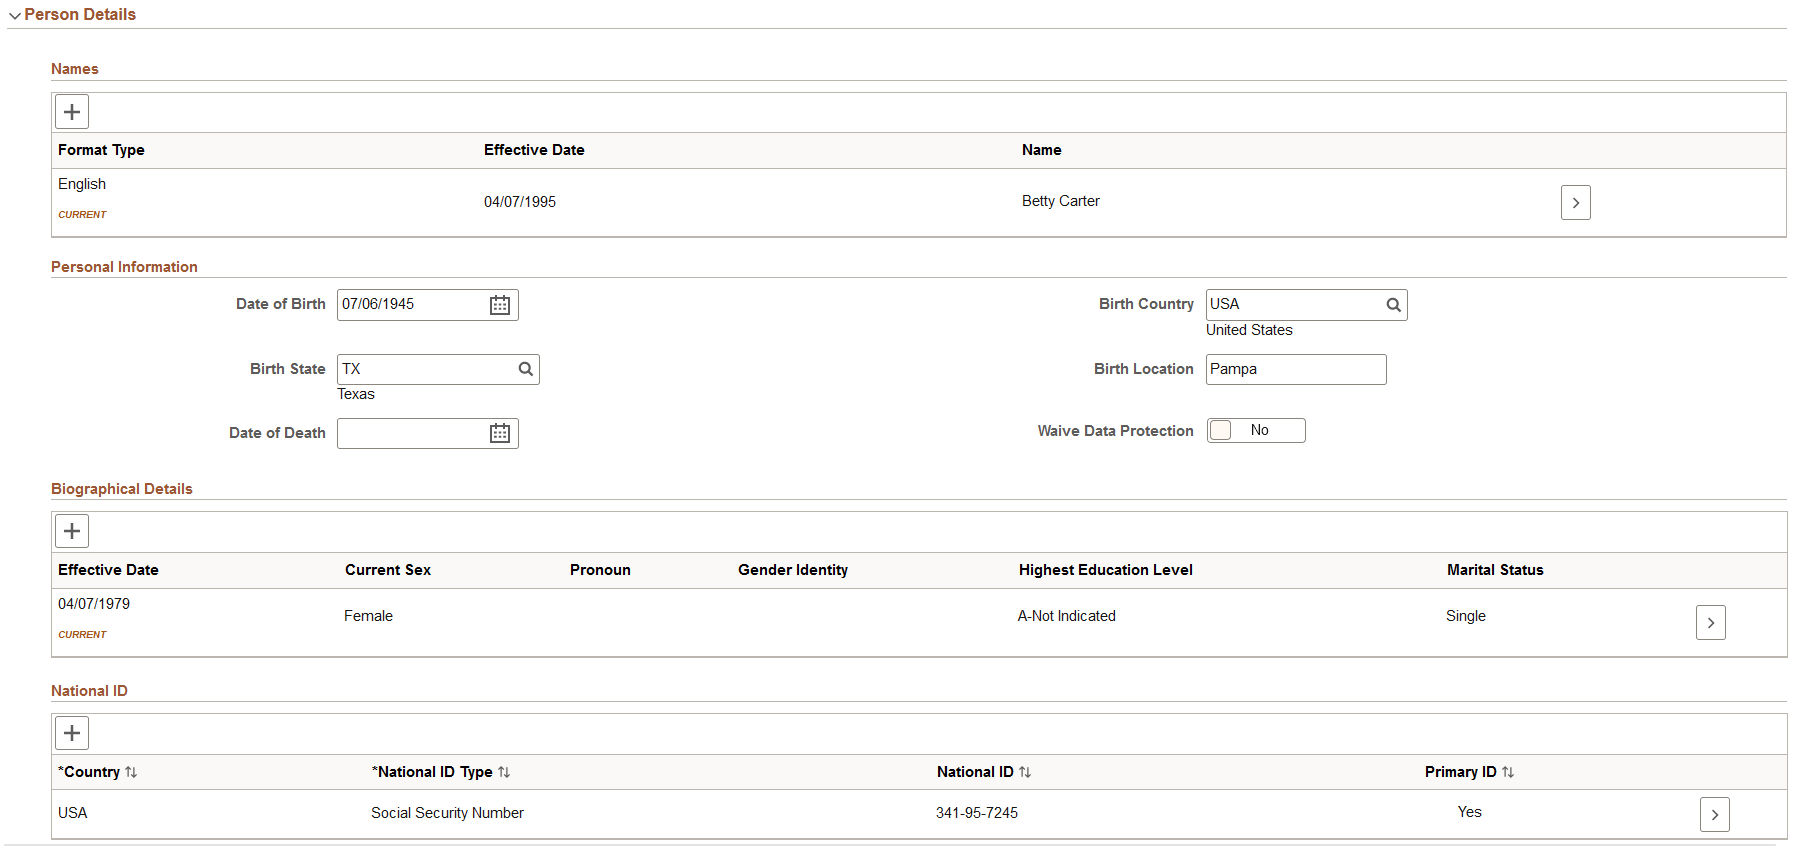
Use the Person Details section of the Person Data page (PERSONAL_DATA_FL) to enter name and other biographical information.
Navigation:
Navigate to the Person Details section on the Person Data Page in fluid.
This example illustrates the Personal Details section of the Person Data page (1 of 2).
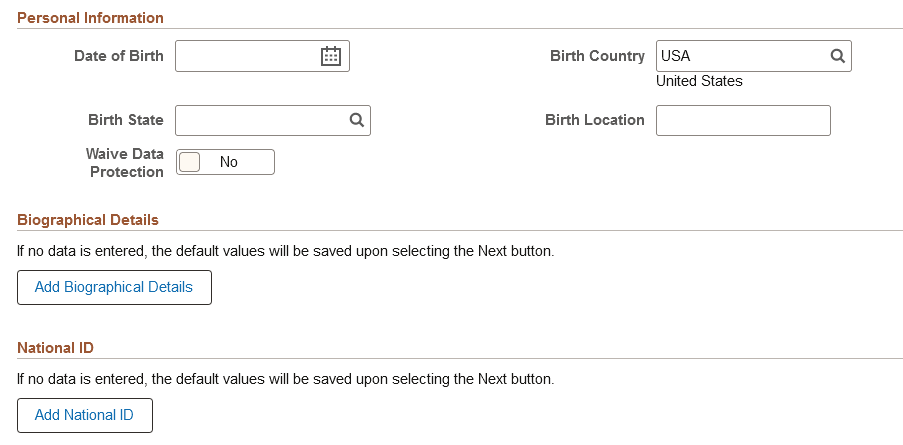
This example illustrates the Personal Details section of the Person Data page (2 of 2).
This example illustrates the Personal Details section of the Person Data page when you are modifying a person.
Name
Use this subsection to enter information about a person's name.
If you entered a person's name on the Add Person Page, the page will auto populate the name fields with that information, but you can overwrite those here.
|
Field or Control |
Description |
|---|---|
|
View Name link |
Select to view how the pages will show the display, formal, and full name throughout the system. |
When you are modifying a person, this section displays a grid showing historical rows. Select the Add (+) button to enter a new name rows, or the View (>) button to edit or delete a name row using the Name Page. When enabled, you can add attachments for each name row on this page.
Note: You cannot delete the initial name row.
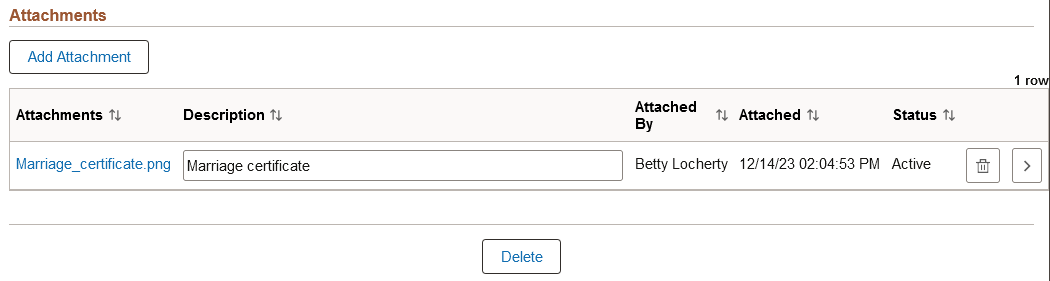
(Name) Attachments
This subsection is available when the Name check box is selected in the Person Data section on the Person and Job Installation - Person and Organization Page.
Use the Attachments subsection to provide additional documentation to support a person's name.
|
Field or Control |
Description |
|---|---|
|
Add Attachment button |
Select this button to open the File Attachment page and upload a file. After you have selected and uploaded the file, select Done to return to this page. |
|
Attachments link and Description |
Displays the uploaded file as an active link in the Attachments field. Enter a description of the file. The page will also display who uploaded the file and the date and time it was uploaded. |
The following video provides an overview and demonstration of the Fluid Attachment framework:
Personal Information
|
Field or Control |
Description |
|---|---|
|
Date of Birth |
If you entered a Date of Birth value on the Add Person Page, the page will auto populate this field with that information, but you can overwrite it here. Enter the person's date of birth. If you leave this field blank, a warning message appears during the validation process. Note: Although the birth date isn't required for the Administer Workforce business process, the system uses it to calculate a person's age in some benefit and payroll tasks. It also calculates dates, such as the U.K. expected retirement date, based on the person's age. |
|
Birth Country |
Select a country. Based on the selected country, the system might display additional fields, such as Birth State, Province, County, Prefecture, and so forth. |
|
Birth Location |
Enter a birth location, usually a city, town, or village. (BRA) If the selected birth country is BRA (Brazil), this field becomes a prompt field for cities. |
|
Date of Death |
This field does not appear during the hiring process. Use this field when updating a person's records. |
|
Waive Data Protection |
European community employment and personal privacy legislation specifies that personnel information can't be passed across countries in the European Union without authorization from the employee. Swipe to Yes if you obtain the employee's consent to share personal data with users in other European Union member nations. |
Biographic Details
|
Field or Control |
Description |
|---|---|
|
Add
Biographical Details or |
Select to access the Biographical Details Page and add details about a person's education level, marital status, gender and orientation details, and add supporting attachments. If you do not enter biographical details, the system will save the default values of unknown or not indicated for this person when you move to the next page in the activity guide process. |
|
Effective Date, Gender, Highest Education Level, and Marital Status |
These fields appears when Enable Gender Identity is deselected on the Installation Table - HCM Options Pageand you have added information on the Biographical Details page. |
|
Effective Date, Current Sex, Pronoun, Gender Identity, Highest Education Level, and Marital Status |
These fields appears when Enable Gender Identity is selected on the Installation Table - HCM Options Pageand you have added information on the Biographical Details page. |
|
|
This button is available when you have added information on the Biographical Details page. Select to access the Biographical Details page and view further details or make changes. |
 button
  (View Biographical Details) button
National ID
|
Field or Control |
Description |
|---|---|
|
Add
National ID or |
Select to open the National ID Page and enter details about the national identification number. If you do not enter nation ID information, the system will save the default values for this person when you select Next and move to the next page. |
|
Country, National ID Type, National ID, and Primary ID |
Displays these fields when you have added information on the National ID page. |
|
|
This button is available when you have added information on the National ID page. Select to access the National ID page and view further details or make changes. |
 button
 (View National ID) button
Use the Name page (HR_NM_EDIT_SCF) to enter name change information and view or add attachments to support the change.
Note: This page is available when you are modifying a person's data.
Navigation:
Select to add (+) or view (>) a name row in the Names sub-section of the Person Data Page - Person Details Section of this activity guide.
This example illustrates the Name page.

The fields on this page vary depending on the value in the Name Format field.
Attachments
This subsection is available when the Name check box is selected in the Person Data section on the Person and Job Installation - Person and Organization Page.
Use this section to manage attachments by uploading, deleting, or updating attachments.
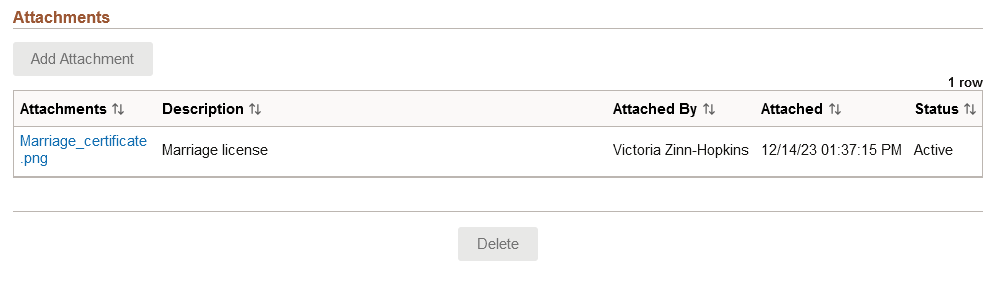
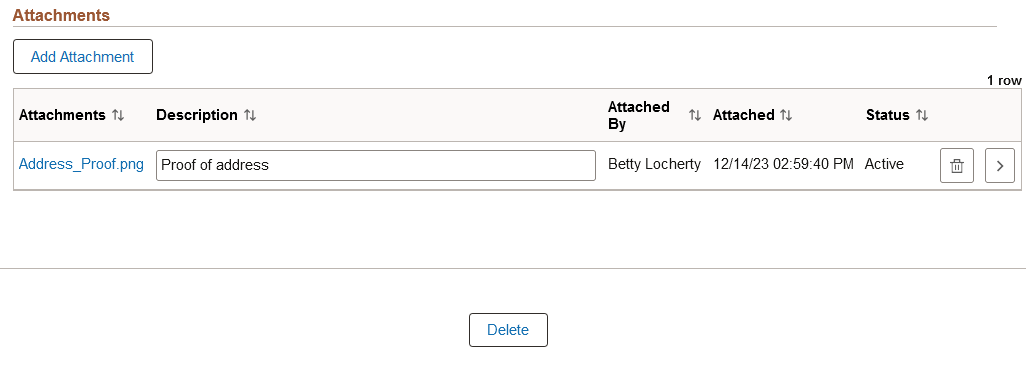
This example illustrates the Attachments section of the Name page when the administrator adds an attachment.
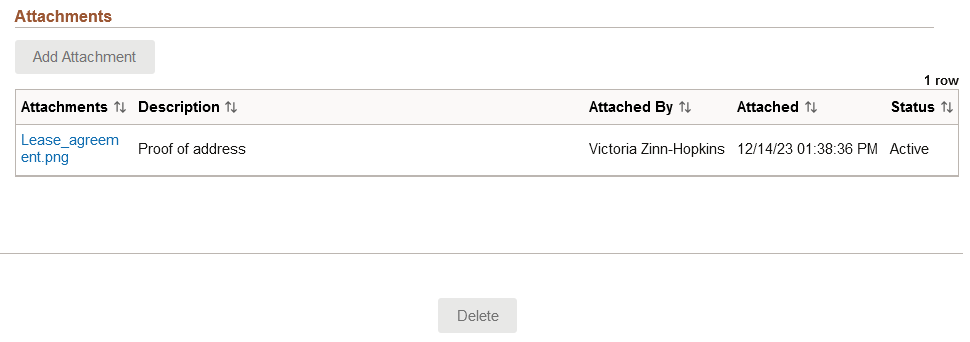
This example illustrates the Attachments section of the Name page when the employee uploads an attachment from self service.
|
Field or Control |
Description |
|---|---|
|
Add Attachment |
Select this button to access the File Attachment page and upload files. This button is not available when viewing an attachment that was uploaded by the employee on the Name (Detail) Page in self service unless in Correct History mode. |
|
Attachments |
Select the link to download and view the attachment. Enter a description, or the field will use the attachment file name as the description upon saving the page, which you can overwrite. |
|
Delete icon button |
Select this button to remove an attachment from the Name page. This button is not available when viewing an attachment that was uploaded by the employee on the Name (Detail) Page in self service unless in Correct History mode. |
The following video provides an overview and demonstration of the Fluid Attachment framework:
Use the Biographical Details page (HR_BIO_PD_SCF) to record details about a person's education level, marital status, gender and orientation details, and add supporting attachments.
Navigation:
Select the Add Biographical Details, + add, or the View Biographical Details (>) button on the Person Data Page - Person Details Section.
This example illustrates the Biographical Details page.

When you are adding a person for the first time, the effective date must be equal to the current name effective date.
|
Field or Control |
Description |
|---|---|
|
Highest Education Level |
Select the person's highest level of education. Note: (JPN) For Japanese education-level age-related pay calculations, a form of seniority pay, these values are linked to an education-level age basis as of hire. |
|
Marital Status and As of |
Select the person's marital status. Values are: Civil Partner, Common Law, DissDeclLost Civil Partner, Dissolved Civil Partnership, Divorced, Head of Household, Married, Separated, Single, Surviving Civil Partner, Unknown, and Widowed. Enter the effective of date for this marital status in the As of field. PeopleSoft Payroll doesn't use the marital status that is entered on this page for tax calculations. For U.S. employees, you enter that information in Maintain Payroll Data on the Federal, State, and Local Tax pages. Taxes for Canadian employees are based on net claim amount, which varies depending on the employee status. Note: Laws in the Netherlands require tracking effective-dated marital status information for employees. |
|
Language Code |
Select the person's native or preferred language. Although tracking official or preferred languages is required in some countries in PeopleSoft Human Resources, the system also uses the preferred language when you communicate with people with a relationship to the organization. For example, PeopleSoft Global Payroll for Germany and Switzerland use the language code to print paychecks in the payee's preferred language. Other types of communication also use this as the default language for written communication. Note: Don't use this field to record the organization's official language or to rate a worker's proficiency in speaking, reading, or writing various languages. Use the Location Table to track the organization's official language. Use the Languages table to record a worker's language proficiency. The Language Code field prompts from the LANG_CD table, which concerns the person's native or preferred language, and not from the LANGUAGE_CD table, which contains the languages into which the application can be translated. |
|
Alternate ID |
Use this field to record a second type of ID for a person. |
|
Full-Time Student |
Set to Yes if the person is a full-time student. |
|
Gender |
This field appears in this section when Enable Gender Identity is not enabled on the Installation Table. When this feature is enabled, the page will display the Gender and Orientation Details section where you will record gender information. Select the person’s gender. By default, the value is set to Unknown. Note: (BRA) You must specify the person’s gender (Male or Female) for eSocial reporting to work properly. |
Gender and Orientation Details
Note: This section appears when Enable Gender Identity is selected on the Installation Table - HCM Options Page. This allows administrators and employees to track gender identity details in Personal Data. This functionality is delivered turned off.
When you or a manager approves a gender update from an employee, the system will insert a new Biographical Details effective dated row. However, if you do not allow the employee to update and submit gender details, you need to insert a new effective dated row here to retain historical information. See also Pending Approvals - Gender Identity Change Page.
Gender details are specific to an individual and a person can choose to identify all gender details or just a few. Employees can update their own details on the fluid self service Personal Details - Gender Details Page when they have been assigned the Fluid Dashboard - Person Dtls role and granted access to update the fields. Employees must also be part of a regulatory region that is configured for gender identity (see configuration on the Gender Details Page).
Note: Unless otherwise noted, the values for these fields are defined on the setup Gender Details Page.
|
Field or Control |
Description |
|---|---|
|
Regulatory Region |
Enter a region that is configured for gender identification.The valid values for the remaining fields are based on the regulatory region you enter here. Important! The regulatory region for gender details should align with the regulatory region assigned to a person's primary job on the Work Location Page. The employee self service Gender Identity Page and Gender Details Page use the regulatory region from Job Data to manage gender details. If this region varies from that in Job Data, the Gender Identity page will display the current information from this section. However, the employee will not be able to edit information that is tied to a regulatory region different from that stored in Job Data. Instead, the page will display an + (Add) button for the employee to enter gender details using the regulatory region associated with the employee's primary job. |
|
Current Sex (label name may vary) |
This is the only required field in the Gender and Orientation Details section. Select the person’s current sex. By default, the value is set to Unknown. Valid values come from the translate table and are not tied to region. Note: This field label is configurable on the Gender Configuration Page. Current Sex is the new label delivered by default, but this value can also be overwritten. |
|
|
Select this icon to access the <Gender Field Label> Values Page and view descriptions of values for gender-related fields. This displays the values entered by region on the configuration Gender Details Page. |
|
Birth Sex |
Enter the sex assigned at birth. |
|
Pronoun |
Select the pronouns this person prefers to be called. Note: When you enter this information, and the system is configured to show pronouns, the pronouns will display next to the employee's name on the Company Directory - Profile pages in fluid (see Using the PeopleSoft Fluid User Interface for the Company Directory). To configure the Company Directory to display pronouns in fluid, see the Chart and Profile Settings - Profile Content Page. |
|
Sexual Orientation |
Enter this individuals inherent attraction to a sexual partner of a certain gender. |
|
Gender Identity |
Enter the person's inner sense or self perception of being male, female, a blend of both or neither. One's gender identity can be the same or different from their sex assigned at birth or current sex. |
These videos provide an overview of the gender identity functionality:
Video: Image Highlights, PeoleSoft HCM Update Image 41: Gender Identity and Expression
Considerations when Entering Gender and Orientation Details
Since gender information is driven by region and an administrator's security access, there are situations that will impact what gender fields you can access.
Assuming all setup has been done to support recording gender details, consider the following scenarios in regards to the regulatory region assigned to the employee on the Job Data - Work Location Page and your security access:
You have row level and global security access to a region configured for gender identification (for example, USA). You can:
Search for employees in the USA regulatory region.
See and select USA as a regulatory region within Biographical History: Gender and Orientation Details section of Personal Data.
See the gender identity fields for the USA region.
See the modified Gender label as Current Sex, if applicable.
You have row level and global security access to a region configured for gender identification and one not configured for gender identification (for example, USA and MYS respectively). You can:
Search for employees in the USA and MYS regions.
See the gender identity fields for USA employees and see the modified Gender label as Current Sex, if applicable.
NOT see the gender identity fields for MYS employees, or see the modified Gender label as Current Sex, if configured as such.
You have row level security for USA (which is configured for gender identification) and MYS (which is not configured for gender identification), but you have global security for MYS only. You can:
Search for employees in the USA and MYS regions.
NOT see the gender identity fields for USA employees in person data, or see the modified Gender label as Current Sex, due to global security.
NOT see the gender identity fields for MYS employees in personal data, or see the modified Gender label as Current Sex, due to MYS not being a gender configured region.
(Biographical Details) Attachments
This section is available when the Biographical check box is selected in the Person Data section on the Person and Job Installation - Person and Organization Page.
Use the Attachments section to provide additional documentation to support a person's biographical information.
This example illustrates the Attachments section of the Biological Details page when the administrator adds an attachment.
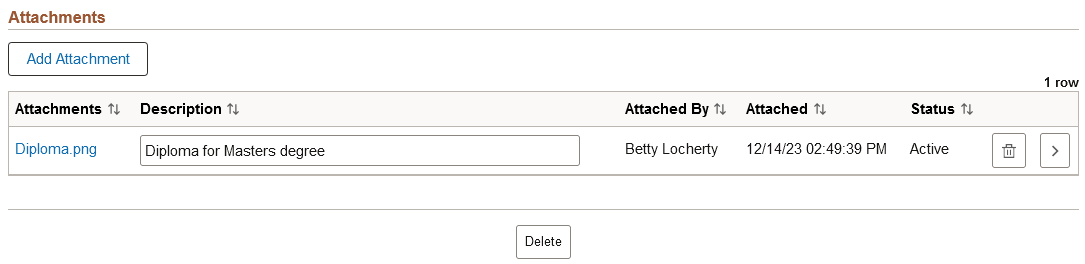
This example illustrates the Attachments section of the Biological Details page when the employee uploads an attachment from self service.

|
Field or Control |
Description |
|---|---|
|
Add Attachment button |
Select this button to open the File Attachment page and upload a file. After you have selected and uploaded the file, select Done to return to this page. This button is not available when viewing an attachment that was uploaded by the employee on the Gender Details Page in self service unless in Correct History mode. |
|
Attachments link and Description |
Displays the uploaded file as an active link in the Attachments field. Enter a description of the file. The page will also display who uploaded the file and the date and time it was uploaded. |
|
Delete icon button |
Select this button to remove an attachment from the Biological Details page. This button is not available when viewing an attachment that was uploaded by the employee on the Gender Details Page in self service unless in Correct History mode. |
Use the <Gender Field Label> Values page (HR_GENDER_DTL_SCF) to view gender field value descriptions.
Note: The page title and information correlates to the gender field label, such as Birth Sex Values page or Pronoun Values page.
Navigation:
Select the  (Information) icon for a gender field on the Biographical Details Page.
This example illustrates the Birth Sex Values page. Other <Gender Field Label> Values pages display similar information.
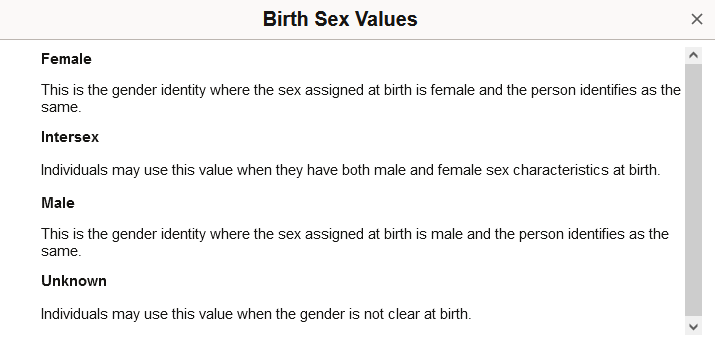
Page content will vary by gender field type and the configuration of the Gender Details Page for the region.
Use the National ID page (HR_NID_PD_SCF or HR_NID_PD_VW_SCF) to enter national ID information for a person and add supporting attachments.
Navigation:
Select the Add National ID, + add, or View National ID (>) button on the Person Data Page - Person Details Section.
This example illustrates the fields and controls on the National ID page.
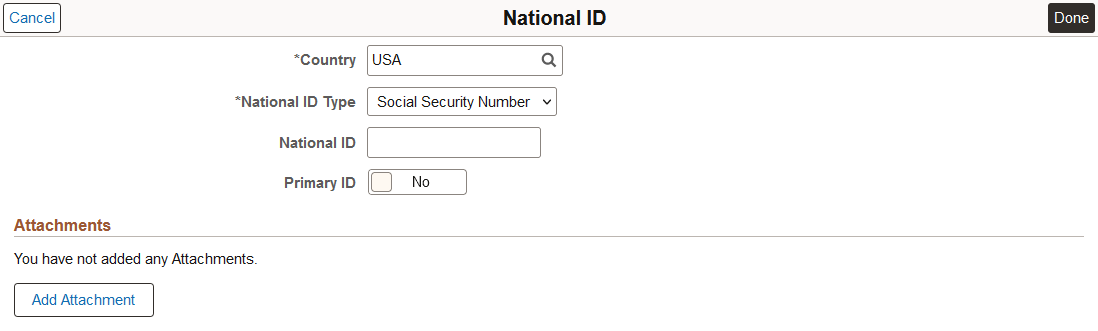
National ID
|
Field or Control |
Description |
|---|---|
|
Country |
Select the country that issued the worker's national ID. |
|
National ID Type |
The system enters the value that you establish for this country on the National ID Type Table page. You can override this default. Add new rows to enter one or more ID types for a person. Note: (BRA) Changes made to a Brazilian person's CTPS - Work Card and PIS national ID types will be recorded on the National ID History page. |
|
National ID |
Enter the worker's national ID number. The system checks the format of the entry against the default format that you enter on the National ID Type Table page. (GBR) For the U.K. the normal format of two letters followed by six digits and then one letter for National Insurance identification appears by default. Other options that are dependent on employee status are available. (GBR) When you enter a national insurance number, the system uses the NID Prefix GBR page to check that you have entered a valid national insurance prefix. You can't save this page if you have entered an invalid national insurance prefix. |
|
Primary ID |
Set to Yes if the national ID is the person's primary ID. If this is the only data row for this person, the system selects it as Yes by default. You can deselect it. |
|
Tax Ref |
(SGP) Set to Yes if the worker's national registration ID is used as the person's employer tax reference number. This field is for information only. |
|
National ID Expiry Date |
(CAN) Enter the expiration date for this national ID. |
Consider the following country specific national ID information:
(CAN) Verifying Social Insurance Numbers for Canadian Employees
Invoke a modulus 10-check digit formula to verify an employee's social insurance number (SIN), if needed. The formula follows federal standards for using the ninth digit in an employee SIN to verify the number.
If you enter an employee SIN that doesn't match the check digit that is calculated by the formula, an error message appears.
(NLD) Verifying Social Security IDs for Dutch Employees
The Dutch national ID is commonly called the SoFi (Social/Fiscal) number. You can invoke the 11-check digit formula to verify a Dutch employee's SoFi number. The 11-check formula is a mathematical formula that evaluates the entry for the employee's social security ID and verifies that the result of the calculation is 11, to determine whether the national insurance/social security ID has a valid format.
(USA) Reporting to Government Agencies When the Social Security Number Is Unknown
When the social security number (SSN) is missing, the system enters the default number that is defined on the National ID Type table, usually all 9s. However, reports and files that are created by PeopleSoft Payroll for North America for submission to government agencies, such as the IRS or Social Security Administration, convert missing or unknown SSNs to the specific format that is required by the government agency. For example, a missing or unknown SSN is reported to the IRS using all zeros on the W-2 file.
(National ID) Attachments
This section is available when the National ID check box is selected in the Person Data section on the Person and Job Installation - Person and Organization Page.
Use the Attachments section to provide additional documentation to support a person's national ID information.
|
Field or Control |
Description |
|---|---|
|
Add Attachment button |
Select this button to open the File Attachment page and upload a file. After you have selected and uploaded the file, select Done to return to this page. |
|
Attachments link and Description |
Displays the uploaded file as an active link in the Attachments field. Enter a description of the file. The page will also display who uploaded the file and the date and time it was uploaded. |
Use the Contact Information section of the Person Data page (PERSONAL_DATA_FL) to enter or edit a person's contact information.
Navigation:
Navigate to the Contact Information section on the Person Data Page in fluid.
This example illustrates the Contact Information section of the Person Data page.
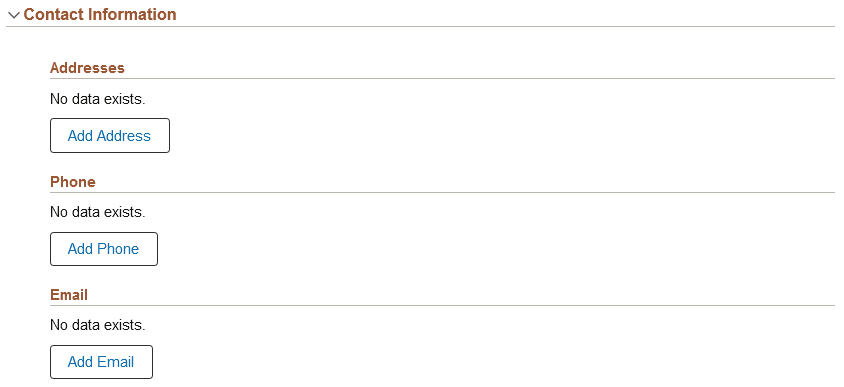
Use this section to enter or view address, phone, and email information for the person. After you have added these details, the corresponding subsection will display a grid showing a summary of the information.
Addresses
|
Field or Control |
Description |
|---|---|
|
Display History |
This option is available when you access and existing record from the Modify Person Tile or access and existing person record. Set to Yes to display all historical address rows. Set to No to show only the current row for each address type. |
|
Add
Address or |
Select to open the Add (or Edit) Address Page and enter address details for this person. |
|
Address Type, Effective Date, and Address |
Displays these fields when you have added information on the Address page. |
|
|
This button is available when you have added information on the Address page. Select to access the Edit Address page and view additional details or make changes. |
 button
 (Add/Edit address) button
Phone
|
Field or Control |
Description |
|---|---|
|
Add
Phone or |
Select to open the Phone Number Page and enter phone numbers for this person. |
|
Type, Number, Extension, and Preferred |
Displays these fields when you have added information on the Phone Number page. If this is the only phone number row for this person, the system selects it as the preferred number by default. You can deselect it on the Phone Number page. |
|
|
This button is available when you have added information on the Phone Number page. Select to access this page and view or make changes to the number. |
 button
|
Field or Control |
Description |
|---|---|
|
Add
Email or |
Select to open the Email Address Page and enter details about an address. |
|
Country, National ID Type, National ID, and Primary ID |
Displays these fields when you have added information on the Email Address page. If this is the only email row for this person, the system selects it as the preferred email by default. You can deselect it on the Email Address page. |
|
|
This button is available when you have added information on the Email Address page. Select to access the National ID page and view or make changes. |
 button
Use the Add (or Edit) Address page (HR_ADD_ADDRESS_SCF or HR_ADDRESS_SCF) to add or manage addresses for a person.
Note: This page title will also display as the Add Another Address or Edit Address page, depending on how you access the page.
Navigation:
Navigate to the Contact Information section on the Person Data Page in fluid and select the Add Address button, Add (+) button, or Add/Edit address (>) button.
This example illustrates the Add Address page.
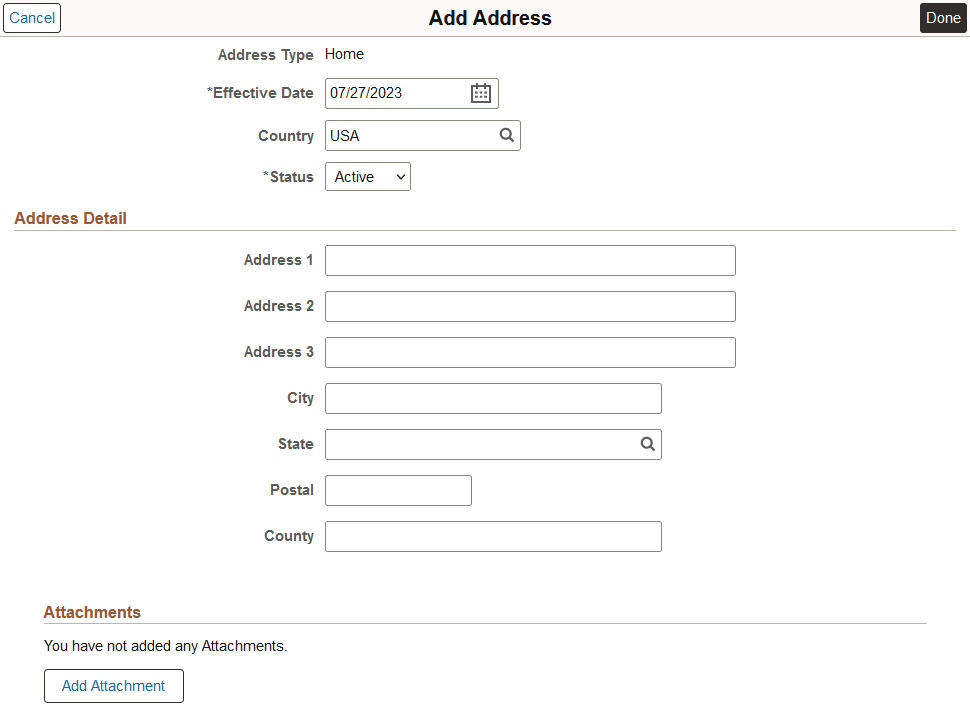
Note: The page layout and options vary depending on the value in the Country field.
|
Field or Control |
Description |
|---|---|
|
Address Type |
Select the type of address you are adding. The system automatically displays Home for the first address that you enter. Note: Payroll for North America requires the person to have one address with type Home to successfully calculate taxes. You must set up each Puerto Rico employee's home address with country code USA and state code PR for proper tax reporting. You can add multiple address types, such as home, mailing, or preferred. |
|
Delete button |
This button is available when you are accessing an existing address row added by the administrator. |
Note: When entering certain country addresses, use the Address Search link in the Address Detail section of the page to locate valid cities based on other information on the page.
Note: Laws in Belgium, the Netherlands, and Japan require maintaining effective-dated address information for employees.
(Address) Attachments
This section is available when the Address check box is selected in the Person Data section on the Person and Job Installation - Person and Organization Page.
Use the Attachments section to provide additional documentation to support a person's address information.
This example illustrates the Attachments section of the Address page when the administrator adds an attachment.
This example illustrates the Attachments section of the Address page when the employee uploads an attachment from self service.
|
Field or Control |
Description |
|---|---|
|
Add Attachment button |
Select this button to open the File Attachment page and upload a file. After you have selected and uploaded the file, select Done to return to this page. This button is not available when viewing an attachment that was uploaded by the employee on the <Type> Address (Detail) Page in self service unless in Correct History mode. |
|
Attachments link and Description |
Displays the uploaded file as an active link in the Attachments field. Enter a description of the file. The page will also display who uploaded the file and the date and time it was uploaded. |
|
Delete icon button |
Select this button to remove an attachment from the Address page. This button is not available when viewing an attachment that was uploaded by the employee on the <Type> Address (Detail) Page in self service unless in Correct History mode. |
Use the Phone Number page (HR_ADD_PHONE_SCF) to enter or edit a person's phone number information.
Navigation:
Navigate to the Contact Information section on the Person Data Page in fluid and select the Add Phone button, Add (+) button, or Edit (>) button for the phone.
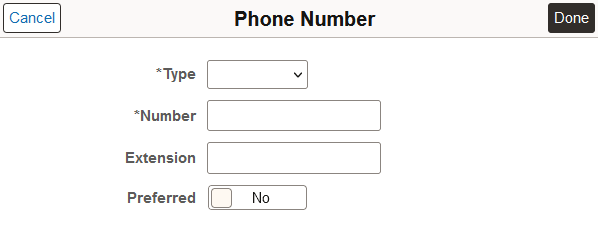
This example illustrates the Phone Number page.
|
Field or Control |
Description |
|---|---|
|
Phone Type |
Select the phone type, such as Business, Home, or Mobile. |
|
Number and Extension |
Enter the phone number. The system formats the number based on the standard phone number format. For 10 digit phone numbers the format is 000/000-0000 and for 7 digit phone numbers the format is 000-0000. The system also supports alphanumeric characters and the punctuations $, -, /, (, and ) when entering telephone numbers. |
|
Preferred |
Set to Yes if the number is the person's primary phone contact. If this is the only data row for this person, the system selects it as Yes by default. You can deselect it. |
Use the Email Address page (HR_PERS_EMAIL_SCF) to enter or edit a person's email information.
Navigation:
Navigate to the Contact Information section on the Person Data Page in fluid and select the Add Email button, Add (+) button, or Edit (>) button for the email.
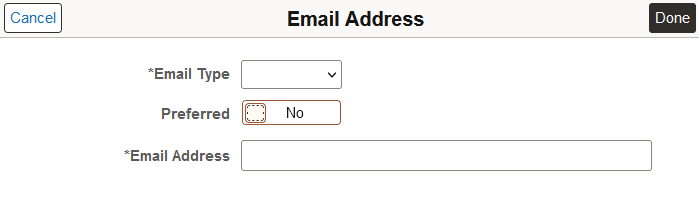
This example illustrates the Email Address page.
|
Field or Control |
Description |
|---|---|
|
Email Type and Email Address |
Select an email type and enter the employee's email address. |
|
Preferred |
Set to Yes if it is the person's primary email contact. If this is the only data row for this person, the system selects it as Yes by default. You can deselect it. |
Use the Regional section of the Person Data page (PERSONAL_DATA_FL) to enter country-specific personal information.
Note: Subsections that appear within this section are controlled by user permission lists.
Navigation:
Navigate to the Regional section on the Person Data Page in fluid.
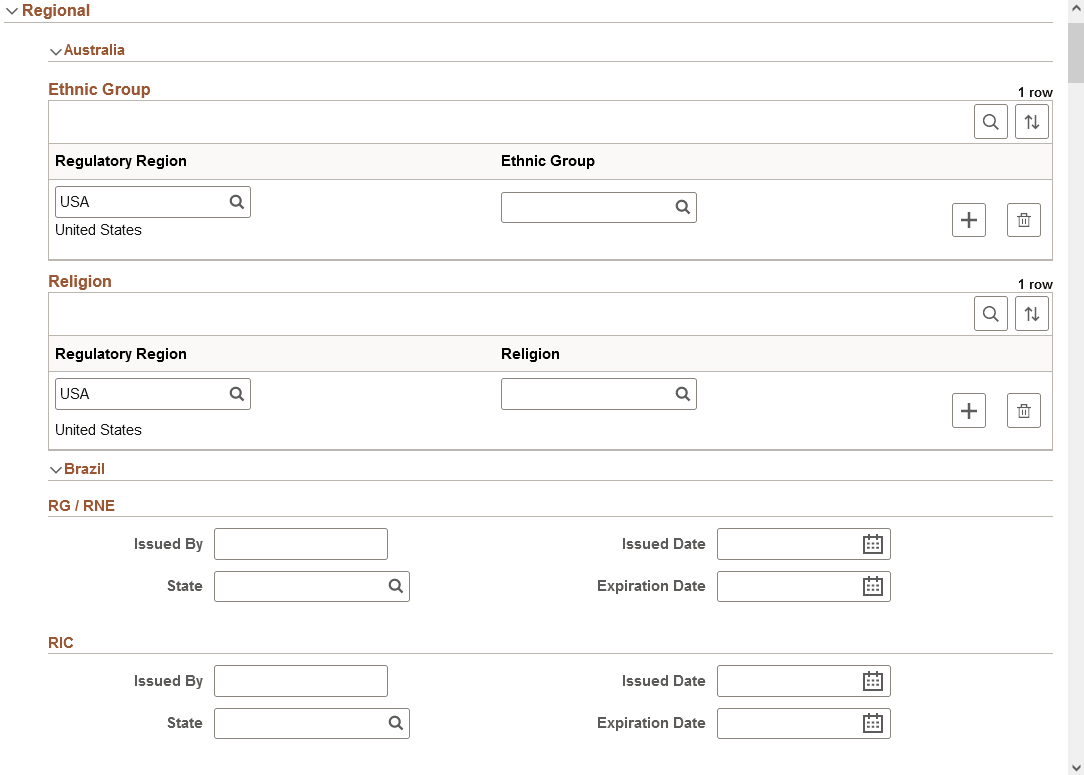
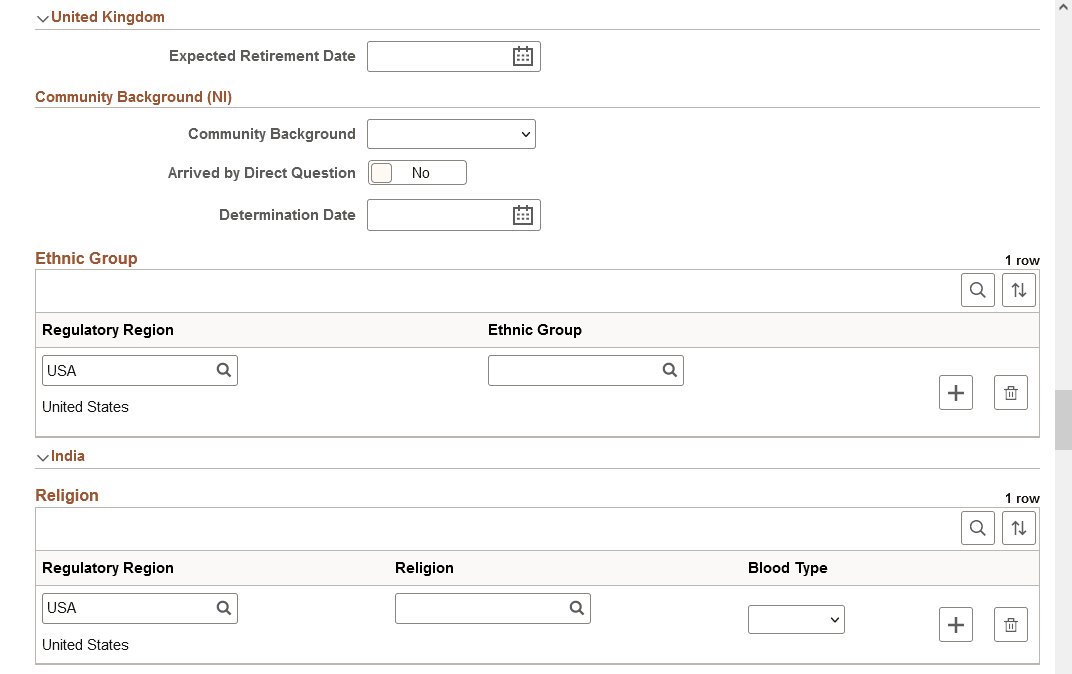
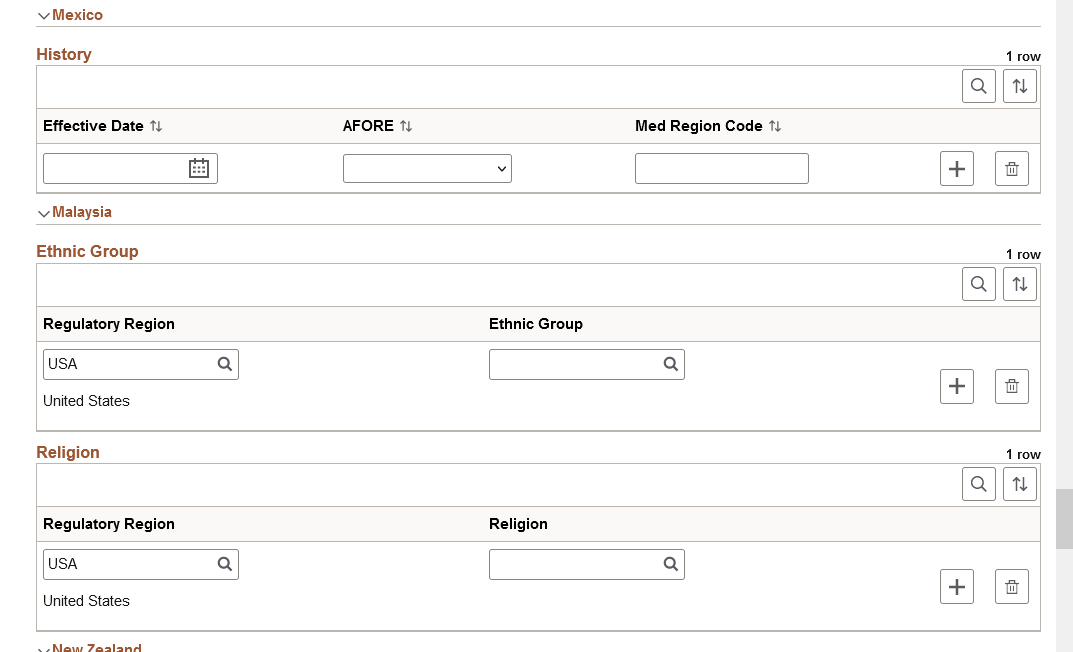
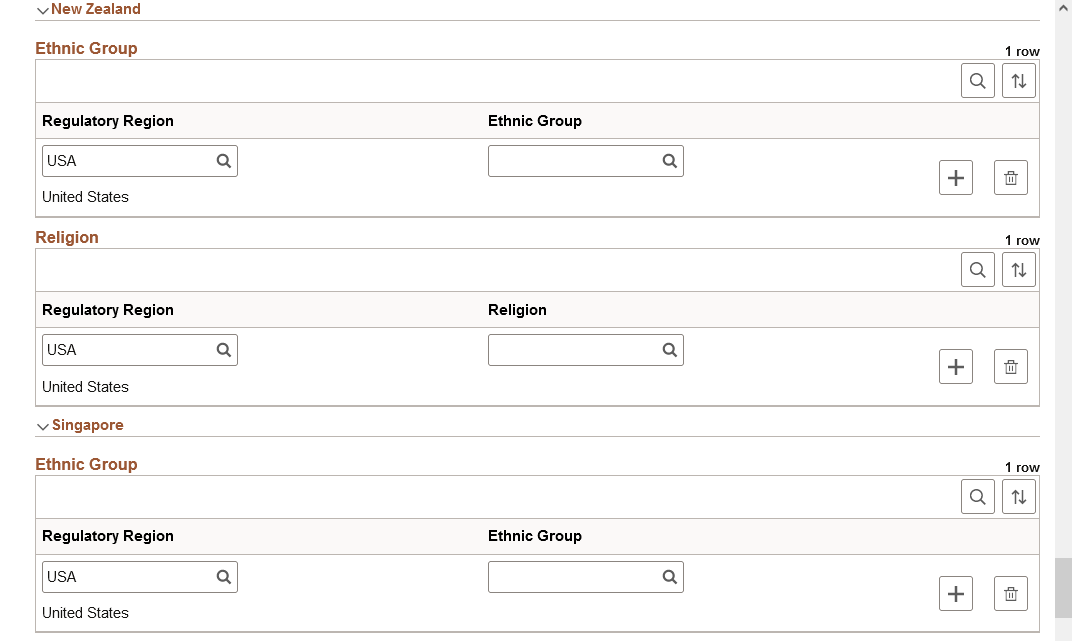
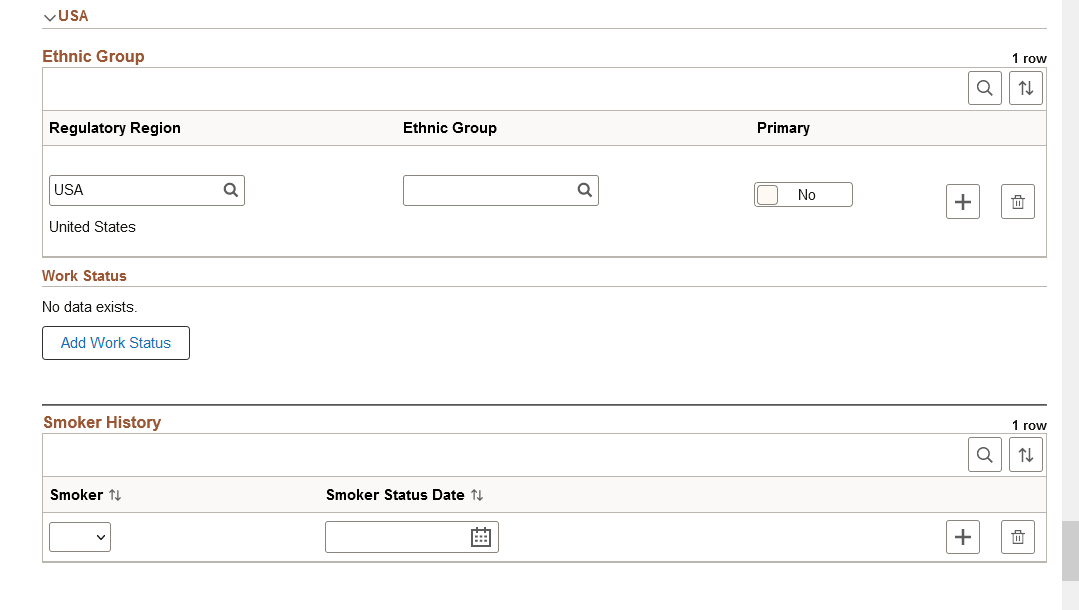
This example illustrates the Regional section of the Person Data page (1 of 12). You can find definitions for the fields and controls later on this page.
This example illustrates the Regional section of the Person Data page (2 of 12). You can find definitions for the fields and controls later on this page.

This example illustrates the Regional section of the Person Data page (3 of 12). You can find definitions for the fields and controls later on this page.

This example illustrates the Regional section of the Person Data page (4 of 12). You can find definitions for the fields and controls later on this page.
This example illustrates the Regional section of the Person Data page (5 of 12). You can find definitions for the fields and controls later on this page.
This example illustrates the Regional section of the Person Data page (6 of 12). You can find definitions for the fields and controls later on this page.
This example illustrates the Regional section of the Person Data page (7 of 12). You can find definitions for the fields and controls later on this page.
This example illustrates the Regional section of the Person Data page (8 of 12). You can find definitions for the fields and controls later on this page.

This example illustrates the Regional section of the Person Data page (9 of 12). You can find definitions for the fields and controls later on this page.
This example illustrates the Regional section of the Person Data page (10 of 12). You can find definitions for the fields and controls later on this page.
This example illustrates the Regional section of the Person Data page (11 of 12). You can find definitions for the fields and controls later on this page.

This example illustrates the Regional section of the Person Data page (12 of 12). You can find definitions for the fields and controls later on this page.
Local country laws that require employers to verify a person's nationality and eligibility to work in that country might require information that you enter here. Much of the data that you enter is required for regulatory reporting in PeopleSoft Human Resources.
Comment Elements Across Countries
|
Field or Control |
Description |
|---|---|
|
Regulatory Region and Ethnic Group |
Select an ethnic group. You set up ethnic groups on the Ethnic Groups page. (AUS) Affirmative action reports and the ATSI (Aboriginal and Torres Strait Islander) code come from this page. (GBR) Values are based on U.K. equal opportunity ethnic categories. (USA) Values are based on U.S. Federal Equal Employment Opportunities ethnic categories. Use ethnic group information to compile the establishment's affirmative action plan and to generate several equal employment opportunity (EEO) reports. |
|
Regulatory Region and Religion |
Enter the person's religion. In (MYS) Malaysia, (THA) Thailand, and (SGP) Singapore, you use the Ethnic Group and Religion fields for eligibility and calculation of festive advances. |
|
Smoker and As of |
Indicate if the person is a smoker and enter the date on which the person started smoking. A person's smoker status affects benefits eligibility and rate determination in PeopleSoft Human Resources (HR) Manage Base Benefits and is required for regulatory reporting. |
|
Military Status |
Enter the person's military status. Note: Employees can enter and update their own military status in self service, on the Veteran Status Page. |
(AUS) Australia
See the Comment Elements Across Countries section on this page discussion.
(BRA) Brazil
Information entered in this section is used in eSocial reporting.
|
Field or Control |
Description |
|---|---|
|
(RG/RNE) Issued By |
Enter the Registro Geral (RG) or Registro Nacional de Estrangeiros (RNE) issuing entity. This information is required if you enter the individual's general registry or foreigner ID number on the National ID Page. |
|
Issued Date and State |
Enter this information, which is required if you enter the individual's general registry or foreigner ID number. |
|
Expiration Date |
Enter the expiration date for the listed entity. |
|
(RIC) Issued By |
Enter the Registro de Identidade Civil (RIC) issuing entity. This information is required if you enter the individual's civil registry number on the National ID Page. |
|
Issued Date and RIC State |
Enter this information, which is required if you enter the individual's RIC number. |
|
Expiration Date |
Enter the expiration date for the listed entity. |
|
(CTPS) Series |
Enter the work card number. |
|
Issued Date |
Enter the work card's issued date. This information is required if a Carteira de Trabalho e Previdência Social (CTPS) number is provided. |
|
State |
Enter the political subdivision of the CTPS issuing agency. This information is required if a CTPS number is provided. |
|
Expiration Date |
Enter the expiration date for the listed entity. |
|
(Voter Data) Zone, Section, City, and State |
Enter this information, which is required if a voter registration card is provided. |
|
(Military Data) Series, Region, and Category |
Enter this information, which is required if a reserve certificate is provided. |
|
State |
Enter the political subdivision of the issued reserve certificate. This information is required if a reserve certificate is provided. |
|
Cert Type (certificate type) |
Enter the type of military service. Values are: Aeronautic, Army, Marine, or Other. This information is required if a reserve certificate is provided. |
|
(PIS/PASEP) Issued Date |
Enter the date of issuance at PIS / PASEP. This information is required if the PIS/PASEP number is provided on the National ID Page. |
|
(Class Entity Registration) Issued By |
Enter the class entity registration issuing entity. This information is required if you enter the individual's class entity number on the National ID Page. |
|
Issued Date and State |
Enter this information, which is required if you enter the individual's class entity number. |
|
Expiration Date |
Enter the expiration date for the listed entity. |
|
(History)
Add
History or
|
Select an add button to access the (BRA) History Page and add historical details about a person's ethnicity, blood type, education, residency, and so forth. The Edit > button is available when you have added information on the Brazilian History page. Select to access the History page and view additional details or make changes. |
|
Effective Date, Regulatory Region, Ethnic Group, Country of Nationality, and Residence Period |
Displays these fields when you have added information on the Brazilian History page. |
(CAN) Canada
|
Field or Control |
Description |
|---|---|
|
Self Identification Data link |
Select this link to access the (CAN) Canada Self IdentificationData Page, where you enter ethnic background information for the person. This link is visible only to users with access to the Canada Self IdentificationData page. To secure this page and protect the confidentiality of the ethnicity data, you can use the delivered permission list HCCPHR40CA and the delivered role HR Admin CAN Confdl Data. |
|
Bilingualism Code |
Record the appropriate code for the person. If the Official Languages Act applies to the organization, use the bilingualism code as part of the Official Languages reports (PER102CN and PER108CAN) that you submit to the government. |
|
Health Care Number and Health Care Province |
Enter a number and select the health care province. |
(CHE) Switzerland
|
Field or Control |
Description |
|---|---|
|
Guardian |
Minors who are age 18 or younger or people with mental illness must have a parent or guardian sign employment contracts on their behalf. Enter the name of the parent or guardian who is authorized to act for this employee. |
|
Place of Origin |
Enter a place of origin. Every Swiss person has at least one place of origin, usually determined by the father or husband's birthplace. |
|
Main Origin |
Swipe to Yes if the place of origin in the Place of Origin field is the person's main place of origin. (A person can have more than one place of origin.) |
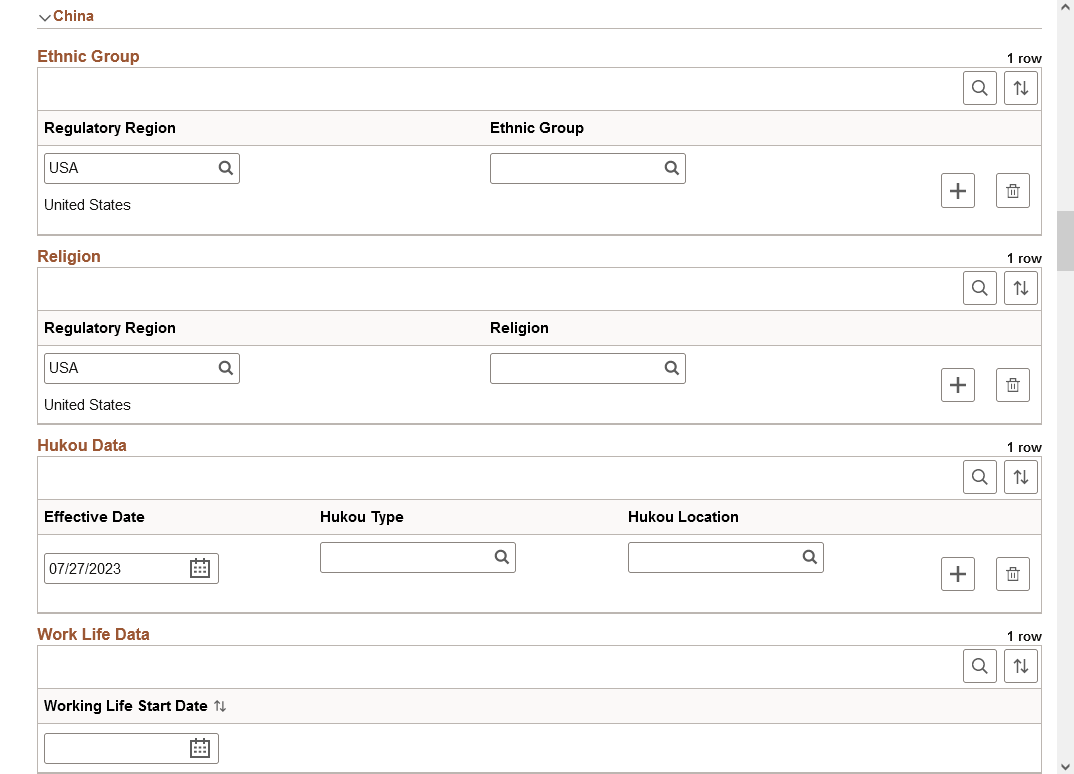
(CHN) China
Also see the Comment Elements Across Countries section within this page discussion.
|
Field or Control |
Description |
|---|---|
|
Hukou Type and Hukou Location |
Enter the person's Hukou type and locatoin. |
|
Working Life Start Date |
Enter the date on which the person first began to work. |
|
Working & Living Status |
Enter the status of the worker's working and living permit. Values are: Expired, Granted, and Renewed. |
|
Issue Date |
Enter the date on which the working and living permit was issued. |
|
Renew Date |
Enter the date on which the working and living permit was renewed. |
|
Expiration Date |
Enter the date on which the working and living permit expires. |
|
Political Status |
Enter the person's political status. |
|
Native Place |
Enter the town or city or area that a person is from, especially the one in which they were born and lived while young. |
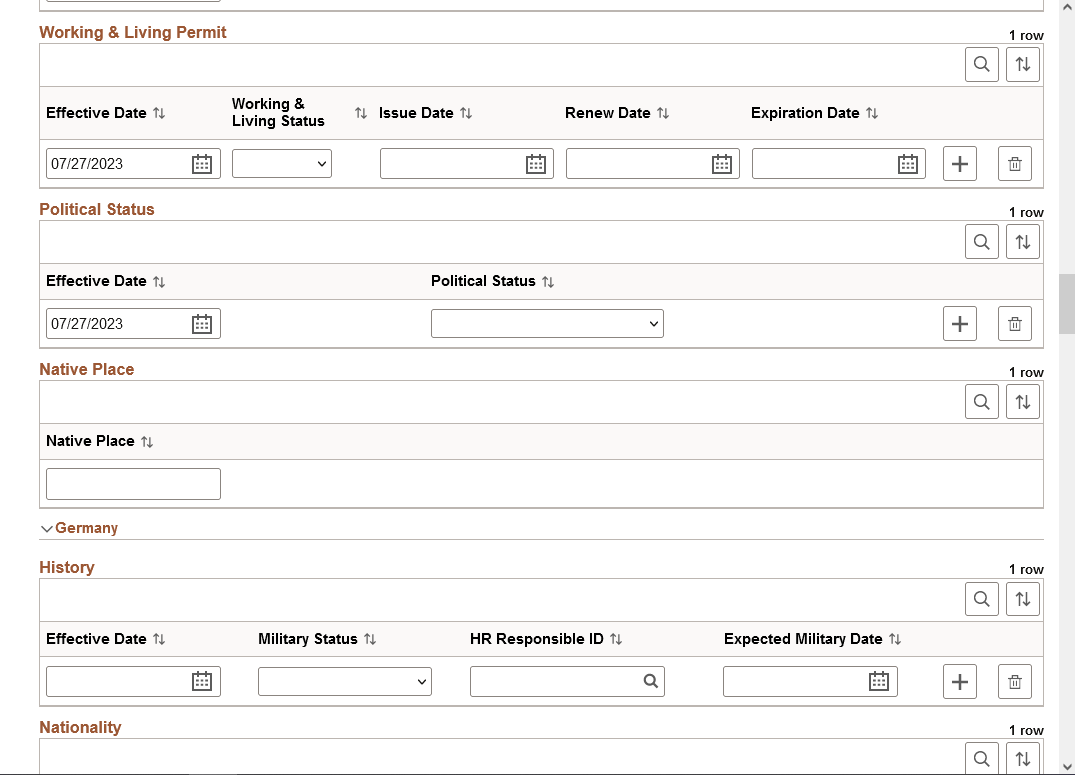
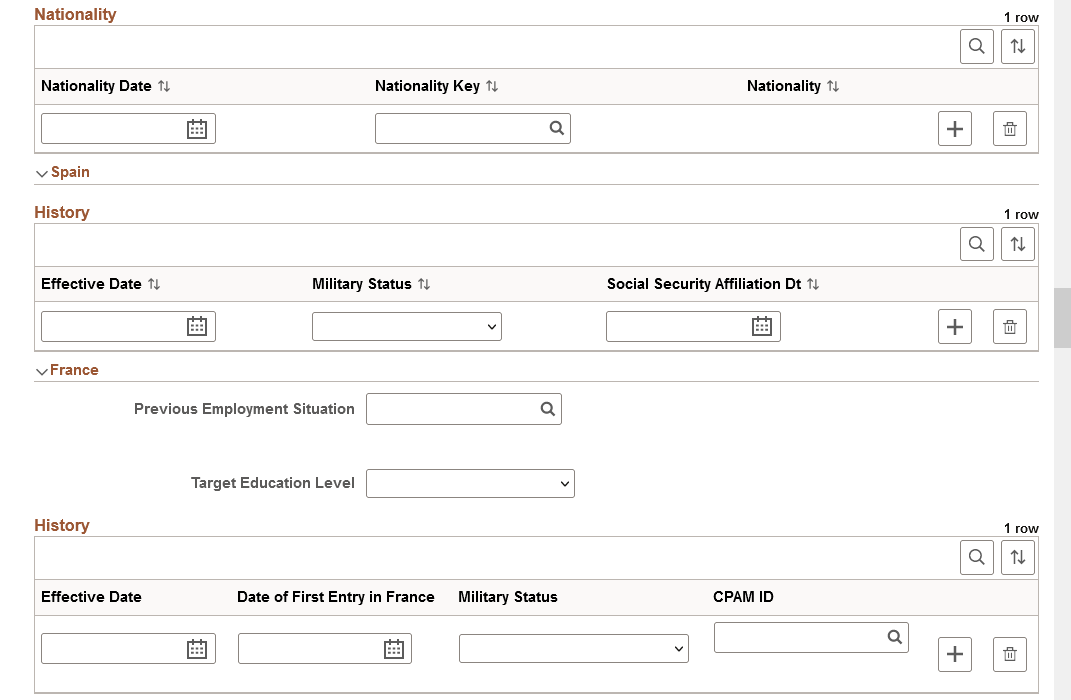
(DEU) Germany
Also see the Comment Elements Across Countries section within this page discussion.
|
Field or Control |
Description |
|---|---|
|
HR Responsible ID |
Select the ID of the human resources representative responsible for this person. |
|
Expected Military Date |
If the person hasn't already completed military service, enter the date when service is expected to begin. |
|
Nationality Date |
Enter the effective date of the person's nationality status. If the employee is a native citizen of the country, enter the person's birth date. If the person is a naturalized citizen, enter the date on which the person became a citizen. |
|
Nationality Key and Nationality |
Enter the person's nationality by selecting a nationality key code. German labor laws require recording an employee's nationality to determine if the employee is eligible to work in certain industries, particularly those that are related to technology or defense. Use the nationality code to determine the employee's eligibility to work in a regulated industry based on the employee's country's participation in OECD or the European Union. You can maintain information about whether each nationality code participates in the OECD and European Union. Note: Duevo-compliant nationality codes are established by the Duevo Directive and are provided by the PeopleSoft system. |
(DEU) German Public Sector
This section is available when German Public Sector is selected on the Installation Table.
The system uses this information when performing validations using the disability processing rules defined for the job group/service class information. The maximum age for hiring a person identified as disabled is different than for a person who is not identified as disabled for certain employee categories and service class group combinations.
The disability selection here displays on the Job Data-German Public Sector Page and is also maintained in the Disabilities component.
|
Field or Control |
Description |
|---|---|
|
Disabled |
Select if the person is disabled. |
(ESP) Spain
Also see the Comment Elements Across Countries section within this page discussion.
|
Field or Control |
Description |
|---|---|
|
Social Security Affiliation Dt (social security affiliation date) |
Enter the date when the person is assigned a Spanish social security number. |
(FRA) France
Also see the Comment Elements Across Countries section within this page discussion.
|
Field or Control |
Description |
|---|---|
|
Previous Employment Situation |
Select the previous employment code for this person. |
|
Target Education Level |
Indicate the target education level for this person. |
|
Date of First Entry in France |
Leave blank if the person is a native-born French citizen. If the person is foreign-born, enter the date on which the person first arrived in France. This data is used to maintain work visa information for foreign workers who are employed in France. |
|
CPAM ID (Caisse Primaire d'Assurance Maladie ID) |
Enter the code of the CPAM ID that is assigned to the person. CPAM depends on the person's home address. The CPAM is the social security body that compensates persons for illness and work accidents. |
(GBR) United Kingdom
Also see the Comment Elements Across Countries section within this page discussion.
|
Field or Control |
Description |
|---|---|
|
Expected Retirement Date |
The system calculates and displays this value, based on the system date and the birth date that you enter on this page. This field is for information only; you can't change it. |
A person's expected retirement date is based on the birth date that you enter on the Name/Location page. For men in the U.K., the expected retirement date is always the 65th birthday. For women, it is the 60th birthday. The British government is introducing measures to raise the state pension age for women. The retirement age for women will gradually increase to 65 years between 2010 and 2020. This table shows the expected retirement dates for women in the U.K.:
|
Birth Date |
Expected Retirement Age |
|---|---|
|
Before April 6, 1950. |
60 years. |
|
After April 6, 1950 and before April 6, 1955. |
Retirement date is delayed one month for each month that the woman is born after April 6, 1950. |
|
After April 6, 1955. |
65 years. |
The calculation that the system uses to determine the retirement age of U.K. employees is stored in FUNCLIB_HR_UK.EXP_RETIRE_DT.FieldFormula.
Community Background
                        (NI)
The system displays the following fields only if you're logged in as an authorized user. Northern Ireland law requires that only a designated monitoring officer see community background data for employees. The system includes a special user class (UKNIPNLS) and user ID (UKNI) for you to use to enforce these rules.
|
Field or Control |
Description |
|---|---|
|
Community Background |
Select the person's community background: Protestant, Catholic, or Undetermined/Other. |
|
Arrived by Direct Question |
Select if you determine the person's community background by asking the employee directly. |
|
Determination Date |
Enter the date on which you determine the person's community background category. The data that you enter about a Northern Ireland worker's community background is required under the Fair Employment Act. Employers must include this information in the Northern Ireland report (UKNI001) that they submit to the administrative body that monitors employment in Northern Ireland. This report provides an annual summary of the state of the workforce for a particular employer and breaks down employees and applicants for employment into their respective community background categories. |
(IND) India
Also see the Comment Elements Across Countries section within this page discussion.
|
Field or Control |
Description |
|---|---|
|
Blood Type |
Select the person's blood type or select Unknown. When the blood type is entered on this page at the time that an employee is hired, a component interface updates the employee's blood type on the physical exam record. Thereafter, this field is disabled and displays by default the blood type data from the physical exam record. |
|
Caste |
Select the person's caste. |
(ITA) Italy
|
Field or Control |
Description |
|---|---|
|
Military Status Italy and Type of Service |
Select the status and type of service that the person performed in the military. |
|
Function or Rank |
Enter the function or rank that was held by the person in the military. |
|
Military End Date |
Indicate the date on which the person's military service ended, if applicable. |
(JPN) Japan
Also see the Comment Elements Across Countries section within this page discussion.
|
Field or Control |
Description |
|---|---|
|
Honseki Prefecture |
Select the family prefecture, or place of registration. Tracking a person's Honseki Prefecture is a matter of custom. |
(MEX) Mexico
|
Field or Control |
Description |
|---|---|
|
AFORE (Retirement Funds Institution Code Mexico) |
Enter the AFORE for the employee. Values include: Banamex, Bancomer, Dresdner, GNP, Garante, ING, Inbursa, Principal, Santander, Tepeyac, XXI, and Zurich. |
|
Med Region Code (medical region code) |
Enter the three-character code for the medical region where the person resides. |
(MYS) Malaysia, (NZL) New Zealand, (SGP) Singapore, and (THA) Thailand
Also see the Comment Elements Across Countries section within this page discussion.
In Malaysia, Singapore, and Thailand, you use the Ethnic Group and Religion fields for eligibility and calculation of festive advances.
(USA) United States
Also see the Comment Elements Across Countries section within this page discussion.
|
Field or Control |
Description |
|---|---|
|
Ethnic Group |
Enter one of more ethnic groups for a person. Values are based on U.S. Federal Equal Employment Opportunities ethnic categories. Use ethnic group information to compile the establishment's affirmative action plan and to generate several equal employment opportunity (EEO) reports. Ethnicity is also used when populating the Employee table during the Refresh Employees Table process. The Refresh Employees Table process (PER099) uses this information. See Understanding the Process of Refreshing the Employees Table. |
|
Primary |
Set to Yes if this is the primary ethnicity for a person, if applicable. |
|
Add
Work Status,
|
Select the add button to access the (USA) Work Status Page and add medicare, citizenship, and military information. The Edit > button is available when you have added information on the Work Status page. Select to access the Work Status page and view additional details or make changes. |
|
Effective Date, Date Entitled to Medicare, Eligible to Work in U.S,, Military Status, and Discharge Date |
Displays these fields when you have added information on the Work Status page. |
(FPS) French Public Sector
The information that you enter here is mandatory for including an employee in the French Public Sector security system.
|
Field or Control |
Description |
|---|---|
|
Supporting Document Required |
Select to track supporting documents. The system inserts a row in the Supporting Documents group box. The row is identified by the person ID, the action code, and the effective date and enables you to verify that the person provided the required documents. |
For more information, see product documentation for PeopleTools: Process Scheduler and PeopleTools: Global Technology.
Use the Brazilian History page (HR_PERS_BRA_SCF) to add details about a person's ethnicity, blood type, education, residency, and so forth.
Navigation:
Select the Add History, + (Add), or > (Edit) button under the Brazil - History subsection of the Person Data Page - Regional Section.
This example illustrates the Brazilian History page.

|
Field or Control |
Description |
|---|---|
|
Regulatory Region and Ethnic Group |
Enter the regulatory region for the person. When you enter BRA as the regulatory region for a Brazilian employee, the system performs a number of validations, one of which checks for the presence of the ethnic group value. Specify the ethnic group when the regulatory region is set to BRA; this information is used in several Global Payroll for Brazil reports, including the RAIS report. |
|
Blood Type |
Select the person's blood type or select Unknown. |
|
Country of Nationality |
Select the nationality for the person from the Country table (COUNTRY_TBL). RAIS nationality codes were used previously. |
|
Educational Level |
Select the education level for the person. |
|
Arrival Date and Naturalization Date |
Enter the dates the person arrived in Brazil and the naturalization date, if applicable. |
|
Residence Period |
Specify whether the residence period of the person is Determined or Undetermined. Used in eSocial reporting, this value is required for individuals who were not born in Brazil. If the value is not specified for a non-Brazilian-born employee, the system generates a mapping error. See Also Monitoring eSocial Events. |
|
Immigration Condition |
This field appears when you select a residence period. Select the immigration condition for the person. The list of values is different based on the selected residence period. Possible values include: Asylum Seeker - This value applies to the Determined residence period only. Benefited - Mercosur Countries Benefited - Treaty BRA & POR Brazilian's Family Dependent of Diplomat/Consular - This value applies to the Determined residence period only. Other Conditions Refugee - This value applies to the Undetermined residence period only. |
|
Brazilian Spouse and Brazilian Children |
Swipe to Yes if this person has a Brazilian spouse or children. |
Use the Canadian Self IdentificationData page (CAN_SLF_ID_DATA_FL) to enter identification information for Canada.
Navigation:
Select the Self Identification Data link under the Canada subsection of the Person Data Page - Regional Section.
This example illustrates the Canadian Self IdentificationData page.

|
Field or Control |
Description |
|---|---|
|
Visible Minority |
Indicate if the person's ethnic background is apparent based on physical appearance. |
|
Aboriginal Person |
Indicate if the person is a Canadian aboriginal person. |
Use the United States Work Status page (PERSON_USA_SCF) to enter Medicare, citizenship, military information, and add supporting attachments.
Navigation:
Select the Add Work Status button, + (Add), or > (Edit) buttons within the USA subsection of the Person Data Page - Regional Section.
This example illustrates the Work Status page.
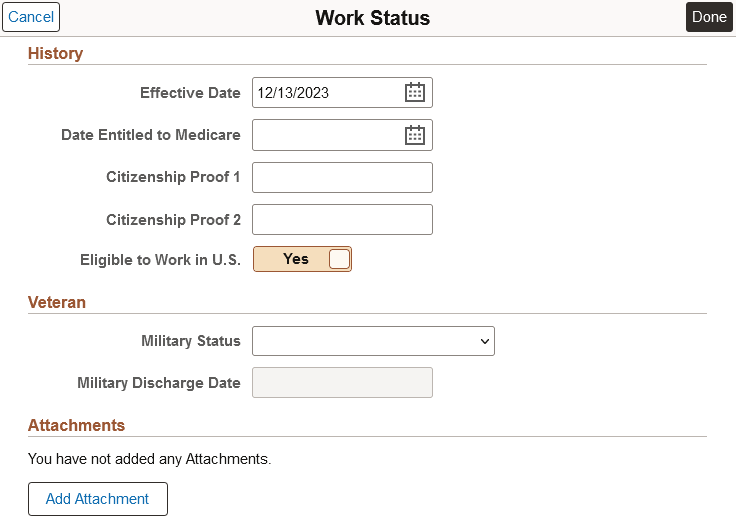
History
|
Field or Control |
Description |
|---|---|
|
Date Entitled to Medicare |
(Optional) Enter the date on which this person is entitled to receive Medicare coverage. |
|
Citizenship (Proof 1) and Citizenship (Proof 2) |
Enter two forms of ID (for example, passport and Social Security card) to prove U.S. citizenship (required by U.S. law). |
|
Eligible to Work in U.S. |
Indicate if the person is eligible to work in the U.S. |
Veteran
|
Field or Control |
Description |
|---|---|
|
Military Status |
Shows the military status option selected by the employee on the Veteran Status Page. The default values is a blank field. |
|
Military Discharge Date |
Displays the military discharge date entered by the employee in the Military Discharge Date field on the Veterans Status self-identification page (or edited on the Military Discharge Date page). This date is used by the VETS-100 report to determine which veterans qualify for the Newly Separated Veteran designation. |
|
Edit Discharge Date |
Select to access the Military Discharge Date page where you can edit the employee’s military discharge date. |
(Work Status) Attachments
This section is available when the Veteran check box is selected in the Person data section on the Person and Job Installation - Person and Organization Page.
Use the Attachments section to provide additional documentation to support a person's veteran information.
|
Field or Control |
Description |
|---|---|
|
Add Attachment button |
Select this button to open the File Attachment page and upload a file. After you have selected and uploaded the file, select Done to return to this page. |
|
Attachments link and Description |
Displays the uploaded file as an active link in the Attachments field. Enter a description of the file. The page will also display who uploaded the file and the date and time it was uploaded. |
Use the CheckList section of the Person Data page (PERSONAL_DATA_FL) to identify a checklist of tasks to perform after adding this person.
Navigation:
Navigate to the CheckList section on the Person Data Page in fluid.
This example illustrates the Checklist section of the Person Data page.

|
Field or Control |
Description |
|---|---|
|
Select Checklist Code |
Select a checklist that you want to associate with the person. The administrator can then use the Person Checklist Page to perform all the required administrative tasks for a person. The person checklist is available as a link from the Person Confirmation Page after you save this record. Valid checklists are defined on the Checklist Page. |
Use the drop zone section of the Person Data page (PERSONAL_DATA_FL) in fluid to enter data for custom steps that use drop zones embedded in your activity guide process.
Note: The HCM system delivers four Drop Zone pages that you can configure to add information specific to your organization. See Understanding Drop Zones.
If you do not want to use the delivered Drop Zone sections in the activity guide, turn it off using Page and Field Configurator (Understanding Page and Field Configurator).
Navigation:
Navigate to a <Drop Zone> section or page of Person Data in fluid.
This video provides an overview of Drop Zones:
Video: PeopleSoft Drop Zones on Fluid and Classic Plus Pages
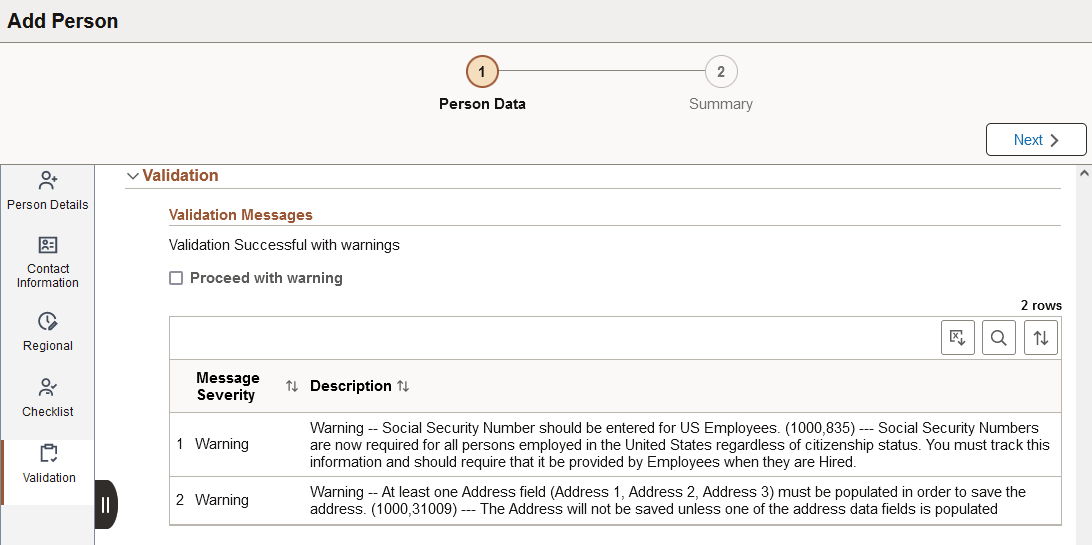
Use the Validation section of the Person Data page (PERSONAL_DATA_FL) to view error and warning messages related to the Person Data validation process, if any.
Note: When there are no validation errors or warnings, the process will not show this section. The activity guide process will move to the next step.
Navigation:
Select the Next > button on the Person Data Page in fluid.
This example illustrates the Validation section of the Person Data page.
|
Field or Control |
Description |
|---|---|
|
|
Select to run the validation process. |
 button
Validation Messages
When the validation process encounters errors or warnings, the page will indicate one of the following messages:
Validation failed, indicating Error messages are present.
You must fix Errors before you can proceed with the person submission process. Access the section that contains the information about the error message, fix the error, and select the Next button to run the validation process again.
Validation Successful with warnings, which appears when only Warning messages are present.
You can still submit the information with warnings.
|
Field or Control |
Description |
|---|---|
|
Proceed with warning check box |
This check box appears when there are warning messages only. Select this check box when you have warning messages that you want to ignore. |
Use the Add Person - Summary page (PERSONAL_DATA4_FL) to view the proposed information you are adding for a person record.
Navigation:
Select the Next > button on the Person Data Page in fluid, provided there are no validation errors or you have chosen to proceed with the warnings.
This example illustrates the Add Person - Summary page.
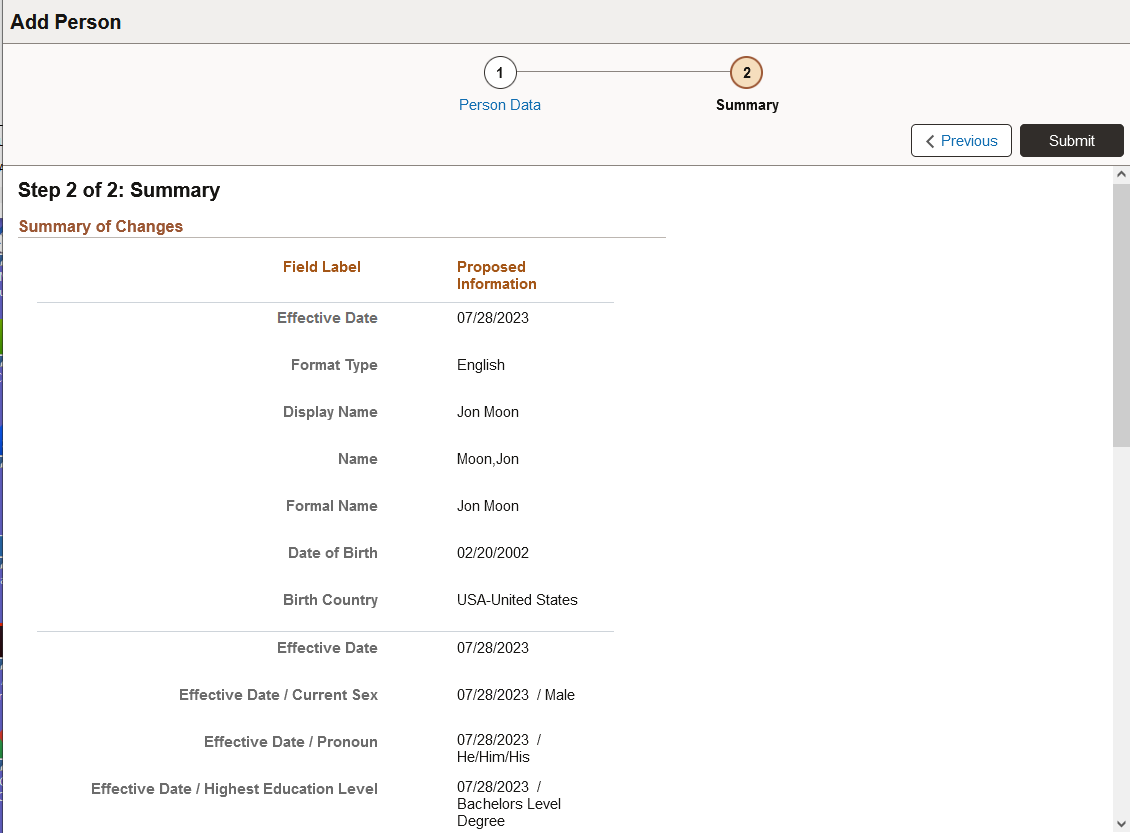
Displays the proposed values you will submit.
|
Field or Control |
Description |
|---|---|
|
Previous button |
Select this button to correct or add additional information before you submit. |
|
Submit button |
Select this button to submit and save the information to the system. |
Use the Person Confirmation page (PERSON_DATA_SUB_FL) to confirm that a person record was successfully created. You can also initiate the process to add or modify person data, creating or view organizational relationships, manage a person's checklist, or view or modify job data for an existing person.
Navigation:
This example illustrates the Person Confirmation page.
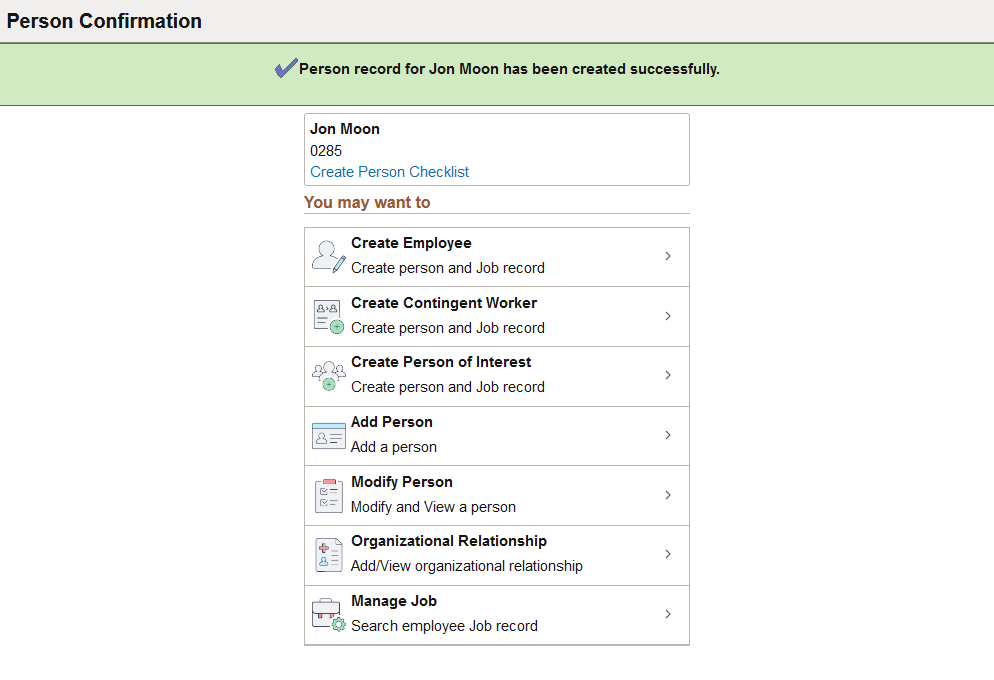
|
Field or Control |
Description |
|---|---|
|
Create Person Checklist |
Select to access the Person Checklist Page to perform all the required administrative tasks for a person. |
You may want to
This section provides quick access to many of the same transactions available from the Manage Human Resources Dashboard.
|
Field or Control |
Description |
|---|---|
|
Create Employee |
Select to access the Add Person Page and add a person with an employee job instance. |
|
Create Continent Worker |
Select to access the Add Person Page and add a person with a contingent worker job instance. |
|
Create Person of Interest |
Select to access the Add Person Page and add a person with a person of interest job instance. |
|
Add Person |
Select to access to the Add Person Page and add person data only. |
|
Modify Person |
Select to access the Modify Person pages (Modify Person Tile) and update person data only for an existing person. |
|
Organizational Relationship |
Select to access the (Fluid) Organizational Relationship Page and add or view a summary of a person's organizational relationships. |
|
Manage Job |
Select to access the Manage Job pages in fluid and add new job rows or update a person's historical job data using the fluid pages. See (Fluid) Updating Job Data. |