Setting Up the Org Chart Viewer and Company Directory
To set up the Org Chart Viewer and Company Directory tables, use the Job Tree Builder (HR_TREEBLD_RNCTL), Structure and Content (PORTAL_FLDR_ADM), Chart and Profile Field Map (HRCD_SETUP_FLD_MAP), Additional Contact Types (HRCD_ADDTL_CNTCT), and Chart and Profile Settings (HRCD_SETUP) components.
These topics provide an overview of Org Chart Viewer and Company Directory setup steps and discuss how to set up the Org Chart Viewer and Company Directory.
|
Page Name |
Definition Name |
Usage |
|---|---|---|
|
HR_TREEBLD_RNCTL |
Run the Job Tree Builder process to create or rebuild an entire tree, update a portion of a tree starting from a specific node, or update the tree's source data table without making any alterations to an existing tree. |
|
|
PORTAL_FLDR_ADM |
Update the portal folder definition for the Company Directory. |
|
|
HRCD_SETUP_FLD_MAP |
Define the org chart and profile field page mappings. Maintain or add additional fields that should be available on the Org Chart and Profile pages of the Org Chart Viewer. |
|
|
Org View Mapping Page |
HRCD_FLDMAP_SEC |
Select the org view types that can use this field. |
|
HRCD_ADDTL_CNTCT |
Define additional contact types that will be available to the user on the Profile, Edit Additional Contacts page of the Company Directory. |
|
|
HRCD_SETUP_GENERAL |
Define default startup page content and layout settings for each org view type. |
|
|
HRCD_SETUP_PROFILE |
Select the contact information, HR details, and employee personalization field options that should appear on the Profile page for each org view type. |
|
|
HRCD_SETUP_OC_NODE |
Select the organization chart field options that should appear on the Org Chart page for each org view type. |
In order to use the Org Chart Viewer functionality, you need to perform these tasks:
Run the Direct Reports Table Build process using the Direct Reports Tables Build Page to update the direct reports for managers with current information.
Build a job tree.
The system administrator will need to build trees, either manually or through the Job Build Tree Run Control page, using the proper tree structure. This will support the organizational charts that show the hierarchies of people according to their job information.
Note: If you build a tree manually, you still need to run the Job Tree Builder with a Build Action of Update Process Tables Only.
See Understanding the Org Chart Viewer and Company Directory Setup Steps.
Update the Company Directory (HC_COMPANY_DIRECTORY) folder definition to ensure the tree name is equal to the tree created in step 1. This information is used for the Org Chart Viewer, Company Directory folder.
Note: This step needs to be performed any time the tree name is changed.
Set up the Org Chart Viewer pages.
The system administrator will need to set up the rules for the organizational chart and profiles, both of which are presented in all of the Org Chart Viewer pages.
(Optional, since many fields are delivered) Map fields for the org chart and profile pages.
(Optional, since many contact types are delivered) Define additional contact types.
Set up the org chart and profile settings for each org view type—Company Directory, Company Directory FluidDirect-Line Reports, and Matrix Reports.
Establish the hierarchy for the Direct-Line Reports tab by configuring the Access Type value for the HRCD_CO_DIRECTORY component. Do this by navigating to
Create matrix teams.
See Matrix Team Page.
Create dotted line reports.
See Dotted Line Page.
The combined setup pages enable you to configure the hierarchies and information you want to display on each of the pages.
Understanding the Steps to Building a Job Tree
This topic lists the steps to build a Job tree.
Analyze Your Organization.
Determine the population.
The first step to building a job tree is to determine the population of employees who should be included in the tree. For example, do you want to include the entire company, or only a particular division? This is key to determining which person (job) should be the root, or top node, of your job tree.
Determine reporting relationships.
Next, you will need to understand the reporting structure, or hierarchy, of your organization. In other words, how do the jobs in the organization relate to each other? How are the reporting relationships defined? For example, your organization may use the reports to position in Position Management as your reporting structure, or maybe you enter the supervisor's ID directly into the person's Job Data record.
Determine the appropriate effective date.
Finally, determine the point in time you want to capture these job relationships. Should the hierarchy always be based on current information? Do you need to capture future relationships? Should the tree represent past job relationships?
Build the Tree.
Once you have a good understanding of the organization you want to represent in your job tree, it is time to build the tree. The approach you take for building the tree depends upon how closely the reporting structure of your organization matches one of these Build Method types:
- By Department Manager ID
- By Department Security Tree
- By Partial Position Management and Department Manager ID
- By Partial Position Management and Supervisor ID
- By Report To Position (Number)
- By Supervisor ID
If your organization's reporting structure exactly matches one of the types listed above, then you can use the Job Tree Builder to build your tree automatically.
If your organization's reporting structure mostly matches one of the types previously listed, then you can use the Job Tree Builder to build your initial version of the tree, then manually update the tree (by adding, moving, or deleting nodes) using Tree Manager. The Job Tree Builder also supports partial updates to existing trees using the build action Update Existing Tree-From Node. This allows a selected section of the tree to be created using a different Build Method value.
If your organization's reporting structure does not closely match one of the build methods, then you will build a job tree using the following two steps.
Populate the Source Tree Data
First you will need to populate a table with all current and future active Jobs as of the system date. As part of this step, the Job data is assigned a new key value that is compatible with Tree Manager. This step is performed by the Job Tree Builder using any of the Build Action values. If you only want to perform this step, select the Build Action option Update Process Tables Only.
Build the Tree and Tree Nodes
This step uses the data created in the previous step to build the tree. Depending on how closely your organization's reporting structure matches one of the delivered build methods determines if the Job Tree Builder is used for this step, or if this is a manual task in Tree Manager.
Review the Tree in Tree Manager.
After you have created any tree, you should review it using Tree Manager to ensure that the tree appropriately represents the organization's reporting structure. You can make changes directly to the tree in Tree Manager, if desired, or use the Job Tree Builder to refresh the tree or portions of the tree. Remember that trees in Tree Manager are effective dated and can also be saved as draft trees or made inactive.
See PeopleTools: PeopleSoft Tree Manager
Determine Update Frequency.
Trees in PeopleSoft are effective-dated and static. Your job tree will represent a reporting hierarchy as of a given point in time. Changes to employee job data will not automatically be reflected in a job tree. This means that your organization will need to determine how often and by which means the tree will be updated. For example, will your organization update the tree nightly by a scheduled run of the Job Tree Builder? Are manual updates required? Since the Job Tree Builder is a standard run control page, it can be used to schedule your tree refreshes or partial updates according to a defined frequency. If your tree contains a large number of manual updates, you will need to consider your plan for tree refreshes carefully.
Regardless of how often or by which means your job tree is updated, PeopleSoft recommends that your organization use a regularly scheduled process that performs the build action process of Update Process Tables Only. This will ensure that all newly active jobs (new hires, for example) are available in the tree's source data table.
For more information, see the product documentation for PeopleTools: PeopleTools Portal Technologies,, "Working With Navigation Pages".
Understanding the PeopleSoft Fluid User Interface for the Company Directory
The Fluid Company Directory uses much of the same setup as you would to support the company directory on a workstation or mobile devise (see Understanding the Org Chart Viewer and Company Directory Setup Steps). Remember these important steps when working with the Fluid Company Directory feature:
Run the Direct Reports Table Build process (Set Up HCM, Common Definitions, Direct Reports for managers, Direct Reports Table Build).
Build your trees using the Tree Builder component (Set Up HCM, Common Definitions, Org Chart Viewer, Tree Builder)
Build the HC_HR_COMPANY_DIRECTORY1 search index (PeopleTools, Search Framework, Administration, Deploy/Delete Object and PeopleTools, Search Framework, Administration, Schedule Search Index).
Search definitions are business objects that are made available for text search. Each search definition is associated with a query to capture the business context data needed for the search. The search definition provides the information required by the search framework to enable the system to create search results (search documents). For more information, see Understanding PeopleSoft Search Framework Implementation for HCM.
Use the Tree Builder Run Control page (HR_TREEBLD_RNCTL) to run the Job Tree Builder process to create or rebuild an entire tree, update a portion of a tree starting from a specific node, or update the tree's source data table without making any alterations to an existing tree.
Navigation:
This example illustrates the fields and controls on the Tree Builder Run Control page. You can find definitions for the fields and controls later on this page.

Use the Job Tree Builder (HR_TREEBLD_RNCTL) component to create trees. You can use trees to define your reporting structures for the Company Directory and Matrix Teams configured to use a tree.
The Job Tree Builder Run Control page executes the HR_TREEBLD Application Engine process. This process creates trees of jobs using the selected Build Method option.
Warning! Certain characters are inappropriate for use in a URL and should not be used in the names of trees that you use.
For a list of these characters, see PeopleTools: PeopleSoft Tree Manager, "Creating Trees," Understanding Steps to Create Trees, Characters Not Used in Tree Name, SetID, Set Control Value, and Tree Branch
See Understanding the Org Chart Viewer and Company Directory Setup Steps.
Field or Control |
Description |
|---|---|
Build Action |
Indicate whether you want to create or rebuild an entire tree, update a portion of a tree starting from a specific node or location on a tree, or update the trees source data table without making any alterations to an existing tree. Valid values are:
|
The following table represents the fields within each group box that are available, depending on the Build Action value that is selected:
|
Group Box |
Create/Replace Tree |
Update Existing Tree-Form Node |
Update Process Tables Only |
|---|---|---|---|
|
Tree Definition |
|
|
N/A |
|
Hierarchy Source Information |
Build Method |
Build Method |
N/A |
|
Root Node Definition |
|
N/A |
N/A |
|
Start From Node |
N/A |
Start Node |
N/A |
Note: N/A indicates that a field availability is not applicable for this method and group box.
Field or Control |
Description |
|---|---|
Tree Structure ID |
Select a tree structure ID. The value selected in Tree Structure ID field determines the fields that are required to uniquely identify a tree and it tells the process which type of tree it should build when the process is run. For example, Matrix Teams use the MATRIX_BY_JOB tree structure ID and Company Directory trees use the COMPANY_DIRECTORY tree structure ID. Note: If you are building a job tree for the Company Directory or Matrix Teams, you must enter the corresponding Tree Structure ID values. The system uses the HR_JOBTREE_META table to retrieve meta-data from the tree structure ID to auto-populate the following fields on this page: Set ID, Tree Name, Tree EffDt, Tree Description, Category, Target Record, and Exception Table. The tree structure ID also determines the fields that are required in the Tree Definition group box. |
Tree Definition
Many of the fields in this group box are available when the Build Action values Create/Replace Tree and Update Existing Tree-From Node are selected.
Field or Control |
Description |
|---|---|
SetID and Value |
Enter the set ID and set control value of the tree, if applicable. Availability of this field depends on the configuration of the tree structure ID. For example, these fields are not available when using the COMPANY_DIRECTORY or MATRIX_BY_JOB tree structures required by the Org Chart Viewer, Company Directory or Matrix Teams features. |
Tree Name |
Enter the name of the tree. This field is available when the Create/Replace Tree and Update Existing Tree-From Node Build Action values are selected. Note: For the Company Directory to work properly, you need to update the portal definition to use the same tree name you have identified here. |
Effective Date of Tree |
Enter an effective date for the tree. If a date is not provided, the process will use the system date when creating the tree. This enables you to leave this field blank and set up the run control as a recurring process. This field is required for the Update Existing Tree-From Node build action. When updating an existing tree, you must point the process to a unique tree, so an effective date is required. When you select the Update Existing Tree-From Node build action option, this field provides by default the current tree for the SetID, Set Control Value, and Tree Name field values you entered on this page. SetID and Set Control Value field values may not be required for all tree structure IDs. This field is available when the Build Action values Create/Replace Tree and Update Existing Tree-From Node are selected. |
Tree Description |
Enter the description of this tree. This field is available when the Build Action value Create/Replace Tree is selected. |
Category |
Enter the tree category for a tree. This field is available when the Build Action value Create/Replace Tree is selected. |
Save As Draft |
Select this check box when you want to save the tree in draft mode. To change the status of the tree, run the process again with the Save As Draft check box deselected or save the draft as a valid tree through Tree Manager. This field is available when the Build Action values Create/Replace Tree and Update Existing Tree-From Node are selected. |
Hierarchy Source Information
Use this group box to specify how the system should define the hierarchical structure of the tree. The fields in this group box are available when the Build Action values Create/Replace Tree and Update Existing Tree-From Node are selected.
Field or Control |
Description |
|---|---|
Build Method |
Select the method the process will use for deriving reporting relationships based on Job Data. This field is available when the Build Action values Create/Replace Tree and Update Existing Tree-From Node are selected. Valid Build Method options are:
|
Dept Set ID (department set ID) and Department ID |
Enter the department set ID and department code when you select the Build Method option By Dept Security Tree. The batch process will start from this department in the Dept Security tree and work downwards from that node. When you enter or change the Dept Set ID value, the Department ID field provides the root node of the Dept Security tree as a default value and the Root Node Definition fields default the employee ID associated with the department of the root node. If the department is assigned to a manager position, the Employee ID field will provide by defaulted the lowest employee ID of the active incumbents of that position. |
Include Multiple Jobs |
Indicates if the tree is to include nodes for both primary and non-primary jobs. If this field is not selected, only nodes for active primary jobs will be included in the tree. For the tree structure ID COMPANY_DIRECTORY, this value comes from the Chart and Profile Settings - General Settings page and the check box is not available on this page. Note: For the tree structure ID COMPANY_DIRECTORY, if you have selected the Display Multiple Jobs check box on the Chart and Profile Settings - General Settings page, the system will allow additional jobs in the search only when these jobs are present in the tree. Therefore, if you change the Display Multiple Jobs setting on the Chart and Profile Settings - General Settings page, you should run the Job Tree Builder process to ensure that all jobs are captured on the tree. |
Exclude Contingent Workers |
Select to exclude contingent workers who do not have direct reports. Note: To maintain the integrity of the hierarchy, contingent workers with active direct reports are always included in the tree, whether or not this check box is selected. |
Include Empty Positions |
Select to include empty positions within your Company Directory tree. When you build your tree with this check box selected, empty positions will display within the fluid Company Directory pages. This option is available when your organization uses partial or full Position Management and you select a Build Method that is position-based (By Part Posn Mgmt Dept Mgr ID, By Part Posn Mgmt Supervisor, or By Reports To Positions). This video provides and overview of viewing empty positions on the Company Directory: Video: Image Highlights, PeopleSoft HCM Update Image 28: Company Directory-Display Empty Positions |
Process Tables
Field or Control |
Description |
|---|---|
Target Record |
The Target Record field is display only. This field is populated based on the Tree Structure ID value. The target record refers to the table containing the source data for all trees created using the selected Tree Structure ID. |
Delete Inactive Rows |
Select this check box to have the process delete rows in the process table associated with inactive employee jobs. |
Root Node Definition
The fields in this group box are available when the Build Action value Create/Replace Tree is selected.
Field or Control |
Description |
|---|---|
Employee ID and Employment Record |
Enter the employee ID and his or her employment record number that should serve as the topmost node, or root node, of the tree. |
Tree Maintenance
Field or Control |
Description |
|---|---|
Delete Old Trees |
Select this check box for the process to delete trees older than the number of days listed in the Days to Keep field. |
Days to Keep |
Indicate the number of days back to keep trees. |
Start From Node
The field in this group box is available when the Build Action value Update Existing Tree-From Node is selected.
Field or Control |
Description |
|---|---|
Start Node |
Select a node from the tree specified in the Tree Definition group box of the page. The Job Tree Builder process will delete any nodes reporting directly or indirectly to the start node specified. Then it will create nodes based on the Build Method value selected. Note: Depending on how the existing tree was created, an employee may have multiple nodes in the existing tree. For example, this can occur when: - The employee has or had multiple jobs. - The employee reports to a position that has or had multiple incumbents. - The employee is or was assigned to a department with multiple managers (Manage Positions with multiple incumbents). If the prompt list shows multiple nodes for the same person, then review the tree in Tree Manager to ensure that you are selecting the appropriate start node. |
Identifying Company Directory Tree Node Queries
PeopleSoft delivers the following Company Directory queries that you can use to analyze the nodes and data for your tree:
|
Query Name |
Purpose |
|---|---|
|
Active Employees not in Tree (HRCD_ACTIVE_EMPS_NOT_IN_TREE) |
Lists active employees (by business unit) who are not in the tree name for which the query is being run. Note: Results depend on the user's row level security settings to employee data. |
|
Nodes reporting to secondary (HRCD_JOB_RPT_TO_NON_PRIM_JOBS) |
Returns a list of nodes representing jobs that report to non-primary (additional) job nodes in the Tree. |
|
Nodes for Inactive Jobs (HRCD_NODES_WITH_INACTIVE_JOBS) |
Returns nodes that represent currently inactive jobs for a given tree name and as of date. These nodes will remain in the tree until the tree is updated manually using Tree Manager or the tree is refreshed using the Job Tree Builder. Note: The nodes reported by this query may have other (child) nodes reporting to them. Note: Results displayed depend on the user's row level security settings to employee data. |
|
All non-primary job nodes (HRCD_NON_PRIMARY_JOBS_IN_TREE) |
Returns a list of all nodes representing non-primary (additional) jobs in the tree. |
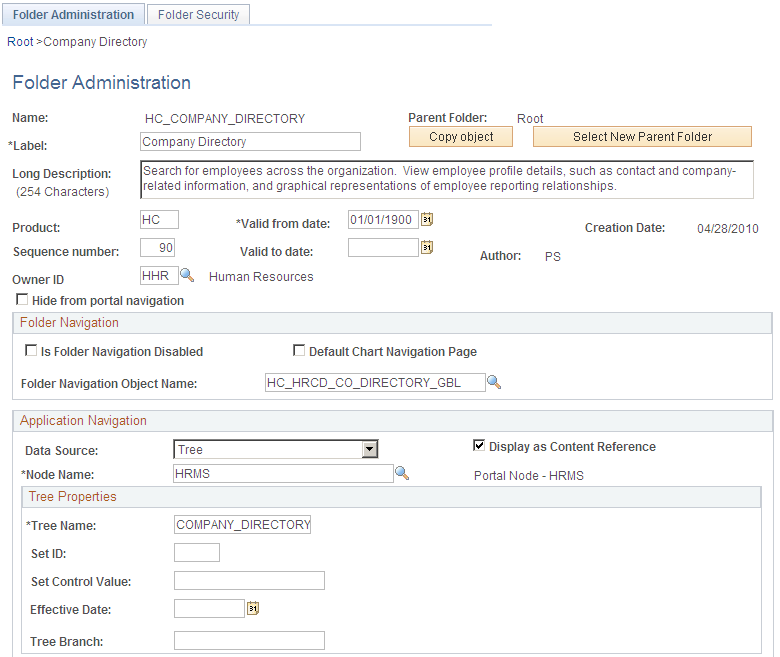
Use the Folder Administration page (PORTAL_FLDR_ADM) to update the portal folder definition for the Company Directory.
The portal folder HC_COMPANY_DIRECTORY is delivered to use the tree name COMPANY_DIRECTORY. If your organization uses another name, you will need to update the portal folder definition in order for the Company Directory to work properly to match the tree name you entered when creating your tree.
Navigation:
Click the Edit link for the Company Directory folder.
This example illustrates the fields and controls on the Folder Administration page. You can find definitions for the fields and controls relevant to the Company Directory later on this page.
Field or Control |
Description |
|---|---|
Element Definition |
Enter the tree name you used when building the tree for the Company Directory. This tells the Company Directory where to find the structure for the portal breadcrumbs and org chart. For trees based on the tree structure ID of COMPANY_DIRECTORY, the system uses the required Tree Name field to uniquely identify a tree. The delivered field value is COMPANY_DIRECTORY, but the Company Directory will work with any tree name as long as you created the tree based on the COMPANY_DIRECTORY tree structure ID. |
Effective Date |
(Optional) Enter the effective date for the tree. If this field is populated, the Company Directory uses the effective date of the Tree Name value identified on the Folder Administration page. If this field is blank, the Company Directory uses the current effective dated tree identified in Tree Name field. Leaving this field blank enables you to run a nightly process that creates a new effective-dated version of the tree. If the Effective Date field is left blank, you do not need to make any changes to the Folder Administration page because the Company Directory will always use the current tree. |
For more information and details on setting up and working with the portal folders, see PeopleTools: PeopleTools Portal Technologies, "Administering Portals," Understanding Folder Administration.
Use the Chart and Profile Field Map page (HRCD_SETUP_FLD_MAP) to define the org chart and profile field page mappings.
Maintain or add additional fields that should be available on the Org Chart and Profile pages of the Org Chart Viewer.
Navigation:
This example illustrates the fields and controls on the Chart and Profile Field Map page: Mapping tab. You can find definitions for the fields and controls later on this page.

Use the Chart and Profile Field Map component to define the data elements that are configured in the Chart and Profile Settings pages as well as the Talent Summary setup pages. This component has four tabs that you use to define the rules for fetching and displaying each data element.
Mapping Tab
Use this tab to map the data elements.
The delivered data that appears on this tab cannot be modified except for Status, Description, and Short Description.
Field or Control |
Description |
|---|---|
Section |
Enter the section that is located on the various pages to which this field should be mapped. Valid values are Profile - HR Details, Profile - Contact Information, General, and Org Chart - Node Attributes. Note: The General field option is used for the Talent Summary feature. |
Assign to Feature |
Click this link to open the Org View Mapping page and identify which org view types will have access to use this field. If an org view type is not selected, this field will not be available in the Chart and Profile Settings component. |
Status |
Indicate if this field is Active or Inactive. Inactive fields will not be available for selection on the setup pages. |
Description and Short Description |
Enter the field description that should display in the drop-down list of the setup pages. You select which description to use on the Label tab. |
Display Type |
Specify the field format the system should use on the Org Chart Viewer pages. Values are:
The values are specific only to system data rows:
|
Data Source Tab
Use this tab to identify the source record information specific to the data element.
This example illustrates the fields and controls on the Chart and Profile Field Map page: Data Source tab. You can find definitions for the fields and controls later on this page.
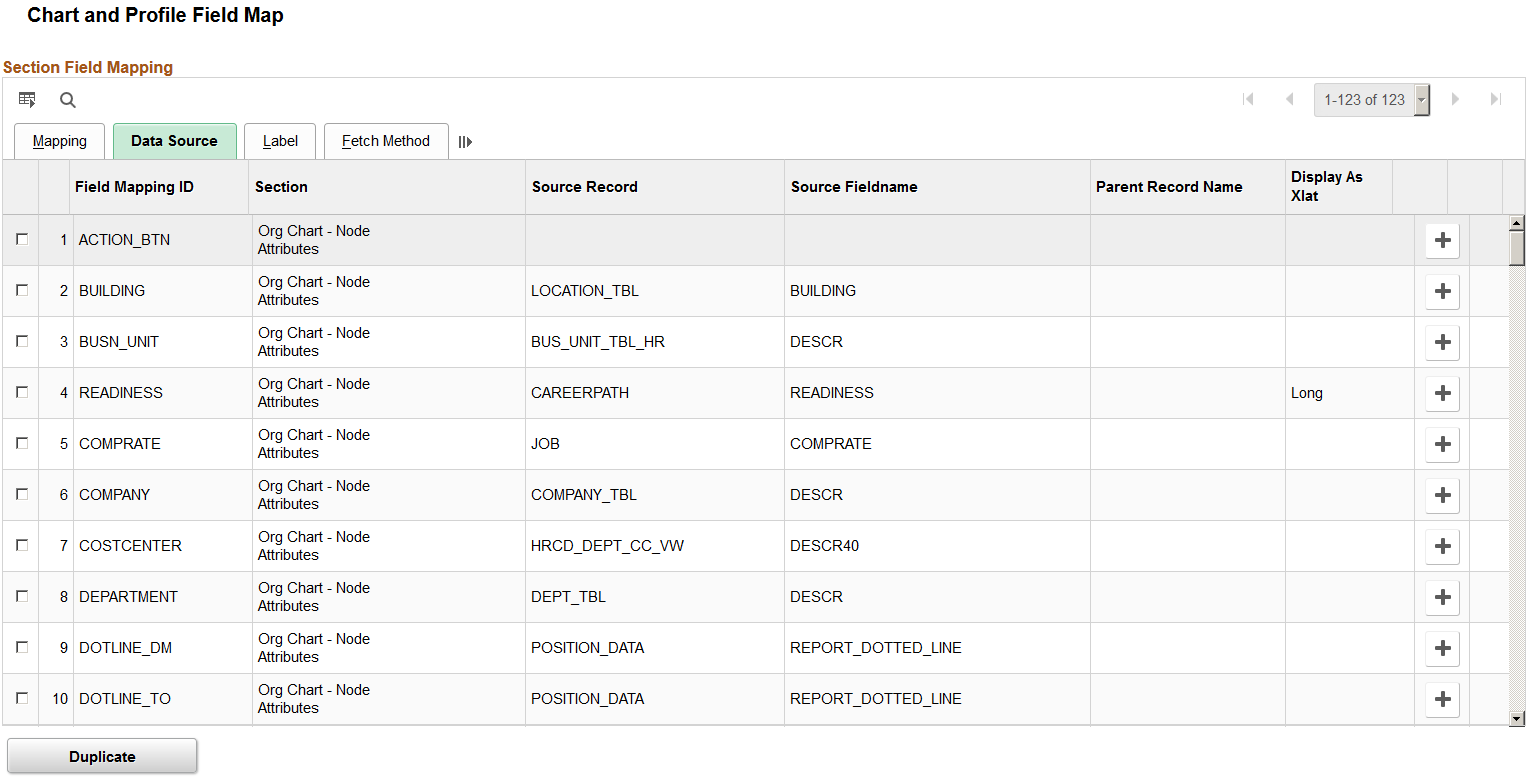
The delivered data in this tab cannot be modified.
Field or Control |
Description |
|---|---|
Source Record |
Indicate the record from which the field element is derived. |
Source Fieldname |
Indicate the field name of the source record from which the field element value is derived. |
Parent Record Name |
Identify the intermediate record needed to get from the Org Chart Viewer to the data to be displayed by the respective data element class. This is not necessarily the source record’s parent record. |
Display as Xlat |
If the source field is defined to use the Translate Table, then specify if the field should display the long or short name. |
Label Tab
Set label information for the data element that will display in the Org Chart Viewer.
This example illustrates the fields and controls on the Chart and Profile Field Map page: Label tab. You can find definitions for the fields and controls later on this page.
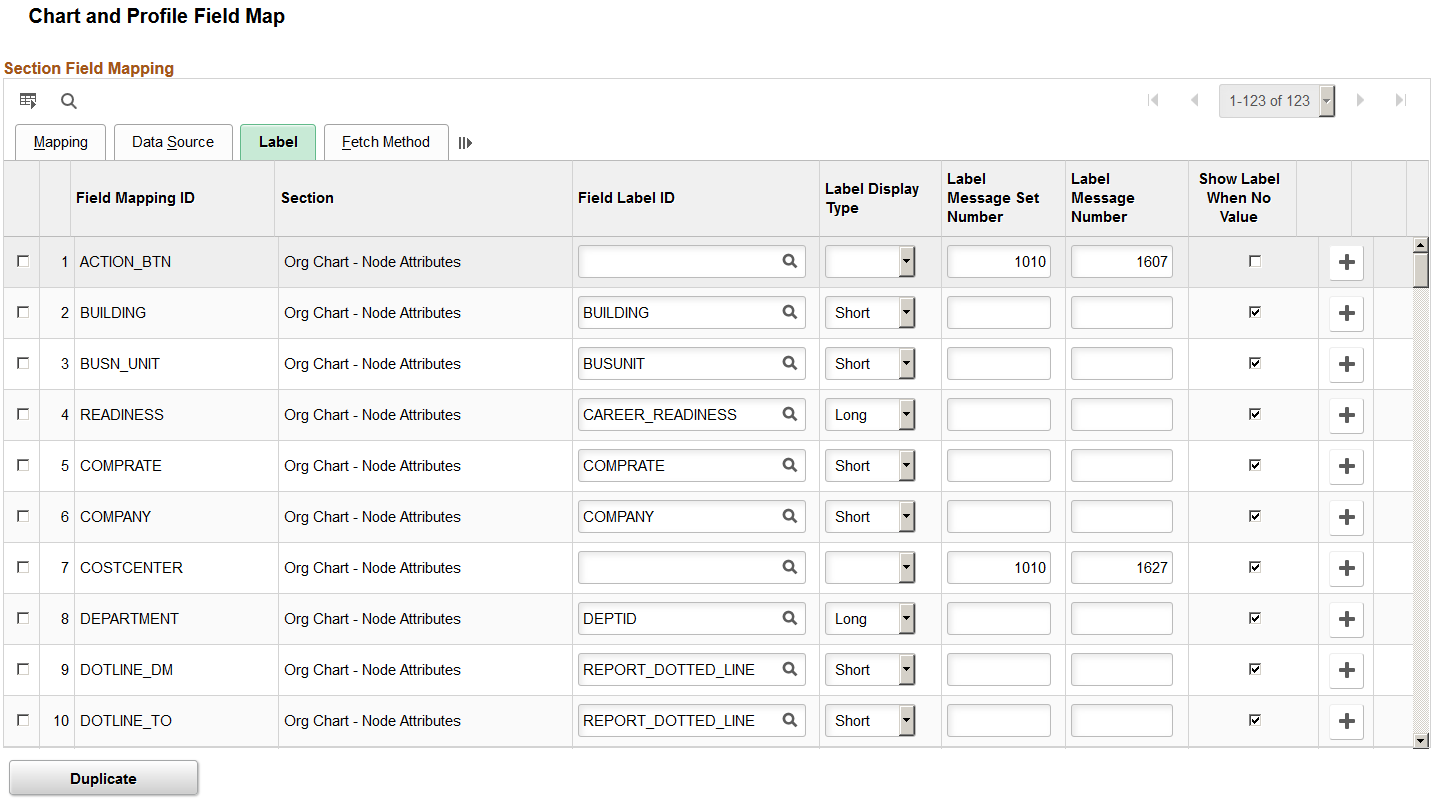
The delivered data that appears on this tab can be modified.
Field or Control |
Description |
|---|---|
Field Label ID |
Enter the field label ID that should be used to display on the Org Chart Viewer pages. For example, the PHONE_CELL field would use the Field Label ID MOBILE to differentiate it from other phone types, such as work phone. |
Label Message Set Number and Label Message Number |
Enter the message number for this field mapping. Enter the number that will identify the label that should be used for the field on the Org Chart Viewer pages. Do not use these fields if you have entered a value in the Field Label ID field. |
Show Label When No Value |
Select to display the field label even when there is no value to display. For example, If an employee does not have peers, the peers label will still display but with no names listed after it on the Profile page. |
Fetch Method Tab
The tab is used to assign the code used for fetching and displaying the data element.
This example illustrates the fields and controls on the Chart and Profile Field Map page: Fetch Method tab. You can find definitions for the fields and controls later on this page.
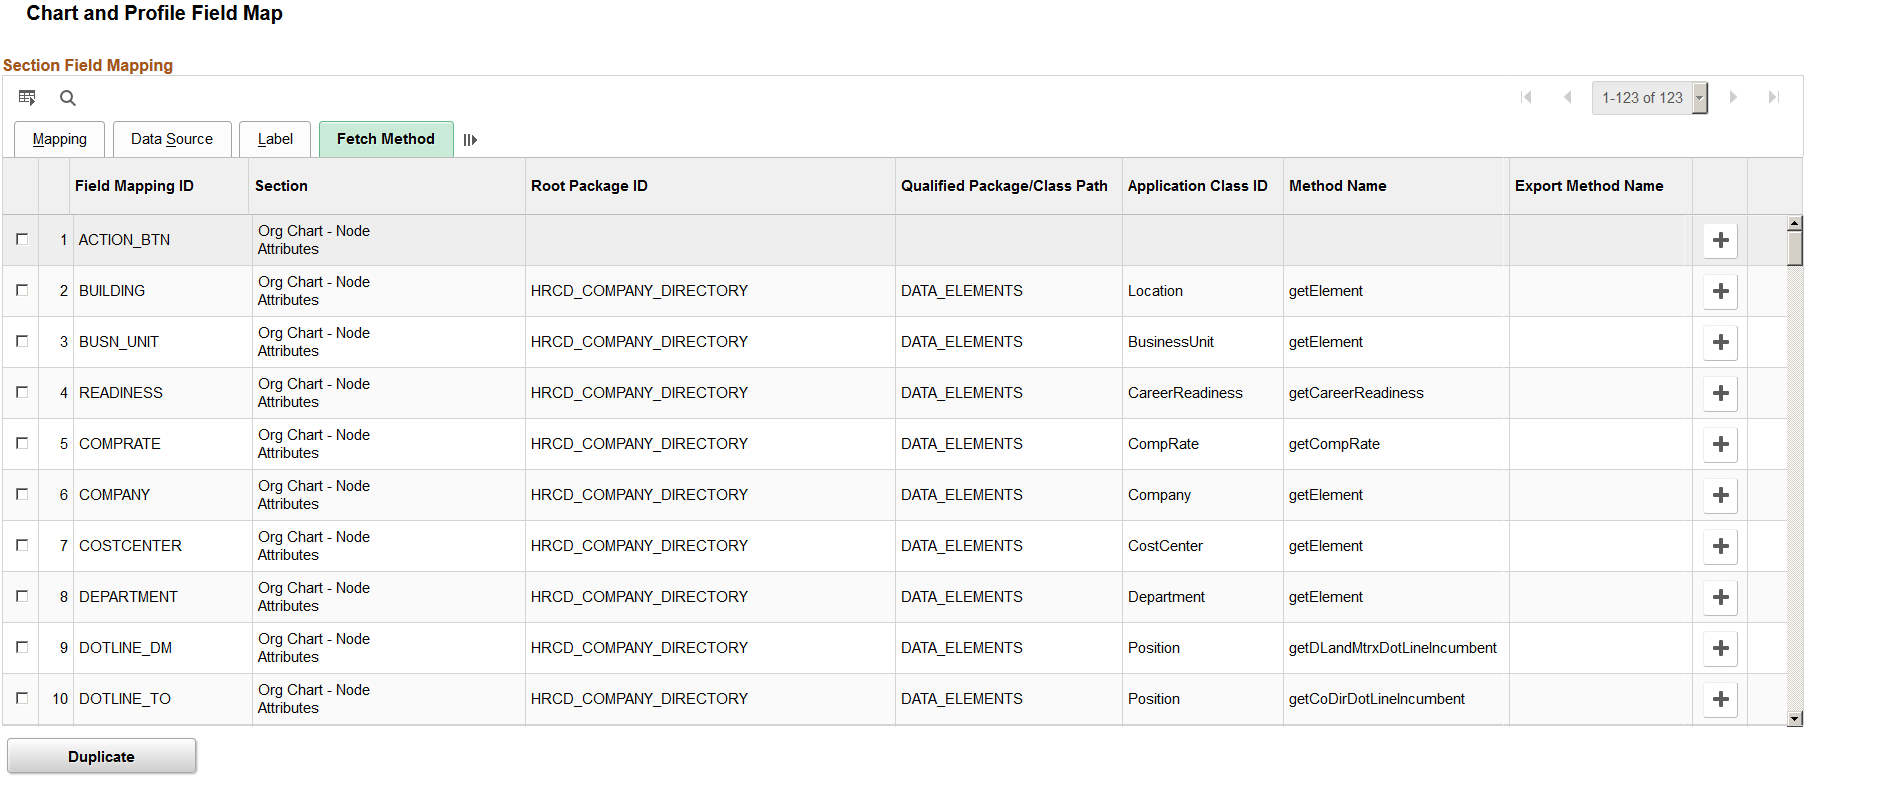
The delivered data in this tab cannot be modified, but new rows can be added.
Field or Control |
Description |
|---|---|
Qualified Package/Class Path |
Displays the qualified package/class in the root package ID that resolves the field mapping element value. |
Application Class ID |
Displays the application class ID in the qualified package/class path that resolves the field mapping element value. Note: Any class assigned here must be inherited from HRCD_COMPANY_DIRECTORY:DATA_ELEMENTS: DataElementBase. |
Method Name |
Displays the method name in the application class ID that resolves the field mapping element value. Note: Field mapping IDs that are configured to use a method name getElement are using the logic inherited from the base class. |
Export Method Name |
Displays the method name in the application class ID that resolves the export data for the field mapping element. An export method is only required when if the logic in the class assigned to method name is not also compatible with export. |
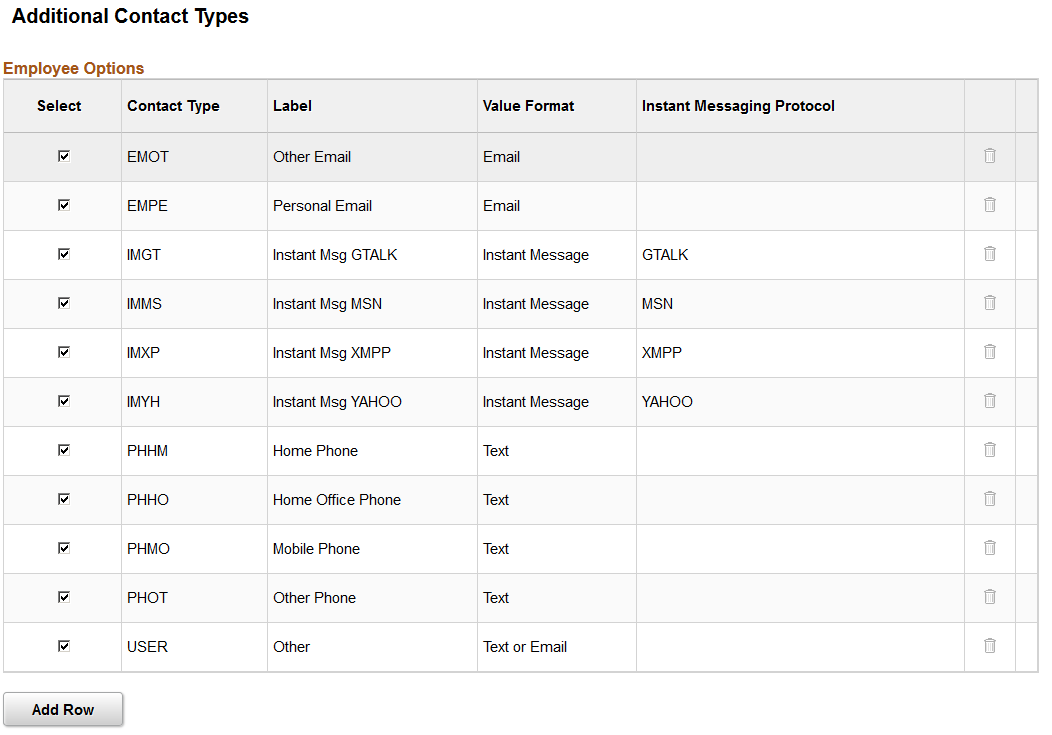
Use the Additional Contact Types page (HRCD_ADDTL_CNTCT) to define additional contact types that will be available to the user on the Profile, Edit Additional Contacts page of the Company Directory.
Navigation:
This example illustrates the fields and controls on the Additional Contact Types page. You can find definitions for the fields and controls later on this page.
Field or Control |
Description |
|---|---|
Select |
Select the contact types that should be available to the user on the Edit Additional Contacts page when the user updates his or her additional contact information on the Profile page of the Org Chart Viewer. If you deselect an option, this contact type will not be available to the user. The following contact types are delivered selected:
|
Contact Type |
Enter a unique four letter code to identify the contact type. This page sorts the contact types by the code. However the Edit Additional Contacts page accessible from the Profile pages of the Org Chart Viewer sorts them by label name. |
Label |
Enter the name of this type of contact. This value will appear in the Contact Type drop-down list and as the label, of display as, name on the add or edit contact pages. This label will appear on the Profile pages of the Org Chart Viewer when a user selects and enters a value for this contact type. The following text or email contact types are delivered with the system:
The following instant messaging contact types are delivered with the system:
These labels are display-only for the user with the exception of the Other field. The contact type Other enables users of the Company Directory to enter their own label or field description for a contact type. |
Value Format |
Select the format the system should use for this field. Options are Email, Instant Message, Text, and Text or Email. |
Instant Messaging Protocol |
Identify the IM protocol that should be associated with this IM contact type. Valid values include GTALK, MSN, XMPP, and YAHOO. This field is available when you select Instant Message from the Value Format field. With the delivered IM contact types, the field displays the associated IM protocol type. |
Add Row |
Click this button to add additional contact types in the Employee Options group box. This will open up free-form text fields in which the administrator can enter the field labels and determine the value format that will be available to the user. |
Use the Chart and Profile Settings search page to select an org view type for page configuration.
Navigation:
This example illustrates the fields and controls on the Chart and Profile Setting search page. You can find definitions for the fields and controls later on this page.
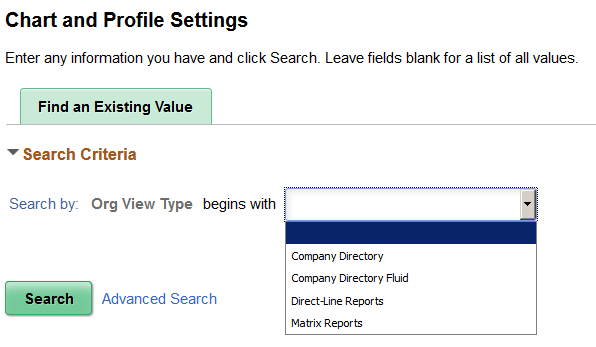
You use the Chart and Profile Settings component to configure the pages of the Org Chart Viewer for each org view type.
The desktop Org Chart Viewer component consists of up to three types of organizational views (shown as folders and tabs to the user). The PeopleSoft application delivers these desktop org view types:
Company Directory — a view of the Company Directory.
Direct-Line Reports — a view of a user’s direct-line reports.
Matrix Reports — views of the matrix teams associated with a user.
You can also define settings for the PeopleSoft Fluid User Interface, which is designed to be used on mobile devices, but can also be used on a laptop and desktop. The PeopleSoft application delivers the Company Directory Fluid org view type for this.
All org view types use a similar setup format. The Chart and Profile Settings component may contain up to three pages (the General Settings, Profile Content, and Org Chart Content pages), however, some fields and pages are hidden depending upon the org view type you select.
Field or Control |
Description |
|---|---|
Org View Type |
Select from one of the list of valid values to define the setup for that specific org view type. Valid values for the desktop version of the org chart viewer are Company Directory, Direct-Line Reports, or Matrix Reports. The valid value for the PeopleSoft Fluid User Interface is Company Directory Fluid. |
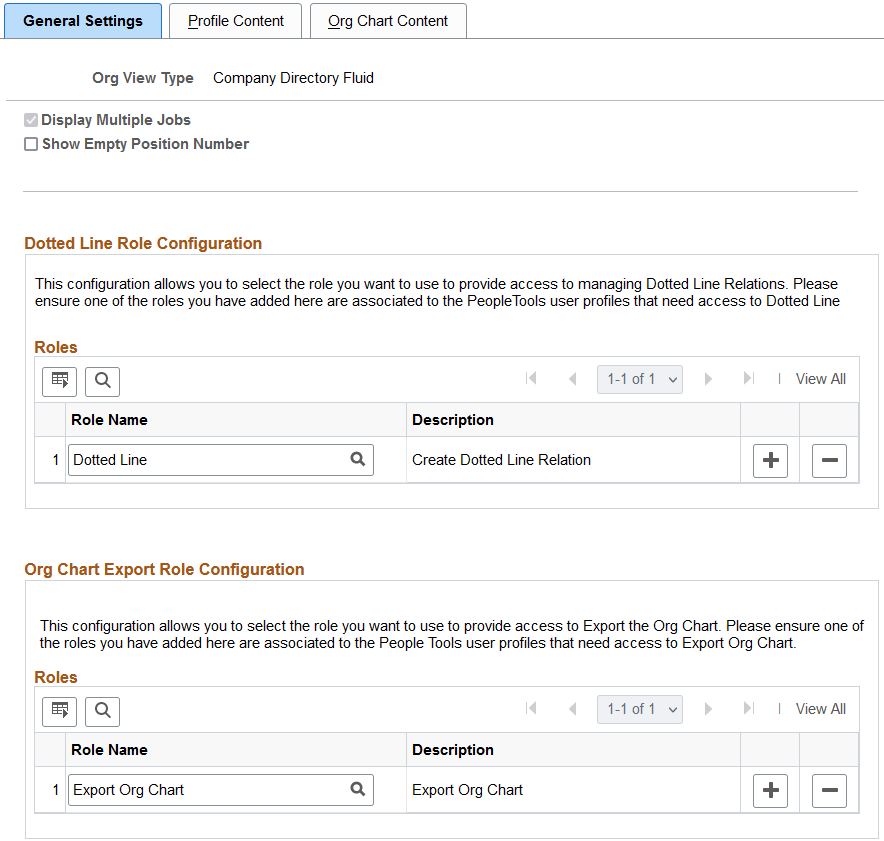
Use the General Settings page (HRCD_SETUP_GENERAL) to define default startup page content and layout settings for each org view type.
Navigation:
This example illustrates the fields and controls on the Chart and Profile Settings – General Settings page for the Company Directory Fluid org view type.
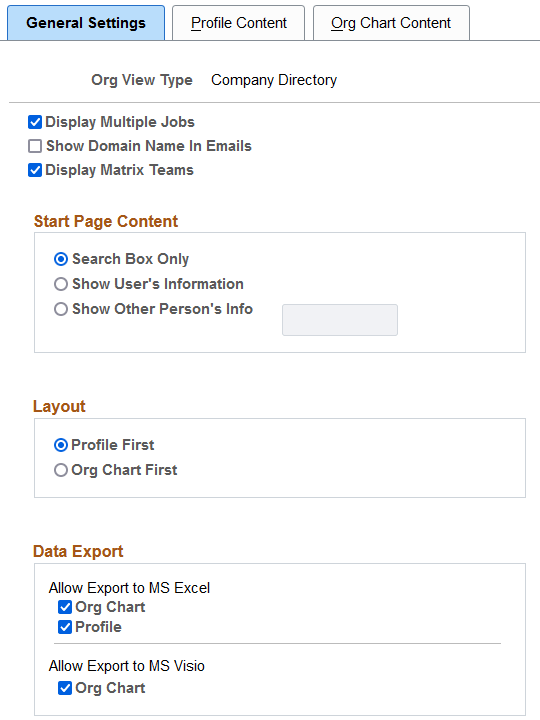
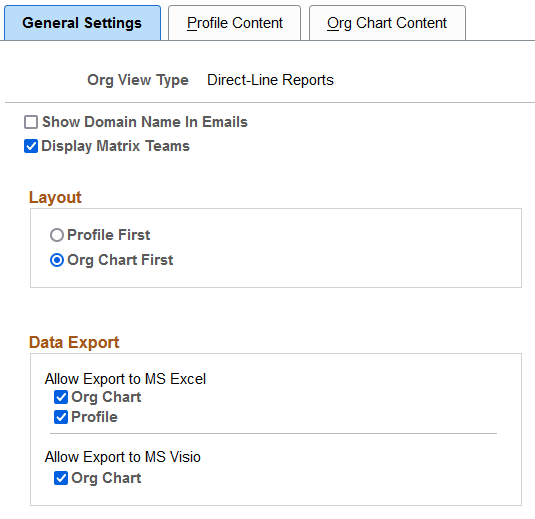
This example illustrates the fields and controls on the Chart and Profile Settings – General Settings page for the Company Directory org view type.
This example illustrates the fields and controls on the Chart and Profile Settings – General Settings page for the Direct-Line Reports and Matrix Reports org view types.
Field Availability on the General Settings Page by Org View Type
These tables list the field elements available on the Chart and Profile Settings - General Settings page according to the Org View Type value you select:
Fields at the top of the page:The following field elements are available at the top of the page for the mentioned org view types:
|
Page Element |
Company Directory Fluid |
Company Directory |
Direct-Line Reports |
Matrix Reports |
|---|---|---|---|---|
|
Display Multiple Jobs |
Yes (display only) |
Yes |
N/A |
N/A |
|
Show Empty Position Number |
Yes |
N/A |
N/A |
N/A |
|
Show Domain Name in Emails |
N/A |
Yes |
Yes |
Yes |
|
Display Matrix Teams |
N/A |
Yes |
Yes |
Yes |
Dotted Line Role Configuration group box:The following field elements are available in the Dotted Line Role Configuration group box for the mentioned org view type:
|
Page Element |
Company Directory Fluid |
|---|---|
|
Role Name |
Yes |
This video demonstrates the dotted line role configuration feature:
Video: Image Highlights, PeopleSoft HCM Update Image 24: Company Directory Setup Enhancement
Org Chart Export Role Configureation group box:The following field elements are available in the Org Chart Export Role Configuration group box for the mentioned org view type:
|
Page Element |
Company Directory Fluid |
|---|---|
|
Role Name |
Yes |
Start Page Content group box:The following field elements are available in the Start Page Content group box for the mentioned org view type:
|
Page Element |
Company Directory |
|---|---|
|
Search Box Only |
Yes |
|
Show User’s Information |
Yes |
|
Show Other Person’s Info |
Yes |
Layout group box:The following field elements are available in the Layout group box for the mentioned org view types:
|
Page Element |
Company Directory |
Direct-Line Reports |
Matrix Reports |
|---|---|---|---|
|
Profile First |
Yes |
Yes |
Yes |
|
Org Chart First |
Yes |
Yes |
Yes |
Data Export group box:The following field elements are available in the Data Export group box for the mentioned org view types:
|
Page Element |
Company Directory |
Direct-Line Reports |
Matrix Reports |
|---|---|---|---|
|
Allow Export to MS Excel - Org Chart |
Yes |
Yes |
Yes |
|
Allow Export to MS Excel - Profile |
Yes |
Yes |
Yes |
|
Allow Export to MS Visio - Org Chart |
Yes |
Yes |
Yes |
General Settings
Use the first several check boxes on the General Settings page to specify the amount of detail the system should display about a person.
Field or Control |
Description |
|---|---|
Display Multiple Jobs |
This field is available for selection for the Company Directory org view type. Select to have the Company Directory search feature return all multiple job or additional job rows for a person. Deselect this option to have the system display the primary job only for the person. Note: For the Company Directory Fluid org view type, this field is display only and comes from the setting that was selected for the Company Directory org view type. When you select this check box, the Title-Job fields on the Profile Content and Org Chart Content pages will be automatically selected. Also, the Company Directory - Profile page will display the Additional Jobs field in the HR Details group box. Note: Selecting the Display Multiple Jobs check box will allow additional jobs in the search only when these jobs are present in the tree. You may need to refresh the tree using the Job Tree Builder component or update the tree manually in Tree Manager. |
Show Empty Position Number |
This field is available for the Company Directory Fluid org view type. Select this check box to have the Company Directory pages display the position number in an empty position row or org chart node box. The text Empty Position and the position title always display for rows or org chart nodes of vacant positions. Deselect this option to display only the text Empty Position and the position title without the position number. This check box is deselected by default. Note: You must use a Company Directory tree that includes empty positions in order for empty positions to appear within the Company Directory pages. For more information on building trees that include empty positions, see the Tree Builder Run Control Page topic. |
Show Domain Name in Emails |
This field is available for the desktop org view types. Select this check box to have the domain name appear in the person's email. The domain name is the text that appears after the @ sign in an email address. Deselect this check box to not have the system display the domain name. This will save space on the page and avoid redundancy, such as when all employees have the same domain name in their business email address. With this option deselected, the full email address still appears when the user places the mouse over an email address field. Note: The selection you make here does not affect the email addresses entered by end-users in the Additional Contact Information group box of the Profile page. |
Display Matrix Teams |
This field element is available the desktop org view types. Select this check box to enable the user to view or export hierarchical reporting details for a matrix team. See the Data Export group box on this page. |
Dotted Line Role Configuration
This field is available for the Company Directory Fluid Org View Type.
Field or Control |
Description |
|---|---|
Role Name |
Select the role or roles that will provide a user access to the Profile - Manage Dotted Line Page, where a person can create or remove dotted line reporting relationships. The PeopleSoft application delivers the Dotted Line role for this purpose, but you can identify other roles that should be granted access to the dotted line pages. You must ensure that at least one of the rows entered here is associated with a user’s profile. Note: If no roles are defined in this setup grid, users will not be able to manage dotted line relationships in the Company Directory profile pages. |
Org Chart Export Role Configuration
This field is available for the Company Directory Fluid Org View Type.
Field or Control |
Description |
|---|---|
Role Name |
Select the role or roles that will provide a user the ability to export the org chart data from the Organization Chart Page. When you enter a role here and assign this role to the user, the Export to Excel and Export to Visio menu items will be available from the Actions List. The PeopleSoft application delivers the Export Org Chart role for this purpose, but you can identify other roles that should be granted access to export org chart functionality from the Actions List menu of the Company Directory Org Chart page. You must ensure that at least one of the rows entered here is associated with a user’s profile. Note: If no roles are defined in this setup grid, users will not be able to export the Company Directory organization chart from the fluid pages. |
Start Page Content
These fields are available for the Company Directory Org View Type.
Use this group box to specify the default settings for the Company Directory start page. Choose from one of the three options to define what information the system should display to the user when first accessing the Company Directory. Users can override this default setting by defining their own preferences.
Field or Control |
Description |
|---|---|
Search Box Only |
Select this option to display the search field only, where you can search by name, job title, department, or email for any active person in the system. You will also have the option to use an advanced search, where you can enter additional search criteria. |
Show User's Information |
Select this option to have the system display the information of the user accessing the Org Chart Viewer pages. The user will appear as the focus of the node or Profile page, depending on the layout setting selected. The search field is also available at the top of the page when you select this option. |
Show Other Person's Info |
Select this option and enter a person’s employee ID in the accompanying field to have the system display the information of this employee on the startup page. The identified person will appear as the focus of the node or the Profile page, depending on the layout setting selected. Note: In order to populate this field, a tree must already be created and the tree name must match the Tree Name provided on the portal folder definition HC_COMPANY_DIRECTORY. For more information, see PeopleTools: PeopleTools Portal Technologies, "Administering Portals," Managing Portal Objects. |
Layout
These fields are not available for the Company Directory Fluid org view type.
Use this group box to define which page of the Org Chart Viewer pages the system should display first. The value you select here will determine the page order. The user can override these default settings by defining personal preferences.
Field or Control |
Description |
|---|---|
Profile First |
Select this option to have the system display the Profile page for the focus person. The Profile page displays detailed information about the person, such as contact information, HR details, and personalized links and information. This option will also display the Profile page as the first page in the component. |
Org Chart First organizational chart first |
Select this option to have the system display the Org Chart page. The Org Chart page displays a multi-leveled graphical representation of the focus person’s reporting structure, as well as high-level details about this person. This option will also display the Org Chart page as the first page in the component. |
Data Export
These fields are not available for the Company Directory Fluid org view type.
Use this group box to enable exporting options for the user.
Field or Control |
Description |
|---|---|
Allow Export to MS Excel (allow export to Microsoft Excel) – Org Chart and Profile |
Select these check boxes to enable the user to export profile or org chart information to a Microsoft Excel spreadsheet. Users will be able to export the following hierarchical reporting details:
|
Allow Export to MS Visio – Org Chart |
Select this check box to enable the user to export org chart information to a Microsoft Visio drawing. |
Use the Profile Content page (HRCD_SETUP_PROFILE) to select the contact information, HR details, and employee personalization field options that should appear on the Profile page for each org view type.
Navigation:
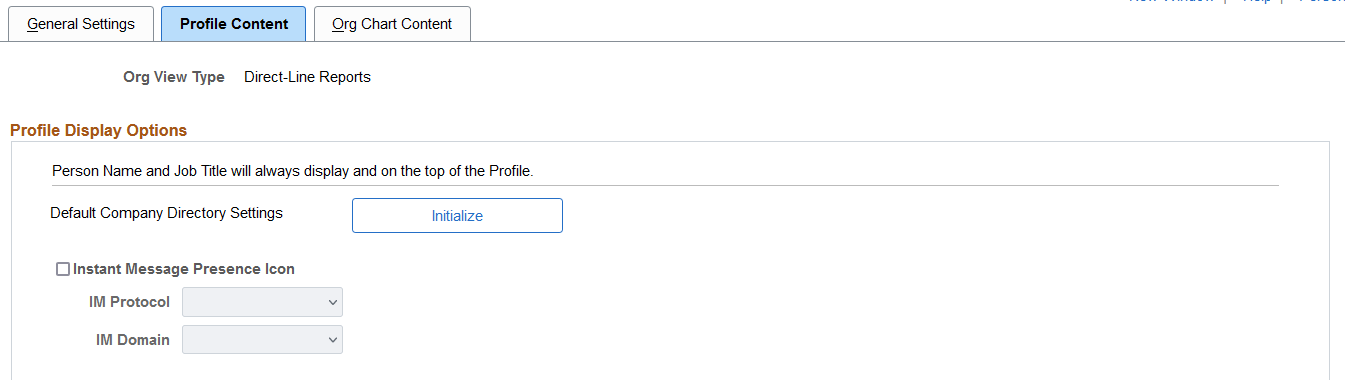
This example illustrates the Profile Display Options section of the Chart and Profile Settings - Profile Content page (1 of 3). This example applies to all Org View Types, with the exception of the Company Directory Fluid type.
This example illustrates sections of the Chart and Profile Settings - Profile Content page (2 of 3) for the Company Directory Fluid type. Similar fields are found on the other Orv View Types with the exception of the Additional Display Options, which is specific to the Fluid pages.

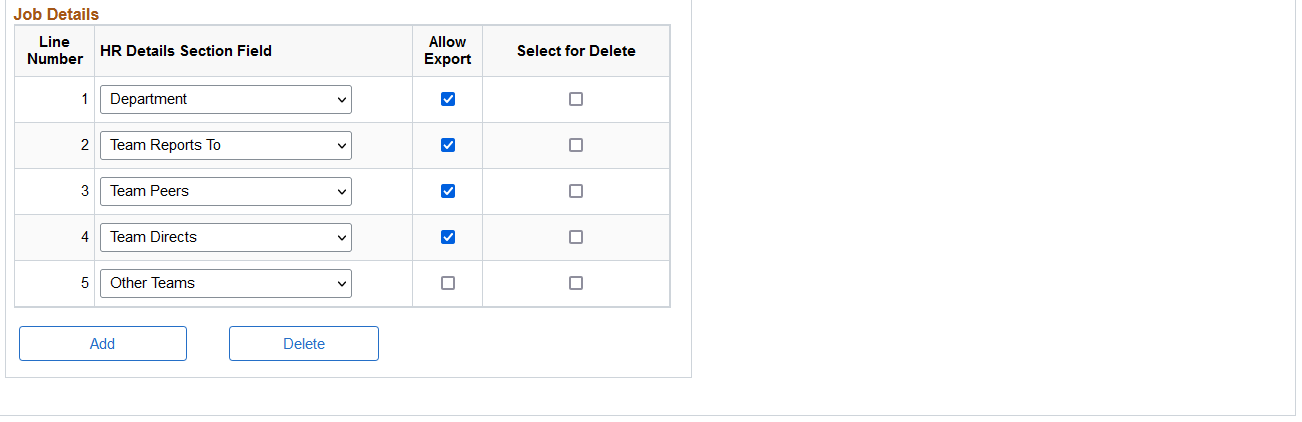
This example illustrates the Job Details section of the Chart and Profile Settings - Profile Content page (3 of 3) for all types except the Company Directory Fluid type, which does not have the Allow Export column.
The Profile pages will display detailed information about a person using the fields you select on this page for the individual org view types. The field content is specific to the org view type.
The field elements on this page are available for all org view types unless otherwise specified.
Profile Display Options
Field or Control |
Description |
|---|---|
Initialize |
Click to have the system provide by default the same settings you established for the Company Directory org view type. This field element is available for the following org view types: Direct-Line Reports and Matrix Reports. |
The Instant Message field elements are not available for the Company Directory Fluid org view type.
Field or Control |
Description |
|---|---|
Instant Message Presence Icon |
Select this check box to have the Profile page display the IM icon for a person, if an IM address exists for a person. Store instant message IDs for a person on the Contact Information page of personal data in HR. |
IM Protocol (instant messaging protocol) |
Identify the IM protocol that the system should use when displaying the IM icon. Valid values include GTALK, MSN, XMPP, and YAHOO. If a person does not have this IM protocol type defined in their personal data, the icon will not display for this person. This field is available when you select the Instant Message Presence Icon check box. |
IM Domain |
Displays the Instant Message domain associated with the IM Protocol you selected for all protocols except XMPP. For XMPP, you must select the value of the XMPP server that has been defined by your organization. See PeopleTools: PeopleSoft MultiChannel Framework, "Configuring Instant Messaging in PeopleSoft MultiChannel Framework" |
Contact and Organizational Content
Select fields in this group box that should appear on the Profile page. This information comes from the HR tables. The field elements in this group box are available for all org view types unless otherwise specified.
Field or Control |
Description |
|---|---|
Contact Information |
Select contact-related fields that will appear as person profile data in the Contact Information group box or page of the Company Directory - Profile page. Note: Although the Contact Information section will display the fields in the order you select, it will first group the information in the following contact type order and then by the order you select: 1. Phone number types 2. Email types 3. Address types 4. Other For example, you have defined the following sort order: Address- Business Telephone - Mobile Email - Business Telephone - Business The Contact Information section will display phone number contacts first, then email contacts, then addresses, with each group sorting the content within those contact types according to your defined order. In this scenario it would appear like the following: Telephone - Mobile Telephone - Business Email - Business Address- Business Valid field values are:
These options are available for the remaining line numbers:
Addition values specific to the Direct-Line Reports and Matrix Reports org view types:
Note: * These field elements are considered to be sensitive data. Sensitive data will only display if the employee reports to the signed-in user, hence the user will only see this information for his or her subordinates. |
Job Details |
Select job detail fields that will appear as person profile data in the Job Details group box or panel of the Profile page. The pages will display the fields in the order you select them on this page. Select from these valid values for all remaining org view types:
Value specific to the Company Directory org view type: Additional Jobs. Value specific to the Company Directory and Direct-Line Reports org view types: Teams (provided as a page for the fluid user). Value specific to the Direct-Line Reports org view type: Salary Plan/Grade/Step. Note: Salary Plan/Grade/Step is considered to be sensitive data. Sensitive data will only display if the employee reports to the user, hence, the user will only see this information for his or her subordinates. Value specific to the Direct-Line Reports and Matrix Reports org view types: Reports Count - Total. Values specific to the Matrix Reports org view type:
When there is an empty position, only these values will display, if selected:
Values specific to the Company Directory Fluid org view type:
|
Allow Export |
Select this check box to enable the user to export this field content. This page element is not available for the Company Directory Fluid org view type. |
Select for Delete and Delete |
Select the check box after a field and use the Delete button to remove a field from appearing on the Profile page. The system automatically re-sequences line numbers when you delete rows in the middle of the grid. |
Add |
Select the Add button to identify additional fields that should appear on the Profile page. |
Employee Personalizations
Use information in this group box to determine which personalization group boxes should appear on the right side of the Profile page.
Field or Control |
Description |
|---|---|
Additional Contacts |
Select this option to enable the user to add or edit contact information on the Profile page. When a person has added additional contact information, it will also appear on the page. If you deselect this option, the Profile page will not display additional contact information added by a person and users will not be able to add other contact information in the company directory. |
Go to Define Additional Contact Types link |
Click this link to access the Additional Contact Types page to add or review contact types. |
My Profile Links |
Select this option to have the My Profile Links group box available on the Profile page. Profile links enable the user to define shortcut links to other web sites. When you select this option, the Show My Links Shortcut Icon check box on this page will be available for selection. If you deselect this option, the My Profile Links group box will not be available on the Profile page. |
Show My Links Shortcut Icon |
Select this check box to have the shortcut icons associated with target web addresses appear next to the label entered by the user. Some sites may or may not have a default shortcut icon. For example, when this check box is selected, and the user enters the web address for Oracle (http://oracle.com), the following icon will appear next to the label name. This option is available when the Display My Profile Links check box is selected. |
Personal Statement |
Select this option to have the Personal Statement group box available on the Profile page. This functionality enables the user to enter personalized text. Users will update their personal statement using the Rich Text Editor. See PeopleTools: Using PeopleSoft Applications, "Using PeopleSoft Application Pages," Working With the Rich Text Editor If you deselect this option, the Personal Statement group box will not be available on the Profile page. |
Additional Display Options
This section is only available for the Company Directory Fluid org view type.
This video demonstrates the additional display configuration options:
|
Field or Control |
Description |
|---|---|
|
Pronoun |
Note: Gender Identity functionality must be enabled on the Installation Table - HCM Options Page for this section to appear and to use this feature. Select to display a person's pronouns on the Fluid Company Directory pages to help others know how to address a person. (See also Using the PeopleSoft Fluid User Interface for the Company Directory and Company Directory Profile Page Layout). The pages will only display pronouns for those who have provided pronouns (see the employee self service Gender Details Page and the administrator Biographical Details Page of Personal Data). When an employee has not specified a pronoun, the pronouns will not appear on the Company Directory. These videos provide an overview of the gender identity functionality: Video: Image Highlights, PeoleSoft HCM Update Image 41: Gender Identity and Expression |
|
Remote Worker Status |
Select to have the Fluid Company Directory display a person's remote worker status on the home page and other areas that display a grid of employees. Note: This setting does not control the display of the Profile - Remote Worker Status Page on the Company Directory page. The page will appear if the employee has a remote worker request in the system, regardless if you select this option. |
|
Local Time and Time Zone |
Select to have the Fluid Company Directory display the person's local time and time zone on the home page and other areas that display a grid of employees. Selecting this check box will also enable an edit time zone option when individuals are on their own profile to specify their time zone. |
Use the Org Chart Content page (HRCD_SETUP_OC_NODE) to select the organization chart field options that should appear on the Org Chart page for each org view type.
Navigation:
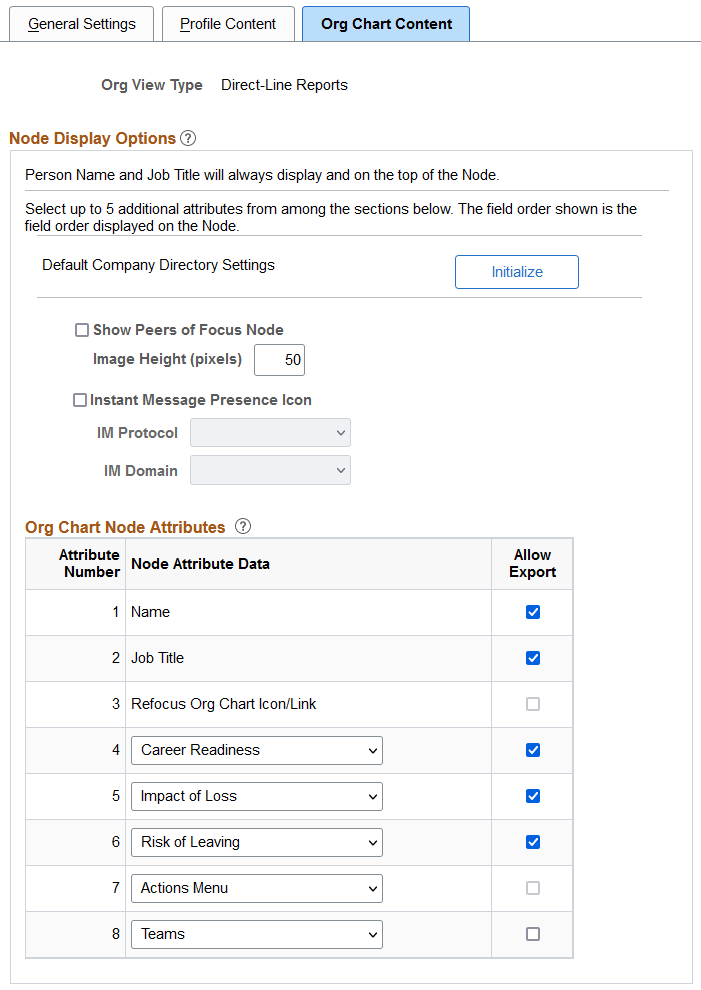
This example illustrates the Org Chart Content page for org view types Company Directory, Direct-Line Reports, and Matrix Reports.
This example illustrates the Org Chart Content page for the Company Directory Fluid org view type.
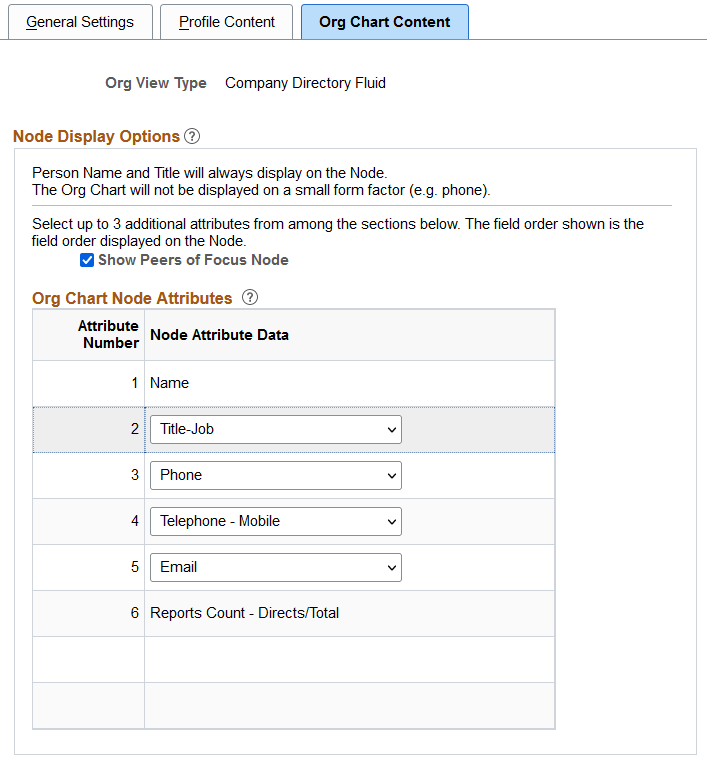
Node Display Options
Field or Control |
Description |
|---|---|
Initialize |
Click this button to have the system provide by default the same settings you established for the Company Directory org view type. This field element is available for the following org view types: Direct-Line Reports and Matrix Reports. |
Show Peers of Focus Node |
Select this check box to have the system display peers within the same reporting structure level of the focus person. Deselect this check box to show only the focus person at the middle level of the organizational chart. The report to and subordinate nodes will still display for this person, if applicable. |
Image Height (pixels) |
Enter size in which the height of an employee picture should appear within the node. This option is available when the Display Photo check box is selected on the HCM Options Page of the Installation Table. This field element is not available for the Company Directory Fluid org view type. |
The Instant Message field elements are not available for the Company Directory Fluid org view type.
Field or Control |
Description |
|---|---|
Instant Message Presence Icon |
Select this check box to have the Org Chart node display the IM icon for a person, if IM information exists in the HR person model. Instant Message IDs for a person can be stored on the Contact Information page of personal data in HR. |
IM Protocol (instant messaging protocol) |
Identify the IM protocol that the system should use when displaying the IM icon. Valid values include GTALK, MSN, XMPP, and YAHOO. If a person does not have an IM protocol type defined in his or her personal data, the icon will not display for this person. This field is available when you select the Instant Message Presence Icon check box. |
IM Domain |
Displays the Instant Message domain associated with the IM Protocol you selected for all protocols except XMPP. For XMPP, you must select the value of the XMPP server that has been defined by your organization. See PeopleTools: PeopleSoft MultiChannel Framework, "Configuring Instant Messaging in PeopleSoft MultiChannel Framework" |
Org Chart Node Attributes
|
Field or Control |
Description |
|---|---|
|
Org Chart Node Attributes |
Select field attributes that will display in the individual nodes of the chart on the Org Chart page. The fields within the node will appear in the order of the attribute line number. Valid values for line numbers are:
These values are available for selection for the Company Directory Fluid org view type:
These remaining field selections discussed here apply to the following org view types: Company Directory, Direct-Line Reports, and Matrix Reports, unless otherwise noted.
These values are available for the remaining line numbers.
These options are specific to the Company Directory org view type.
These values are specific to the Direct-Line Reports and Matrix Reports org view types:
When there is an empty position, only these values will display, if selected:
Attribute number 8 enables you to display either the Teams or Other Teams link in a node for a person who is part of a matrix team. If the person is not part of a matrix team, the link will not appear in the node. Valid values are:
|
|
Allow Export |
Select this check box to enable the user to export this field content. This option is not available for the Company Directory Fluid org view type. |