
 (JPN) Understanding How to Track Selectees for Japan
This chapter provides an overview of how to track selectees for Japan, lists a prerequisite and common element, and discusses how to:
Track applicant activity.
Enter applicant expenses.
Add contact notes and attachments.
Edit applications and resumes.
Edit contact information.
Manage references.
Edit eligibility and identity information.
Manage applicant lists.
Create applicant checklists.
Forward applicants.
Send emails and letters.
Link applicants to job openings.
Change applicant statuses.
Add external trainees.
Process duplicate applicants.
Generate a Candidate Listing report.
Generate an Applicant Summary by Job report.
Generate an Applicant Summary by Source report.
Generate a Job Group Movement Analysis report.
(JPN) Understanding How to Track Selectees for JapanThe standard PeopleSoft recruitment process begins with posting job openings and ends with hiring—when applicants become employees. In between job opening posting and hiring, there are the other recruitment activities, such as screening, interviewing, and offering and accepting employment.
The recruitment process followed by most Japanese companies, however, requires selectee statuses between applicant and employee. Applicants become known as selectees when they have one of these four user-maintained preliminary offer statuses (applicant and selectee statuses are also known as dispositions):
Preliminary offer decided.
Preliminary offer notified.
Preliminary offer accepted.
Preliminary offer rejected.
There is a fifth user-maintained status of Hire Decided. You manually enter the Hire Decided status when an applicant who has accepted a preliminary offer is about to be hired. The status of Preliminary Offer Accepted remains until that decision is made because it is possible that an applicant who has accepted might not in fact graduate and may not, therefore, be hired. The Hire Decided status distinguishes between those who have accepted and who might be hired and those who have accepted and will be hired.
This flowchart illustrates the common additional Japanese recruitment stages within the context of the standard recruitment process. The flowchart represents an organization that includes an acceptance letter with its version of a preliminary offer letter for the selectee to use when responding:
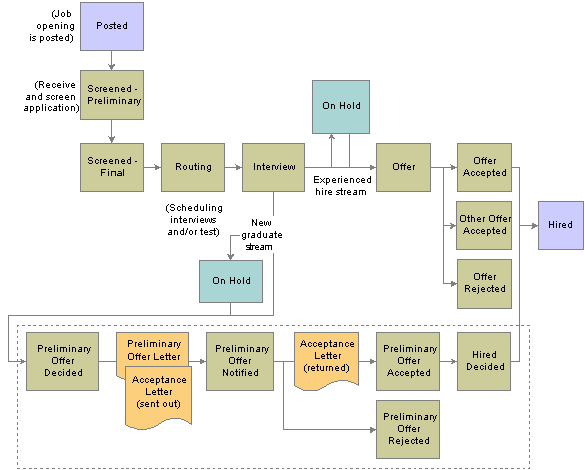
Japanese recruitment stages
Prerequisite
Before you can track applicant activity, you must enter applicants.
See Entering Applicants.
Common Element Used in this Chapter
|
Contact |
Displays the applicant's preferred contact method. Specify an applicant's preferred contact method on the Add New Applicant - Contact Details and Manage Applicant - Applicant Data: Contact pages. |
Tracking Applicant ActivityThis section provides an overview of applicant tracking and discusses how to:
Track applicant activity.
Edit disposition details.
Understanding Applicant Tracking
You can track applicant activity by using the Manage Applicant (HRS_MANAGE_APP) component. From the Manage Applicant - Applicant Activity: Current Status page, you can see where applicants are in the recruitment process for each job opening to which they are associated.
You can also view track applicant activity by using the Job Opening (HRS_JO_360) component. From the Job Opening - Manage Applicant page, you can see where all applicants are in the recruitment process for a specific job opening.
See Also
Reviewing Applicants Linked to Job Openings
Pages Used to Track Applicant Activity
|
Page Name |
Object Name |
Navigation |
Usage |
|
Find Applicants |
HRS_REC_SCHAPP |
Recruiting, Find Applicants, Find Applicants |
Search for and select applicants. |
|
HRS_MANAGE_APP |
Click an applicant name link in the Search Results grid on the Find Applicants page. |
Manage an applicant. |
|
|
HRS_MANAGE_APP |
Click the Applicant Activity link and then the Current Status link on the Manage Applicant page. |
Track applicant activity. |
|
|
HRS_APP_RESUME |
Click the Resume icon on the Manage Applicant - Applicant Activity: Current Status page. |
View an applicant's resume for a job opening. |
|
|
HRS_APP_RCMNT |
|
Edit disposition details. The options on this page vary depending on the applicant's disposition. |
Tracking Applicant ActivityAccess the Manage Applicant - Applicant Activity: Current Status page.
Applicant Activity
Use this group box to view the disposition for an applicant for each job opening to which the applicant is linked. This group box also lists a disposition when an applicant is not linked with a job opening. The system sorts the information in this group box by status date, with the most recent date at the top. The default view for this group box is current activity, but you can choose to view activity history if needed.
|
Job Opening |
Click a job opening link to access the Job Opening page for that job opening. |
|
Disposition |
Click the a disposition link for a job opening to access the Manage Applicant - Disposition Details page, where you can view and make changes to an applicant's disposition for that job opening. |
|
Click the Resume icon for a job opening to access the Manage Applicant - Applicant Resume page, where you can view the applicant's resume for that job opening. |
|
|
Add New Disposition |
Click to access the Manage Applicant - Disposition Details page, where you can add a new disposition for the applicant. |
|
View Current Activities |
Click to view all current activity. The system displays information for these dispositions: Draft, Review, Linked, Apply, Screen, Route, Interview, Preliminary Offer Decided, Offer, Offer Accepted, Preliminary Offer Notified, Preliminary Offer Accepted, Preliminary Offer Rejected, Hire Decided, Ready to Hire, and Hired. If you want to view information for Hold, Reject, Withdrawn, and Inactive dispositions, you must view activity history. This link appears only when you are viewing activity history. |
|
View Activity History |
Click to view all current and history activity. The system displays information for all dispositions. This link appears only when you are viewing current activities. |
Editing Disposition DetailsAccess the Manage Applicant - Disposition Details page.
Users can use this page view and edit details on key actions (Route, Interview, Offer, and Hire), view history for key actions, and manually override the disposition status.
Routing Details, Interviews, Offer, and Hire
The system displays either the Routing Details, Interviews, Offer, or Hire group box on the page, depending on which key action is the most recent in the disposition history. For example, if Interview is the most recent action in the disposition history, then the Interviews group box appears on this page; if Offer is the most recent action in the disposition history, then the Offer group box appears on this page. Each group box enables you to view and edit details for that disposition.
Disposition History
Use this group box to view disposition history. Only key actions (for example, Route, Interview, Offer, and Hire) appear in this grid. Each disposition appears in the grid when you perform that action for an applicant. For example, when you route an applicant, the system adds a row to this grid for the Route disposition status along with the date that the action took place. You can click a disposition link to access historical information for that disposition. For example, if you click the Interview disposition link, you can view interview schedules and evaluations for the applicant.
Click icon to edit disposition details
Use this group box to edit disposition details for an applicant. For example, when you link an applicant to a job opening, the system assigns Applied as the disposition for that job opening. You might want to change the disposition to Linked to indicate that you linked the applicant to the job opening. Or you might want to change the disposition from Applied to Review to indicate that you have reviewed a resume for the applicant. PeopleSoft recommends that you let the system assign dispositions for key actions (for example, Route, Interview, Offer, and Hire) and that you do not override dispositions for key actions.
|
Job Opening ID |
Select a job opening ID if you want to associate the applicant to a specific job to which they have not applied. If you access disposition information for a specific job opening, the job opening ID appears in this field. You can change the job opening ID if you need to associate the applicant with a different job opening. |
|
Contract Number |
Select a contract number. Only contracts that you create for the applicant appear as values in the system prompt. Create contracts for an applicant by using the HRS_APP_CNTRACT component. |
Entering Applicant ExpensesThis section provides an overview of applicant expenses and discusses how to:
View applicant expenses.
Enter applicant expenses.
See Also
Adding Expenses to Job Opening
Understanding Applicant Expenses
You can manually enter expenses at any time in the recruitment process after you have set up job openings and linked applicants to them. You can enter expenses incurred by applicants for a given job opening in two ways:
Use the Manage Applicant - Applicant Activity: Expenses page in the Manage Applicant component.
Use the Job Opening - Activity & Attachments page in the Job Opening component.
Pages Used to Enter Applicant Expenses
|
Page Name |
Object Name |
Navigation |
Usage |
|
Find Applicants |
HRS_REC_SCHAPP |
Recruiting, Find Applicants, Find Applicants |
Search for and select applicants. |
|
Manage Applicant |
HRS_MANAGE_APP |
Click an applicant name link in the Search Results grid on the Find Applicants page. |
Manage an applicant. |
|
HRS_MANAGE_APP |
Click the Applicant Activity link and then the Expenses link on the Manage Applicant page. |
View applicant expenses. |
|
|
HRS_APP_EXP_SP |
|
Enter applicant expenses. |
Viewing Applicant ExpensesAccess the Manage Applicant - Applicant Activity: Expenses page.
Expenses
|
Expense Details |
Click to access the Add Expenses page, where you can edit expense details for the expense. |
|
Add New Expense |
Click to access the Add Expenses page, where you can add expense details for a new expense. |
Entering Applicant ExpensesAccess the Add Expenses page.
|
Expense Code |
Select an expense code, such as airfare, car rental, travel, or parking. |
|
Expense Amount |
Enter an expense amount and select a currency code. |
|
Charge Date |
Enter the date that the expense occurred. |
|
Business Unit |
Select a business unit to which the expenses should be charged. |
|
Department |
Select a department to which the expenses should be charged. |
Adding Contact Notes and AttachmentsThis section provides an overview of contact notes and attachments, lists a prerequisite, and discusses how to:
View contact history for an applicant.
Add contact notes and attachments.
View proxy details.
Understanding Contact Notes and Attachments
Use the Manage Applicant - Contact Notes page to:
Review existing contacts notes.
Access the Add Note page, where you can add new contacts notes about interactions with an applicant.
Interactions can be inbound or outbound phone calls, emails, faxes, and so on, depending on the contact methods that you set up on the Contact Methods page.
On the Add note page, you can also add attachments.
You can make contact notes public or private. Only the recruiter or hiring manager that creates a private note can view that contact note. All recruiters and hiring managers can view public notes.
Prerequisite
Before you can log details for applicant interactions, you must define contact method types on the Contact Methods page.
See Defining Contact Method Types.
Page Used to Add Notes and Attachments
|
Page Name |
Object Name |
Navigation |
Usage |
|
Find Applicants |
HRS_REC_SCHAPP |
Recruiting, Find Applicants, Find Applicants |
Search for and select applicants. |
|
Manage Applicant |
HRS_MANAGE_APP |
Click an applicant name link in the Search Results grid on the Find Applicants page. |
Manage an applicant. |
|
HRS_MANAGE_APP |
Click the Contact Notes link on the Manage Applicant page. |
View contact history for an applicant. |
|
|
HRS_APP_NOTES |
|
Add contact notes about interactions with an applicant and add attachments. |
|
|
HRS_APP_PROXY_SBP |
Click the Proxy Details link on the Add Note page. |
View contact information for the proxy, including the proxy's name, email address, and phone number. |
Viewing Contact History for an ApplicantAccess the Manage Applicant - Contact Notes page.
Contact History
Use this group box to view a summary of all contact notes entered for an applicant. The system sorts the information in this group box by status date, with the most recent date at the top.
|
Contact Method |
Displays the contact method. Define contact methods on the Contact Method page. |
|
Subject |
Displays the text entered in the Subject field on the Add Note page. |
|
Details |
Click to access the Add Note page, where you can view and edit the contact note. |
|
Add Contact Note |
Click to access the Add Note page, where you can add a new contact note. |
Use this group box to enter the name and email address of interested parties. When you send correspondence to an applicant, you can select the Include Interested Parties option on the Send Correspondence page to send email correspondence to the persons that you add here.
Adding Contact Notes and AttachmentsAccess the Add Note page.
|
Click to access the Proxy Details page, where you can view contact information for the proxy. |
|
|
|
Click the applicant's name link to send an email to the applicant. |
Applicant Notes
|
Contact Method |
Select a contact method. Define contact methods on the Contact Method page. |
|
Note Audience |
Select Public or Private. You can make contact notes public or private. Only the recruiter or hiring manager that creates a private note can view that contact note. All recruiters and hiring managers can view public notes. |
|
Subject |
Enter a subject. The subject that you enter appears in the Contact History group box on the Manage Applicant - Contact Notes page. |
|
Notes |
Enter notes about the interactions with the applicant. |
Attachments
Use this group box to add and delete attachments that pertain to the interactions that you had with the applicant.
Viewing Proxy DetailsAccess the Proxy Details page.
Editing Applications and ResumesThis section discusses how to:
View applications.
Edit applications.
Pages Used to View and Edit Applications and Resumes
|
Page Name |
Object Name |
Navigation |
Usage |
|
Find Applicants |
HRS_REC_SCHAPP |
Recruiting, Find Applicants, Find Applicants |
Search for and select applicants. |
|
Manage Applicant |
HRS_MANAGE_APP |
Click an applicant name link in the Search Results grid on the Find Applicants page. |
Manage an applicant. |
|
HRS_MANAGE_APP |
Click the Applicant Data link and then the Applications & Resumes link on the Manage Applicant page. |
View an applicant's applications and add new applications. |
|
|
HRS_APP_PROFILE |
|
Enter application details. |
|
|
HRS_RESDTL_SEC |
|
Print resume text. |
|
|
HRS_APP_WRK_SEC |
|
Enter work experience information for an applicant. |
|
|
HRS_APP_PRI_ED_SEC |
|
Enter primary education information for an applicant. |
|
|
HRS_APP_DEG_SEC |
|
Enter secondary education information for an applicant. |
|
|
HRS_APP_LIC_SEC |
|
Enter license and certificate information for an applicant. |
|
|
HRS_APP_LANG_SEC |
|
Enter language information for an applicant. |
|
|
HRS_APP_MBR_SEC |
|
Enter membership information for an applicant. |
|
|
HRS_APP_HON_SEC |
|
Enter honors and awards information for an applicant. |
|
|
HRS_APP_EVAL |
|
Enter competency information for an applicant. See Adding Competencies. |
|
|
HRS_APP_EVAL |
|
Edit competency information for an applicant. See Adding Competencies. |
|
|
HRS_CE_ADM_PP |
|
Enter priority placement information for an applicant. |
Viewing ApplicationsAccess the Manage Applicant - Applicant Data: Applications & Resumes page.
Applications
Use this group box to view all of an applicant's applications.
|
View Application |
Click to access the Manage Applicant - Application Details page, where you can view and edit the application. |
|
Add Application |
Click to access the Manage Applicant - Application Details page, where you can add a new application for the applicant. |
Editing ApplicationsAccess the Manage Applicant - Application Details page.
The fields on this page are the same as the fields on the Add New Applicant - Contact Details page.
See Entering Application Details.
Editing Contact InformationThis section discusses how to edit contact information.
Pages Used to Edit Contact Information
|
Page Name |
Object Name |
Navigation |
Usage |
|
Find Applicants |
HRS_REC_SCHAPP |
Recruiting, Find Applicants, Find Applicants |
Search for and select applicants. |
|
Manage Applicant |
HRS_MANAGE_APP |
Click an applicant name link in the Search Results grid on the Find Applicants page. |
Manage an applicant. |
|
HRS_MANAGE_APP |
Click the Applicant Data link and then the Contact link on the Manage Applicant page. |
Edit contact information for an applicant. |
Editing Contact InformationAccess the Manage Applicant - Applicant Data: Contact page.
Most of the fields on this page are the same as the fields on the Add New Applicant - Contact Details page.
See Entering Contact Information.
|
Applicant Type and EmplID |
Select the type of applicant. Values are: Employee, External Applicant, and Non-Employee. If the applicant type is Employee or Non-Employee, the EmplID field appears and displays the human resources (HR) ID number for the applicant. If the applicant type is External Applicant, the EmplID field appears only if you have added the external applicant to the HR system as a person of interest. Add an external applicant to the HR system as a person of interest by using the Add Person of Interest page. |
Managing ReferencesThis section discusses how to:
View and request references.
Add and edit references.
Pages Used to Manage References
|
Page Name |
Object Name |
Navigation |
Usage |
|
HRS_REC_SCHAPP |
Recruiting, Find Applicants, Find Applicants |
Search for and select applicants. |
|
|
HRS_MANAGE_APP |
Click an applicant name link in the Search Results grid on the Find Applicants page. |
Manage an applicant. |
|
|
HRS_MANAGE_APP |
Click the Applicant Data link and then the Verification link on the Manage Applicant page. |
View, add, and request references. |
|
|
HRS_APP_REF_SEC |
|
Enter reference details for an applicant. |
|
|
HRS_APP_REF_SEC |
|
Edit reference details for an applicant. |
Viewing and Requesting ReferencesAccess the Manage Applicant - Applicant Data: Verification page.
The fields on this page are the same as the fields on the Add New Applicant - Verification page.
Adding and Editing References
Access the Add Reference Details page or the Edit Reference Details page.
See Entering References.
Editing Eligibility and Identity InformationThis section discusses how to edit eligibility and identity information.
Pages Used to Edit Eligibility and Identity Information
|
Page Name |
Object Name |
Navigation |
Usage |
|
Find Applicants |
HRS_REC_SCHAPP |
Recruiting, Find Applicants, Find Applicants |
Search for and select applicants. |
|
Manage Applicant |
HRS_MANAGE_APP |
Click an applicant name link in the Search Results grid on the Find Applicants page. |
Manage an applicant. |
|
HRS_MANAGE_APP |
Click the Applicant Data link and then the Eligibility & Identity link on the Manage Applicant page. |
Edit eligibility and identity information for an applicant. |
|
|
HRS_APP_NID |
|
Enter national ID information for an applicant. |
|
|
HRS_APP_CIT_PSP1 |
|
Enter citizenship information for an applicant. |
|
|
HRS_APP_VSA_PMT1 |
|
Enter visa permit information for an applicant. |
|
|
HRS_APP_BANKACCT |
|
Enter bank account information for an applicant. |
Editing Eligibility and Identity InformationAccess the Manage Applicant - Applicant Data: Eligibility & Identity page.
The fields on this page are the same as the fields on the Add New Applicant - Eligibility & Identity page.
See Adding Eligibility and Identity Information.
Managing Applicant ListsThis section provides an overview of applicant lists and discusses how to:
View existing applicant lists.
Create applicant lists.
Manage applicant lists.
Edit primary applicant list data.
Add applicants to applicant lists.
Understanding Applicant Lists
Applicant lists are logical groupings of applicants that recruiters can use to facilitate the recruiting process. Recruiters can add applicants to a list and then perform tasks for one, several, or all applicants on the list at the same time. For example, a recruiter can create a list of applicants that they need to contact, a list of applicants that are hot prospects but for whom there is no current applicable job opening, or a list of college students that will graduate in the fall that the recruiter might want to hire in the spring.
Lists can be public or private. The creator of an applicant list is the owner of the list. All recruiters and hiring managers have access to public lists. They can view public lists, take actions on the applicants in the lists, add applicants to the lists, and view primary list information, but they cannot make changes to the primary list information. Only the list owner can edit primary list information for public lists. For private lists, only the list owner can view and make changes to the lists.
Pages Used to Manage Applicant Lists
|
Page Name |
Object Name |
Navigation |
Usage |
|
HRS_APPL_LIST |
Recruiting, Applicant Lists, Applicant Lists |
View existing applicant lists. |
|
|
HRS_CREATE_LIST |
Click the Create New List button on the Applicant Lists page. |
Create an applicant list. |
|
|
HRS_LIST_MEMBER |
Click the Add Applicants button on the Applicant Lists page. |
Manage an applicant list. |
|
|
HRS_CREATE_LIST |
Click the Edit Primary List Data link on the Applicant List page. |
Edit primary applicant list data. |
|
|
HRS_SELECT_LIST |
Click the Add Applicants button on the Applicant List page to access the Find Applicants page. On the Find Applicants page, select Add Applicant to Saved List in the Take Action field for an applicant, or select one or more applicants and select Add Applicant to Saved List in the Group Action field and click Go. |
Select the applicant list to which you want to add an applicant. |
Viewing Existing Applicant ListsAccess the Applicant Lists page.
|
Display |
Select which applicant lists you want to view and click the Refresh icon to view those lists. Values are: Only My Lists: Select to view all lists to which you are the owner. All Lists: Select to view all public lists and all lists to which you are the owner. |
Applicant Lists
|
Find List and Go |
Enter a partial or full list name to search for that list and click Go to display the search results. |
|
List |
Click a link to access the Applicant List page, where you can view details for all applicants on the list. |
|
Access |
Displays whether the list is public or private. |
|
Owner |
Displays the name of the user that created the list. |
Creating Applicant ListsAccess the Create New List page.
Name Your New List
|
Active |
Select Active or Inactive. When a list is inactive, only the list owner can view the list. You cannot add applicants to inactive lists. |
|
Public |
Select to make the list a public list. Clear this check box if you want this list to be private. |
Managing Applicant ListsAccess the Applicant List page.
|
Find Applicant and Go |
Enter the partial or full name of the applicant that you are searching for and click Go to display the search results. |
|
Add Applicants |
Click to access the Find Applicants page, where you can search for and select applicants to add to the list. |
|
Delete List |
Click to delete the list. Only the list owner can delete the list. |
|
Edit Primary List Data |
Click to access the Edit Primary List Information page, where you can make changes to the applicant list. |
Applicants
|
Applicants and Go |
Click an applicant's name link to access the Manage Applicant page for that applicant. |
|
Preferred Contact |
Displays the email address, phone number, or mailing address of the applicant, depending on the applicant's preferred contact method. Specify an applicant's preferred contact method on the Add New Applicant - Contact Details and Manage Applicant - Applicant Data: Contact pages. |
Editing Primary Applicant List DataAccess the Edit Primary List Information page.
|
Active |
Select Active or Inactive. When a list is inactive, only the list owner can view the list. You cannot add applicants to inactive lists. |
|
Public |
Select to make the list a public list. Clear this check box if you want this list to be private. |
Adding Applicants to Applicant ListsAccess the Select Applicant List page.
|
Select List |
Select the applicant list to which you want to add the applicant. All private applicant lists to which the recruiter is the owner and all public applicant lists appear in this field as valid options. |
Creating Applicant ChecklistsThis section provides an overview of checklists and discusses how to create applicant checklists.
Understanding Checklists
A checklist helps you remember all the details that you need to get applicants through the recruiting and hire process. You can use standard checklists that you create in the Checklist (CHECKLIST_TABLE) component or create an individualized checklist for a particular applicant for whom you’re processing recruitment activities. When you hire an applicant, the checklists for that applicant are passed to PeopleSoft Enterprise Human Resources.
Pages Used to Create Applicant Checklists
|
Page Name |
Object Name |
Navigation |
Usage |
|
Find Applicants |
HRS_REC_SCHAPP |
Recruiting, Find Applicants, Find Applicants |
Search for and select applicants. |
|
HRS_APP_CHKLST |
Select Manage Applicant Checklist in the Take Action field for an applicant on the Find Applicants page. |
Create a checklist for an applicant. |
Creating Applicant ChecklistsAccess the Manage Applicant - Applicant Checklist page.
The fields on this page are the same as those on the Checklist Table page in PeopleSoft Enterprise Human Resources Administer Workforce.
See Creating Checklists.
Forwarding ApplicantsThis section provides an overview of applicant forwarding and discusses how to:
Forward applicants.
Find email addresses.
Understanding Applicant ForwardingRecruiters can forward applicants to one or more persons to enable those persons to review the applicant. When recruiters forward an applicant, the system sends a notification (HRS_FORWARD_APPLICANT) to the persons to whom the recruiter specifies on the Forward Applicant page. Forwarding an applicant is similar to routing an applicant. However, when you forward an applicant, the system does not change the disposition status for the applicant. The system does, however, add an entry to the Contact History group box on the Manage Applicant - Contact Notes page.
Pages Used to Forward Applicants
|
Page Name |
Object Name |
Navigation |
Usage |
|
Find Applicants |
HRS_REC_SCHAPP |
Recruiting, Find Applicants, Find Applicants |
Search for and select applicants. |
|
HRS_FWRD_APPL |
Select Forward Applicant in the Take Action field for an applicant on the Find Applicants page. |
Forward applicants. |
|
|
HRS_FND_EMAIL_ADDR |
Click the Find link on the Forward Applicant page. |
Search for and select employees to whom you want to forward applicants. |
|
|
HRS_FWRD_APP_PRVW |
Click the Preview button on the Forward Applicant page. |
Preview a message. |
Forwarding ApplicantsAccess the Forward Applicant page.
|
Preview |
Click to access the Forward Applicant Preview page, where you can preview the email before you send it. To access the Forward Applicant Preview page, you must enter an email address and subject in the To and Subject fields. |
Forward Applicant
This group box displays the name and ID of the applicants that you selected to forward.
Recipient Information
Use this group box to enter email addresses of the persons to whom you want to forward these applicants.
|
Find |
Click to access the Find Email Address page, where you can search for and select employees to whom you want to forward these applicants. |
Message
Use this group box to enter a subject for the message that you are sending and the actual message.
|
Access |
Select Public or Private. |
Finding Email AddressesAccess the Find Email Address page.
Find Employees
Enter a full or partial employee ID or name and click Search to display the search results.
Search Results
This group box displays the search results. Select one, several, or all employees in the search results and click Add Selected to add their email addresses to the appropriate fields on the Forward Applicant page.
|
Indicates whether this is the preferred email address for the employee. If an employee has multiple email addresses, the system lists all email addresses and indicates which email address is the preferred email address so that you can select the email address that is most appropriate. |
Sending Emails and LettersThis section lists prerequisites and discusses how to send emails and letters.
Prerequisites
Before you can send emails , you must create generic templates by using the Generic Templates (WL_TEMPLATE_GEN) component. PeopleSoft delivers generic notification templates that you can use.
See Delivered Workflows for Talent Acquisition Manager.
Before you can send letters, you must:
Set up letter codes that have a set letter code of Recruiting Letters on the Standard Letter Table page.
Create a Word template with tokens.
Save the file as LTRxxx, where xxx is the letter code that you defined in step one.
Associate correspondence tokens with letter codes on the Letter Template Details page.
You can view the correspondence tokens on the Correspondence Tokens page.
Pages Used to Send Emails and Letters
|
Page Name |
Object Name |
Navigation |
Usage |
|
Find Applicants |
HRS_REC_SCHAPP |
Recruiting, Find Applicants, Find Applicants |
Search for and select applicants. |
|
HRS_SEND_CRSP |
Select Send Correspondence in the Take Action field for an applicant on the Find Applicants page. |
Send emails and letters to applicants. |
Sending Emails and LettersAccess the Send Correspondence page.
Message Type and Method
|
Contact Method |
Select Email to send an email or Letter to create and print a letter. The options on the page change depending on the value that you select. |
|
Template ID |
Select a template ID. This field appears only when you select Email in the Contact Method field. Define templates by using the Generic Templates component. |
|
Letter Code |
Select a letter code. This field appears only when you select Letter in the Contact Method field. Define letter codes on the Letter Template Details page. |
|
Printer |
Enter a printer. The printer that you enter in the Printer Name field on the Recruiting Installation - Installation Options page appears here. You can change the printer that appears if needed. This field appears only when you select Letter in the Contact Method field. |
Recipient Information
Use this group box to enter the names of the recipients of the correspondence.
|
Select to send the email to the interested parties that you specified on the Manage Applicant - Contact Notes page. This option appears only if you select Email as the contact method. |
Sender Information
This group box displays the name of the person sending the correspondence.
Message
Use this group box to enter a subject and message.
|
Access |
Select Public or Private. When you send correspondence to an applicant, the system adds the correspondence information to the Contact History group box on the Manage Applicant - Contact Notes page. Only the user that sends a private correspondence can view that correspondence. All users that have access to the Manage Applicant - Contact Notes page for an applicant can view public correspondence. |
Additional Page Elements
|
Preview |
Click to preview the email. This field appears only when you select Email in the Contact Method field. |
|
Send |
Click to send the email. This field appears only when you select Email in the Contact Method field. |
|
|
Click to print the letter. This field appears only when you select Letter in the Contact Method field. |
Linking Applicants to Job OpeningsThis section provides an overview of how to link applicants to job openings, lists prerequisites, and discusses how to link applicants to job openings.
Understanding How to Link Applicants to Job Openings
If you find an applicant that is qualified for a specific job opening and should be considered, you can link the applicant to that job opening. When you link an applicant to a job opening, the system creates a new row on the Manage Applicant - Applicant Activity: Current Status page that you can use to track the applicant for that job opening and assigns a disposition status of Applied.
There are three ways to link an applicant to a job opening:
Associate one or more job opening IDs with the applicant on the Link to Job Opening - Select Job Opening page.
Associate one or more job opening IDs with the applicant on the Add New Applicant - Application Details page when you manually enter a new applicant.
Associate one or more job opening IDs with the applicant on the Manage Applicant - Application Details page when you add or update applications for an existing applicant.
Prerequisites
Before you can link applicants to job openings, you must:
Create job openings.
Enter applicants.
See Entering Applicants.
Pages Used to Link Applicants to Job Openings
|
Page Name |
Object Name |
Navigation |
Usage |
|
Find Applicants |
HRS_REC_SCHAPP |
Recruiting, Find Applicants, Find Applicants |
Search for and select applicants. |
|
HRS_GACT_RCM_STS |
Select Link Applicant to Job in the Take Action field for an applicant on the Find Applicants page. |
Link an applicant to a job opening. |
Linking Applicants to Job OpeningsAccess the Link to Job Opening - Select Job Opening page.
Disposition Details
Use this group box to enter disposition details.
|
Status Code and Status Reason |
Select a status code and status reason. The default status code is Applied. |
|
Status Date |
Enter a status date. The date that you enter appears in the Disposition History grid on the Manage Applicant - Disposition Details page. |
Select Job Openings
Select the job openings to which you want to link the applicant. The job openings that a user can select depend on the security setup.
See Activating Additional Security for Recruiting Solutions.
Changing Applicant StatusesThis section discusses how to change applicant statuses.
See Also
Setting Up Recruiting Statuses
Pages Used to Change Applicant Statuses
|
Page Name |
Object Name |
Navigation |
Usage |
|
Find Applicants |
HRS_REC_SCHAPP |
Recruiting, Find Applicants, Find Applicants |
Search for and select applicants. |
|
HRS_GACT_RCM_STS |
Select Change Applicant Status in the Take Action field for an applicant on the Find Applicants page. |
Change an applicant's status. |
Changing Applicant StatusesAccess the Change Applicant Status - Select New Applicant Status page.
|
Status Code |
Select a status code: 010 Active, 020 Hired, 030 Inactive, 040 Queued. Define status codes on the Status/Reason Definition page. |
Adding Persons of InterestThis section provides an overview of persons of interest and discusses how to:
Select person of interest types and add persons of interest.
View Search/Match results.
See Also
Understanding Organizational Relationships, Employment Record Numbers, and Multiple Jobs
Setting Up and Working with Search/Match
Understanding Persons of InterestMany organizations must add applicants to the HR system as persons of interest before the applicants are actually hired. For example, you might want to add an applicant to the HR system as an external trainee so that you can enroll the applicant in training prior to being hired. The option to add an applicant as a person of interest appears only for external applicants. You cannot add applicants that are employees or non-employees as persons of interest because they already exist in the HR system. When you add an external applicant as a person of interest, the system adds the applicant to the HR system and assigns an HR ID to the applicant.
To add an applicant as a person of interest:
On the Manage Applicant page, select Add Person of Interest from the Take Action field and click Go.
The Add Person of Interest option appears only in the Take Action field for external applicants.
View Search/Match results on the Search Results page, depending on whether the system uses Search/Match functionality when you add persons of interest.
If you select Yes for the Add Person of Interest option in the Search/Match group box on the Recruiting Installation - Installation Options page, the system checks to see if the applicant already exists in the HR database.
If the system finds a match, the Search Results page appears. On the Search Results page, select Carry ID for the ID that matches and click Return. The Add Person of Interest page appears again, prompting you to confirm whether you want to add the applicant. On the Add Person of Interest page, click the Continue button to add the applicant as a person of interest.
Confirm that the applicant was added as a person of interest.
When you add an external applicant as a person of interest, the system adds the EmplID field to the Manage Applicant - Applicant Data: Contact page and adds the applicant's HR ID number to the field.
Pages Used to Add Persons of Interest
|
Page Name |
Object Name |
Navigation |
Usage |
|
Find Applicants |
HRS_REC_SCHAPP |
Recruiting, Find Applicants, Find Applicants |
Search for and select applicants. |
|
Manage Applicant |
HRS_MANAGE_APP |
Click an applicant name link in the Search Results grid on the Find Applicants page. |
Manage an applicant. |
|
HRS_ADD_EXT_TRN |
|
Select the person of interest type to which you want to assign the applicant when you add them to the HR database and add a person of interest. |
|
|
HCR_SM_RESULTS |
|
View Search/Match results and investigate potential duplicate IDs. |
Selecting Person of Interest Types and Adding Persons of InterestAccess the Add Person of Interest page.
|
Select Type |
Select the person of interest type that you want to assign to the applicant. Define person of interest types on the Person of Interest Type Tbl (person of interest type table) page. |
Viewing Search/Match ResultsAccess the Search Results page.
See Reviewing Search/Match Results.
Processing Duplicate ApplicantsThis section provides an overview of duplicate applicant processing and discusses how to:
View process statuses.
Define search criteria.
Merge duplicate applicant records.
Understanding Duplicate Applicant ProcessingIt is possible for an applicant to be entered more than once with different applicant IDs. Duplicate applicant records can occur when applicants apply to the organization more than once and send different information each time or submit their applications using different methods. Having the same applicant referenced with multiple applicant IDs is confusing for hiring managers and recruiters. Talent Acquisition Managers enables recruiters to identify and merge duplicate applicant records into one applicant record.
To process duplicate applicant records:
Define search criteria on the Find Duplicate Applicants page.
Run the Find Applicant Duplicates Application Engine process (HRS_DUPE_PRC).
This process finds potential duplicate applicant records that match the search criteria that you define on the Find Duplicate Applicants page. The search is case-sensitive on email, addresses, and middle name. The process runs against active applicant records only. It ignores inactive applicant records. For the system to consider two applicants a match, all search criteria that you define on the Find Duplicate Applicants page must match exactly. Any duplicate email addresses, phone, and national ID numbers, regardless of type, is identified as potential duplicate records. For example, if one applicant has "[email protected]" as his work email address and another applicant has "[email protected]" as his home email address, the system counts this as a potential match regardless of the fact that the address types (work vs. home) are different.
View and identify duplicate applicant records on the Review Duplicate Applicants page.
The system groups each set of potential duplicate applicants into duplicate sets. If you determine that the applicants in the duplicate set are actually duplicates, you must mark the applicant records as targets and sources. The source applicant records are merged into the target applicant records. For each duplicate set, there can be multiple source and target records.
Run the Duplicate Applicant Merge Application Engine process (HRS_DUPE_MRG).
This process merges the source applicant records into the target applicant record. This process also sets the source applicant records to Inactive. The system updates the target record with the most current contact information (first name, middle name, last name, address, phone numbers, email addresses) and identity and eligibility data. If there is no data on the target record, but there is data on the source record, the system uses the data on the source record to update the target record. If data on the source and target records has the same effective date, the system does not change the data on the target record.
All unique recruitment rows from the source records are added to the target record so that there is no loss of data. This includes interview schedules, interview evaluations, contact notes, expenses, interested parties, references, and referral sources.
Note. If you select internal applicants (employees and non-employees), the system deletes or modifies the applicant data only. Information held in Personal Data tables is not modified or deleted.
This diagram illustrates the Duplicate Applicant Merge process:
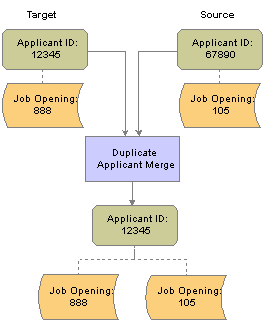
Duplicate Applicant Merge process
Pages Used to Process Duplicate Applicants
|
Page Name |
Object Name |
Navigation |
Usage |
|
HRS_DUPE_PRCS |
Recruiting, Administration, Process Duplicate Applicants, Process Duplicate Applicants |
View process statuses. |
|
|
HRS_DUPE_FIND |
|
Define search criteria and search for duplicate applicants. |
|
|
HRS_DUPE_REVIEW |
Click the View Duplicates link on the Process Duplicate Applicants page. |
Merge duplicate applicant records. |
Viewing Process StatusesAccess the Process Duplicate Applicants page.
|
Create New Search |
Click to access the Find Duplicate Applicants page, where you can select new duplicate applicant search criteria and run the Find Applicant Duplicates process. |
|
Refresh |
Click to refresh the status links with the current status of the process. |
|
Status |
Displays the status of the process instance. Click a status link to access the Find Duplicate Applicants page, where you can review the duplicate applicant search criteria used for the process. Values are: Closed: Indicates that the search is closed. The system assigns this status to queued or pending processes when you run the Find Applicant Duplicates process for a new process. Only one process can be active at a time. This ensures data integrity and avoids process conflicts among target and source applicants during the merge. Merge Completed: Indicates that the Duplicate Applicant Merge process is complete. Review In Progress: Indicates that the results of the Find Applicant Duplicates process are being reviewed. The system assigns this status when you click the View Duplicates link for the process. Search Completed: Indicates that the Find Applicant Duplicates process is complete but that the results have not been reviewed. Search In Progress: Indicates that the Find Applicant Duplicates process is in progress. Search Requested: Indicates that the Find Applicant Duplicates process is initiated. |
|
View Duplicates |
Click to access the Review Duplicate Applicants page, where you can identify duplicate sets and merge duplicate applicant records. This link appears after the Find Applicant Duplicates process is complete. |
Defining Search CriteriaAccess the Find Duplicate Applicants page.
Select the data that must be identical for applicants to be considered as duplicates. By default, the system automatically selects the search criteria that the user used for the previous search.
|
Phone, Email, and National ID |
Select to search for matching phone numbers, email addresses, and national IDs. For these search criteria, the system ignores the phone, email, and national ID types. For example, if two applicants have the same email address but the email type is different, the system still flags the applicants as potential duplicates. |
Click Run to run this request. PeopleSoft Process Scheduler runs the Find Applicant Duplicates process at user-defined intervals.
See Also
PeopleTools 8.45 PeopleBook: Using PeopleSoft Applications
Merging Duplicate Applicant RecordsAccess the Review Duplicate Applicants page.
Click Run to run this request. PeopleSoft Process Scheduler runs the Duplicate Applicant Merge Application Engine process (HRS_DUPE_MRG) at user-defined intervals.
Note. After you start the Duplicate Applicant Merge process, you cannot cancel it. You must be certain that you want to merge the
applicant records before you schedule the process.
You can do partial runs of the process. For example, you can run the process for the first 10 duplicate sets and then the
rest at a later time.
Duplicate Review
Use this group box to specify how the system merges duplicate applicant records. Applicants with matching data are grouped into duplicate sets. Review each set and decide if the applicant records are duplicates.
|
Duplicate Set ID |
Displays the ID number for the duplicate set. |
|
Duplicate Set Status |
Displays the status of the merge process. Values are: No Merges: Indicates that the system has not merged duplicate applicant records for the duplicate set. Merged: Indicates that the system has merged duplicate applicant records for the duplicate set. |
|
Applicants |
Click the applicant ID link to access the Manage Applicant page, where you can view additional details for the applicant. Click the Applicant List link to return to the Review Duplicate Applicants page. |
|
Relationship |
Specify how the applicant records are merged. Values are Source and Target. For each duplicate set, there can be multiple source and target records. You cannot edit these fields after you run the Duplicate Applicant Merge process. Leave these fields blank if you determine that the applicants in a duplicate set are not duplicates. |
|
Target |
Select the target for the source. The applicant ID for the applicant marked as the target in the Relationship column appears as a valid value. This column appears on the page only after you select Source in the Relationship column for an applicant. |
See Also
PeopleTools 8.45 PeopleBook: Using PeopleSoft Applications
Generating a Candidate Listing ReportThis section lists the page used to generate a Candidate Listing report.
Page Used to Generate a Candidate Listing Report
|
Page Name |
Object Name |
Navigation |
Usage |
|
PRCSRUNCNTL |
Recruiting, Reports, Candidate Listing, Run Control |
Generate a Candidate Listing report, which you can use to view job opening information with a list of the candidates being interviewed for the positions. The report groups job openings by department ID. |
Generating an Applicant Summary by Job ReportThis section lists the page used to generate an Applicant Summary by Job report.
Page Used to Generate an Applicant Summary by Job Report
|
Page Name |
Object Name |
Navigation |
Usage |
|
PRCSRUNCNTL |
Recruiting, Reports, Applicant Summary by Job, Run Control |
Generate the Applicant Summary by Job report, which you can use to view the number of applicants and percentage of total applicants that applied to a job opening, sorted by source type and specific source. |
Generating an Applicant Summary by Source ReportThis section lists the page used to generate an Applicant Summary by Source report.
Page Used to Generate an Applicant Summary by Source Report
|
Page Name |
Object Name |
Navigation |
Usage |
|
PRCSRUNCNTL |
Recruiting, Reports, Applicant Summary by Source, Run Control |
Generate the Applicant Summary by Source report, which you can use to view the number of applicants and percentage of total applicants sorted by source type and specific source (regardless of job opening). |
Generating a Job Group Movement Analysis ReportThis section lists the page used to generate a Job Group Movement Analysis report.
Page Used to Generate a Job Group Movement Analysis Report
|
Page Name |
Object Name |
Navigation |
Usage |
|
RUN_CNTL_REG_INTRO |
Recruiting, Reports, Job Group Movement Analysis, Job Group Movement Analysis |
Generate the Job Group Movement Analysis report, which you can use to generate racial and gender demographic data regarding the hiring process. This report provides an analysis of the number of males and females by ethnic group who were applicants, hires, promotions, or terminations during a specified time period. The report shows which sex and ethnic groups are moving in and out of the organization and which groups are offered opportunities for advancement. |