
 Creating Teams
This chapter discusses how to:
Create teams.
Create job openings.
Create job openings from open positions.
Clone job openings.
Approve job openings.
Creating Teams
This section provides an overview of teams and discusses how to create teams.
Understanding TeamsIt may be necessary to associate a group of recruiters, hiring managers, or interviewers to a job opening. Assigning teams to a job opening when it is created can help expedite the recruiting process. When you create a job opening, you have the option of entering a team or individuals to the following areas:
Recruiters.
Hiring Managers.
Interviewers.
Interested Party.
When a team is added to the job opening, the team ID does not actually get added to the job opening. Instead, users who currently belong to the team are added individually to the job opening. Only active teams can be added to a job opening. If a team is made inactive after it has been assigned to a job opening, it continues to be assigned to the job opening. Administrators can remove a team or an individual within a team from a job opening at any time and those affected individuals will not longer have access to that job opening.
There is no limit to the number of teams you create, nor to the number of teams to which an employee can belong.
Pages Used to Setup and Manage Teams
|
Page Name |
Object Name |
Navigation |
Usage |
|
HRS_TEAM |
Recruiting, Administration, Teams, Teams |
Create and maintain teams. |
Creating TeamsAccess the Teams page.
|
Team ID |
Displays the ID assigned to the team. |
|
Status |
Specify whether this team is Active or Inactive. |
|
EmplID |
Select the employee ID for the people that you want to be members of this team. |
Creating Job Openings
This section provides an overview of how to create job openings, lists prerequisites, and discusses how to:
Enter primary job opening information.
Enter job opening details.
Add locations to job openings.
(USF) Enter candidate name requests.
Add screening criteria to screening levels.
Define competency points.
Add job posting details.
Understanding How To Create Job OpeningsTo create a new job opening, you use the Create a New Job Opening (HRS_JO_LAUNCH) component.
When you create a new job opening, you have the option of creating two types of job openings:
Continuous job openings are job openings that require only a job posting title.
They do not require a job code or position number. They can be used as a place holder for possible candidates. This type of job opening does not require a closing date because it represents those jobs for which your organization is always hiring. The job posting could potentially remain open for an indefinite amount of time. Also, if your company uses PeopleSoft Enterprise Performance Management, continuous job openings are not used in time to fill reporting.
Standard requisitions are specific jobs or positions that you want to fill.
They require specific data regarding the job or position code.
If you clone a job opening, it is automatically assigned the same type as the original job opening. After the job opening is submitted, applicants can apply for the job opening and you can begin the recruitment process.
If you are using approval processing for job openings, they must be approved before the recruitment process can begin.
The first page that displays is Enter Primary Job Opening Information. It is used to identify basic information about the job opening. The segmenting value entered in the Template Segmenting Type field on the Recruiting Installation - Installation Options page appears as a field on this page.
To identify which recruitment template to associate with the job opening, the system compares the value selected for the segmenting type entered on this page to the segmenting values entered on the recruitment template. The recruitment template that has segmenting values that match the information entered on the Enter Primary Job Opening Information page becomes the recruitment template assigned to the job opening.
For example, if Job Family is selected as the template segmenting type on the Recruiting Installation - Installation Options page, the field Job Family appears on this first page. The job family that you entered is used to find the recruitment template associated to that particular job family when the recruitment template is displayed.
If you are using approvals for job openings designated as a continuous job opening and the segmenting value type is either company or job family, you must enter a job code, position number, business unit, or department so the system can identify the setID.
After the recruitment template is identified, complete the detailed information about the job opening, including posting information. Job posting information consists of the posting title, one or more posting description types, and one or more posting destinations.
After you have entered the job opening information, you can submit the job opening or save it as a draft. If you select Save as Draft, the job opening status is set to draft. If you select Submit, the job opening status is set to:
Pending approval, if you require approval for job openings.
A notification is sent to the person designated as the next approver notifying them that there is a job opening that requires their attention.
Open, if you do not require approval for job openings.
Define whether the system requires approvals for job opening creation on the Recruiting Installation - Installation Options page.
See Defining Recruiting Installation Defaults.
Prerequisites
Before you can create a job opening, you must:
Set up the recruiting process.
Set up recruiting templates.
See Setting Up Recruiting Templates.
Pages Used to Create Job Openings
|
Page Name |
Object Name |
Navigation |
Usage |
|
HRS_JO_LAUNCH |
Recruiting, Create New Job Opening, Enter Primary Job Opening |
Enter primary job opening information. |
|
|
HRS_JOB_OPENING |
Click the Continue button on the Enter Primary Job Opening page. |
Enter job opening details. |
|
|
HRS_JO_LOC_SEC |
Click the Add Additional Locations link on the Job Opening page. |
Add locations to job openings. |
|
|
HRS_JO_NM_SEC |
Click the Candidate Name Request link on the Job Opening page. |
(USF) Enter candidate name requests. |
|
|
HRS_JO_SCR_DTL |
Click the screening level link in the Applicant Screening group box on the Job Opening - Job Opening Details page. |
Add screening criteria to screening levels. |
|
|
HRS_JO_SCR_CMP_SEC |
Click the Edit Details link in the Screening Requirements group box in the Job Opening - Job Opening Screening Criteria page. |
Define competency points. |
|
|
HRS_JO_PST_DTL_SEC |
Click the job posting title link in the Job Postings group box on the Job Opening - Job Opening Details page. |
Add job posting details. |
Entering Primary Job Opening InformationAccess the Enter Primary Job Opening page.
|
Job Opening Type |
Select the type of job opening. Valid options are: Standard Requisition Continuous Job Opening |
|
Business Unit |
Select the business unit associated with the job opening. The business unit defaults to the business unit of the person creating the job opening and acts as a filter to the remaining fields on the page. |
|
Company |
Select the company associated with the job opening. This field appears when the Template Segmenting Type field on the Recruiting Installation - Installation Options page is set to Company. |
|
Department |
Select the department associated with this job opening. This field appears when the Template Segmenting Type field on the Recruiting Installation - Installation Options page is set to Department. |
|
Position |
Select the position number associated with this job opening. This field appears when Position Management Option on the HRMS Options page is set to Full or Partial. For continuous and standard requisition job openings, this field is optional. |
|
Job Code |
Select the job code associated with this job opening. This field appears when Position Management Option on the HRMS Options page is set to None or Partial. For continuous job openings, this field is optional. For standard requisition job openings, this field is required if the Position field is blank. If the Position field contains a value, the system derives the job code from the position number. |
|
Job Family |
Select the job family associated with this job opening. This field appears if you selected Job Family in the Template Segmenting Type field on the Recruiting Installation - Installation Options page. |
|
Salary Grade |
Select the salary grade associated with this job opening. This field appears if you selected Salary Grade in the Template Segmenting Type field on the Recruiting Installation - Installation Options page. |
|
Posting Title |
Enter the job posting title. For continuous job openings, this field is required if the Position and the Job Code fields are blank. For standard requisitions, this field is optional. |
Entering Job Opening DetailsAccess the Job Opening page.
Note. The availability and order of these sections depends on the template that is associated with the job opening. The system determines which template to use from the segmenting values that are defined on the Recruiting Installation - Installation Options and Recruitment Template - Segmentation Values pages.
Opening Information
|
Select the template that you want associated with this job opening. The system determines the default value for this field based on the Template Segmenting Type entered on the Recruiting Installation - Installation Options page and the Segmentation Values entered on the Recruitment Template - Segmentation Values page. Only users that have Recruiting row level security enabled can edit this field. See Setting Up Talent Acquisition Manager Implementation Defaults. |
|
|
Job Opening Type |
Displays the type of job opening selected on the Enter Primary Job Opening Information page. |
|
Date Opened |
Enter the date on which the job opening was created. The default date is today's date. |
|
Openings to Fill |
Specify whether the openings are:
|
|
Target Openings |
Enter the number of positions that are to be filled. This field appears only if Limited was selected in the Openings to Fill field. |
|
Available Openings |
This field displays the number of available openings only if Limited was selected in the Openings to Fill field. The default number of openings is the value entered in the Target Openings field. When you hire an applicant in this job opening, the system decreases this number by one. When all available positions are filled, the status of the job opening is set to Closed. |
|
Business Unit |
Select a business unit. The default value is the value that you entered on the Enter Primary Job Opening Information page. |
|
Position Number |
Select a position number. This field defaults to the value entered on the Enter Primary Job Opening Information page. This field is available if Allow multiple jobs/positions is not selected on the Recruiting Installation - Installation Options page. |
|
Job Code |
Select a job code. The default value is the value that you entered on the Enter Primary Job Opening Information page. This field is available if Allow Multiple Jobs/Positions is not selected on the Recruiting Installation - Installation Options page. |
|
Company |
Select a company. The default value is the value that you entered on the Enter Primary Job Opening Information page when it is the Template Segmenting Type. |
|
Department |
Select a department. The default value is the value that you entered on the Enter Primary Job Opening Information page when it is the Template Segmenting Type. |
|
Select the location code for the location of this job opening. |
|
|
Select the recruiting location that you want displayed when a applicant searches for a job opening. For example, the location might say “Headquarters - Building A,” but the recruiting location would say “Western Canada.” |
|
|
Add Additional Locations |
Click to access the Job Opening - Locations page, where you can enter additional locations and recruiting locations. |
|
Displays the current job opening status. Only recruiting administrators can override this field. |
|
|
Status Reason |
Select the appropriate status reason code. The default value is the current status of the job opening. |
|
Status Date |
Enter the date on which the status went into effect. The default date is the current date. |
|
Desired Started Date |
Enter the date that the job begins. This field can be used as a parameter for screening applicants. |
|
Encumb. Dt (encumbrance date) |
If your organization uses Commitment Accounting for budgeting, indicate how the system budgets for the unfilled position. Select one of these options:
If you’re not using commitment accounting, leave this field blank. |
|
Projected Fill Date |
If you selected Project Fill Date in the Encumbrance Date Indicator field, enter the date that you expect to fill the job opening. |
|
Date Authorized |
The date that the job opening was approved. If approvals is being used, this date is the date the job opening reaches final approval. |
|
Select an employee referral program. If there is an employee referral program associated to the recruitment template, that employee referral program appears here. |
|
|
Select a recruitment contact. Recruitment contacts are defined on the Recruitment Contacts page and must have a recruitment type of Office. |
|
|
Select from the following available options Internal: Only current agency employees are considered. Merit Promotion: Only current and previous federal employees are considered. Open Competition: All internal and external applicants and federal employees are considered. This field can be used as a parameter for screening applicants. |
|
|
(USF) Area of Consideration |
Select the area that covers the job opening.
|
|
(USF) Draft Status |
Select the applicant's draft status:
This field can be used as a parameter for screening applicants. |
|
(USF) Country |
Select the country in which the job opening is to be filled. |
|
(USF) Citizenship Status |
Select the applicant citizenship status. Select from the following options:
This field can be used as a parameter for screening applicants. |
|
(USF) Minimum Age |
Enter the minimum age restriction that might apply to this job opening. This field can be used as a parameter for screening applicants. |
|
(USF) Maximum Age |
Enter the maximum age restriction that might apply to this job opening. This field can be used as a parameter for screening applicants. |
|
(USF) Gender |
Enter any gender restriction that might apply to this job opening. This field can be used as a parameter for screening applicants. |
|
(USF) Candidate Name Requests |
Click to access the Candidate Name Requests page, where you can enter candidates that you highly recommend for the job opening. This information can be used in resolving ties when screening applicants. |
(USF) Priority Placement Considerations
|
Program |
Select a priority place code that you want to associate with this job opening. The Priority Placement process uses this to identify any applicants that have an entitlement to priority placement consideration. |
|
Add Priority Placement Programs |
Click to access the Priority Placement page. |
Employees Being Replaced
|
Name |
If specific employees are being replaced, enter the names here. |
|
Add Employees Being Replaced |
Click to add another row to the Employees Being Replaced grid. |
Use this group box to select a works council ID. This group box only appears on the page if the Works Council Information section is included on the associated job opening template.
|
Works Council ID |
Select a works council ID. Only works council IDs with the same setID as the user appear as values. |
This group box appears only if Allow Multiple Jobs/Positions is selected on the Recruiting Installation - Installation Options page.
|
Job Code |
If the job opening has multiple job codes, the system displays the primary job code once the competency is assigned. When you save the component, the system automatically assigns the competencies to all other job codes in the job opening. When you display the page again, it shows all competencies with every job code in the job opening. However, only the competencies for the primary job code are changeable. |
|
Add Job Codes |
Click to add another row to the Job Code Information grid. |
|
Delete Job Code |
Click to delete a job code. |
|
Region |
Select the region in which the job opening is located. Regions are defined on the Regulatory Region page. |
|
Schedule Type |
Select whether this a Full-time or Part-Time position. This field can be used as a parameter for screening applicants. |
|
Regular/Temporary |
Select whether this is a Regular or Temporary position. This field can be used as a parameter for screening applicants. |
|
Begin Date |
Enter the date on which the job is to begin. |
|
End Date |
Enter the date on which the job is scheduled to end. This field is for temporary job openings. |
|
(USF) Not To Exceed Date |
If this is a temporary position, enter the date on which it will end. |
|
(USF) Not To Exceed Days |
If this is a temporary position, enter the maximum number of days after the Not To Exceed Date by which the job can extend. |
|
(USF) Summer Appointment |
Select if this position is a summer appointment. This information is sent as part of the vacancy information for the USA Jobs program. When there are multiple job codes, the primary job code value for summer appointment is used. |
|
Shift |
Select the shift for this job opening. This field can be used as a parameter for screening applicants. |
|
Hours |
Enter the default number of hours in a normal workweek for this job. The field defaults to the number associated with the job code. This field can be used as a parameter for screening applicants. |
|
Work Period |
Select the time period in which employees must complete the standard hours. These values are created by using the Frequency table. |
|
Travel Percentage |
Enter the percent of travel required by this job. This field can be used as a parameter for screening applicants. |
|
(USF) Supervisor Level |
Enter the supervisor level. The default value is the level assigned on the job code. |
|
(USF) FLSA Status (fair labor standards act status) |
Displays the FLSA status associated with the job code. |
|
(USF) LEO/Fire Position (law enforcement officer/fire position) |
Displays the LEO/Fire position code associated with the job code. |
|
(USF) Sensitivity Code |
Select a sensitivity code. The default value is the value assigned to the job code. |
|
(USF) Type of Appointment |
Select the type of administrative post. |
|
Salary Admin Plan |
Displays the salary plan associated with the position. You can change the salary plan by selecting another from the list of available options. |
|
(USF) Pay Plan |
Displays the pay plan associated with the position. You can change the pay plan by selecting another from the list of available options. |
|
From Grade |
Displays the low grade associated with the position. You can change the from grade by selecting another from the list of available options |
|
From Step |
Displays the low step associated with the position. You can change the from step by selecting another from the list of available options |
|
To Grade |
Displays the high grade associated with the position. You can change the to grade by selecting another from the list of available options |
|
To Step |
Displays the high step associated with the position. You can change the to step by selecting another from the list of available options |
|
Salary Range From |
The system supplies the salary range from the Job Code table. You can override these values. |
|
Salary Range To |
The system supplies the salary range from the Job Code table. You can override these values. |
|
Pay Frequency |
Select the pay frequency in which this job is paid. |
|
Currency |
Select the currency in which this job is paid. |
|
(USF) Occupational Series |
Displays the occupational series that is associated with this occupational series for this position. |
|
(USF) PATCOB Code |
Displays the PATCOB code that is associated with occupational series for this position. |
|
Highest Education Level |
Select the highest level of education that an applicant must have completed to be eligible for this job. Education levels are defined on the Education Level Achieved Table page. This field can be used as a parameter for screening applicants. See Setting Up Educational Qualifications and Accomplishments. |
|
Years of Work Experience |
Enter the years of work experience required for this job opening. |
|
Add Work Experience & Education |
Click to add another row to the Work Experience & Education grid. |
|
License or Certificates |
Select a license or certificate required by this job opening. Licenses and certificates are defined on the Licenses/Certifications Table page. This field can be used as a parameter for screening applicants. See Setting Up Educational Qualifications and Accomplishments. |
|
Add Licenses/Certificates |
Click to add another row to the Licenses & Certificates grid. |
|
Language |
Select a language required by this job opening. Languages are defined on the Language Table page. This field can be used as a parameter for screening applicants. See Setting Up Educational Qualifications and Accomplishments. |
|
Add Languages |
Click to add another row to the Languages grid. |
|
Membership |
Select a membership required by this job opening. Memberships are defined on the Membership Table page. This field can be used as a parameter for screening applicants. See Setting Up Educational Qualifications and Accomplishments. |
|
Add Memberships |
Click to add another row to the Memberships grid. |
|
Honor or Award |
Select an honor or award required by this job opening. Honors and awards are defined on the Honor/Award Table page. This field can be used as a parameter for screening applicants. See Setting Up Educational Qualifications and Accomplishments. |
|
Add Honors and Awards |
Click to add another row to the Honors & Awards grid. |
|
Test |
Select a test required by this job opening. Tests are defined on the Test table. This field can be used as a parameter for screening applicants. See Setting Up Educational Qualifications and Accomplishments. |
|
Add Tests |
Click to add another row to the Tests grid. |
|
Competency |
Select a competency required by this job opening. Competencies are defined on the Competency Table page. The system supplies the default competencies associated with the job code. |
|
Add Competencies |
Click to add another row to the Competencies grid. |
|
Description |
Select a screening question. Screening questions are defined on the Question Definition page. Screening questions are associated to a job opening, so that when an applicant applies to the job, the questions appear to the applicant during the Apply online process. It is optional to associate them to screening criteria. |
|
Add Screening Questions |
Click to add another row to the Screening Questions grid. |
Applicant Screening
|
Max Ttl Pts (maximum total points) |
Enter the total points an applicant can achieve during screening. |
|
(USF) Transmutation |
Select if you want to use transmutation. If screening levels are defined to allow applicants to get more than 100 points, you can transmute the applicant score, which bases the scoring on a scale of 100. |
|
Must Pass Previous Levels |
Select if the applicant must pass the current screening level to move on to the next level. |
(USF) Federal Group Box
|
Raw Augmented Score Limit |
Total number of points enabled for augmentation. The recruiting specialist may award augmentation points for certain competencies or accomplishments that are not required for the position but may be given consideration in the selection process. |
|
Raw Veterans Pref Score Limit raw veterans preference score limit |
Total number of points enabled for veterans preference. The recruiting specialist may award veteran preference points for certain competencies or accomplishments that are not required for the position but may be given consideration in the selection process. |
|
Tie Break Number |
Enter the agency’s random number that is used to find the starting point for the number sequence used to break ties on a certain day. |
|
Rank Candidates of Category 1 |
Select to indicate that when full ranking process is used the applicants on the list of eligible candidates are ranked according to category 1. Category 1 ranking is Qualified/Well-Qualified/Best_Qualified Preference Eligibles with 'Must Select' for the given Recruiting Type. |
|
Rank Candidates of Category 2 |
Select to indicate that when full ranking process is used the applicants on the list of eligible candidates are ranked according to category 2. Category 2 ranking is Well-Qualified/Best_Qualified Preference Eligibles with 'Must Consider' for the given Recruiting Type. |
|
Rank Candidates of Category 3 |
Select to indicate that when full ranking process is used the applicants on the list of eligible candidates are ranked according to category 3. Category 3 ranking is Best_Qualified Non-Preference Eligibles or Best_Qualified Preference Eligibles with an effect of 'None' for the given Recruiting Type. |
|
Rank Candidates of Category 4 |
Select to indicate that when full ranking process is used the applicants on the list of eligible candidates are ranked according to category 4. Category 4 ranking is Qualified/Well-Qualified Non-Preference Eligibles or Qualified/Well-Qualified Preference Eligibles with an effect of 'None' for the given Recruiting Type. |
|
Veteran Preferred in Tie Break |
Select to allow veterans preference be used as a tie breaking criteria. |
|
Rank Candidates of Category 1 |
Select to indicate that when full ranking process is used the applicants on the list of eligible candidates are ranked according to category 1. Category 1 ranking is Qualified/Well-Qualified/Best_Qualified Preference Eligibles with 'Must Select' for the given Recruiting Type. |
|
Rank Candidates of Category 2 |
Select to indicate that when full ranking process is used the applicants on the list of eligible candidates are ranked according to category 2. Category 2 ranking is Well-Qualified/Best_Qualified Preference Eligibles with 'Must Consider' for the given Recruiting Type. |
|
Rank Candidates of Category 3 |
Select to indicate that when full ranking process is used the applicants on the list of eligible candidates are ranked according to category 3. Category 3 ranking is Best_Qualified Non-Preference Eligibles or Best_Qualified Preference Eligibles with an effect of 'None' for the given Recruiting Type. |
|
Rank Candidates of Category 4 |
Select to indicate that when full ranking process is used the applicants on the list of eligible candidates are ranked according to category 4. Category 4 ranking is Qualified/Well-Qualified Non-Preference Eligibles or Qualified/Well-Qualified Preference Eligibles with an effect of 'None' for the given Recruiting Type. |
|
Veteran Preferred in Tie Break |
Select to allow veterans preference be used as a tie breaking criteria. |
The fields in this group box default to values that you entered on the screening template that is associated with recruitment template assigned to this job opening.
|
Sequence |
Displays the screening sequence number from the defaulted template. If you are adding a screening level, enter the order in which you want the screening levels executed. |
|
Screening Levels |
Displays the screening level title from the defaulted template. Click the screening level name link to access the Job Opening - Job Opening Screening Criteria page, where you can define the screening criteria. |
|
Add Screening Options |
Click to add another row to the Applicant Screening grid. |
|
Name |
Select a recruiter or recruiting team for this job opening. The system uses this person or persons as the second approver of the job opening, if job opening approvals is selected on the Recruiting Installation - Installation Options page. The system also uses recruiters and teams to specify access rights to a job opening. |
|
Add Recruiters |
Click to add another row to the Recruiters grid. |
|
Add Team to Recruiters |
Click to add another row to the Recruiters grid. |
|
Name |
Select a hiring manager or hiring manager team for this job opening. If the approval process is active, the system uses this information to determine who is the first approver for this job opening. The system also uses managers and teams to specify access rights to a job opening. |
|
Add Hiring Managers |
Click to add another row to the Hiring Managers grid. |
|
Add Team to Hiring Managers |
Click to add another row to the Hiring Managers grid. |
|
Name |
Select interviewers or interview teams. The system uses this list of interviewers as the default list when you schedule interviews for the job opening. |
|
Add Interviewers |
Click to add another row to the Interviewers grid. |
|
Add Team to Interviewers |
Click to add another row to the Interviewers grid. |
|
Name |
Select the name of the person you want to be associated with this job opening. |
|
Add Interested Parties |
Click to add another row to the Interested Party grid. |
|
Add Team to Interested Parties |
Click to add another row to the Interested Party grid. |
|
Posting Title |
Enter the title that you want to display when the applicant searches for a job posting. |
|
Add Postings |
Click to add another row to the Postings grid. |
Adding Locations to Job OpeningsAccess the Job Opening - Locations page.
Locations
|
Location |
Select an HR location that identifies where the job opening is physically located. |
|
Primary Location |
If there is more the one location associated with the job opening, indicate which location is primary. |
|
Add Locations |
Click to add another row to the Locations grid. |
Recruiting Locations
|
Location |
Select the recruiting location that appear to applicants when they search for a job. |
|
Primary Recruiting Area |
If there is more the one recruiting location associated with the job opening, indicate which recruiting location is primary. |
|
Add Recruiting Locations |
Click to add another row to the Recruiting Locations grid. |
(USF) Entering Candidate Name RequestsAccess the Candidate Name Requests page.
|
Name |
Select the name of a person who you would like to target for this position. This field can be used as a tie breaker in screening. |
Adding Screening Criteria to Screening LevelsAccess the Job Opening - Job Opening Screening Criteria page.
Screening Option Description
|
Name |
Displays the name of the screening level. |
|
Pass Status |
Select the status that you want assigned to the applicant when they pass a screening level. . |
|
Pass Reason |
Select the reason that you want assigned to the applicant when they pass a screening level. |
|
Fail Status |
Select the status that you want assigned to the applicant when they fail a screening level. |
|
Fail Reason |
Select the reason that you want assigned to the applicant when they fail a screening level. |
|
Letter Code |
Select the letter that you want sent to the applicant if they fail the screening level. |
Scoring Definition
|
Manual Screening |
Select if you do not want the screening level to assign points, but plan to use manually assign screening points. When you select this option, the system disables all fields in the Manual Screening group box. |
Manual Screening
|
Percent Needed to Pass |
Defines the minimum score, expressed as a percentage, that each applicant must to get in order to pass the screening level. This value can be populated based on the screening level definition on the screening template. |
|
Use Raw Points |
Select if the accumulated points for an applicant will be used to determine whether they pass a screening level. If this is selected, do not specify a maximum amount of points to assign. |
|
Maximum Points to Assign |
Define the maximum points that can be earned by an applicant for that screening level. |
|
Points Assigned for Pass |
Define the number of points that should be given to an applicant for passing that screening level. It overrides any points accumulated from passing screening requirements. |
|
Points Assigned for Fail |
Define the number of points that should be given to an applicant for failing that screening level. It overrides any points accumulated from passing screening requirements. This value can be assigned a negative value, to deduct points from an applicant's score if they should fail that screening level. |
Screening Requirements
|
Description |
Displays the job requirements specified in the job opening details. |
|
Edit Details |
Click to access the Define Competency Points page. where you can change the points associated with the competency. |
|
Used in Screening |
Select to use this criteria in the screening level. |
|
Required |
Select if the applicant must have this criteria to pass the screening level. |
|
Augment |
Select to assign extra-credit points to the applicant when they meet this criteria. These points appear on the Screening Details page for an applicant for each screening level. |
|
Points |
Enter the number of points the applicant receives if they meet the requirement. These points appear on the Screening Details page for an applicant for each screening level and are separate from augmenting points. |
Defining Competency PointsAccess the Define Competency Points page.
For each rating enter the points that you want assigned to an applicant if they meet that screening criteria.
Adding Job Posting DetailsAccess the Job Opening - Posting Information page.
Job Postings
|
Posting Title |
Displays the title entered on the Job Opening page, but can be modified. |
Job Descriptions
|
Visible |
Specify whether this posting description is visible to Internal, External, or Internal and External applicants. |
|
Description Type |
Select a description type. Description types are defined on the Posting Description Types page. |
|
Description ID |
Select a description from the Posting Description Library page. The system automatically populates the Description field with the text from the library posting. |
|
Description |
Enter a description for this description type. |
|
Add Posting Descriptions |
Click to add another row to the Job Descriptions. |
Job Posting Destinations
|
Destinations |
Select where you want this posting to go. Valid options are active Marketing type recruitment sources. |
|
Posting Type |
Select the type of posting. Options are:
|
|
Post Date |
Enter the date on which you want the job posting posted to this destination. You can enter a future date. |
|
Remove Date |
Enter the date on which you want to remove the posting from this destination. |
Creating Job Openings from Open PositionsThis section provides an overview of job opening creation from open positions and discusses how to create job openings from open positions.
Understanding Job Opening Creation from Open PositionsTo create job openings from open positions, run the Create Job from Position Application Engine process (HRS_CRJOB).
During the Create Job from Position process, the system:
Determines all current open positions in the company.
To determine whether a position is open, the system uses the PS_POSN_VACANT view on the Position Data table (PS_POSITION_DATA).
Identifies the maximum head count allowed for each open position.
Determines the current head count for each open position (how many incumbents, or current employees, fill any or all of the head count).
Creates one standard requisition job opening for each position number that has openings and sets the status of each new job opening to Draft.
When the system creates a new job opening, it populates the job opening data with data from the position or the derived job code—for example, the business unit, job code, company, department, location, and staffing and salary information. The system also populates the Target Openings field on the Job Opening page with the number of openings (maximum head count minus current head count) for that position number.
If you select the Allow Duplicates option on the Create Job Openings from Positions page, the system creates a job opening for all open positions, regardless of whether a job opening for a position already exists.
If you clear the Allow Duplicates option on the Create Job Openings from Positions page, the system checks to see if a job opening already exists for each position number. If a job opening already exists for a position number, the system creates a new job opening only if the number of open positions (maximum head count minus current head count) is greater than the number of target openings on the Job Opening page for the existing job opening. For example, if a position has five openings and a job opening already exists for that position with a target opening value of two, the system creates one new job opening with three as the target opening value.
The system uses the segmenting type that is specified in the Template Segmenting Type field on the Recruiting Installation - Installation Options page and position data to select a recruitment template for each job opening. Because position data might be different for each position, the system could potentially use a different recruitment template for each job opening that it creates.
When you run the process, you must specify an originator. The originator appears in the Created By field on the Job Opening page, and will have access to the job openings after the system creates them. After the process completes, the originator will be able to access the new job openings through existing recruiting components, complete the necessary data entry—for example, screening, posting, and approval information—and submit the job opening for approval or save as normal, depending on whether the system requires approval for standard requisitions job openings.
Note. This feature is available only to organizations that use partial or full position management.
The user must also have the HCCPRS0000 permission list to access this page.
See Delivered Permission Lists and Roles for Talent Acquisition Manager.
Pages Used to Create Job Openings from Open Positions
|
Page Name |
Object Name |
Navigation |
Usage |
|
HRS_RUN_CR_JOB |
Recruiting, Administration, Create Openings from Positions, Create Job Openings from Positions |
Create job openings from open positions. |
Creating Job Openings from Open PositionsAccess the Create Job Openings from Positions page.
|
Allow Duplicates |
Select to have the system create job openings for all position openings, regardless of whether a job opening already exists for a position. Clear this option if you do not want the system to create duplicate job openings. By default, this option is cleared. |
|
Originator |
Select the ID of the person that you want to be the originator of the new job openings. The originator appears in the Created By field on the Job Opening page, and will have access to the job openings after the system creates them. By default, the system populates this field with the current user's ID. |
Click Run to run this request. PeopleSoft Process Scheduler runs the Create Job from Position process at user-defined intervals.
See Also
PeopleTools 8.45 PeopleBook: Using PeopleSoft Applications
Cloning Job OpeningsThis section provides an overview of cloning job openings and discusses how to clone a job opening.
Understanding Cloning Job Openings
Another way to create a job opening is to clone an existing one. To clone a job opening, use the Clone Job Opening (HRS_JO_360) component. The only time you cannot clone an existing job opening is when the status of the job opening is Draft.
When you clone a job opening most of the data is copied from the existing job opening to the new one. However, some data will be left blank or adjusted. The following table summarizes the data that is transferred from the existing job opening to new job opening.
|
Existing job opening |
New job opening |
|
Status. |
Open if approvals is not selected on the Installation table. Pending Approval if approvals are associated with the job opening. |
|
Status Reason. |
New Authorization |
|
Open Date. |
Current Date |
|
Status Date. |
Current Date |
|
Desired Start Date/Projected Fill Date. |
Set according to the dates in the Open Date field. The system uses the interval between the open date and the desired start date or projected fill date to determine the dates for the cloned job opening. |
|
All other dates. |
Blank |
|
Applicant and interview schedule data linked to the copied job opening. |
Not copied. |
|
Approval process, if exists. |
Copied |
|
Primary Recruiter/Hiring Manager Teams. |
Active teams copied |
|
Additional recruiters, hiring managers, and teams. |
Active teams copied. |
Pages Used to Clone Job Openings
|
Page Name |
Object Name |
Navigation |
Usage |
|
HRS_JO_FIND_JOB |
Recruiting, Find Job Openings, Find Job Openings |
Search for and select job openings. |
|
|
HRS_JO_360 |
Click a job name link on the Find Job Openings page. |
Perform various tasks related to job openings. |
|
|
HRS_JO_CLONE_SEC |
Click the Clone Job Opening icon or the Clone link on the Job Opening page. |
Clone a job opening. |
Cloning a Job OpeningAccess the Job Opening - Clone Job Opening page.
|
Job Opening ID |
Displays the job opening ID for the job opening that you want to clone. |
|
Number of New Job Openings |
Enter the number of job openings that you want to create. |
|
Clone Job Opening |
Click to clone the job opening. The system displays a confirmation message. |
Approving Job OpeningsThis section provides an overview of job opening approvals and discusses how to:
View pending approvals.
Approve a job opening.
Add another approver or reviewer.
Understanding Job Opening ApprovalsPeopleSoft software delivers a two-step approval process for job openings. You can modify the approval process to fit your organization's business needs.
To use the approval process for job openings, you must select the Standard Requisition and Continuous Job Opening check boxes in the Approvals Required group box on the Recruiting Installation - Installation Options page. When a recruiter creates and submits a job opening, the system checks whether approvals is required for that job opening type. If the check box is selected for the type of job opening that is being created, the system initiates the approval process. For example, if a recruiter creates a standard requisition job opening, and Standard Requisition is selected on the Recruiting Installation - Installation Options page, the system initiates the approval process.
Each approver can take action on the request on the Job Opening - Approval page, which they can access by using the link in the email notification that they receive or through the Pending Approvals component. Approvers can also add additional approvers or reviewers to an individual job offer by clicking on the Insert Approver icon on the Manage Applicants - Disposition Details page and entering information for the additional approver or reviewer on the Insert additional approver or reviewer page.
Approvers have the option of either:
Approving the job offer.
Denying the job offer.
The system sets the job offer status to Denied, stops the progress of the job offer, and notifies the hiring manager. However, the originator of the job opening can later resubmit the job opening.
Pushing back the job offer.
The system notifies the previous approver that the job offer has been pushed back and needs his or her attention.
Note. The first approver cannot push back the job offer.
The first approver is the supervisor of the person or persons entered as the primary hiring manager on the Job Opening page. To identify the supervisor, the system uses the Target Information page. The second approver is the recruiter or recruiters entered as the recruiter for the job opening.
This is how the delivered two-step job opening approval process works:
A recruiter, also known as the originator, creates a job opening and submits it.
The system sets the job opening status to Pending Approval. The system also identifies the first and second approvers and displays the Job Opening - Approval page that summarizes who is in the two-step approval process.
The system notifies the first approver.
The first approver is the supervisor of the person entered as the primary hiring manager on the Job Opening page. If there is more than one hiring manager and none is marked as primary, or if there is no hiring manager, then the first approval step is skipped. To identify the supervisor of the hiring manager, the system uses the Target Information page.
If the first approver approves the job offer, the system notifies the second approver.
The second approver is the recruiter or recruiters entered on the Job Opening page. When there are multiple recruiters, only one recruiter must approve the job opening. If you do not specify a recruiter, the system routes the approval request to the Recruiting Solutions Approval Administrator.
If the second approver approves the job opening, the system updates the status of the job opening to Open and ends the approval process.
During the approval process, an approver can change information on the job opening. If certain fields are changed that might require the job opening to be evaluated again, , a trigger is created and the system sends a notification back to the first approver to start the approval process over. The fields that can cause a trigger to occur are:
Target Openings.
Job Code.
Position Number.
Salary Administration Plan.
From Salary Grade.
To Salary Grade.
Full-time/Part-time.
Regular/Temporary.
Standard Hours.
(USF) Recruitment Type.
(USF) Area of Consideration.
(USF) Salary Range From.
(USF) Salary Range To.
(USF) Pay Frequency.
(USF) Citizenship Status.
This diagram shows the delivered three-step job opening approval process:
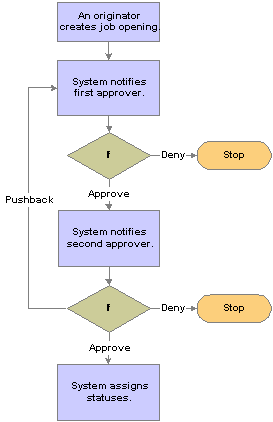
Delivered two-step job opening approval process
See Also
Pages Used to Approve Job Openings
|
Page Name |
Object Name |
Navigation |
Usage |
|
HRS_RECRUIT_CONSOL |
Recruiting, Pending Approvals, Pending Approvals |
View pending approvals and approve job openings. |
|
|
HRS_JOB_OPENING |
Click the subject link on the Pending Approvals page. |
Approve a job opening or add approvers or reviewers to the approval process. |
|
|
NA |
|
Add approvers or reviewers to the approval process. |
Viewing Pending ApprovalsAccess the Pending Approvals page.
To approve or deny multiple pending approvals, select the check box for the job openings and job offers that you want to approve or deny, select Approve or Deny from the Select field and click Go. The system approves or denies the selected pending approvals and removes them from the page.
|
Subject |
Click a job approval link to access the Job Opening page, where you can view details for and approve the job opening. Click an offer approval link to access the Manage Applicant - Disposition Details page, where you can view details for and approve a job offer. |
Approving a Job OpeningAccess the Job Opening - Job Approvals page.
Job Opening: <status name>
|
Pending |
Click the name link to display the approver information box. |
|
|
Click to access the Insert additional approver or reviewer page, where you can add approvers or reviewers to the approval process. |
|
Approve |
Click to approve the job opening. When final approval is reached the system changes the job opening status from Pending Approval to Open. |
|
Click to send a notification to the previous approver telling them the job opening needs to be changed. |
|
|
Click to reject the job opening and set the job opening status to Closed. |
Adding Another Approver or ReviewerAccess the Insert additional approver or reviewer page.
|
User ID |
Select the user ID of the person that you want to add. |
|
Insert as |
Specify whether this user is added as an approver or reviewer. |