
 Understanding Self-Service Transactions
This chapter provides an overview of self-service transactions and discusses how to:
Configure self-service transactions.
Review transactions.
Set up access to direct reports data.
Use workflow with self-service transactions.
Understanding Self-Service TransactionsSelf-service transactions are designed to be extensions of a core PeopleSoft application. They enable workers to update their personal information or to perform some basic task required by their job.
When the self-service transactions were designed there were two things to consider when a worker entered new data:
Do you want that new information to update the HR database or do you want a system administrator to update the database?
Do you want the transaction to go through an approval process? This means that once the new information is submitted, a notification is sent to someone who has to look at this information and approve it before the database can be updated.
Configuring Self-Service TransactionsTo configure self-service transactions, use the Self Service Workflow Configurations component (WF_CO_CONFIG).
This section provides an overview of rules for self-service transactions and discusses how to:
Set up approvals and database updates.
Set up administrator notification rules.
Set up component interface rules.
Understanding Rules for Self-Service TransactionsYou can set rules that define whether the transaction:
Goes through an approval process.
Updates the database or sends a notice to the administrator to complete the transaction manually.
Who to notify when problems occur during the processing of the transaction or when a transaction successfully completes.
Which Transactions Can Be Configured
The following self-service transactions were designed so users could define how processing for each self-service transaction would behave:
Performance Document
Address Change
Change Full/Part Time Status
Change Location
Marital Status
Name Change
Promotion
Reporting Change
Retire Employee
Salary Change
Terminate Employee
Training Enrollment
Training Enrollment by Manager
Transfer
Overview of the Self-Service Processing
The following diagram maps out the process a self-service transaction takes when the transactions is set up to follow the configuration rules.
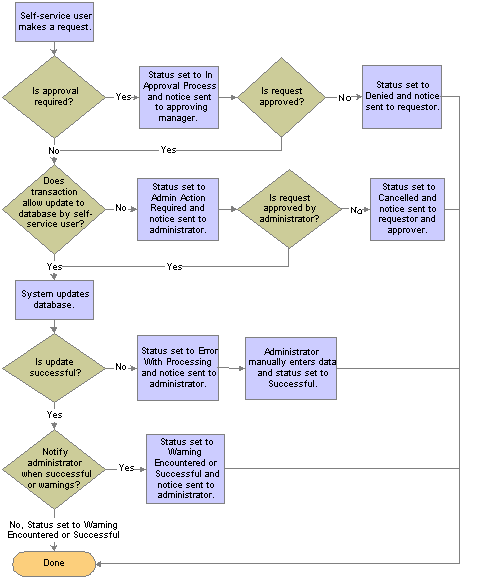
Process flow for transactions using Process Configuration
Note. If a user ID is not tied to the role entered in the Route to Role field on the Approval Rule Set page, an error notification is sent to the administrator and the error can be viewed using the Self-Service Inquiry page. If an alternate user is entered on the General Profile Information page, make sure the User ID entered has permission to access the necessary pages.
Some transactions update the worker’s job data. These self-service rules cannot override information controlled by Position Management.
|
If Position Management Is Set To |
And a Worker's Job Is |
Then Auto-Update of Database |
|
None |
Not Applicable |
Is allowed. |
|
Partial |
In a position |
Not allowed. Exception to this rule is when a manager is requesting a reporting change for a worker. If the worker is in a position and an ID was entered in the Supervisor ID field automatic update is allowed. |
|
Full |
In a position |
Not allowed. Exception to this rule is transferring and promoting a worker. This is because managers promote or transfer workers by selecting a new position number, not changing the existing one. So, automatic updates will insert the new position number and update all the related fields; position data is not touched. |
Pages Used to Set Up Rules for Self Service Transactions
|
Page Name |
Object Name |
Navigation |
Usage |
|
WF_CO_CONFIG |
Set Up HRMS, Common Definitions, Self-Service, Workflow Configurations, Self Service Workflow Configurations |
Determines whether transaction should follow an approval process, update the database automatically, and identify who handles errors and manual updates to database. |
|
|
WF_HR_TRANS_NOT |
Set Up HRMS, Common Definitions, Self-Service, Workflow Configurations, Self Service Workflow Configurations Click the Notification Setup link on the Self Service Workflow Configurations page. |
Defines if an administrator should receive email notification when automatic update was successful or there were warning messages issued during the update. |
|
|
SS_TRANS_CIDTL_SEC |
Set Up HRMS, Common Definitions, Self-Service, Workflow Configurations, Self Service Workflow Configurations Click the Component Interface Setup link on the Self Service Workflow Configurations page. |
Defines the name of the component interface used by the transaction and location of error and warning messages. |
Setting Up Approvals and Database UpdatesAccess the Self Service Workflow Configurations page.
|
Description |
Lists the self-service transaction delivered with system that is designed to work with the Process Configuration Process. |
|
Approval Process? |
This check box is only available to those transactions designed to use an approval process. If selected, the system will require Manager level approval. If not selected, manager level approval is not required. |
|
Allow DB Update |
If selected, this check box allows the transaction to update the database. If not selected, an administrator will be notified of the change and need to complete the process request. Administrators can complete the request on the Workflow Inquiry page or in the Self-Service transaction pages. |
|
Administrator Role |
Identifies the role of the person who is responsible for reviewing the results of the transaction if errors occur. If Notify on Success or Notify on Warnings is selected on the Admin Notification Setup page, this role receives notifications when processing is successful or warnings are encountered. |
|
Notification Setup |
Click this link to display the Admin Notification Setup page. |
|
Component Interface Setup |
Click this link to display the SS Component Interface Setup page. |
See Also
Enterprise PeopleTools PeopleBooks: Security Administration
Setting Up Administrator Notification RulesAccess the Admin Notification Setup page.
|
Component |
The name of the transaction. |
|
Notify on Success |
Applicable only if Allow DB Update is selected on the Configuration Options page. Select to have the role selected on the Configuration Options page receive an email when automatic updates are successful. |
|
Notify on Warnings |
Select to have the role selected on the Configuration Options page receive an email when warning messages are generated during a successful HR database update. |
|
Business Process Name, Activity Name, and Event Name |
This is predefined system data that can be changed if you want to use a different business process. |
Setting Up Component Interface RulesAccess the SS Component Interface page.
Note. You do not need to modify this page unless you use component interfaces or exception tables that you have created or modified. This is predefined system data that can be changed if you want to use a different component interface.
Reviewing Transactions
To review transactions, use the Workflow Inquiry component (WF_SS_STAGED).
This section discusses how to review transaction activity.
Page Used to Review Transactions
|
Page Name |
Object Name |
Navigation |
Usage |
|
WF_SS_STAGED |
Workforce Administration, Self Service Transactions, Workflow Inquiry |
Administrators review activity for self-service transactions. |
Reviewing Transaction ActivityAccess the Workflow Inquiry page.
|
Required Search Fields |
To see the activity for a specific worker enter the ID in the EmplID field. Make sure to tab out of the field. To see the activity for <name of transaction> select <object name for transaction> in the Transaction Name field. Make sure to tab out of the field. To select activity with a specific status, select the check box next to the name of the status. You can select one or more statuses. |
|
Optional Search Field |
To see the activity for transaction that occurred on a specific date, enter the date in the Date field. |
|
Search |
Click this link to find transaction that match the search criteria. Results are displayed below the Search button. |
|
Search Results |
Information about the transaction displays. Click the various tabs to display information relevant to the transaction:
|
Setting Up Access to Direct Reports DataTo set up access to direct reports data, use the Direct Reports Setup component (SS_LINK_TBL).
This section discusses how to:
Determine access to manager self-service.
Set up direct reports.
Set up transaction instructional messages.
Note. If you are setting up direct reports data for ePerformance or eProfile, use the pages documented in the “Working With Common Components” chapter.
See Configuring Direct Reports Functionality.
Pages Used to Set Up Direct Reports
|
Page Name |
Object Name |
Navigation |
Usage |
|
SS_LINK_TBL |
Set Up HRMS, Common Definitions, Direct Reports for Managers, Direct Reports Setup, Target Information |
Set up worker data access for the Manager self-service option. |
|
|
SS_LINK_TBL2 |
Set Up HRMS, Common Definitions, Direct Reports for Managers, Direct Reports Setup, Instructional Text |
Add instructional messages to the Select Employee page (OPRROWS) for this transaction component.service. |
Determining Access to Manager Self-ServiceThe system determines who can access the manager self-service components and data by determining the answers to these questions:
Is this user a manager?
Who reports to this manager?
You determine a user's access to some or all of the manager self-service components when you define their component access on the Permission List page. In the Direct Reports Setup component, you specify whose data a user can see for a particular manager self-service transaction.
The system determines what kind of reporting relationship exists between managers and their staff. Reporting relationships are determined on two pages: the Work Location page (JOB_DATA1) and the Department Profile page (DEPARTMENT_TBL_GBL). On the Work Location page, you indicate who a worker's manager is. On the Department Profile page, you indicate who manages a department and the staff who report to that department.
Note. This section does not apply to the manager role in PeopleSoft Enterprise eRecruit Manager Desktop.
See Setting Up Primary Permission List Preferences.
See Entering Employee Job Location and Position Information.
See Defining Basic Information About a Department.
Setting Up Direct ReportsAccess the Target Information page.
Note. To determine technical names of the system objects, use PeopleSoft Application Designer.
|
Component Name |
Enter the component name as defined on the menu in PeopleSoft Application Designer. The component name is the name of the Select Employee page that the system displays when the user selects a Manager self-service transaction. It isn’t the name of the transaction component. |
|
Menu Name |
Select ROLE_MANAGER. All Manager self-service transactions are delivered on this menu. To grant manager access to components on other menus, select the name of the menu that the component is on. |
|
Menu Bar Name |
Select the name of the menu bar that the transaction component is under. |
|
Item Name |
Enter the component's item name. The item name is the system name of the transaction component, not the component name of the Select Employee page. The transaction component contains pages that the manager uses to view or manipulate staff data. |
|
Page Name |
Enter the object name of the transaction component's page. The object name for each Manager self-service transaction is listed in the introduction table of the page discussion. If a transaction component has more than one page, enter the name of the transaction page that the system displays first (usually the first page in the component) when a user selects a person name. |
|
Access Mode |
Select which action the user performs in the transaction. Options are Add, Update/Display, Update/Display All, and Correction. |
|
Record (Table) Name |
Enter the object name of the record that makes up the page of the transaction component. |
|
Access Type |
This field defines the reporting relationship used by the Select Employee page for this transaction component and determines which method is used to identify who approves the transaction. Available options are:
|
|
Update Own Info (update own information) |
Not applicable to self service. Select to allow managers to update their own information in this transaction component. |
See Also
Enterprise PeopleTools PeopleBook: PeopleSoft Application Designer
Creating and Modifying Security Trees
Setting Up Transaction Instructional MessagesAccess the Instructional Text page.
Direct Reports - Page Instructional Text
|
Title Message Set and Title Message Number |
Enter the title message set and number of the transaction instructions title that the system displays on this component's Select Employees page. |
|
Message Text |
Displays the text of the transaction instruction title that is associated with the Title Message Number. The system displays this text on this component's Select Employees page. |
|
Instructions Message Set and Instructions Message Number |
Enter the number of the instructions message set and number for the instruction message that the system displays on this component's Select Employees page. |
|
Explain |
Displays the text of the instruction message that is associated with the Instructions Message Number. The system displays this text on this component's Select Employees page. Tells the user how to select the employees whose data they want to view or manipulate. |
Using Workflow with Self-Service TransactionsTo use workflow with self-service transactions, use the Set Workflow Defaults component (WF_SYSTEM_DEFAULTS), Transaction Categories component (EO_TRAN_CATS), Workflow Transactions component (EO_TRANSACTIONS), System Workflow Rules component (EO_SYS_WF_RULES), Workflow Status component (HR_WF_STATUS), and Workflow User Preferences component (HR_SS_WF_EE_PREF).
This section discusses how to:
Activate workflow message defaults.
Set user notification preferences.
Define rules for workflow notifications.
See Also
Enterprise PeopleTools PeopleBook: Workflow Technology
Pages Used to Activate Workflow
|
Page Name |
Object Name |
Navigation |
Usage |
|
WF_SYS_DEFAULTS |
PeopleTools, Workflow, Defaults & Messages, Set Workflow Defaults |
Set default parameters for workflow messages. |
|
|
EO_TRAN_CATS |
Set Up HRMS, Common Definitions, Self Service, Transaction Categories, Workflow Transaction Categories |
Defines the category for self-service transactions. Generally, all self-service transactions are assigned to HR_TRANSACTIONS. This data is supplied by PeopleSoft and it is recommended that you not change this information. |
|
|
EO_TRANSACTIONS |
Set Up HRMS, Common Definitions, Self Service, Workflow Transactions |
Assign the self-service transaction to a category set up in the Workflow Transaction Categories page. This data is supplied by PeopleSoft and it is recommended that you not change this information. |
|
|
EO_SYS_WF_RULES |
Set Up HRMS, Common Definitions, Self Service, System Workflow Rules |
For every SetID where you plan to use workflow, set the rules for workflow notification. |
|
|
HR_WF_STATUS |
Set Up HRMS, Common Definitions, Self Service, Workflow Status |
For each self-service transaction, specify what workflow is triggered. Changes to the approval path can be made, but is not recommended. |
|
|
HR_SS_WF_EE_PREF |
Self Service, Workflow User Preferences |
Set up a user's notification method for workflow messages. |
Activating Workflow Message DefaultsAccess the Worklist System Defaults page.
Make sure the Worklist Active, Email Active, and HR Installed check boxes are selected.
Defining Rules for Workflow NotificationsAccess the System Workflow Rules page.
For different rules to exist for different business units specify these rules at the SetID level.
Note. You must specify this information when you implement PeopleSoft HRMS.
|
Transaction Category |
Select a transaction category. |
|
Workflow Rule |
Define how the system notifies users when they're required to perform a function. Values include:
|
|
Notify User - Entry |
Select if users are to receive confirmation when initiating transactions. |
|
Notify All |
Select if users are to be notified each time someone processes one of their transactions. |
|
Notify - Final disposition |
Select if users are to be notified when the final disposition has been made for the request. |
See Also
Delivered Workflows for PeopleSoft HRMS
Setting User Notification PreferencesAccess the Workflow User Preferences page.
Select the method of workflow notifications.