
 Understanding Analytic Grid Design
This chapter provides an overview of analytic grid design and discusses how to:
Insert and resize analytic grid controls.
Set analytic grid analytics properties.
Set analytic grid label properties.
Set analytic grid use properties.
Set analytic grid general properties.
Insert and manipulate analytic grid columns.
Set column properties for analytic grids.
Manipulate the analytic grid at runtime.
Understanding Analytic Grid DesignThe analytic grid retrieves data from the analytic server and displays it in a grid format on a PeopleSoft Pure Internet Architecture page. This grid is the centerpiece for the Analytic Calculation Engine user interface, enabling end users to view, edit, and drag and drop data from an analytic model's cube collection.
Note. Within an application, a PeopleSoft Pure Internet Architecture page that contains an analytic grids may be referred to as an interactive report. Interactive reports are typically read only, but in some cases may also be editable.
Constructing a PeopleSoft Pure Internet Architecture pages that contain an analytic grid consists of these basic steps:
Create an analytic model.
See Understanding the Analytic Model Definition Creation Process.
Use PeopleSoft Application Designer to design the page that contains the analytic grid.
Insert the analytic grid into the page and associate the grid with the analytic model by using the Analytics tab on the Analytic Grid Properties dialog box.
Define the initial layout and characteristics of the analytic grid.
Producing an analytic grid involves many of the same tasks as generating a regular grid. These include inserting and resizing grid controls, inserting and manipulating grid columns, and setting column properties. In addition, you set certain analytic grid properties by using the Analytics tab, Use tab, Label tab, and General tab in the Analytic Grid Properties dialog box.
See Setting Column Properties for Analytic Grids.
See Setting Analytic Grid Label Properties.
See Setting Analytic Grid Use Properties.
See Setting Analytic Grid General Properties.
You can also control the analytic grid layout programmatically using analytic grid APIs.
See GetLayout.
See SetLayout.
You can populate the grid with data in two ways: use the PeopleCode analytic grid classes or have the system populate the analytic grid with data automatically.
To populate the analytic grid data automatically:
Insert into the page any control from which you can obtain analytic instance values—for example, an edit box.
Set this control's properties to the analytic instance (select the appropriate record and field name on the Record tab); this will be the analytic instance field you select in the Analytics tab of the Analytic Grid Properties dialog box.
Drag the appropriate record onto the grid.
Although the developer determines the initial layout of the analytic grid using PeopleSoft Application Designer, one of the primary advantages of the analytic grid is that end users can also modify the layout of the grid at runtime. Among other things, end users can use the analytic grid to:
Pivot data—for example, swap row and column orientations.
Perform hierarchy-related actions such as expanding, collapsing, drilling in, and drilling out in the data.
Slice data—for example, view a subset of a multidimensional array.
Hide non-dimensional fields.
Modify data.
Save the current view settings.
Restore the defaults as specified by the application.
See Working with Analytic Grids.
Components for Working with Analytic GridsYou design analytic grids using PeopleSoft Application Designer. In addition, you may need to work with analytic grids in the runtime environment.
You use these PeopleSoft Application Designer areas to create analytic grids:
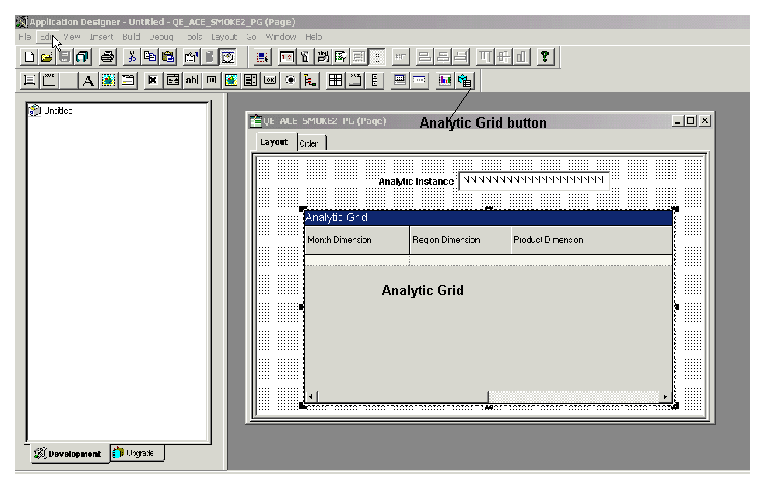
Analytic grid in PeopleSoft Application Designer
|
Analytic Grid button |
Select and then drag to insert an analytic grid into the page. |
|
analytic grid |
Contains the grid itself. You can modify the grid's properties by double-clicking to display the Analytic Grid Properties dialog box. (Click anywhere except the column headings.) You can also double-click a grid column to display the properties box for modifying the column. In addition, you can change the order of columns on either the Layout or Order tab. |
You use these areas to modify analytic grids in runtime:
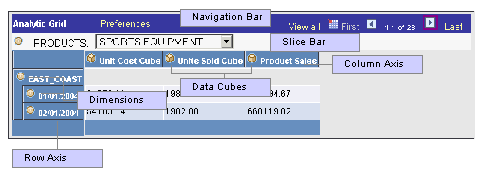
Analytic grid at runtime
|
Navigation Bar |
Enables end users to navigate through the displayed data set. |
|
Slice Bar |
Enables end users to view selected portions, or slices, of the data—for instance, the sales of one category of product or the sales from a single region. |
|
Column Axis |
Displays the designated cubes or dimensions across the top of the analytic grid. |
|
Row Axis |
Displays the designated cubes or dimensions along the left-hand side of the analytic grid. |
|
Data Set |
Displays the data from the loaded analytic instance. |
See Understanding Analytic Grids.
Inserting and Resizing Analytic Grid ControlsTo insert an analytic grid on a page:
Select Insert, Analytic Grid.
Drag to place the grid on the page.
If you need to adjust the grid width, drag the horizontal or vertical control handles.
The grid width should be roughly equivalent to the columns that you insert into the grid. Otherwise, the grid might appear too wide or narrow at runtime.
Note. The grid height depends on the data contained in the grid.
Note. These steps insert an analytic grid control on the page, but so far you have not associated this analytic grid with the relevant model or record definition. You establish this association by means of the Analytic Grid Properties dialog box.
Setting Analytic Grid Analytics PropertiesAccess the Analytic Grid Properties dialog box by double-clicking anywhere on the analytic grid other than on the column headings, and use the Analytics tab to set analytic model association and axis display properties:
Setting Analytic Grid Label PropertiesAccess the Analytic Grid Properties dialog box by double-clicking the analytic grid, and then click the Label tab:
|
Style |
Select the style—font, color, and so on—to apply to the analytic grid. All contents—including the grid's title, labels, columns, rows, and data—appear in this style to the end user. When you select a style, you are actually selecting a style sheet. |
|
Title |
Enter a title that will appear in the upper-left corner of the analytic grid. Note. You can also modify this title at runtime by using the AnalyticGrid API. |
|
Display Slice Bar |
Select for the slice bar to appear in the analytic grid. By default, this check box is selected. |
|
Default Initial View to Expanded State |
Select to have the slice bar appear expanded to the end user initially. Clear to have the slice bar initially appear collapsed to the end user. Note. The slice bar is expanded by default. |
|
Show Grid Lines |
Select to display grid lines to the end user. |
Setting Analytic Grid Use PropertiesAccess the Analytic Grid Properties dialog box by double-clicking the analytic grid, and then click the Use tab:
|
No Auto Select |
Select to suppress the system from automatically retrieving data from the analytic calculation engine. If you select No Auto Select, you must use the LoadData method to load the analytic grid with data. See LoadData. |
|
No Auto Load/Unload Analytic Instance |
Determines whether and how you load the analytic instance for the analytic grid.
|
|
Display Only |
In some cases, you might design grids that enable end users to view but not change information. Select this check box if you do not want the end user to enter data into the fields in any of the rows. End users can still manipulate the grid to display a new view of their data, but they cannot update the actual data displayed in the analytic grid. If the grid is display only, obviously all the fields within the grid are display only. However, if the grid is not display only, there are several possibilities:
|
|
Inactive |
The analytic grid does not display to end users and no data is loaded into the analytic grid data, thus no data is available to the application developer via PeopleCode. |
|
Wrap Column Label |
Select whether column labels wrap if they are too long to fit within the column at its current width. If you do not select this option, columns widen as needed to accommodate long column labels. |
|
Collapsible Data Area |
Select this option so that the data area for your analytic grid can be collapsed into a header bar with an icon that the end user must click to expand it. Selecting Collapsible Data Area enables the Default Initial View to Expanded State check box. |
|
Default Initial View to Expanded State |
Select whether the initial view of the grid is expanded or collapsed. It is expanded by default. Note. This check box is available only if you selected Collapsible Data Area. |
Setting Analytic Grid General PropertiesAccess the Analytic Grid Properties dialog box by double-clicking the analytic grid, and then click the General tab:
|
Page Field Name |
Specify a grid name consisting of any combination of uppercase letters, digits, and the symbols #, $, @, and _. The default is the name of the main record for the analytic grid; however, you can rename the grid as long as you use a unique name for the page or component. This name is used by the PeopleCode GetAnalyticGrid function to create a grid definition. See GetAnalyticGrid. |
|
Occurs Count (rows) |
Determines the vertical page size—that is, how many rows of data are displayed initially at runtime. The occurs count is set to 1 by default. If you set the occurs count to 30 rows, for example, the end user sees 30 rows of data at a time. |
|
Unlimited Occurs Count (rows) |
Sets the occurs count to unlimited, which means that the end user sees all rows of data. (Note that selecting this check box disables the Occurs Count option, because it is no longer applicable.) Note. In addition to setting an occurs count, the developer can set a threshold (by using ACEGRDROWS in PeopleSoft Personalizations) to limit how many rows of data are displayed in the grid. (The analytic grid supports a minimum of 2 rows—one for column axis and one for data—and a maximum of 101 rows—one for column axis and 100 for data.) This threshold works with the View All link in the grid. If the number of rows of data returned is less than the threshold, this link reads View All and, when the end user clicks it, all records appear. However, if the number of rows of data returned is more than the threshold, the View All link changes to View X, where X is the value of the threshold. (This link is a toggle: clicking it switches between displaying the occurs count specified in the properties dialog box and the threshold specified in user personalizations.) If the occurs count is greater than or equal to the threshold, the threshold takes precedence. |
|
Enable as Page Anchor |
Select to apply an anchor tag to serve as a jump destination on the page. |
Inserting and Manipulating Analytic Grid ColumnsThis section discusses how to:
Insert analytic grid columns.
Delete analytic grid columns.
Move analytic grid columns on the Layout tab.
Move analytic grid columns on the Order tab.
Resize analytic grid columns.
Note. The analytic grid supports a minimum of 2 columns (one for row axis and one for data) and a maximum of 101 columns (one for column axis and 100 for data). The default maximum number of columns is 41. You can also use the ACEGRDCOLS option in PeopleSoft Personalizations to set the number of columns displayed in the analytic grid. If necessary, the analytic grid provides a scroll bar that enables end users to scroll through all columns.
See Working with Personalization Options.
Note. The order of the dimensions in the analytic grid does not need to match the order of dimensions in the analytic model. The order in the model is for the purposes of calculation, whereas the order of columns in the analytic grid determines the order that displays to the end user.
Inserting Analytic Grid ColumnsUse one of the following methods to insert an analytic grid column:
Select a page control from the Insert menu and click the analytic grid.
Note. You can insert these page controls within analytic grids: edit boxes, long edit boxes, images, push buttons, and check boxes.
Note. A cube formatted as dimension member should have field type of edit box.
Drag a page field from within the current page, or from another page, into the analytic grid.
Copy and paste a page field or record field.
Drag a definition (such as a record field definition, a page field definition, or an entire record definition) from the project workspace to the analytic grid.
The Analytic grid columns should all be bound to the same record definition to which the underlying cube collection is attached; the only exception is the columns used for related display/related edit. All the fields in the record definition that are mapped to either a dimension or a field should have a representative column in the analytic grid.
Deleting Analytic Grid ColumnsTo delete an analytic grid column:
Select a column by clicking the column heading.
Be sure that you select only the column and not the analytic grid as a whole; otherwise, you might delete the entire grid instead of just the column. The column is selected when it turns black. The whole analytic grid is selected when control boxes appear around the edges of the grid.
Press Delete.
Moving Analytic Grid Columns on the Layout TabTo move analytic grid columns on the Layout tab:
Select a column by clicking its column heading.
Drag the column to its new location.
Release the mouse button over the column that is to the left of the new location.
Note. Remember, the order of columns here determines the order in which they display to end users. However, to determine the axis on which fields appear, you use the Analytics tab in the Analytic Grid Properties dialog box. All non-dimensional fields can appear on one axis only.
Moving Analytic Grid Columns on the Order TabTo move analytic grid columns on the Order tab:
Select the column row by clicking the row number.
The analytic grid is identified as such in the Type column and appears in green. All columns in the analytic grid are directly below this analytic grid row and appear in a lighter green.
Drag the row to the new position in the grid.
A red line indicates the new position of the column before you release it.
Note. You cannot move a column outside of the grid when working on the Order tab. Similarly, you cannot move an existing page control from elsewhere on the page into the grid. You can perform both of these operations on the Layout tab.
Resizing Analytic GridsYou can resize analytic grids in PeopleSoft Application Designer by dragging the right border of the grid. The size of individual columns is determined by the data they contain. The height of the analytic grid is determined by the number of rows it contains. If the number of columns extends beyond the maximum width of the page, a scroll bar is introduced to enable end users to scroll through the columns.
Note. When designing analytic grids, keep in mind that the row header, which you do not see in PeopleSoft Application Designer, takes up some of the width of the analytic grid that is displayed to end users.
Setting Column Properties for Analytic GridsAfter you insert the page control or field into your grid, you can set the properties for that field as you would set properties for any other page control. Access the field properties by double-clicking the column heading. This properties dialog box behaves much as it does for ordinary grids.
See Setting Page Field Properties for Controls.
Note. Settings that you select in the properties dialog, which comes up when you click an individual column in the analytic grid, override the settings that you select in the Analytic Grid Properties dialog box.
In addition, related display fields and related edit fields behave the same for analytic grids as they do for ordinary grids.
See Creating Display Control and Related Fields.
Manipulating the Analytic Grid at RuntimeYour job as an application developer is not finished at design time. You can perform several tasks at runtime to ensure that the analytic grid works as desired:
All data for the analytic grid can be accessed using the PeopleCode RowSet class, as with the regular grid.
You can write business logic to manipulate this data.
If necessary, use the RowInit event to populate data for application data fields.
The record definition associated with a cube collection—and, therefore, with the analytic grid—can have fields that are not mapped to the cube collection's cubes or dimensions. These extra application data fields are treated as non-dimensional fields. They are not populated automatically by the PeopleSoft Analytic Calculation Engine. The RowInit event is fired for each row as it is retrieved from the database, and provides the opportunity for the application to populate these application fields with the appropriate data.
See RowInit Event.
Use PeopleCode to manipulate the analytic model and analytic grid data, as well as change the display of the analytic grid.