Setting Up a Workspace
This section elaborates on the details required to define a workspace.
|
Page Name |
Definition Name |
Usage |
|---|---|---|
|
Administration - Properties Page |
EPPCW_ADMIN_PROP |
Enter detailed properties of a workspace including a name, description, category, valid dates, and welcome text. |
|
Select Category Page |
EPPCW_CATG_SELECT |
Select the category that you want to assign to the workspace. |
|
Administration - Members Page |
EPPCW_ADMIN_MBR |
Manage the membership settings of a workspace. |
|
Set Invitation Message Page |
EPPCW_ADMIN_INVITE |
Write a member invitation message that you want to use as the default to invite members to participate in the workspace. |
|
Create User Account Page |
EPPCW_ADMIN_EXTUSR |
Create a new account for an external user or look up existing external accounts by email address. |
|
Administration - Modules Page |
EPPCW_ADMIN_MOD |
Select the modules that you want to include in the workspace. |
|
Documents Module Properties Page |
EPPCW_DC_CATGOPTS |
Determine properties for the Documents module such as whether checkouts, approvals, and version control are enabled. |
|
Add Pagelet Page |
EPPPB_CP_ADD |
Select a pagelet definition from a source portal, and add it to the template. |
|
Edit Pagelet Page |
EPPPB_CP_EDIT |
Edit the definition for a related pagelet. |
|
Key Name Mapping Page |
EPPCW_ADMIN_KEYMAP |
Specify and optionally rename the keys passed to the pagelet. |
|
EPPCW_ADMIN_KEYS |
Manage contextual data associated with the workspace. For example, you can enter data that ties the workspace to one or more transaction key fields. |
|
|
Publish Feed Definition (Workspace Feeds) Page |
PTFP_PUB_AS_FEED |
Define feed security options, enter additional feed properties, and access advanced options. |
|
Advanced Feed Options (Workspace Feeds) Page |
EPPCW_PUB_ADVOPT |
Select the workspace modules to be published and other advanced options for a workspace feed. |
|
Publish as Feed (Workspace Feeds) |
EPPCW_PUB_AS_LIST |
Review, edit, add, or delete feed definitions for this item. |
|
Publish Feed Definition to Sites Page |
PTFP_PUB_AS_SITES |
Publish an existing feed to other sites. |
|
EPPCW_ADMIN_ADV |
Access advanced utilities and tools for configuring the workspace. |
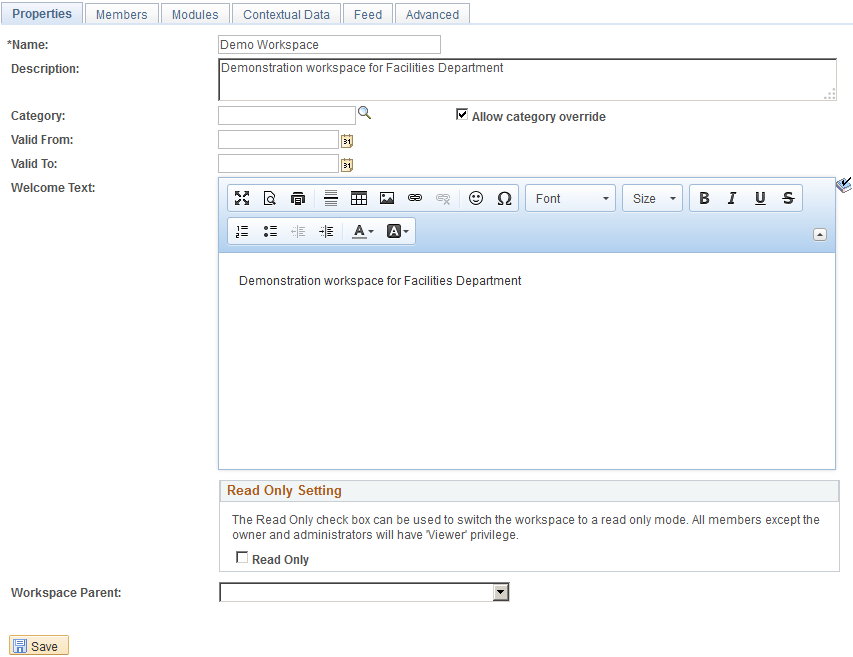
Access the Administration - Properties page (in the workspace menu, click the Administration link).
This example illustrates the fields and controls on the Administration - Properties page for a workspace instance. You can find definitions for the fields and controls later on this page.
Field or Control |
Description |
|---|---|
Name |
The workspace name entered on the Name and Describe Workspace page appears, but can be overridden. |
Description |
The workspace description entered on the Name and Describe Workspace page appears, but can be overridden. |
Category |
The workspace category selected on the Name and Describe Workspace page appears, but can be overridden. Click the Search Categories button to access the Select Category page, where you can select a category for the workspace. |
Valid From and Valid To |
Enter the span of dates during which you want the workspace to be valid. Important! When the valid to date has passed, the workspace is expired. Workspace members can no longer access the workspace. In addition, portal administrators cannot manage the workspace such as deactivating or deleting the workspace. |
Welcome Text |
Enter text or HTML-formatted content that you want to appear as a welcome message on the Welcome pagelet. See the product documentation for PeopleTools: Applications User's Guide, “Using PeopleSoft Application Pages Working With Rich Text Editor Fields. |
Read Only |
Select to make the workspace read-only. All members except the owner and administrators have viewer privileges only in this mode. |
Workspace Parent |
Select a workspace from the drop-down list box to make it the parent workspace. Select blank to make this workspace a root workspace. |
Selecting a Workspace Category
Access the Select Category page (click the Search Categories button on the Administration - Properties page).
This example illustrates the fields and controls on the Select Category page. You can find definitions for the fields and controls later on this page.
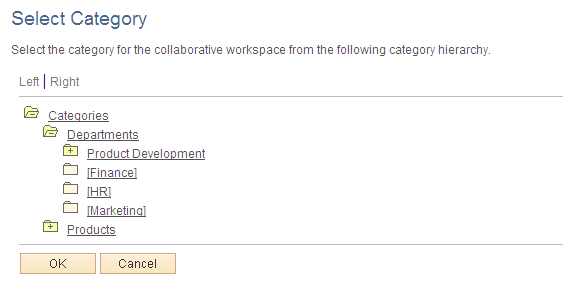
To select the category that you want to assign to the workspace:
Browse the category hierarchy to view the available categories:
Click + next to a category folder to expand it and reveal its contents.
Click – next to a category folder to collapse and hide its contents.
Click a link for a category to select that category for the workspace.
Access the Administration - Members page (in the workspace menu, click the Administration link; then select the Members tab).
Adding Workspace Members
Field or Control |
Description |
|---|---|
Send Invite |
Select to send a notification to the selected members alerting them that they have been added as a member to the workspace. The default notification text will be used and includes a link to the workspace homepage. Alternatively, you can send notifications after the workspace has been created, which also enables you to modify the notification text on the Set Invitation Message page. |
Type |
Select the type of member that you want to add to the workspace. To be able to select Administrator or Owner in the Privilege Set field, you must select the User value here. Available values include: Role: Select to be able to select a role in the Member Name field. Available roles are derived from PeopleSoft roles defined on the Roles page. See the product documentation for PeopleTools: Security Administration, “Setting Up Roles.” User: Select to be able to select a user in the Member Name field. Available users are derived from PeopleSoft users defined on the User Profiles page. See the product documentation for PeopleTools: Security Administration,“Administering User Profiles.” |
Member Name |
Select a name from the list of roles or users. |
Privilege Set |
Select a privilege level that you want to assign to the member. To be able to assign the Administrator or Owner privilege level to a member, you must have selected User in the Type field. Available values are: Administrator Approver Contributor Moderator Owner Viewer |
Add Workspace Member |
Click to add another member to the workspace. |
Create User Account |
Click to access the Create User Account page, which enables you to enter a new user name and email account for an external member. Note: The Create User Account button appears only if the Enable External Users option has been set on the Installation Options page. |
Finish |
Click to finish workspace creation and access the workspace homepage. |
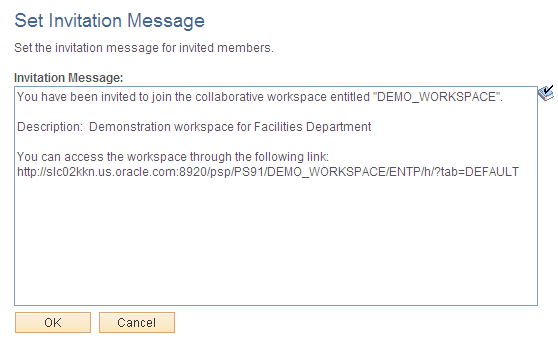
Sending Invitations to Workspace Members
Access the Set Invitation Message page (select specific workspace members and click the Send Invitations button on the Administration - Members page).
This example illustrates the fields and controls on the Set Invitation Message page.
Creating an External User Account
Access the Create User Account page (click the Create User Account button on the Administration - Members page).
This example illustrates the fields and controls on the Create User Account page. You can find definitions for the fields and controls later on this page.
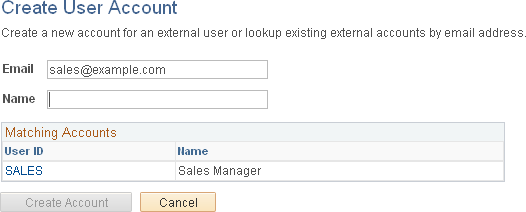
Use the Create User Account page to create an account to allow an external user to access this workspace. The system user ID will be based on the email address that you enter. The name will be used as the description in the PeopleTools user profile. A dynamically created password will be mailed to the user enabling access to the workspace. When the external user signs in to the workspace for the first time, the Change Password page is displayed and he or she is asked to change the password that was sent in the invitation.
Field or Control |
Description |
|---|---|
|
Enter a valid email address. The system user ID generated from this email address will be truncated at the @ sign. For example, an email address of [email protected] will result in a user ID of FIRST.LAST. |
|
Name |
Enter a description for this account. This will be used as the description in the PeopleTools user profile. |
Matching Accounts |
After you enter a valid email address and exit the Email field, if a matching email address is found in the system, then the Matching Accounts group box appears displaying matching accounts. |
Create Account |
Click to create a new external user account and return to the Add Members (Optional) page. |
Cancel |
Click either button to return to the Add Members (Optional) page without creating the external user account. |
External user information can be accessed and managed from the Manage External User page.
Access the Administration - Modules page (in the workspace menu, click the Administration link; then select the Modules tab).
This example illustrates the fields and controls on the Administration - Modules page. You can find definitions for the fields and controls later on this page.
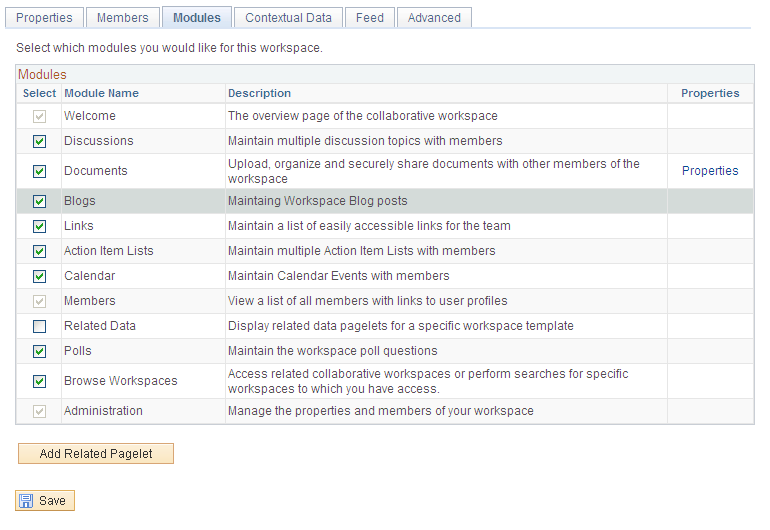
The Modules group box displays module settings defined for the workspace on the Select Workspace Modules page, but can be overridden.
Select the modules that you want to include in the workspace. Welcome, Members, and Administration values are selected and unavailable for editing because those modules are required in a workspace. These are modules delivered with PeopleSoft Interaction Hub.
You can choose to remove a module even after activity has been performed in the module without losing any data. Deselecting the Select option for a module simply removes link access to the module from the workspace menu; all module data is preserved. If you decide to include the module in the workspace again, all module activity that existed in the module before removal will be accessible.
The Properties link associated with a module enables you to further define the properties and options that are available in the module.
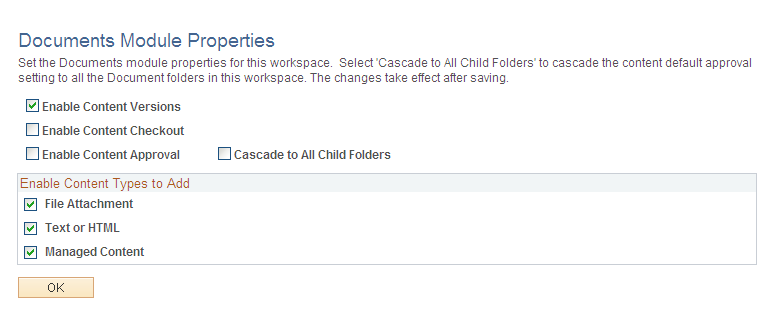
Defining Documents Module Options for a Workspace
Access the Documents Module Properties page (click the Properties link for the Documents module on the Administration - Modules page).
This example illustrates the fields and controls on the Documents Module Properties page. You can find definitions for the fields and controls later on this page.
Field or Control |
Description |
|---|---|
Enable Content Versions |
Select to enable different versions of content. |
Enable Content Checkout |
Select to enable the check-in and checkout of documents posted to the Documents module of this workspace. If you select this option, fields and options enabling the check-in and checkout of documents appear appropriately on the pages used to post documents to the Documents module. |
Enable Content Approval |
Select to enable the approval of documents posted to the Documents module of this workspace. If you select this option, fields and options enabling the approval of documents appear appropriately on the pages used to post documents to the Documents module. |
Cascade to All Child Folders |
Sets the default approvals for all new content in child folders. The approval settings are transferred to all child folders when the page is saved. This setting does not affect existing child content approval settings. |
Enable Text/HTML |
Select to enable the posting of text and HTML documents to the Documents module of this workspace. If you select this option, the Text or HTML option appears on the Documents - Add Documents page in the Documents module. |
Enable File Attachments |
Select to enable the posting of file attachments to the Documents module of this workspace. If you select this option, the File Attachment option appears on the Documents - Add Documents page in the Documents module. |
Enable Managed Content |
Select to enable the posting of managed content to the Documents module of this workspace. If you select this option, the Managed Content option appears on the Documents - Add Documents page in the Documents module. |
Adding or Editing a Related Pagelet in a Workspace
Access the Add Pagelet page (click the Add Related Pagelet button on the Administration - Modules page).
Access the Edit Pagelet page (click the Edit Pagelet button for an existing pagelet on the Administration - Modules page).
This example illustrates the fields and controls on the Add Pagelet page. You can find definitions for the fields and controls later on this page.
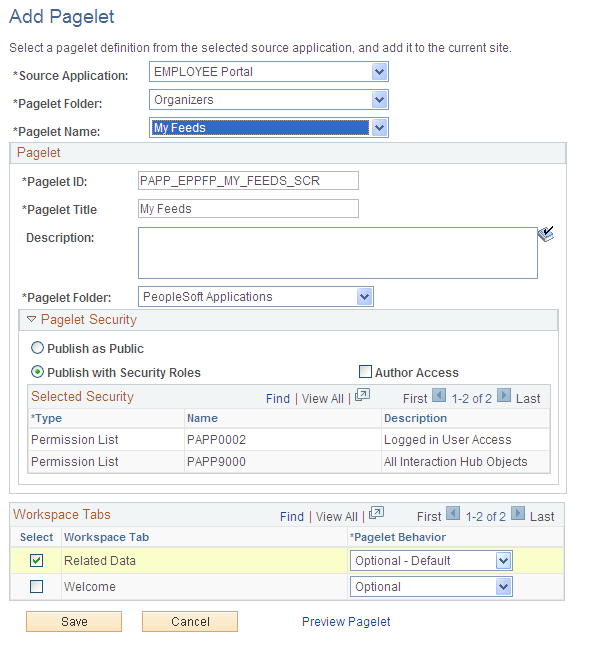
Use the Add Pagelet page to add an already defined pagelet to be available on the workspace homepage (Welcome tab) or the workspace Related Data tab.
Field or Control |
Description |
|---|---|
Source Application |
Select the portal registry that is the source of the pagelet definition. To select the portal registry from the node of a content provider system, that node must already be defined as a source application. |
Pagelet Folder |
Select the portal folder that is the source of the pagelet definition. |
Pagelet Name |
Select the pagelet definition. |
Pagelet Name |
Displays the ID of the pagelet. |
Pagelet Title |
Displays the title of the pagelet, which you can modify. |
Description |
(Optional) Enter a description for the pagelet. |
Pagelet Folder |
Select the folder in which the pagelet definition will be stored. PeopleSoft Applications is the default folder for workspace pagelets. |
Pagelet Security |
Select a pagelet security option:
|
Author Access |
Select to provide the pagelet author with access to the pagelet regardless of any security restrictions assigned to the pagelet. This access is granted based on the author’s user ID. |
Select |
Select one or more workspace tabs for this pagelet:
|
Pagelet Behavior |
Select the default behavior for the pagelet:
|
Mapping Keys for Context-Sensitive Pagelets
Access the Key Name Mapping page (click the Map link for a context-sensitive pagelet on the Administration - Modules page).
This example illustrates the fields and controls on the Key Name Mapping page.
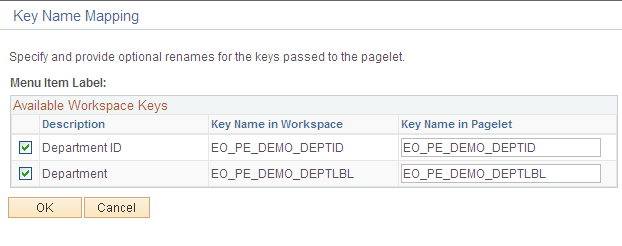
When a related pagelet is added to a workspace and is designated as being context-sensitive, the pagelet is passed the same key names and values that are associated with the workspace. These keys are passed to the pagelet as query string parameters. If needed, the key names can be overridden for a related pagelet by means of the EPPCW_KEYMAPPING attribute to the content reference representing the pagelet.
The content reference for the pagelet content reference can be accessed by means of clicking the Structure and Content link on the Administration - Advanced page. The syntax for the attribute value is:
KEY1ORIGNAME=KEY1NEWNAME;
KEY2ORIGNAME=KEY2NEWNAME;
...
KEYNORIGNAME=KEYNNEWNAMEAccess the Administration - Contextual Data page (in the workspace menu, click the Administration link; then select the Contextual Data page).
This example illustrates the fields and controls on the Administration - Contextual Data page. You can find definitions for the fields and controls later on this page.
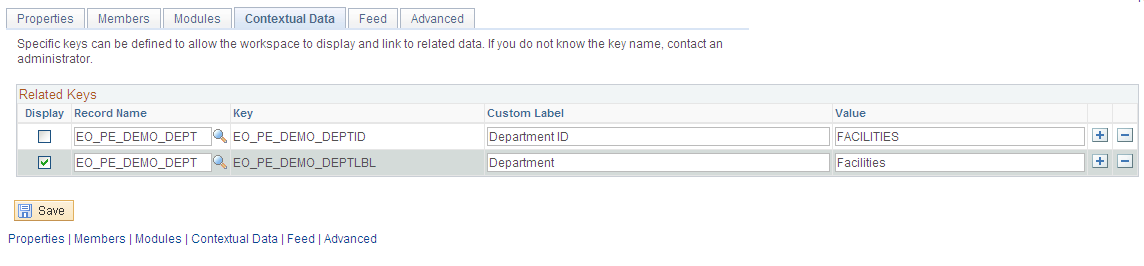
Related Keys
If this workspace was created by means of a template for which contextual data has been defined, the key fields selected to supply contextual data appear here. The key field values can be specified at the time of creation of the workspace or by using the Administration module of the workspace once it has been created.
If this workspace was created by means of a template that did not specify a contextual relationship, you can enter your own key fields and values.
While you can manually enter data on this page, Oracle recommends that you populate these fields by creating a workspace from a template and directly from a transaction.
Note: Modifying existing field values or options set in this group box initiates a function that updates all workspace pagelet content reference URLs that contain an attribute of EPPCW_PAGELET with a value of KEYS. This change affects all workspace pagelets, as well as any related pagelets associated with the workspace in which the key was modified.
Field or Control |
Description |
|---|---|
Display |
Select to display the contextual data in the workspace. If this option is selected, the key appears in the menu of the workspace. |
Record Name |
Select the record name that you want to use to derive contextual data for the workspace. |
Key |
Enter the key field that you want to use to derive contextual data for the workspace. |
Custom Label |
Enter an overriding value for the key label. If you choose to display the key, this label will appear alongside the key field value below the menu of a workspace for a transaction that contains the key. |
Use the Administration - Feeds page as the starting point for administering workspace feeds.
In addition to workspace modules that can be published as feeds on their own, one or more feeds can be published for the entire workspace, each of which is known as a workspace feed. While workspace members with sufficient privilege can publish feeds for individual workspace modules, only the workspace administrator can publish a workspace feed. In addition, the administrator is responsible for selecting which modules will be included in that feed.
The following steps provide a high-level overview of the process to administer workspace feeds:
In the workspace menu, click the Administration link to access the Administration module.
Select the Feeds page.
Depending on whether a workspace feed has already been published, one of the following pages is displayed:
The Publish as Feed page is displayed if a workspace feed has already been published. Continue with step 3.
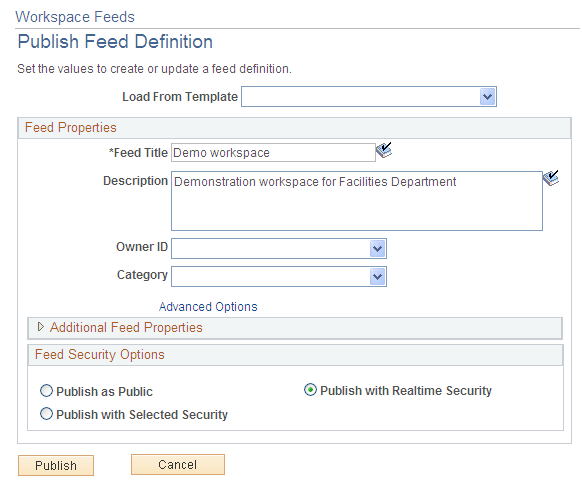
The Publish Feed Definition page is displayed if a workspace feed has not been published for this workspace. Continue with step 4.
Determine whether you want to edit one of the current workspace feeds, or create a new workspace feed.
On the Publish as Feed page, click Edit to edit an existing workspace feed; click Add New to create a new workspace feed.
Set the feed parameters, additional feed parameters, and feed security options on the Publish Feed Definition page.
See the product documentation for PeopleTools: Feed Publishing Framework,“Creating and Using Feeds and Feed Templates ,” Understanding Creation and Use of Feeds and Feed Templates.
You must select at least one module for publishing in this workspace feed. Therefore, click the Advanced Options link.
Set the advanced options for the workspace feed on the Advanced Feed Options page.
Click OK on the Advanced Feed Options page.
Click the Publish button on the Publish Feed Definition page to save any new or revised feed definitions.
Modifying and Saving Workspace Feed Definitions
Access the Publish as Feed page (click Publish on the Publish Feed Definition page; alternatively, if a workspace feed definition already exists, select the Feeds page in the Administration module).
This example illustrates the fields and controls on the Publish as Feed page (Workspace Feeds). You can find definitions for the fields and controls later on this page.
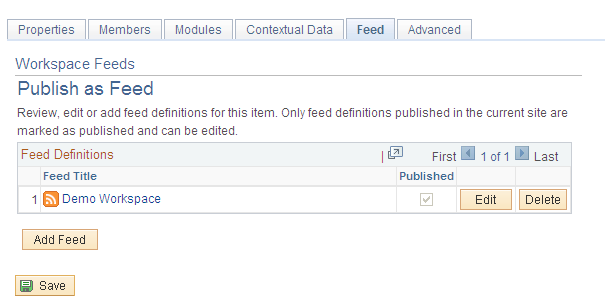
Use the Publish as Feed page for workspace feeds to administer and save workspace feed definitions.
Field or Control |
Description |
|---|---|
Feed Title |
Click a link in this column to view the feed document for that workspace feed. |
Published |
Indicates whether a workspace feed is currently published. |
Edit |
Click to edit an existing workspace feed definition. |
Delete |
Click to delete an existing workspace feed definition. |
Add Feed |
Click to add a new workspace feed definition. |
Save |
Click to save a new feed definition or changes to existing workspace feed definitions. |
Setting Advanced Options for Workspace Feeds
Access the Advanced Feed Options page (click the Advanced Options link on the Publish Feed Definition page).
This example illustrates the fields and controls on the Advanced Feed Options page (Workspace Feeds).
Use the Advanced Feed Options page for workspace feeds to determine which workspace modules will be included in the workspace feed. The workspace feed can be configured to include content from one or more of the following modules:
Action Item Lists
Blogs
Calendar
Discussions
Documents
Wiki Content
Note: A specific workspace module can be configured to be published in one or more or no workspace feeds.
To set advanced options for a workspace feed:
Set the maximum number of entries per module for this workspace feed in the Max Number of Entries field.
From the list of available workspace modules, select those modules that you want to publish in this workspace feed.
Note: If a module has not been selected on the Administration - Modules page, then it will appear as disabled on this page.
Click OK.
Access the Administration - Advanced page (in the workspace menu, click the Administration link; select the Advanced tab).
This example illustrates the fields and controls on the Administration - Advanced page for a workspace instance. You can find definitions for the fields and controls later on this page.
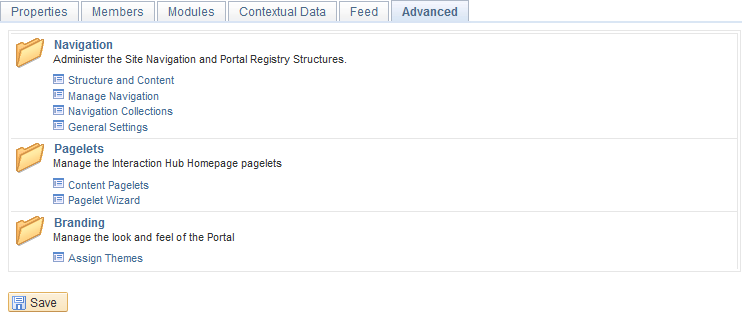
Field or Control |
Description |
|---|---|
Navigation |
Access utilities and tools that enable you to implement advanced navigation configurations for the workspace. See the product documentation for PeopleTools: Portal Technology, “Administering Portals.” |
Pagelets |
Access utilities and tools that enable you to implement advanced pagelet configurations for the workspace. See the product documentation for PeopleTools: Portal Technology, “Using Pagelet Wizard to Create and Manage Pagelets.” |
Branding |
Access utilities and tools that enable you to change branding theme assignments for the template. See Themes, Headers, and Skins. In addition, see PeopleTools: Portal Technology, “Using PeopleTools Branding Features,” Administering System Branding, Assigning Branding Themes. |