Managing Site Navigation
This section provides an overview of site navigation management and discusses how to manage site navigation.
|
Page Name |
Definition Name |
Usage |
|---|---|---|
|
EPPNA_REG_ADMIN |
Add, delete, and manage menu folders and links for the site. Use the Manage Navigation page instead of directly addressing content references (CREFs) in the portal registry or through the Structure and Content pages. Provides simplified access to the portal registry for the current site. Provides a unified interface for management of the menu folders and links for the site. |
|
|
EPPNA_NEW_PRNT |
Use a hierarchical representation of the portal registry to select the parent folder into which you want to move the selected element. |
Use the Manage Navigation page (EPPNA_REG_ADMIN) to add, delete, and manage menu folders and links for the site.
Use the Manage Navigation page instead of directly addressing content references (CREFs) in the portal registry or through the Structure and Content pages. Provides simplified access to the portal registry for the current site. Provides a unified interface for management of the menu folders and links for the site.
Navigation:
.
This example illustrates the fields and controls on the Manage Navigation page.
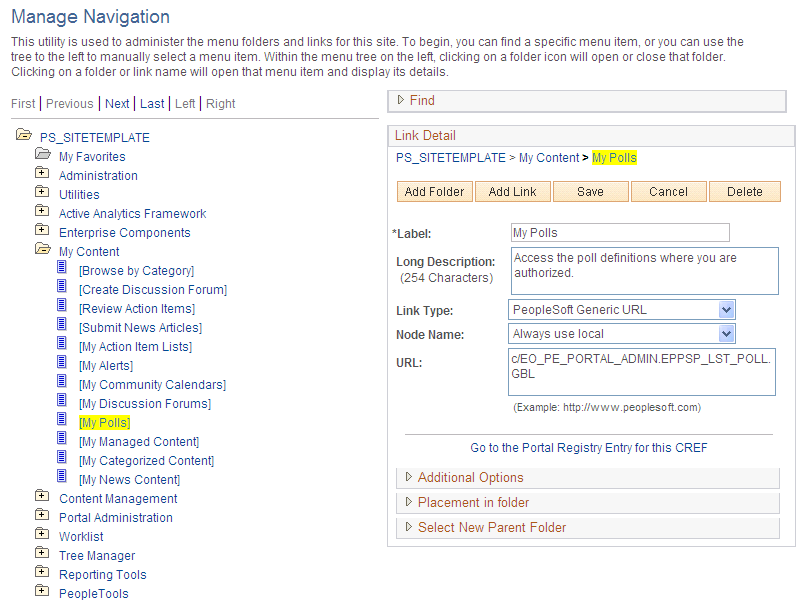
The Manage Navigation page provides an interface to the portal registry for tasks specific to the current site based on site defaults.
It is a front-end to the portal registry, which stores site navigation. Site administrators may not be familiar with the portal registry and may not have the security required to access portal administration functions. Authorized site administrators can manage their site's content and navigation without having access to the registry for other sites or to the default portal.
Site publishers can use the Manage Navigation page to post content to the site and manage its navigation. Publishers can specify the content source, template (if authorized in the Define Publishing Defaults component), and the content's placement in the site navigation, as well as create folders and delegate folder administration.
Only site administrators (as authorized by the portal administrator) and site publishers (as authorized by the site administrator) can manage site navigation. Site administrators can use the Manage Navigation page to change the navigation menu's structure or to create folders for new content, for example. Site publishers can use the Manage Navigation page to add or move folders for site content or add links to content, for example.
The Manage Navigation page initially displays the site's navigation menu and a Find group box. You can browse through the hierarchy by expanding and contracting folders. Alternatively, you can use the Find group box to locate a menu item by name.
Click on a folder or content reference link to select the item with which you want to work. The selected item will appear highlighted in yellow anywhere it appears on the page.
Managing Folders and Links
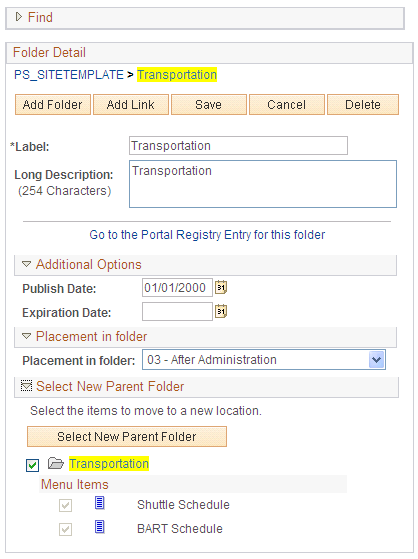
After you select or add a folder, the Folder Detail group box appears.
This example illustrates the fields and controls on the Folder Detail group box.
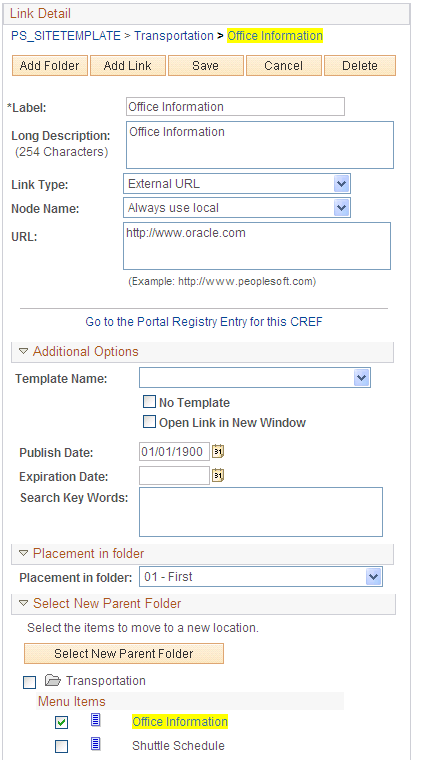
After you select or add a link, the Link Detail group box appears.
This example illustrates the fields and controls on the Link Detail group box. You can find definitions for the fields and controls later on this page.
Field or Control |
Description |
|---|---|
Add Folder |
Click to add a folder within the selected folder. |
Add Link |
Click to add a new link within the selected folder. |
Save |
Click to save the new or modified folder or link. |
Cancel |
Click to cancel the creation or modification of the folder or link. |
Delete |
Click to delete the folder or link. You will be prompted to confirm your deletion. |
Label |
Specify the label that will appear in the menu. |
Long Description |
Specify a description that will appear as the hover text for the label. |
Link Type |
This field displays in the Link Detail group box. Select the link type from the drop-down list box, and specify the required information for the selected link type: Content Management Folder. Create a link to a content management folder. External URL. Create a link to a URL to an external site. File Attachment. Create a link to a file. Managed Content. Create a link to managed content. PeopleSoft Query. Create a link to a predefined PeopleSoft database query. Portal/Site. Create a link to any site or main portal accessible from the current site. If you are a portal administrator managing navigation on the default portal, the following additional link types are available: PeopleSoft Component. Create a link to a PeopleSoft component. PeopleSoft iScript. Create a link to a PeopleSoft iScript, which can return anything. Generally, iScripts are used to return information placed on pagelets. In this case, you can point to an iScript as a target. PeopleSoft Generic URL. Create a link to a generic URL in your PeopleSoft database. This option enables you to point to any PeopleSoft object (iScript, component, and so forth) as a generic URL. You may choose to use this option rather than specifying an iScript or component when you are not required to inherit the security specified on that object. You can then place your own security on the target to which you are pointing. |
Portal Name |
Select a portal that contains the folder you want to link to using the Content Management Folder. |
Node Name |
Select the node through which the material to which you want to create a link should be accessed. Available nodes are comprised of defined content providers from which content can be retrieved and rendered. This field displays in the Link Detail group box for the PeopleSoft Component, External URL, PeopleSoft Generic URL, and PeopleSoft IScript link types. |
Menu Name |
Enter the menu in which the component to which you want to create the link resides. This field displays in the Link Detail group box for the PeopleSoft Component link type. |
Market |
Select the market for the component to which you want to link. This field displays in the Link Detail group box for the PeopleSoft Component link type. |
Component |
Enter the name of the component to which you want to link. This field displays in the Link Detail group box for the PeopleSoft Component link type. |
Additional Parameters |
Enter any additional parameters you want to use to locate the content to which you want to link. This field displays in the Link Detail group box for the PeopleSoft Component and PeopleSoft IScript link types. |
URL |
Enter the URL to which you want to link, including the leading http://. This field displays in the Link Detail group box for the External URL and PeopleSoft Generic URL link types. |
Add Attachment |
Click to access a page where you can browse for and upload the file attachment to which you want to create a link. This button displays in the Link Detail group box for the File Attachment link type. |
Select Content |
Click to access the Select Managed Content page, where you can search for and select the managed content to which you want to create a link. This button displays in the Link Detail group box for the Managed Content link type. |
Record (Table) Name |
Enter the name of the record to which the iScript you want to link is associated. This field displays in the Link Detail group box for the PeopleSoft IScript link type. |
Field Name |
Enter the name of the field to which the iScript you want to link to is associated. This field displays in the Link Detail group box for the PeopleSoft IScript link type. |
Event Name |
Enter the name of the event to which the iScript you want to link to is associated. This field displays in the Link Detail group box for the PeopleSoft IScript link type. |
IScript Name |
Enter the name of the iScript to which you want to link. This field displays in the Link Detail group box for the PeopleSoft IScript link type. |
Query Name |
Enter the query to which you want to create a link. This field displays in the Link Detail group box for the PeopleSoft Query link type. |
Site ID |
Select the site to which you want to create a link. This field displays in the Link Detail group box for the Portal Site link type. |
Go to the Portal Registry Entry for this CREF |
Select to access the Content Ref Administration page, where you can access additional options for the selected link in the portal registry. This link displays in the Link Detail group box for an existing link or a newly created link that has been saved. See the product documentation for PeopleTools: Portal Technology, “Administering Portals,” Administering Content References. |
Go to the Portal Registry Entry for this folder |
Click to access the Folder Administration page, where you can access additional options for the selected folder in the portal registry. Note: This option is only available to portal administrators. This link displays in the Folder Detail group box for an existing folder or a newly created folder that has been saved. See the product documentation for PeopleTools: Portal Technology, “Administering Portals,” Administering Folders. |
Additional Options
Field or Control |
Description |
|---|---|
Template Name |
Select a template to apply to the new link. This option is only available if authorized by the site administrator. This field displays in the Link Details group box. |
No Template |
Select if you do not want to apply a template to the link content. When you select this option, the Template Name field does not display. This field displays in the Link Details group box. |
Open Link in New Window |
Select to indicate that you want the link contents to open in a new browser window instead of in the current browser window. This field displays in the Link Details group box. |
Publish Date |
Specify an effective date for this element. |
Expiration Date |
Specify an expiration date for this element. |
Search Key Words |
Specify keywords you want to use to identify this link in a search of this site. The search engine will pick up this text to be able to include the link in a search collection for the site. |
Placement in Folder
Field or Control |
Description |
|---|---|
Placement in Folder |
Specify the placement of the element in the new parent folder. |
Select the item or items that you want to move. The tree displays one level of the tree, enabling you to select a folder within that level. To select all folder items displayed in the tree, select the parent folder. To select one or more folder items in the tree, clear the check box for the parent and select the children items individually. For content references, the tree shows the parent folder and all of the sibling folders. If you select the parent, then all of the child items are selected.
Navigation:
Click the Select New Parent Folder button on the Manage Navigation page to access the Select New Parent Folder page, where you can use a hierarchical representation of the portal registry to select the parent folder into which you want to move the selected element.
This example illustrates the fields and controls on the Select New Parent Folder page.
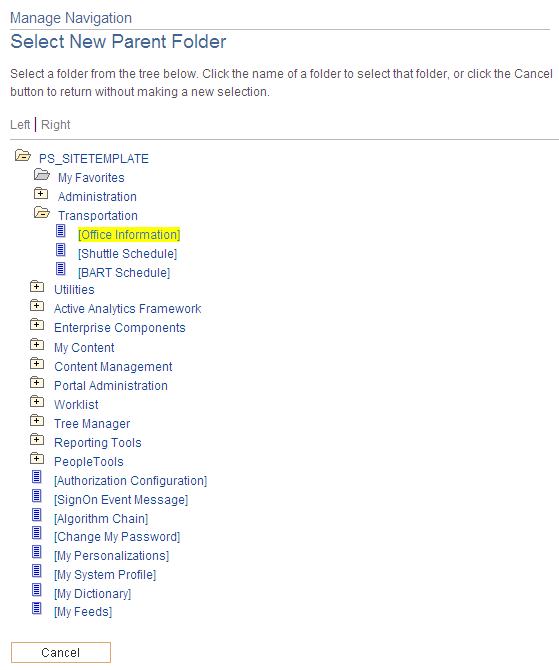
The items that you have selected to move to a new folder appear highlighted. Click the name of the folder that you want to move the items to, and the system will display a confirmation message ensuring that you want to proceed with the move. Click Cancel to not move the item.