 Understanding Payables Payment Formats
This chapter provides an overview of Payables payment formats and discusses how to:
Decide which payment forms you need.
Specify payment form attributes.
Assign payment forms to bank accounts.
Modify payment forms.
Specify magnetic ink character recognition (MICR) fonts.
Print logos and signatures with Crystal checks.
Set up workstations to view Crystal 9.0 checks and drafts from the process monitor using the web function.
Test checks.
Understanding Payables Payment FormatsThis section discusses available payment formats and provides overviews of:
Available Payables payment formats.
System and manual checks.
Wire transfers.
Electronic funds transfer (EFT) and automated clearinghouse (ACH) payments.
Drafts.
Giros.
Letters of credit.
Direct debits.
 Available Payables Payment Formats
Vendors might require specific methods of making payments, such as issuing a check or sending payments electronically using a specific electronic file format. Payables currently supports the following payment methods and formats:
|
System and manual check |
Printed payment format for regularly scheduled payments. |
|
Wire transfer |
A transaction that you initiate through your bank. Printed remittance advice is the only format available for paying by wire. |
|
EFT and ACH |
Electronic payment file formats for regularly scheduled payments. |
|
Draft |
Internationally accepted printed and electronic payment format that adheres to a specific maturity date agreement between the buyer and vendor. |
|
Giro |
Printed and electronic payment format primarily used in the Netherlands and Singapore for regularly scheduled payments. |
|
Letter of credit |
Electronic payment format for scheduled payments that is supported by a signed agreement between you, your bank, and your vendor. |
|
Direct debit |
Payment method in which the buyer and vendor create a contract that enables the vendor to collect an amount due for specific goods or services directly from the buyer's bank through EFT. |
Before you can use a payment format, you must associate it with a bank account. You specify the payment method on the Payables Options - Payment Options page, the Vendor Payment Options page, or the Pay to Bank Account page.
You must also set up payment relationships when you define vendors.
See Also
Maintaining Vendor Information
System and Manual ChecksIn Payables, system and manual checks require a printed paper check and remittance advice. System checks are scheduled payments that you generate and print online. At voucher entry, indicate that the payment is a system check. During the next pay cycle, Payables selects the payment and creates system checks. You can select to have the system generate a positive pay file and report for the system checks.
Manual checks are usually issued for payments that you have already made by physically writing a check. You create a voucher and indicate that the payment is a manual check. Payables immediately marks your the payment as paid but does not print a paper check because you have previously created and issued the check.
Once you create system and manual payments, you can run the payment posting process to create accounting entries, then run the Journal Generator Application Engine process (FS_JGEN) to pass the accounting entries to the general ledger. After you create system or manual checks, you can view inquiries for the payments by vendor, bank or bank account, payment method, reference number, or voucher number.
This diagram shows the process flow for system and manual checks:
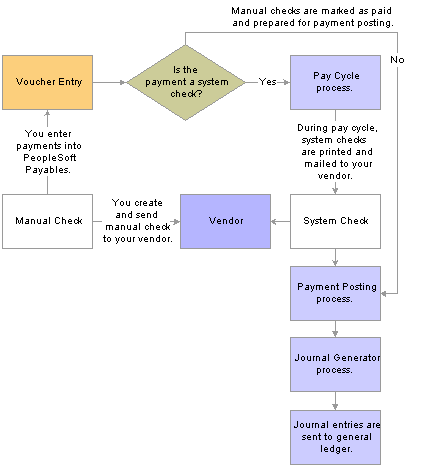
System and Manual Checks process flow
See Also
Running the Payment Posting Application Engine Process (AP_PSTPYMNT)
Reviewing Voucher, Payment, and Vendor Information
Wire TransfersA wire transfer is a transaction that you initiate through your bank. You can create a manual payment, and run pay cycle processes to process your wire transfer payments. During pay cycle processing, you can generate a remittance advice only report (WIRE1) for paying by wire.
Wires can also be processed through Pay Cycle Manager using the Financial Gateway functionality.
As with system and manual checks, once you create your wire payments, you can run the payment posting process to create accounting entries, then run the Journal Generator process to pass the accounting entries to the general ledger.
See Also
Using the Manual Payment Creation Process
Setting Up the Financial Gateway Integration
Pay Cycle Processing using the Financial Gateway
EFT and ACH PaymentsBoth EFT and ACH are paperless payment formats. Both require that you create an electronic file that contains the necessary bank or clearinghouse information. The electronic layout and data requirements for EFTs and ACH payments are set up for Payables when you set up banks and counterparties.
Note. Before sending EFT payments, you can establish a prenote test to verify that the data is received in the correct format.
EFT and ACH payments differ primarily with regard to the party who processes the payments.
EFT involves the movement of funds by a non-paper means (meaning, electronically) usually through a payment system such as the ACH network or Fedwire. The four largest EFT systems are Fed Wires, ACHs, Swift, and Chips. For EFT, you send all applicable payments in one file to your bank for payment. The bank then sends the payments through the appropriate ACH payment system to the vendor’s bank.
For ACH, you send all applicable payments in one file to your financial institution. If the financial institution is a member of a clearinghouse, then the clearinghouse sends the payments to the vendor’s bank for payment.
EFT and ACH payments can also be processed through Pay Cycle Manager using the Financial Gateway functionality. In this case, the Financial Gateway functionality handles sending the payment to the applicable party for processing.
Once the payment files are sent to the bank or clearinghouse, the payments are posted and accounting entries are generated and sent to the general ledger.
This diagram shows the process flow for EFT and ACH payments:

EFT and ACH Payments process
Note. If you run Payables on a DB2 database on a Windows NT or OS390 server, you must manually insert an owner ID parameter into
the list of parameters for the process definition before you can run the Format EFT Files SQR process (FIN2025) to create
EFT files.
To do so, select PeopleTools, Process Scheduler, Processes. On the search page, enter FIN2025 for the Process Name. On the Override Options tab, under the Prepend Parameter List, add the following text to the beginning of the list of parameters: %%OWNERID%%. Be sure to leave a space between the owner ID parameter and :EFT_WRK_PARM1.
See Also
Setting Up Files for Electronic Funds Transfers
Setting Up the Financial Gateway Integration
Pay Cycle Processing using the Financial Gateway
PeopleSoft PeopleTools PeopleBook: PeopleSoft Process Scheduler
DraftsDrafts are used throughout the world in commercial transactions for which a customer or vendor agrees to pay a specified amount on a certain day. Drafts are payments that are dated for a time in the future—usually 20, 60, 90, or 120 days later. Payables currently supports vendor-initiated drafts, customer-initiated drafts, and customer-initiated EFT drafts, enabling you to manage and process these draft payments efficiently.
You manually create bills of exchange (BOE), which are vendor-initiated draft payments. After you record the draft information, the Payables system creates the draft payment and generates the accounting entries.
This diagram shows the process flow for vendor-initiated drafts:
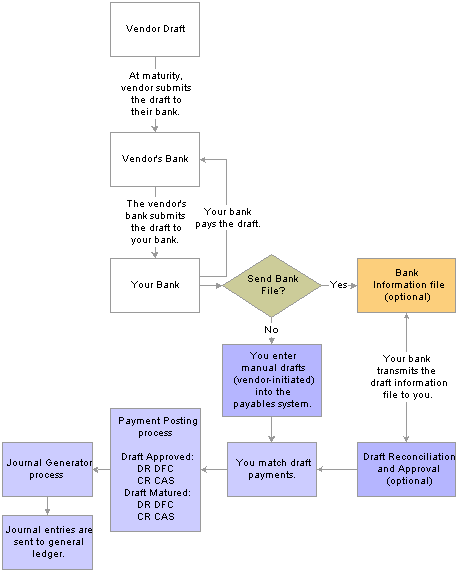
Vendor-initiated Draft Payment process
Bills of order (BOO), which are customer-initiated draft payments, are usually created during an automatic batch process. If stamp tax minimization is applicable, Payables splits the draft master and assigns sibling system draft identification numbers.
You can also create customer-initiated drafts manually.
Customer-initiated EFT drafts are processed in Payables much the same way as customer-initiated drafts, except that you send an EFT file to your bank when the draft payment is due. You don't print the drafts. Your bank pays the draft on the draft maturity date.
This diagram shows the process flow for customer-initiated drafts:
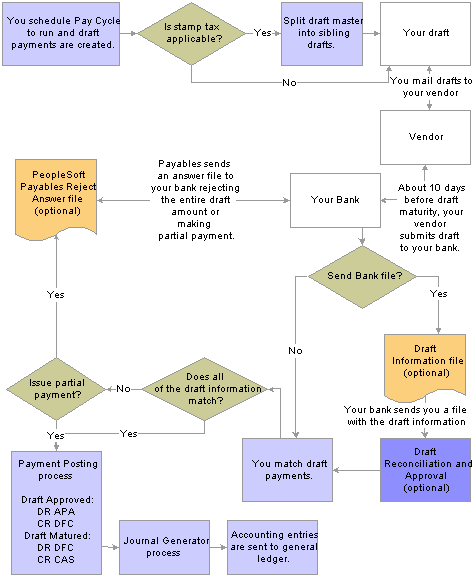
Customer-initiated Draft Payment process
See Also
GirosThe giro is a common international payment method prevalent in the customer-to-business relationship because it provides efficiency with high volumes of transactions. In Payables, the giro is similar to manual and EFT payment methods, but it is uniquely identified for reporting and analytical purposes.
In Payables, the giro payment method (GM-Manual) is a type of remittance slip that is handled like a manual payment. The Accept Giro is a standard format used in the Netherlands that has an invoice with a tear-off portion. The tear-off section displays the information necessary to process a payment. You detach the tear-off portion and send it to your bank for payment to the vendor. Your bank sends payment to the vendor’s bank, and the vendor’s account information is updated. There is no need to run the Pay Cycle Application Engine process (AP_APY2015) because you use the information on the tear-off section to record the payment on the Payments page of the Voucher component.
In some instances, you may send an electronic payment file to your bank.
In Payables, the EFT giro payment method (GE-EFT) is handled like an EFT payment. This standard payment format is used in Singapore for performing direct debits and credits. It is often used to make payments that recur within a set time period and has been used to make direct deposits of employee payroll checks and expense reimbursements. The EFT giro file layout is formatted when you set up banks and counterparties, and it is set up according to the local requirements of the vendor. For EFT giro payments in Singapore, you can use the sample file layout called FEDI. Giro authorizations are specific to a particular vendor, containing standard data elements according to the giro requirements. They contain your bank account information and the vendor’s account information.
For the EFT giro, the vendor directly debits your bank account for remittances. During voucher entry, you specify a bank account sequence number to associate the vendor’s bank information with the voucher.
In the Payment Selection Criteria component (PYCYCL_DEFN), you specify Giro - EFT on the Bank/Method page. During the Pay Cycle process, Payables collects all EFT giro transactions and creates an output data file containing the payment information. You send the output data file to the bank electronically or on taped media.
This diagram shows the process flow for giro payments:
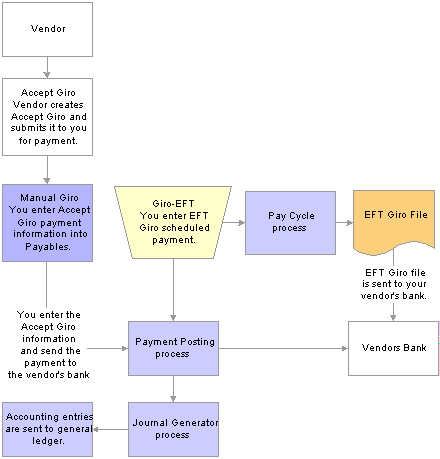
Giro Payment process
See Also
Scheduling and Creating Voucher Payments
Specifying Bank and Payment Methods Criteria
Letters of CreditLetters of credit are commonly used in international trade as one of the safest means for establishing payment terms. It is an agreement issued by a bank at the request of its client and adds the bank’s promise of payment to the client's promise. The letter of credit frequently requires congruity with a number of terms, conditions, or events before the vendor can collect payment.
Because most invoices are sent directly to your bank and the bank handles approval and electronic fund transfers directly to the vendor’s bank, your bank often pays invoices before you receive them. When you select the letter of credit payment method, the letter of credit identification number is added to the L/C ID (letter of credit ID) field on the Payments page in the Voucher component. The letter of credit ID can also be copied from a purchase order at voucher entry. If the letter of credit ID appears on a purchase order, it is carried over to the Invoice Information page in the Voucher component (VCHR_EXPRESS) when you select the worksheet copy option PO Receipt.
Because you might sometimes remit vouchers to multiple vendors, the letter of credit identification number is validated when you change the Remit to field on the Payments page. During voucher entry, Payables validates the letter of credit ID against the Treasury table (LC_HDR) to make sure that the identification number exists and that the status is open. Once you select a payment scheduled for the Pay Cycle process, you cannot edit the letter of credit identification number on the Payments page in the Voucher component.
Note. All details pertaining to the letter of credit terms, agreements, expiration date, and related bank documents are maintained in Treasury documentation.
This diagram shows the process flow for letters of credit:
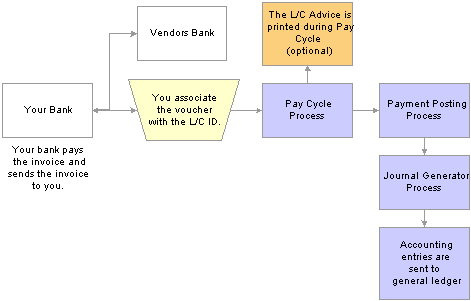
Letter of Credit Payment process
Letters of credit can contain multiple vouchers; therefore, you might need to view the specific details regarding a particular voucher to which a letter of credit pertains. You view these details by clicking the related links button next to the L/C ID field on the Payments page in the Voucher component and clicking the Letter of Credit Doc (letter of credit document) link or the Letter of Credit Details link.
During the Pay Cycle process, all vouchers that have the same letter of credit ID are grouped, and a single payment is issued. A printed letter of credit advice is created for payments for which you have selected the L/C Advice option on the Payment Selection Criteria - Preference page. The letter of credit advice shows vouchers paid under a specific letter of credit identification number.
Because letters of credit can comprise many vouchers, you may need to review the details for individual vouchers paid by one letter of credit. You use the L/C Inquiry page to verify payment entries, payment totals, and the payment status of vouchers associated with a letter of credit. You can obtain more information about vouchers and payments from the L/C Inquiry page by clicking the related links button and selecting the Voucher Inquiry option or the Payment Inquiry option.
Letter of Credit Accounting Entries
At payment posting, only letter of credit payments that have a valid letter of credit ID and status are posted. During payment posting, the following accounting entries are generated:
DR AP Liability (APA)
CR L/C Payable (LCP)
When the letter of credit payment is made, you must manually enter the following journal entries in PeopleSoft General Ledger:
DR L/C Payable (LCP)
CR Cash (CAS)
Note. PeopleSoft Treasury Management does not perform any accounting calculations for Payables letter of credit payments, regardless of whether you have or have not installed Treasury Management. The Treasury Management system only retains Payables letter of credit entry definitions as data items for inquiries.
See Also
Entering and Processing Vouchers Online: General Voucher Entry Information
Making General Ledger Journal Entries
Direct DebitsDirect debits are a contractual method for collecting payment and receipts. You and your vendor set up a contract that enables the vendor to collect an amount due for specific goods or services directly from your bank through EFT. Some banks require a cover letter for the EFT files that they receive. The direct debit is entered as a manual payment in Payables. Once you create the manual payment, you can run the payment posting process to create the accounting entries, then run the Journal Generator process to pass the accounting entries to the general ledger.
Deciding Which Payment Forms You NeedPayment formatting capabilities provide a variety of payment form layouts. You can use the delivered forms, modify the delivered forms, or build your own payment forms; however, creating a new form requires in-depth knowledge of Crystal Reports software and PeopleSoft Query. Typically, you select one of the delivered forms and use it as is, or you modify it according to the guidelines in this chapter.
The PeopleSoft system comes with the following basic payment form types:
|
Form Type |
Description |
|
ASCII file |
For electronic payments, such as EFT, EFT draft, or EFT giro. Also for positive payment files. |
|
Prenumbered form |
For printed payments on custom or standard check stock that have preprinted identification numbers. |
|
Remittance advice only |
For EFT, wire transfer, and printed payments. |
|
System-numbered form |
For drafts and checks printed on plain check stock for which Payables assigns an identification number. |
With magnetic toner in a laser printer and MICR fonts, you can print checks that magnetic scanners can process.
Note. Payables does not deliver MICR fonts.
For electronic payments, transmit payment data to the vendor’s bank in a flat file or print a remittance advice and send it to the vendor. The payment form for the remittance advice and the overflow or the separate remittance advice is the same as for printed payments.
This section discusses:
Questions to ask when deciding on payment forms.
Procedure for selecting and configuring payment forms.
Questions to Ask When Deciding on Payment Form LayoutsView the delivered layouts on the Form Information page. When you make decisions about payment form parameters, consider the following questions:
Do you want to print checks and advices on the same page or on separate pages?
How many detail lines do you want to display on an advice?
How will you handle detail line overflow?
Do you want to void the next check and use its advice or generate a separate print file for advices on a different paper stock?
Do you want to use your own preprinted forms and turn off check formatting so that only the data prints, and then customize the Crystal Reports layout to position the fields on the form?
Do you need to add new fields to the checks or change formulas that determine how data is printed?
Do you need to print checks at all?
You may decide to make all payments electronically.
If you don’t send a printed check, do you need to supply your vendor with an advice?
Note. If you modify the delivered payment forms extensively in Crystal Reports, strictly follow the local rules for check layout. You must exactly follow field dimensions—such as bank account MICR lines—so that banks can successfully process your forms. In the U.S., refer to the document Understanding and Designing Checks by the X9-Financial Services Standards Committee for more details. Always have your custom forms approved by your banks before using them. Because customizing forms can be a lengthy process, you should do it early in an implementation.
Procedure for Selecting and Configuring Payment FormsTo set up payment forms:
Specify each payment form's attributes, such as how the advice is handled and how the payments are sorted for printing.
Specify the payment form to use for each bank account.
(Optional) Modify Crystal reports for any delivered payment forms that do not meet your needs.
(Optional) Add signatures or logos to Crystal checks.
Test the checks.
Specifying Payment Form AttributesThis section provides an overview of payment form attribute specifications and discusses how to:
Set form and advice attributes to link payment layouts to data.
Select payment sort fields.
Understanding Payment Form Attribute Specification
To link the layout of a payment form to the data that the Pay Cycle - Payment Creation subprocess (AP_APY2015) generates, you must specify attributes for each payment form ID that determine, for example, whether the payment prints on check stock or is an electronic file, and whether the advice starts directly after the check or on another page. These attributes do not control the actual printing of the payment form, but rather the formatting of the query that extracts information from the payment tables. During payment creation, the system assigns payment reference numbers, counts advice lines on each page, and applies other format controls. The associated Crystal report (such as CHECK1.RPT) controls how the formatted payment information is laid out on the printed page.
You can also specify the payment fields, such as the Bank Code field and the Payment Method field, that determine the order in which the Pay Cycle - Payment Creation subprocess generates payments forms.
Pages Used to Specify Payment Form Attributes
|
Page Name |
Object Name |
Navigation |
Usage |
|
PYMNT_FORM |
Banking, Banks and Branches, Payment Forms, Form Information |
Set form and advice attributes, and add payment forms. Link the layout of a payment form in Crystal Reports to the data that the Pay Cycle - Payment Creation subprocess generates. |
|
|
PYMNT_FORM_SORT |
Banking, Banks and Branches, Payment Forms, Sort Fields |
Indicate the sort level that determines the order in which payments and advices print. |
Setting Form and Advice Attributes to Link Payment Layouts to DataAccess the Form Information page.
After you enter a form ID and description, select a form type to define during file creation if the Crystal report prints check numbers and advices or only an ASCII file.
|
Form Type |
Select the form type. Options are: System numbered form: The system generates check numbers to print on the payment forms. Pre-numbered form: The check stock has preprinted check numbers. The system does not generate check numbers, but it tracks the payment references and can warn you of any discontinuity in reference numbers. ASCII file: Use for EFT or positive payment files. Remittance Advice only: Use for WIRE (wire transfer) reports and letters of credit. Note. You must customize the Crystal report layout to match the form type that you specify if it differs from the form type that comes with Payables. |
|
Form Alignment Count |
Select to align the printer head with the first row of the form so that checks and advices print correctly. You use this field with system-numbered forms only. |
|
Advice Location |
Select the location of the advice. Options are: Same report as check: The advice prints below or above the check on the same form. Separate advice report: The advice prints in a separate job from the check. You need to load two different forms: one for the checks and one for the advices. You can also select this option to create an advice report for EFT payments. No advice: No advice lines print. |
|
Overflow Location |
Select to indicate where any information that does not fit on one page prints. Options are: Same report as check: If more advice lines are required than the number of lines on the check form, a second check form is used for advice lines, and the check is voided. Separate advice report: A separate advice form is used for overflow. You need to load two forms: one for the checks and one for the advices. Separate reports are created. You can also select this option to create an advice form for overflow for EFT payments. No advice report: No advice lines are printed. |
|
Advice Lines |
Enter the total number of lines available for the advice. This differs depending on whether the advice is on the same report as the check or on a separate report. The information that you assign must fit on the Crystal check space. Note. If the first invoice has payment messages that exceed the number that you enter, voucher information prints on both the regular check and the overflow advice. The system, however, sets the payment amount to 0 on the overflow advice. |
|
Advice Layout |
Select to indicate where the check and advice are positioned on the printed page. The Crystal report determines the layout, so this is only informational. Match the description to how you define the Crystal report. Options are: Check over stub: Position the check over the advice. Stub over check: Position the advice over the check. Full page: Send the advice lines to a separate page from the check and a separate file. |
As you select attributes for the form, the Preview group box displays a representation of the layout.
|
Description |
Format Name and Layout |
|
Draft EFT file |
BEF1 generates an ASCII file that your bank uses to make the appropriate EFTs for vendor payments. This format is used with the draft payment method. |
|
Draft EFT file with advice |
BEF2 generates an ASCII file for the bank and a separate advice report that you can send to vendors. This format is used with the draft payment method. |
|
Stub over check with advice |
CHECK1 prints the remittance advice block followed by the check. If more advice lines are included within the payment than can fit on the remittance advice, a separate file is created that prints advice overflow. |
|
Check with separate advice |
CHECK2 prints a check for payment to a vendor and prints the remittance advice on a separate advice form. The Crystal report file is set up to print three checks on one form. The system generates two separate files, one for the checks and one for the advices. |
|
Check over stub with overflow |
CHECK3 prints the check followed by a remittance advice block. If more advice lines are included within the payment than can fit on the remittance advice, the next check is voided, and its remittance advice is used for overflow lines. |
|
File copy |
COPY1 prints the check followed by a remittance advice block. If more advice lines are included within the payment than can fit on the remittance advice, the next check is voided, and its remittance advice is used for overflow lines. This format creates a backup file only. No negotiable checks are created. |
|
Stub over draft with advice |
DRAFT1 prints the remittance advice block followed by the draft. If more advice lines are included within the payment than can fit on the remittance advice, a separate file is created that prints the advice overflow. |
|
EFT file |
EFT1 generates an ASCII file that your bank uses to make the appropriate transfers for vendor payments. This format is used with the EFT payment method. |
|
EFT file with advice |
EFT2 generates a file for the bank and a separate advice report that you can send to vendors. This format is used with the EFT payment method. |
|
Check file layout |
FILE1 prints the check followed by a remittance advice block. If more advice lines are included within the payment than can fit on the remittance advice, the next check is voided, and its remittance advice is used for overflow lines. This format creates a backup file only. No negotiable checks are created. |
|
Giro-EFT file |
GE1 generates an ASCII file that your bank uses to make the appropriate electronic funds transfers for vendor payments. This format is used with the giro payment method. |
|
Giro-EFT file with advice |
GE2 generates a file for the bank and a separate advice report that you can send to vendors. This format is used with the giro payment method. |
|
Letter of credit advice |
LC1 generates a remittance advice only, which you can send to vendors. This format is used with the letter-of-credit payment method. |
|
Positive payment form |
POS1file generates an ASCII file that contains payment information for checks that can be paid. You send the file to your bank. The bank compares the data on the file against the data on the checks that your vendors submit. Only checks that match are paid. |
|
Wire report |
WIRE1 generates a remittance advice only for paying by wire. |
See Also
Selecting Payment Sort FieldsAccess the Sort Fields page.
Activate each sort field that you want to use to sort the check output. For each sort field that you select, enter a unique sort sequence number.
Payment handling codes take priority over the sort sequence; the sort order is the handling code followed by the sort fields that you specify on this page.
See Also
Defining Payment Handling Codes
Establishing Payment Sort Fields
Assigning Payment Forms to Bank AccountsEach bank account that you use to pay vendors must have a payment form specified for it. This section discusses how to specify payment form IDs for bank accounts.
Page Used to Assign Payment Forms to Bank Accounts
|
Page Name |
Object Name |
Navigation |
Usage |
|
PYMNT_BANK |
|
Specify which payment form to use for each bank account. |
Specifying Payment Form IDs for Bank AccountsAccess the Payment Methods page.
Payment Options
If you select File Copy or Positive Payment in the Payment Options group box, you must specify the positive payment form or the file copy form in the Payment Form group box.
Payment Form
|
Form ID |
For each bank account, specify the form ID for the payment method that you are using. |
|
Positive Payment Form |
Select to have the system create a payment file for every pay cycle using this bank account. The system formats the file to the specifications of the positive payment form that you select. |
|
EFT Layout |
For EFT payment methods, specify an EFT layout, such as EDI, KIJ, or UFF. The payment method must be an EFT method in order to select an EFT layout. |
Note. Merely specifying a file type does not ensure that the output is sent to a file. The output destination is controlled by the run control ID on the User Preference - Pay Cycle page.
See Also
Modifying Payment FormsTo configure the payment forms that come with Payables to meet your specific needs, you must modify the Crystal report for the form and ensure that the form ID matches the output configuration. Extensive modifications require an advanced understanding of Crystal reports.
A payment form consists of these sections:
Page header.
Check body–group header #1 for the payment ID reference (PYMNT_ID_REF).
Details.
Group footer #1.
Page footer.
View the payment form fields in Crystal reports layouts by opening the appropriate check and selecting View.
To modify a form:
Copy the form (CHECK2.RPT, for example).
Rename it (CHECK5.RPT, for example).
Use Crystal Reports to modify the form.
Open the Banks and Branches, Payment Forms component in Add mode to add the name of a new payment form.
See Also
PeopleSoft PeopleTools PeopleBook: Crystal Reports
Specifying MICR FontsTo use the Payables MICR font printing capability, make sure that the MICR fonts are loaded on the workstations where you use Crystal reports to print payment forms. The specified check lines print then correctly when you print payment forms through Crystal reports. To make the forms machine-readable, use special magnetic toner in the laser printer. (You can order the toner from most standard toner suppliers.)
Note. Work with your bank to make sure that the check formatting and magnetic readability are acceptable before you start printing large numbers checks.
Note. Payables does not deliver MICR fonts.
Printing Logos and Signatures with Crystal ChecksWith Crystal checks, you can easily add a check signature or any other graphic, such as a company logo.
First, determine where to store the signature. A signature is no more than a special font—a series of control characters that have been redefined to build the signature—and you can store it on a client workstation, printer cartridge, or a single inline memory module (SIMM). Generally, you store signatures on a printer cartridge so that you can maintain control over them. The manufacturer of the printer can provide information about creating a custom font.
The specialized font comes with instructions containing two important pieces of information:
Directions for installing the font and making the font available to applications such as Microsoft Word, Crystal Checks, and so on.
Directions for printing the signature.
Once you have installed the signature font, you can add the signature to the Crystal checks. To do this, create the signature first in a word processor such as Microsoft Word and then include this document as an OLE object in Crystal Checks.
Alternatively, you can add an embedded Crystal formula.
This section discusses how to:
Create a signature file.
Add a signature to checks.
Creating a Signature FileTo create a Crystal formula signature file:
Open a new document in a word processor and select the signature font as the font.
It should now be listed along with the other fonts. If it is not and you are using a printer-based font (such as a cartridge or SIMM), be sure that the printer defined for the document is the same as the printer where the font is located.
Enter the signature character sequence exactly as provided.
The signature may not appear correctly on the screen, unless the signature font is stored on the workstation. You might need to enter characters like the following for the signature character sequence:
!a#$%&
b()*+,
-./012
345678
Print the document to verify that it appears the way that you want.
If the signature doesn’t appear properly, first check the character sequence. One character in the wrong place can change the signature dramatically. If white lines appear in the signature, adjust formatting options such as line spacing, font size, margins, and so on. The signature's appearance reflects exactly how it will look on the check.
When the signature is correct, save the document and open Crystal Reports.
Add this signature to each check forms that you use.
Payables comes with sample forms: check1.rpt, check2.rpt, check3.rpt, and draft1.rpt. If you edit any of these reports in Crystal Reports, the following text appears above the signature line: “Insert your signature.” This is only a placeholder, which you should delete.
To use the U.S. Postal Service bar code, install a TrueType bar code font. Payables provides a predefined formula on the check layouts for Postnet. To use it, install the bar code font and use that font.
Adding a Signature to ChecksTo add a signature to Crystal checks (first method):
Select Insert, OLE Object.
Select Create from file and enter the path and filename of the signature document that you created.
Select the Link check box if you want the Crystal report to be updated automatically whenever you change the signature document; otherwise, you’ll need to update each check form every time the signature changes.
Click OK.
The system opens Crystal and inserts the object file into the report.
Position the signature object where you want it on the form.
Remember, if your the signature font is not stored on the workstation, the signature does not appear on the screen.
After you position the signature, save the form and print a test check.
To add a signature to Crystal checks (second method), on the Insert menu, select to add a formula that contains the control character sequence to the report. The formula must contain the control sequence of characters. Frequently, this sequence begins and ends with an unprintable character such as ESC. To add the ESC character, use the Crystal chr(x) function where x is the ASCII value of the special character. For example, if the control characters are !ab and this must be enclosed in ESC characters, the formula would look like this:
chr(27) + "!ab" + chr (27)
You should now be able to print the checks with the digitized signature. Use this procedure to add any other digitized graphic object, such as a corporate logo, to the check.
Note. Signature fonts and logos are not provided with the PeopleSoft system. Typically, you purchase them separately from a third party, such as Hewlett-Packard. For additional information on troubleshooting signature fonts and logos, please consult the vendor from which they were purchased.
Setting up Workstations to View Crystal 9.0 Checks and Drafts from the Process Monitor Using the Web FunctionTo view the following Crystal 9.0 report layouts using the web function from the process monitor, you must configure your workstation:
check1.rpt
check2.rpt
check3.rpt
draft1.rpt
copy1.rpt
To configure your workstation:
Install Crystal 9.0 on the client workstation.
Access the Client Setup tab in PeopleSoft Configuration Manager.
Select the Install Workstation option, click the OK button, and exit Configuration Manager.
Copy the following DLL files from the PeopleTools directory (\bin\client\winx86) to the your \apps\Crystal9 directory:
psicuuc22.dll
psicuin22.dll
psicudt22l.dll
Note. If you install Crystal 9.0 on another directory, you must copy these 3 DLL files into the directory where crw32.exe resides.
See Also
PeopleSoft PeopleTools PeopleBook: PeopleSoft Administration Tools
Testing ChecksThere are two methods for testing the check printing:
Create an express payment by adding a voucher in the Voucher component and clicking the Express Payment link on the Payment page.
(This opens the Express Payment Manager page).
Run a pay cycle to test the sorting and printing for a batch of checks.
After testing vouchers, test overflows (where advice lines are too long to fit on one form).
See Also
Entering and Processing Vouchers Online: General Voucher Entry Information