Creating Courses
To create courses, use the Maintain Courses (LM_CI_LA_CMP) component.
Each course represents a specific topic of study for which you offer classes. All classes that are associated with a given course share the same prerequisites, objectives, equivalencies, and other features.
Note: When you create or modify courses, you must rebuild the catalog index before the changes are reflected in the catalog search results.
|
Page Name |
Definition Name |
Usage |
|---|---|---|
|
LM_CI_BASICDTA_PG |
Define basic item information, such as description and course code. |
|
|
LM_CI_PRQ_PG |
Identify prerequisites, which are other courses and objectives that one must complete or can complete if recommended, before a user can enroll in this course. |
|
|
LM_CI_EQUIV_PG |
Identify courses and objectives that are equivalent to a given course. |
|
|
LM_CI_NANDA_PG |
Add notes and attachments (such as documents to read before beginning a class) to a course. |
|
|
LM_LE_CI_PG |
Define security for courses. |
|
|
LM_CI_ATTRIB_PG |
Define category relationships, keywords, and objectives. |
|
|
LM_CI_DLVRY_PG |
Specify which delivery methods are applicable to a given course. |
Before you create courses, you must define:
Categories.
Delivery method types.
(Optional) Approval process definitions.
(Optional) Keywords.
See Defining Keywords.
(Optional) Objectives.
Use the Course Details: Basic Data page (LM_CI_BASICDTA_PG) to define basic item information, such as description and course code.
Navigation:
This example illustrates the fields and controls on the Course Details: Basic Data page.
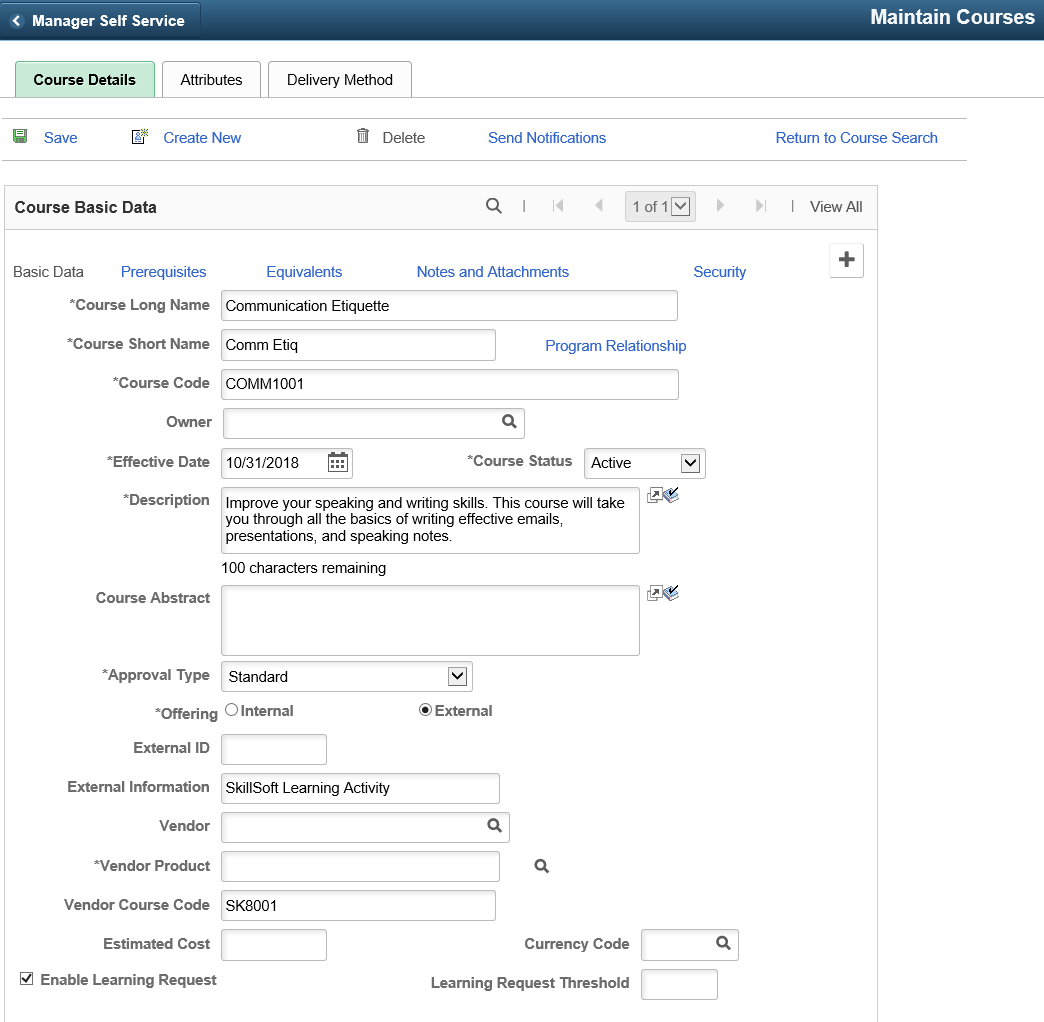
Note: When you modify the course long name, description, course code, effective date, or course status, you must rebuild the catalog index before the changes are reflected in the catalog search results.
See Updating the Catalog Indexes.
Field or Control |
Description |
|---|---|
Program Relationship |
Click to list any programs that include this course. |
Course Code |
Enter an identifier for the course. The value that you enter must be unique if the Course Code Option on the Install Defaults - General page is set to Restricted. If that option is set to Restricted by LE, the value you enter must be unique to your current learning environment. Note: If you enable automatic course code generation on the Install Defaults - Counter Records (LM_CNTR_SETUP_PG) page, the system creates a course code for new courses when you click Save. |
Owner |
Enter the name of the person whom the system notifies when the course is updated. Note: Any learning administrator who is associated with one of the learning environments for this course (as defined on the Item - Security page) can update this course. |
Course Status |
Select a course status: Active: This is the default status when you create a new course. Inactive: Indicates that neither delivery methods nor classes can be defined for the course. Also, if selected, the item and its classes do not appear in the catalog, and learners cannot enroll in related classes. Pending: Indicates that only delivery methods with a status of Pending can be defined for the course. Also, if selected, the item and its classes do not appear in the catalog, and learners cannot enroll in related classes. |
Course Abstract |
Enter an abstract of the course. This entry appears on the <Course Name> page that users can access when searching the catalog. If you do not provide an abstract the system displays the course description to the learner when searching the catalog. |
Approval Type |
Select a value if approval is required to enroll in a class that is associated with this course. This option can be overridden at the class level. Select from the approval process definitions that have been defined for your organization. |
Offering |
Select whether the class is offered internally or externally. The default is Internal. |
External ID |
Enter the (numeric) external course ID, if one is associated with the course. |
External Information |
Enter information about a class that a vendor delivers. The learning catalog does not display this information. Only administrators can view this information. |
Vendor |
Select the vendor that supplies the learning, if applicable. |
Vendor Product |
Select the vendor product that is used with this course. The cost of the selected product appears on the Class Costs page. Define vendor products on the Vendor Products page. |
Vendor Course Code |
Enter the vendor-supplied course code if you purchased this course from a third-party content provider. |
(FRA) Learning Class (learning classification) |
This field only appears when French features are enabled for the administrator's current learning environment. Select the default learning classification to associate with the classes for this course. Administrators can override the classification during enrollment. Classifications are used when generating training plans and the 2483 report. |
(FRA) Eligible for DIF |
This field only appears when French features are enabled for the administrator's current learning environment. Selecting this check box enables learners and administrators to request the use of DIF hours when enrolling in classes associated with this course. |
Estimated Cost and Currency Code |
The default values that appear here are inherited from the administrator's learning environment. The cost value can be used to calculate forecasted training costs when you produce training plan budgets. It represents the estimated cost, per learner, of delivering the class and can be overridden at the delivery method level. |
Enable Learning Request |
Select to allow learners to choose this course when submitting a learning request. |
Learning Request Threshold |
If learning requests are enabled, you can specify how many requests must be made before the administrator is notified. |
This example illustrates the fields and controls on the Course Details: Basic Data page – Education Units group box. You can find definitions for the fields and controls later on this page.

Field or Control |
Description |
|---|---|
Education Units group box |
Use this group box to add, edit or delete Education Unit related information. Use the lookup icon to select the Education Unit Type. In the Education Units field, enter the number of units. For new classes, the system populates this field by default from the Course Detail page and this remains editable at the class level. Use the Add Educational Unit Type button to add a new row. You can add up to five new rows. Note: The Education Units group box replaces the single field for Education Unit which was available in the previous versions of the product. If your courses had values in the single field for Education Units, you need to re-enter the units along with the Education Unit Type. |
Use the Course Details: Prerequisites page (LM_CI_PRQ_PG) to identify prerequisites, which are other courses and objectives that one must complete or can complete if recommended, before a user can enroll in this course.
Navigation:
Click the Prerequisites link on the Course Details: Basic Data page.
This example illustrates the fields and controls on the Course Details: Prerequisites page.
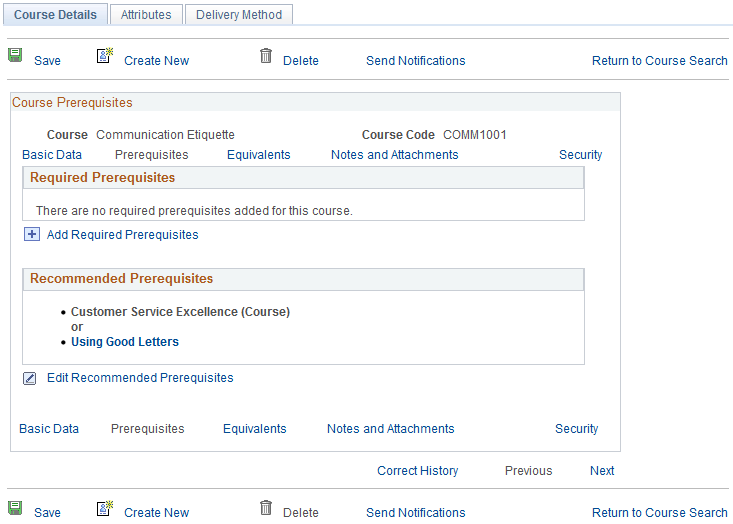
Course Prerequisites
Select all courses, objectives, and programs that are prerequisites for this course. Administrators can override prerequisites for learners during group and mass enrollment. Managers cannot override prerequisites for a learner directly, but can use the Supplemental Learning page to give learners waivers on courses, objectives, and programs.
See Understanding Supplemental Learning.
Field or Control |
Description |
|---|---|
Type |
Select the type of prerequisite from the following options: Course, Objective, or Program. |
Prerequisite |
Select the name of the prerequisite course, objective, or program. |
Relationship |
Select a value:
The system displays the text that appears in the catalog directly above the Course Prerequisites group box. Important! The system ignores any prerequisites that are listed after End. |
Proficiency |
This field applies to objectives that are selected as prerequisites. If the objective is associated with a rating model, select the required proficiency level. |
Recommended Prerequisites
These fields are similar to the Course Prerequisites fields. Use them to select classes, programs, and objectives that learners should complete before taking the class. Recommended prerequisites that are not met do not prevent the learner from enrolling in the class.
Use the Course Details: Equivalents page (LM_CI_EQUIV_PG) to identify courses and objectives that are equivalent to a given course.
Navigation:
Click the Equivalents link on the Course Details: Basic Data page.
This example illustrates the fields and controls on the Course Details: Equivalents page.
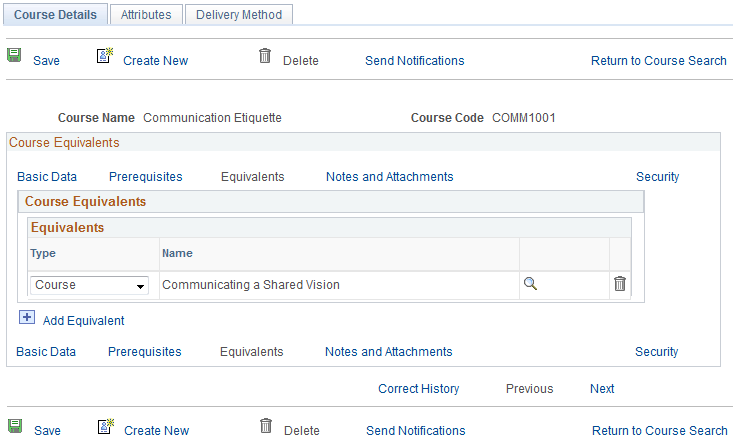
If another course or program is considered to be the equivalent of this one, select the equivalent item. The system does not perform any checks to determine if equivalent items have the same objectives.
For example, suppose that a course called Intermediate C Programming has a prerequisite of Introduction to C Programming. If you select Introduction to C++ as an equivalent to Introduction to C Programming, learners who complete either Introduction to C Programming or Introduction to C++ meet the prerequisite for Intermediate C Programming.
Use the Course Details: Notes and Attachments page (LM_CI_NANDA_PG) to add notes and attachments (such as documents to read before beginning a class) to a course.
Navigation:
Click the Notes and Attachments link on the Course Details: Basic Data page.
This example illustrates the fields and controls on the Course Details: Notes and Attachments page.
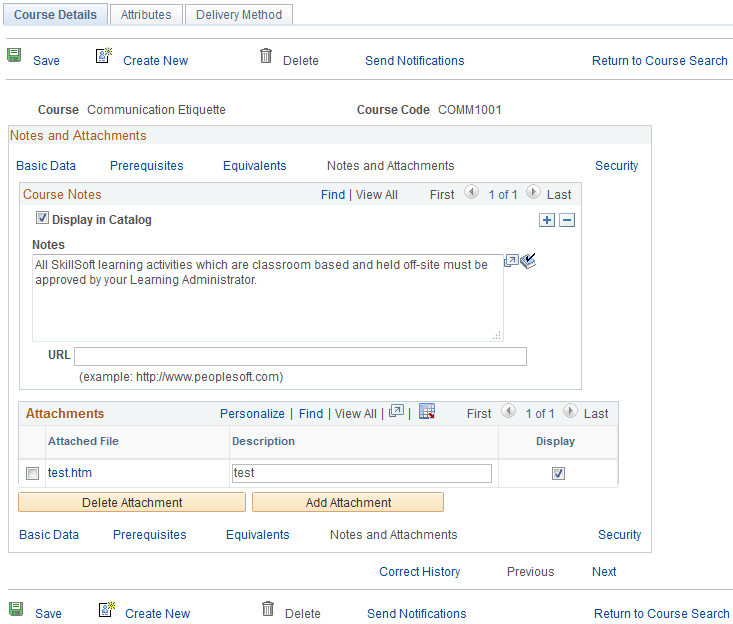
You can enter notes and attach files, such as documents to read before beginning a class. To enable users to access notes, URLs, or attachments from the catalog, select the Display in Catalog check box. Attachments can be included elsewhere in the system, including at the class level.
Note: The URL associated with a course note displays in the catalog only if you also enter text in the Notes field for the note.
To attach a file to an item:
Click the Add Attachment button to access a new page and navigate to the file's location on your server.
Locate the file and click the Upload button.
Note: Your system configuration determines the size of the files that you can attach to courses.
Use the Course Details: Security page (LM_LE_CI_PG) to define security for courses.
Navigation:
Click the Security link on the Course Details: Basic Data page.
This example illustrates the fields and controls on the Course Details: Security page.
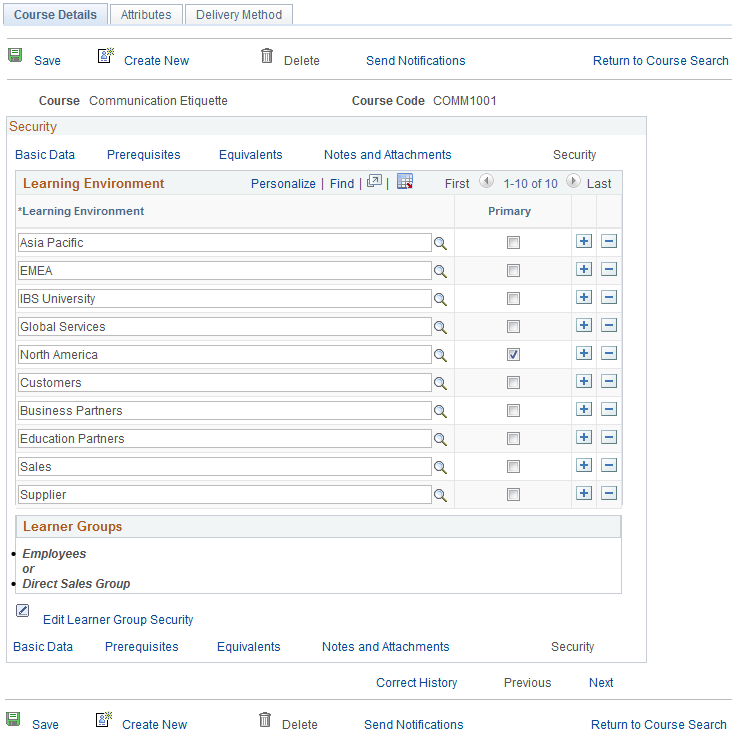
Note: When you add or remove learning environments or learner groups to courses, you must rebuild the catalog index before the changes are reflected in the catalog search results.
See Updating the Catalog Indexes.
Learning Environment
Use these fields to specify the learning environments for which this course is valid.
Field or Control |
Description |
|---|---|
Primary |
A course must be associated with at least one learning environment. The system displays the administrator's current learning environment as the default. You cannot remove the primary learning environment from this page without first selecting another environment as the primary. You can change the primary learning environment on this page at any time. |
Learner Groups
Click the Edit Learner Group Security link to display fields for adding or editing learner groups. Specify which learner groups can access this course when searching the catalog. You can select from the learner groups that have been defined for any of the learning environments associated with the course.
Field or Control |
Description |
|---|---|
Relationship |
Specify how this learner group is related to others in the list when used to determine whether or not a person has access. Values are: And: A learner must be a member of both this learner group and the next in the list. Or: A learner must be in this learner group or the next in the list. End: A placeholder for the last learner group in the list. The system ignores any learner groups that are listed after End. For example, to define security such that a learner must be a member of learner group A, and a member of learner group B or learner group C, you must reuse learner group A. The resulting security would look like this: Learner group A and Learner group B or Learner group A and Learner group C end. Important! Associate a category with at least one learner group. If you do not select a learner group, learners cannot access this category. |
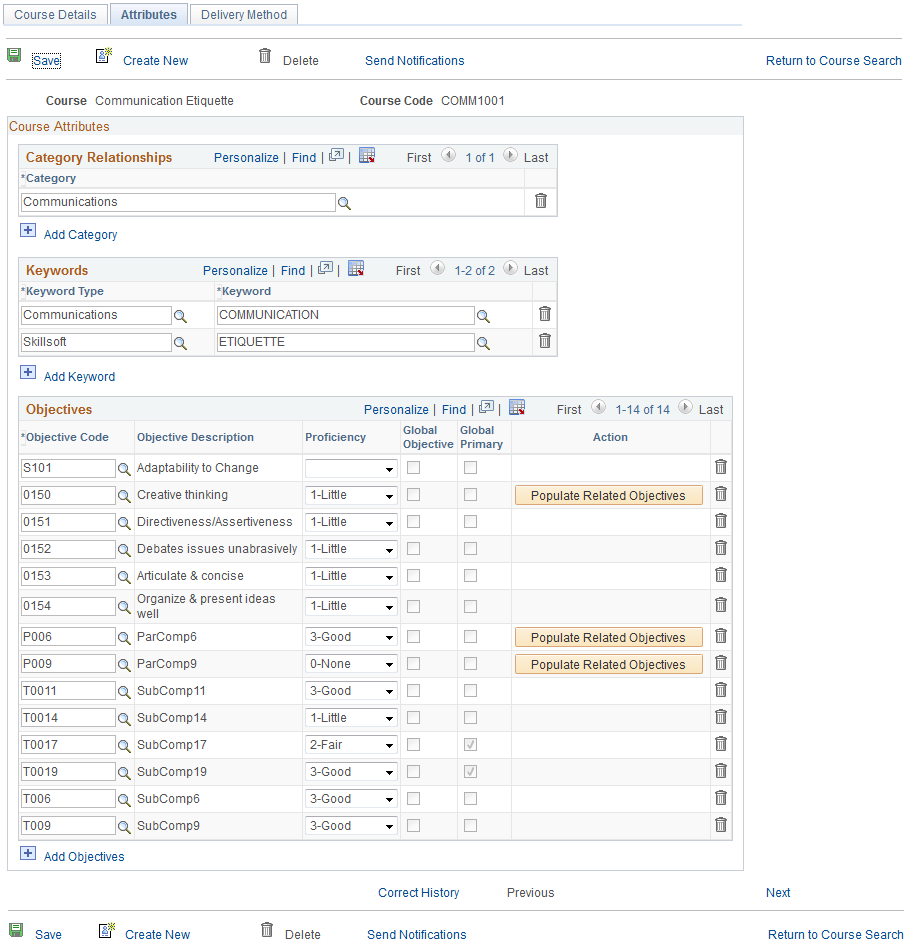
Use the Maintain Courses - Attributes page (LM_CI_ATTRIB_PG) to define category relationships, keywords, and objectives.
Navigation:
This example illustrates the fields and controls on the Maintain Courses - Attributes page.
Note: When you add, remove, or change keywords, objectives, or category relationships, you must rebuild the catalog index before the changes are reflected in the catalog search results.
See Updating the Catalog Indexes.
Category Relationships
Select the categories under which this item is to be listed in the learning catalog.
Field or Control |
Description |
|---|---|
Category |
Select the category to which this course belongs. |
Keywords
Keywords help users locate this course and its classes in the catalog. You can enter only keywords that belong to the selected keyword type.
Objectives
Select the objectives that learners meet by completing a class that is associated with this course. Learners receive credit for meeting the objectives that have been directly assigned to them. Define objectives on the Objectives page.
You can associate multiple global objectives with a course, but you can designate only one global objective as primary. Classes are sorted by global objective when you create training plans. For courses with multiple global objectives, only the global objective designated as primary appears on the training plan.
Field or Control |
Description |
|---|---|
Populate Related Objectives |
Click to add all the parent objective’s related objectives to the Objectives grid for the course. Note: This button appears only for objectives imported from PeopleSoft HCM that are associated with one or more sub-items (related objectives). For more information about related objectives, see Understanding Objectives. |
Use the Maintain Courses - Delivery Method page (LM_CI_DLVRY_PG) to specify which delivery methods are applicable to a given course.
Navigation:
This example illustrates the fields and controls on the Maintain Courses - Delivery Method page.

Note: For new courses, the system hides this page until you save the item.
To add a supported delivery method for this course, click the Add New Delivery Method button to access the Delivery Methods component. When you add a delivery method and return to this page, the system lists the delivery method that you selected here. When a class is created for a course, it must be created in the context of one of the supported delivery methods for that item.
To edit a delivery option, click the delivery method name. The Delivery Methods component opens in update/display mode.