Setting Up Workspace Templates
This section discusses steps to create a workspace template, edit related properties to the template and define template security.
|
Page Name |
Definition Name |
Usage |
|---|---|---|
|
EPPCW_MANAGE |
Browse and manage a list of workspace templates. |
|
|
Create Workspace Template Page |
EPPCW_TMPL_CREATE |
Create a workspace template definition. |
|
Template Created Page |
EPPCW_TMPL_COMPL |
Access a new template by clicking the template name link. |
|
Administration - Properties Page |
EPPCW_ADMIN_PROP |
Set workspace template properties such as name, category, and branding theme. |
|
EPPCW_ADMIN_MBR |
Manage the membership settings of a workspace template. |
|
|
Administration Modules Page |
EPPCW_ADMIN_MOD |
Select the modules and pagelets that you want to include in a workspace template. |
|
Key Name Mapping Page |
EPPCW_ADMIN_KEYMAP |
Select and optionally rename the keys passed to the pagelet. |
|
EPPCW_DC_CATGOPTS |
Define options available in the Documents module of workspaces created using the template. |
|
|
Add Pagelet Page |
EPPPB_CP_ADD |
Select a pagelet definition from a source portal and add it to a template. |
|
Edit Pagelet Page |
EPPPB_CP_EDIT |
Edit the definition for a related pagelet. |
|
Administration - Contextual Data Page |
EPPCW_ADMIN_KEYS |
Manage contextual data associated with a template. For example, you can enter data that ties the template to one or more transactions and to one or more transaction key fields. |
|
Select Transaction Page |
EPPCW_BROWSEREG |
Select a transaction that you want to include as contextual data for a template. |
|
Administration - Copy Changes Page |
EPPCW_ADMIN_COPY |
Copy selected items updated in the template to specified target workspaces, templates, or both. |
|
Modules Page, Related Pagelets Page, Link Details Page |
EPPCW_ADM_COPY_DET |
Select which modules, pagelets, or links will be copied to the target workspaces. See Copying Changes from Templatesfor more details on Modules page and Related Pagelets page |
|
EPPCW_ADMIN_SEC |
Manage security options for a template. |
|
|
EPPCW_ADMIN_ADV |
Access tools and utilities that enable you to implement advanced configurations for a workspace template. |
When creating a workspace, you must select a workspace template on which to base the workspace. A workspace template is a model that provides common characteristics for the workspaces built from it. For example, a workspace template can define default workspace modules, the default layout of the workspace homepage, default workspace members and privileges, and the contextual relationships, if applicable.
Three workspace templates are delivered with PeopleSoft Interaction Hub:
Base workspace template
The base workspace template provides a basic module configuration in a three-column homepage layout. The other delivered templates are based on this template.
Base workspace template wiki
This template is a variation of the base workspace template. It includes the Wiki Content module instead of the Welcome module and a two-column homepage layout to accommodate wiki content.
Demo workspace template
This template is a variation of the base template. It demonstrates a contextual data relationship between a transaction page (Demo Department Definition page) and an associated workspace.
Note: This template exists in the Demo database only.
A workspace template is a portal registry derived from the delivered workspace base portal template. Using the template administration pages documented in this section, you can define various aspects of this template registry, including security, contextual data, associated workspace modules, and related pagelets.
You can create additional workspace templates to suit your organization's needs. You can create highly or minimally configured templates, depending on their usage. For example, you can create separate templates to meet the needs of project groups, departments, business units, or transaction-based collaborators.
Access the Manage Templates page (Portal Administration, Workspaces, Manage Templates).
This example illustrates the fields and controls on the Manage Templates page. You can find definitions for the fields and controls later on this page.

Filter Templates
Field or Control |
Description |
|---|---|
Category |
Select the category in which you want to search for the template that you want to manage. |
Owner |
Select the owner of the template that you want to manage. |
Status |
Select the Active check box or the Inactive check box to indicate the status of the workspace or template that you want to manage. |
Keyword |
Enter any keywords that you want to use to narrow your search results. The keywords you enter will be matched against any text that appears in the title (label) or description of a template. |
Search |
Click to perform your requested search. |
Reset |
Click to clear all keywords that you entered. |
Templates
Field or Control |
Description |
|---|---|
Select |
Select a check box to indicate that you want to perform a managerial action on the workspace. |
Template |
Displays the name of the workspace template. Click the link to access the template. |
Category |
The system displays the category to which the template is assigned. |
Owner |
The system displays the name of the template owner. |
Status |
The system displays the status of the template, active or inactive. |
Activate |
Click to reactivate the selected template. |
Deactivate |
Click to deactivate the selected template The template is no longer accessible or usable by members, but its data continues to be stored in your database. |
Delete |
Click to delete the selected template. You are prompted to confirm your deletion. |
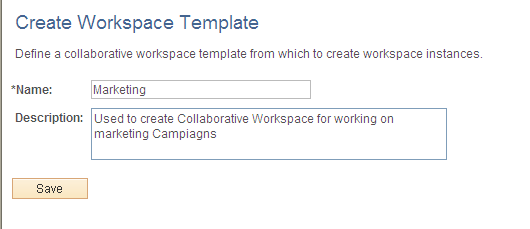
Access the Create Workspace Template page (Portal Administration, Workspaces, Create Template).
This example illustrates the fields and controls on the Create Workspace Template page. You can find definitions for the fields and controls later on this page.
Field or Control |
Description |
|---|---|
Name |
Enter a name for the template. This name becomes an available value in the Template field on the Select a Workspace Template page. |
Description |
Enter a description of the template. The system displays this description when the template is selected on the Select a Workspace Template page. |
Save |
Click to create and save the template definition. After the save is complete, the system takes you to the Template Created page. |
Accessing the Newly Created Template
After you save a new template, the system takes you to the Template Created page, where you click the template name link to display the administration pages for the new template.
Working With Templates and the Action Item Lists Module
When you create templates in the Action Item Lists module, the system does not create a default list. However, when you create Workspaces the system does create a default list. If the template has any manually created lists, the Workspace created from that template will contain a default list (with the same name as the Workspace) plus any manually created lists in the template.
Access the Administration - Properties page (in a workspace template, click the Administration link).
This example illustrates the fields and controls on the Administration - Properties page for a workspace template. You can find definitions for the fields and controls later on this page.

Field or Control |
Description |
|---|---|
Name |
The template name you entered on the Create Workspace Template page appears, but you can override it. This name becomes an available value in the Template field on the Select a Workspace Template page. |
Description |
Enter a description of the template. This description appears when the template is selected on the Select a Workspace Template page. |
Category |
Select a category for the workspace template. This category appears by default on the Name and Describe Workspace page for a workspace created using this template. |
Allow category override |
Select to override the selected category on individual workspaces created using this template. You perform this override on the Name and Describe Workspace page. |
Theme Name |
Displays the branding theme that will be used to display workspaces created using this template. This field is editable for template owners and administrators. Note: All branding themes defined in the system are available for selection; however, only certain themes are applicable to collaborative workspaces. |
Access the Administration - Members page (in a workspace template, click the Administration link and then select the Members tab).
This example illustrates the fields and controls on the Administration - Members page. You can find definitions for the fields and controls later on this page.
See Workspace Administration Advanced Page.
Members
Use the Members group box to manage the membership settings of the workspace template. The system provides these settings by default to the workspaces that are created using this template.
You can also use the Add Members page and the Administration - Members page to manage the membership of a workspace built using this template.
See Add Members (Optional) Page.
Field or Control |
Description |
|---|---|
Type |
Select the type of member you want to add to the workspace template. Users and roles that are available for selection are those who have access to the PAPP5300 permission list. Available values include: Role: Select to enable selecting a role or a group of users in the Member Name field. Available roles are defined in the Roles component. See the product documentation for PeopleTools: Security Administration, “Setting Up Roles.” User: Select to enable selecting a user in the Member Name field. You must select this value to be able to select a Privilege Set field value of Owner or Administrator. Available users are defined in the User Profiles component. See the product documentation for PeopleTools: Security Administration, “Administering User Profiles.” |
Privilege Set |
Select the privilege set you want to assign by default to the member in workspaces created using this template. You must select a Type field value of User to be able to select the Owner or Administrator value. Available values are: Administrator. Approver. Contributor. Moderator. Owner. Viewer. |
|
Click to view information about the privilege set. |

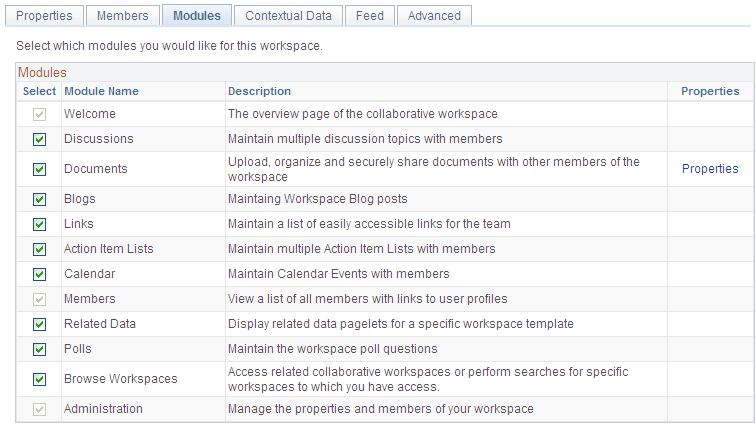
Access the Administration - Modules page (in a workspace template, click the Administration link and select the Modules tab).
This example illustrates the fields and controls on the Administration - Modules page.
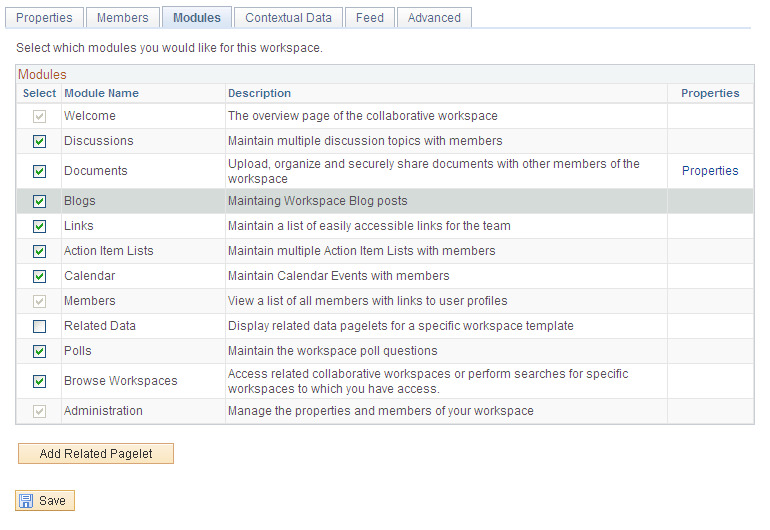
Select the modules that you want to include in the workspace template.
The system provides these settings by default to the workspaces that are created using this template. The Welcome, Members, and Administration module names are selected and unavailable for editing because they are required in a workspace.
The Properties link associated with a module enables you to further define the properties and options available in a module.
Mapping Keys for Context-Sensitive Pagelets
Access the Key Name Mapping page (click the Map link for a context-sensitive pagelet on the Administration - Modules page).
This example illustrates the fields and controls on the Key Name Mapping page.
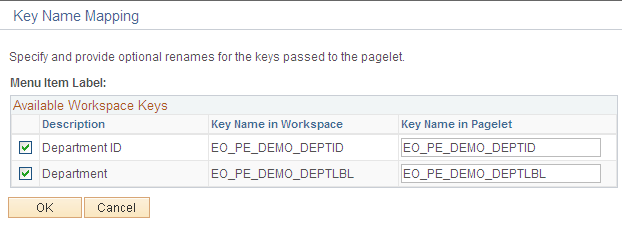
When you add a related pagelet to a workspace and designate it as being context-sensitive, the pagelet is passed the same key names and values that are associated with the workspace. These keys are passed to the pagelet as query string parameters. You can override the key names for a related pagelet by adding the EPPCW_KEYMAPPING attribute to the content reference representing the pagelet.
You access the content reference of the pagelet by clicking the Structure and Content link on the Administration - Advanced page. The syntax for the attribute value is:
KEY1ORIGNAME=KEY1NEWNAME;
KEY2ORIGNAME=KEY2NEWNAME;
...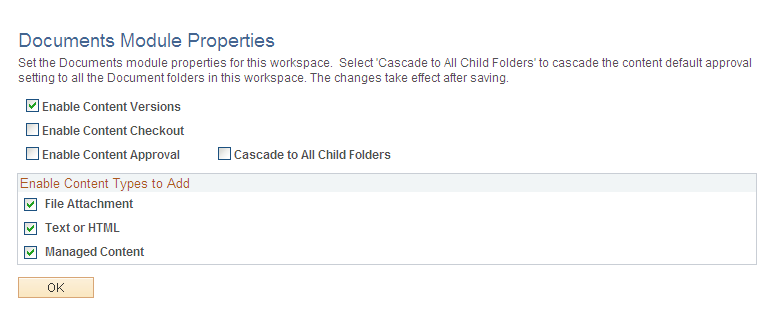
KEYNORIGNAME=KEYNNEWNAMEAccess the Documents Module Properties page (click the Properties link for the Documents module on the Administration - Modules page).
This example illustrates the fields and controls on the Documents Module Properties page. You can find definitions for the fields and controls later on this page.
Field or Control |
Description |
|---|---|
Enable Content Versions |
Select to enable different versions of content. |
Enable Content Checkout |
Select to enable the check in and check out of documents posted to the Documents module in workspaces created using this template. If you select this option, fields and options enabling the check in and check out of documents appear appropriately on the pages used to post documents to the Documents module. |
Enable Content Approval |
Select to enable the approval of documents posted to the Documents module in workspaces created using this template. If you select this option, fields and options enabling the approval of documents appear appropriately on the pages used to post documents to the Documents module. |
Cascade to All Child Folders |
Select to set the default approvals for all new content in child folders. The approval settings are transferred to all child folders when the page is saved. This setting does not affect existing child content approval settings. |
Enable Content Types to Add
Field or Control |
Description |
|---|---|
File Attachment |
Select to enable the posting of file attachments to the Documents module in workspaces created using this template. If you select this option, the File Attachment option appears on the Documents - Add Documents page in the Documents module. Note: If file attachments are added to the template itself, these attachments will not appear in workspaces created from the template. |
Field or Control |
Description |
|---|---|
Text or HTML |
Select to enable the posting of text and HTML documents to the Documents module in workspaces created using this template. If you select this option, the Text or HTML option appears on the Documents - Add Documents page in the Documents module. |
Field or Control |
Description |
|---|---|
Managed Content |
Select to enable the posting of managed content to the Documents module in workspaces created using this template. If you select this option, the Managed Content option appears on the Documents - Add Documents page in the Documents module. |
Access the Add Pagelet page (click the Add Related Pagelet button on the Administration - Modules page).
Access the Edit Pagelet page (click the Edit Pagelet button for an existing pagelet on the Administration - Modules page).
This example illustrates the fields and controls on the Add Pagelet page. You can find definitions for the fields and controls later on this page.
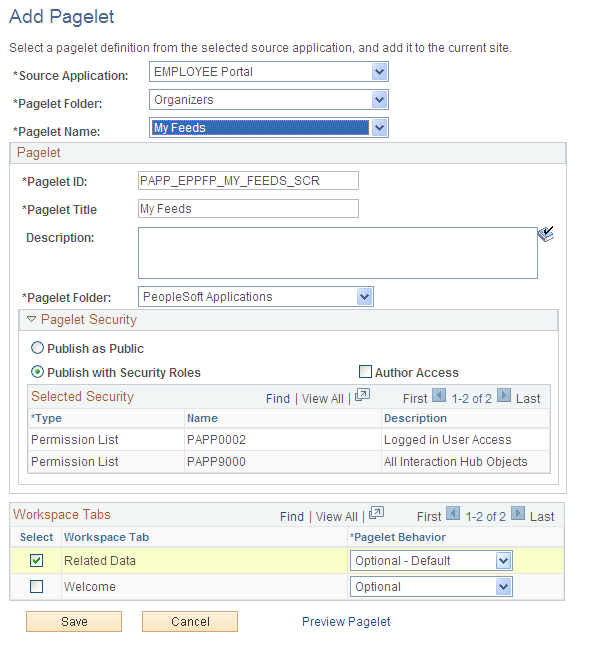
Use the Add Pagelet page to add an already defined pagelet to be available on the workspace homepage (Welcome tab) or the workspace Related Data tab.
Field or Control |
Description |
|---|---|
Source Application |
Select the portal registry that is the source of the pagelet definition. To select the portal registry from the node of a content provider system, that node must already be defined as a source application. |
Pagelet Folder |
Select the portal folder that is the source of the pagelet definition. |
Pagelet Name |
Select the pagelet definition. |
Pagelet Name |
Displays the ID of the pagelet. |
Pagelet Title |
Displays the title of the pagelet, which you can modify. |
Description |
(Optional) Enter a description for the pagelet. |
Pagelet Folder |
Select the folder in which the pagelet definition will be stored. PeopleSoft Applications is the default folder for workspace pagelets. |
Pagelet Security |
Select a pagelet security option:
|
Author Access |
Select to provide the pagelet author with access to the pagelet regardless of any security restrictions assigned to the pagelet. This access is granted based on the author’s user ID. |
Select |
Select one or more workspace tabs for this pagelet:
|
Pagelet Behavior |
Select the default behavior for the pagelet:
|
Access the Administration - Contextual Data page (in a workspace template, click the Administration link and select the Contextual Data tab).
This example illustrates the fields and controls on the Administration - Contextual Data page. You can find definitions for the fields and controls later on this page.
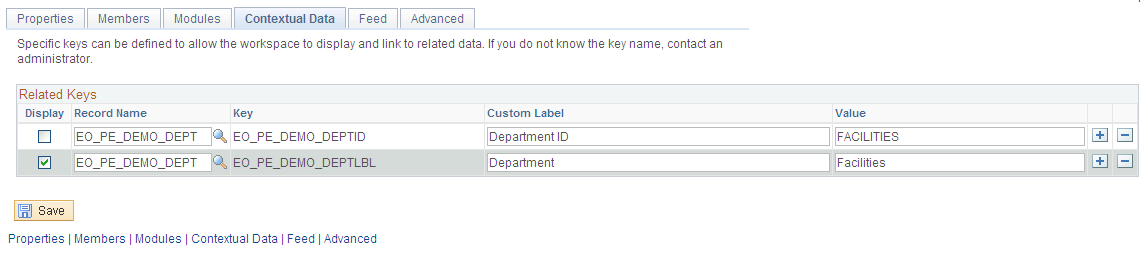
Use the Related Transactions group box to associate workspaces you built using this template with specific transactions.
Field or Control |
Description |
|---|---|
Type |
Select the type of transaction you want to associate with the template. Not Registered: Select to associate the template with a transaction that is not registered in the PeopleSoft database environment. When you select this value, the Node Name, URL, and Label fields appear. Registered: Select to associate the template with a transaction that is registered in the PeopleSoft database environment. When you select this value, the Portal / Subsite and Transaction Name fields appear. |
Portal / Subsite |
Select the portal or subsite in which the internal transaction to which you want to tie this template resides. This field appears when the Type field is set to Registered. |
Transaction Name |
Enter one or more internal transactions to which you want to associate this template. This field appears when the Type field is set to Registered. Click the Select Transaction button to access the Select Transaction page, where you can select a transaction from a graphical representation of the portal registry. |
Component Interface |
Select a component interface to update the template with the key values of the transaction you are working with in Step 2 of the wizard. Any component interface that has the GET tied to the component will update the template and, when you create the workspace using that template, the prompt will show the key values for you to select. This field appears when the Type field is set to Registered. |
Node Name |
Select the node through which the external transaction to which you want to associate this template should be accessed. These nodes are defined content providers from which content can be retrieved and rendered. This field appears when the Type field is set to Not Registered. |
URL |
Enter the URL to the external transaction to which you want to associate this template. This field appears when the Type field is set to Not Registered. |
Label |
Enter the label that you want to appear for an unregistered transaction. This field appears when the Type field is set to Not Registered. Label text that you enter here appears in the Relate Workspace to a Transaction page when the keys edit boxes are presented and in the workspace menu, below module choices to the left. |
Only for selected transactions |
Select if you want this template to be available for selection only when a user chooses to create workspaces from the related transactions you define on this page. When a user creates a workspace based on any other transaction, this template will not be available for selection. |
Use the Related Keys group box to specify key fields that you want to associate with this template. When you build a workspace using this template and associate it with a transaction that contains these key fields, the workspace is able to display pagelets and links related to the key field values from the transaction.
Note: Modifying existing field values or options set in this group box initiates a function that updates all workspace pagelet content reference URLs that contain an attribute of EPPCW_PAGELET with a value of KEYS. This change affects all workspace pagelets as well as any related pagelets associated with the workspace in which the key was modified.
Field or Control |
Description |
|---|---|
Display |
Select if you want the key field and its transactional value to appear in a workspace created from this template using a transaction that contains the key field. Deselect this option to hide certain keys and their values from workspace users. |
Record Name |
Select the record name that you want to use to associate with the workspace template. |
Key |
Enter the key field name that you want to associate with the workspace template. These keys and their values can be used to generate context-sensitive Related Pagelets and links that are specific to the workspace created from this template. |
Custom Label |
Enter an overriding value for the key label. If you choose to display the key, this label will appear alongside the key field value below the menu of a workspace created from this template for a transaction that contains the key. |
Allow key overrides |
Select if you want an administrator to be able to edit these keys in a workspace created using this template. |
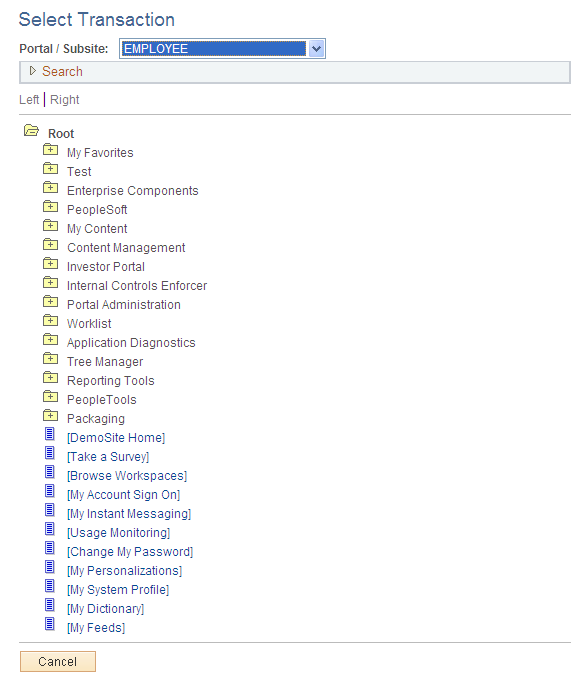
Selecting Transactions for a Template
Access the Select Transaction page (add a registered transaction and click the Select Transaction button on the Administration - Contextual Data page).
Note: You access this page by adding a transaction on the Contextual Data page. Set the type to registered, specify a portal name, and then click the prompt button.
This example illustrates the fields and controls on the Select Transaction page. You can find definitions for the fields and controls later on this page.
Field or Control |
Description |
|---|---|
Portal / Subsite |
Displays the portal or subsite you selected on the Administration - Contextual Data page, but you can override this value. Select the portal in which the transaction you want to associate to the template resides. |
Search by |
Description. Label. |
Search |
Click to execute the search you entered using the Search by elements. |
You can also manually click through the folder tree to locate the transaction. Select the transaction you want to associate with the template and click OK to return to the Administration - Contextual Data page and add the transaction to a template.
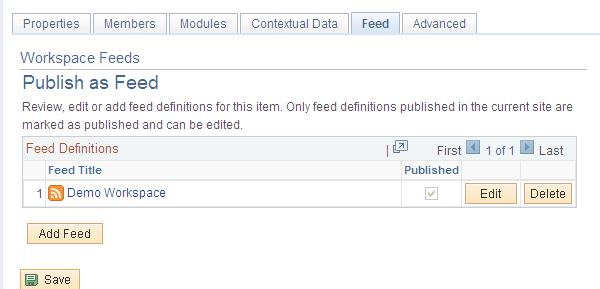
Access the Administration - Copy Changes page (in a workspace template, click the Administration link and select the Copy Changes tab).
This example illustrates the fields and controls on the Administration - Copy Changes page. You can find definitions for the fields and controls later on this page.
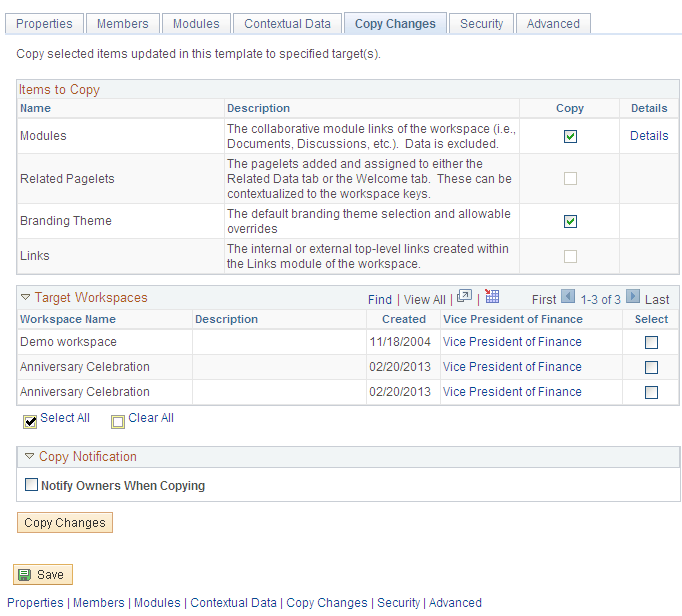
Use this page to make changes to all workspaces created from this template.
Note: This page is a portal registry copy only. No data is copied in the Copy Changes process.
Items to Copy
Select the options that you want to copy to the selected workspaces.
Field or Control |
Description |
|---|---|
Modules |
You can select to copy all modules or only ones selected on the Modules page by clicking the Details link. |
Related Pagelets |
You can copy pagelets from the Related Pagelets module. Click the Details link to view the Related Pagelets page. |
Branding Theme |
Select this check box to copy template’s branding theme. |
Links |
Select this option to copy internal or external links. |
Target Workspaces
This region of the page lists all workspaces that have been generated using this template. Select the ones to which you want to copy the changes.
Note: If you are working with the base template, then this section will show all target templates created using the base template instead of target workspaces.
Copy Notification
Select this option to send an email to workspace owners informing them that changes were copied to their workspaces.
Determining Which Items to Copy
Access the Module Details page (click the Details link for modules on the Administration - Copy Changes page).
Access the Related Pagelets page (click the Details link for related pagelets on the Administration - Copy Changes page).
This example illustrates the fields and controls on the Module Details page.
Use the Module Details page to select which modules to copy to the selected workspaces.
This example illustrates the Related Pagelets page.

Use the Related Pagelets page to select which modules to copy to the selected workspaces.
Access the Administration - Security page (in a workspace template, click the Administration link and select the Security tab).
This example shows Administration Security page.
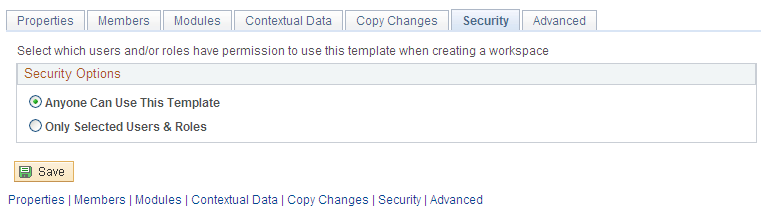
Security Options
Field or Control |
Description |
|---|---|
Anyone Can Use This Template |
Select if you want this template to be available for selection without any user security restrictions. |
Only Selected Users & Roles |
Select if you want to this template to be available for selection only by the specific users and roles you specify in the Users/Roles group box. When you select this option, the Users/Roles group box appears. |
Users/Roles
The Users/Roles group box appears when you select the Only Selected Users & Roles option.
Field or Control |
Description |
|---|---|
Type |
Select the type of member you want to be able to access this workspace template. Available values include:
|
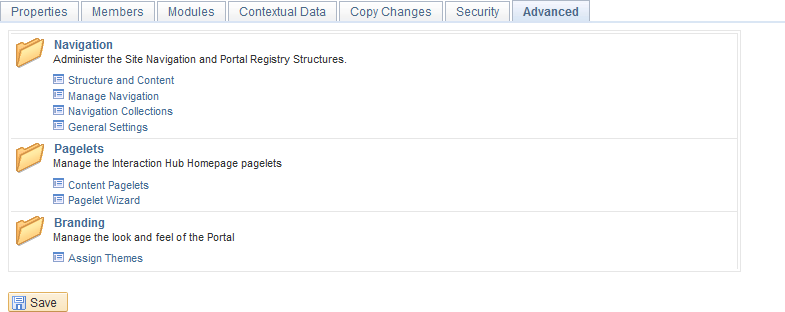
Access the Administration - Advanced page (in a workspace template, click the Administration link and select the Advanced tab).
This example illustrates the fields and controls on the Administration - Advanced page. You can find definitions for the fields and controls later on this page.
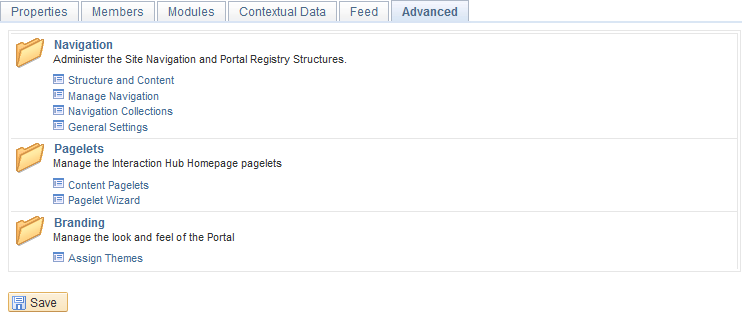
This example illustrates the fields and controls on the Administration - Advanced page for a workspace template. You can find definitions for the fields and controls later on this page.
Field or Control |
Description |
|---|---|
Navigation |
Access utilities and tools that enable you to implement advanced navigation configurations for the workspace template. Add new modules to the workspace or access Pagelet Wizard to create new pagelets for use with the workspace. See the product documentation for PeopleTools: Portal Technology, “Administering Portals.” |
Pagelets |
Access utilities and tools that enable you to implement advanced pagelet configurations for the workspace template. See the product documentation for PeopleTools: Portal Technology, “Using Pagelet Wizard to Create and Manage Pagelets”. |
Branding |
Access utilities and tools that enable you to change branding theme assignments for the template. See Themes, Headers, and Skins. In addition, see PeopleTools: Portal Technology, “Using PeopleTools Branding Features,” Administering System Branding, Assigning Branding Themes. |