Creating Root-Level Workspaces
This section discusses the workspace creation wizard to create root-level workspaces.
|
Page Name |
Definition Name |
Usage |
|---|---|---|
|
EPPCW_WIZ_TMPL |
Select the template on which you want to base the new workspace. |
|
|
EPPCW_WIZ_KEYS |
If the workspace template on which you are basing the creation of your workspace contains contextual data, you can use this page to relate the workspace to specific data about a transaction; otherwise, the system skips this page during workspace creation. |
|
|
EPPCW_WIZ_DESCR |
Enter a name, description, and category to help identify the workspace. |
|
|
EPPCW_WIZ_MOD |
Select the modules you want to include in the workspace. |
|
|
EPPCW_WIZ_MBR |
Select and invite members to participate in the new workspace. |
|
|
EPPCW_WIZ_EXTMBR |
Create a system account and ID to allow an external user to access this workspace. |
Access the Select A Workspace Template page (Browse Workspaces and then click the Create Workspace button on the Search page or Browse Workspaces, select the Hierarchy page, and then click the Create Root Workspace button).
This example illustrates the fields and controls on the Select A Workspace Template page. You can find definitions for the fields and controls later on this page.
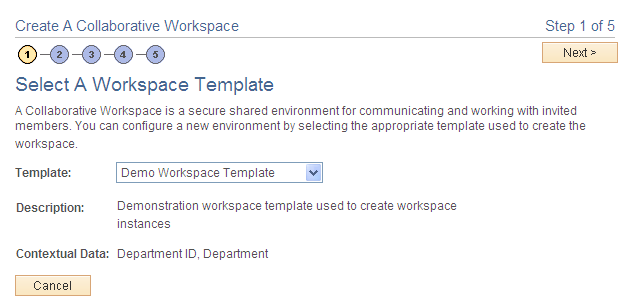
Field or Control |
Description |
|---|---|
Template |
Select the template on which you want to base your workspace. If you accessed this wizard directly from the transaction for which you are building this workspace and the transaction is already associated with a workspace template, then the system selects a recommended template by default. You can override this template. |
Description |
The system displays a description of the selected template. |
Contextual Data |
If you selected a template and contextual data is already defined for the template, then the labels of the key fields selected to supply contextual data appear here. |
Access the Relate Workspace to a Transaction page (click the Next button on the Select Workspace Template page).
This example illustrates the fields and controls on the Relate Workspace to a Transaction page.
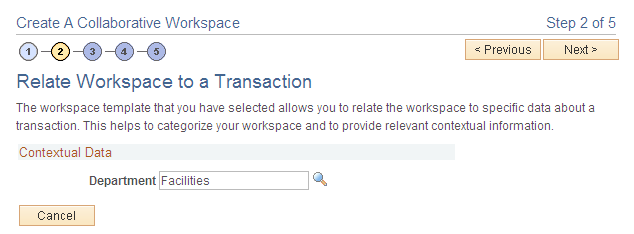
Note: If no contextual data is required for this workspace, then the system skips this step and displays Step 3 automatically.
Contextual Data
If contextual data is defined for the workspace template, then the key fields selected to supply contextual data appear here. In addition, if you accessed this component directly from the transaction for which you are building this workspace, then applicable values appear in the key fields. If you did not access this component directly from a transaction, then you can enter your own values in the key fields.
For example, if you tied a template to a customer profile transaction with a key of customer ID, you could create a workspace that is contextually tied to a customer. Another example could involve a template tied to a help desk transaction with a key of case ID. You could create a workspace that is contextually tied to a specific case.
Note: While you can manually enter data on this page, we recommend that you populate these fields by creating a workspace directly from a transaction.
Access the Name and Describe Workspace page (click the Next button on the Relate Workspace to a Transaction page).
This example illustrates the fields and controls on the Name and Describe Workspace page. You can find definitions for the fields and controls later on this page.
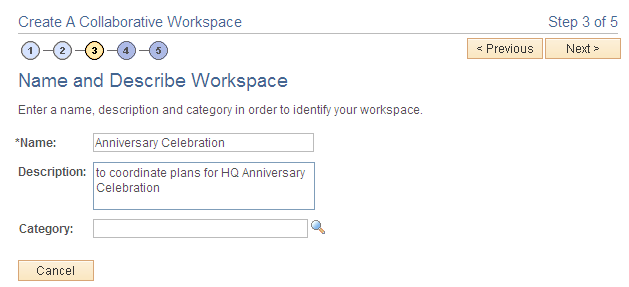
Field or Control |
Description |
|---|---|
Name |
Enter a name for the workspace. The name of the workspace appears in the header on the workspace homepage, at the top of the workspace menu, and anywhere workspaces are listed. For example, the name can appear on pages used to search for or manage workspaces, in pagelets, in search results, and so on. |
Description |
Enter an optional description for the workspace. This description becomes the default welcome text, which appears in the Welcome module if that module is configured for this workspace. |
Category |
Select a category for the workspace. If a category is defined for the workspace template, then the category appears by default. You can select a different category if the template definition specifies that the category can be overridden. |
You can also use the Administration - Properties page, which you access from the workspace, to modify the workspace name, description, category, and other attributes.
Access the Select Workspace Modules page (click the Next button on the Name and Describe Workspace page).
This example illustrates the fields and controls on the Select Workspace Modules page.
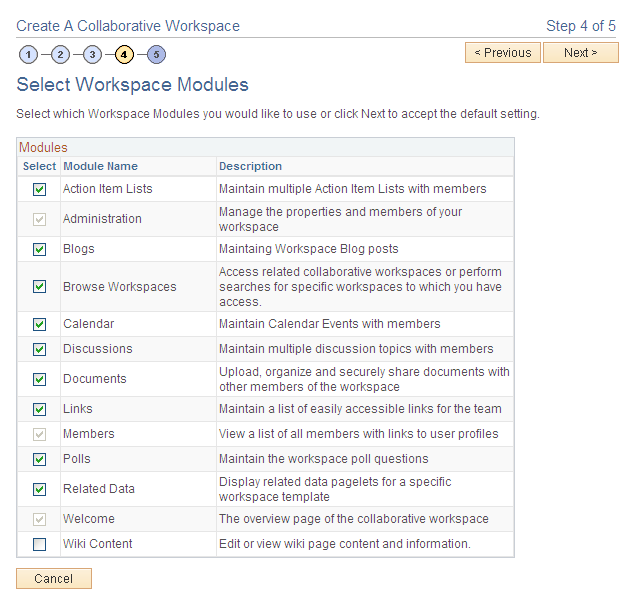
Modules selected in the workspace template are selected by default on this page. You can select or remove modules as appropriate to your workspace. Removing a module simply hides the link to the module. Data is preserved and no activity in the module is deleted. If you select to include the module in the workspace in the future, all data present prior to its removal will still be available.
If you selected the Base Workspace Template, then the Member, Administration, and Welcome modules are required and cannot be deleted from the workspace. If you selected the Base Workspace Template Wiki, then the Member, Administration, and Wiki Content modules are required and cannot be deleted from the workspace.
You can also use the Administration - Modules page, which you access from the workspace, to add and remove workspace modules.
Access the Add Members (Optional) page (click the Next button on the Select Workspace Modules page).
This example illustrates the fields and controls on the Add Members (Optional) page.

You can add members and create a user account using this page when you create the workspace. If the workspace template contains definitions for default members, those member names will appear on this page. You can also use the Administration - Members page, which you access from the workspace, to add and remove members.
See Administering Workspace Members.
Members
Field or Control |
Description |
|---|---|
Send Invite |
Select to send a notification to selected members alerting them that they were added as members to the workspace. The system uses default notification text that includes a link to the workspace homepage. Alternatively, you can send notifications after the workspace is created, which also allows you to modify the notification text on the Set Invitation Message page. |
Type |
Select the type of member you want to add to the workspace. To be able to select Administrator or Owner in the Privilege Set field, you must select the User value here. Available values include: Role: Select to be able to select a role in the Member Name field. Available roles are derived from PeopleSoft roles defined on the Roles page. See the product documentation for PeopleTools: Security Administration,“Setting Up Roles.” User: Select to be able to select a user in the Member Name field. Available users are derived from PeopleSoft users defined on the User Profiles page. See the product documentation for PeopleTools: Security Administration, “Administering User Profiles.” |
Member Name |
Select a name from the list of roles or users. |
Privilege Set |
Select a privilege level you want to assign to the member. To be able to assign the Administrator or Owner privilege level to a member, you must have selected User in the Type field. Available values are: Administrator Approver Contributor Moderator Owner Viewer |
Add Workspace Member |
Click to add another member to the workspace. |
Create User Account |
Click to access the Create User Account page, which enables you to enter a new user name and email account for an external member. Note: The Create User Account button appears only if the Enable External Users option is set on the Installation Options page. |
Finish |
Click to finish workspace creation and access the workspace homepage. |
Access the Create User Account page.
This example illustrates the fields and controls on the Create User Account page. You can find definitions for the fields and controls later on this page.
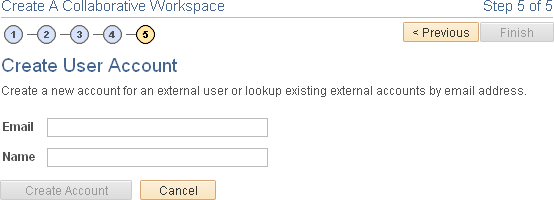
Use the Create User Account page to create an account to allow an external user to access this workspace. The system user ID is based on the email address that you enter. The system will use this name as the description in the PeopleTools user profile. A dynamically created password will be mailed to the user enabling access to the workspace. When the external user logs in to the workspace for the first time, the Change Password page appears and the user is asked to change the password that was sent in the invitation.
Field or Control |
Description |
|---|---|
|
Enter a valid email address. The system will truncate the system user ID generated from this email address at the @ symbol. For example, an email address of [email protected] will result in a user ID of FIRST.LAST. |
|
Name |
Enter a description for this account. The system will use this value as the description in the PeopleTools user profile. |
Matching Accounts |
After you enter a valid email address and exit the Email field, if the system finds a matching email address, then the Matching Accounts group box appears, displaying the matching accounts. |
Create Account |
Click the Create Account button to create a new external user account and return to the Add Members (Optional) page. |
Cancel and Previous |
Click either button to return to the Add Members (Optional) page without creating an external user account. |
Finish |
The Finish button is not active on this page. Click the Create Account or Cancel button. |
You can access and manage external user information from the Manage External User page.