Managing Versions
This topic discusses the Managed Content approval process.
|
Page Name |
Definition Name |
Usage |
|---|---|---|
|
EPPCM_USER_MAIN |
Edit and view all content that was checked out by you. |
|
|
EPPCM_HIERTOP_MAIN |
Edit and view all content that was checked out by you. |
|
|
EPPCM_CONT_ATT |
Assign business attribute controls to a piece of managed content. |
|
|
EPPCM_CONT_VER |
Review, delete, or check out different versions for a specific content item. |
|
|
EPPCM_CONT_MAIN |
Modify content properties, such as content location, content approver, and content version; check content out, check it in, and submit it for approval; and maintain comments or discussions specific to that piece of content, and other functions. |
|
|
EPPCM_CONT_LOC |
View information about the folders in which the content is published. From this page, you can move content to a new folder on the Move Content page. In addition, from this page, you can specify additional folders in which the content is available on the Add Content Locations page. Specifying an additional location does not create another copy of the content; instead, it creates a link so that only one instance of the content is present within managed content. |
|
|
EPPCM_CONT_TREEADD |
Select an additional location for the content. |
|
|
Start Discussion Confirmation Page |
EO_PE_YESNOCONFIRM |
Use to confirm the start of a discussion on this piece of content. |
|
Post Details Page |
EPPDF_VIEW_TOPIC |
Use to start a new discussion, edit an existing discussion, or view an existing discussion for a content item. From this page, you can edit the existing discussion, delete the discussion entirely, and add a reply, among other tasks. |
|
Discussion Page |
EPPDF_REPLY_TOPIC |
Enter or edit a discussion topic. |
|
Edit a Post Page |
EPPDF_REPLY_TOPIC |
Edit an existing discussion. |
|
Add a Reply Page |
EPPDF_REPLY_TOPIC |
Respond to a discussion. |
|
EPPCM_STAT_MAIN |
View, at a glance, the work that you need to perform based on the status of managed content. |
|
|
Content Notification |
EPPCM_CONT_NTFY |
Send email notifications of saved content to the list of interested parties. |
|
Comments |
EPPCM_CONTCOMM_SEC |
Enter additional comments about this content item. |
Managed content enables users to share content among users. It offers a check-in and check-out function, version controls, and an approval process to safeguard and manage the quality of content that is made available for publishing to a wider audience.
To approve content for publishing:
Add new content.
Select locations and verify folder membership.
Check content in.
Other authorized folder members can now check out and review or edit the content.
Submit completed content for approval.
Approve content.
Access the My Managed Content – Checked Out page (select click the Check out link).
This example illustrates the fields and controls on the My Managed Content - Checked Out page showing content items that are filtered by the Status and Checked Out To Me fields. You can find definitions for the fields and controls later on this page.
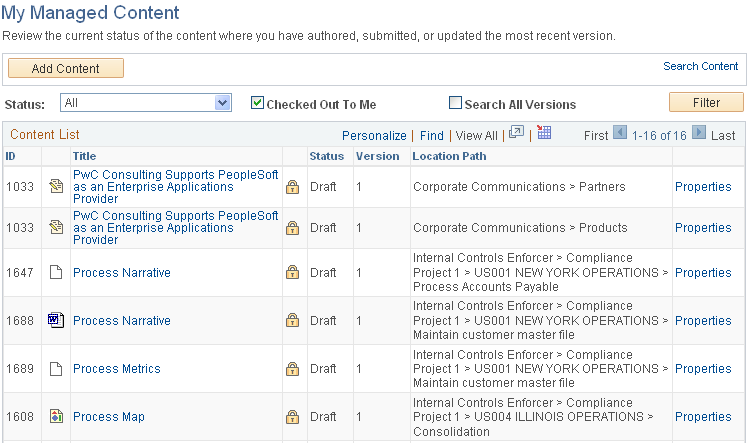
When clicking a Content Item Status link on the My Managed Content Status page, you are redirected to the My Managed Content page with the filters set according to the status selected. These filters can be adjusted directly on the My Managed Content page. The content is automatically filtered to only return content rows where the user is the creator, updater, or approver of the last version.
Selecting the Search All Versions option filter will check all versions; however, data retrieval will take longer with this filter selected. The preceding example shows the My Managed Content page when the Checked Out content item status is selected.
Note: The newly added content item How to Retrieve Secure Content is listed as checked out and locked. You can also see that it is a Microsoft Word document, its latest version is 1, and it is located in two folders.
Field or Control |
Description |
|---|---|
Add Content |
Clink to access the Add Content page, where you can add a new content to this section. |
Status |
Select to search articles with a status of Draft, Pending, Published, Rejected, Rework, or All. |
Checked Out to Me |
Select to limit your search to articles that were checked out to you. |
Search All Versions |
Select this option to check all versions of content; data retrieval will take longer with this filter selected. |
Filter |
Click to limit the number of articles displayed on the page based on the values entered for the Status and Checked Out to Me fields. |
|
Indicates content is in Microsoft Word format. |
|
Indicates content is a file attachment. |
|
Indicates content is an image attachment. |
|
Indicates content is in either text or html format. |
Title |
Click the content title link to view the content details. |
|
Indicates content is checked out and locked. |
|
Indicates content is published. |
Status |
Displays the current publishing status of this article: Draft, Pending, Publish, Reject, or Rework. Note: You can use the Status drop-down list to search based on a selected status. |
Version |
Displays the version number of the content. |
Location Path |
Displays the path to the content location. Note: Content that is in multiple locations appears multiple times in the list. |
Properties |
Click to access the content properties page, where you can specify the type of content you want to add to a section of a news publication. |


Use the Content Attachment Properties page to modify content properties such as content location, content approver, and content version; to check content out, to check it in, and to submit it for approval; and to maintain comments or discussions specific to that piece of content, among other functions.
When you check in a file attachment, you are prompted to upload it from a local drive and folder.
To check in a content item:
Access the My Managed Content page for a list of all content currently checked out to you.
Select
Click the Properties link to access the Content Attachment Properties page.
Click the Check In button to unlock the content item and make it accessible to authorized folder members for review or edit.
Members can access the content using a variety of methods, including their own in-box or using browse.
Note: The Check In and the Cancel Check Out buttons disappear. The Check Out and the Submit For Approval buttons appear.
Return to the My Managed Content page.
The content item is no longer listed. You will need to change the filtering criteria to see it.
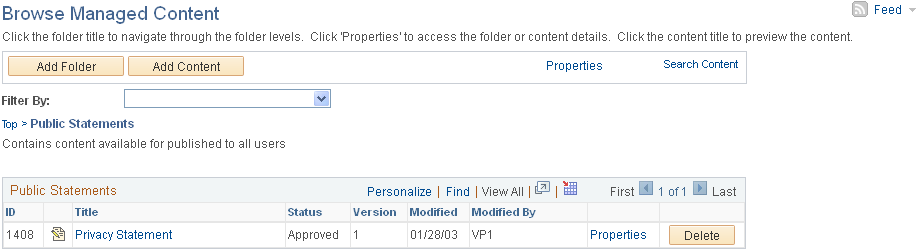
Use the Browse Managed Content page (EPPCM_HIERTOP_MAIN) to edit and view all content that was checked out by you.
Navigation:
Click a title link.
This example illustrates the fields and controls on the Browse Managed Content page, Public Statements folder.
Use the Content Attachment Properties page to modify content properties such as content location, content approver, and content version; to check content out, to check it in, and to submit it for approval; and to maintain comments or discussions specific to that piece of content, among other functions.
When you check out a file attachment, you are prompted to save it to a local drive and folder.
If you navigate to the folder containing the required content, a lock is no longer associated with the file because the content is now checked in. Instead, a star icon indicates the content item was recently added.
Note: The My Managed Content page takes you directly to the content. To find your content using the browse option, you need to know where the content is located.
To check out content items:
Click the Properties link on the Browse Managed Content page.
Click the Check Out button on the Content Properties page.
The content item opens in its original format ready for you to review, edit, or save. For example, the How to Retrieve Secure Content item opens in Microsoft Word.
Save the content to a location on your computer.
The Content Properties page reappears. Notice the changes to the Version, Version Status, Created, and Modified fields. Checking out a piece of content creates a new version with a status of draft.
Return to the Browse Managed Content page.
Notice the icon indicating that this content is checked out and locked, and the version number has changed.
Use the Content Business Data Attributes page (EPPCM_CONT_ATT) to assign business attribute controls to a piece of managed content.
Navigation:
Click the Business Data Attributes link on the Content Properties page.
This example illustrates the fields and controls on the Content Business Data Attributes page. You can find definitions for the fields and controls later on this page.
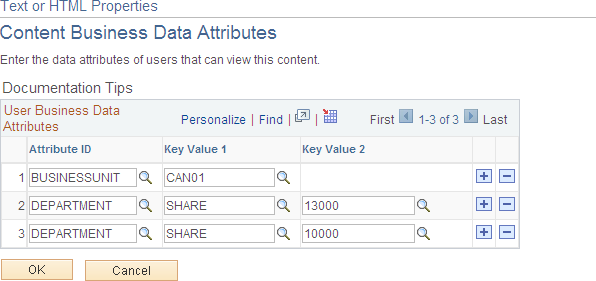
Insert one or more rows and select the attribute(s) and key(s) to assign to this content. Only users whose attributes match the values specified will have access to this content.
You can assign multiple business attributes. Values using the same attribute are grouped using the OR operator. Values from different attributes are grouped using the AND operator. For example:
Suppose Company is defined as an attribute that is used to manage access to content. If both Company A and Company B are assigned to a piece of content, then users from either Company A or Company B can access that content.
Suppose both Business Unit and Department are defined as attributes to manage content access to content. If business unit US001 and department 1000 are assigned to a piece of content, then only users assigned to business unit US001 and department 1000 can access that content.
Field or Control |
Description |
|---|---|
Attribute ID |
Select the data attribute to use to control access to this content. |
Key Value 1 |
Select the attribute value for the primary key. |
Key Value 2 |
Select the attribute value for the secondary key, if applicable. |
Use the Content Versions page (EPPCM_CONT_VER) to review, delete, or check out different versions for a specific content item.
Navigation:
Click the Properties link on the Browse Managed Content or My Managed Content page.
Click the Versions link on the Content Properties page.
This example illustrates the fields and controls on the Content Versions page. You can find definitions for the fields and controls later on this page.
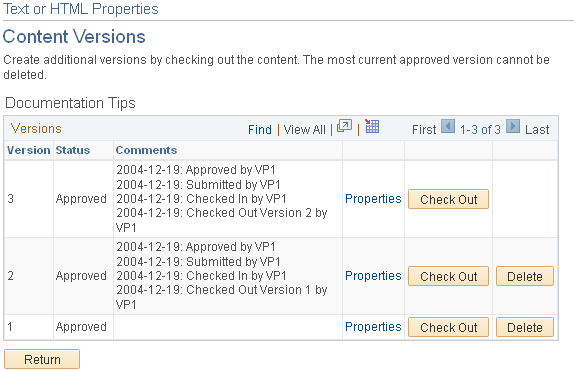
Use this page to review, delete, or check out different versions of a specific content item. New versions can only be created by checking content out.
Field or Control |
Description |
|---|---|
Delete |
This button is only available for content that has more than one version, and the version to be deleted is not the latest approved version. |
Check Out |
This button is only available for content that is checked in. Click to check out content and create a copy of the specific version it is used. |
You can select an approver at your discretion from the users who have been granted approval privileges for this folder. Before you can submit content items for approval, you must check in the content.
To submit content items for approval:
Select
Alternatively, select
Access the Content Properties page.
Click the Properties link on the Browse Managed Content page or the My Managed Content page.
Select an approver user ID or role.
Click the Submit for Approval button.
Note the following:
The content is automatically checked out and locked to the approver.
The fields on the Content Properties page are only editable by the listed approver because the content is checked out to the approver.
The Version Status and Locked To fields have been updated.
The icon also indicates that the file is locked. When you submit content for approval, it is automatically checked out to the approver by the system.
The Check Out button and the Submit for Approval buttons disappear. The Cancel Check Out button appears.
The Content Attachment Properties page is used to modify content properties such as content location, content approver, and content version; to check content out, to check it in, and to submit it for approval; and to maintain comments or discussions specific to that piece of content, among other functions.
When you approve an item of managed content, you make that item available to be reused in other content management features such as news publications, categorized content, collaborative workspaces, and so on.
To approve a content item:
Select to access the My Managed Content page to view content items of a particular status, including a list of all content that requires your review and approval.
Click the Properties link for the desired content on the My Managed Content page.
Click the link to review the content.
For example, if the content is a file attachment, click the file name.
Click the Approve button if the content is ready to be published.
Click the Rework button if the content requires additional work.
Notice that the Modified and Version Status fields were updated and the locked icon was removed.
Approved content is now available for publishing.
Use the Content Locations page (EPPCM_CONT_LOC) to view information about the folders in which the content is published.
From this page, you can move content to a new folder on the Move Content page. In addition, from this page, you can specify additional folders in which the content is available on the Add Content Locations page. Specifying an additional location does not create another copy of the content; instead, it creates a link so that only one instance of the content is present within managed content.
Navigation:
Click a folder title link and click a subfolder title link.
Click an appropriate Properties link and click the Locations link on the Content Properties page.
This example illustrates the fields and controls on the Content Locations page. You can find definitions for the fields and controls later on this page.
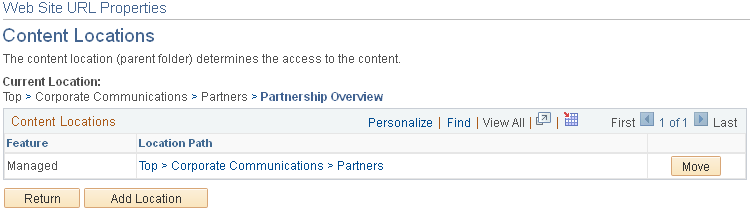
Note: The Content Locations page in the Managed Content feature lists all the folders where the content is located, including the locations of other publishing features that imported the managed content. When the Content Locations page is accessed from a nonmanaged feature, such as Workspaces or Categorized Content, it will only show the content locations for that feature. You can only move content between folders of the current feature in the current site.
When moving content or adding new content locations, be aware that the location (parent folder) determines the access security for the content.
See Top Folder Properties - Move Folder Page.
Field or Control |
Description |
|---|---|
Move |
Click to change the current location of the content. |
Add Location |
Click to add an additional location for the content. |
Use the Add Content Locations page (EPPCM_CONT_TREEADD) to select an additional location for the content.
Navigation:
Click a folder title link and click a subfolder title link.
Click an appropriate Properties link and click the Locations link on the Content Properties page.
Click the Add Location button on the Content Locations page.
This example illustrates the fields and controls on the Add Content Location page.
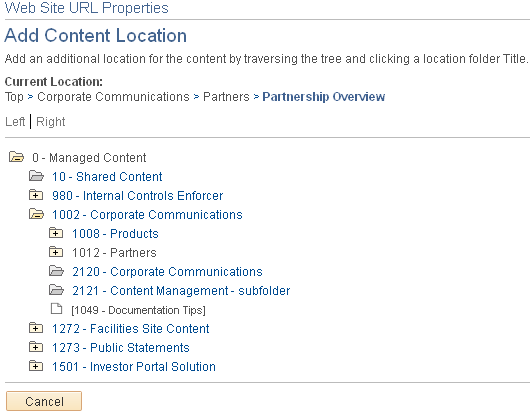
To select an additional location for the content:
Click the folder icons to navigate through the hierarchies.
Select the new location by clicking the folder title.
The Content Locations page appears with the new location listed.
Click the Return button to return to the Content Properties page.
Click the Save button.
The document is now listed in two folders.
The Start Discussions link on the Content Properties page enables users to start a discussion, which is then attached to the content item. After a discussion has been started, the link changes to View Discussions and is used to edit, respond to, and view discussions.
Note: These discussions stay with the content item, and they can only be accessed from the Content Properties page.
Start Discussion Confirmation Page
Use the Start Discussion Confirmation page (EO_PE_YESNOCONFIRM) to use to confirm the start of a discussion on this piece of content.
Navigation:
Click a folder title link and click an appropriate Properties link.
Click the Start Discussion link on the Content Properties page.
This example illustrates the fields and controls on the Start Discussion Confirmation page.
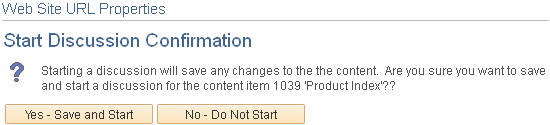
Use the Start Discussion Confirmation page to confirm the start of a discussion on this piece of content.
Post Details Page
Use the Post Details page (EPPDF_VIEW_TOPIC) to start a new discussion or edit an existing discussion for this content item.
Navigation:
Click a folder title link and click a content title link.
Click the Start Discussion link on the Content Properties page.
Click Yes-Start Discussion on the Start Discussion Confirmation page.
This example illustrates the fields and controls on the Post Details page.
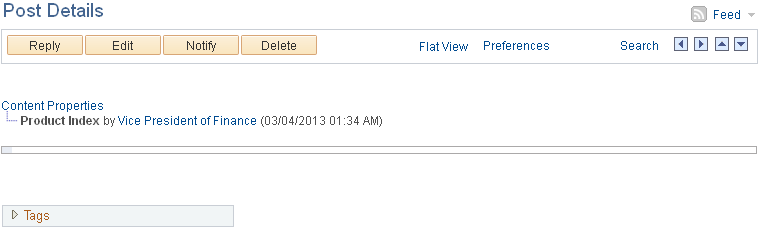
Use the Post Details page to start a new discussion, edit an existing discussion, or view an existing discussion about a content item.
Edit a Post and Add a Reply Page
Use the Edit a Post page (EPPDF_REPLY_TOPIC) to edit an existing discussion or respond to a discussion.
Navigation:
Click the Add Content button on the Browse Categorized Content page.
Click the Start Discussion link, and click the Yes-Start Discussion button.
Click the Edit button or the Reply button on the Post Details page.
Notice that the title for the topic is the same as the title for the piece of content being discussed.
Use the Add a Reply page (EPPDF_REPLY_TOPIC) to respond to a discussion.
Navigation:
Click the Reply button on the Post Details page.
Discussion Page
Use the Discussion page (EPPDF_REPLY_TOPIC) to enter or edit a discussion topic.
Navigation:
Click a folder title link and click an appropriate Properties link.
Click the Start Discussion link on the Content Properties page.
Click the Yes-Save and Start button and click the Edit button.
This example illustrates the fields and controls on the Discussion page.

Use the Discussion page to edit a discussion topic. A discussion for a content item contains only one topic, but it can contain one or more replies.
After you post a discussion, click the Content Properties link; the Start Discussion link is now a View Discussions link.
Tags for Content Management appear on the properties pages as well as the view page for the content. However, some types of content—such as attachments and URLs—open the content in a new window without using the application view page. In these instances, tags are only available on the properties page. Application pages appear only in edit or view mode.
To create and use tags for Content Management:
Access the pages either by:
Selecting
Selecting
Select any content item.
Click an appropriate link to view, edit, or add tag.
Enter the tag name, and click the Update Tags button.
Note: Security considerations: Users that have access to the content must have the add and view tag permissions. Users that are assigned the Administrator, Author, or Expert roles also are assigned the modify permissions. All users have access to delete their own tags, both public and private. User with Admin privileges can delete all tags in the content, and an Admin user cannot delete the Private tags of other users.
Use the My Managed Content Status page (EPPCM_STAT_MAIN) to view, at a glance, the work that you need to perform based on the status of managed content.
Navigation:
Content Management, Managed Content, My Content Status
This example illustrates the fields and controls on the My Managed Content Status page. You can find definitions for the fields and controls later on this page.
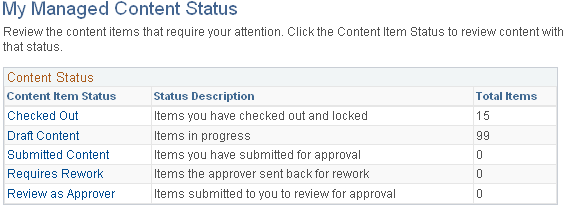
The My Managed Content Status page and the My Managed Content page enable you to see, at a glance, the work that you need to perform based on the status of managed content.
Field or Control |
Description |
|---|---|
Content Item Status |
Click an appropriate link to access the My Managed Content page, where you can preview the content items for the selected status, view their property details, or add new content. |
Note: PeopleSoft Interaction Hub provides a My Managed Content homepage pagelet that gives you easy access to the content items that require your attention.