 Action Items Overview
This chapter gives you an overview of working with action items and discusses:
Managing action item lists
Managing action items
Creating an action item
Administering action items
Publishing action item lists
Reviewing action items
Action Items Overview
The Action Items feature enables users to create and track action items, as well as collaborate with other users using the feature. Action items are assignments or tasks that are assigned to people across groups and require some sort of activity, monitoring, or event to take place before they can be considered complete. Items can be tracked through summary homepage pagelets, through inquiry pages, as well as through email notification and calendar entries.
These items are organized into groups called action item lists. An action item list is a set of action items. Action items appear in the list as a flat view, with no nested hierarchy. Security privileges for users and for roles are defined based on the list membership.
The Action Items feature can be accessed through portals, sites, and workspaces.
Understanding the Tasks Pagelet
The Tasks pagelet is a delivered pagelet that displays a consolidated list of all of your action items and tasks based on the preferences that you specify for the pagelet. The Tasks pagelet and related pages provide you with access to personal tasks, worklist tasks, and action items that are assigned to you. Personal tasks are those you add to your task list using the Task Details page. Worklist tasks are those tasks that have been routed to you by way of PeopleSoft Workflow. Action items are those assignments or actionable items that are related to an action items list.
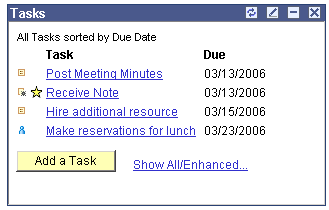
Tasks pagelet
See Working With the Tasks Pagelet.
Understanding the Action Items Pagelet
The pagelet that you publish from the Action Items component can be created to meet the needs of your project or department and can be published to sites and portals. Access to the items in the pagelet is based on list membership.
Generally, only users who have access to see the list will have access to the Action Items List pagelet and to the individual action items themselves. There may be incidences when a user is assigned to an action item, but does not have permission to view the list. In that case, the assigned user has access to the action item only, and not the list.
Note. Action Items pagelets can be published in Pagelet Wizard using the Action Items data type, as well.
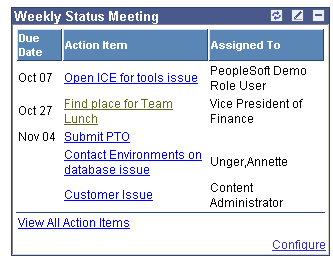
Pagelet published from the Action Items component
Understanding Upcoming Action Items in Workspaces
Workspace action items lists appear for all workspace members as Upcoming Action Items if action items have been enabled in step 4 of the Workspace Wizard or if they have been selected on the workspace Modules page.
See Step 4: Selecting Collaborative Workspace Modules.
A consolidated list of all action items that are associated with the workspace appears in the pagelet. To view all of the lists associated with the workspace, click the View All Action Item Lists and the system displays the Action Items page. The Action Items page is also available from the Action Items menu item.
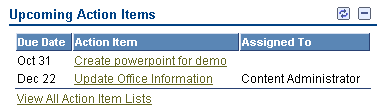
Upcoming Action Items
Managing Action Item Lists
This section discusses managing action item lists and how to:
Use the Action Items page
Add action item lists
Assign action item list participants and privileges
 Pages Used to Manage Action Item Lists
|
Page Name |
Object Name |
Navigation |
Usage |
|
Action Items |
EPPAI_BROWSE |
My Content, My Action Items. In Workspaces, click Action Items in the left navigation or click View All Action Items link in Upcoming Action Items. |
View and Manage action item lists and associated action items that you have access to. |
|
List Properties |
EPPAI_LIST_INFO |
Click the Add List button on the Action Items page. Click the Properties link on the Action Items page. |
View or define the Action Items List and notification properties. |
|
List Security |
EPPAI_LIST_PRIV |
Click the Add List button on the Action Items page and select List Security. Click the Properties link on the Action Items page and select List Security. Select Portal Administration, Administer Action Items, Privileges link. |
Assign privilege sets to members of the list. |
Using the Action Items Page
Access the Action Items page.
Use the Action Items page to browse through the lists of action items that you are associated with. If you have permission to create an action items list, the Add List button appears on the page.
If you are the administrator of the list, the Properties link is available and you can edit the list properties and security. The Delete button is available only to administrators, as well.
If you have created lists that have been set to a status of Inactive, the system displays a lookup on the page the enables you to display either all active lists that you have created or all inactive lists.
|
Add List |
Click to create a new action items list. Note. This button appears only for those users who have Create List privileges. |
|
Search |
Click to access the Search Action Items page where you can retrieve action items based on the search criteria that you enter. |
|
List ID |
The system-generated number assigned to the list. |
|
Title |
Click the list title to view the individual action items that are associated with the list. |
|
Properties |
Click to view the List Properties page where you can make modifications to the list. Note. This button appears only for those users who have Edit List privileges. |
|
Delete |
Click to delete the list. Note. This button appears only for those users who have Delete List privileges. |
Adding Action Item Lists
Access the List Properties page.
The breadcrumbs displayed across the top of the page reflect the path used to access the list and can be used to navigate back to the Action Items page
|
Title |
The name of the list. |
|
List ID |
The system generates and displays a unique number to identify the list. |
|
Created By |
The system displays the user ID and profile of the list creator. Click the link to display the member's profile page. If Resource Finder is enabled, the system displays the Resource Finder profile. |
|
Active |
Select this option to make the list active and have the list appear in the portal or site. If this option is not selected, the list will not be available to users. |
|
Action Item Notification Type |
Specify how email notifications should be sent to members of the list any time an action item associated with the list is changed or created and saved. The text of the email describes any changes made to the action item and contains a link back to the Action Items page. Available options are:
|
|
Return |
Displays the Action Items page. |
|
Publish as Pagelet |
Displays the Publish Pagelet Wizard Definition page where you can publish the pagelet to the homepage. |
Assigning Action Item List Participants and Privileges
Access the List Security page.
Use this page to assign privilege sets for different groups of users. Members and privilege sets are assigned at the action item list level. Privilege sets maintain security for accessing and managing action item lists as well as viewing, editing, and deleting action items.
Note. If a user who does not have security access to the list is assigned an action item from that list, they will be able to view the Action Item Details page, but they will not have access to the list.
|
Member Type |
Select the type of participant you want to add to the action item list. Available values include: Role. Select to be able to select a role in the Member Name field. Available group names are derived from PeopleSoft roles defined in the Roles component. See Enterprise PeopleTools 8.48 PeopleBook: Security Administration, “Setting Up Roles” User. Select to be able to select a user in the Member Name field. Available users are derived from PeopleSoft users defined in the User Profiles component. See Enterprise PeopleTools 8.48 PeopleBook: Security Administration, “Administering User Profiles” |
|
Member Name |
The name of the member as defined in the Roles component or the list of users from the User Profiles component. |
|
Privilege Set ID |
Select a privilege level you want to assign to the member. Delivered values are: Administrator. Administrators can add, edit, or delete action items, and action items lists. In addition, they can add and delete list members. Contributor. Contributors can add or edit action items. They can delete their own action items, but not those belonging to others. Viewer. Viewers have read-only access to the action items. |
|
|
Click to view additional information about the actions that the privilege set enables the member to use. |
Managing Action Items
This section discusses adding an action item to the action items list.
Page Used to Manage Action Items
|
Page Name |
Object Name |
Navigation |
Usage |
|
Action Items |
EPPAI_BROWSE |
My Content, My Action Items |
Use to view your action items. |
|
Action Items Detail |
EPPAI_ITEM_INFO |
Click the Add Item button on the Action Items page. |
Add action items to the list. |
Adding Action Items to the List
Access the Action Items page.
|
Add Item |
Click to access the Action Item Details page where you can create a new action item. |
|
Search |
Click to access the Search Action Items page where you can retrieve action items based on the search criteria that you enter. |
|
Status |
Select the state or condition of the action items you want to select as your filter criteria. |
|
Category |
Select an action item category to use as filter criteria. |
|
Filter |
Click the Filter button to retrieve your filtered results. |
|
Item ID |
The identifier that the system assigned to the action item. |
|
Title |
Click the list title to display the Action Item Details page and view the details of the action item. |
|
Priority |
The assigned relative importance of the action item |
|
Status |
The state or condition of the action item. |
|
Modified Date |
The date that the action item was last modified. |
|
Due Date |
The date that the action item is scheduled to be completed. |
|
Delete |
Click to delete the action item. Note. This button appears only if you have delete privileges. |
Creating an Action Item
Access the Action Items Details page.
The breadcrumbs displayed across the top of the page are generated according to the path used to access the current content. You can select the active breadcrumbs to navigate through the path you used to access the current item. For example, selecting the Top link will take you back to the Action Items page that displays all of your lists. The second level link will take you to the Action Items page that displays all of the action item in the list.
If you do not have privileges to access the items in any of the breadcrumbs, the links in the breadcrumbs will not be active. You may have access to the Action Items Details page if you are assigned the action item, but if you aren't a member of the list the item belongs to, you will not be able to use the breadcrumbs to navigate to the Action Items list.
|
Title |
Enter the title for the action item. |
|
Item ID |
The system generates and displays a unique number to identify the action item. |
|
Description |
Enter a description of the task or activity that needs to take place. |
|
Status |
Select a value for the status of the action item. Note. Cancelled or completed action items will not appear in the pagelet. They do appear Action Items browse page, the Review Action Items page, and in the Tasks pagelet if you select the filter All rather than Open. |
|
Priority |
Select a priority for the action item. |
|
Assigned To |
Select an assignee from the list of all users in the system. Initially, the Lookup page displays all users, with list members appearing at the top of the list. To find only members of the list, select User Type in the Search By drop-down and then select Member Users or All Users in the second drop-down list box. Note. You must have edit privileges to be able to assign an action item to a user. After you select an assignee, their profile name appears next to the Assigned To field. You can click the profile name to view the profile page and start a messaging session or send email if the options are set up. |
|
|
Click the icon to search for a profile using Resource Finder. This option is available only if you have enabled Resource Finder profile searches on the Installation Options page. |
|
Due Date |
Select a date from the calendar. Items are displayed in order of their due dates. Note. Action items must have an assigned due date to appear in the Upcoming Action Items pagelet in Workspaces. |
|
List ID |
The identification number of the current list appears in this field. If you have edit privileges, you can move the action item to another list by selecting another ID from the action item lists that you have access to. An action item can only be associated with one list only. |
|
Category |
Select a category from the drop-down list box or enter a new one. When you save the page, the new category will be saved to the list of categories and is available across sites and lists. |
|
Progress Remarks: |
Use the HTML text editor to enter comments and updates regarding the action item. See Common Elements Used in Enterprise Portal Collaboration. |
|
Completed By |
Select the ID of the person who completed the action item. The system automatically defaults to the user ID and profile of the person who changes the Status field to Completed. |
|
Complete Date |
Select the date that the action item is completed. The system automatically defaults to the date that the Status field is changed to Complete. |
Attachments
Use this section of the page to add attachments to the action item, if necessary. Attachment types include file attachments that you upload and store in Content Management and managed content that use an existing Content Management file.
|
Attachment Type |
Select the type of attachment you want to include in your posting. Available values include: File Attachment. Select to attach a file from a directory that is accessible from the machine on which you are working. Managed Content. Select to import a piece of managed content. |
|
Add Attachment |
If you have selected the File Attachment attachment type, click to access a page that enables you to browse directories for the file you want to attach. |
|
Select Content |
If you have selected the Managed Content attachment type, click to access the Look Up Content ID page, where you can select the piece of managed content you want to attach. |
Other Action Items Features
|
Change Log |
Click to view the log of changes made to this action item. |
|
Notify |
Click to send a notification. |
|
Start Discussion orView Discussion |
Click to start or view a discussion related to the action item. |
|
Add to Personal Calendar |
Click to add the action item to your personal calendar. |
Sending Notifications
Access the Action Items Notification page.
Use the Action Item Notification page to send messages to users associated with the action item. Notifications can originate because notifications have been enabled for the list on the List Properties page or they can originate as ad hoc notifications after the user has selected the Notify link.
If you send a notification to a user who does not have access to the workspace, the link to the Action Items Detail page will be opened in the main portal, but the navigational breadcrumbs at the top of the page will not be available.
Include in 'To' List
Select the people you want to receive the notification. Selecting any of these options will populate the To field with the corresponding users from the list. If you select more than one option, the entries will not overwrite each other. Additionally, you can manually enter email addresses in the To: field.
Note. Addresses for the Cc: and Bcc: fields must be manually entered or copied and pasted from the To: field.
|
All Members |
Sends the notification to all members of the list. |
|
Assignee |
Sends the notification to the person that the action item has been assigned to. |
|
Creator |
Sends the notification to the person who created the action item. |
|
Me |
Sends the notification to you. |
|
Add Selected to Email |
Populates the To field with names of those people you have selected to receive the notification. |
Use this section of the page to enter additional address information as well as the text of the notification. The system displays the title of the action item as the subject of the notification.
|
Message |
When sending an ad hoc notification, type the text of the message in this text box. The text appears in the email message along with a URL to the Action Item Detail page. When the notification is created because notifications have been enabled on the List Properties page, the system populates the message text box with information stating who modified the item and what they changed. You can add any additional information by typing it after the system-generated text. |
|
Send |
Click to send the email notification. |
Viewing a Notification
Access the notification in your default email application.
The message text from the notification appears along with a URL to display the action item. Notifications that are sent because they have been enabled on the List Properties page will contain additional information in the body of the email such as status changes and the user ID of the person making the modification.
Starting a Discussion from an Action Item
Access the Post Details page.
The Post Details page starts a discussion forum based on this action item. Participants can post discussion topics, such as issues and suggestions, and receive replies and feedback. This feature enables multiple relevant individuals to contribute to the review and resolution of issues related to the action item. If there is already a forum started for this item, the link on the Action Item Details page will display as View Discussion.
You can select the active breadcrumbs to navigate back to the Action Item Details page. Discussions started from an action item will not appear in the Discussion Forum pagelet.
Adding Action Items to Your Calendar
Depending on the options defined in the Installation Options page, the system can either create a calendar event that you can save to your default calendar application or it can send you an email that you can add to your calendar. The remarks appear in the body of the calendar event and the title field is the subject of the calendar event.
Searching within Action Items
Access the Search Action Items page.
The Search Action Items page returns items that you have access to.
|
Search Text |
Enter the text query in the Search Text field. |
|
Search Tips |
Click Search Tips to get more information about searching action items. |
|
Search In |
Select a location to search for action items. Available options are:
|
Viewing the Action Items Change Log
Access the Action Items Change Log page.
The Action Items Change Log enables you to see all changes associated with the action item, who made the change, and when they made it. Use this page for auditing action items usage.
Administering Action Items
This section discusses how to administer action items.
Page Used to Administer Action Items
|
Page Name |
Object Name |
Navigation |
Usage |
|
Action Items Administration |
EPPAI_ADMIN |
Portal Administration, Administer Action Items |
Manage action items and user privileges. |
|
Edit Privileges |
EPPAI_LIST_PRIV |
Click the Privilegesbutton on the Action Items Administration page. |
Manage privileges for users of action items. |
Administering Action Items
Access the Action Items Administration page.
|
Display Lists with Items Older Than |
Select a date to find items that were created before the date you specify. |
|
Display Lists Created By |
Select a user ID to return all lists that the user has created. |
|
Display Lists Administered By |
Select a user ID to return all lists where the user is an administrator. |
|
Status |
Select to search for Active and Inactive lists. |
|
Filter |
Click this button to view the search results. |
|
Reset |
Click to clear the filter criteria. |
|
List ID |
The system displays the ID of the action items list. |
|
Title |
Click the title of the list to view the Action Items page and view and edit the action items associated with the list. Note. Titles will not be active unless you have security access to the list. |
|
Privileges |
Select the Privileges link to access the Edit Privileges page. |
Deleting Action Items
Select the checkbox to the left of each List ID to identify the action item lists you want to delete. Click the Delete button.
You can also use the Select All and Clear All links to select or deselect the lists.
Changing Privileges on Action Items
Access the Edit Privileges page.
|
Member Type |
Select the type of participant you want to add to the list. Available values include: Role. Select to be able to select a role in the Member Name field. Available group names are derived from PeopleSoft roles defined in the Roles component. See Enterprise PeopleTools 8.48 PeopleBook: Security Administration, “Setting Up Roles” User. Select to be able to select a user in the Member Name field. Available users are derived from PeopleSoft users defined in the User Profiles component. See Enterprise PeopleTools 8.48 PeopleBook: Security Administration, “Administering User Profiles” |
|
Member Name |
The name of the member as defined in the Roles component or the list of users from the User Profiles component. |
|
Privilege Set ID |
Select a privilege level you want to assign to the member. Delivered values are: Administrator. Administrators can add, edit, or delete action items, and action items lists. In addition, they can add and delete list members. Contributor. Contributors can add or edit action items. They can delete their own action items, but not those belonging to others. Viewer. Viewers have read-only access to the action items. |
|
|
Click to view additional information about the actions that the privilege set enables the member to use. |
Publishing Action Item Lists
This section discusses:
Publishing action items from the action items component
Editing a published pagelet
Publishing action items from Pagelet Wizard
Pages Used to Publish Action Items
|
Page Name |
Object Name |
Navigation |
Usage |
|
Publish Pagelet Wizard Definition |
EPPPB_PGLT_PUB |
Click the Add Pagelet button on the Publish as Pagelet page. Click the Publish as Pagelet link on the List Properties page. |
Publish an Action Items pagelet to a site or portal. |
|
Publish as Pagelet |
EPPPB_PGLT_LST |
Click the Add Pagelet button on the Publish as Pagelet page. Click the Publish as Pagelet link on the List Properties page. |
Publish the Action Items pagelet. |
|
Pagelet Wizard |
PTPPB_WIZ_INFO |
Portal Administration, Pagelets, Pagelet Wizard |
Create and publish an Action Items pagelet. |
See Also
Using Pagelet Wizard with PeopleSoft Enterprise Portal
Publishing Action Items from the Action Items Component
Access the Publish Pagelet Wizard Definition page.
Pagelet
The pagelet title and description from the List Properties page appear in the Pagelet group box. You may edit these two fields, if necessary.
|
Pagelet Folder |
Select a folder to publish to. Only folders from the current site are available to select. |
|
Pagelet Security |
Select the security options for viewing the pagelet. Available options are: Publish as Public, which enables all users to view the pagelet. Publish with Security Roles, which uses the roles defined on the List Security page when publishing the pagelet. Note. If there are no roles defined on the List Security page, the system automatically selects to publish the pagelet as Public. |
Homepage Tabs
Use this group box to define the homepage tab labels and behavior for the pagelet.
|
Homepage Tab |
Select the tabs that will display the pagelet. |
|
Pagelet Behavior |
Select the behavior options for the pagelet. Optional. The pagelet will not automatically appear on the homepage. However, it is available for selection when users personalize their homepages. This setting should not be used for guest homepage pagelets because guest users do not have personalization privileges. Optional-Default (optional-default). The pagelet will appear on all user homepages if they have access to the pagelet. The pagelet can be removed when users personalize their homepage. This setting should not be used for guest homepage pagelets because guest users do not have personalization privileges. Required-Fixed (required-fixed). The pagelet will appear on all user homepages if they have access to the pagelet. The placement of the pagelet cannot be changed and the pagelet cannot be removed from the homepage. Required. The pagelet will appear on all user homepages if they have access to the pagelet. The placement of the pagelet can be changed, but it cannot be removed from the homepage. |
|
Publish |
Click the Publish button to display the Publish as Pagelet page, where you can review or edit the pagelet definition |
Editing a Published Pagelet
Access the Publish as Pagelet page.
Review, edit, or add Pagelet Wizard pagelet definitions using this page. To edit a pagelet definition, it must marked as published and have a content reference in the current site.
Pagelets published from Pagelet Wizard will appear in this list.
|
Edit |
Displays the Publish Pagelet Wizard Definition page where you can make changes to the pagelet. |
|
Delete |
Deletes the Pagelet Wizard definition and the published pagelet content references in all sites. |
|
Add Pagelet |
Adds a new Pagelet Wizard definition based on the current action item list. |
Publishing Action Items from Pagelet Wizard
Action Items pagelets can be created and published using Pagelet Wizard and then managed in the My Action Items component.
To publish an action item list from Pagelet Wizard, select the Action Items data type and an existing action items list as a data source in step 2 of Pagelet Wizard.
See Also
Selecting the Action Items Data Source
Reviewing Action Items
This section discusses reviewing action items.
Page Used to Review Action Items
|
Page Name |
Object Name |
Navigation |
Usage |
|
Review Action Items |
EPPAI_INQUIRY |
My Content, Review Action Items |
View action items that you are associated with and drill down to the Action Items Details page. |
Searching for and Viewing Action Items
Access the Review Action Items page.
Use the Review Action Items page to search for all action items that you have access to. The search includes your action items in all portals, sites, and workspaces.
Filters
Select any combination of the available search filters to narrow your search for action items. Available values are List ID, Assigned To, Status, and Category. Click the Refresh button to execute the search.
Main
This tab displays the basic information from the Action Items Details page. Click the title of the action item to view the Action Items Detail page.
Additional Information
This tab shows the description of the items including the portal name as well as the targeted completion date and the user ID and timestamp of the most recent modification to the item.
Creating an Action Items Report Using Excel
Use the Download icon on the Review Action items page to download grid data to a Microsoft Excel spreadsheet. To download grid data:
Click the Download button in the grid's navigation bar.
A new browser window opens, showing the data in a spreadsheet-like format.
Select File, Save As and save the data as a Microsoft Excel (.xls) file.