 Understanding Biographical Information
This chapter provides an overview of biographical information, lists prerequisites, and discusses how to:
Manage names data.
Manage addresses and phones data.
Manage personal attributes information.
Manage FERPA privacy controls.
Manage relationships data.
Enter emergency contact data.
Track work experience.
Understanding Biographical InformationPersonal information is personal data that distinguishes one individual from another. The most basic of this information is a person's biographical data, which includes name, address, gender, marital status, and date of birth.
When you manage many individuals in a database, you want to know and quickly access more than the basic information about them. With the personal information data pages, you can also enter and track an individual's various telephone numbers and addresses (street, email, and uniform resource locator [URL]), and you can maintain data about the individual's ethnicity, visa and permits, citizenship and passports, languages, relationships, religious preference, emergency contacts, and work experience.
You can enter and maintain different name types for an individual. With effective dating, you can also maintain and review the history of name changes for each type. For example, when the divorced Mrs. Edith Jones advises your institution that she has remarried and changed her last name to Bramowitz, you can maintain her preferred name, Edith Bramowitz; her former name, Edith Jones; and her maiden name, Edith Brown. Departments that need to know when these name changes occurred can determine that by reviewing the history of each name type.
You can also enter and maintain different address types for an individual. For example, you might want to enter an individual's home, business, mailing, and permanent address. You can update these addresses as needed and maintain the address change history. In addition to traditional addresses, many individuals have at least one email or web address and several telephone numbers. You can enter and review electronic addresses and phone numbers in your system. After you enter addresses data, you can run processes to apply or remove seasonal addresses, update linked addresses, and search for a specific address for an individual.
Use the pages described in this chapter to report personal attributes, including the ethnicity of students, staff, and constituents in your campus community. The United States government requires that students must be placed in at least one of a limited number of ethnic groups.
You can identify the reciprocal individual relationships that your institution wants to track. Reciprocal relationships include spouses, mother and daughter or mother and son, brother and brother or brother and sister, employer and employee, and so on.
You can use reciprocal relationships to associate an individual in your database with another individual inside or outside of your database. When you associate two individuals, you can set up joint communications for them and maintain one joint address to which to send the joint communication. For example, you can set up a joint communication addressed to Mr. and Mrs. Smith.
You can set the system to automatically verify the marital status that you enter on the Biographical Details Data page against the relationship that you select on the Relationships page. To set automatic marital status verification, select the marital status and associated relationship on the Relationship/Marital Status page that you want the system to verify. If the verification determines that the marital status of either individual is not the specified status for that relationship, a warning message appears, suggesting that you update the marital status on the Biographical Details page. For example, if you set the marital status of Married and the relationship of Spouseon the Relationships/Marital Status page, when you select the relationship of Spouse on the Relationships page, the system verifies that the marital status of each individual on the Biographical Details page is Married. If the marital status of either individual is different from Married, the system displays the warning message.
Note. Some default values for relationships are set on the Installation Defaults -- Campus Community page including reciprocal relationships. When the Create Reciprocal Relationship check box is selected on the Installation Default - CC page, the system automatically updates the relationship record for both IDs when you enter and save information on pages in the Relationship component.
You can track which languages an individual can read, speak, or write and to what degree of proficiency. You can also identify the religious preference, if any, reported by an individual and track the religious preferences of your overall campus community. You can also set preferences for the language and method by which an individual wants to receive communications from your institution.
You can enter the names, addresses, and telephone numbers of people to contact when an individual has an emergency situation. You can enter as many contacts and as many phone numbers for each contact as the individual provides or as your institution requires.
You can use U.S. Standard Industry Classification (SIC) and Standard Occupational Classification (SOC) codes to identify and track data about an individual's work experience, including the name of the individual's former employer, employment begin and end dates, and the most current rate of pay.
You can enter or update most basic biographical data about an individual on the Biographical Details page when you create the personal record, or you can access pages described in this section to edit or update specific information. When you save information on the pages described in this section, the system writes it to the relevant maintenance tables and updates the same information on other pages where it appears, including the Biographical Details page. Detailed information about using the Biographical Details page to add or update a person is provided in the Adding a Person in PeopleSoft Enterprise Campus Solutions section of this PeopleBook.
When you license PeopleSoft Enterprise Campus Self Service, you can also present basic biographical information to students and faculty so that they can view and update their own information, which minimizes the need for your staff to enter and maintain the data.
See Also
Adding a Person to Your Campus Solutions Database
Using Self-Service Campus Personal Information
Prerequisites
Before entering or updating basic biographical data, you must design and set up names, addresses, and other foundational elements of Campus Community. You must also set up basic elements for personal data management.
See Also
Setting Up Emergency Contacts Data
Managing Names DataThis section discusses how to:
Enter name types for an individual.
View name history.
(NLD) Enter the name to report for GBA.
 Pages Used to Manage Names Data
|
Page Name |
Object Name |
Navigation |
Usage |
|
SCC_NAMES_89 |
|
View or create name types and data for an individual. |
|
|
SCC_NAME_HIST_SEC |
Click the Name History link for a name type on an individual's Names page. |
View the history of an individual's name type and update or add a new effective date for that name type. |
|
|
SSR_NAMES_NLD |
|
Enter an individual's name to report for GBA. |
Entering Name Types for an IndividualAccess the Names page.
Warning! You must click Submit to submit data that you enter on the Names page before you save the page. Saving the page without first submitting the data will clear the fields for which you entered values and data will be lost.
Current Names
|
Name Type |
Displays the individual's current name types as links. Click the link to view or update data for an existing name type. The system displays the associated data in the relevant fields. The system displays the name format with the name fields previously entered for this name type and the Display Name, Formal Name, and Name fields at the bottom of the page, where you can add a new past or future effective-dated row for the name type. |
|
Name |
Displays the individual's name as it appears in the default display name format for the selected name type. |
|
Name History |
Click to access the Name Type History page, on which you can view the history of the name type. To update the current name type for the individual, click the Name History link, add a new name row, specify the effective date and name format, and edit the related name fields. |
Add/change a name
Use this area of the page to add or edit name information for the Name Type link that you selected at the top of the page.
|
Type of Name |
Select the type of name, such as Primary, Preferred, Legal, or Maiden, to add or update for this individual. Values for this field are set up on the Name Type Table page. |
|
Format Using |
Displays the name format currently used for this name type. |
|
Change Format |
Click to select a different name format to use. Enterable fields appear based on the format that you select. For example, for the English name format, the prefix, first name, middle name, last name, and suffix fields appear. See Defining Name Usages. |
|
Display Name, Formal Name, and Name |
Displays the name formats to use throughout the system. Display Name is the format to use in the heading of person pages. Formal Name contains the individual's first name and last name with prefix. Name displays the name as LastName, Suffix, comma, First Name, Middle Name. |
|
|
Click to update the display name formats to reflect any changes made in any of the name fields. |
|
Submit |
Click to submit data before saving the page. Submitting the data changes the data in the Current Names area so that you can view the changes, and clears all fields in the Add/change a name area. To save the changes to the database, you must click Save. |
|
Reset |
Click to clear all fields in the Add/change a Name area, which enables you to re-enter field values. |
Viewing Name HistoryAccess the Name Type History page.
The system displays the history of the selected name type. You can view or add data as permitted by the mode (add, update/display, include history, or correct history) that you select.
(NLD) Entering the Name to Report for GBA
Access the Names page.
Enter the individual's name to report for GBA.
See Managing GBA Data.
Managing Addresses and Phone DataThis section provides an overview of managing addresses, lists prerequisites, and discusses how to:
Enter addresses for an individual.
Link addresses.
Enter electronic address data.
Enter seasonal addresses.
Process seasonal addresses.
Update linked addresses.
Search for addresses.
Enter phone data.
Understanding Address ManagementSome of your faculty or constituents might routinely relocate and work from a different address. For example, a student might go to his family's ski lodge every winter break or a staff member might volunteer out of state each summer. Using the Seasonal Addresses feature, you can track temporary addresses to stay in contact with individuals while they are away. You enter the individual's seasonal address data with the appropriate begin and end dates. Then you run the seasonal addresses process to apply or remove the address, based on the begin and end dates. You can run the process to apply the seasonal address for a specific individual or you can run it to apply or remove all seasonal addresses between certain start and end dates.
When you update an address for a campus location or organization, the campus location or organization address for individuals linked to that location or organization are not changed in your database until you run the Update Linked Addresses process. When you run the process, the system locates all the individuals with whom that campus location or organization is linked and updates the changed address there as well. For example, when you change an organization's address and run the Update Linked Addresses process, the system locates each of the individuals who are linked to that organization and changes the organization's address.
You can search for addresses for individuals. You can search on address usage, email type, or address type. For example, if you want to send an email message to an individual at his dorm, you can search on the email type of Dormitory. If you need to send a billing notice, you can search on the address type of Billing or search on the address usage of Billing. However, if no address type of Billing exists for the individual, you will get no results. If your institution has assigned address usages, use one of the address usage search orders (in this case, Billing, Mailing, Home, Permanent) to have the system search for and find the first appropriate address.
Note. The system searches only on active addresses.
You can view a list of all addresses in your system for an individual, which includes all address types that have been entered for the individual. It also includes the individual's current addresses, any previous addresses that are now inactive, and any addresses that are set to become active in the future.
Prerequisites
Before managing seasonal or linked addresses or before searching for addresses in your system, enter addresses and address types for the individual.
See Also
Entering Addresses for an Individual
Entering Electronic Address Data
Pages Used to Manage Addresses|
Page Name |
Object Name |
Navigation |
Usage |
|
SCC_BIO_DEMO_ADDR |
|
Enter or review an individual's address types and data. |
|
|
SCC_ADDR_HIST_SEC |
Click the Edit/View Address Detail link for an address type in the Current Addresses area of the Addresses page. |
View the history of a specific address type for an individual. |
|
|
EO_ADDR_XXX_SEC (where XXX = the country code) |
|
If you access the Edit Address page by clicking Edit Address, enter address data for the specified address type. If you access the Edit Address page by clicking Update Addresses, edit or update any address data associated with the individual. |
|
|
E_ADDR_PERS |
|
Enter or review an individual's email address and URL data. |
|
|
CC_ADDR_SEASONAL |
Campus Community, Personal Information, Biographical, Addresses, Seasonal Address |
Enter a seasonal address for an individual. |
|
|
RUNCTL_SEASNL_ADDR |
Campus Community, Personal Information, Biodemo Processes, Apply Seasonal Addresses |
Run the process to apply or remove the designation of Seasonal Address to specified addresses in the Current Addresses area of the Addresses and Address History pages. |
|
|
SCC_ADDRSA_LNK_SEC |
Click the Address Linkagelink in the Edit Address area of the Addresses page or the Address History page. |
Link an address type to the location of a campus or an organization. |
|
|
RUNCTL_CCADDLINK |
Campus Community, Biodemo Processes, Update Linked Addresses |
Run the process to update linked addresses throughout your system. |
|
|
ADDRESS_SRCH |
|
Search for a specific address for an individual. |
|
|
PHONE_PERS |
Campus Community, Personal Information, Biographical, Addresses, Phones |
Enter or review an individual's telephone numbers. |
Entering Addresses for an IndividualAccess the Addresses page.
Information that you enter here is the same as the address data that you enter on the Biographical Details page when you create a personal record. When you save the data (either there or here), the system updates the address data in both places.
See Adding or Updating Biographical Details Data.
Current Addresses
If the individual has current addresses in the database, this area of the page shows the current address types and the associated data. If the individual does not have a current address, the text No current addresses exist appears instead.
|
Address Type |
Displays the individual's current address types as links. Click the link to view or update data for the address type. The system displays values for the current address in the relevant fields. Displaying the address data enables you to copy it from one address type to another. |
|
Edit/View Address Detail |
Click to access the Address History page, on which you can view the history of the address type. To update the current address type for the individual, click the Edit/View Address Detail link, add a new address row, specify the effective date and address format, and edit the related fields. |
Add Address
|
Effective Date |
Enter the date on which the address is active. Enter addresses in the chronological order of their effective dates. Enter the earliest dated address first and the future-most dated address last. |
|
Country |
Enter the country code for the address format to use for the individual. The system displays the fields required for that country as defined on the Country Table - Address Format page. |
|
Edit Address |
Click to access the Edit Address page, on which you can enter new address data in the specified format. |
|
Address Linkage |
Click to access the Address Linkage page, on which you can link an address type to a campus location or organization location. |
A particular address often applies to more than one address type for an individual. For example, an individual's dormitory, campus, and billing addresses might be the same.
To copy the address, effective date, and status from one address type to other address types, select the address types to which to assign the data, click Submit, and then click Save.
|
Address Type |
Click the current address type such asDormitory, Campus or Billing, to copy. The system displays the associated address data beneath the Edit Address link in the Add Address area of the page. To make changes to the data, click Edit address and make the changes. |
|
|
Indicates that the address type exists and that it has a current or future-dated address with a status of Active. Be sure that you want to add a new effective-dated row to the existing data before selecting the address type. |
|
Explain |
Click to display an explanation of the marks that indicate the successful or unsuccessful creation of an address type. Note. A green check mark indicates the successful creation of an address type. A red X appears if you try to create an address type that causes effective dates to become out of sync for a specific address type. For example, a red X appears if the address type that you are adding already has an existing duplicate effective date, or when an earlier effective-dated address currently exists for the address type. |
|
Submit |
To copy the address data to each of the selected address types, click Submit. A green check mark appears next to each address type to which the data is successfully copied and the new or updated addresses appear in the Current Address area of the page. The addresses are not written to the Addresses Table until you click Save. Note. When you create multiple address types from one source address, you can have a mixture of successful and unsuccessful outcomes (green check mark or red X respectively). The data only from successful outcomes appear in the Current Address area. |
|
Edit/View Address Detail |
Click to access the Address History page, on which you can change the effective date and status for any newly submitted address and address type before you save it. You can also add a new effective-dated row for the selected address type. |
|
Reset |
Click to clear address information in the Add Address and Add Address Type areas. Doing so enables you to enter different data, either manually or by clicking the Address Type link to copy address data from a current address. |
Linking AddressesAccess the Address Linkage page.
This page enables you to specify the addresses to link. It also enables you to set linked data to manual maintenance so that the Update Linked Addresses process (or any other automatic update process) will bypass the information.
Organization
Enter information to identify the organization address to which you want to link.
Location
Enter information to identify the location address to which you want to link.
|
Location Address and Type |
Enter the location address and specify the address type to which to link. |
|
Data and Print Line |
Enter address data to print for this location and specify on which address line to print it. |
Maintain Manually
|
Maintain Address Manually |
Select to maintain the address manually and have the system bypass it in the update linked addresses process or other automatic update processes. |
|
Maintain Other Data Manually |
Select to maintain other data (from Location or Organization page areas) manually and have the system bypass it in the update linked addresses process or other automatic update processes. |
Entering Electronic Address DataAccess the Electronic Addresses page.
Note. Information that you enter here is the same as the email address data that you enter from the Biographical Details page when you create a personal record. When you save data here, the system updates the same email address data on the Biographical Details page.
See Adding a Person to Your Campus Solutions Database.
Email Information
|
Email Type |
Select the type, such as Home, Business, or Mailing, that describes this email address. Values for this field are delivered with your system as translate values. You can modify these translate values. |
|
Email Address |
Enter the individual's email address. |
|
Preferred |
Select to indicate the individual's preferred email address, which is the one to use first when contacting this individual. You may select only one preferred email address for an individual. |
URL Information
|
Type |
Select the type, such as Home, Business, or Mailing) that describes this electronic address or URL. |
|
URL Address |
Enter the individual's URL or home page address. |
Entering Seasonal AddressesAccess the Seasonal Addresses page.
|
Address Type |
Select the type of address that is seasonal for this individual. Only the address types for which the individual has data are available. |
|
Start Date |
Indicate the date when the seasonal address begins to apply. |
|
End Date |
Indicate the date when the seasonal address ceases to apply. When the end date occurs, the system automatically increases the start and end dates by one year and resets the address for the next year. |
|
Country |
Enter the country formatting to use for this address. When you exit the Country field, the address fields appear in the format for the selected country as defined on the country Address Format page. |
Processing Seasonal AddressesAccess the Process Seasonal Addresses page.
|
Select One ID |
Select this check box to apply or remove seasonal addresses for one individual only. You must specify the individual's ID in the ID field. If you do not choose Select One ID, the system applies or removes seasonal addresses for all IDs for which seasonal address data exists. |
|
Use Start Date Range |
Select this check box to indicate that all seasonal addresses beginning within the specified date range should be applied or removed. |
|
Use End Date Range |
Select this check box to indicate that all seasonal addresses ending within the specified date range should be applied or removed. |
Note. You must enter either a start date range, an end date range, or both. If the individual has multiple seasonal addresses, consider
specifying a date range long enough to include all of them in the search.
If you specify only one date in a range, the system limits the search to seasonal addresses that begin or end, respectively,
on that specific date.
Updating Linked AddressesAccess the Update Linked Addresses page.
|
Location Link |
Select this check box to indicate that the process should update all addresses linked to locations. |
|
Organization Link |
Select this check box to indicate that the process should update all addresses linked to organizations. |
Searching for AddressesAccess the Address Search page
Selection Criteria
|
ID |
Enter the ID of the individual whose address you want to find. |
|
Usage |
Enter the type of address usage or search order for the system to use in the search. All address usages on the Address Usage page are available. |
|
Email Type |
Enter the type of email address, if any, for which the system should search, such as Home, Dorm, or Business. Only the existing email types for this individual are available. If no email data exists for the individual, no email types are available. |
|
Address Type |
Enter the type of street address for which the system should search, such as Home, Dorm, or Business. All address types are available. If no data of that type exists for the individual, no results are returned. |
|
Search |
Click to launch the search. |
Address Data
The system displays the search results in this area.
|
Update Addresses |
Click this link to access the Addresses page on which you can edit or update any address data associated with the individual. |
Entering Phone DataAccess the Phone Numbers page.
Note. Information that you enter here is the same as the phone number data you enter on the Phone Detail page. When you save data here, the system updates the same phone number data on the Phone Detail page.
|
Phone Type |
Select the type, such as Home, Business, or Mailing) that describes this telephone number. Values for this field are delivered with your system as translate values. You can modify these translate values. |
|
Phone Number |
Enter the telephone number, including area code, for this individual. |
|
Extension |
Enter the individual's direct extension, if any. |
|
Country Code |
Enter the country code, if required to complete the call. |
|
Preferred |
Select to indicate that this is the individual's preferred phone number, and the one to use first when contacting this individual. You can select only one preferred phone number for an individual. |
Managing Personal Attributes InformationThis section provides an overview of the personal attribute deceased label, lists prerequisites, and discusses how to:
Enter ethnicity information.
Enter ethnicity percentages.
Enter languages information.
Enter communication preferences
Enter religious preferences.
Enter date of death and other decedent data.
(AUS) Enter student data.
Understanding the Personal Attribute Deceased LabelWhen an individual dies, you should apply the deceased label to all pages about that individual. Then, when users encounter a page with the word DECEASED at the top, they can determine whether to continue or suspend their transactions for that individual.
You can apply the label using either of the following methods. In both methods, when you save the individual's page, the system displays the word DECEASED at the top of the pages.
To display the deceased label and not enter any other decedent data (for example, place of death and death certificate number), assign your institution's deceased service indicator to the decedent. The service indicator sets the deceased label to display. You can use this method regardless of whether you know the individual's date of death.
If you know the individual's date of death, you can enter that date on the Decedent Data page along with other decedent data, and then save the page. You can use this method to apply the deceased label only if you know the date of death.
For example, you might receive confirmation that Gloria is deceased. You want to apply the deceased label to all pages about her as soon as possible to alert users. However, you have not received a copy of the death certificate or official confirmation of her date of death. Because you do not know when she died, you could assign her your institution's deceased service indicator, which is the one that is set to display the deceased label.
You can verify that the label is applied by accessing any page about the decedent. The word DECEASED appears at the top right of the page.
All of the decedent's data remains in your database until your system administrator deletes the decedent's ID.
See Also
Prerequisites
Before you can enter personal attributes data, you must define language codes, and religious preferences codes in your system. Before you can apply and manage FERPA privacy control, you must establish FERPA privacy control fields. Before you can allow students to identify publications for which they release FERPA privacy restrictions, you must set up your institution's publications.
See Also
Setting Up Personal Attributes
Pages Used to Manage Personal Attributes Information|
Page Name |
Object Name |
Navigation |
Usage |
|
ETHNICITY_DETAIL |
Campus Community, Personal Information, Biographical, Personal Attributes, Ethnicity |
Enter or review an individual's ethnicity data. |
|
|
ETHNICITY_SEC |
Click the Ethnicity Detail link for an ethnic group on the Ethnicity page. |
Enter or review an individual's ethnicity detail, including percentages and whether it is the individual's primary ethnicity. |
|
|
SCC_LANGUAGES |
|
Enter and track an individual's language abilities. |
|
|
SCC_COMM_PREF |
Campus Community, Personal Information, Biographical, Personal Attributes, Communication Preferences |
Enter an individual's preferred language and method for receiving communications (applies to communication generated by Comm Gen only). |
|
|
RELIGIOUS_PREF |
|
Enter data to identify an individual's religious preference. |
|
|
SA_DECEASED_DATA |
|
Enter the date of death and other data about the decedent. |
|
|
SSR_STDN_DATA_DEST |
Campus Community, Personal Information, Biographical, Personal Attributes, Student Data AUS |
Enter DEST information regarding a student's prior programs, including values related to TAFE, secondary school, and postgraduate programs. |
Entering Ethnicity InformationAccess the Ethnicity page.
Ethnicity
|
Regulatory Region |
Enter your institution's regulatory region. The regulatory region controls the set of ethnic group values available from the Ethnic Group field. Note. Currently PeopleSoft delivers ethnic group values for Regulatory Region = USA only. See PeopleSoft Enterprise HRMS 9.0 PeopleBook: Administer Workforce,“Setting Up the Administer Workforce Business Process,” Defining Additional Employment Setup Data, Defining Ethnic Groups |
|
Ethnic Group |
Select the ethnicity claimed by this individual. Values for the specified regulatory region are available from the Ethnic Groups page. |
|
Primary |
Select to indicate that this is the primary ethnicity that the individual claims. |
|
Ethnicity Detail |
Click to access the Ethnicity Detail page, on which you can specify or view the percentages of each ethnic group. |
Entering Ethnicity PercentagesAccess the Ethnicity Detail page.
|
Percentage |
Enter the proportion of ethnicity, expressed in a valid numerator and denominator ratio not exceeding a total of one. For example, if the individual claims to be half Eskimo you could enter 1/2 or 50/100. However, if she says she is 110% Eskimo, the most you can enter is the equivalent of one or 100% (100/100). The total for each ethnicity cannot be more than one. However, the system does not place restrictions on the sum of all of the ratios together. For example, if you enter more than one ethnic group for the individual on the Ethnicity page, you can enter different percentages here on the detail page for each ethnic group. You could enter 50/100 Eskimo, 50/100 Cherokee, and 50/100 South American, for a total of 150/100. Note. No linkage exists between the ethnic categories mandated by a regulatory region and the details that you enter here. The additional ethnicity data is for your institution's information only. |
Entering Languages InformationAccess the Languages page.
|
Language Code |
Enter the language that this individual speaks, reads, or writes. |
|
Native |
Select this check box to indicate that this is the individual's native or primary language. |
|
Translator |
Select this check box to indicate that the individual can translate or interpret this language. |
|
Teacher |
Select this check box to indicate that the individual can teach or has taught this language. |
|
Speak |
Select the level of proficiency, such as high, medium, or low, with which the individual can speak this language. |
|
Read |
Select the level of proficiency, such as high, medium, or low, with which the individual can read this language. |
|
Write |
Select the level of proficiency, such as high, medium, or low, with which the individual can write this language. |
|
Evaluation Date |
Enter the date on which the individual's levels of proficiency in this language were evaluated, reported, or entered. |
|
Set Preferred Communication Language |
Appears only if the Support multiple languages check box is selected on the Installation Default - CC (installation default - Campus Community) page. Click to transfer to the Communication Preferences page where you can specify the language in which the student prefers to receive communications from you. See Reviewing or Defining Campus Community Installation Settings. |
See Also
Entering Communication Preferences
Access the Communication Preferences page.
If your institution supports multiple languages and multiple methods, you can enter an individual's communication preferences so that the Communication Generation process will produce correspondences to that individual accordingly.
Note. Communication preferences apply to the Communication Generation process only. They do not apply to the Letter Generation process.
|
Preferred Language |
Enter the language in which the individual prefers to receive communications from your institution. Only the languages that your institution supports and selects on the Installation Default - CC (installation default Campus Community) page are available. |
|
Preferred Communication Method |
Enter the method by which the individual prefers to receive correspondence from your institution.., Only the methods that your institution supports and selects on the Installation Default - CC (installation default Campus Community) page are available. Note. Currently, the Communication Generation process supports only the methods of Email and Letter. |
Entering Religious PreferencesAccess the Religious Preference page.
|
Religious Preference |
Select the individual's stated religious preference. |
See Also
Defining Religious Preference Codes
Entering Date of Death and Other Decedent DataAccess the Decedent Data page.
Note. Only the date of death is required to display the deceased label for the individual throughout your system.
|
Date of Death |
Enter the individual's date of death. You can enter either the official date of death or the date on which your institution was notified of the death, depending on your institution's requirements. When you enter a date and save the page, the system displays the word DECEASED at the top of pages about this individual throughout your system. If you do not enter a date, the deceased label does not appear. Note. If you do not know the date of death, use the Service Indicator page to assign your institution's deceased indicator to this individual. If, after you enter a date of death and save the Decedent Data page, you decide that you do not want the deceased label to appear on pages for this individual, return to the Decedent Data page, highlight and delete the date, and then save the page with an empty Date of Death field. The deceased label no longer appears. |
|
Place of Death |
Enter the place (city, state, county, or country) where the individual died. |
|
Death Certificate Number |
Enter the number from the official certificate of death. The death certificate number might be required for financial aid reconciliation if the individual is a student, for beneficiary pay out if the individual is an employee, or to receive funds if the individual donated a trust to your institution. Consult your institution's administration. |
(AUS) Entering Student DataAccess the Student Data AUS page to enter.
DEST (Department of Education, Science and Training) reports require data on students and staff at an institution. The Staff File for DEST is produced using PeopleSoft Enterprise Human Resources Management System. It is important that the data elements used in the DEST reports be set up and entered properly.
See Setting Up DEST Reporting Codes, Generating DEST Reports.
DEST Data
|
DEST Year Arrival Code |
Enter the year that a student not born in Australia, entered Australia. If the student is an Australian citizen, leave the field blank. |
|
Language Spoken at Home |
Enter the appropriate code to indicate use of a language other than English at the student's permanent home residence. The drop-down list includes any PeopleSoft defined language codes. The DEST Student Enroll process maps your selection to the correct DEST language code. |
|
DEST Permanent Resident Code |
Enter the appropriate permanent resident code: Perm/Res Status 0 Perm/Res Status 1 Perm/Res Status 2 Perm/Res Status 3 Perm/Res Status 7 |
Refer to DEST's Higher Education Collection Documentation for explanation of the permanent resident codes.
DEST Prior Program Details
Enter the appropriate value to describe the student's status in each program. Also enter the most recent year in which the student was enrolled in that program.
Values for Post Graduate Program, Degree Program, Non-TAFE Sub Degree Program, and TAFE Program are:
Commenced, not completed
Completed all requirements
Never commenced
No information
Not a commencing student
Values for School Secondary Program, are:
Did final year
Did not do final year
No information
Not a commencing student
Values for TAFE Secondary Program are:
Completed such a course
Didn't begin/complete
No information
Not a commencing student
Values for Other Program are:
No information
No other qualifications/certs (certifications)
Not a commencing student
Other qualifications/certs (certifications)
Managing Relationships DataThis section lists prerequisites and discusses how to:
Relate one individual to another.
Identify an individual's legacy relationship to the institution.
Specify communications for the communication recipient relationship.
Create joint communications relationships.
Enter relationship addresses.
Enter relationship detail data.
View a list of relationships.
Identify an individual's relationship with the institution.
See Also
Understanding Joint Communications
Identifying an Individual's Relationship with the Institution
Prerequisites
Before you can enter relationship data, you must define the relationship types for which you want to collect information. To use full relationship functionality, you must also define legacy affiliations, create institutions and academic programs, and create letter codes to identify communications to send to related individuals and set up salutation types to use.
See Also
Setting Up Individual Relationships
Setting Up Relations to the Institution
Designing Your Academic Structure
Defining Salutation Types for Joint Communications
Reviewing or Defining Campus Community Installation Settings
Pages Used to Enter Relationships Data|
Page Name |
Object Name |
Navigation |
Usage |
|
RELATIONSHIPS |
|
Enter data to associate one individual with another individual inside or outside of your database. |
|
|
LEGACY_SEC |
Click the Legacy button on the Relationships page. |
Identify a related person's legacy relation with your institution. |
|
|
REL_MLT_RECPNT_SEC |
Click the Communication Recipients button on the Relationships page. |
Specify the communications for which a copy should also be sent to the related person. |
|
|
RELATION_SALU_SEC |
Click the Joint Communication Management button on the Relationships page. |
Create joint communications between two related individuals and establish how their names should appear in the address and salutation. You can also use this page to dissolve joint communications for these individuals. |
|
|
REL_ADDR_DTL |
|
Review addresses for the primary individual and for the related individual. If the related person does not have an ID in your system, the Edit Address link is available for you to enter an address for this person. If you use the communication recipient feature, this is also where you select the related individual's address to send a copy letter. Also, if you use the joint communication feature, this is where you select which address (either from the primary or from the related ID's addresses) to which you want to send the joint communications. |
|
|
RELATIONSHIP_DTL |
|
Enter information about the related person that is of interest to your institution. |
|
|
RELATIONSHIP_SUMRY |
Campus Community, Personal Information, Biographical, Relationships, Person to Person - Summary |
View a list of relationships for an individual. |
|
|
PERS_INST_REL |
|
Specify or review an individual's relations to your institution. |
Relating One Individual to AnotherAccess the Relationships page.
Relationship
|
Related ID |
If the related person is in your database, select the related person's ID. When you select the ID, the system displays the related person's biographical data, including the person's name, prefix, suffix, sex, marital status, and primary NID information. If the related person is not in your database, the name and biographical data fields are available so that you can enter the related person's name and data. Note. The Related ID field is available when you are creating the relationship between these individuals for the first time. After you create and save the relationship, when you return to the Relationships page, the system continues to display the related ID and biographical data, but you cannot edit or update it from here. If you need to edit or update the related person's biographical data, click the Biographical Details link at the bottom of the page. You then determine if you need to update information on the Biographical Details page or reconsider the relationship that you are creating. |
|
Relationship |
Specify the related person's relationship, such as mother, neighbor, employer, or loan reference to this individual. Values for this field are delivered with your system as translate values. Do not modify these values in any way. Any modifications to these values could require substantial programming effort. Note. If you set up marital status verification on the Relationship / Marital Status page, the system verifies the marital status on the Biographical Details page for each individual against the relationship that you select here. If the marital status of either individual is not the appropriate status for the specified relationship, the system displays a warning message suggesting that you update the marital status for the individuals on the Biographical Details page. |
|
Guardian |
Select the legal guardianship that describes the status of the related person to the primary individual. Values are: Guardian N/A Other Parent Self Values for this field are delivered with your system as translate values. Do not modify these values in any way. Any modifications to these values could require substantial programming effort. |
|
Comment |
Enter comments to further identify or describe the related person or the relationship between the two individuals. |
|
Biographical Details |
Click to access the Biographical Details page, on which you can view or update the related person's biographical data. |
|
Legacy |
Click to access the Legacy Information page, on which you can identify the related person's legacy relation with your institution. |
|
Communication Recipients |
Click to access the Communication Recipient page, on which you can specify the communications for which a copy should also be sent to the related person. |
|
Joint Communication Management |
Click to access the Joint Communication Management page, on which you can create or dissolve joint communications for these two individuals. |
Warning! Individuals can have several relationships in your database; however they can have joint communications with only one of those relationships. For example, you can create a relationship between Gloria Wilson and her husband, Mark Gonzalez, and you can create a relationship between Gloria Wilson and her mother, Maria Wilson. You can then create joint communications with either Gloria and her husband or Gloria and her mother, but you cannot create joint communications for both.
Identifying an Individual's Legacy Relation to the InstitutionAccess the Legacy Information page.
See Defining Person and Organization Relationships.
Specifying Communications for the Communication Recipient RelationshipAccess the Communication Recipient page.
You can create letter copies to send to an individual's related IDs. You can create copies of all communications generated for the primary ID or select specific communications to copy. To create the copy letter, you must set up a template with the related ID's name and address. When the letter generation data extract process encounters a letter code that is set to include a copy to the individual's related ID, it extracts the related person's address data from the Relationship Address page.
Note. For confidentiality purposes, the communication recipients that you set here will not receive copies of communications set to allow joint communications for a relationship, even when you select All Communications. This preserves information communicated to Mr. and Mrs. Smith, for example.
|
All Communications |
Select to generate a copy for this related individual of all communications to the primary individual. |
|
Letter Code |
Enter the letter codes for the communication to copy. Available letter codes are from the Standard Letter Codes page. |
Warning! When an individual has multiple relationships set up with communication recipients, the process extracts data for all of the related IDs. When merging the data into the template, the process lists a maximum of five recipients as receiving a copy. You can create and send copies to more than five recipients, but the letter can list only five, as shown in the following sample letter.
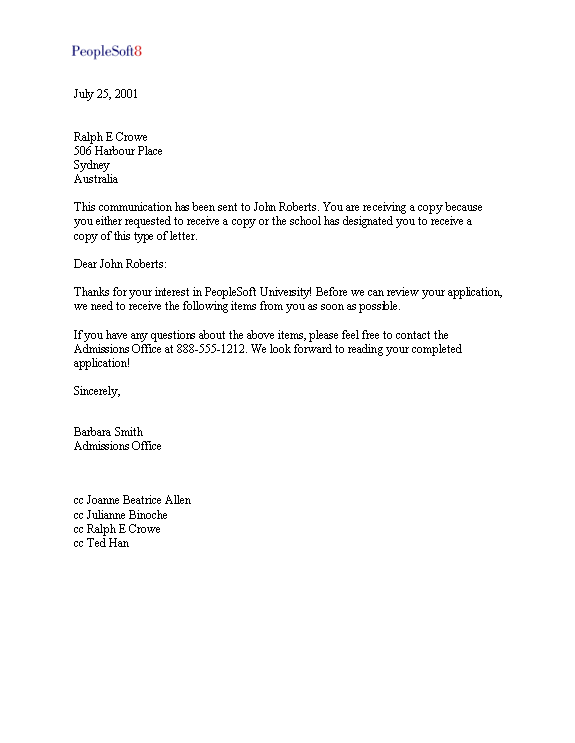
Example of the CCLTRREC.doc letter created for recipients set on the Communication Recipient page
Creating Joint Communications RelationshipsAccess the Joint Communication Management page.
|
Create Joint Communication |
Select to address joint communications to both the primary and related individuals, using the salutation that you specify on this page. |
|
Dissolution Reason |
When you clear the Create Joint Communication check box, or when you inactivate the relationship to stop joint communications for these two individuals, the Dissolution Reason field becomes available, enabling you to enter the reason for dissolving the joint communications. Values include: Deceased Partner Divorce Per Request Values for this field are delivered with your system as translate values. You can modify these translate values. |
|
Salutation Type |
Specify the type of salutation, from the Joint Salutation Type Table page, to use for joint communications to these IDs. When you enter a salutation type, the system displays the individual's names in the Salutation and Address Block Name fields, based on the default formats associated with that salutation type. The default formats are designed to reduce data entry; however always validate that the information is correct. Note. When you select the Create Joint Communication check box, the system displays the default salutation type from the Installation Default – CC page, if you entered one. You can add salutation types, but do not delete the one that you defined as the default value. Use the default value as the lowest level joint usage on the Name Usage page so that when you run the letter generation process, it does not fail due to a lack of salutation type. |
|
Salutation (Line 1), Salutation (Line 2) |
The system displays the names of the two individuals as they will appear in the greeting of the letter according to the default salutation format for the salutation type defined on the Joint Salutation Type Table page. Example values include: Mr. and Mrs. Smith or, using two lines: John Smith Mary Fletcher |
|
Address Block Name (Line 1) Address Block Name (Line 2) |
The system displays the names of the two individuals as they will appear in the address of the letter (and envelope or label if applicable) according to the default address block format for the salutation type defined on the Joint Salutation Type Table page. Example values include: Mr. and Mrs. Smith or, using two lines: John Smith Mary Fletcher |
Entering Relationship AddressesAccess the Relationship Address page.
Related ID (or Name) Address
|
Address Type |
Select the related individual's address type to associate with this relationship. If the related person does not have an ID in your database, the Edit Address link becomes available for you to manually enter the related person's address data. When the individual has an ID in your database, the system automatically displays the address data for the address type that you select. Only address types that contain data are available. If you do not select an address type, the default value is the address type, if any, selected in the Address For Related IDfield on the Installation Default - CC page. |
|
Joint Address |
Select to send joint communications for these two individuals to this address. If you are creating joint communications for this relationship, you can select either the related individual's address or the primary individual's address as the joint address, but you must select one of them. You cannot select both. Also, if the related person does not have an ID, this check box is unavailable. For the system to generate a joint communication, the address must be saved with an ID in your system. |
|
Related ID's Addresses |
If the related person has an ID in your database, you can click this link to access the Addresses page, on which you can view or update the related person's address data. If the related person does not have an ID in your database, this link is not available. |
Primary ID Address
|
Address Type |
Select the primary individual's address type to associate with this relationship. Because the primary individual has an ID in your database, the system automatically displays the address data for the address type that you select. Only address types that contain data are available. If you do not select an address type, the default value is the address type, if any, selected in the Address For Primary ID field on the Installation Default - CC page. |
|
Joint Address |
Select to send joint communications for these two individuals to this address. If you are creating joint communications for this relationship, you can select either the related individual's address or the primary individual's address as the joint address, but you must select one of them. You cannot select both. |
|
Primary ID's Addresses |
Click this link to access the Addresses page, on which you can edit or update the primary person's address data. |
Entering Relationship Detail DataAccess the Relationship Detail page.
Relation Demographics
For related individuals with or without an ID in your database, enter data in the fields in this area. For a related individual with an ID in your database, you can click the Biographical Details link at the bottom of the page, to review additional information.
|
Income |
Enter the amount of the related individual's income and the currency in which it is expressed. The amount is usually expressed annually, but it can be expressed hourly or monthly. |
|
Occupation |
Enter the related individual's occupation, from the Standard Occupation Classification Code page. |
|
External Org ID |
If the related person is associated with or employed by an organization that is in your database, identify that organization here. |
|
Employer |
The system automatically displays the name of the related person's employer if you selected an employer ID. If the employer does not have an organization ID in your database, you can manually enter the employer's name here. |
|
Highest Education Level |
Specify the highest level of education that the related person has achieved. Values for this field are delivered with your system as translate values. Do not modify these values in any way. Any modifications to these values could require substantial programming effort. |
Relation Residency
|
Country, State, and Date |
For related individuals with or without an ID in your database, you must enter the related individual's country, state and date of residency information. |
Daytime Telephone
When the related person does not have an ID in your database, the system displays this group box with fields available for you to enter the related person's daytime, evening, and fax telephone numbers.
Email ID
When the related person does not have an ID in your database, the system displays this group box with fields available for you to enter the related person's email ID and URL.
Country of Citizenship
When the related person does not have an ID in your database, the system displays this group box with fields available for you to enter the related person's country of citizenship and citizenship status based on the Citizen Status Table page.
Links
|
Phones |
Click this link to access the Phone Numbers page, on which you can review or change telephone numbers for the related ID. For a related individual with no ID in your database, manually enter the individual's phone data in the Daytime Telephone section. |
|
Email Address |
Click this link to access the Electronic Addresses page, on which you can review or change URLs and email addresses for the related ID. For a related individual with no ID in your database, manually enter the individual's email data in the Email ID section. |
|
Biographical Details |
If this related individual has an ID in your database, click this link to access the Biographical Details page, on which you can review or change additional basic data for the related ID. |
|
Citizenship and Passport Date |
Click this link to access the Citizenship/Passport page, on which you can review or change additional citizenship and passport data for the related ID. For related individuals without an ID in your database, you must manually enter the related individual's Citizen Country and Citizenship Status. |
Viewing a List of RelationshipsAccess the Person-to- Person Summary page to view a list of an individual's relationships.
The Person-to- Person Summary page is for viewing only. You cannot enter or edit data here. Data that appears here is entered on pages in the Relationships component.
Identifying an Individual's Relationship with the InstitutionAccess the Relations with Institution page.
Note. PeopleSoft Enterprise Contributor Relations Solutions uses the abbreviations on this page in the contributor relations search.
See Searching for Records and Using Search/Match.
|
Currently Is A(n) |
Select to indicate that the individual is currently related in this way to your institution. |
|
Has Been A(n) |
Select to indicate that the individual has previously been related in this way to your institution. |
|
Manual Maintenance |
Select to indicate that this relationship (current or past as appropriate) should be maintained manually and not used or changed by mass change or any other automatic process. |
Entering Emergency Contact DataThis section discusses how to
Enter emergency contact data.
Enter additional phone numbers for the emergency contact.
Pages Used to Enter Emergency Contact Data|
Page Name |
Object Name |
Navigation |
Usage |
|
SCC_EMERG_CNTCT1 |
Campus Community, Personal Information, Biographical, Emergency Contacts |
Enter an individual's emergency contact data, including the contact's name, addresses, and primary phone number. |
|
|
SCC_EMERG_CNTCT2 |
Campus Community, Personal Information, Biographical, Emergency Contacts, Emergency Contact Other Phones |
Enter additional telephone numbers for an emergency contact. |
Entering Emergency Contact DataAccess the Emergency Contact Information page.
Emergency Contact
|
Contact Name |
Enter the name of the emergency contact for this individual. |
|
Relationship to Individual |
Select the option that indicates the contact's relationship to the individual at your institution. Values for this field are delivered with your system as translate values. Do not modify these values in any way. Any modifications to these values could require substantial programming effort. |
|
Primary Contact |
Select to indicate that this is the first person to contact in an emergency. You can enter only one primary contact for an individual. |
|
Same Address as Individual and Address Type |
Select to indicate that the contact has the same address information as the individual in your database, and then select that individual's address type that is the same as this contact's address type. If it is selected, you do not need to complete any of the address fields. The system displays the correct address data. Note. If Same Address as Individual is not selected, the address area of the page is titled Contact Address. When Same Address as Individualis selected, the title becomes Individual's Current Address. |
|
Same Phone as Individual and Phone Type |
Select to indicate that the contact has the same phone information as the individual in your database, and then select that individual's phone type that is the same as this contact's phone type. If it is selected, you do not need to complete any of the phone fields. The system displays the correct phone data. An emergency contact can have the same address as the primary individual, but have a different phone number. Note. If Same Phone as Individual is not selected, the phone area of the page is titled Contact Phone. When Same Phone as Individualis selected, the title becomes Individual's Phone. |
Entering Additional Phone Numbers for the Emergency ContactAccess the Emergency Contact Other Phones page.
Other Phone Numbers for Emergency Contact
|
Phone Type |
Select the phone type that describes the additional phone number for this emergency contact. |
|
Phone |
Enter the additional phone number for this emergency contact. |
Tracking Work ExperienceThis section discusses how to enter work experience data.
Pages Used to Track Work Experience|
Page Name |
Object Name |
Navigation |
Usage |
|
PRIOR_WORK_EXP_SA |
|
Enter data to track an individual's work experience. |
Entering Work Experience DataAccess the Work Experience page.
Work Experience Details
|
Employer |
If the employer is an organization in your database, enter the organization's ID. The system displays the organization name and address. If the employer is not an organization in your database, enter the employer's name and address. |
|
Relevant Work Experience |
Select to indicate that the former position is relevant to a current position within your institution or to the career that the individual is seeking. |
|
Retired and Retire Date |
If the person retired from this employer, select this check box and enter the date on which the individual retired. |
|
Industry Code (SIC) (industry code [Standard Industrial Classification]) |
Enter the SIC for this position. |
|
Start Date and End Date |
Enter the dates on which the individual began and ended employment with this employer. |
|
Job Title |
Enter the title of the last position that the individual held with this employer. |
|
Occupation Code (SOC) (occupation code [Standard Occupation Classification]) |
Select the SOC codes for this position. |
|
Ending Pay Rate |
Enter the pay rate and currency at which the individual ended employment. |
|
Pay Frequency |
Select the frequency that describes the ending pay rate. The default value is Month. |
|
Comments |
Enter comments to further describe this work experience. |