Setting Up the Event
|
Page Name |
Definition Name |
Usage |
|---|---|---|
|
RA_PROGRAM_ADD |
Add a new Marketing Program. |
|
|
RAE_EVENT_DETAIL |
Define event details. |
|
|
RAE_EVENT_DETAIL |
Define financial information about the event. |
|
|
RAE_EVENT_SESSIONS |
Define event sessions. |
|
|
RAE_EVT_TEAM |
Define team members for the event. |
|
|
RAE_EVENT_RESOURC |
Define resources for the event. |
|
|
Event - Task Page |
RAE_EVENT_TASK |
Manage event tasks. |
|
RB_TSK |
Define detailed task information for an event task. |
|
|
RAE_EVENT_COSTS |
Define costs related to the event. |
|
|
RAE_EVENT_NOTES |
Define notes related to the event. |
|
|
RAE_EVENT_REGISTR |
Define information about event participants. |
An Event is a type of Marketing Program that provides functionality specific to Event Management business processes. It is created using the Program Type Event, which appears in the Marketing Programs list along with the Campaign, Roll Up, and Dialog program types. The Event program type allows the event to be associated with a roll up program for rolling up budgets and costs to a higher level, along with other program types such as mass mailing program or Dialog for an online marketing program.
When you define an event, you define various information about it, including:
Event details, such as start and end date, event capacity, venue, and other descriptive information about the event.
Event financial information, including details about the event sponsor and budget, and a breakdown of the costs associated with the event.
After you have defined the overall information about the event itself, you can define the details of the event's individual sessions, the team members and roles associated with it, the tasks that must be completed, the associated costs, and the event participants.
When an event is cloned (using the Clone link in the Toolbar), the dates associated with the event are not cloned. These include dates relating to:
Event.
Session.
Fees.
After the event has been cloned, you must enter dates for these items.
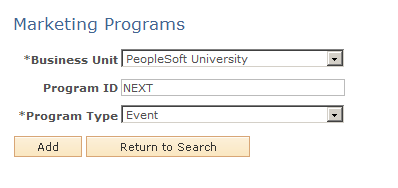
Use the Marketing Programs page (RA_PROGRAM_ADD) to add a new Marketing Program.
Navigation:
Marketing, Marketing Programs
Click the Add Program button.
This example illustrates the fields and controls on the Marketing Programs page.
Field or Control |
Description |
|---|---|
Business Unit |
Select the business unit for which you want to create the event. |
Program ID |
By default, this value is NEXT for a new event. The event will be assigned the next available Program ID when you save. |
Program Type |
Select Event from the list of available choices. |
Use the Event Detail page (RAE_EVENT_DETAIL) to define event details.
Navigation:
Select an event from the list, or create a new event.
This example illustrates the fields and controls on the Event - Event page: Detail section.
Field or Control |
Description |
|---|---|
Name |
Enter a name for the event. Event names must be unique within a business unit. |
Status |
Select a status from the list of choices. For a new event, the status is New by default. Other statuses include:
Note: You can define your own Status values using the Status Rules page in PeopleSoft Marketing. Refer to the Marketing documentation for more information. |
Venue |
Click the icon to search and then select a venue from the available list. |
Capacity |
Enter the maximum number of attendees who can attend the event. This value is used to determine whether a person registering for the event will be waitlisted if the number registered exceeds the Capacity. If the event's Capacity increases and there are waitlisted participants, a message displays to inform you that you should review the waitlisted participants. If the Capacity decreases and the number of registrants exceeds the new capacity, a message displays to inform you to review the participant list. |
Start Date, Start Time |
The time and date when the event begins. |
End Date, End Time |
The time and date when the event ends. The End Date cannot be earlier than the Start Date. |
RSVP Date |
The date by which prospective registrants must respond to the invitation. This date cannot be greater than the End Date value, but it can be later than the Start Date. |
Private Event |
Select this check box if the event is private. If the check box is not selected, then the event is public. |
Event Type |
Select an event type from the list of choices. The available choices are:
This value is for informational purposes only; the choice does not change what is displayed on the Event Definition pages. |
Currency |
Select the default currency for the event from the list of choices. |
Objective |
Select an objective for the event (such as Recruiting, Fundraising, and so on). Refer to the Marketing documentation for more detailed information about objectives. Note: You can define your own objectives using the Marketing Objectives page in PeopleSoft Marketing. Refer to the Marketing documentation for more information. |
Collateral |
Click the icon and select marketing collateral to associate with the event, if relevant. |
Owner |
Click the icon and select an owner for the event from the available list. The default is the person who created the event. The event owner is leveraged in the event approval workflow process. |
Approver |
Click the icon and select the person who must approve the event. The event approver is leveraged in the event approval workflow process. |
Host Company |
Click the icon and select the name of the company that is hosting the event. |
Host Employee |
Click the icon and select the name of the employee who is hosting the event. The Host Employee does not have to be a member of the Host Company. |
Roll Up (Campaign) |
Select the name of the roll up to which this event is to be associated. |
Secure Event |
Select this check box to restrict access and visibility to the event. When an event is secured, users will be unable to access it unless they are a team member or part of a team role that has been associated with the event. Secure Event uses the same security framework used to secure online dialogs and audiences. |
Participant Counts |
This section displays information about the participants for the event. It is read-only, and is updated when the main Event Detail page is updated. It includes:
|
Related Events |
This section contains references to events that are similar in nature to the current event. This enables the event marketer or support analyst to recommend future events to anyone who cannot attend the current event or who was placed on a waiting list. Related events can also be displayed on the online Event Registration page.
|
Target Academic Term |
Specify the institution, career, and admit term for the marketing event. This section appears only if the Higher Education field is selected on the General Options page. Specify the admit term if you run the Recruiting Performance Fusion Intelligence reports off of the CSW: Recruiting & Admissions Interactive Dashboard. |
Event Workflow
The following table shows the workflow actions for events based on a change in the event status.
|
Event Status Change |
Action Name |
Role Name |
|---|---|---|
|
Changed to In Review |
Worklist to Approver |
Approver |
|
Email to Approver |
Approver |
|
|
Changed to Approved. |
Worklist to Event Owner |
Owner |
|
Email to Event Owner |
Owner |
|
|
Changed to Declined |
Worklist to Event Owner |
Owner |
|
Email to Event Owner |
Owner |
|
|
Changed to Stopped |
Worklist to Event Owner |
Owner |
|
Email to Event Owner |
Owner |
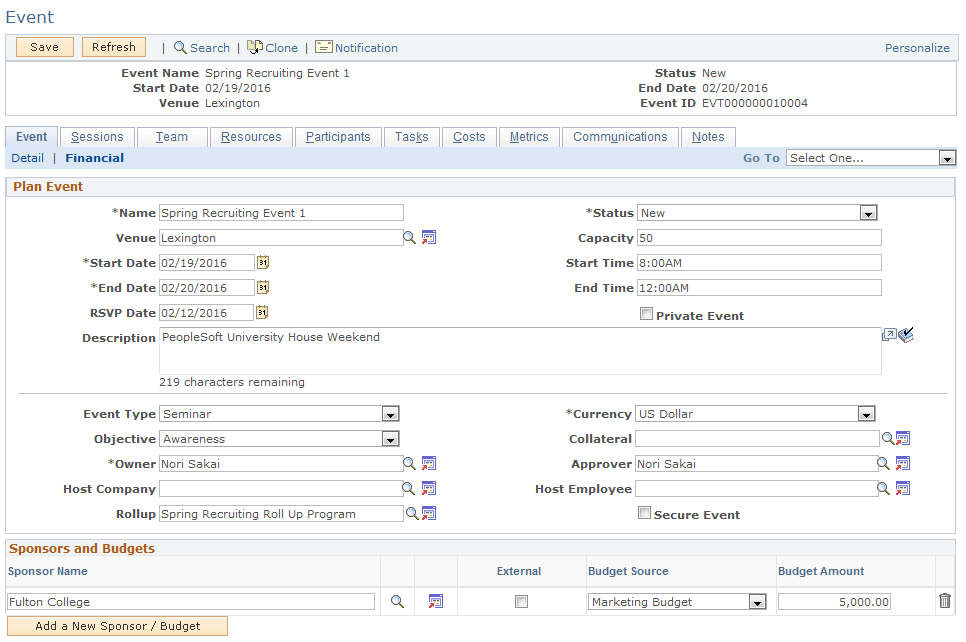
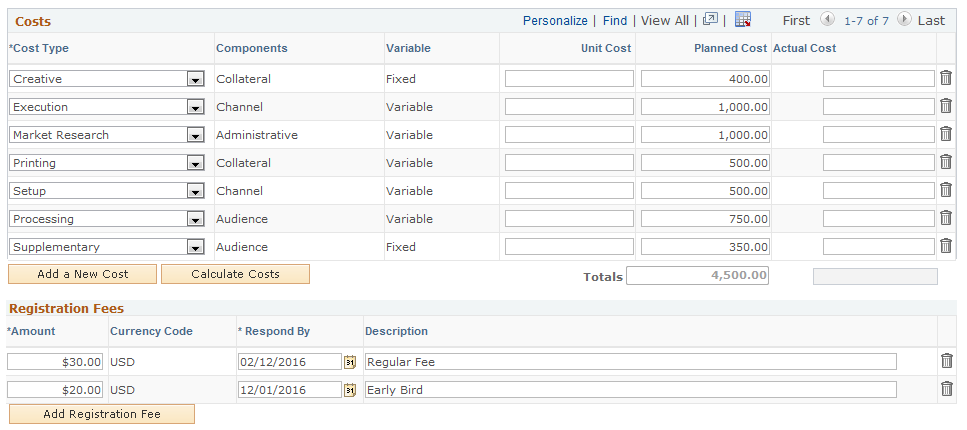
Use the Event - Event page: Financial section (RAE_EVENT_DETAIL) to define financial information about the event.
Navigation:
Select an event from the list, or create a new event.
Click the Financial link on the Event tab.
This is the first of two examples illustrating the fields and controls on the Event - Event page: Financial section.
This is the second of two examples illustrating the fields and controls on the Event - Event page: Financial section.
Field or Control |
Description |
|---|---|
Sponsors and Budgets |
This section is a common sub page used by marketing campaigns, marketing roll ups, and the Dialog Designer if the dialog was created using the Marketing Programs page.
|
Record Program Costs |
This section is a common sub page used by marketing campaigns, marketing roll ups, and the Dialog Designer if the dialog was created using the Marketing Programs page.
|
Field or Control |
Description |
|---|---|
Registration Fees |
This section contains an amount and a respond-by date. Typically, an event includes a promotional or Early Bird fee in order to encourage invitees to sign up early for an event. If payment is received on or before the respond-by date, then the special fee takes effect. If the event start is after the last respond-by date, the system uses the most recent fee as the walk in fee.
|
Use the Event - Sessions page (RAE_EVENT_SESSIONS) to define event sessions.
Navigation:
Select an event from the list, or create a new event.
Click the Sessions tab.
This example illustrates the fields and controls on the Event - Sessions page.
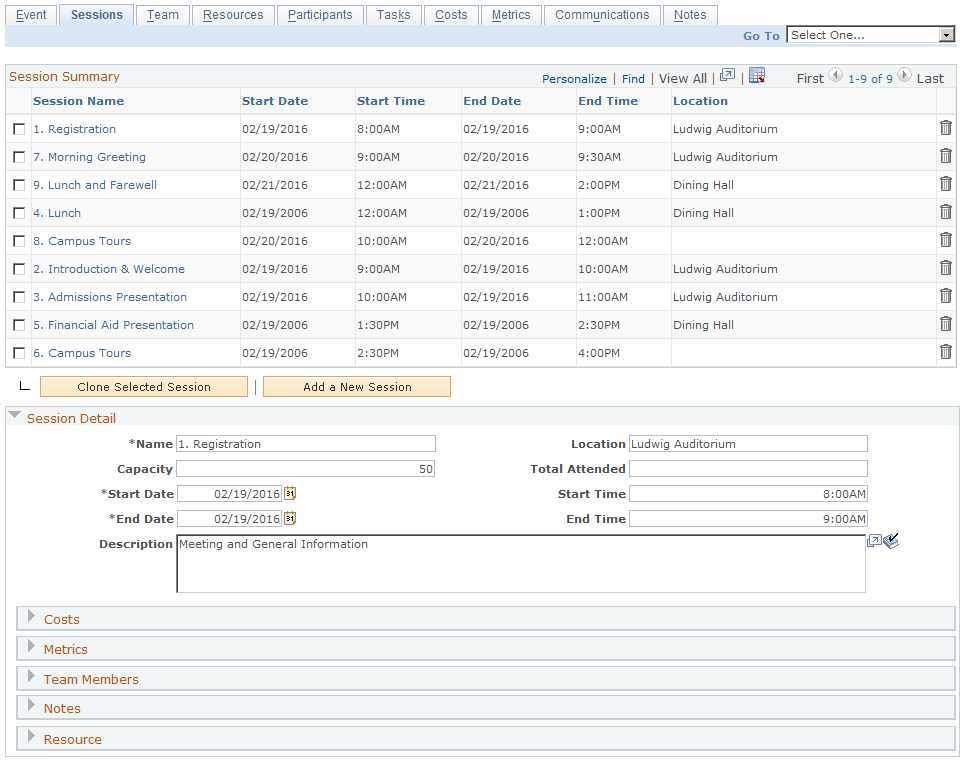
Click the Sessions tab to show all sessions for this event. Sessions are a series of smaller events within the main event. For example, for an Open House event, sessions could define the agenda for the day (9-10 a.m., Overview of Institution; 10-11 a.m., Overview of Arts program, and so on). You can define multiple sessions for any event and each session can have its own resources (external speaker, projector, and so forth) associated with it. When you first display the Sessions page, several of its sections are collapsed.
Note: Every event must have a minimum of one session. If you create an event without defining a session for it, a default session with the same start and end date values as the event itself is created with it.
Session Summary
The Session Summary section provides an overview of the event's sessions, including name, start date and time, end date and time, and location. All of these items are described in more detail in the Session Detail section.
Field or Control |
Description |
|---|---|
Selection Check Box |
Select one or more check boxes to include a selected session for cloning. |
Clone Selected Session |
Click this button to clone the selected sessions. Session information as well as Costs, Metrics, and Team Members will be cloned. |
Add a New Session |
Click this button to add a new empty session. |
Session Detail
This section provides a more detailed view of the event's sessions. To display information about a particular session, click its name in the Session Summary section.
Field or Control |
Description |
|---|---|
Name |
Enter the name of the session. This value is required. |
Location |
Enter the location of the session. |
Capacity |
Enter the capacity of the session's location. |
Attended |
Enter the number of people who attended the session. |
Start Date, Start Time |
Enter the starting date and time of the session. The Start Date value is required. |
End Date, End Time |
Enter the ending date and time of the session. The End Date value is required. |
Description |
Enter any defining information or particulars that need to be included for further clarification about the session. |
Other Sections
The remaining sections on the page allow you to associate resources with the selected session (as opposed to the entire event).
Field or Control |
Description |
|---|---|
Costs |
Use this section to associate costs with a specific session of the event. |
Metrics |
Use this section to associate metrics (such as session attendance rate or cost per attendee) with a specific session of the event. |
Team Members |
Use this section to associate team members with a specific session of the event. |
Notes |
Use this section to attach a note to a specific session of the event. |
Resource |
Use this section to associate other resources (such as collateral, external participants, or internal participants) with the session. |
Use the Event - Team page (RAE_EVT_TEAM) to define team members for the event.
Navigation:
Select an event from the list, or create a new event.
Click the Team tab.
This example illustrates the fields and controls on the Event - Team page.
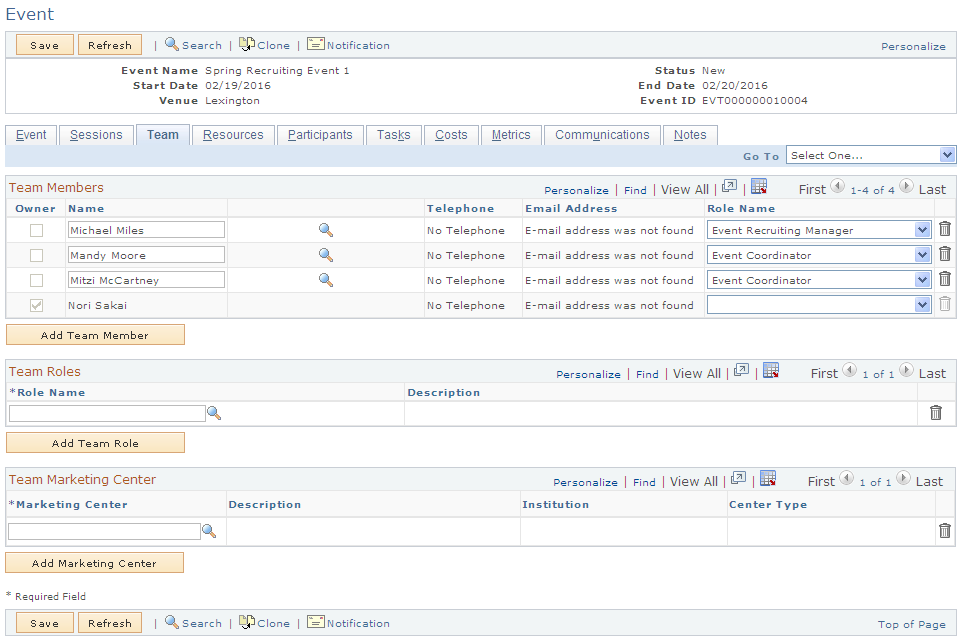
Field or Control |
Description |
|---|---|
Team Members section |
This section shows the team members associated with the event. The Owner check box is selected for the event owner. You can add more team members by clicking the Add Team Member button. If you add a team member on this page, that person will be immediately available for selection on the Sessions page. Likewise, if you delete a team member who was already associated with a session, that team member is automatically deleted from any sessions with which he or she was associated. You can secure an event so that only team members and team roles that you have specified on this page can view or access the event. |
Team Roles section |
This section shows the roles associated with the event. You can select a role from the available list, and add another role by clicking the Add Team Role button. |
Team Marketing Center section |
The Team Marketing Center grid allows you to specify which events team members can access. Users can only select authorized Marketing Centers from the Marketing Center prompt. The Marketing Program component search excludes any secured events that the user is not authorized to access. If the user has at least one of the allowed roles, or is a team member or is authorized to at least one of the Marketing Centers, then that user can access the secured event. The Event Transfer icon on the Related Events section of the Event Detail page is secured. If user is not authorized to view the event, an error message is displayed. |
Use the Event - Resources page (RAE_EVENT_RESOURC) to define resources for the event.
Navigation:
Select an event from the list, or create a new event.
Click the Resources tab.
This example illustrates the fields and controls on the Event - Resources page.
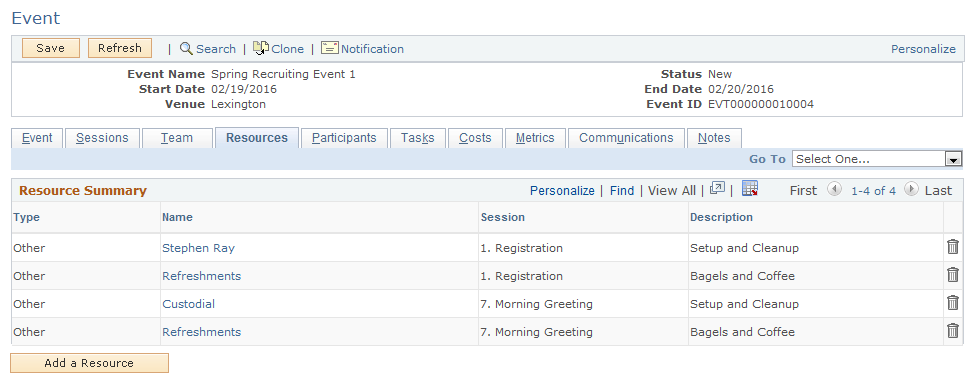
This section displays any resources currently attached to the event. You can use the page to associate resources to a particular session.
Field or Control |
Description |
|---|---|
Resource Summary |
The Resource Summary section displays an overview of all the event's resources. Click a resource name to display more detail about the resource. The summary includes the following:
|
Add a Resource |
Click this button to insert another resource item in the list and display its Resource Detail information. |
Field or Control |
Description |
|---|---|
Resource Detail |
The Resource Detail section displays more information about a new or selected resource. Click the Apply Resource button to update the grid with any changes and hide the Resource Detail section.
|
Use the Event - Task Details page (RB_TSK) to define tasks for the event.
Navigation:
Select an event from the list, or create a new event.
Click the Tasks tab, then click the name of a task or click the Add Task button.
This example illustrates the fields and controls on the Event - Task Details page.
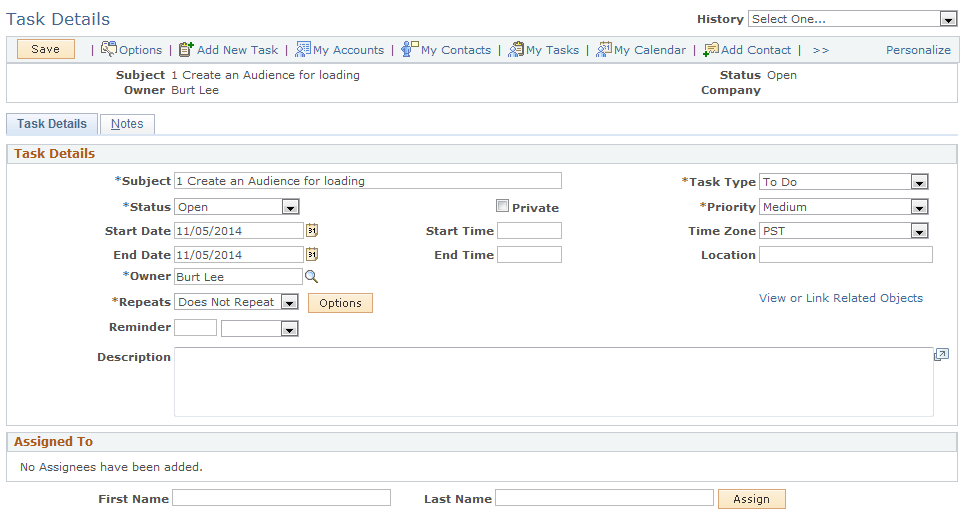
You can use Task Groups to set up common recurring tasks for events, then reuse the tasks for a different event. Examples of common recurring tasks could include reserving the venue, reserving speakers, printing name cards, and so forth.
Refer to the Tasks section in the Marketing documentation for more information about using tasks.
Use the Event - Costs page (RAE_EVENT_COSTS) to define costs related to the event.
Navigation:
Select an event from the list, or create a new event.
Click the Costs tab.
This example illustrates the fields and controls on the Event - Costs page.
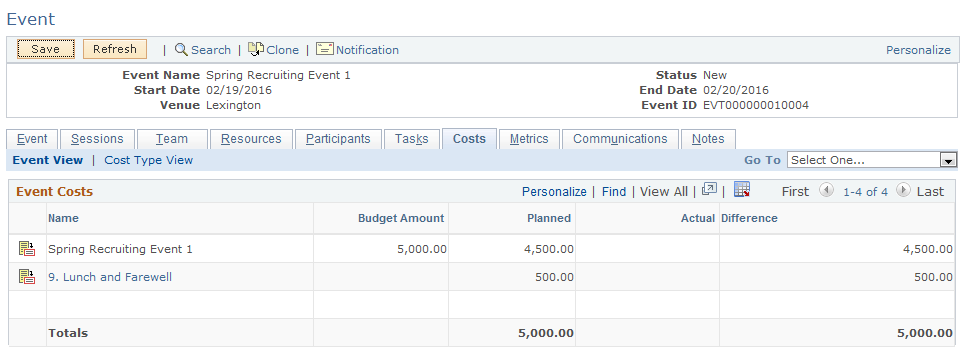
The Cost tab displays costs associated to the specified event and its sessions.
Field or Control |
Description |
|---|---|
Event View tab |
This tab displays information about the event costs:
|
Cost by Cost Types tab |
This tab displays information about event cost types:
|
For more information about costs, refer to the Costs section in the Marketing documentation.
Use the Event - Notes page (RAE_EVENT_NOTES) to define notes related to the event.
Navigation:
Select an event from the list, or create a new event.
Click the Notes tab.
This example illustrates the fields and controls on the Event - Notes page.
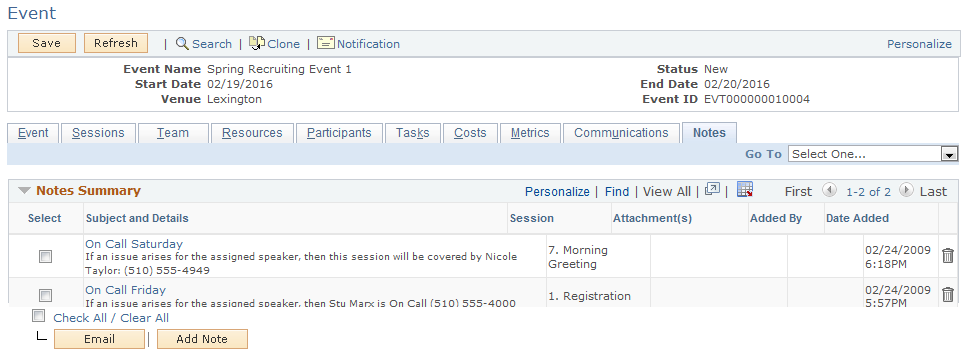
Clicking the Notes tab will display notes associated to this event or to an event session.
Field or Control |
Description |
|---|---|
Selection Check Box |
Select the check box to select a note for emailing. |
Subject and Details |
Click the Subject link to view the note detail. |
Session Name |
The event session to which the note is related. If the note is for an event, this field is empty. |
Attachments |
If there are any attachments associated with the note, a paperclip icon appears in this field. |
Row Added By, Row Added Date |
The name of the person who added the note and the date on which it was added. |
Note Type |
Select Event or Session from the list of choices. |
Session |
If you selected Session in theNote Type field, you can select an available session from the list of choices. |
Subject |
The subject of the note. |
Use the Event - Participants page (RAE_EVENT_REGISTR) to define information about event participants.
Navigation:
Select an event from the list, or create a new event.
Click the Participants tab.
This example illustrates the fields and controls on the Event - Participants page.

Note: This section describes only the Participants page fields relevant to defining participants for the event. For information about inviting participants, refer to the Sending Invitations section.
You can select audiences to load in order to populate the participant list for your event. You can also add participants manually. There are no restrictions to the number of participants that can be loaded.
Field or Control |
Description |
|---|---|
Audience |
Select the name of the audience you want to load. |
Load Audience |
Click this button to load one or more seed audiences to create the initial participant list. You can add participants manually or by loading additional audiences, which are added cumulatively to the list. If the audience is dynamic, clicking this button will generate it. Note: If you load multiple audiences, the Audience field will display the name of the last audience loaded. Members of all the loaded audiences are displayed in the participant list, but after they have been loaded the list does not display the name of the audience from which they were loaded. In the case of multiple audiences containing the same person, deduplication is performed so that the person's name appears only once in the participant list. |
Participants Tab
The Participants tab shows detailed information about the invitees.
Field or Control |
Description |
|---|---|
360 icon |
Click this icon to access the 360-degree view for the invitee. The type of 360-degree view displayed depends on which application is installed and enabled. |
Last Name, First Name |
The name of the invitee. |
Guest Count |
The number of guests to attend the event on behalf of the participant. |
Add Participant |
Click this button to add additional individuals to the participant list. If the person already exists in the participant list with a different role, an error message displays informing you that you cannot add the same person with a different role. If you want to change the participant's role, you can delete the existing participant and add a new one. If the search returns no results, you can quick create the person with the role of Consumer, or Contact for a Company. If the prospective participant has requested not to be contacted, an error message displays and that person is not added to the participant list. |
Address Tab
This tab contains invitees' email and physical addresses.
More Info Tab
Field or Control |
Description |
|---|---|
Role |
The invitee's role (for example, Consumer, Contact, or Worker). If the same person appears in the attendee list under multiple roles (for example, if the person belongs to more than one audience), then priority is given to the Consumer role followed by Contact for Company, and finally Worker. Do Not Contact requests are not considered when loading audiences, since it is expected that any applications using the lists will be applying Do Not Contact rules. |
Company |
The company with which the invitee is associated. This field is optional. |
Guest Of |
The name of the event participant who registered for this guest attendee, if the guest is registered through an Online Marketing Dialog using the Register Event for Guest function. Note: A guest attendee can be the guest of only one participant and not multiple participants. |
Comments |
Enter any relevant comments from or about the attendee (for example, meal preference or any special accommodations that must be made). |
360 icon |
Click this icon to access the 360-degree view for the invitee. The type of 360-degree view displayed depends on which application is installed and enabled. |
Note: On deleting an invitee from this page, the system displays a warning if there are guests associated with the invitee.
See Sending Invitations.