Creating Campaigns
This topic discusses how to create and manage campaigns.
|
Page Name |
Definition Name |
Usage |
|---|---|---|
|
RA_CM_HOME_GRD |
Search for marketing programs. |
|
|
RA_CAMPAIGN_DETAIL |
Define new marketing campaign programs or edit existing ones. |
|
|
RA_CMPGN_ACTIVITY |
Access existing activities and attach additional activities to the campaign. |
|
|
RA_CAMPAIGN_TEAM |
Specify team members for the campaign. |
|
|
RA_CAMPAIGN_TRIGER |
View summary information about existing triggers and add new triggers. |
|
|
RA_CAMPAIGN_TASK |
View existing campaign tasks and add new tasks. |
|
|
RA_PGM_TASKDTL |
Add detailed information about a campaign task. |
|
|
RA_CAMPAIGN_COSTS |
View all costs associated with the campaign including all activities. Costs are summarized by activity and by cost type. |
|
|
RA_CM_LIST_SUMRY |
Attach target audience lists to campaigns. |
|
|
RA_CMPGN_METRICS |
Measure the effectiveness of marketing campaigns. |
|
|
RA_CAMPAIGN_NOTES |
View descriptions of campaign notes; add new notes. |
|
|
RA_CMPGN_HISTORY |
View the audit and interaction information associated with the campaign. |
|
|
Marketing Programs - Attributes Page |
RB_ATTR_RUN_CMPG |
View campaign attributes. |
|
RA_CALENDAR |
View the time relationships of all campaigns. |
Use the Marketing Program search page (RA_CM_HOME_GRD) to search for marketing programs.
Navigation:
The Marketing Program Search page displays summary information about existing campaigns. To manage an existing campaign, click the campaign name.
To add a new campaign, access the Marketing Program Add page (select the Marketing Program Add tab).
Note: The Marketing Program Search page is a configurable search page. You can configure this page to suit your personal search needs. For more details, seeUnderstanding the Configurable Search
Note: Selecting a roll up name from the Program Roll up Name search field returns all related campaigns and dialogs that use this roll up name as the marketing program to roll up to, and not the roll up program itself. To find the roll up program, enter the program name of the roll up or change the program type to Roll up to view all roll ups.
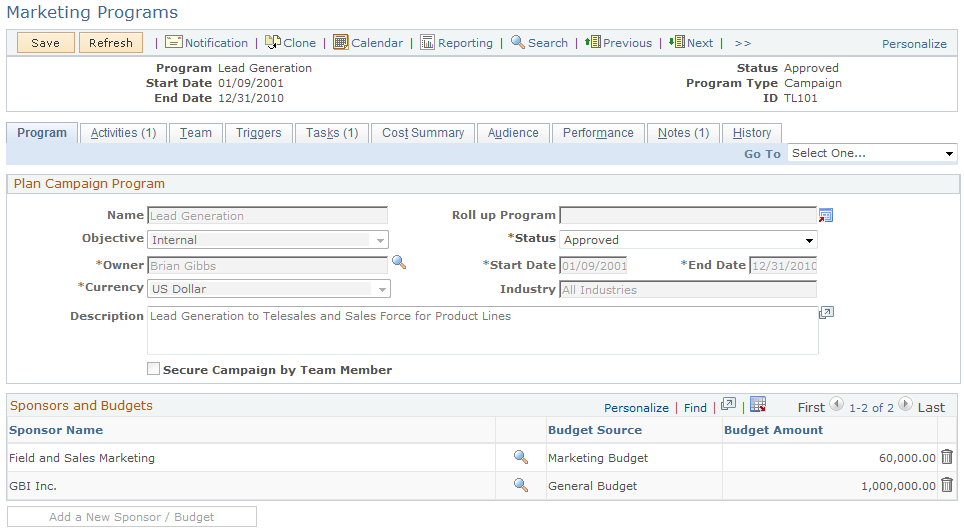
Use the Marketing Programs - Program page (RA_CAMPAIGN_DETAIL) to define new marketing campaign programs or edit existing ones.
Navigation:
This is the first of two examples illustrating the fields and controls on the Marketing Programs - Plan Campaign Program.
This is the second of two examples illustrating the fields and controls on the Marketing Programs - Plan Campaign Program.
Plan Campaign Program
Field or Control |
Description |
|---|---|
Name |
Enter a descriptive code to identify the campaign. Note: Campaign names do not need to be unique. However, duplicate campaign names might confuse users. |
Roll up Program |
If this campaign is part of a roll up, select the descriptive name of the parent roll up of which this campaign is a part. |
Objective |
Select an objective from the available options to describe what you will accomplish with this campaign. |
Status |
Select the position of the campaign in its life cycle. Note: When the campaign status is set to Executing or Approved, nothing in the definition can be changed without changing the campaign status. |
Owner |
Displays the descriptive name of the user who is primarily responsible for the campaign. |
Start Date and End Date |
Enter the date when the campaign begins and ends. Start and end dates for campaigns that are part of a roll up campaign must be within the range of the parent campaign. |
Currency |
Select the monetary unit with which the campaign is funded. |
Industry |
Select an industry group from the lookup. |
Description |
Enter a detailed description of the campaign. |
Secure Campaign by Team Member |
Select this check box to if you want a security verification process to be performed to determine if the user has authority to view the campaign. If this option is not selected, the campaign is considered to be unsecured, and all users will have access to it. |
Campaign Sponsors
Campaign sponsors are persons or companies outside the department or organization who contribute to the funding of the campaign—for example, cooperative advertisers.
Note: Sponsors must exist in the system as an entity, but do not have to be specially set up as a sponsor. If the sponsor you want to add does not exist as an entity within the system, you can add company or site names using Quick Create.
Field or Control |
Description |
|---|---|
Sponsor Name |
Select a sponsor name from the lookup table. |
External |
Select this check box if the sponsor is external. |
Budget Source |
Select the department that is funding the campaign. |
Budget Amount |
Enter the amount of money allocated for the campaign. |
Add a New Sponsor/Budget |
Click to insert another sponsor or budget source. Note: You can add one (and only one) budget without a name, allowing a budget amount to be entered and not associated with a particular name. (For example, if a campaign has no sponsor and its budget is 20,000.00, that budget can be entered without a name. If you enter names, you can also split that same budget across multiple named sponsors.) |
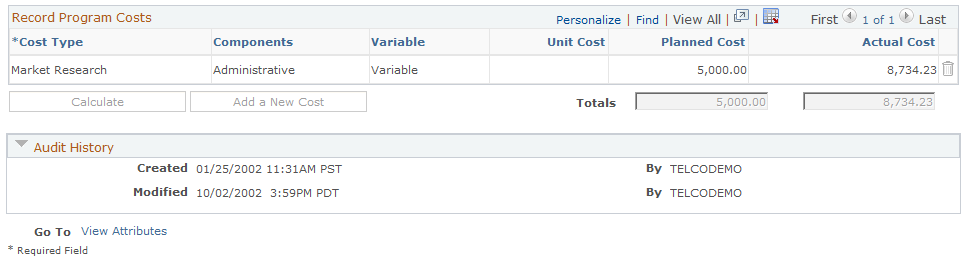
Record Program Costs
The Record Program Costs section enables you to keep a record of costs not associated with any other component; that is, costs that relate to the campaign as a whole.
Warning! Do not enter the same costs twice. If you entered an expense elsewhere (for example, when you created collateral or generated an audience), do not reenter that expense here.
Field or Control |
Description |
|---|---|
Cost Type |
Select the cost type description that uniquely identifies the main purpose of the expense. |
Components |
Displays the category to which the cost belongs. |
Variable |
Displays whether the cost type is defined as variable or fixed. |
Unit Cost |
Enter the cost of one unit of the product or service to be measured in this cost metric. Note: This field is available only when the cost type is Variable. |
Planned Cost |
Enter the amount that you expect to pay for all units of the product or service to be measured in this cost metric. |
Actual Cost |
Enter the amount that you actually pay for all units of the product or service measured in this cost metric. |
Totals |
The sums of all planned costs and all actual costs. |
Calculate |
Click to calculate total values. |
Add a New Cost |
Click to add a new cost. |
Child Programs
This section appears only if the marketing program is a roll up that contains one or more child campaigns or dialogs. Each campaign or dialog name is listed with its type, name, and budget.
Target Academic Term
This section appears only if the Higher Education option is enabled on the General Options page. Enter applicable academic information, such as institution, career and admit term for the marketing program.
Enter an admit term if you run the Recruiting Performance Fusion Intelligence reports off of the CSW: Recruiting & Admissions Interactive Dashboard.
Go To
Field or Control |
Description |
|---|---|
View Attributes |
Click to access the Attributes page. The Attributes page displays any defined attributes associated with the campaign. When selected, the Attributes page is included in the component tab navigation until you exit this campaign and select another. |
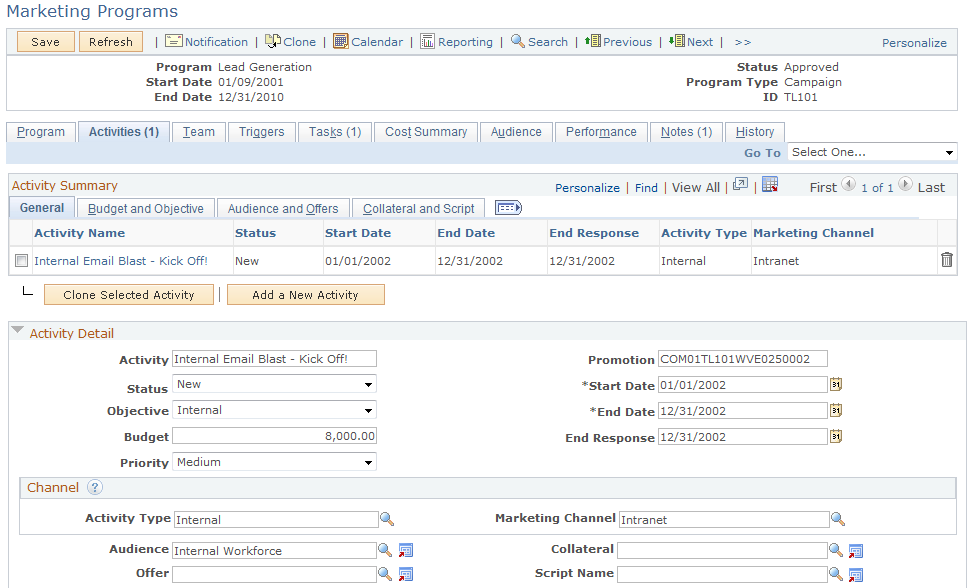
Use the Marketing Programs - Activities page (RA_CMPGN_ACTIVITY) to access existing activities and attach additional activities to the campaign.
Navigation:
This is the first of two examples illustrating the fields and controls on the Marketing Programs - Activities page.
This is the second of two examples illustrating the fields and controls on the Marketing Programs - Activities page.
Activity Summary
Field or Control |
Description |
|---|---|
Activity Name |
Click the activity name of a campaign to access details about the activity, where you can define additional activity attributes for the selected activity. |
Add a New Activity |
Click to add a new activity. Note: When adding a new activity, the system generates an activity name related to the name of the campaign. You can enter a new activity name. |
Clone Selected Activity |
Click to clone a selected activity. Select activities by selecting the check box beside the activity name. When you clone an activity, all associated costs and metrics are included, but can be edited. |
Activity Detail
Field or Control |
Description |
|---|---|
Activity |
Enter a descriptive name to identify the activity. Note: Activity names do not need to be unique. However, duplicate activity names might confuse users. |
Promotion |
A unique code that identifies the activity. This code is generated automatically. Promotion is used to integrate PeopleSoft Marketing with PeopleSoft Order Capture by associating the order with the offer that is on the activity record. |
Status |
Displays the position of the activity in its life cycle. Note: Only activities with a status of New can be deleted. Further, after an activity has been placed in Stopped status, none of its associated components (such as Offer, Audience, or Collateral) can be deleted. |
Start Date and End Date |
Enter the dates when the activity begins and ends. The activity start date cannot precede the campaign start date. The end date cannot exceed the campaign end date. |
Objective |
Select the objective that describes the purpose of this activity. |
Priority |
Select the priority of the activity. Your priority selection determines how multiple campaign activities are sorted when used. |
Budget |
Enter the amount of money allocated for the activity. The system accepts standard monetary formats, such as 10,000 USD. Note: Establish the campaign currency on the Marketing Programs - Plan Campaign Program page (Sponsor section). |
End Response |
Enter a date equal to or later than the end date. The end date allows the use of the activity by Sales beyond the activity's end date, for example, to allow time for late respondents in a mass mailing activity that has already ended. |
Channel
A channel is used to get the message to the audience. A full channel definition requires selection of both an activity and a marketing channel. Under certain circumstances, a channel detail selection is needed as well.
The fields available in this section depend on the activity and marketing channel combination selected. Not all fields are used with all combinations.
Activity, marketing channel, and channel detail values are defined in setup.
Field or Control |
Description |
|---|---|
Activity Type |
Enter the means by which you convey the marketing message. |
Marketing Channel |
Enter the medium by which you convey the marketing message. For example, in a broadcast campaign you might use the channel types radio and television. Selection of the marketing channel may change the appearance of the Activities page display. |
Channel Detail |
This field appears only when the activity is Broadcast and the marketing channel is TV or Radio. |
Audience |
If the channel execution is Sales Force, Order Capture, or Mail Correspondence, select the audience that you want to attach to the activity. |
Package Name |
If the channel execution is Mail Correspondence, select a correspondence package. Correspondence templates are created in the Correspondence setup component. |
Offer |
If the channel execution is Sales Force, Order Capture, or Mail Correspondence, select the offer that you want to attach to the activity. |
Collateral |
If the channel execution is Sales Force, Order Capture, or Mail Correspondence, select the collateral that you want to attach to the activity. |
Send Date |
If the channel execution is Mail Correspondence, this field displays the date that the message package (email or mail) was sent. |
Script Name |
If the channel execution is Order Capture, select the script to be used when the activity runs. Because different channel types have different scripts associated with them, if an activity's channel type is changed the Script Name field is cleared and must be reselected. Note: In PeopleSoft Marketing, you can associate scripts with activities for use by other PeopleSoft applications, but you cannot run scripts. |
Description for Sales Team
This section displays descriptive information about the activity to give Sales users details about the originating campaign so that they can make good decisions about the processing of generated leads and their resultant opportunities. Note that this information appears only if the marketing channel is a sales agent.
If neither of these two conditions is met, then the fields described in this section do not appear.
Note: A marketing activity cannot be moved to Approved status if either of the fields in this section are left blank.
Field or Control |
Description |
|---|---|
Summary |
Because sales users do not always understand the marketing jargon used in the marketing-oriented activity description, this field gives the campaign or marketing manager a place to include a description more tailored to the sales user's needs to aid the user in operating on the lead within proper context. |
Call To Action |
Specify appropriate follow-up actions to help the sales user correctly interpret and convert the generated lead. |
See PeopleSoft Sales.
Record Costs
Enter costs associated with the activity that are not included elsewhere. Selection of collateral or an audience that has an associated cost record propagates those costs into the campaign activity.
Field or Control |
Description |
|---|---|
Cost Type |
Select the cost type description that uniquely identifies the main purpose of the expense. |
Components |
Displays the category to which the cost belongs. |
Variable |
Displays whether the cost type is defined as variable or fixed. |
Unit Cost |
Enter the cost of one unit of the product or service to be measured in this cost metric. Note: This field is editable only when the cost type is Variable. |
Planned Cost |
Enter the amount that you expect to pay for all units of the product or service to be measured in this cost metric. |
Actual Cost |
Enter the amount that you actually pay for all units of the product or service measured in this cost metric. |
Totals |
The sum of all planned costs and the sum of all actual costs. |
Calculate |
Click to calculate total values. |
Add a New Activity Cost |
Click to add a new cost. |
Review Activity Performance Metrics
Select the terms by which to measure campaign performance.
Field or Control |
Description |
|---|---|
Metric |
Select the metric by which to measure activity performance. |
UOM (unit of measure) |
Displays the unit of measure in which the metric is calculated. |
Forecast Value |
Enter the result that you expect the activity to produce. |
Actual Value |
Displays the result that the activity actually produces. The system populates this field with data from various tables and sometimes from multiple applications (such as PeopleSoft Sales and PeopleSoft Call Center). |
Difference |
Displays any difference between the forecast and actual values. Over expenditures appear as a negative number. |
Add a New Activity Metric |
Click to add additional activity metrics. |
Recalculate |
Recalculates all attached metrics. Note: All existing metrics are calculated when you access the Activity Detail page for the first time. |
Activity Notes Summary
This section contains a list of any notes that have been associated with the activity. An Add Activity Note button on the main activity page enables you to create additional notes to associate with the activity. Activity notes can include attachments.
Use the Marketing Programs - Team page (RA_CAMPAIGN_TEAM) to specify team members for the campaign.
Navigation:
Marketing, Marketing Programs, Team
This example illustrates the fields and controls on the Marketing Programs - Team page.
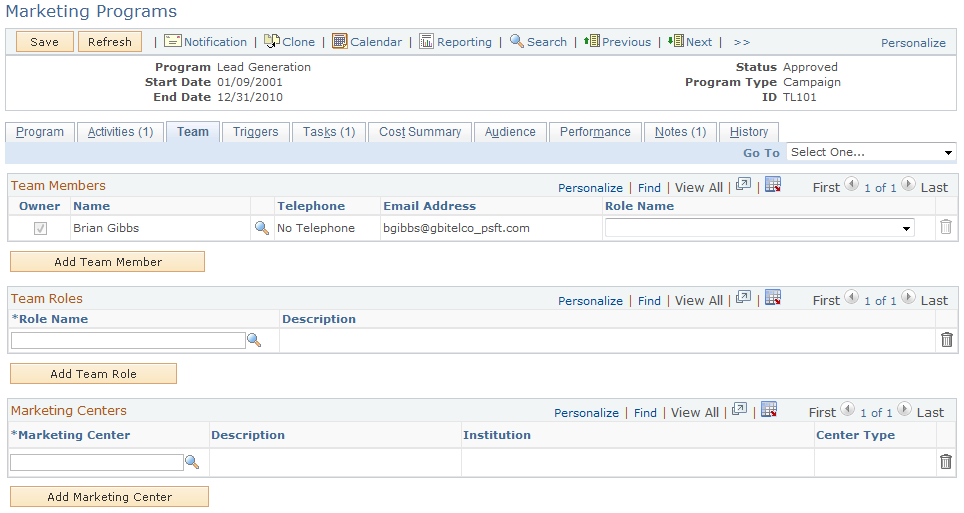
Field or Control |
Description |
|---|---|
Owner |
This check box is automatically selected for the owner of the campaign. |
Name |
Select the name of each person included in the campaign team from the lookup table. Phone and Email information appears when available. Note: Team members must exist in the system as an entity. If the team member whom you want to add does not exist as an entity within the system, you can add company or site names using Quick Create. |
Add a Team Member |
Click to enter additional team members. |
Team Role |
Select a role for each person on the team. Only persons with valid user IDs can have a role. Based on their team role, team members can also receive notification of campaign events. For example, a campaign manager can receive an email notice whenever a campaign is submitted for review or a worklist note whenever an activity is stopped prematurely. |
Add Team Role |
Click to enter additional team roles. |
Marketing Center |
You can select a Marketing Center from the available list if any have been defined for the campaign. |
Add Marketing Center |
Click this button to add a Marketing Center to the campaign. |
Delivered Team Roles
The following campaign team roles are delivered:
|
Role |
Description |
|---|---|
|
Marketing Manager |
|
|
Campaign Manager |
|
|
Marketing Analyst |
|
|
Marketing Researcher |
|
|
Marketing Creative |
|
|
Marketing App Administrator (marketing application administrator) |
|
Marketing Programs and Marketing Security
The Marketing Centers grid appears on the Team tab of the Marketing Programs component.
In order to secure a marketing program, you must select the Secure check box, which appears on the Program tab of the Marketing Programs component.
When searching for Marketing Programs that might be secured, the search displays only those Marketing Programs that the user performing the search is authorized to access. Because the Marketing search can also include the program type of Dialog, the search also checks secured dialogs for Marketing Center authorization.
If a secured child campaign is associated to a roll up, all campaigns are automatically copied over from the roll up to the secured child campaign. If a campaign is unsecured and a roll up is selected, Marketing Centers from the roll up are not copied to the campaign.
When a Marketing Center is added or deleted on a roll up, then the changes are propagated to all the secured child campaigns associated to the roll up. However, when adding or deleting Marketing Centers on a secured child campaign, changes are not propagated from the child to the parent roll up. This is because multiple child campaigns can be associated with a roll up, and users might want to assign different Marketing Centers for each campaign. Specific requirements are as follows:
If a campaign is secured and you select a roll up, the system displays a warning message informing you that Marketing Centers from the selected roll up will be copied over when the campaign is saved, and reminding you to review Marketing Centers that might have been copied from a prior roll up if the campaign was previously associated to another roll up.
When a save occurs, all Marketing Centers from the roll up that do not already exist on the secured child campaign will be copied over.
When adding new Marketing Centers to a roll up, upon a save the new Marketing Centers are added to all secured child campaigns that do not already exist on the child campaigns.
When deleting Marketing Centers from a roll up, upon a save the deleted Marketing Centers will be removed from all secured child campaigns.
If a secured child campaign that has been previously linked to a roll up is modified by associating it to another roll up, then upon a save all Marketing Centers from the newly linked roll up are copied over to the child campaign if they do not already exist. The user decides whether to manually delete any Marketing Centers that might have been copied over from a prior roll up.
Use the Marketing Programs - Triggers page (RA_CAMPAIGN_TRIGER) to view summary information about existing triggers and add new triggers.
Navigation:
This example illustrates the fields and controls on the Marketing Programs - Trigger page.
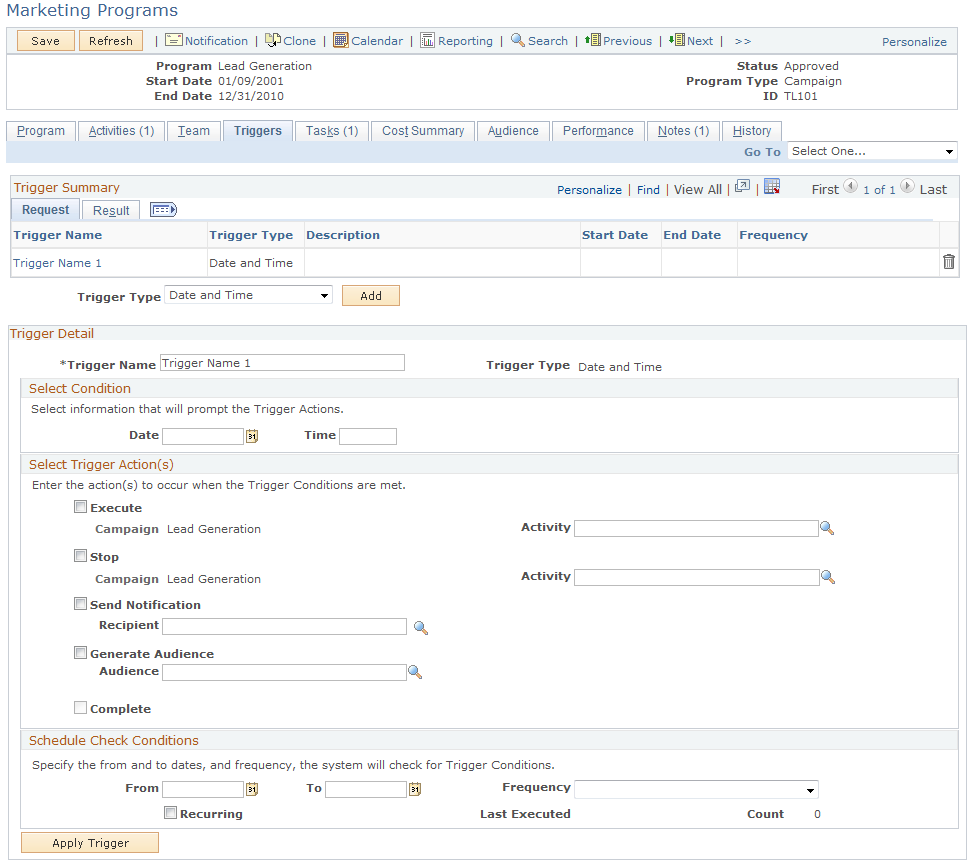
Understanding Triggers
The system can initiate campaign events on the currently-viewed campaign at specified times or when specified conditions are met, by using campaign triggers. Use triggers to run or stop the campaign or activity at a certain point in time or when another campaign or activity attains a certain condition. Also, use triggers to send notifications or generate an audience at specified points. One example of how a trigger can be used is to launch a series of activities within a campaign.
Note: You can only stop or run the campaign currently being viewed; likewise, only activities associated with that campaign can be stopped or run. You cannot select another campaign.
Suppose that you have a campaign with two activities. The objective of this campaign is to move the best standard credit card customers up to the premium card service, and the two activities include a mailed postcard and a mailed letter with brochure. When you define the campaign, you define two triggers, one for each activity.
The purpose of the first trigger is to launch the postcard activity on a certain date. To accomplish this, you create a Date and Time trigger and have it run the postcard activity, send notification to a team member telling her to mail the postcards, and generate an audience to receive the cards.
The purpose of the second trigger is to launch the letter and brochure activity sixty days after the postcards are mailed. Again, you create a Date and Time trigger with the same trigger actions reflecting the new activity and a new audience based on results of the postcard activity.
Note: A trigger can be deleted until it has finished.
Trigger Summary
Access an existing trigger by clicking on the trigger name within the trigger summary grid.
Field or Control |
Description |
|---|---|
Trigger Type |
Select a trigger type. The trigger type determines when the system runs action requests and controls the field display on the Trigger Detail page. Values are: Date and Time: The system initiates campaign events on specified dates and times. Metric to Metric: The system initiates campaign events when two metric results align as defined. Metric to Value: The system initiates campaign events when a metric result matches a fixed amount. |
Add |
Click to add the selected trigger type. |
Trigger Detail
This group box shows the detailed information for a trigger that you click in the summary grid or for a trigger that you are creating after clicking the Add button.
Field or Control |
Description |
|---|---|
Trigger Name |
Enter a descriptive name for the trigger. |
Trigger Type |
Displays the trigger type that you selected on the Marketing Programs - Trigger Summary page. Depending on the trigger type selection, different fields appear in the rest of the Select Condition region. |
Select Condition Group Box
The trigger type selected determines the fields that appear in the Select Condition group box. The following table lists the fields that appear with each trigger type.
|
Trigger Type |
Select Condition |
|---|---|
|
Date and Time |
|
|
Metric to Metric |
|
|
Metric to Value |
|
The system displays some combination of the following fields, based on the trigger type that you select.
Field or Control |
Description |
|---|---|
Date |
Select the date when the system is to run the trigger. Note: The system displays this field only when you select the trigger type Date and Time. |
Time |
Enter the time when the system is to run the trigger. The system recognizes standard time formats, for example, 2:30 p.m. or 02:30 PM or 14:30. Note: The system displays this field only when you select the trigger type Date and Time. |
Metric, Metric One, Metric Two |
Select a performance metric to apply against a corresponding campaign or activity. Metric One and Metric Two labels indicate that the metric is applied against the campaign or activity with the same designation. |
Campaign One, Campaign Two |
Select a campaign against which you want to apply the metric. Selection of a campaign is required. Condition metrics may be applied against any running campaign. |
Campaign |
This field displays the name of the current campaign. |
Activity, Activity One, Activity Two |
Select an optional activity within the specified campaign. When an activity is specified, the metric applies only against that activity and no others within the campaign. |
Operator |
Select the operator by which to compare two metric results, or a metric against a fixed value. Operator values are:
Note: The following four operators are reserved for future use: Divide, Minus, Multiply, and Plus. |
Value |
Enter a fixed value against which the metric result is compared. Note: The system displays this field only when you select the trigger type Metric to Value. |
Select Trigger Actions Group Box
Field or Control |
Description |
|---|---|
Execute |
Select to run an activity within the current campaign when the trigger condition is true. Execute actions apply only to the campaign activity and not to the campaign itself. |
Stop |
Select to stop a campaign, or an activity within the campaign, when the trigger condition is true. If no activity is selected, the stop action applies to the campaign. |
Send Notification |
Select to notify a person when the trigger condition is true. Select the person to notify in the Send Notification field. |
Generate Audience |
Select to generate an audience when the trigger condition is true. Select the audience to generate in the Generate Audience field. Schedule the Audience Generation Application Engine program to be run by the processor to generate the audience. |
Result |
After the system attempts to run a trigger—whether successfully or unsuccessfully—it displays a result message. If the trigger execution attempt is unsuccessful, the result message indicates the nature of the failure. |
Schedule Check Conditions
If you select either the Metric to Metric or the Metric to Value trigger type, schedule intervals of time that determine when the system checks those campaign conditions. For example, the system could check campaign conditions every day, every two weeks, or every four months. Establish trigger schedules on the Campaign Trigger Schedules page.
Field or Control |
Description |
|---|---|
From and To |
Enter start and end dates and times between which the system checks for trigger conditions. |
Frequency |
Select the schedule that determines how frequently the system checks whether trigger conditions have been met. |
Start Date and End Date |
Enter dates when the system begins and stops checking whether trigger conditions have been met. |
Recurring |
Select this check box if you want the trigger to recur. Note: Recurring triggers generate an error if the EXEC or STOP action is requested and Recurring is selected. |
Use the Marketing Programs - Tasks page (RA_CAMPAIGN_TASK) to view existing campaign tasks and add new tasks.
Navigation:
This example illustrates the fields and controls on the Marketing Programs - Tasks page.
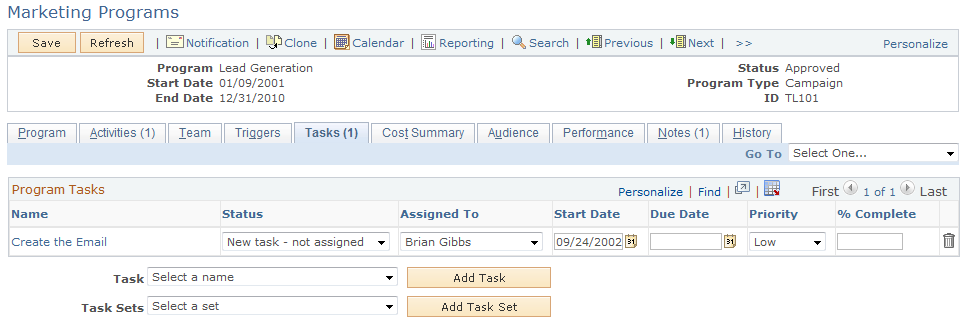
Throughout the course of a marketing campaign, various tasks may need to be accomplished. These tasks can include things such as creating advertising and collateral materials, contracting for ad space and purchasing media time, or generating a target audience. Tasks are associated with a campaign and assigned to appropriate team members as a reminder to do a certain thing at a certain time. When a task is assigned to a campaign team member, a notification is added to her worklist when she is to perform the task.
The Marketing Programs - Tasks page displays any existing tasks and enables you to add new tasks. To access an existing task, click the task name within the Campaign Tasks grid.
You use task sets to group individual tasks and add them as a group. For example, when you create a campaign, three tasks always need to be added: Create Collateral, Create Metrics, and Create Offer. Rather than selecting each task individually, you can create a task set (perhaps called Always Add 3) and include the three tasks within the task set. Next time you create a campaign, you can select the Always Add 3 task set, eliminating the need to add the tasks one at a time.
Field or Control |
Description |
|---|---|
Task |
Select a predefined Task Shell from the available list. To create a new task, select Create a New Taskand define the new task as required. Otherwise, select a predefined task shell and modify it if necessary. Click Add to access the Marketing Program Tasks - Campaign Task Detail page, where you can define a new task or modify an existing one. |
Task Sets |
Select a previously defined task set from the available list. Selecting a task set automatically displays the single tasks in the set. Selecting another task set refreshes the display, and setting the value back to the default or adding the task set clears the display. Use task sets as defined or modify as necessary. Click Add to add all tasks in a task set. View details about each task by clicking the task name. Eliminate individual tasks by deleting them from the list. |
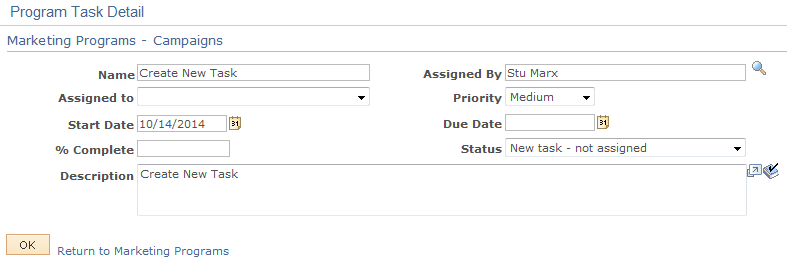
Use the Marketing Programs - Task Detail page (RA_PGM_TASKDTL) to add detailed information about a campaign task.
Navigation:
Click the Add Task button.
This example illustrates the fields and controls on the Task Detail page.
Field or Control |
Description |
|---|---|
Name |
Enter a name for the task, or leave the shell default name. |
Assigned By |
The system automatically assigns the current user to this position. You can change this to any worker. |
Assigned to |
Select a user to run the task. The user must be a member of the campaign team. Save the campaign to activate the task assignment. Note: The system does not permit you to assign a task to a person who is not a member of the campaign team. |
Start Date |
Enter a date on which the task is to begin. On this date, a notification is added to the worklist of the team members assigned to the task. |
Due Date |
Enter a date on which the task is to be complete. This due date is compared against the % Complete field. If the task is not 100 percent complete by the due date, a workflow process sends notifications (when defined). |
Priority |
Select the urgency of the task. This information is for the benefit of the user, only. No logic is attached to priority values. The values are:
|
Status |
Select the position of the task in its life cycle. When the status is changed to Completed, the due date is changed to the current date and the % Complete value is changed to 100. |
% Complete (percent complete) |
Enter the percentage portion of the task that is complete. When this value is changed to 100, the due date is changed to the current date and the status is changed to Completed. |
Description |
Enter a description of the task, or leave the shell default description. |
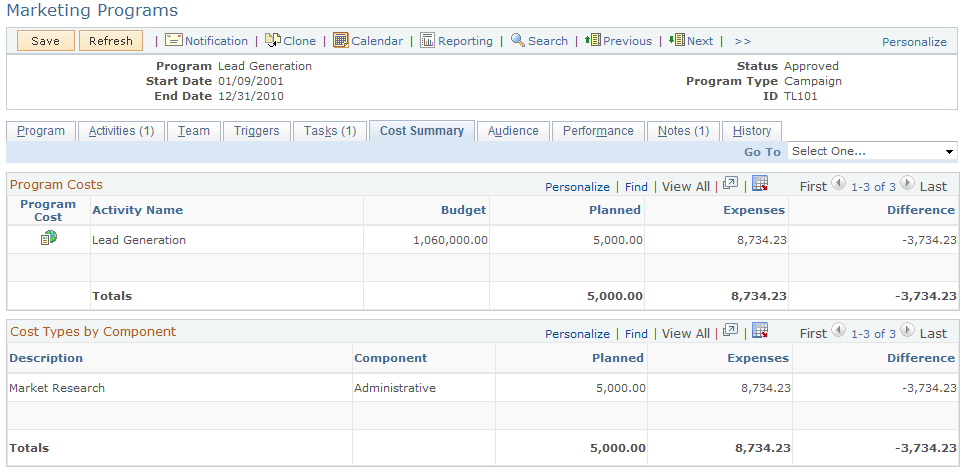
Use the Marketing Programs - Cost Summary page (RA_CAMPAIGN_COSTS) to view all costs associated with the campaign including all activities.
Costs are summarized by activity and by cost type. For roll up campaigns, all child costs (for associated campaigns, activities, and dialogs) are also displayed.
Navigation:
This example illustrates the fields and controls on the Marketing Programs - Cost Summary page.
Use the Marketing Programs - Audience page (RA_CM_LIST_SUMRY) to attach target audience lists to campaigns.
Navigation:
This example illustrates the fields and controls on the Marketing Programs - Audience page.
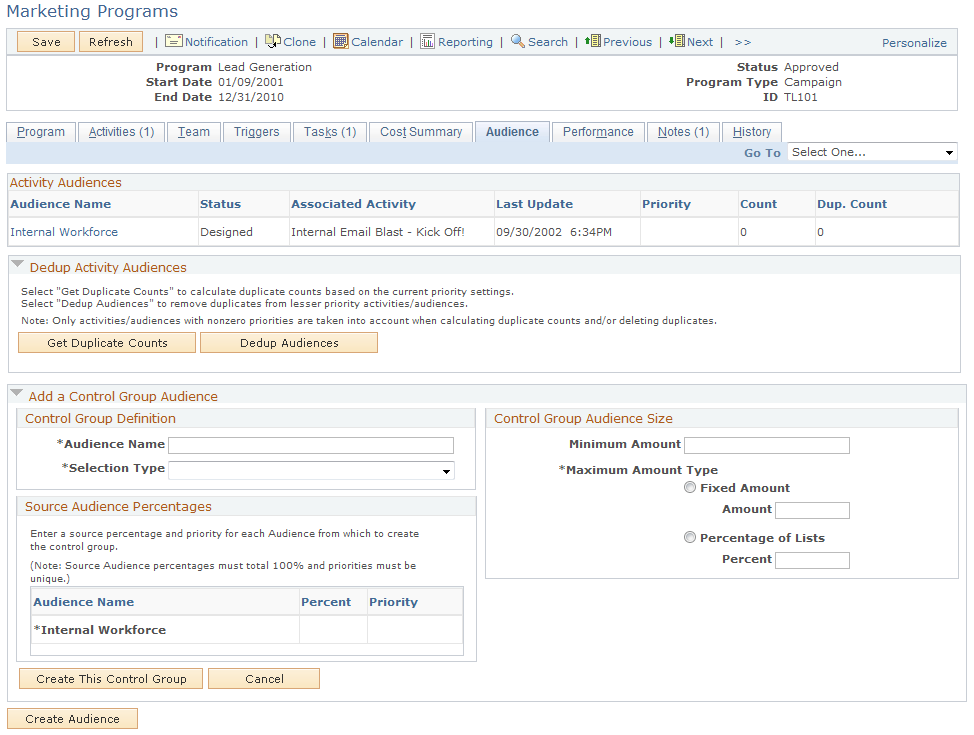
Audiences are associated with campaigns through the campaign activities. The Marketing Programs - Audience page enables you to see all audiences that are associated with the campaign through all activities. Additionally, the Marketing Programs - Audiences page enables you to run deduplication processes and create one or more control groups.
Activity Audiences
The Activity Audiences group box displays information about all audiences associated with the campaign. Information displayed about each audience includes the name of the audience, audience status, the activity to which the audience is attached, the date on which the audience was last updated, and the priority value of the audience.
Field or Control |
Description |
|---|---|
Count |
The total count of records in the audience. |
Dup. Count (duplicate count) |
A count of the number of records that are duplicated in other audiences associated with the campaign. |
Note: The system calculates duplication counts only for those audiences for which you have defined priority numbers greater than zero.
Dedup Activity Audiences
Depending on the campaign strategy, you may want to eliminate duplicated records from the audiences to prevent prospects from being contacted more than once. For example, suppose you have a campaign with two activities. The first activity targets all customers identified having an interest in golf. The second activity targets all females who live in Georgia. Since Jane Smith loves golf and lives in Georgia, her name appears on both lists. As marketing manager, you determine that the golf lover's activity takes priority over the activity that targets women in Georgia. When you deduplicate the audiences, you eliminate Jane Smith's name from the Georgia women's activity and retain it on the golf lover's activity.
In some cases, however, the activities are designed for the purpose of contacting prospects multiple times through different methods. In this case, do not eliminate duplicated records.
Note: Only fixed audiences in approved status can be deduplicated.
Field or Control |
Description |
|---|---|
Get Duplicate Counts |
Click to run a process to determine how many duplicated records exist in each audience. The process is scheduled to run immediately. How long it takes to complete the process depends on the size of the list and other processor activity. |
Dedup Audiences (deduplicate audiences) |
Click to run a process to eliminate duplicated records. Records in the audience with the highest priority value remain as the original record. Duplicated records in all audiences with a lower priority value are eliminated. The process is scheduled to run immediately. How long it takes to complete the process depends on the size of the list and other processor activity. |
Priority |
Enter a priority value to determine which records the system removes. The system removes lower-priority duplicates before higher-priority duplicates. Indicate the relative priority of the audiences by giving numerically higher numbers to lower-priority audiences. For example, an audience with a priority number of 99 is of lower priority than an audience with a priority number of 30. To prevent an audience from being modified, enter a priority value of zero (0). Note: This field can be edited only if the audience is approved or if it is a fixed audience. |
Add a Control Group Audience
Control groups help you gauge the effectiveness of the campaign by isolating a small segment of the target audience. By comparing sales results of the larger audience to those of the control group, you can determine the actual influence of the campaign.
How control group members are drawn from each included audience is controlled by a combination of the control group audience size and source audience percentages. Source audience percentages determine the percent of the total control group members who are drawn from each audience. The control group audience size determines the total number of control group members. For example, suppose the campaign includes the following three audiences (all record counts are unduplicated); Audience 1 with 900 records, Audience 2 with 750 records, and Audience 3 with 1,800 records. If you create a control group of five percent of the audience (total 172), and specify the source audience percentages as 33 percent, 33 percent, and 34 percent respectively, 56 records will be drawn from Audience 1, 56 from Audience 2, and the remaining 60 from Audience 3.
Field or Control |
Description |
|---|---|
Audience Name |
Enter a descriptive name for the control group audience. |
Selection Type |
Select the manner in which the system selects specific records and people to place in control groups. Select Every Nth to select records by an even distribution method. For example, for a control group consisting of five percent of the total audience, every 20th record is selected. Select Random to select records on a random basis. Note: The method used to randomly select records is not meant to produce a statistically valid random sample. |
Minimum Amount |
Enter the smallest control group size that you consider acceptable. If the actual amount yielded by the selection process is less than the minimum, the process fails. The newly created control group audience is set to a status of Designed rather than Generated and a note is entered in the log indicating the reason. |
Maximum Amount Type |
Select the manner in which the maximum size of the control group is determined. Select Fixed Amount to specify an actual maximum number. Enter the maximum number. Select Percentage of Lists to determine the control group count as a percentage of the combined audience total. Enter the percentage of the total number of control group members to draw from each of the audiences. The total percentage must equal 100. To prevent control group members from being selected from a particular audience, enter zero as a source percentage for that audience. Note: You can draw control group members only from fixed audiences that have the status Approved. |
Create This Control Group |
Click to generate a control group. The control group creation process is scheduled and run immediately. |
Cancel |
Click to cancel the control group definition before creating it. After you click the Create This Control Group button, the process cannot be canceled. |
Use the Marketing Programs - Performance page (RA_CMPGN_METRICS) to measure the effectiveness of marketing campaigns.
Navigation:
This example illustrates the fields and controls on the Marketing Programs - Performance page.

Review Campaign Performance Metrics
The grid displays information about any metrics attached to the campaign. All existing metrics are calculated when you enter the page.
To add a new metric, click the Add a New Activity Metric button.
Field or Control |
Description |
|---|---|
Metric |
Select to measure campaign performance. |
UOM (unit of measure) |
Displays the unit of measure associated with the selected metric. |
Forecast Value |
Enter the result that you expect. |
Actual Value |
Displays the actual result. This field is populated with data from various tables and sometimes from multiple applications (such as PeopleSoft Sales). |
Difference |
Displays the difference between the forecast and actual values. |
Edit or View |
Click the Edit button to edit an existing metric. Click the View button to return the display to the view mode. Note: Only one metric can be edited at a time. No metric changes are effective until the page is saved. |
Delete |
Click to delete an existing metric. |
Add a New Performance Metric |
Click to add a new metric to the existing list. |
Use the Marketing Programs - Notes page (RA_CAMPAIGN_NOTES) to view descriptions of campaign notes; add new notes.
Navigation:
Use this page to view existing notes and attachments, to send email messages, or to add new notes.
You can add a note to a campaign, activity, task, content item, content task, or offer.
Use the Marketing Programs - History page (RA_CMPGN_HISTORY) to view the audit and interaction information associated with the campaign.
Navigation:
Use this page to view audit and interaction information about the campaign.
Viewing Audit Information
To view information about changes to the campaign, click the Audit link.
This example illustrates the fields and controls on the Marketing Programs - History page.
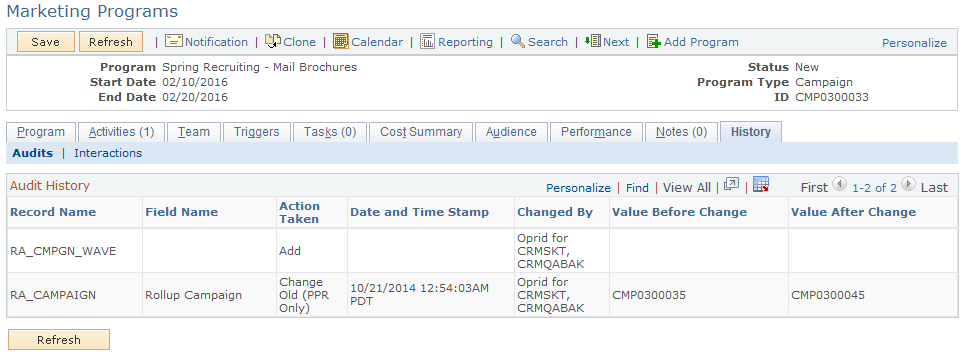
Viewing Interaction Information
To view the email notification interaction records for the marketing campaign, click the Interactions link.
You can click the record's icon to transfer to the appropriate 360-degree view for the interaction.
Use the Marketing Calendar page (RA_CALENDAR) to view the time relationships of all campaigns.
Navigation:
Click the Marketing Calendar button on the Marketing Programs component.
This example illustrates the fields and controls on the Marketing Calendar page.
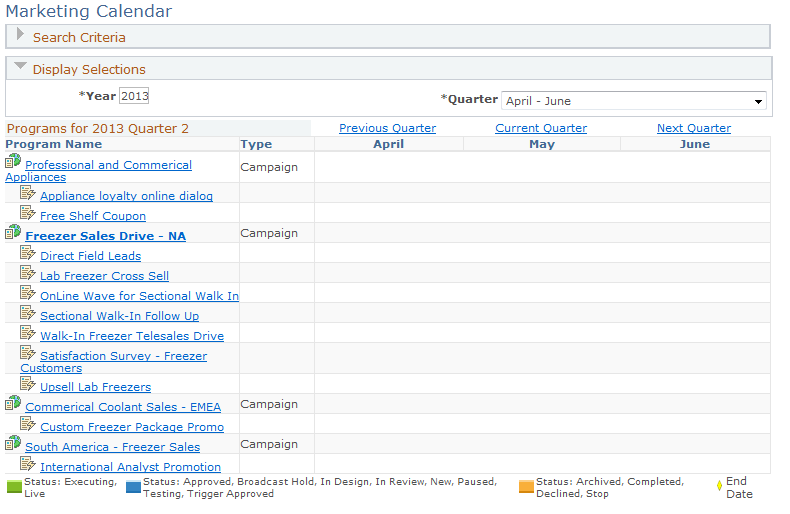
The Marketing Calendar page displays the status and schedule relationship of all campaigns and activities that meet the search criteria that you define (business unit, year, and quarter are required). Schedules are displayed graphically, showing the start and end dates of the campaign at each level of the hierarchy: roll up, campaign or dialog, and activity. Campaigns within a roll up campaign are displayed relative to the parent campaign, and activities within each child campaign are displayed relative to the child campaign.