Sending Invitations
This section describes how to send invitations to an event.
|
Page Name |
Definition Name |
Usage |
|---|---|---|
|
RAE_EVENT_REGISTR |
Send invitations to an event. |
Use the Event - Participants page (RAE_EVENT_REGISTR) to send invitations to an event.
Navigation:
Click the Participants tab on the Event Detail page.
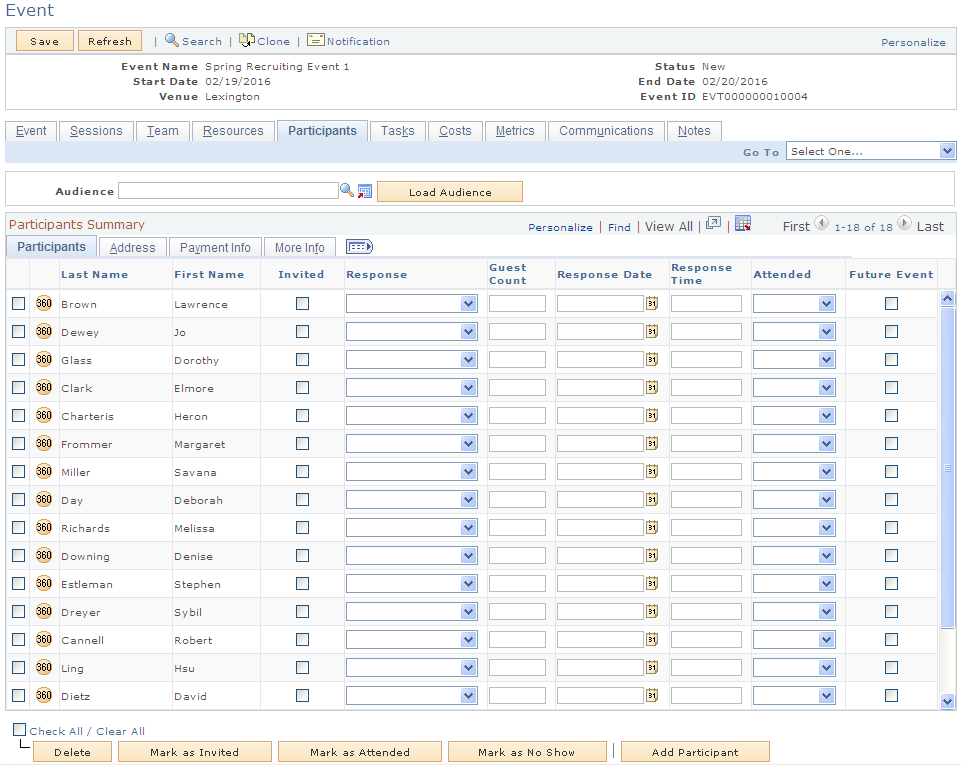
This example illustrates the fields and controls on the Event - Participants page.
Note: This section describes only the Participant page fields relevant to inviting participants to the event. For information about defining participants, refer to the Defining Participants section.
Depending on the number of seats available for the event, invitees can either be Registered or Waitlisted. Additionally, they can decline the invitation but specify that they are interested in future events similar to this one. Finally, the participant can be marked as either Attended or a No Show, depending on whether they actually attended the event.
Participants Tab
The Participants tab shows detailed information about the invitees.
Field or Control |
Description |
|---|---|
360 icon |
Click this icon to access the 360-degree view for the invitee. The type of 360-degree view displayed depends on which application is installed and enabled. |
Last Name, First Name |
The name of the invitee. |
Invited |
Select this check box to include the specified person in the event invitation. |
Response |
Select the invitee's response to the invitation from the list of choices. The default value is no response; other options include Registered, Waitlisted, and Declined. Invitees are waitlisted if they accept the invitation after all available seats for the event have been filled. If you select Registered, the system verifies whether the event has the required number of available seats. If seats are not available, the system displays a warning indicating that the event does not have available seats, but the invitee can be waitlisted for the event. |
Guest Count |
The number of guest participants to attend the event on behalf of the invitee. |
Response Date, Response Time |
The date and time on which the invitee responded to the invitation. |
Attended |
Specifies whether the invitee attended the event. By default this field is blank; select Yes or No. |
Future Event |
Select this check box if the invitee has indicated interest in receiving information about upcoming future events similar to this one. |
Mark as Invited |
Click this button to mark all selected invitees as Invited to the event. |
Mark as Attended |
Select this check box to mark all selected invitees has having Attended the event. |
Mark as No Show |
Click this button to set the value in the selected invitees' Attended field to No. |
Add Participant |
Click this button to add additional individuals to the participant list. If the person already exists in the participant list with a different role, an error message displays informing you that you cannot add the same person with a different role. If you want to change the participant's role, you can delete the existing participant and add a new one. If the search returns no results, you can quick create the person with the role of Consumer, or Contact for a Company. If the prospective participant has requested not to be contacted, an error message displays and that person is not added to the participant list. |
Payment Info Tab
This tab shows the details about the invitee's payment.
Field or Control |
Description |
|---|---|
Amount Paid |
The amount that the invitee has paid to attend the event. This amount is captured automatically from the Online Marketing credit card payment. |
Refund Amount |
The amount refunded to the invitee (for example, if attendance was cancelled). The Amount Paid and Refund Amount are used when calculating the revenue generated from the event. |
Currency Code |
The currency type in which the payment was made. The Currency Code displayed is the same as the value specified on the Event Detail page. |
360 icon |
Click this icon to access the 360-degree view for the invitee. The type of 360-degree view displayed depends on which application is installed and enabled. |
See Sending Invitations.