
 Choosing Selection Criteria
To selectively retrieve just the data you want, you define selection criteria. Selection criteria refine your query by specifying conditions that the retrieved data must meet. For example, you can specify that the system retrieve only those phone numbers with a certain area code instead of all phone numbers.
This chapter discusses how to:
Choose selection criteria.
Define criteria.
Define prompts.
Define HAVING criteria.
Define expressions.
Choosing Selection CriteriaBecause your PeopleSoft database stores data in tables, you can identify every individual piece of data by saying what column (field) and row (record) its in. When you create a query, pick the data that you want by specifying which columns and rows you want the system to retrieve.
If you run the query after selecting the fields, the system retrieves all the data in those columns; that is, it retrieves the data from every row in the table or tables. There is a good chance that this is much more data than you want or need. You select which rows of data you want by adding selection criteria to the query.
The selection criteria serves as a test that the system applies to each row of data in the tables that you are querying. If the row passes the test, the system retrieves it; if the row does not pass, the system does not retrieve it. For example, suppose that you needed the names of all PeopleStore customers who are not PeopleSoft employees. You would start by creating a query that retrieved the Name and Company fields from the Customer table. You could then add a selection criterion that told PeopleSoft Query to scan for rows where the company name is not PeopleSoft.
In most cases, a selection criterion compares the value in one of a row’s fields to a reference value. In the preceding example, you would compare the value in the Company field to the constant value PeopleSoft. In other situations, you might compare the value to the value in another record field or to a value that the user enters when running the query.
Defining CriteriaThis section discusses how to:
View and edit selection criteria.
Select condition types.
Enter comparison values.
Specify effective date criteria.
Relate multiple criteria.
Pages Used to Enter Selection Criteria
Viewing and Editing Selection CriteriaAccess the Criteria page.
Any rows after the first row must include either an AND or OR logical value in the Logical column to specify whether you want the rows to meet this criterion in addition to other criteria you have defined or as an alternative criterion. The first criterion you define does not have a value in this column. The default for subsequent criteria is AND.
To reorder the criteria for your query, click Reorder Criteria, enter the new positions for the criteria on the Edit Criteria Ordering page, and click OK. You can also click the Add Criteria button from this Criteria page to add additional criteria, and you can click the Group Criteria button to group your criteria logically.
Editing Criteria PropertiesAccess the Edit Criteria Properties page.
|
Field |
Select this option if you want to base the selection criterion on another field’s value. Usually a field in another record component. To compare the values from fields in two records, you must join the record components. When you select this option, you must go on to select a condition type. Click the drop-down button in the Condition Type column and select the appropriate comparison operator from the pop-up menu. |
|
Expression |
Select this option if you want PeopleSoft Query to evaluate an expression that you enter before comparing the result to the value in the selected field. When you select this option and then click the New Expression link to create a new expression, you must go on to select an expression type. If you are entering an aggregate value, select the Aggregate Function check box. You can also enter parameters for length and decimal positions. Also enter the expression in the text box. Query Manager inserts this expression into the Structured Query Language (SQL). |
To create criteria based on a field:
Click the Add Criteria icon that is associated with the required field, on the Fields or Query page.
Query Manager opens the Edit Criteria Properties page with the selected field entered as Expression 1.
Specify the criteria for that field, and then click OK to return to the Fields or Query page.
You can also use a field from a record as criteria even if you have not chosen that field for query output.
To create criteria that is not based on a field:
Click the Add Criteria button on the Criteria page.
The Edit Criteria Properties page appears, enabling you to edit Expression 1 and Expression 2.
In the Choose Expression 1 Type group box, select Field or Expression.
Edit the second (right-hand) Expression column to enter comparison values.
Save your query.
Selecting Condition TypesThe condition type determines how Query Manager compares the values of the first (left-hand) expression to the second (right-hand) expression.
The following table describes the available condition types. Query Manager also offers a “not” option that reverses the effect of each condition type. For example, not equal to returns all rows that equal to would not return.
Note. It is always better to use the not version of an operator rather than the NOT operator on the entire criterion. When you use NOT, PeopleSoft Query cannot use SQL indexes to speed up the data search. When you use the not version of an operator, PeopleSoft Query can translate it into an SQL expression that enables it to use the indexes.
|
Condition Types |
When It Returns a Row |
|
The value in the selected record field falls between two comparison values. The range is inclusive. |
|
|
The value in the selected record field exactly matches the comparison value. |
|
|
This operator is different from the others, in that it does not compare a record field to the comparison value. The comparison value is a subquery. If the subquery returns any data, PeopleSoft Query returns the corresponding row. |
|
|
The value in the record field is greater than the comparison value. |
|
|
The value in the selected record field matches one of the comparison values in a list. |
|
|
The value in the selected record field appears as a node in a tree created with PeopleSoft Tree Manager. The comparison value for this operator is a tree or branch of a tree that you want PeopleSoft Query to search. Note. PeopleSoft Query should not use trees that contain a combination of dynamic details and range details. The results returned from trees with this combination of details may be inaccurate. |
|
|
The selected record field does not have a value in it. You do not specify a comparison value for this operator. Key fields, required fields, character fields, and numeric fields do not allow null values. |
|
|
The value in the record field is less than the comparison value. |
|
|
The value in the selected field matches a specified string pattern. The comparison value may be a string that contains wildcard characters. The wildcard characters that PeopleSoft Query recognizes are % and _. % matches any string of zero or more characters. For example, C% matches any string starting with C, including C alone. _ matches any single character. For example, _ones matches any five-character string ending with ones, such as Jones or Cones. PeopleSoft Query also recognizes any wildcard characters that your database software supports. See your database management system documentation for details. To use one of the wildcard characters as a literal character (for example, to include a % in your string), precede the character with a \ (for example, percent\%). |
Note. If you have selected the EFFDT field on an effective-dated table, PeopleSoft Query also offers special effective date operators.
Entering Comparison ValuesThis section provides an overview of comparison values and discusses how to:
Select a constant value.
Build a list of values.
Add prompts to an expression list.
Add comparison values to an expression list.
The procedure for entering comparison values differs depending on what kind of value you are entering. If you are comparing one field to another, pick the second record field; if you are comparing the rows to a constant value, enter the constant.
The following table describes all the available value types, the pages that appear based on each comparison type, and the fields you must complete in those pages.
|
Value Type |
Action |
|
The value in the selected field is compared to the value in another field, usually a field in another record component. When you select Field as the comparison value, the Choose Record and Field page appears. The Record Alias field lists all the records that are part of the current query. Select the record and the field. The selected field name appears in the second Expression column of that field’s row. |
|
|
The value in the selected field is compared to an expression you enter, which PeopleSoft Query evaluates once for each row before comparing the result to the value in the selected field. When you select Expression as the comparison value, the Define Expression page appears. In the text box, enter a valid SQL expression. To add a field or user prompt to the expression, click the Add Field or Add Prompt link, respectively. These links display the same pages that you see when adding a field or prompt as a comparison value: Add Prompt displays the Run-time Prompt page; Add Field link displays the Select a Field page. The only difference is that PeopleSoft Query adds the field or prompt to your expression rather than using it directly as the comparison value. |
|
|
The value in the selected field is compared to a single fixed value. When you select Constant as the comparison value the Define Constant page appears. In the text box, enter the value you want to compare the first expression to. To add a value by selecting it from a list, click the Look Up button to display the Select a Constant page. Note. A list of constants is only available for fields that have translate values or an assigned prompt table. See Selecting a Constant Value. |
|
|
The value in the selected field is compared to a value that you enter when running the query. When you select Prompt as the comparison value, the Define Prompt page appears. Click the New Prompt link to move to the Edit Prompt Properties page. To modify an existing prompt, you can click the Edit Prompt link. See Defining Prompts. |
|
|
The value in the selected field is compared to the data returned by a subquery. When you select Subquery as the comparison value, the Define Subquery page appears. Click the Define/Edit Subquery link to move to the Records tab to start a new query. |
|
|
The value in the selected field is compared to a list of values that you enter. This value type is available only when the selected operator is in list or not in list. When you select In List as your comparison value, the Edit List page appears. Use the Look Up button to display the Edit List page and search for the desired values. Note that values will appear here only if you have entered them previously. See Building a List of Values. |
|
|
The value in the selected field is compared to the current date on the database server. |
|
|
The value in the selected field is compared to a selected set of tree nodes. This value type is available only when the selected operator is in tree or not in tree. When you select Tree Option as the comparison value, the Select Tree Node List page appears. Use this page to create a list of values for PeopleSoft Query to compare to the value from the first expression. |
|
|
Used on some effective-dated records, the effective sequence is a sequencing number provided to further refine the effective date. |
Note. Not all value types are available for all operators. For example, when you select the exists operator, Subquery is the only available value type. After you select an operator, PeopleSoft Query displays only the value types that are available for that operator.
When you select Constant as your comparison value, the Define Constant page appears. In the text box enter the value to which you want to compare the first expression. To add a value by selecting it from a list, click the Look Up button to display the Select a Constant page.
Note. A list of constants is only available for fields that have translate values or an assigned prompt table.
To select a constant:
Click the Look Up button to select a constant.
The Look Up page appears.
Select the desired value from the result list by clicking its associated link.
The Select a Constant page appears again with the selected value in the field. If you are working with a date field, you can select a date/constant from a calendar.
If more than one field exists on the Select a Constant page, you must repeat steps 1 and 2 for each field in order to further narrow your search for the constant.
Click OK.
The Edit Criteria Properties page appears, with the selected value in the Define Constant page.
When you select In List as your comparison value, the Edit List page appears. Use this page to build a list of values for PeopleSoft Query to compare to the value from the first expression. (Once you have created such a list, you can also use this page to select from the list.) To add a comparison value to the list, click the Look Up button on the Edit List page. This displays the Edit List page, which dynamically reflects which record is used.
|
Lists the values that have been selected using the Add Value button. Note. The grid, containing the selected value, appears when a value is selected. To delete a value, select the check box to the left of the appropriate List Members value and click the Delete Checked Values button. |
|
|
Value |
To add a value, enter it into the Value text box and click the Add Value button. The value will display in the List Members grid. To select from a list of values, click the Search button to display the Select a Constant page. Click the Look Up button to display the Look Up page. Enter part of a value in the text box. The system automatically adds a wildcard to the end of the entry, which enables you to do a partial search. For example, if you enter a value of 10, the system will return all values, (up to a total of 300), that begin with 10, such 10, 100, and 10069. Click the Look Up button to display the list of values that corresponds to the search criteria. Select the desired value from the list by clicking its associated link. The Select a Constant page appears again. Click OK. The selected value will display in the List Members grid. |
|
Select to add one or more prompts to the list so that users can enter the comparison values when they run the query. Note. The prompts must be defined before you can select them. If no prompts have been defined, you will receive an error message. |
|
|
OK |
Click to accept the values listed on the List Members grid. You will return to the Edit Criteria Properties page, where the selected values will be displayed in the Edit List page. |
|
Cancel |
Click to return to the Edit Criteria Properties page without saving selections. |
Adding Prompts to an Expression List
You can add one or more prompts to the expression list so that users can enter comparison values when they run a query.
Note. You must have defined the prompts before you can add them to your expression list.
To add prompts to an expression list:
With the Expression List open, click the Add Prompt link to open the Select a Prompt page.
Click the required prompt.
The prompt appears on the Edit List page.
If you selected the in list operator, you may want to add more than one prompt so that your users can enter more than one value to search for.
To add another prompt, click the Add Prompt link again and select a different prompt.
Because you already have a prompt in place, a different page appears, showing the prompt you have already added.
To add the next prompt, click the New button and complete the Run-time Prompt page.
The settings for this second prompt are the same as those used with the first prompt. If you want a different label for this prompt, enter that label in the Heading Text text box.
When you click OK, the second prompt appears in the Available Prompts list.
Highlight the second prompt, and click the Select button to add it to the list of comparison values.
The prompt then appears in the Edit List page.
Repeat this process for each prompt you want to add.
When you’re done, click OK to close the Edit List page.
Adding Comparison Values to an Expression List
When you select Tree Option as the comparison value (available if you select the in tree or not in tree condition type), the Select Tree Node List page appears. Use this page to create a list of values for PeopleSoft Query to compare to the value from the first expression. Click the New Node List link to display the Select Tree page.
If the Selected Nodes List has been previously populated, you can either:
Change the tree by clicking the New Nodes List link.
Open the previously selected tree, bypassing the Tree Selection page, by clicking the Edit Node List link.
Click the name of the desired tree to display the Display and Select TreeNodes page, which you can use to select which element of the tree PeopleSoft Query will check. If no nodes have been previously selected, the Selected Nodes List grid is collapsed. If you do not know the name of the tree, you can perform a search for the tree.
Highlight the desired tree node, and click the Add Node icon.
If you know the name of the desired node, enter the name of the desired node in the Manual Selection list box.
Alternatively, click the Look Up button to select the desired node from a list of available nodes. When you find the node you’re looking for, click the Add to List button to add it to the list. The nodes you enter or select from the list appear in the Selected Nodes list box.
Remove nodes from the list by clicking the Remove from List icon corresponding to the node to be deleted.
Display the selected tree branch by clicking the corresponding icon.
Once you are done selecting nodes, click OK.
The selected tree SetID, tree name, effective date, and selected nodes appear in the Select Tree Node List page.
Specifying Effective Date CriteriaEffective-dated tables have record definitions that include the Effective Date (EFFDT) field. This field, used throughout the PeopleSoft applications, provides a historical perspective, allowing you to see how the data has changed over time. Whenever users add a row of data to the table, they specify the date on which that data becomes effective; whenever users change a row of data, they specify a new effective date, and the system retains the previous version of the row as history.
When you use a PeopleSoft application for day-to-day processing, you usually want the system to give you the currently effective rows of data—the rows where the effective date is less than or equal to today’s date. You do not want to see the history rows, which are no longer accurate, nor do you want to see future-dated rows, which are not yet in effect.
When you query an effective-dated table, however, you may want to see some rows that are not currently in effect. You might want to see all the rows, regardless of their effective dates. Or you might want to see the rows that were effective as of some date in the past.
To specify effective date criteria:
When you choose the record that has EFFDT as a key field, Query Manager automatically creates default criteria and adds that criteria to the Criteria page.
This criteria is used to specify which row of data PeopleSoft Query retrieves for each item in the table. The default is the currently effective row. Defaults are as follows:
|
Expression 1 |
Record Alias.EFFDT |
|
EffDt <= |
|
|
Expression 2 |
Current Date |
|
Last |
If you choose one of the comparison options, choose to compare each row’s effective date against today’s date or a date other than today.
Select Current Date to compare each row’s effective date against today’s date.
Select Constant to display the Define Constant box so that you can enter a date.
Select this option when you want to see the rows that were effective as of a past date or that will be effective on some future date.
Select Expression to display the Define Expression page so that you can enter a SQL expression that evaluates to a date.
Select this option if you want to prompt users for an effective date when they run the query. You can add a prompt to the expression you define in the Define Expression page.
Select Field to display the Select Field box so that you can select the record field that holds the date to which you want to compare effective dates.
Select this option when you want to see the rows that were effective at the same time as some other record. For example, if you’re reviewing the list of products on a customer order, you will want to see the products that were effective on the date of the order.
Select First Effective Date to return the row with the oldest effective date, usually the first row entered for an item.
Select Last Effective Date to return the row with the latest effective date, even if that date is still in the future.
Removing the Effective Datecriterion is equivalent to selecting No Effective Date. The query will return all rows, regardless of their effective dates.
Note. All options (except No Effective Date) return a single row for each item on the table. If you want a subset of the rows (say, all future-dated rows or all history rows), enter a selection criterion on the Effective Date field. Use the standard comparison operators rather than the Effective Date comparison operators.
Keep in mind that the effective date operators work differently than the standard comparison operators: they always return a single effective-dated row. For example, Eff Date <= returns the one row whose EFFDT value is most recent, whereas not greater than would return the currently active row and all history rows.
See Also
Relating Multiple CriteriaUsing PeopleSoft Query, you can relate multiple criteria in specific ways that you define using the AND, AND NOT, OR, and OR NOT operators. You can also group criteria using parentheses.
This section discusses how to:
Use AND and OR logical operators.
Group criteria with parentheses.
Using AND and OR Logical Operators
When you specify two or more selection criteria for a query, you must tell PeopleSoft Query how to coordinate the different criteria. For example, suppose you are querying your list of customers and you have defined two criteria: one that selects customers from the state of Washington and another that selects customers who have purchased airplanes. You may want PeopleSoft Query to return only those rows that meet both conditions (customers in Washington who have purchased airplanes), or you may want the rows that meet either one of the conditions (all Washington customers plus all customers who have purchased airplanes).
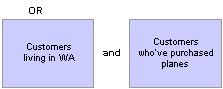
Rows returned by AND and OR
When your query includes multiple criteria, link them using either AND, AND NOT, OR, or OR NOT. When you link two criteria with AND, a row must meet the first and second criterion in order for PeopleSoft Query to return it. When you link two criteria with OR, a row must meet the first or second criterion, but not necessarily both.
By default, PeopleSoft Query assumes that you want rows that meet all of the criteria you specify. When you add a new criterion, PeopleSoft Query displays AND in the Logical column on the Criteria tab. To link the criterion using one of the other options instead, select the required option from the drop-down list.
Grouping Criteria with Parentheses
When your query includes multiple criteria, PeopleSoft Query checks the criteria according to the rules of logic: it evaluates criteria linked by ANDs before those linked by ORs. When all the criteria are linked by ANDs, this order always returns the correct results. When you mix in one or more ORs, however, this is not always what you want.
For example, suppose you wanted a list of employees who are not married and reside in either California (CA) or British Columbia (BC). Enter the following criteria:
The set of criteria entered in the previous screen shot returns a list of employees in California (except for those who are married) and all employees in British Columbia (including those who are married). This list results because PeopleSoft Query evaluates criteria in the order of appearance. It looks for rows where the employee is not married and where the state is California or rows where the state is British Columbia.
What you really want PeopleSoft Query to search for are rows where the state is British Columbia or California, and where the marital status is not married. That is, you want PeopleSoft Query to evaluate the OR before the AND. To accomplish this task, add parentheses to the list of criteria. When a list of criteria includes parentheses, PeopleSoft Query evaluates the criteria inside the parentheses before the criteria outside the parentheses.
On the Criteria tab, the opening parenthesis appears just before the field name and the closing parenthesis appears just after the comparison value. For example, following is the set of criteria that returns the result you want:
To group criteria:
Click the Group Criteria button on the Criteria tab.
The Edit Criteria Grouping page appears.
Use the edit boxes to enter parenthesis for the criteria as needed.
A parenthesis appears at the beginning of the Expression1 column for the first row that you selected and at the end of the Expression2 column for the last row that you selected. In the previous example, notice that the AND operator precedes the parentheses, while the OR operator is located within the parentheses.
You can add as many parentheses as needed.
Defining PromptsThis section provides an overview of prompts and discusses how to add or edit a prompt.
Understanding PromptsAdding a prompt lets you further refine a query when you run it. For example, suppose you want to change a query so that you can prompt the user to enter a value for the duration of a vacation. Before you added the prompt, the query always retrieved rows for employees who had taken vacation based on a defined constant value on which to make a comparison. Adding a prompt to the query enables the user to enter any duration, and then the query can return employees based on the value provided when running the query.
When you run a query with a prompt, a prompt page requests the required value. Enter the value into the field. The query uses the value that you enter as the comparison value for the criterion that included the prompt.
If the field for which you are prompting has an associated prompt table (even if it is the Translate table), the Edit Table drop-down list box shows its name.
Pages Used to Define Prompts
|
Page Name |
Object Name |
Navigation |
Usage |
|
Prompts |
QRY_PROMPT |
Reporting Tools, Query, Query Manager Click the Create New Query link. Click the Prompts tab. |
Use this page to add or edit a prompt. |
|
Edit Prompt Properties |
QRY_PROMPT_SEC |
Reporting Tools, Query, Query Manager Click the Create New Query link. Click the Prompts tab. Click the Add button or the Edit button on the Prompts page. |
Use this page to edit the prompt properties. |
Editing Prompt Properties
Access the Edit Prompt Properties page.
To define prompts:
From the Prompts page, click the Add Prompt button to add a new prompt, or click the appropriate Edit button to edit an existing prompt.
The Edit Prompt Properties page appears.
Click the Look Up button next to the Field Name field to select a prompt field.
After you select a prompt field, the name of the field appears. PeopleSoft Query looks to the record definition for information about this field and completes the rest of the page based on its properties.
Note. When using a prompt table on a field from a record definition with multiple keys, you must prompt for all higher-level keys before lower-level keys. PeopleSoft Query needs values for the higher-level keys to generate the correct prompt list. Because of this complication, it is unwise to use multikey prompt tables.
See Also
Adding Fields to Query Content
Defining HAVING CriteriaSQL does not support the use of aggregate functions in WHERE clauses. Therefore, once you have applied an aggregate function to a field, you cannot use that field in your selection criteria, which corresponds to a SQL WHERE clause. When you want to select rows based on the results of an aggregate function, Query Manager enables you to create HAVING criteria. You might use such criteria, for example, when you want a list of the departments whose minimum salary is greater than $100,000.
In SQL, a HAVING clause is like a WHERE clause for rows of data that have been aggregated into a single row of output. The system evaluates WHERE clauses by looking at the individual table rows before they are grouped by the aggregate function, and then it evaluates HAVING clauses after applying the function. So if you want to check the value returned by the function, you must define a HAVING criterion.
When you click the Add Criteria icon from the Fields or Query tabs for an aggregate field, new criteria is added to the Having tab instead of the Criteria tab. Add selection criteria using the Having tab in the same way you add selection criteria using the Criteria tab.
Keep in mind that PeopleSoft Query compares the result of applying the aggregate function to the comparison value.
Defining ExpressionsThis section provides an overview of Expressions and shows you how to add or edit an expression.
Understanding ExpressionsExpressions are calculations that PeopleSoft Query performs as part of a query. Use them when you must calculate a value that PeopleSoft Query does not provide by default (for example, to add the values from two fields together or to multiply a field value by a constant).
You can treat an expression just as if it were a field in the query: select it for output, change its column heading, or choose it as an “order by” column.
In Query Manager, you can use expressions in two ways:
As comparison values in selection criteria.
As columns in the query output.
Editing Expression Properties
To add or edit expressions for queries:
Select Reporting Tools, Query, Query Manager, click the Create New Query link, and click the Expressions tab to open the Expressions page.
The query name appears in the Query Name field.
The default for this field is New Unsaved Query until you change it on the Properties page.
Click Add Expression to open the Edit Expression Properties page, where you can select expression types.
Select an Expression Type from the drop-down list.
If you select Character, enter the maximum length of the expression result in the Length field.
If you select Number or Signed Number, enter the total number of digits in the Length field and the number of digits after the decimal point in the Decimal field.
If you are entering an aggregate value, such as SUM, AVG, or COUNT, select the Aggregate Expression check box.
In the Expression Text field, enter the expression (for example, A. Total * .1, where A represents the first record.)
Query Manager inserts the expression into the SQL for you. You can include Oracle hints in PeopleSoft Query expressions as long as you adhere to the following rules:
Expressions containing a hint must begin with /*+
Expressions can contain only one hint.
For example, only one set of /*+ */ is allowed.
Expressions must contain a complete hint.
For example, it can't have only /*+ or */. Both must be in the same expression.
Click Add Prompt to add prompt properties for this expression; click Add Field to add another field to this expression.
Note. You must define a prompt, as described in the next section, before you can add it to your expression.
MetaSQL enables you to enter an expression that can be used across any supported database. For example, to concatenate strings use the MetaSQL %CONCAT, and Enterprise PeopleTools will convert it to the appropriate database string concatenation function. To create a substring use %SUBSTRING.
Note. You need to make sure that the expression type and length are set correctly for the data that is going to be returned. Only the MetaSQL functions that are valid for dynamic views will work with PeopleSoft Query.
See Also