
 Working with Aggregate Functions
This chapter discusses how to:
Work with aggregate functions.
Work with subqueries.
Work with unions.
Join records.
Note. Familiarity with Structured Query Language (SQL) is helpful when writing more advanced queries.
Working with Aggregate FunctionsThis section provides an overview of aggregate functions and discusses how to apply an aggregate function to a field.
Understanding Aggregate FunctionsIn a standard query, each row in the result set corresponds to an individual row in the table that you are querying. Sometimes, however, you instead want a summary of the information in multiple rows. For example, you might want to know how many customers you have in each state. You can query for this kind of summary information using aggregate functions.
An aggregate function is a special type of operator that returns a single value based on multiple rows of data. When your query includes one or more aggregate functions, PeopleSoft Query collects related rows and displays a single row that summarizes their contents.
For example, suppose that your Order table includes (among other fields) a customer ID and an amount for each item ordered. You would like to find out how much each customer has ordered, so you create a query that selects the customer ID and amount fields. Without any aggregate functions, this query would return the same number of rows as there are in the table. If Stuart Schumacher ordered 10 items, you would see 10 rows with his ID in the customer ID column. On the other hand, if you apply the aggregate function Sum to the amount field, you will get just one row for each customer ID. PeopleSoft Query collapses all the rows with the same value in the nonaggregated column (customer ID) into a single row. The value of the amount field in Stuart Schumacher’s row would be the sum of the values from the 10 rows.
The following table lists the aggregate functions that you can apply to a field using PeopleSoft Query:
|
Aggregate Function |
Action |
|
Adds the values from each row and displays the total. |
|
|
Counts the number of rows. |
|
|
Checks the value from each row and returns the lowest one. |
|
|
Checks the value from each row and returns the highest one. |
|
|
Adds the values from each row and divides the result by the number of rows. |
Applying an Aggregate Function to a FieldWhen you apply an aggregate function to a field, you are redefining how PeopleSoft Query uses the field throughout the query. Essentially, PeopleSoft Query replaces the field, wherever it occurs, with the results of the function. If you select the field as a display column, PeopleSoft Query displays the aggregate values; if you use the field as an order by column, PeopleSoft Query orders the results based on the aggregate values.
Note. If you do not want PeopleSoft Query to redefine the field in this way—for example, if you want to display both the individual row values and the results of the aggregate function—create an expression that includes the aggregate function rather than applying the function directly to the field.
To apply an aggregate function to a field:
In Query Manager, select the Fields tab.
Click the Edit button associated with the appropriate field.
The Edit Field Properties page appears.
Pick the aggregate function that you want to use for this field, and click OK.
The abbreviation for the selected function appears in the Agg column. If a function is not available for the field you have selected, the Edit Field Properties page does not close. For example, you cannot use Sum with a character field, but you can useCount, Min,and Max.
Note. In addition to the previously listed aggregate functions, you can use any aggregate function supported by the underlying database by creating an expression component.
See Also
Working with SubqueriesA subquery,sometimes called a sub-SELECT, is a query whose results are used by another query. The main query uses the subquery’s result set as a comparison value for a selection criterion.
You create a subquery when you need to compare a field value to the results of a second query. Suppose, for example, that you want a list of employees who are not members of any professional organizations. For each employee in the PERSONAL_DATA table, you must find out whether their employee IDs are in the MEMBERSHIP table. In other words, you must compare the value in the PERSONAL_DATA.EMPLID field to the results of a subquery that selects the EMPLID values from the MEMBERSHIP table. Following are examples of the Criteria page when using a subquery and the Query page when creating a subquery:
To create subqueries:
From the Edit Criteria Properties page, select Subquery as the comparison value.
PeopleSoft Query displays a special Query Manager view where you can select a record. See Subquery − Query page above.
From the Subquery - Query page, select the required field.
Note. A subquery can have only one field. However, you can create multiple subqueries.
When you have defined subqueries and unions, a Subquery/Union Navigation link appears at the top each page of the main query and the subqueries.
Click the Subquery/Union Navigation link to display a hierarchical view of the main query and all subqueries and unions.
Use the hierarchy to navigate between the main query, subqueries, and unions.
Working with UnionsUnions enable you to get the results from two or more separate queries at the same time. You can create a union of multiple queries only when the queries have the following common elements:
The same number of selected fields.
The same data types for all fields.
The same display order for the columns.
Note. Translate values, long or short description, cannot be displayed in a union query. Only the code for the field can be selected
for output display.
You must understand SQL to ensure that you create logical union queries.
To create a union:
Click the New Union link. (It is available on the bottom of each Query Manager page except for the Run page.)
PeopleSoft Query automatically switches to the Records tab so that you can start defining the second query. Define that query in the same way that you define other queries.
When you’re working on a union, each individual selection looks like an independent query, and for the most part they are independent. However, the first selection in the union—the one you started before clicking the New Union link—has a special status. PeopleSoft Query determines the ordering of the rows and columns based on what you specify for the first selection. It also uses the column headings defined for the first selection.
Navigate between the main query, subqueries, and unions using the Subquery/Union Navigation link.
Joining RecordsQuery Manager enables you to create queries that include multiple-table joins. Joins retrieve data from more than one table, presenting the data as if it came from one table. PeopleSoft Query links the tables, based on common columns, and links the rows on the two tables by common values in the shared columns.
Joins are what make relational databases relational. Using joins, you define relationships among fields when you query the records, not when you create the records. Because PeopleSoft records are highly normalized (they each describe one kind of entity), it is easy to use Query Manager to create joins.
The procedure for joining tables differs depending on how the tables being joined are related to each other. Query Manager recognizes three types of joins: record hierarchy, related record, and any record.
This section discusses how to:
Create record hierarchy joins.
Create related record joins.
Create any record joins.
Create outer joins.
Create left outer joins.
Creating Record Hierarchy JoinsA record hierarchy join joins a parent table to a child table. (A child table is a table that uses all the same key fields as its parent, plus one or more additional keys.) Specify the parent/child relationship using the Parent Record Name option in PeopleSoft Application Designer.
Selecting the second record
To create a record hierarchy join:
Choose the base record for your query and select the appropriate fields and criteria.
From the Query page, click the Hierarchy Join link.
All of the records that have a parent/child relationship with your selected record appear.
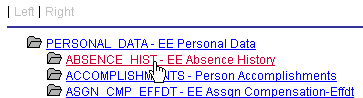
Select the second record for the join.
In our example, we are selecting ABSENCE_HIST.
The join is reflected on the Query page.
Creating Related Record JoinsIn a related record join, you can automatically join two records based on a relationship that has been predefined in the record designer. For example, if a field has a prompt table defined for it, PeopleSoft Query displays a join link to the right of the shared field.
The following example shows that you can join the QEDMO Employee record to the JobCode record by using the QE_JOBCODE field, or you can join the QEDMO Employee record to the Data Department Table by using the DEPTID field:
To create a related record join:
Choose the base record for your query and select the appropriate fields and criteria.
From the Query page, click the Related Record Join link.
From the Select Join Type page, select the standard join option and click OK.
The join is reflected on the Query page.
Creating Any Record JoinsUsing Query Manager, you can create a join between two records (any record join) by selecting your initial base record, defining its output fields and associated criteria, and then returning to the Records page to select the second record. When you return to the Records page, you will see the link Join Record rather than Add Record to the right of all listed record names.
If you have the Enable Auto Join preference selected in the Query Preferences page, PeopleSoft Query automatically attempts to join the new record to the existing record by looking for matching columns on the two records. To navigate to the Query Preferences dialog, click the Preferences link.
Creating Outer JoinsAn outer join forces a row from one of the participating tables to appear in the result if there is no matching row.
Note. You can only create an outer join using this method if you have an Oracle 8 database. If you use a platform other than Oracle 8, you can create an outer join equivalent or create a left outer join using PeopleSoft Query's left outer join feature.
See Creating Left Outer Joins.
To create an outer join, you must include a plus sign in parentheses (+) after the key fields of the subordinate record in the criteria that link the records. To produce this syntax, you cannot use the predefined joins. You must perform an any record join and code an expression that contains the (+) instead of a field. Following is an example of the Define Expression page:
Creating an Outer Join for Oracle 8
To create an outer join for Oracle 8:
From the Criteria page, click the Edit button to the right of the required field from the primary record.
In the Condition Type Operator field, accept the value of Equal To, and in the Expression 2 Type field, accept the value of Expression.
The Define Expression page appears.
Click Add Field.
Select the required field from the secondary record.
Manually enter (+) after the field name.
Click OK.
Creating an Outer Join Equivalent for non-Oracle 8 Platforms
If you use a platform other than Oracle 8, use this method to achieve the same effect as an outer join.
Note. If you use a platform other than Oracle 8, you can also create a left outer join using PeopleSoft Query's left outer join feature.
See Creating Left Outer Joins.
For example, to retrieve a list of all students and any evaluation information on file, the first select must retrieve those students who have not completed an evaluation; the second select must retrieve those students who have completed an evaluation.
To perform an outer join equivalent for the previous example:
Using the Student_Data record, select Customer_ID and Name.
Because you will be selecting two different fields from the Student_Eval record and you want them to have their own columns, you must create two dummy fields for your first record.
Create two different expressions and select them for output.
Save the query.
Create your subquery to find those students who have not completed an evaluation.
This completes your first select. If you run the query at this point, you will see only those students who did not completed an evaluation.
To join in the students who did complete an evaluation, create a union.
Using the Student_Data record, select Customer_ID and Name for output.
Join the Student_Eval record using a record hierarchy join.
Select Course and Course_Rt for output.
Creating Left Outer JoinsPeopleSoft Query enables you to easily create a left outer join. In a left outer join, all rows of the first (left) record are present in the result set, even if there are no matches in the joining record.
Note. This feature is not available for the Oracle 8 platform.
To create a left outer join on a new query:
On the Query Manager search page, click the Create New Query link.
On the Records page, search for the first (left) record for the left outer join.
Click the Add Record link on the same row as the record you would like to add.
The Query page appears.
Select the appropriate fields to add to the query.
Navigate to the Records page.
Find the joining record and then click the Join Record link on the same row as that record.
Select Join to get additional fields only (Left outer join).
Note. When you select Left outer join, you must select the last record that you've previously added to the query. If you attempt to join to records other than the last record, an error message appears.
Complete the join.
If the Enable Auto Join preference is selected in the Query Preference page, click the record name to join with.
If the Enable Auto Join preference is not selected in the Query Preference page, click OK.
Define the join criteria.
If the Enable Auto Join preference is selected, the Auto Join Criteria page displays.
You may deselect the criteria from the query. You may also click Add Criteria to add or edit criteria or conditions (2–3 tier client only). If there are no common keys between the two join records, a message appears instead of the Add Criteria page.
If the Enable Auto Join preference is not selected, the Auto Join Criteria page does not appear.
If desired, navigate to the Criteria page to add criteria to the On clause of the outer join. The This criteria belongs to drop-down list box specifies where the criteria will appear. Select the alias that corresponds to this join record.
Define the effective date criteria.
(2–3 tier client) If the joined record is an effective-dated record, the Effective Date Criteria page appears.
You may accept the defaults or change them as desired.
(4–tier PeopleSoft Pure Internet Architecture) If the joined record is an effective dated record, a message appears stating that an effective date criteria has been automatically added.
If desired, you may navigate to the Criteria page to change the defaults for this criteria.
To ensure that the left outer join completed successfully, you may navigate to the Query page.
Text for the joined records confirms a successful left outer join.
Note. If you use PeopleSoft Query with the DB2 UDB platform, the DB2 UDB platform will not allow you to have a subquery in the ON
clause of a left outer join. For example:
SELECT A.ROLENAME, A.DESCR FROM
(PSROLEUSER B LEFT OUTER JOIN PSOPRDEFN C ON
B.ROLEUSER IN (SELECT F.OPRID FROM
PSOPRDEFN F WHERE F.OPRID IN ('AMA1','AMA2','AMA3')))
This code yields the following error message: SQL0338N An ON clause associated with a JOIN operator or in a MERGE statement is not valid.
Adding Left Outer Joins Criteria into the ON Clause
If you want to create criteria for the left outer joined record, you can add left outer joins criteria into the ON clause.
To create left outer joins criteria into the ON clause:
On the Criteria page, click the Edit button to access the Edit Criteria Properties page.
On the Edit Criteria Properties page, select ON clause of outer join <Alias Name> from the This Criteria Belongs to drop-down list box.
Click OK.