
 Understanding Retroactive Distribution of Funding Sources
This chapter provides an overview of retroactive distribution of funding sources and discusses how to:
Create retroactive distribution transactions directly.
Create retroactive distributions from the department budget table component.
View and process retroactive transactions.
Run the Retroactive Distribution report.
Understanding Retroactive Distribution of Funding SourcesYou can make mass changes to the distribution of funding sources at the department, job code, position pool, position, or job data (appointment) level for data that has been posted to PeopleSoft Enterprise General Ledger. Create retroactive transactions directly by using the Direct Retro Distributions (direct retroactive distributions) process to search the database for records that meet search criteria and replace selected data in those records with new information. Or create retroactive transactions by modifying department budgets. When you start the Budget Retro Distribution process, the system will create retroactive transactions for all records effected by the changes, either using the Direct Retro Distribution process or in the Department Budget Table component (DEPT_BUDGET).
After you create the transactions, using either method, view them in the Review Retro Distribution (review retroactive distribution) component (HP_RDIST_TRANS_USA or HP_RDIST_TRANS_CAN) to ensure that they are correct and make changes if necessary. From there, start the online transaction process to apply the new transactions to the actuals data.
The following diagram illustrates the two methods of creating retroactive transactions, applying transactions, and the flow of data through the Commitment Accounting business process and to other PeopleSoft applications:
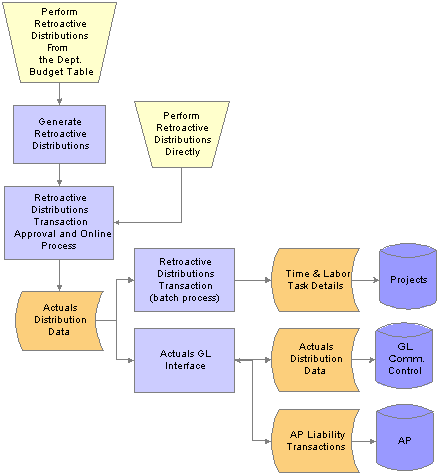
Retroactive distributions
Common Elements Used in This Chapter|
Combination Code |
Combination code funding the associated portions of the check. Note. Click the Edit ChartFields link to search for an existing combination code or select a unique combination of ChartFields on the ChartField Detail page. See Entering or Reviewing ChartFields in PeopleSoft HRMS Transactions. |
|
Benefit Plan |
Displays the benefit plan covered by the paycheck. |
|
Canadian Tax Class |
Displays the Canadian tax class for Canadian taxes. |
|
Check # (check number) |
Paycheck number. |
|
Company |
Name of company that issued check. |
|
Current Deduction |
Displays the deduction amount distributed to the associated combination code. |
|
Current Tax |
Displays the total amount of tax deduction distributed to the associated combination code. |
|
Deduction Classification |
Displays the deduction classification of the deduction covered by the paycheck. |
|
Deduction Code |
Displays the deduction code of the deduction covered by the paycheck. |
|
Department |
Displays the department to which the earnings, deductions, or taxes are distributed. |
|
Earnings |
Displays the amount of earnings distributed to the associated combination code. |
|
Earnings Code |
Displays the earnings code describing the earnings, such as Regular or Vacation. |
|
Job Code |
Displays the job code to which the earnings, deductions, and taxes are distributed. |
|
Line |
Paycheck line number. |
|
Locality |
Displays the locality that regulates and collects the associated tax. |
|
Message ID |
The message ID of the message generated by the associated process. The system displays the text of the message in the text box below this field. |
|
Off Cycle |
Indicates if the check is off-cycle. |
|
Page |
Paycheck page number. |
|
Pay End Date |
Pay end date of the pay cycle. |
|
Pay Group |
Pay group that the check was processed with. |
|
Plan Type |
Displays the type of benefit plan covered by the paycheck. |
|
Position Number |
Displays the position number to which the earnings, deductions, and taxes are distributed. |
|
Position Pool ID |
Displays the position pool ID to which the earnings, deductions, and taxes are distributed. |
|
Province |
Displays the province that regulates and collects the tax. |
|
Selected |
Check to include the paycheck in retroactive processing. |
|
State |
Displays the state (or federal marker, if a federal tax) that regulates and collects the tax. |
|
Tax Balance Class |
Displays the tax balance class for US taxes. |
Creating Retroactive Distribution Transactions DirectlyThis section provides an overview of retroactive distribution transactions and describes how to:
Specify search and update criteria.
View earnings, deductions, and tax transaction messages.
Understanding Retroactive Distribution Transactions
You can redistribute funding sources directly in the actuals records at the department, job code, position pool, position, or job data (appointment) level without making changes to the department budget. The Direct Retro Distributions (direct retroactive distributions) process selects the records that fit your search criteria. It updates the data in specified fields with the new data from the run control page.
Note. The system only selects records processed by the Commitment Accounting GL Interface process.
In this section we discuss how to:
Specify search criteria, and indicate which fields to update and the data to update them with.
Run the Retro Distribution process.
View the earning, deduction, or tax-related messages generated by the Retro Distribution process.
Pages Used to Create Retroactive Distribution Transactions Directly
|
Page Name |
Object Name |
Navigation |
Usage |
|
RUN_HP_RETDISTSRCH |
|
|
|
|
HP_RETDIST_ERNMSG |
|
View or modify the earnings-related messages created by the Retro Distribution process. |
|
|
HP_RETDIST_DEDMSG |
|
View or modify the deduction-related messages created by the Retro Distribution process. |
|
|
HP_RETDIST_CTXMSG |
|
View the Canadian tax-related messages created by the Retro Distribution process. |
|
|
HP_RETDIST_TAXMSG |
|
View or modify the tax-related messages created by the Retro Distribution process. |
Specifying Search and Update CriteriaAccess the Direct Retro Distribution (direct retroactive distributions) process page.
The Direct Retro Distributions process does not apply any changes to the database. If this process produces warnings or errors (viewed in the Review Retro Distributions Msgs components) you can rerun this process with different parameters.
Processing Option
|
Apply to Transactions |
|
Search for Next Payroll
|
Pay Period End Date |
The pay period end date defaults the end date closest to, but not included in, the last CA GL Interface process run. Enter a new pay period end date, if necessary. The system only processes pay periods that have not been processed by the GL Interface. |
|
Days Prior End Date |
Enter the number of days prior to the posting date of the pay calendar. |
|
Ignore Off Cycle |
Select to ignore off cycle pay calendars. |
Transaction Date Range
The process searches for the earnings end dates that fall within the date range you specify.
|
Begin Date and End Date |
Enter the transaction begin and end dates. Clear these fields to use fiscal periods as the date range. |
Or Fiscal Periods
|
Detail Calendar ID |
Select a detail calendar ID. |
|
From Year/Period and To Year/Period |
Enter the year and period from and to which you want to process. |
Search Fields
|
Field Description and Field Value |
Select the fields and the field values of the records you want the process to search for. |
|
Search Spaces |
Select to have the system search for blank field values. |
Update Sequences
|
SeqNum (sequence number) |
Enter the sequence in which this funding amount should be used. |
|
Amount |
Enter the funding amount. |
Update Value
|
Field Description and Field Values |
Select the fields in the selected records that should be updated and the values they should be updated with. |
|
Update Space |
Select to have the system update spaces. |
Viewing Earnings, Deductions, and Tax Transaction MessagesUse Review Retro Distribution Messages component to view the transactions produced by the retroactive distribution process and any generated messages.
To view retroactive distribution messages:
Access the Retro Distribution Messages component and select the Earnings Messages page, Deduction Messages page, or the Tax Messages page.
View the check earns line and the earnings distribution, deduction distribution, or tax distribution information of the transaction.
View the message ID and message text explaining the results of the process for this transaction.
Creating Retroactive Distributions From the Department Budget TableMake retroactive changes to budgets on the Department Budget Table component. Insert a new, effective-dated row in the Department Budget Table and make the necessary funding changes to the budget. Run the Budget Retro Distributions (budget retroactive distributions) process to redistribute paycheck transactions using the new budget setup.
In this section we discuss how to:
Make changes to a department budget.
Run the Budget Retro Distributions process.
Pages Used to Create Retroactive Distributions From the Department Budget Table
Making Changes to a Department BudgetAccess the Department Budget Table and open the department budget you want to modify.
To make changes to a department budget that has been used in encumbrance or actuals processing:
Insert a new effective-dated row (the date as of which the retroactive changes should apply).
Make funding distribution changes on the Dept Budget Earnings, Dept Budget Deductions, or Dept Budget Taxes pages.
Save your changes.
Select Yes to the system prompt “Do you want to save changes for retro distribution?”
Select Yes to the system prompt “Do you want to go to Run Control Page?”
The system accesses the Budget Retro Distributions (budget retroactive distributions) page.
Note. If you don’t opt to save the changes for retroactive distribution, the system deletes the changes.
See Also
Option 4: Using the Department Budget Table Component
Running the Budget Retro Distributions ProcessAccess the Budget Retro Distributions page.
|
SetID, Department, and Fiscal Year |
Enter the department budget’s setID, department, and fiscal year. |
Search for Next Payroll
|
Pay Period End Date |
Enter the end date of the pay period that you are processing retroactive distributions for. This must be the same pay ending date as the original entry. |
|
Days Prior End Date |
Enter the number of days prior to the posting date of the pay calendar. |
|
Ignore Off Cycle |
Select to ignore off cycle pay calendars. |
Transaction Date Range
The process searches for the earnings end dates that fall within the specified date range.
Pay Period Dates
|
Begin Date and End Date |
Enter the transaction begin and end dates. Clear these fields to use fiscal periods as the date range. |
Or Fiscal Periods
|
Detail Calendar ID |
Select a detail calendar ID |
|
From Year/Period and To Year/Period |
Enter the year and period from and to which you want to process. |
Note. The Budget Retro Distribution does not update transactions for which the Combination Code has been overridden.
Viewing and Processing Retroactive DistributionsThis section discusses how to:
Compare new earnings, deduction, and tax transactions with old.
Process the retroactive distributions.
After you have made retroactive changes to funding distribution, either directly or through the Department Budget Table, you can view the new transactions and compare them with the old. If you are satisfied with the new transactions, you can run the Retro Distribution Update process to distribute the actuals using the new information.
Pages Used to View and Process Retroactive Distributions
|
Page Name |
Object Name |
Navigation |
Usage |
|
HP_RETRO_DISTERNS |
|
Modify the earnings transactions created by the Retro Distribution process. |
|
|
HP_RETRO_DISTDEDS |
|
Modify the deductions transactions created by the Retro Distribution process. |
|
|
HP_RETRO_DISTCTXS |
Payroll for North America, Payroll Distribution. Commitment Accounting CAN, Review Retro Distribution, Retro Distribute Tax |
Modify the Canadian tax transactions created by the Retro Distribution process. |
|
|
HP_RETRO_DISTTAXS |
Payroll for North America, Payroll Distribution. Commitment Accounting USA, Review Retro Distribution, Retro Distribute Taxes |
Modify the US tax transactions created by the Retro Distribution process. |
|
|
RUN_HP_RETDIST |
|
Use to apply retroactive distribution updates to the database. |
Comparing New Earnings, Deductions, and Tax Transactions with the Old TransactionsUse the Review Retro Distribution (review retroactive distribution) component to compare the proposed funding distribution transactions with the old and to make any necessary changes.
To view, compare, and modify proposed retroactive distribution earnings, deductions, and tax transactions:
Access the Review Retro Distribution component and select the Retro Distribute Earnings page, Retro Distribute Deductions page, or the Retro Distribute Tax page.
View the paychecks effected by this retroactive transaction using the Employee Id and Employee Name tabs in the Check Earns Line group box.
Compare the information on the New Data and Posting Accounting Period tabs with the information on the Old Data and Old Accounting Period tabs.
Modify the distribution information in the fields on the New Data tab, if necessary.
Remember that you must distribute and fund all the earnings on the person's paycheck.
Select the transactions to process by clicking Select or Select all.
The system only processes selected transactions.
See Also
Processing Retroactive Distribution TransactionsWhen the retroactive distribution transactions meet your approval, process them to apply them to the system. The retroactive distribution process applies all the selected transactions to the actuals distribution of the original paycheck. The system marks the checks as corrected and posts the corrected date. After processing, the actuals are ready to be processed by the Commitment Accounting GL Interface and Time and Labor records are ready to be processed to PeopleSoft Enterprise Projects.
Access the Actuals Distribution Update page.
|
Select |
Select the transactions (listed by the run control ID for each transaction) to process. The process will only process one selection at a time. |
|
Errors Option |
|
See Also
Running the Encumbrance GL Interface Process (PAYGL03)
Running the Retroactive Distribution ReportThis section explains how to generate the Retro Distribution report.
Page Used to Run the Retro Distribution Report
|
Page Name |
Object Name |
Navigation |
Usage |
|
RUNCTL_BUD020 |
|
Run the Retro Distribution report (BUD020). This reports on the paychecks that have been modified using retroactive distribution. The report displays the old and the modified check data. |
Running the Retro Distribution Report
Access the Retro Distribution Audit Rpt page.
|
Run Control ID |
Select the Run Control ID of the Create Retro Distribution Transactions process on which you want to report. |
|
Create User Id |
Select the Create User ID of the retroactive processes on which you want to report. |
|
Error Status |
Select the error status of the retroactive transactions on which you want to report. |
|
Process Status |
Select the process status of the retroactive transactions on which you want to report. |
|
Create Date Range |
Enter the create date range. |
|
Start Date and End Date |
Select the created date range of the transactions on which you want to report on. |
|
Processed Date Range |
Enter the processed date range. |