
 Understanding Self-Service Setup Tasks
This chapter provides an overview of the setup tasks for self-service absence transactions and explains how to:
Define self-service absence rules by country.
Define self-service absence rules by take element.
Define forecasting rules for self-service absence requests.
View or modify text on the self-service absence pages.
See Also
Understanding Absence Management
Understanding Self-Service Setup TasksPayees and managers can use web-based browser pages, referred to as self-service pages, to enter online requests for absences, view current and future absence balances, and run the Absence Forecasting process. Managers and administrators can also use self-service pages to approve, deny, or push back absence requests.
Requests that are entered through the self-service pages are treated as actual absences once they are approved, and are included in the Absence Take process.
This section lists prerequisites and common elements and provides an overview of the high-level setup tasks for self-service absence transactions.
Prerequisite
Before you can define take rules for self-service absence transactions, you must specify which absence take types are eligible for self-service use. On the Absence Take Types page for a given absence type, select the Allow Request in Self Service check box. This enables you to define self-service rules for any take element with that absence type.
See Defining Absence Types and Reasons.
Common Element Used in This Chapter
|
Status |
When you create a new country-specific or take-specific rule for absence self-service, the rule's default status is Active. Changing the status of a rule to Inactive can impact absence requests that have been entered but not yet approved. Before changing the status of a rule to Inactive, consider how this action will affect already submitted requests. |
Setup Tasks for Self-Service Absence Transactions
The setup tasks for absence self-service are as follows:
Define self-service rules for each country.
Country-specific rules apply to all take elements for a given country. They control some of the field displays on the self-service pages, and determine who can use the online Forecasting and Balance Inquiry processes. You can define a different set of self-service rules for each country.
Define self-service rules for each take element.
For each take element that you want to make available to self-service users, you define an additional set of rules. These rules specify whether partial-day absences are allowed, approval requirements for absence requests, how to display forecasting results, and other usage rules.
Select the entitlement balances to display in the forecasting results.
If you enable self-service users to run the online Forecasting process or Absence Inquiry process, specify which entitlement balances to display to self-service users.
(Optional) Modify fields labels and page text, as needed.
The Text Catalog stores the text that appears on the self-service pages, including field labels, button names, links, page instructions, and warnings. You can modify this text by editing entries in the Text Catalog.
Note. The sequence of steps 2 and 3 can be reversed.
Defining Self-Service Absence Rules by Country
To define country-specific rules for using the absence self-service pages, use the Country Configuration (GP_ABS_SS_CNTRY) component.
This section discusses how to:
Select fields for displaying entitlement balances.
Select fields for displaying absence history.
Select forecasting options and fields.
Enter balance elements and select display options.
Pages Used to Define Self-Service Absence Rules by Country
|
Page Name |
Object Name |
Navigation |
Usage |
|
GP_ABS_SS_CNTRY1 |
Set Up HRMS, Product Related, Global Payroll & Absence Mgmt, Absence Self Service, Country, Entitlement Grid |
Select the entitlement fields that appear on the View Absence Balances page. |
|
|
GP_ABS_SS_CNTRY2 |
Set Up HRMS, Product Related, Global Payroll & Absence Mgmt, Absence Self Service, Country, History Grid |
Select the history fields that appear on the View Absence Requests page. |
|
|
GP_ABS_SS_CNTRY3 |
Set Up HRMS, Product Related, Global Payroll & Absence Mgmt, Absence Self Service, Country, Forecasting Grid |
Select forecasting options and fields. |
|
|
GP_BAL_ELIG_SS |
Set Up HRMS, Product Related, Global Payroll & Absence Mgmt, Absence Self Service, Country, Balances |
Enter balance elements and select display options. |
Selecting Fields for Displaying Entitlement Balances
Access the Entitlement Grid page.
The fields on this page control what appears on the View Absence Balances page.
|
Accrual Period |
Select to have the system display the accumulator period for each entitlement balance, for example, year-to-date or month-to-date. (Define the period for an entitlement accumulator on the Accumulator Periods for Element <element name> page. Select the entitlement accumulators on the Balances page.) |
|
From Date and To Date |
Select to display the begin and end dates of the accrual period. |
|
Display User Key 1...6 |
Select to display the values of up to six user keys that are associated with the entitlement accumulator. (Define user key values on an entitlement element's Auto Generated Accumulators page.) |
Selecting Fields for Displaying Absence History
Access the History Grid page.
The fields on this page control what appears on the View Absence Requests page.
|
Default History Date Range |
Select to define the default date range for displaying historical absence events. When you select this check box, the system displays 90 days before the current date and 90 days after the current date. Note. Users can select dates outside of this date range by editing the From: and Through: fields on the View Absence Requests page. |
|
Days Before Current Date and Days After Current Date |
Use these fields to modify the default date range for displaying historical absence events. |
|
Requested By |
Select to display a column that identifies who (which role) submitted each request: the employer, administrator, or manager. Names are not displayed. This field is selected by default. |
|
Duration |
Select to display the duration of the absence event. This field is selected by default. |
Selecting Forecasting Options and Fields
Access the Forecasting Grid page.
All check boxes on this page are selected by default.
Forecasting Options
|
Forecast Request Enabled |
Select to enable self-service users to run the online Absence Forecasting process. This causes a Forecast button to appear on the Employee - Request Absence page and Manager - Request Absence page. For self-service users to run the forecasting process for a given absence take element, the country take rule for that take element must also allow forecasting. (The Allow Forecasting check box must be selected on the take element's Forecasting Messages page.) |
|
Forecast Balance Enabled |
Select to enable self-service users to run the online Balance Inquiry process. This causes a View Forecast Balances link to appear on the Request Absence pages and the View Absence Balances pages. |
Forecasting Grid
|
From Date and To Date |
Select to have the forecasting results display the From Date and the To Date for the forecasted period. |
|
User Key 1...6 |
Select to display the values of the user keys that are defined for the forecasted entitlement element's accumulator. |
Entering Balance Elements and Selecting Display Options
Access the Balances page.
The fields on this page control what appears on the View Absence Entitlement Balances page in the Self Service component.
|
Effective Date |
The date that the balance accumulator is will appear on the View Absence Entitlement Balances page. |
|
Element Name |
Select the accumulator element for the entitlement balance you want to display. |
|
Unit Type |
Select Days or Hours as the units to display on the self-service pages. These are units that users see when viewing absence entitlement balances. |
Note. The selected unit type should match the unit type defined for the take element.
|
Display Results if Zero |
Select to display the element on the View Absence Entitlement Balances page when there is no balance for that accumulator. The system displays the balances as of the most recent run of the Entitlement process for the employee. |
Defining Self-Service Absence Rules by Take Element
To define take-specific self-service absence rules, use the Country Take (GP_ABS_BAL_SS_DEF) component.
This section provides overviews of PeopleSoft-delivered Approval Process IDs and approval framework events, absence duration and end date calculations, and forecasting messages, and discusses how to:
Define units, administrative rules, and display rules for absence requests.
Define rules for entering absence dates.
Define user fields to display.
Select forecasting rules and messages.
Customize forecasting messages.
Understanding PeopleSoft Delivered Approval Process IDs and Approval Framework Events
Approval Process IDs determine how absence request submissions, approvals, denials, and requests for rework are routed among approvers, requesters, and absence administrators. Self-service absence transactions that require action by a user appear in both user worklists and emails. The content of the email message is defined using the Generic Template pages in the PeopleTools Workflow Notifications component. Which email template is used depends on the user's role (approver, requester, or administrator), and the approval framework event.
Delivered Approval Process IDs for Absence Management
The following table lists the delivered Approval Process IDs:
|
Approval Process ID |
Description |
|
AbsenceManagement |
Absence Self Service |
|
Absence Mgmt ByDeptManager |
Absence Mgmt By Dept Manager |
|
Absence Mgmt ByPosMgmt |
Absence Mgmt ByPosMgmt |
|
Absence Mgmt ByPosnDeptMgr |
Approval ID by Posn Dept Mgr |
|
Absence Mgmt ByPosnSupervisor |
Absence Mgmt By PosnSupervisor |
|
Absence Mgmt BySupervisorId |
Absence Mgmt BySupervisorId |
See Setting Up Direct Reports.
Email Notification Templates for Absence Management Self-Service Transactions
The following table lists the email template names that are used for each role based on the approval framework event:
|
Approval Framework Event |
Requester templates |
Approver templates |
Administrator templates |
Absence Request Action Button |
|
Launch |
GP_ABS_SS_SUB |
Submit |
||
|
Approve |
GP_ABS_SS_APPR_READY |
Submit |
||
|
OnApprove |
GP_ABS_SS_APPR |
GP_ABS_SS_APPR |
Approve |
|
|
OnDeny |
GP_ABS_SS_DNY |
GP_ABS_SS_DNY |
Deny |
|
|
Back |
GP_ABS_SS_WRK |
Needs Rework (Used when there are multiple levels of approval. For example, when Approver 2 pushes back to Approver 1.) |
||
|
Terminate |
GP_ABS_SS_WRK |
Needs Rework |
||
|
Error |
GP_ABS_SS_ERR |
NONE |
See Enterprise PeopleTools PeopleBook: Workflow Technology, Using Notification Templates
Understanding Absence Duration and End Date CalculationsDepending on the rules that you define, the system can automatically calculate the duration of an absence event or its end date when a user enters an absence request. Calculation occurs when the user clicks a button on the Request Absence page.
The following factors can affect the calculation of an absence duration or end date:
Partial-day absences.
Users can indicate whether partial-day absences apply to the first day of the absence event, all days, or the last day.
Absence take formulas.
If the formulas that your organization has defined for absence take processing do not recognize partial hours, users can enter partial-day absences, but they are not used in calculations.
Holidays and off days.
Specify whether to include or exclude these days on the Date Rules page.
Unit type.
If the unit type defined for the absence (in the Unit Type field on the Absence page) is days, partial hours recorded for an absence event are ignored by the duration and end date calculations.
Calculations for Absences with a Unit Type of Hours
When the unit type defined for the absence is hours, the system calculates the end date and duration of an absence event as follows:
End Date
To calculate the end date, the system applies the hours entered in the Duration field to the scheduled hours, day by day, starting with the begin date. Partial hours and half-days are taken into account. If there's a negative balance when the end date is reached (that is, scheduled hours for the end date exceed any remaining duration hours) the partial hours for the end date are adjusted to reflect the difference of hours.
An error is generated if the Apply to All Days check box is selected and the duration hours cannot be evenly divided by the partial hours or is not a sum of all scheduled hours divided by two.
Duration
The system adds the scheduled hours for the requested absence dates and adjusts the sum for partial or 1/2 day absences.
Example 1: Calculating End Date
Assume an employee works eight hours each day from Monday to Friday. She enters an absence request with a begin date of Monday, January 7 and a duration of 24 hours. Absence take is defined in hours. The following table shows the system-calculated end date for various scenarios:
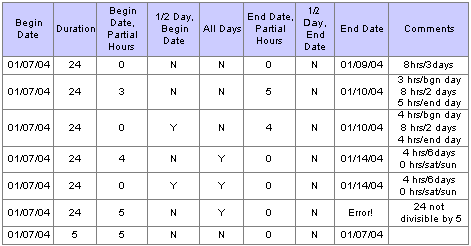
End date calculations
Example 2: Calculating Duration
Assume an employee works eight hours each day from Monday to Friday. Absence take is defined in hours. The following table shows the system-calculated duration for various scenarios:
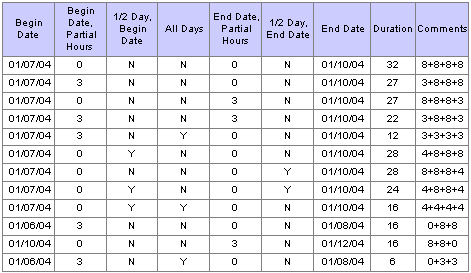
Duration calculations
Understanding Forecasting MessagesIf you enable self-service users to run the online Forecasting process, you can define the message to display at the end of that process. Use the Text Catalog to define the text for up to three messages: a success message, a warning message, and an error message. The entitlement element's forecasting formula should specify the conditions for issuing each message. You will map the value that's returned for each condition to the corresponding message that you define in the Text Catalog.
To define forecasting messages:
Use the Text Catalog to define a status message, a description, or both for each possible Forecasting outcome: success, warning, and error.
Use the Customize Messages page to map each message type (success, warning, error) to the value returned by the forecasting formula and to specify which text to display from the text catalog.
See Viewing or Modifying Text on the Self-Service Absence Pages.
Pages Used to Define Self-Service Absence Rules by Take Element
|
Page Name |
Object Name |
Navigation |
Usage |
|
GP_ABS_ELIG_SS |
Set Up HRMS, Product Related, Global Payroll & Absence Mgmt, Absence Self Service, Country Take, Absences |
For a given take element and country, define absence units (days or hours), who can submit and approve requests, what happens to cancelled requests, and whether to allow partial-day absences. You can also specify whether to display the absence reason and entitlement balances. |
|
|
GP_ABS_ELIG2_SS |
Set Up HRMS, Product Related, Global Payroll & Absence Mgmt, Absence Self Service, Country Take, Date Rules |
Define rules for entering absence dates, such as whether absences can begin or end on a holiday or off-day and whether to have the system calculate an absence's end date or duration. |
|
|
GP_ABS_ELIG3_SS |
Set Up HRMS, Product Related, Global Payroll & Absence Mgmt, Absence Self Service, Country Take, User Fields |
Define user fields. |
|
|
GP_ABS_ELIG4_SS |
Set Up HRMS, Product Related, Global Payroll & Absence Mgmt, Absence Self Service, Country Take, Forecasting Messages |
Define forecasting rules. |
|
|
GP_ABS_ELIG42_SEC |
Click the View Messages link on the Forecasting Messages page. |
View the default messages that are returned by the online forecasting process. |
|
|
GP_ABS_ELIG4_SEC |
Click the Customize Messages link on the Forecasting Messages page. |
Customize the messages that are returned by the online forecasting process. |
Defining Units, Administrative Rules, and Display Rules for Absence RequestsAccess the Absences page.
Self-service Rules
|
Unit Type |
Select Days or Hours as the units to display on the self-service pages. These are units that users enter when requesting time off. Note. The selected unit type should match the unit type defined for the take element. |
Administrative Rules
|
Allow Request By |
Specify who can request absences for this take element through the self-service pages. Values are: Employee, Employee and Manager (default), and Manager. |
|
Approval Process ID |
Select the ID that corresponds to this type of approval, based on how you set up the approval framework. PeopleSoft delivers six Approval Process IDs. The selection of Approval Process ID for the self-service take elements at the country level depends on how the company has set up Direct Reports. |
|
Default Set ID |
The Approval Process IDs within the approval framework are defined by SetID. The user will need to enter the correct SetID. |
Note. If your absence requests do not require approval, then leave the Approval Process ID field and the Default Set ID field blank. The absence request will be automatically approved once the user submits it.
Cancel Request Rules
Specify what happens when an absence request is cancelled. Options are:
Change Status on Record: (Default) Select to have the system change the status of the request to Cancelled. When a request's status is set to Canceled, you can no longer access the request.
Delete from Database: Select to have the system delete the request from the database.
Note. Absence requests cannot be cancelled after they have been submitted.
Page Display Rules
|
Display Reason |
Select to enable self-service users to specify the reason for the absence. This check box is selected by default. |
|
Reason Required |
Select to require that users enter the reason for the absence. |
|
Allow Partial Days |
This check box works with the Partial Days Option field. Select it to specify conditions under which users can report partial day absences. Do not select the check box if partial days or hours are not allowed. |
|
Partial Days Option |
This field becomes available when you select All Days, Begin Day Only, or End Day Only in the Allow Partial Days field. Options are:
|
|
Display Current Balance |
Select to display the balance for the absence entitlement element, as of the last finalized absence run on the Request Absence page. The balance will not reflect the number of units that the user is requesting. This check box is not selected by default. |
|
Use Balance Accumulator |
If you selected the Display Current Balance check box, select the accumulator element that stores the current balance for this absence take element. |
|
Display Option |
Indicate which value you want the system to display as the current balance, when there are multiple instances of the accumulator with different user keys. Select one of the following options: Not Summarized (default). Consider using this option when your rules for displaying the current balance are very complex. Create an accumulator that summarizes the value of the element contributors. The system will display the value of the most current instance of the accumulator. Summarized. Select this option to have the system display the sum of the values of the multiple instances. |
In the following example, the Summarized option would return a value of 20 for the KOAE PTO accumulator.
|
Accumulator |
From |
To |
User Key 1 |
User Key 2 |
Value |
|
KOAE PTO |
January 1, 2000 |
December 31, 2000 |
CIA A |
Paygroup A |
5 |
|
KOAE PTO |
January 1, 2001 |
December 31, 2001 |
CIA A |
Paygroup A |
8 |
|
KOAE PTO |
January 1, 2002 |
July 31, 2001 |
CIA B |
Paygroup B |
4 |
|
KOAE PTO |
August 1, 2002 |
December 31, 2002 |
CIA B |
Paygroup B |
2 |
|
KOAE PTO |
January 1, 2003 |
December 31, 2003 |
CIA B |
Paygroup XYZ |
1 |
See Also
Defining Rules for Entering Absence Dates
Access the Date Rules page.
Start and End Date Rules
|
Allow Start or End on Holiday |
Select if the start or end date of the request can fall on a holiday. This field is selected by default. |
|
Allow Start or End on Off-day |
Select if the start or end date of the request can fall on a day the employee is not scheduled to work. This field is selected by default. |
The option that you select here causes a Calculate End Date button, a Calculate Duration button, or both buttons to appear on the Request Absence page.
See Understanding Absence Duration and End Date Calculations.
|
Calculate End Date |
Select to have the Calculate End Date button appear. When entering an absence request, the user must enter the absence begin date and duration. Clicking the Calculate End Date button causes the system to calculate and display the end date. This is the default selection. |
|
Calculate Duration |
Select to have the Calculate Duration button appear. When entering an absence request, the user must enter the absence begin and end dates. Clicking the Calculate Duration button causes the system to calculate and display the duration. |
|
If both entered recalculate |
This field causes a button labeled Calculate End Date or Duration to appear and controls what happens when a user enters a value in both the End Date and Duration fields while entering an absence request.
|
|
Exclude Holidays |
Select to exclude holidays from the end date and duration calculation for requested absence events. |
|
Exclude Off Day |
Select to exclude non-worked days (based on the employee's schedule) from the end date and duration calculation for requested absence events. |
Defining User Fields
Access the User Fields page.
|
Display User Fields |
Select to have up to four user-defined fields appear on the Request Absence page. |
User Fields
Define up to four fields to appear on the Request Absence page. These fields enable you to collect additional data that you may need for absence tracking. You can use these fields as system elements and embed them in rules to perform a specific task with the information that users enter.
For each field you define, specify the format, the field label, and whether users are required to complete the field.
|
Field <number> Format |
Options are Character, Date, Decimal, and Monetary. |
|
Label <number> |
Enter up to 30 alphanumeric characters for the field name. To appear on the Absence Detail page, the field must have a label. |
|
Field <number> Required |
Select if users are required to complete the field. |
Defining Forecasting Rules
Access the Forecasting Messages page.
Forecasting Results
|
Allow Forecasting |
Select to enable self-service users to run the online forecasting process. A Forecast button will appear on the Request Absence page. This check box is not selected by default. Note. For self-service users to run the forecasting process, the country rules for that take element must also allow forecasting. (The Forecast Request Enabled check box must be selected on the Forecasting Grid page.) |
|
Submission Role |
If forecasting is required before submitting an absence request, specify who must run the process. Options are: Employee, Manager, and Employee and Manager, and Not Applicable (default). This field works in conjunction with the Forecasting Reqd to Submit check box. If you select the Forecasting Reqd to Submit check box, then you must specify a role in this field. |
|
Forecasting Reqd to Submit (forecasting required to submit) |
Select to require that the Forecasting process be run before submitting an absence request. This check box is not selected by default. Depending on your rules, the results of the forecasting process may determine whether or not the request can be submitted. Users receive an error message when they click Submit on the Absence Request page without first forecasting the absence entitlement balance. |
|
Forecasting Reqd to Approve (forecasting required to approve) |
Select to require that the online forecasting process be run before approving an absence request. |
|
Approval Role |
If forecasting is required, specify who can run the forecasting process. Options are: Manager and Not Applicable (default). |
Forecasting Messages
The system can display the message, “Forecasting Completed Successfully!” at the end of the forecasting process, or it can display customized messages that you create. You can have a different message display when the forecasting process is successful, generates a warning, or results in an error. You define the criteria for issuing a success, warning, or error message.
|
Default Message and View Messages |
Select to have the system display the default message after a user runs the forecasting process. Click the View Messages link to access the View Messages page to see the default message. There is a default message for successful forecasting and one for system error. |
|
Customized Message |
Select to have a customized message display after a user runs the online forecasting process. |
|
Customize Success Message, Customize Warning Message and Customize Error Message |
To have the system display a customized message for a success, warning, or error, click the appropriate link to access the Customize Messages page, where you can specify the message to use for each condition. |
|
Allow Warning and Submit Warning |
Select to enable users to submit absence requests when the forecasting process results in a warning. In the Submit Warning field, specify who can submit requests with warnings. Options are: Employee, Manager, and Employee and Manager, and Not Applicable (default). |
|
Allow Errors and Submit Error |
Select to enable users to submit absence requests when the forecasting process results in an error. In the Submit Error field, specify who can submit requests with errors. Options are: Employee , Manager, Employee and Manager , and Not Applicable (default). |
Customizing Forecasting Messages
Access the Customize Messages page.
|
Message Type |
Select the type of message to define: Error, Success, or Warning. |
|
Forecasting Value |
Enter the value that the Forecasting process (the forecasting formula) will return to trigger the display of this message. You can enter up to 20 alphanumeric characters in this field (the maximum field length for a character element). |
|
Display Option |
Specify the type of information in the Text Catalog that is to display after forecasting is complete. Options are: Status, Description and Both (default). |
|
Status Text ID |
If you selected Display Status or Both in the Display Option field, enter the text ID for the status message. |
|
Description Text ID |
If you selected Display Description or Both in the Display Option field, enter the text ID for the description. |
Defining Forecasting Rules for Self-Service Absence Requests
To define rules for using the self-service Forecasting and Balance Inquiry processes, use the Forecasting (GP_ABS_SS_FCST) component.
This section discusses how to:
Selecting entitlement balances to display in forecasting results.
Selecting entitlement balances to display in balance inquiry results.
Pages Used to Define Self-Service Forecasting Rules
|
Page Name |
Object Name |
Navigation |
Usage |
|
GP_ABS_TAKE6 |
Set Up HRMS, Product Related, Global Payroll & Absence Mgmt, Absence Self Service, Forecasting, Forecasting |
Specify which forecasting result elements to display in the Forecasting Results grid. Also specify whether to display a customized label from the HR Text Catalog as the description or the element description as defined on the Element Name page (GP_PIN). |
|
|
GP_ABS_TAKE7 |
Set Up HRMS, Product Related, Global Payroll & Absence Mgmt, Absence Self Service, Forecasting, Balance Inquiry |
Specify which entitlement balances the Balance Inquiry process is to display and whether to display a customized label from the HR Text Catalog as the description or the element description as defined on the Element Name page (GP_PIN). |
Defining Rules for Self-Service Absence Entitlement Balance Forecasting
Access the Forecasting page.
This page displays the forecasting rules defined for a take element on the Absence Take - Forecasting page. The Forecast Element field at the top of the page shows the formula that the system resolves during the Forecasting process. The Forecasting Results Element List grid shows what appears on the Absence Forecast Results page (in the Absence Event Entry component) after you run the Forecasting process. You can have all or a subset of these results display to self-service users after they run the forecasting process.
Note. To enter information on this page, the Allow Forecasting check box must be selected on the Forecasting Messages page.
|
Self Service |
Select to have the forecasting results for this element display to self-service users. |
|
Label |
At the end of the Forecasting process, the system can display a customized message or status description that you build using the Text Catalog. Select the Text ID that corresponds to the message you want to display. |
See Also
Defining Rules for Absence Forecasting
Defining Rules for the Self-Service Balance Inquiry Process
Access the Balance Inquiry page.
This page is similar in function to the Forecasting page but applies to rules for the Balance Inquiry process.
Viewing or Modifying Text on the Self-Service Absence Pages
You can use the Text Catalog feature to modify field labels, button text, and text that appear on the self-service absence pages.
See Also