Using Fluid User Interface for Receiving Items
This section discusses how to receive items using the PeopleSoft fluid user interface.
|
Page Name |
Definition Name |
Usage |
|---|---|---|
|
PV_MOB_SRC_SCF |
Search items to receive. |
|
|
PV_RECV_TX_FL |
Create new receipt. |
|
|
RECV_WPO_DIST_SCF |
Enter distribution information for the receipt line items. |
|
|
PV_RECV_COMM_SCF |
Add comments and attachments to the receipt. |
|
|
RECV_WPO_AM |
Enter asset information for the receipt line items. |
|
|
RECV_INV_ITEMS_SP |
Enter inventory putaway information for receipt line items. |
|
|
PV_RECV_CONF_FL |
Provides receipt details and navigation once receipt is created. |
|
|
PV_MOB_RECEIPT_SCF |
Search the created receipts. |
|
|
PV_MOB_RECV_UPD_FL |
Displays the list of created receipts to edit details, cancel the receipt, and create supplier return. |
|
|
PV_RTVPICK_RCW_FL |
Create supplier return. |
|
|
PV_RTVSAVEDCONF_FL |
Provides return details and navigation once the return is created. |
|
|
PV_MOB_RTV_UPD_FL |
Displays the list of created returns to view and edit the return details. |
Use the Receipt Filters page (PV_MOB_SRC_SCF) to search items to receive.
Navigation:
This example illustrates the fields and controls on the Create Receipt Filters page.
From Date is defaulted to last 90 days. If none of the fields are selected then the Filters page will be skipped and all the transactions will be displayed on the Create Receipt page. If all the fields are left blank on the Filters page except for PO Business Unit then all the pending transactions for receiving are retrieved.
Search result is displayed if user is a requester or if user has created transactions. Users with role action RECV_BY_SHIPTO enabled can receive all the transactions for a particular Ship To ID that is set up in the user preferences for the user, irrespective of being a requester or not for the transaction.
After applying the Filters, select one or more requisition check boxes on the search result and click Receive Selected to create receipt for that requisition lines. The system displays the Create Receipt Page, where you can make changes to the receipt quantity, review requisition details, and add comments.
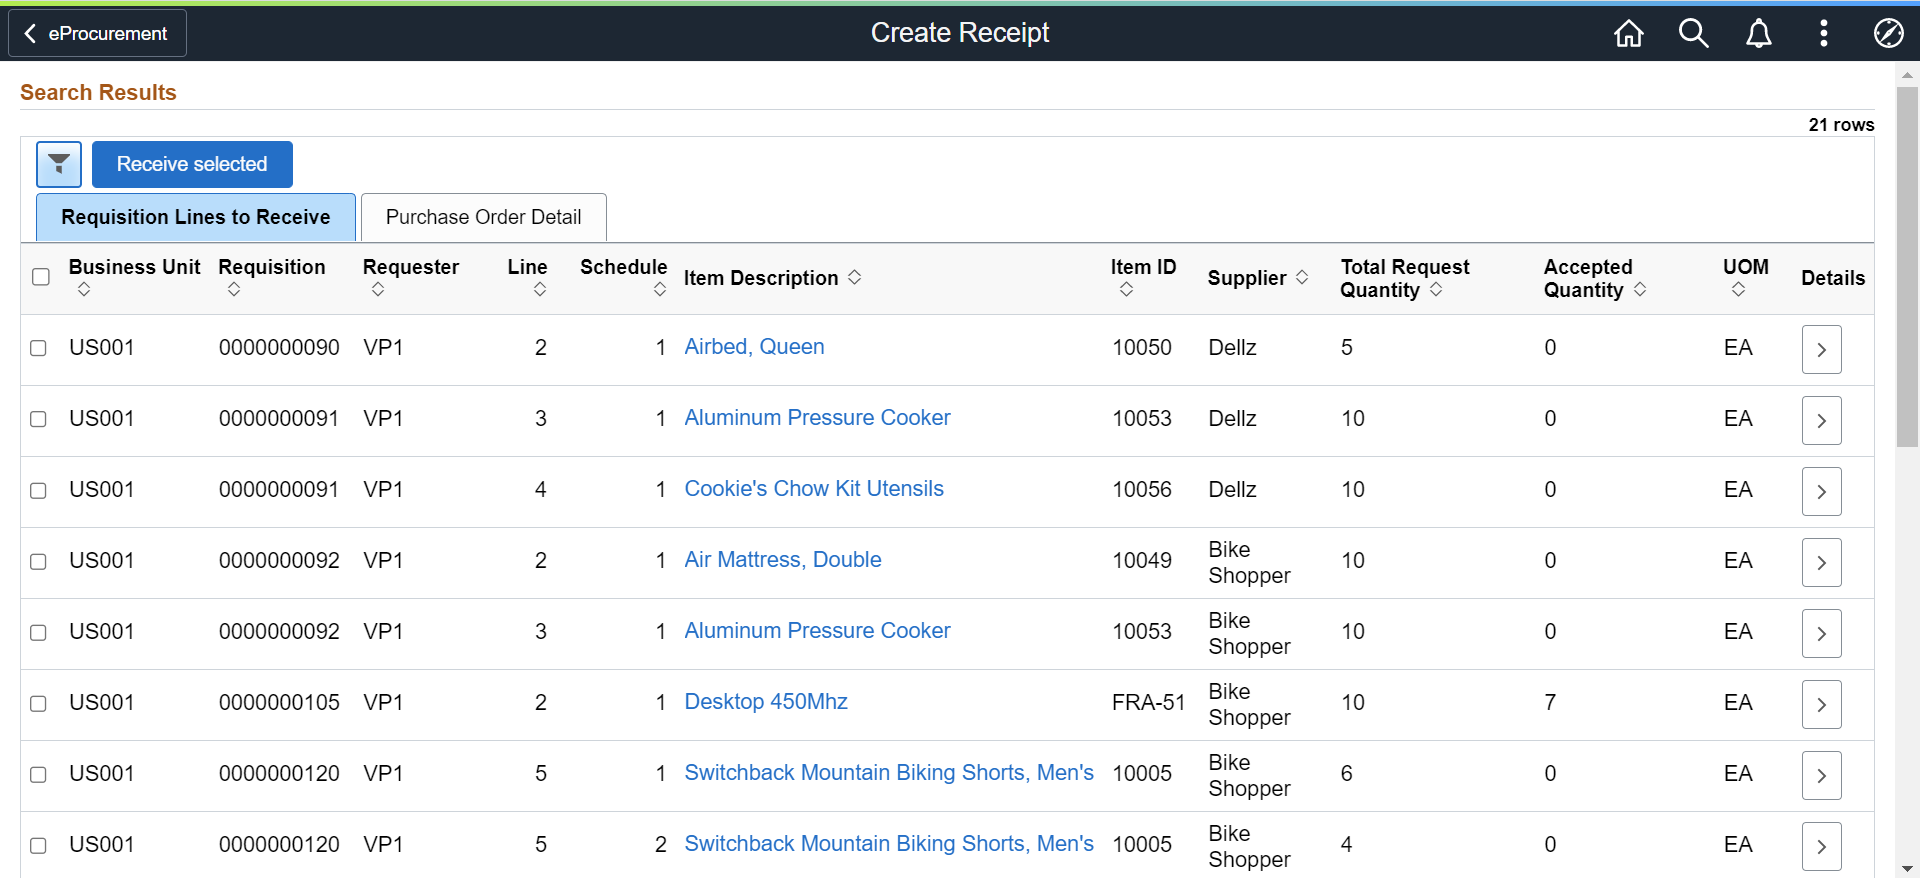
Use the Create Receipt page (PV_RECV_TX_FL) to select items to receive.
Navigation:
Note: You can also create receipt for a specific requisition using the My Requisitions tile. If the requisition Request State is Partially Dispatched or PO(s) Dispatched, then Create Receipt action is available in the Related Actions of the requisition.
This example illustrates the fields and controls on the Create Receipt - Requisition Lines to Receive tab. You can find definitions for the fields and controls later on this page.
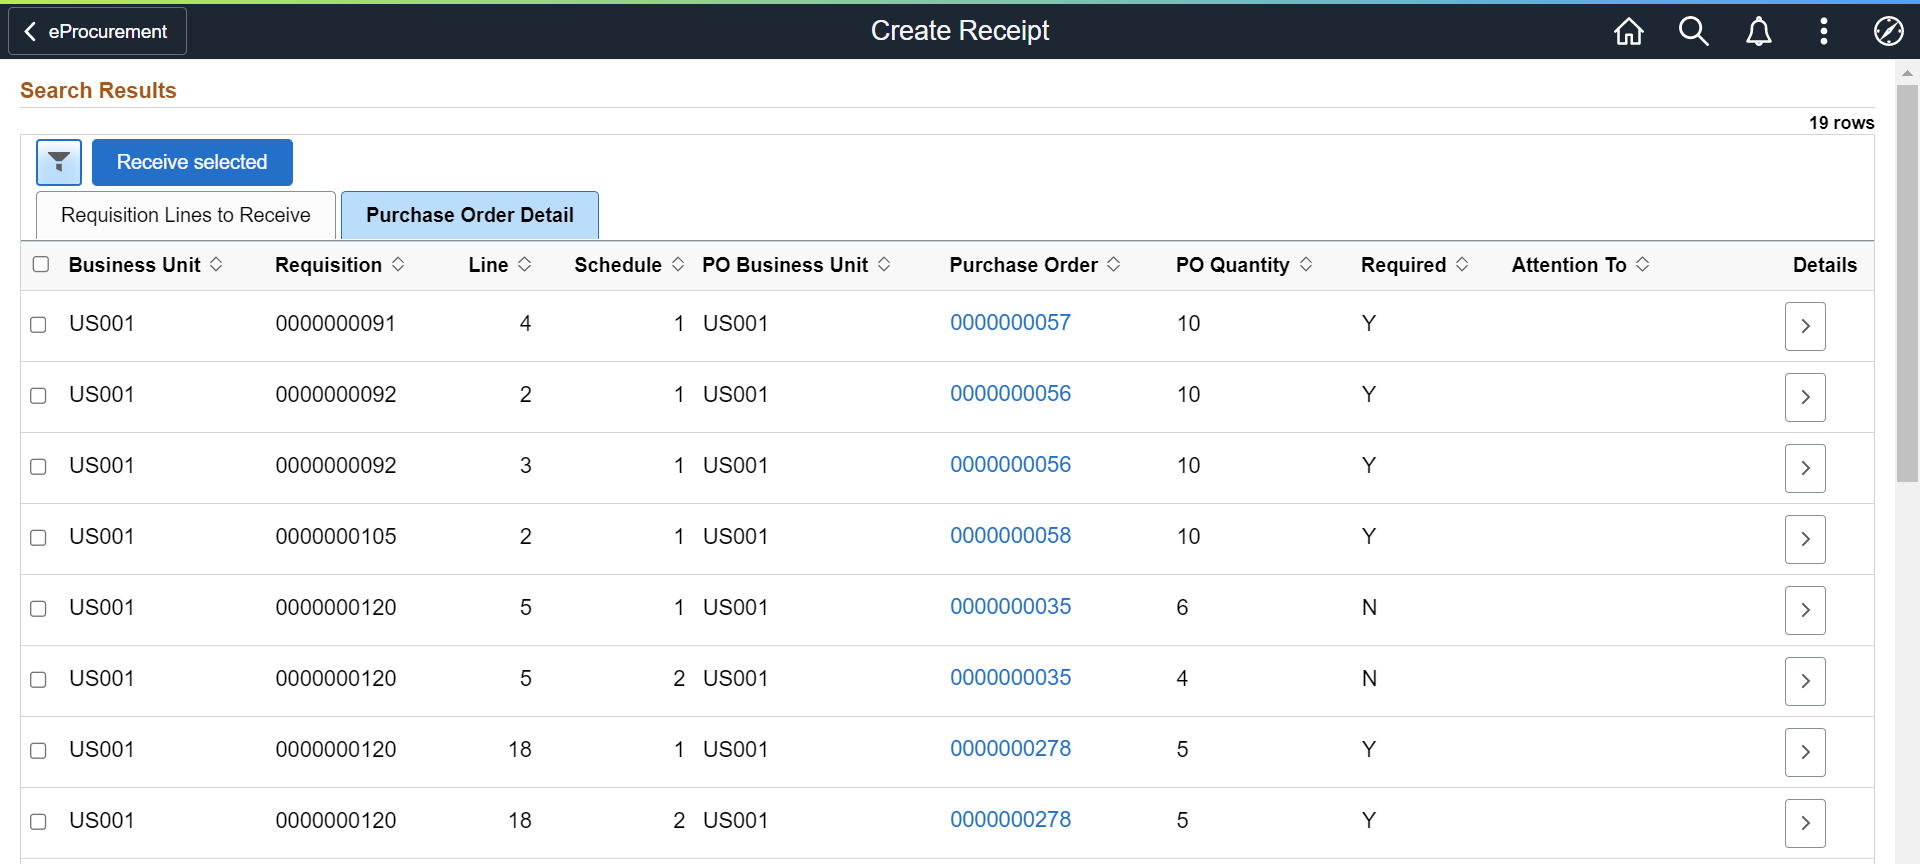
This example illustrates the fields and controls on the Create Receipt - Purchase Order Detail tab. You can find definitions for the fields and controls later on this page.
For a requisition line to appear on this page, the item must have been placed on a PO and dispatched to the supplier. You can view the requisitions that you entered and those that were purchased for you. When the entire quantity of the item has been received, the requisition line no longer appears on this page.
Requisition Lines to Receive Tab
|
Field or Control |
Description |
|---|---|
|
Check All |
Click this check box to select all requisition lines with the same supplier. One receipt can include only one supplier; therefore, not all displayed lines are selected by this button. |
|
Business Unit |
Displays the Business Unit names for the requisition lines. |
|
Requisition |
Select the check box to the left of the line, and click Receive Selected to display the Create Receipt Page. |
|
Requester |
Displays the Requester's name for the requisition lines. |
|
Line |
Displays number of the line associated with this requisition. A requisition may have multiple lines, if there are more lines, then the requisition id will be displayed on multiple rows. |
|
Schedule |
Displays the number of the schedule associated with the line. One line can contain several schedules. if a second schedule exists for the line, the item will be displayed on two rows. |
|
Item Description |
Click to access the Item Description page, where you can review item details and an item image, if it's available. |
|
Item ID |
Displays the Item ID for this particular requisition line. |
|
Supplier |
Displays the Supplier's name for the requisition line. |
|
Total Request Quantity |
This is the quantity that you expect to receive (the requisition quantity or the overage amount). |
|
Accepted Quantity |
Displays the number of items that have been accepted so far. |
|
UOM (unit of measure) |
Displays the type of unit requested on the requisition, for example, by box, each, and so on. |
|
|
Click the Details icon to view the item details. |
 (Details Icon)
Warning! Do not change the Return Adjust Source option after transactions have been recorded in PeopleSoft eProcurement. Changing this option may alter the quantities that appear so that they become inconsistent in the PeopleSoft eProcurement receiving and return transactions.
Purchase Order Details Tab
Select the Purchase Order Details tab.
|
Field or Control |
Description |
|---|---|
|
PO Business Unit |
Displays the business unit name for the PO. |
|
Purchase Order |
Click the hyperlink to view the Purchase Order Detail. |
|
PO Quantity (purchase order quantity) |
Displays the quantity for this PO. |
|
Required (receiving required) |
Displays Y (yes) or N (no) to indicate whether the item requires receiving to pay the supplier for the goods. You do not need to enter a receipt for any item that is marked with N. |
|
Attention To |
Displays the name of the individual who should receive the items or services on this requisition line. Once the shipment is physically received, this individual should record the receipt, enabling the buyers to track the quality and promptness of the supplier. |
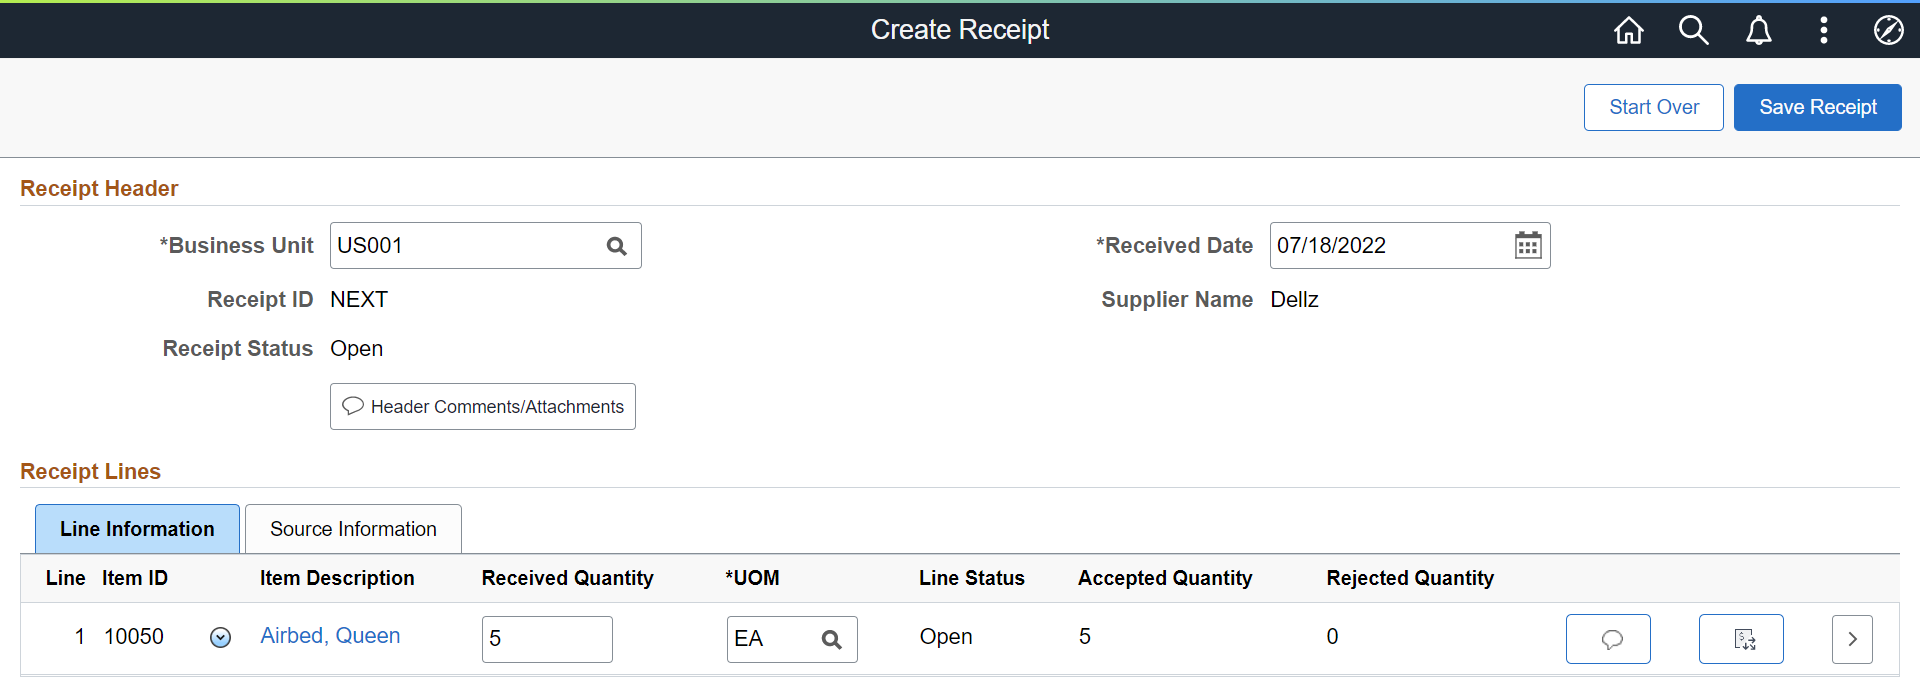
Use the Create Receipt page (PV_RECV_WPO_FL) to create new receipt.
Navigation:
Search for items to retrieve, select the requisition line check box, and click Receive Selected.
Note: You can only receive from one supplier at a time.
This example illustrates the fields and controls on the Create Receipt - Line Information tab. You can find definitions for the fields and controls later on this page.
This example illustrates the fields and controls on the Create Receipt - Source Information tab. You can find definitions for the fields and controls later on this page.

Add a new receipt of one or more PO lines and reject and inspect received quantities. Before creating a receipt, verify that the PO was dispatched.
Receipt Header
|
Field or Control |
Description |
|---|---|
|
Business Unit |
Displays the Business Unit name that was assigned when the receipt was entered. |
|
Receipt ID |
Displays the receipt ID that was assigned when the receipt was entered. If you are adding a new receipt, the word NEXT will appear until the page is saved. Then a receipt ID is assigned automatically. |
|
Received Date |
Enter the date when the shipment is arrived. The default is today's date, but you can change it if the shipment arrived earlier. |
|
Receipt Status |
Displays the status of the receipt. |
|
Supplier Name |
Displays the name of the supplier. |
|
Header Comments/Attachments |
Select to access the Receipt Header Comments page, where you can record one or more comments at the header-level of this receipt and add attachments. This link is not visible unless your user ID is linked to the eProcurement role action of MULTI_COMMENTS. If there are no current comments, the comments icon on the button is empty. If comments exist, the comments icon on the button will contain lines. |
Create Receipt - Line Information Tab
Select the Line Information tab
|
Field or Control |
Description |
|---|---|
|
Line |
A numeric counter showing what row number this item is on. This is line will become the Receipt line number. |
|
Item ID |
Displays the Item ID for the line item. |
|
|
Click the Related Actions icon to: |
|
Item Description |
Click this link to view a detailed description and picture (if available) of the item. |
|
Received Quantity |
Enter the quantity of the items that you received. |
|
UOM (unit of measure) |
Select the type of unit by which the item was shipped to you, for example, by box, each, and so on. |
|
Line Status |
Displays the status of the receipt line. |
|
Accepted Quantity |
Displays the number of items that you are accepting. If you do not reject any items by clicking the Reject Shipment link and entering the quantity that you are rejecting on the Reject Shipment page, the system assumes that you are accepting all of the items that you received. If you rejected any items, the system automatically calculates the accepted quantity when you click OK. |
|
Rejected Quantity |
Displays the number of items that you are rejecting. |
|
|
Select this icon to access the Receipt Line Comments page, where you can record the condition of the shipment when it arrived at the location (good, fair, or damaged), add comments about the receipt line, and add attachments to the receipt line. You are limited to one comment and no attachments unless your user ID is linked to the eProcurement role action of MULTI_COMMENTS. |
|
|
Select Distribution icon to view and edit the distribution details. |
|
|
Click the Details icon to access the Line Details page, where you can view more data about the item. |
|
Asset Status |
Click to access the Asset Management Information Page, where you can view or change the fixed asset information, such as serial ID and asset profile ID. This link appears only if the item is designated as a fixed asset for PeopleSoft Asset Management. |
|
Inventory Status |
Click to access the Inventory Putaway Information Page, where you can view or change the inventory information, such as serial ID and warehouse location. This link appears only if the item is designated as a PeopleSoft Inventory item. |
|
Device Tracking |
Click the Device Tracking button to access the Device Tracking page. |
|
Procurement Group ID |
(Display only) Displays the Procurement Group ID for the item upon saving the component if the purchasing group options are enabled. When saving the component, the existing rows in the RECV_LN_ASSET record are updated with the Procurement Group ID, Primary Unit, Unit Allocation Quantity, and Unit Allocation Amount). |
|
Primary Unit |
(Display only) Displays as selected if this item is the primary unit for the Procurement Group ID, if applicable. When saving the component, all of the procurement group fields are populated on the page and the existing rows in the RECV_LN_ASSET record are updated with the Procurement Group ID, Primary Unit, Unit Allocation Quantity, and Unit Allocation Amount). |
|
Unit Allocation Qty |
(Display only) Displays upon saving the component, if applicable. If the receipt distribution quantity exceeds the allocation quantity the system repeats the first RECV_LN_ASSET row for the remainder of the allocation quantity until it totals the distribution quantity. |
|
Unit Allocation Amt |
(Display only) Displays upon saving the component, if applicable. If the receipt distribution amount exceeds the allocation amount, the system repeats the first RECV_LN_ASSET row for the remainder of the allocation amount until it totals the distribution amount. |
|
Start Over |
Click to ignore the selected items to receive and start all over again the process of selecting items to receive. A message will be displayed on clicking this button alerting the user that the current data will be lost by proceeding with this step. |
|
Save Receipt |
After completing all the actions for a receipt, click Save Receipt. The Receipt is created and Receipt Confirmation Page is displayed. |
 (Receipt Comments icon)
 (Distribution icon)
Source Information Tab
Select the Source Information tab.
|
Field or Control |
Description |
|---|---|
|
Requisition ID |
Displays the Requisition ID for the line items. |
|
Requester |
Displays the Requester's ID for the line items. |
|
Requisition Line |
Displays the number of the line associated with this requisition. A requisition may have multiple lines, if there are more lines, then the requisition id will be displayed on multiple rows. |
|
Requisition Schedule |
Displays the schedule line number that includes this requisition line. |
|
PO Business Unit |
Displays the PO Business Unit name for the line items. |
|
Purchase Order |
Displays the purchase order ID linked to this sourced requisition line. |
|
PO Line |
Displays the number of the PO line associated with this item. |
|
PO Schedule |
Displays the number of the schedule associated with the line. One line can contain several schedules, if a second schedule exists for the line, the item will be displayed on two rows. |
|
PO Quantity |
Displays the quantity for this PO. |
|
Line Status |
Displays the status of the receipt line. |
|
|
Select this icon to view comments added on the purchase order at the header-level, line-level, or ship to level. To appear here, the purchase order comments must have been marked with the Show at Receipt check box. If the icon on the button does not contain any lines in it, then there are no PO comments. The PO comments are display only. |
|
|
Click the Details button to access the Line Details page, where you can view more data about the item. |
Cancel the receipt creation for any requisition line item.
Navigation:
Click the Cancel Receipt Line link from
the  Related Actions.
Select Yes on the confirmation pop-up.
Note: Canceling the receipt of the item cannot be reversed.
Use the Reject Shipment page (PV_RECV_REJECT_SCF) to reject a quantity.
Navigation:
Click the Reject Quantity link from the
Related Actions.
This example illustrates the fields and controls on the Reject Shipment page. You can find definitions for the fields and controls later on this page.

Reject some or all of the items in this receipt by entering information about each item that you are rejecting.
|
Field or Control |
Description |
|---|---|
|
Business Unit |
Displays the Business Unit name. |
|
Receipt No |
Displays the receipt number. If you are adding a new receipt, the word NEXT will appear until the page is saved. Then a receipt number is assigned automatically. |
|
Receipt Line |
Displays the receipt line number. |
|
Item Description |
Click to access the Item Description page, where you can review item details and an item image, if it's available. |
|
Received Quantity |
Displays the quantity of the items that you received. |
|
UOM |
Displays the type of unit requested on the requisition, for example, by box, each, and so on. |
|
Reject Quantity |
Enter the quantity of the item that you are rejecting. This can be all or part of the quantity that was delivered to you (the received quantity). When you enter a quantity and move out of the field, the remaining fields on this page are available for entry. |
|
Reject Reason |
Select the reason why you are rejecting the items. This is a required field. |
|
Reject Action |
Select how you want the supplier to correct the mistake. This is an information field; to return stock to the supplier, use the Return to Supplier page. This is a required field. |
|
RMA Number (return material authorization number) |
Enter the return material authorization number that the supplier provided. This is an optional field. |
|
RMA Line (return material authorization line) |
Enter the return material authorization line number that the supplier provided. This is an optional field. |
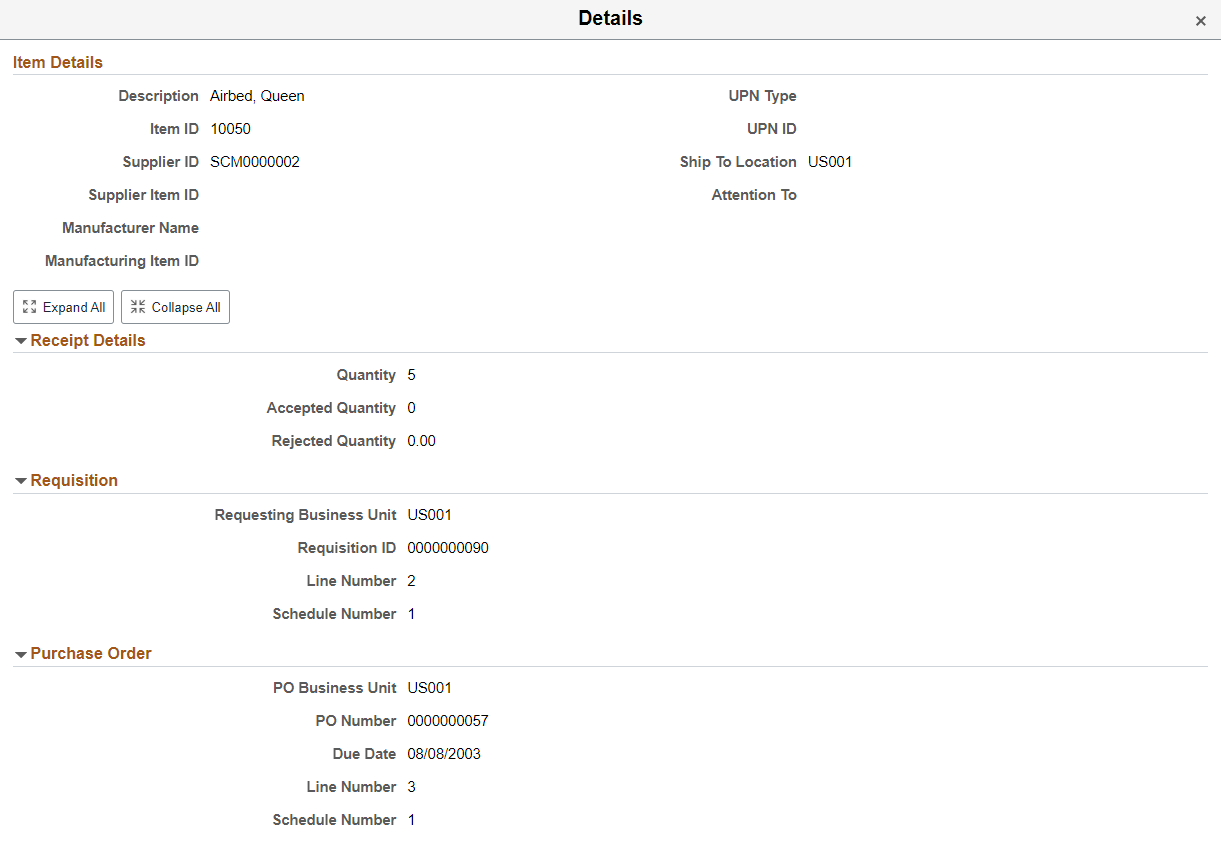
Use receipt Details page (PV_RECV_TX_DTL_SCF) to view the receipt line details.
Navigation:
Click the Receipt Details link from the
Related Actions.
This page displays following information:
Item Details
Receipt Details
Requisition Details
Purchase Order Details
This example illustrates the fields and controls on the receipt Details page.
Use Distribution page (RECV_WPO_DIST_SCF) to retrieve and select the distribution information for the line item.
Navigation:
Click the Distribution icon associated with the line item on the Create Receipt page.
This example illustrates the fields and controls on the Create Receipt - Distribution page (Chartfield Information). You can find definitions for the fields and controls later on this page.
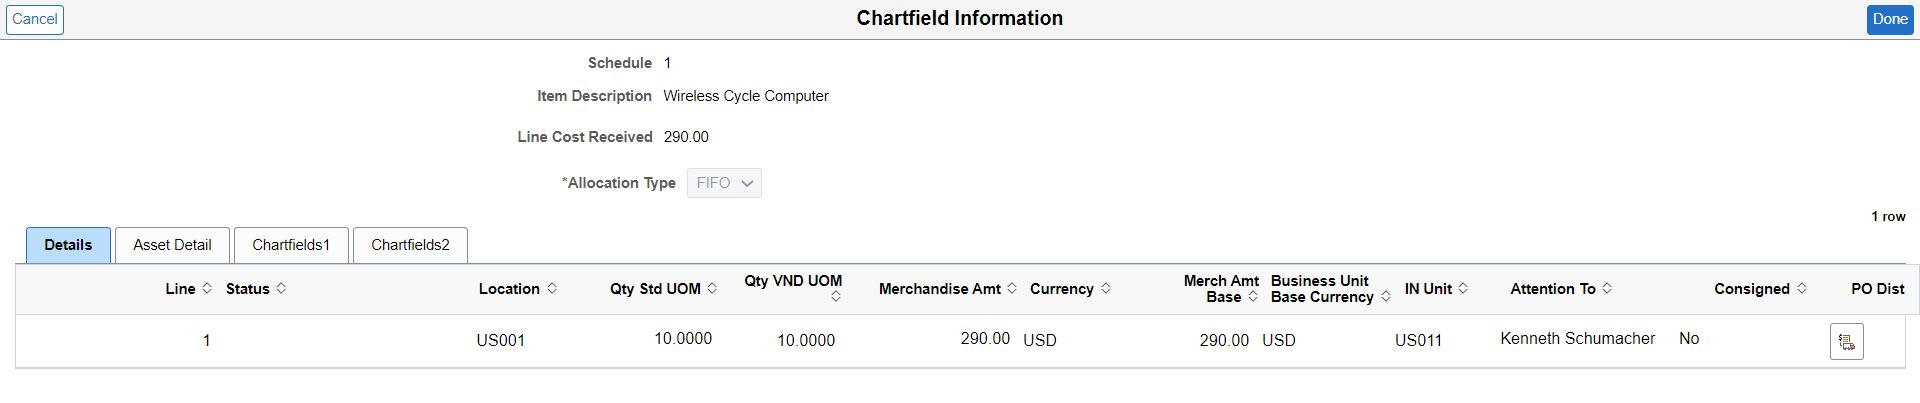
Details Tab
Select Details tab.
|
Field or Control |
Description |
|---|---|
|
Schedule |
Displays the number of schedule associated with the line. One line can contain several schedules, if a second schedule exists for the line, the item will be displayed on two rows. |
|
Item Description |
Click to access the Item Description page, where you can review item details and an item image, if it's available. |
|
Line Cost Received |
Displays the amount of cost received for the line item. |
|
Allocation Type |
Displays the allocation type for the receipt. The method selected is used when the receipt quantity is less than the quantity ordered. This field appears by default from the Purchasing Definition - Business Unit Options page. Values are:
|
|
Line |
Displays the distribution line number. |
|
Status |
Displays the status of the distribution row. |
|
Location |
Displays the location Business Unit to which the item is assigned. |
|
Qty Std UOM |
Displays the quantity of items being distributed, expressed in the standard UOM. |
|
Qty VND UOM |
Displays the quantity of items being distributed, expressed in the supplier UOM. |
|
Merchandise Amt |
Displays the merchandise amount allocated to this distribution, expressed in the transaction currency. This value is dependent on the value entered in the Quantity field. |
|
Currency |
Displays the Currency code. |
|
Merch Amt Base |
Displays the distribution merchandise amount in the PeopleSoft General Ledger business unit currency. This value is dependent on the value entered in the Quantity field. |
|
Business Unit Base Currency |
Displays the merchandise amount for the distribution row in the base currency code. |
|
IN Unit |
The Inventory business unit where the items should be distributed when they are received. |
|
Attention To |
Displays the name of the individual who should receive the items or services on this distribution line. |
|
Consigned |
Displays if the stock is defined as consigned goods. |
|
PO Dist |
View purchase order distribution information. |
Asset Detail Tab
Select Asset Detail tab.
|
Field or Control |
Description |
|---|---|
|
AM Business Unit |
Identify the Asset Management business unit that is responsible for tracking asset transactions. |
|
Profile ID |
Displays the default asset profile ID associated with distribution items. |
|
Capitalize |
Select to indicate that the requisition item is capitalized. |
|
CAP # |
The CAP identification ties the asset to a capital acquisition plan. |
|
CAP Sequence |
Displays the sequence number for the capital acquisition plan. |
|
Employee ID |
Employee ID of the custodian for this distribution item. |
Chartfields Tab
Select Chartfields (Chartfields1 and Chartfields2) tab to enter Chartfield and asset management information.
For more information on Chartfields, see Understanding PeopleSoft ChartFields.
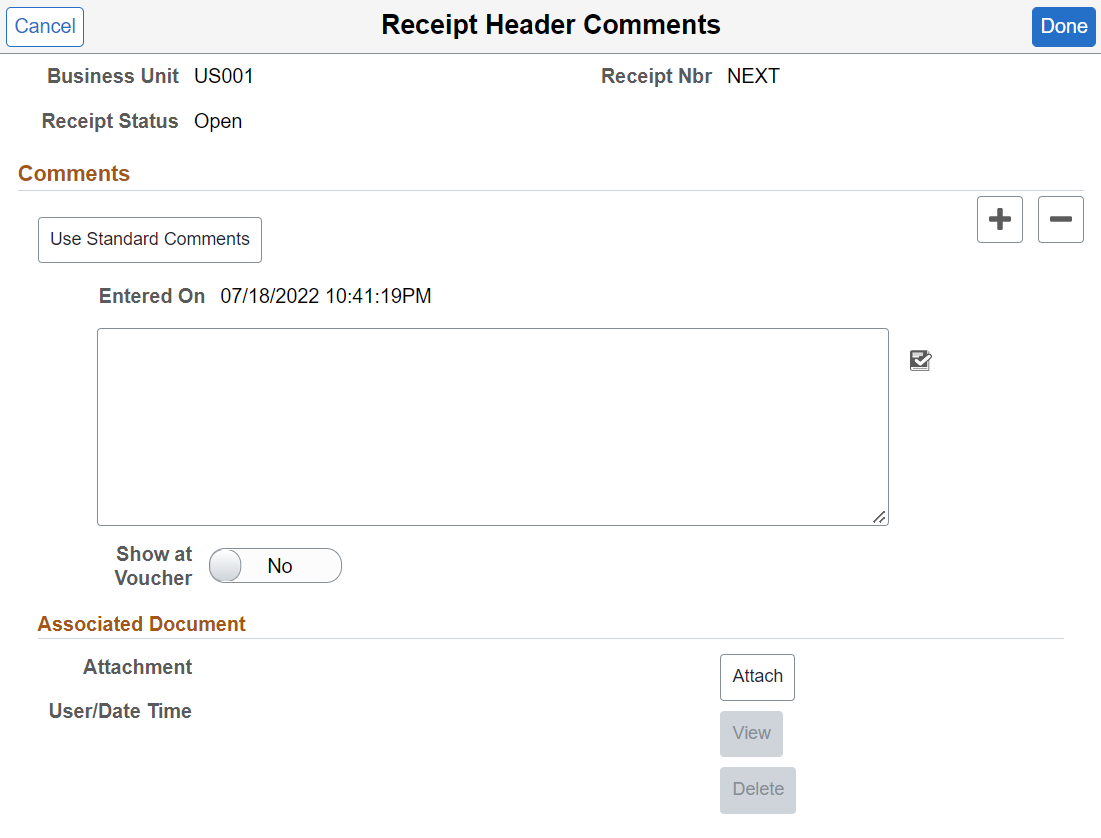
The Receipt Header Comments page and the Receipt Line Comments page use the same fields. Navigation is different and each page adds comments and attachments to a different part of the receipt.
Use the Receipt Header Comments page (PV_RECV_COMM_SCF) to record one or more comments at the header level of this receipt and add attachments.
You cannot access this page unless your user ID is linked to the eProcurement role action of MULTI_COMMENTS.
Navigation:
Click the Add Header Comments link on the Create Receipt page.
This example illustrates the fields and controls on the Receipt Header Comments page. You can find definitions for the fields and controls later on this page.
This example illustrates the fields and controls on the Receipt Line Comments page. You can find definitions for the fields and controls later on this page.

|
Field or Control |
Description |
|---|---|
|
Condition |
(Receipt Line Comment page only) Select the general condition of the shipment; the options are Good, Fair, and Damaged. |
|
|
Select to add a new comment field. Comments are numbered as you add them. |
|
|
Select to delete a comment field. |
|
Use Standard Comments |
Click to access the Standard Comments page (PV_STD_COMM_SCF), where you can select a standard comment to be applied as a comment to this receipt. Standard comments are frequently used comments that have been defined in the system using the Standard Comments (STANDARD_COMMENTS) and Standard Comment Type (STD_COMMENT_TYPE) components. |
|
|
Click to perform a spell check on the comment. |
|
Show at Voucher |
Select if you want this comment to appear on the voucher. |
|
Add Attachments |
Click to access the File Attachments window, where you can browse and select a file to be attached to this comment. Only one file can be attached to each comment. Once a file is attached, the Attachment group box displays the file details including file name, the user who attached it, and the date and time it was attached. The Send Supplier check box applies to each file separately. |
|
Done |
Select to return to the Create Receipt page with the comments and attachments that you have added on this page. |
|
Cancel |
Select to return to the Create Receipt page without saving the changes that were added to this page. |
 (Add a New Row icon)
 (Delete Row icon)
 (Spell Check Comment icon)
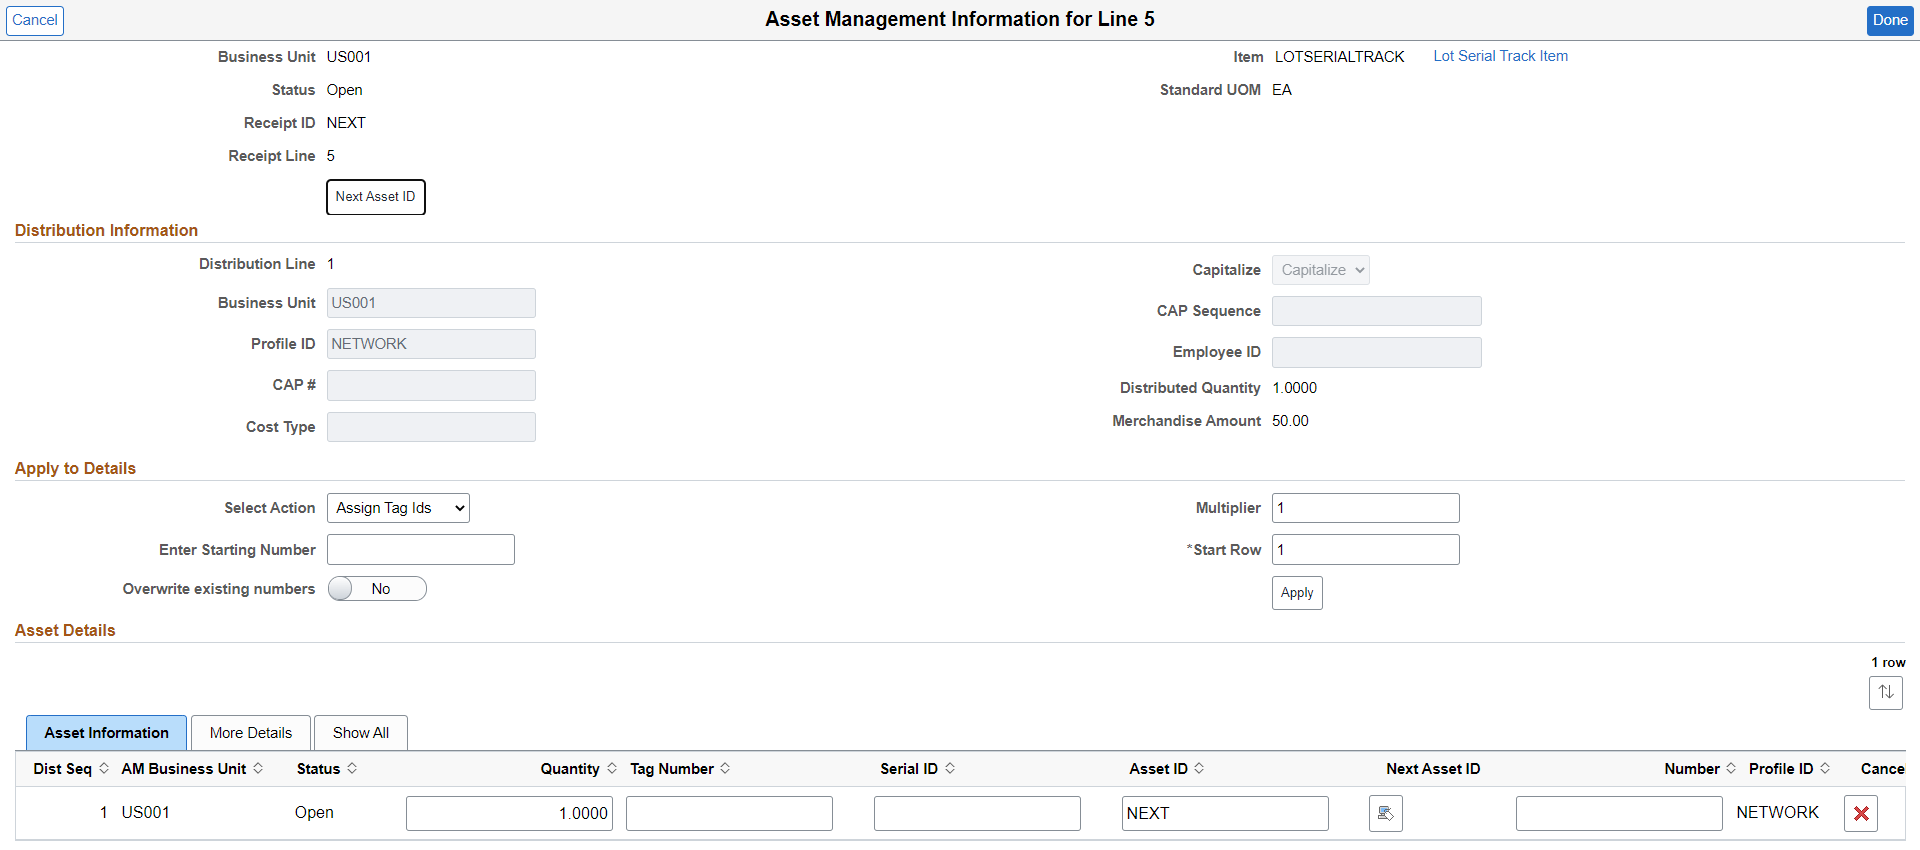
Use the Asset Management Information page (RECV_WPO_AM) to review or add asset information to an item.
This page displays general asset information such as Business Unit, Status, Receipt ID, Receipt Line, Item, and Standard UOM along with Distribution Information. Use this page to record the asset information that is required for the item.
Navigation:
Click the Asset Status link on the Create Receipt page.
This example illustrates the fields and controls on the Asset Management Information page You can find definitions for the fields and controls later on this page.
|
Field or Control |
Description |
|---|---|
|
Select Action |
Select appropriate action from the given options that has to be applied for the asset details. |
|
Enter Starting Number |
If you assign serial IDs, this represents the starting serial ID, which is assigned to the first detail row and is indicated by the Start Row field. If you assign tag IDs, this represents the starting tag ID, which is assigned to the first detail row and is indicated by the Start Row field. |
|
Overwrite existing number |
Select to override existing values in the detail grid rows for either the tag ID or serial ID, depending on which action is selected (Assign Tag IDs or Assign Serial IDs). |
|
Multiplier |
Enter the number multiplier. The system used this value to increment the starting number from detail row to detail row. |
|
Start Row |
This is a required field and automatically changes to a value of 1. Indicates the detail row to use as the starting point for assigning values that are determined by the starting number and multiplier. |
|
Dist Seq (distribution sequence) |
Displays the receiving distribution sequence number that is associated with the selected asset row. |
|
AM Business Unit (asset management unit) |
Displays the PeopleSoft Asset Management business unit, where the item is capitalized. |
|
Status |
Displays the asset status. |
|
Quantity |
Enter the item quantity that is being distributed on the selected distribution sequence. |
|
Tag Number |
The value for this field is generated if you select action Assign Tag Ids in the Select Action drop down list. |
|
Serial ID |
The value for this field is generated if you select action Assign Serial Ids in the Select Action drop down list. |
|
Asset ID |
This is the asset ID assigned to the item by the organization. It is a freeform field. |
|
Next Asset ID |
Click to assign a temporary value of AUTO-ASSIGN as the line item's asset ID value. This value is replaced with the next available asset ID value when you save the receipt. |
|
Number |
This is the asset number assigned to the item by the organization. it is a free form field. |
|
Profile ID |
Displays the identifier for the receipt item product profile defined in PeopleSoft Asset Management. |
|
|
Click the Cancel Row button to cancel this asset schedule information. If the receipt has not been interfaced, this asset row is not interfaced and is deleted during receipt interface processing. If the receipt is interfaced, a retire asset transaction is passed to PeopleSoft Asset Management. |
 (Cancel Row icon)
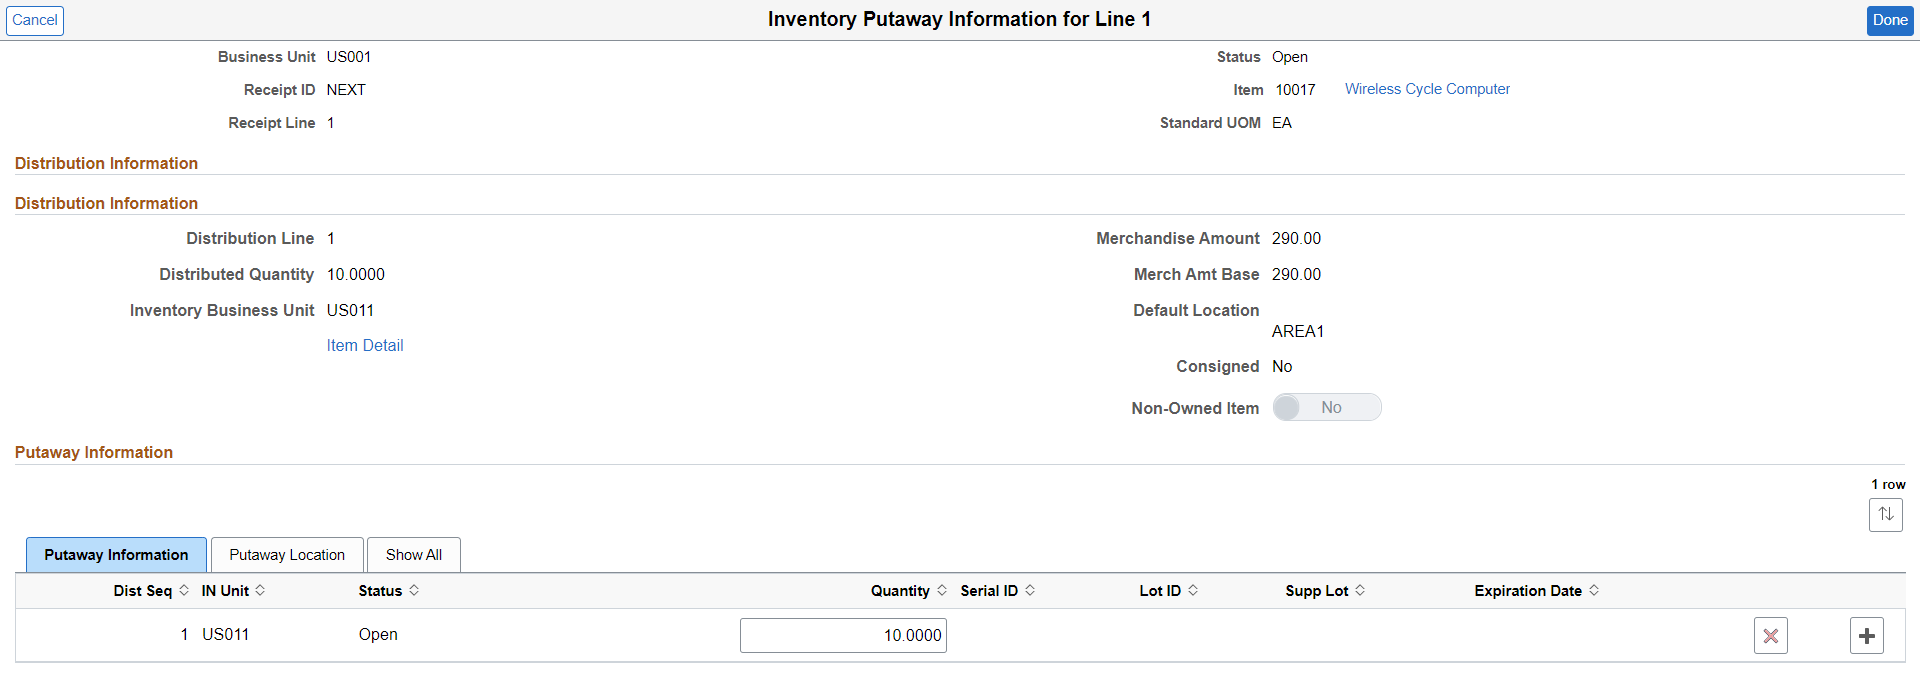
Use the Inventory Putaway Information page (RECV_INV_ITEMS_SP) to enter the location of an item.
Navigation:
Click the Inventory Status link on the Create Receipt page.
Enter or review the location in PeopleSoft Inventory where this item will be placed; record serial and lot IDs. If the item that you are receiving was marked as a PeopleSoft Inventory item (and PeopleSoft Inventory is installed), use this page to record the information that is required to put the item in inventory. The default information appears from the item definition. Change this information only if you are storing the item in a different inventory location.
This example illustrates the fields and controls on the Inventory Putaway Information page. You can find definitions for the fields and controls later on this page.
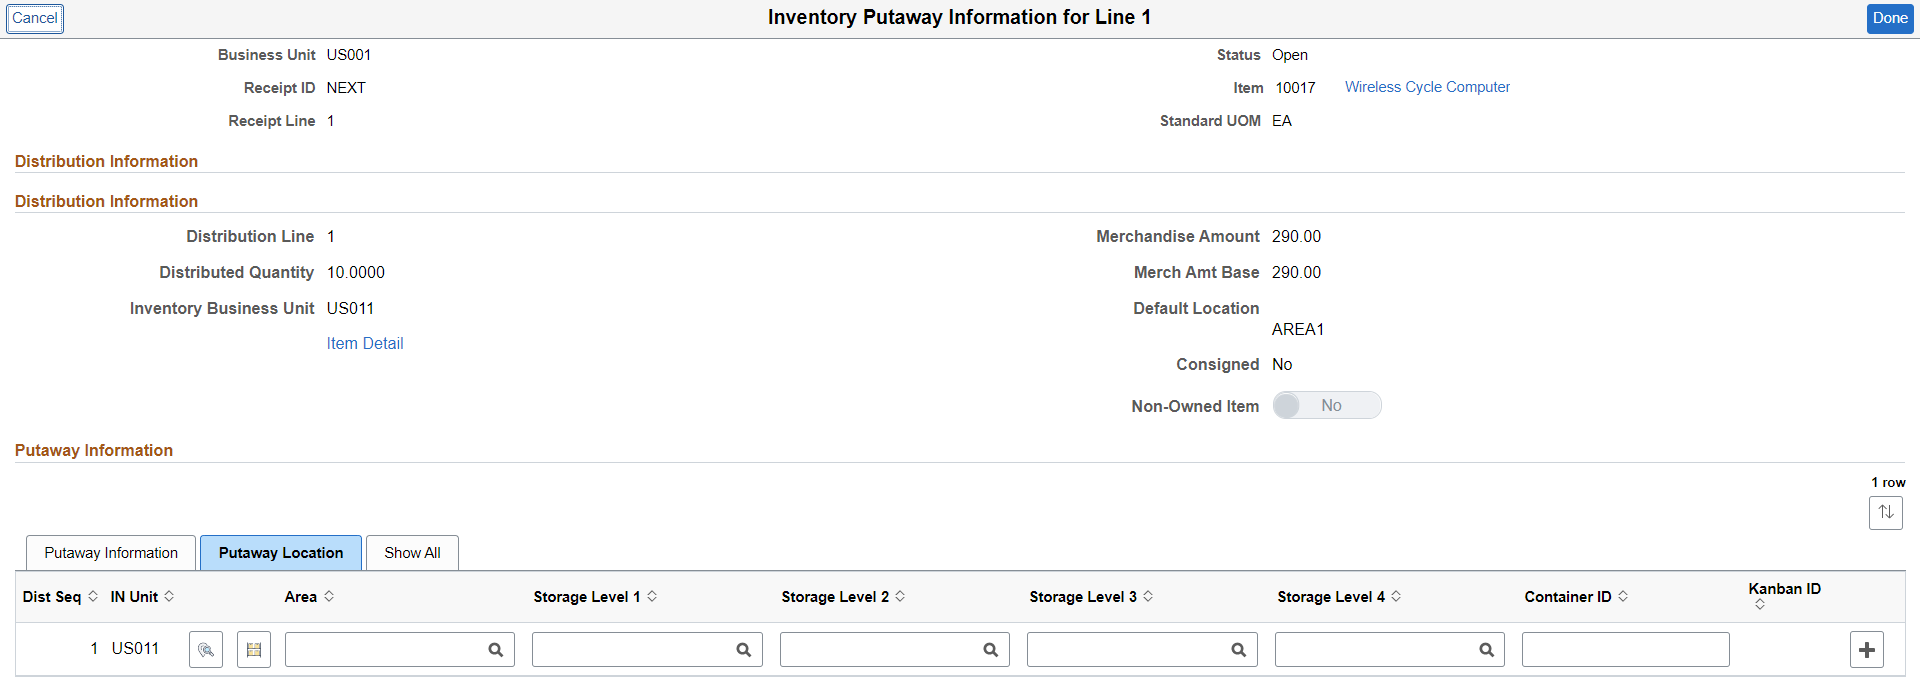
This example illustrates the fields and controls on the Inventory Putaway Information - Putaway Location tab. You can find definitions for the fields and controls later on this page.
Putaway Information Tab
Select Putaway Information tab.
|
Field or Control |
Description |
|---|---|
|
Dist Seq (distribution sequence) |
Displays the putaway distribution sequence number that is associated with the selected asset row. |
|
IN Unit |
Identifies the PeopleSoft Inventory business unit for the distribution. For non-purchase order receipts, this value appears by default from the ship to location. For purchase order receipts, this value appears by default from the purchase order distribution. |
|
Status |
Displays the receipt shipping status. The status can be Open, Received, Closed, Canceled, or Hold. If the status is Open or Received, then you can change the inventory distribution information on this page. |
|
Quantity |
Enter the number of items being received for the distribution sequence. The value in this field determines the values that appear in the Distributed Quantity, Merchandise Amt, and Base Amt fields. If the receipt line is serial controlled, the quantity is not available for change. Note: The sum of the quantities on the putaway rows must equal the distributed quantity on the receipt distribution. |
|
Serial ID |
Enter the serial ID for the distribution sequence. This field is only available for entry if the Serial check box is selected for the receipt line on the Maintain Receipts - Receiving page. |
|
Lot ID |
Enter the lot ID for the distribution sequence. This field is only available when lot control is Y (yes) for the receipt line on the Create Receipt page. If the item being received for inventory is lot controlled, then a lot ID has to be specified on the receipt putaway page. If the target inventory business unit Allow Auto-Add of New Lots check box is selected, a lot ID that does not exist within inventory may be specified. Otherwise, enter an existing lot ID or select a lot ID from the list of values. If you enter a new lot ID and the business unit does not permit the automatic adding of new lots, the system validates the lot ID against the existing list. You can use the Lookup button to find existing lot IDs. |
|
Supp Lot |
Enter the identifier assigned to the item's lot by the supplier. This field is only available when the lot control status is Y (yes) for the receipt line on the Create Receipt page. The system checks for duplicate serial IDs for all serial controlled lines on a receipt document. This edit is only for serial ID assigned within the receipt document. Note: The supplier lot value defaults to the value that you enter for the lot ID. |
|
Expiration Date |
Expiration date for a lot-controlled item. If the item is a noninventory receipt line (subcontract, expense only, or an asset only interface receipt), then this field is left blank. If the item lot ID has been assigned an expiration date, this value cannot be changed. If the item lot ID doesn't have an assigned expiration date, the item shelf-life value (if greater than zero) is added to the receipt date to calculate the expiration date. You can override this value. You must enter a value if the item's shelf life is zero. |
|
|
Select to add another row. |
|
|
Select to remove the added row. |
 (Delete Row icon)
Putaway Location Tab
You can view and change item information and location in the inventory warehouse.
|
Field or Control |
Description |
|---|---|
|
|
Click the Storage Location Search button to access a search page, where you can select the material storage location for the item in the inventory warehouse. |
|
|
Click the Putaway Locations button to access a Putaway Locations page, where you can select the Locations, Putaway Information, and Quantity of the item. |
|
Area |
Displays the storage area of the inventory warehouse where this item will be stored. The default information here is based on the item defaults. You can change the value. |
|
Storage Level (level 1, level 2, level 3, level 4) |
Displays the levels of the inventory warehouse (subdivisions of the Area field) in which this item will be stored. The default information is based on the item defaults. You can change the value. If PeopleSoft Inventory does not use this field, it may be blank. |
|
Container ID |
Enter the container ID if the inventory system uses container management (license plating). This ID can also be assigned later in PeopleSoft Inventory. |
|
Kanban ID |
Displays the identification code assigned to the Kanban card associated with the putaway of this item. This code appears by default from the kanban details. |
|
Sel (select) |
Select to display the Insert Non-Serial Row button if you need to insert a non-serial row number for this row. |
|
Quantity |
Enter the quantity for this row. The total of all the rows must equal the accept quantity on the Receipt form. |
|
Maximum Capacity Available |
Specifies that material storage locations with the most available capacity should be evaluated as potential putaway locations first. This option is only available for business units that implement the Capacity Checking feature. With this option, the Directed Putaway function sorts the matching material storage locations by available capacity and assigns the transaction quantity to those having the most capacity first. Selecting this option results in the smallest number of suggested putaway locations, even if you permit splitting of transaction quantities. |
|
Minimum Capacity Available |
Specifies that the system should evaluate the material storage locations that have the least available capacity first. This option is only available for business units that implement the Capacity Checking feature. With this option, the Directed Putaway function sorts the matching material storage locations by available capacity and assigns the transaction quantity to those having the least capacity first. Select this option if the business rules prioritize maximum capacity utilization above putaway transaction efficiency. If you permit splitting of putaway transaction quantities, the system suggests multiple material storage locations (thus requiring multiple putaway transactions). |
|
Putaway Rule |
Specifies the putaway rule to use when no eligible material storage locations meet capacity requirements. If no valid locations are available for the transaction quantity, a message appears. You must select one default rule for each set of rules that you define. |
|
Split Quantity |
Specifies whether the putaway transaction quantity can be divided among multiple material storage locations. This option is only available for business units that implement the Capacity Checking feature. If you do not select this option, the Directed Putaway function only returns locations that can hold the entire transaction quantity. For cross docking purposes, you can split the quantity between locations even if the putaway rule does not specify this option. |
|
Qty Allocated |
Displays the quantity that is currently hard allocated to a specific material storage location within the inventory business unit. |
 (Storage Location Search icon)
 (Putaway Locations icon)
Receipt Confirmation Page (PV_RECV_CONF_FL) provides the receipt details and navigation to Create New Receipt, Edit Receipt, and My Receipts.
Navigation:
Search for items to retrieve, select the requisition line check box, and click Receive Selected.
After completing all the actions for a receipt, click Save Receipt.
This example illustrates the fields and controls on the Receipt Confirmation page. You can find definitions for the fields and controls later on this page.
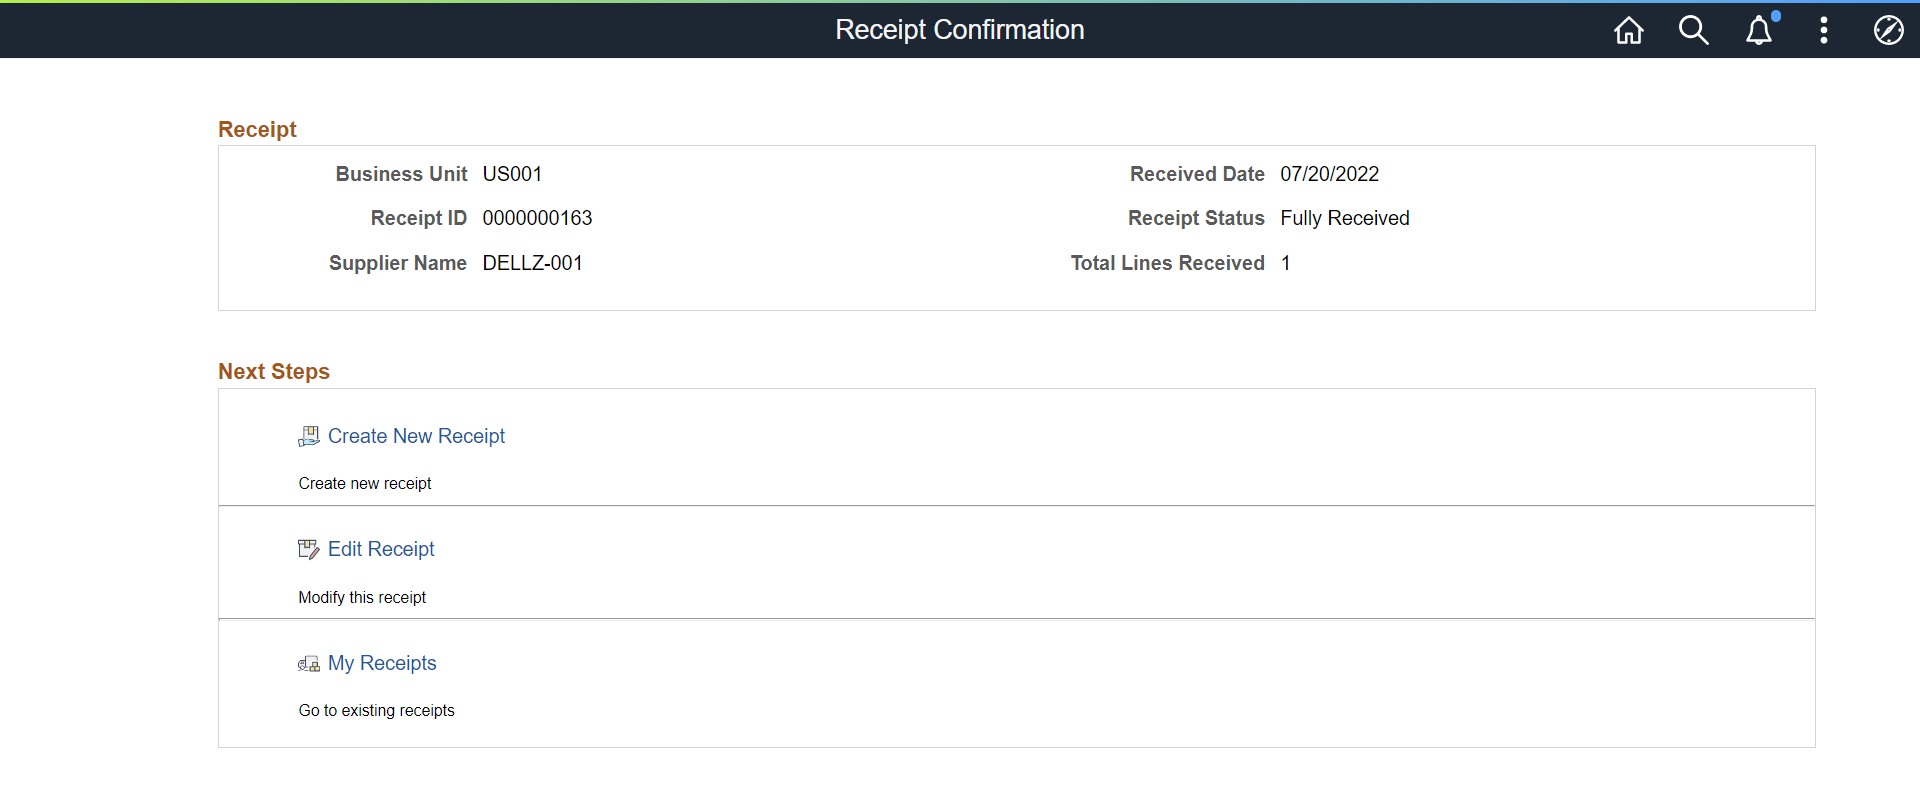
Once the receipt is created, receipt id along with receipt details are displayed on the Receipt confirmation page.
|
Field or Control |
Description |
|---|---|
|
Create New Receipt |
Select Create New Receipt to go back to Create Receipt Page. |
|
Edit Receipt |
Select Edit Receipt to edit this receipt. |
|
My Receipts |
Click My Receipt to go to the fluid My Receipts Page. This page can also be accessed from the tile on the eProcurement homepage. |
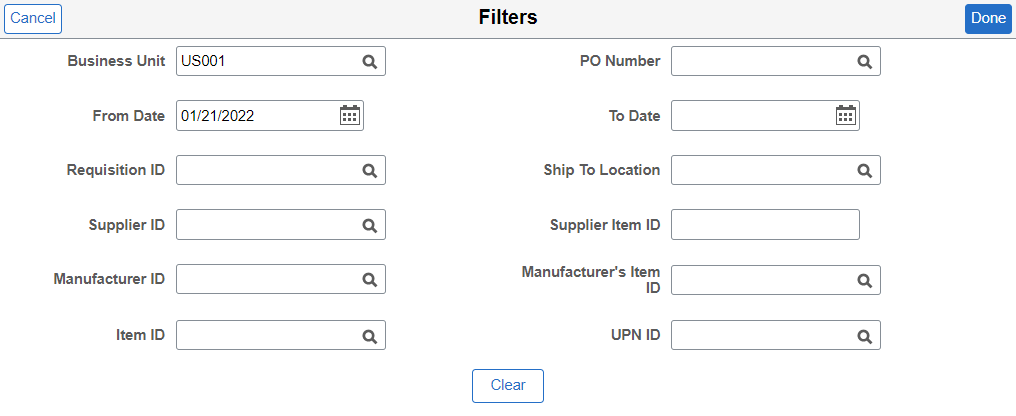
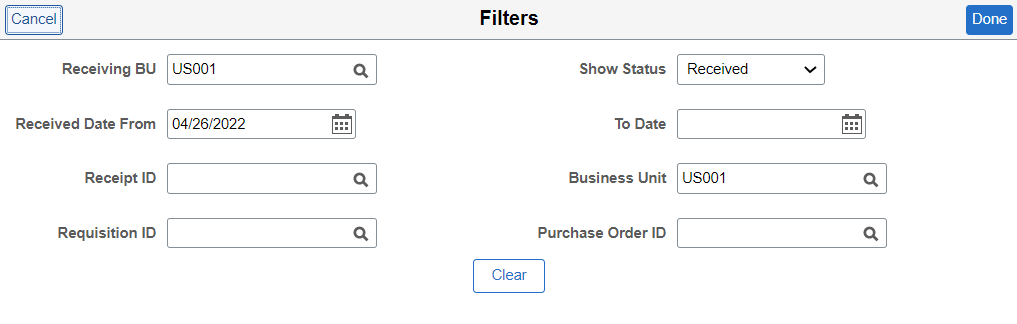
Use the My Receipts Filters Page (PV_MOB_RECEIPT_SCF) to view the list of receipts as per the applied filters criteria.
Navigation:
Enter the filter criteria (Receiving BU, Show Status, Received Date From,To Date, Receipt ID, Business Unit, Requisition ID, and Purchase Order ID) and click Done. Search result displays all the receipts as per the applied filters criteria on the My Receipts Page.
If none of the fields are selected then the Filters page will be skipped and all the transactions will be displayed on the My Receipts Page.
Click Clear button to clear all the selected fields on the Filters page.
This example illustrates the fields and controls on the My Receipts Filters Page.
Use the My Receipts page (PV_MOB_RECV_UPD_FL) to view and edit receipts.
You can add details, return items to supplier, or cancel a receipt.
Navigation:
This example illustrates the fields and controls on the My Receipts page. You can find definitions for the fields and controls later on this page.
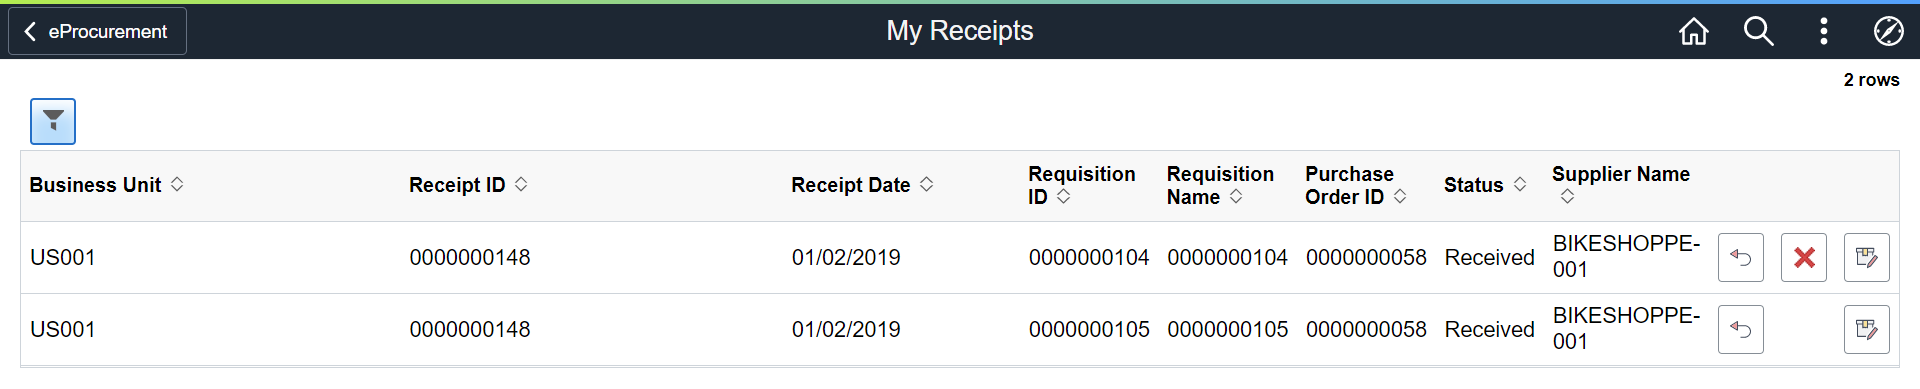
The maximum number of rows that are retrieved and that appear on this page can be defined on the eProcurement Installation Options page. If the search returns more than the defined number of rows, a message appears.
|
Field or Control |
Description |
|---|---|
|
|
Click the Create Return button to access the Create Return page, where you can enter the information that is needed to return the items to the supplier. If this button is unavailable, the item is a PeopleSoft Inventory or Asset Management item, and you must Move the status of the receipt before you can enter an Return. |
|
|
Click the Cancel button to cancel the Receipt. Note: Canceling the receipt cannot be reversed. |
|
|
Click the Edit button to access the Edit Receipt page, where you can view and modify this receipt. |
 (Create Return)
 (Edit icon)
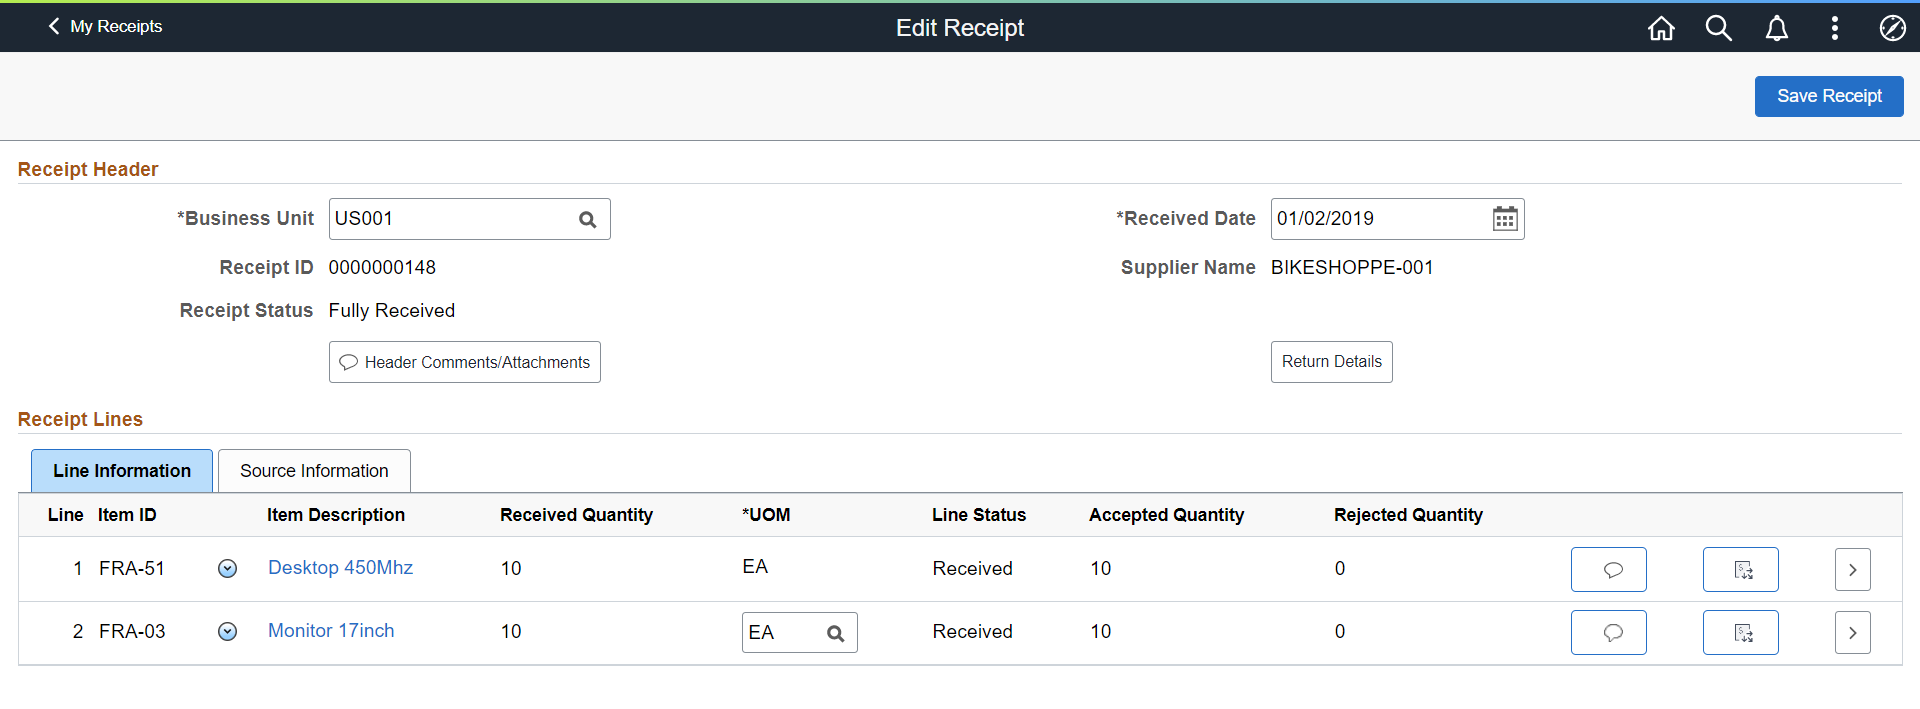
Use Edit Receipt page to edit the created receipt.
Navigation:
After filtering, when Receipt rows are shown on the page, click the Edit Receipt icon for a row.
This page contains similar fields to the Create Receipt Page.
After updating the required changes to the receipt, click Save Receipt. Receipt Confirmation Page appears.
This example illustrates the fields and controls on the Edit Receipt page.
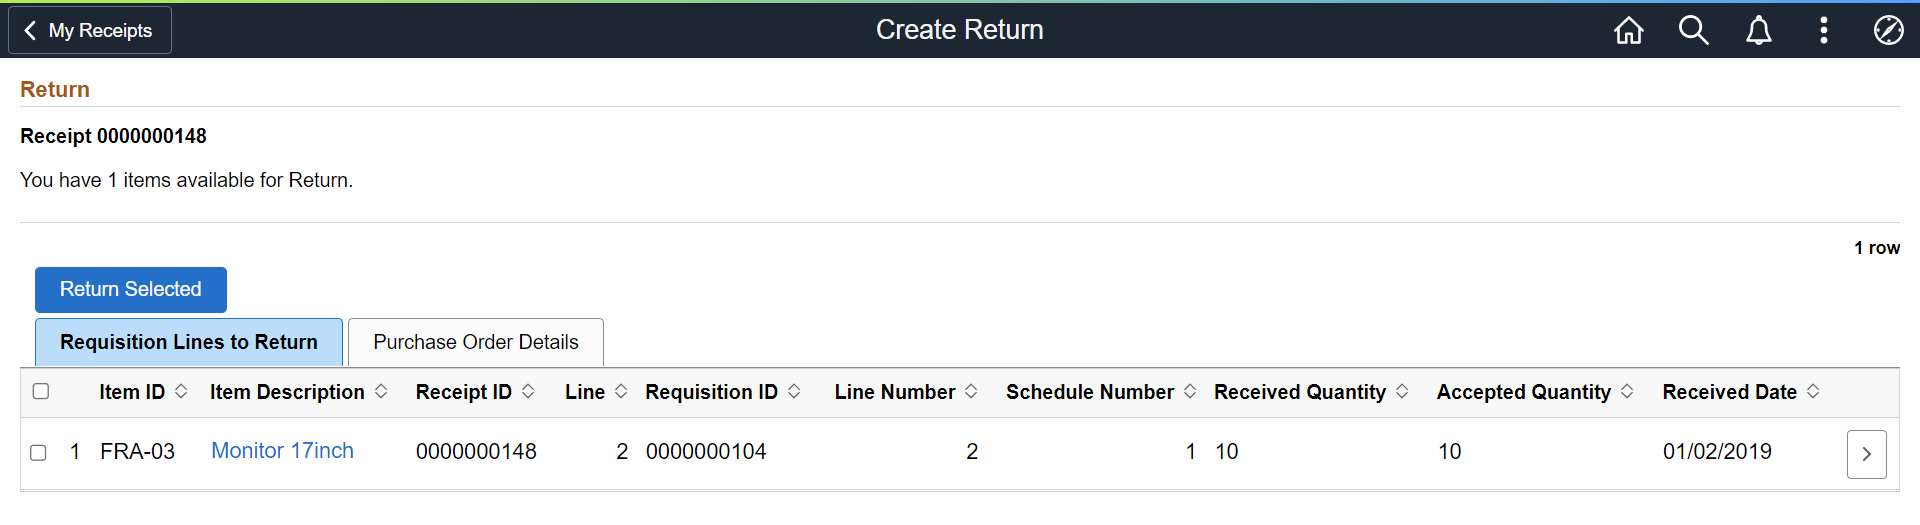
Use the Create Return page (PV_RTVPICK_RCW_FL) to initiate a supplier return.
Navigation:
After filtering, when Receipt rows are shown on the page, click the Create Return icon.
Note: You can also create return for a specific requisition using the My Requisitions tile. If the requisition Request State is Partially Received or Received, then Create Return action is available in the Related Actions of the requisition.
This example illustrates the fields and controls on the Create Return - Requisition Lines to Return tab.You can find definitions for the fields and controls later on this page.
This example illustrates the fields and controls on the Create Return - Purchase Order Details tab.You can find definitions for the fields and controls later on this page.
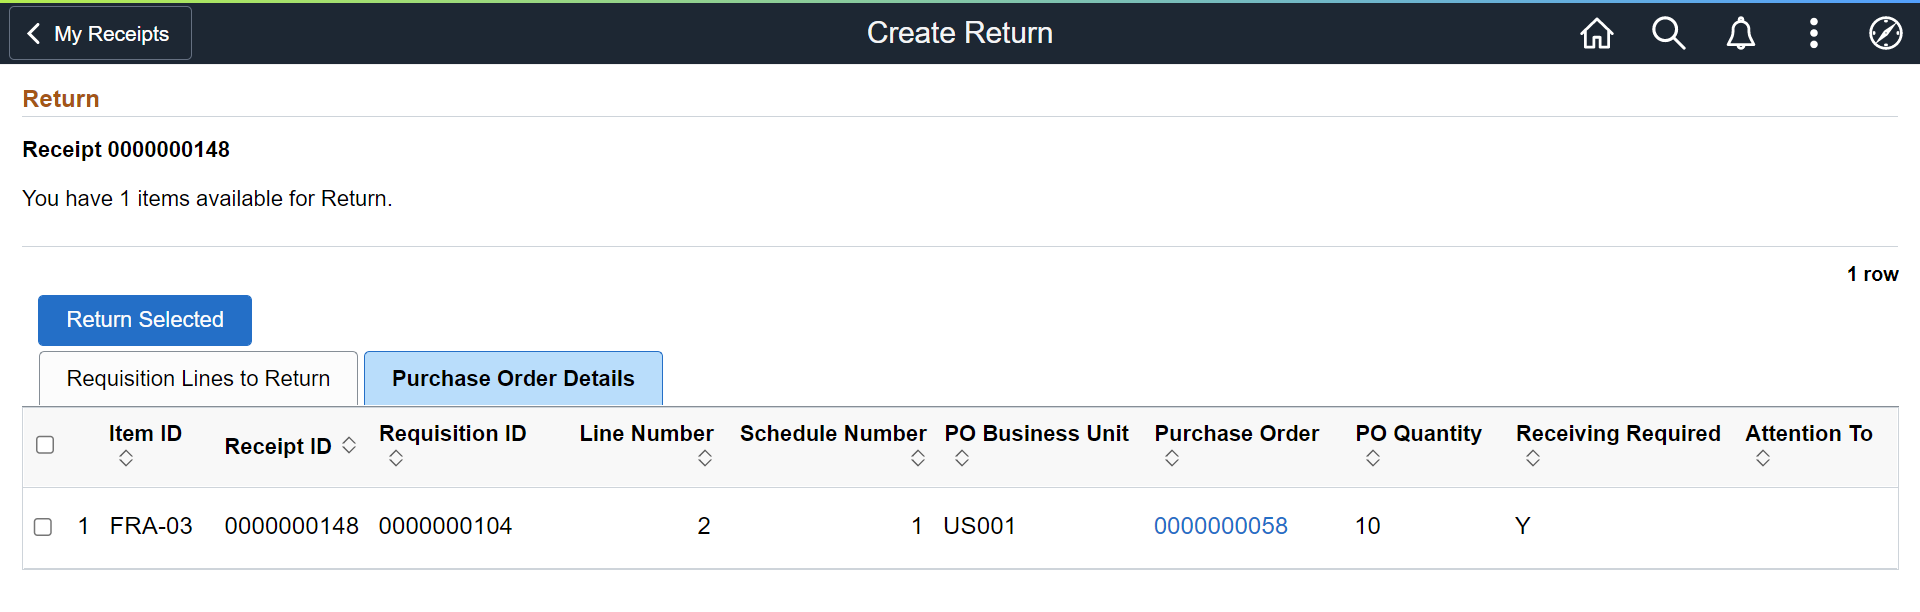
Requisition Lines to Return Tab
Select Requisition Lines to Return tab.
|
Field or Control |
Description |
|---|---|
|
Return Selected |
Select the requisition check box and click Return Selected to create return for that receipt line. The system displays the Create Return page, where you can provide Return Reason, Return Fees, and so on. |
|
Item ID |
Displays the Item ID for this particular line item. |
|
Item Description |
Click to access the Item Description page, where you can review item details and an item image, if it's available. |
|
Receipt ID |
Displays the receipt ID that was assigned when the receipt was created. |
|
Line |
Displays the number of the receipt line associated with the receipt. |
|
Requisition ID |
Displays the Requisition ID for the line item. |
|
Line Number |
Displays the number of the line associated with this requisition. A requisition may have multiple lines, if there are more lines, then the requisition id will be displayed on multiple rows. |
|
Schedule Number |
Displays the number of the schedule associated with the line. One line can contain several schedules, if a second schedule exists for the line, the item will be displayed on two rows. |
|
Received Quantity |
Displays the quantity of the items that you received. |
|
Accepted Quantity |
Displays the number of item that have been accepted so far. |
|
Received Date |
Displays the date when the shipment was arrived. |
|
|
Click the Details icon to access the Line Details page, where you can view more data about the item. |
Purchase Order Details Tab
Select Purchase Order Details tab.
|
Field or Control |
Description |
|---|---|
|
PO Business Unit |
Displays the business unit name for the PO. |
|
Purchase Order |
Click the hyperlink to view the Purchase Order Detail. |
|
PO Quantity |
Displays the quantity for this PO. |
|
Receiving Required |
Displays Y (yes) or N (no) to indicate whether the item requires receiving to pay the supplier for the goods. You do not need to enter a receipt for any item that is marked with N. |
|
Attention To |
Displays the name of the individual who receives the items or services on this requisition line. |
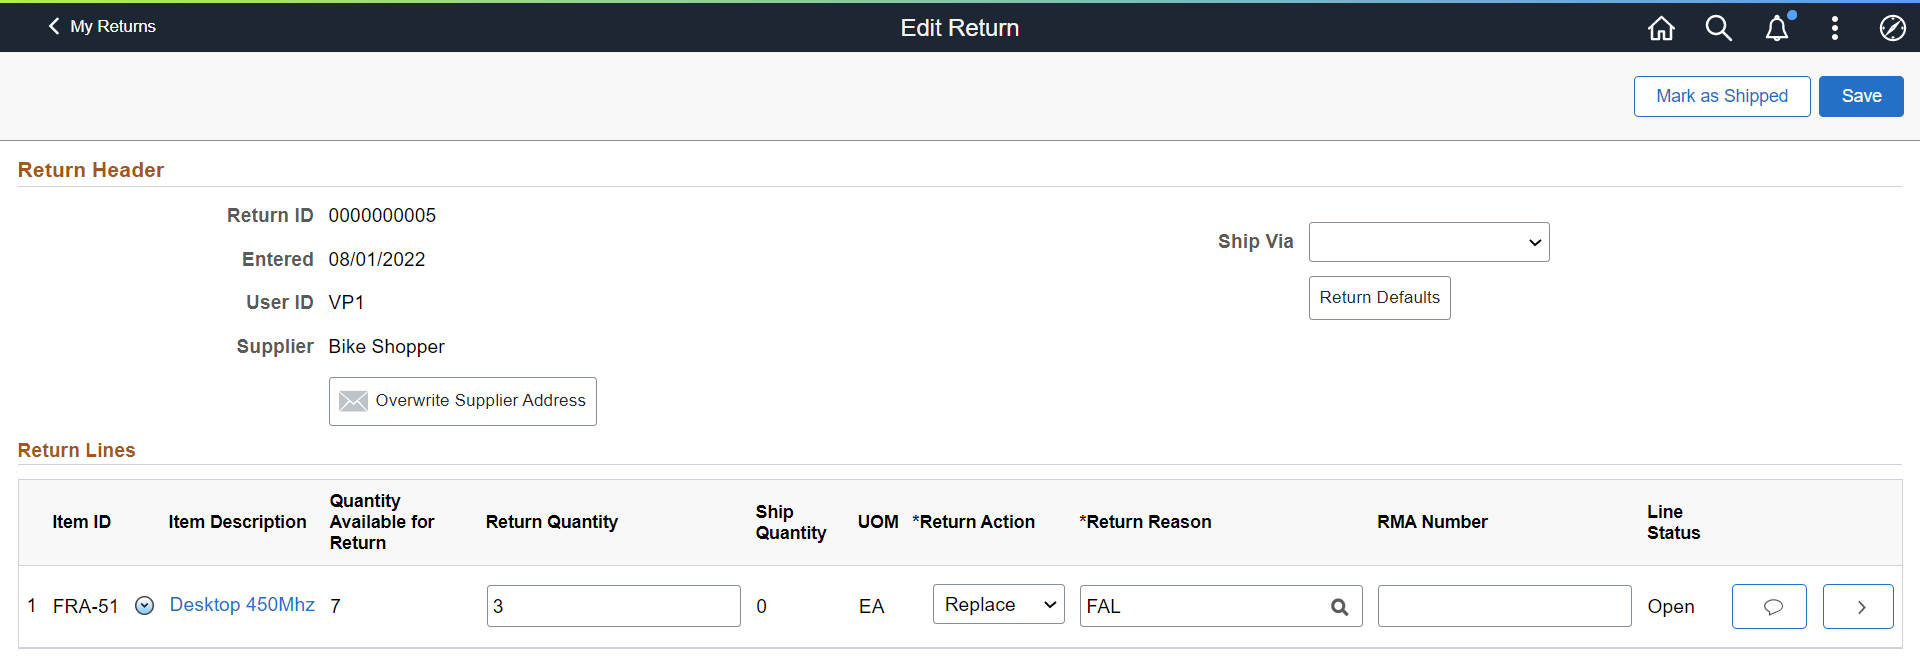
Use the Create Return page (PV_RTV_FL) to initiate a supplier return.
Navigation:
Select the Requisition line check box and click Return Selected.
This example illustrates the fields and controls on the Create Return page. You can find definitions for the fields and controls later on this page.
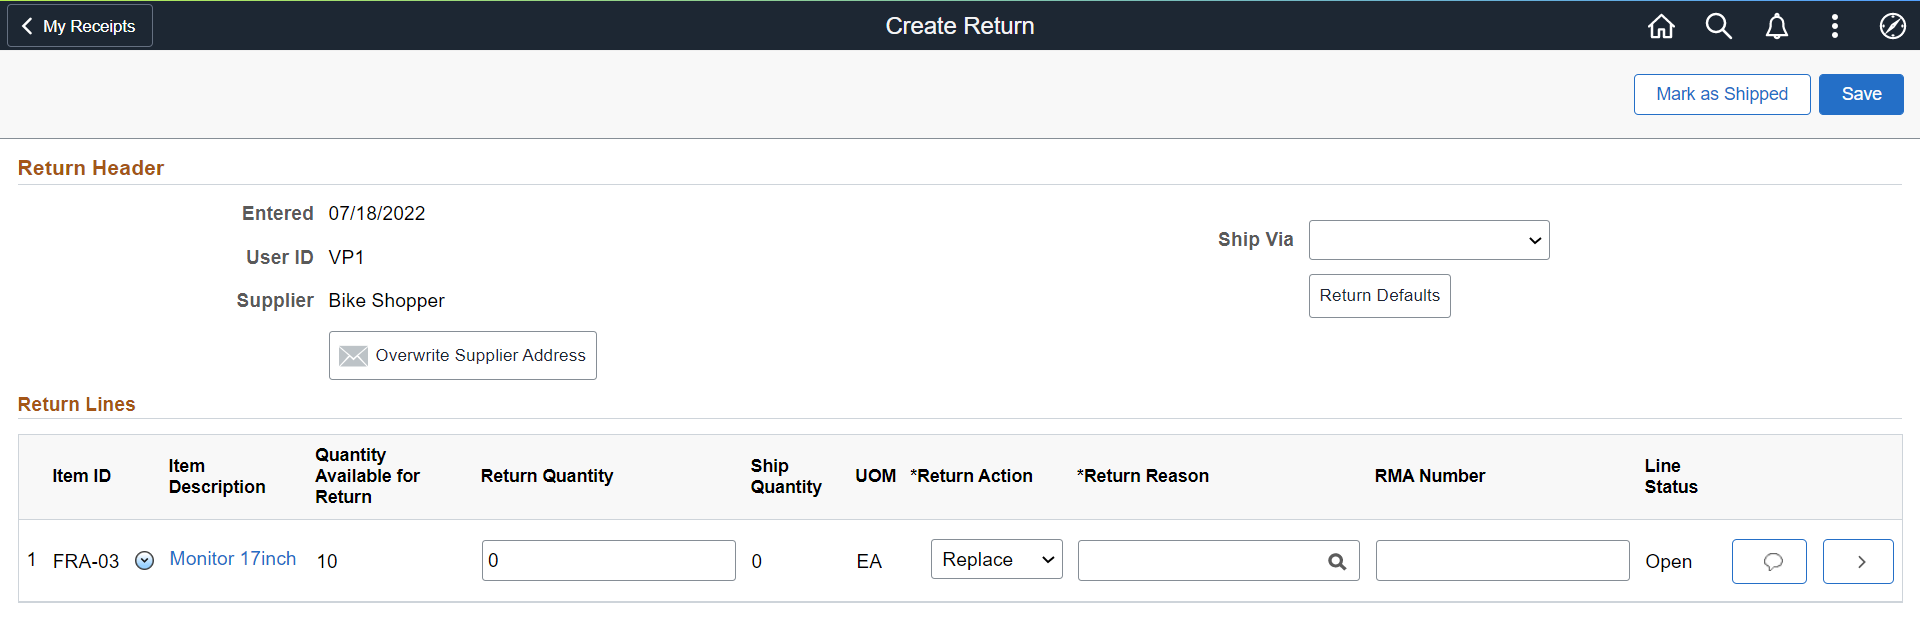
Return Header
|
Field or Control |
Description |
|---|---|
|
Entered |
Displays the date the return was started. |
|
User ID |
Displays the user id for the user who is doing the return. |
|
Supplier |
Displays the name of the supplier. |
|
Ship Via |
Select the method of shipment that you are using to ship the stock back to the supplier. |
|
Return Defaults |
Return Defaults allows to set default actions to create a return. |
|
Overwrite Supplier Address |
Select Override Supplier Address button to change the supplier's ship-to address for this return. |
Return Lines
|
Field or Control |
Description |
|---|---|
|
Item ID |
Displays the Item ID for the line item. |
|
|
Click the Related Actions icon to:
|
|
Item Description |
Select to access the Item Description page to view item details such as Item ID, Manufacturer's Item ID, and UPN ID. |
|
Quantity Available for Return |
Displays the number of items available for return. |
|
Return Quantity |
Enter the number of item you want to return. |
|
Ship Quantity |
Displays the quantity shipped back to the supplier. This value appears by default from the value that you entered in the Ship Qty field on the Distribution Details page. If the return line is not inventory related and there is only one distribution you can enter the ship quantity at the line level, eliminating the need to go to the distribution details page to enter the quantity value. |
|
UOM |
Select the type of unit by which the item was shipped to you, for example, by box, each, and so on. |
|
Return Action |
Select a reject action for the returned merchandise. The selection determines the selections for the other options on this page. Values are: Credit (return for credit): The goods are to be returned to the supplier, and no replacement of these returned goods is requisitioned. Exchange (return for exchange): You are returning the item, and you want a different item to be sent to you. This option triggers a PeopleSoft Workflow event to a buyer. Replace (return for replacement): The returned materials will be received against the original purchase order again, after the supplier ships replacement goods for the returned items. |
|
Return Reason |
Select the reason why you are Returning the items. |
|
RMA Number |
Displays the return material authorization number that the supplier provided. |
|
Line Status |
Displays the status of the return line. |
|
|
Select this icon to view comments added on the purchase order at the header-level, line-level, or ship to level. To appear here, the purchase order comments must have been marked with the Show at Receipt check box. If the icon on the button does not contain any lines in it, then there are no PO comments. The PO comments are display only. |
|
|
Click the Details button to access the Item Detail page, where you can view information about this requisition. |
|
Mark as Shipped |
Click if you have shipped all the items on this page. This option sets the shipped quantity on the RTV to equal the return quantity and changes the RTV status to Shipped. The RTV status must be Shipped before you run the RTV Reconciliation process. |
|
Save |
After entering all the information, click Save to create the return. Once the return is created, Return Confirmation page appears. |
Use the Supplier Address page (PV_RTV_ADDRDTL_SCF) to view or change the supplier's ship-to address for this return.
Use this page if the supplier has a return address that is different from the ordering address.
Navigation:
Click the Override Supplier Address link on the Create Return page.
This example illustrates the fields and controls on the Supplier Address page. You can find definitions for the fields and controls later on this page.

Note: For you to change the address, the roles must contain a user role that is included under RECV_CASUAL_ALL on the eProcurement Role Actions page.
|
Field or Control |
Description |
|---|---|
|
Return to Supplier, Location, and Contact |
Displays the default information from the supplier definition; you cannot change this information here. |
Cancel the return creation for any receipt line item.
Navigation:
Click the Cancel Return Line link from
the Related Actions.
Select Yes on the confirmation pop-up.
Note: Canceling the item cannot be reversed.
Use Return Defaults page (PV_MOB_RTVDFLT_SCF) to configure the default return actions.
Navigation:
Select the Return Defaults button on the Create Return page.
This example illustrates the fields and controls on the Return Defaults page. You can find definitions for the fields and controls later on this page.
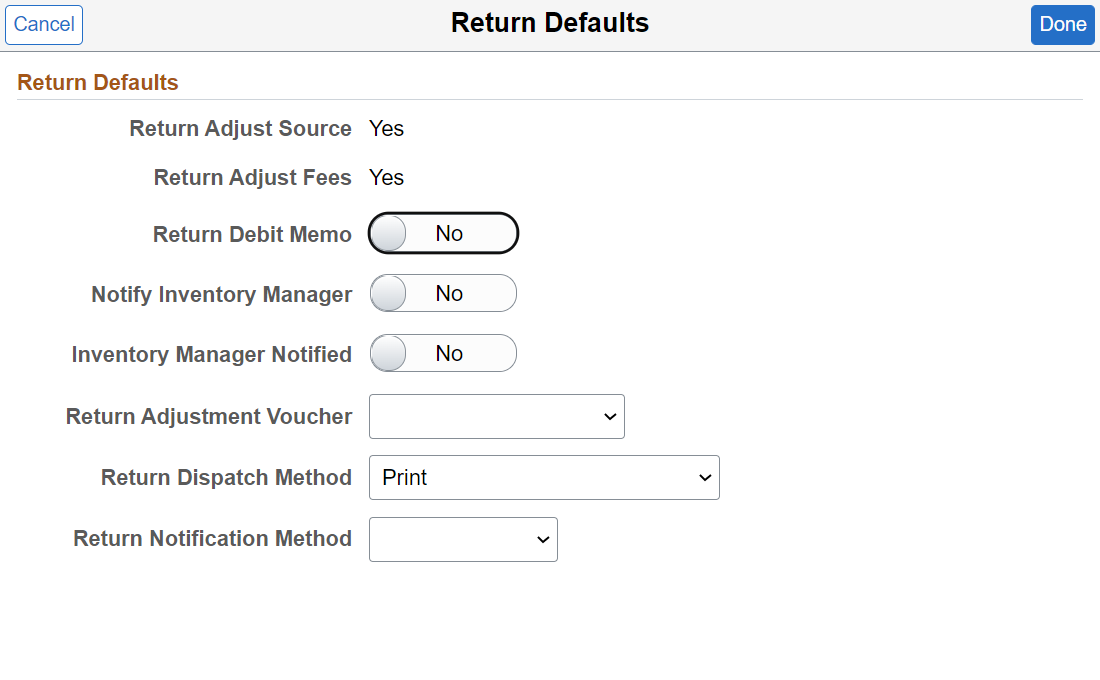
|
Field or Control |
Description |
|---|---|
|
Return Adjust Source |
Provides information about how receipt adjustments are handled. If this button is enabled, the receipt's net received quantity is adjusted if the return action is return for replacement. If this button is not enabled, the net received quantity on the receipt is not adjusted. The return quantity is always adjusted. This check box's setting appears by default from the setting on the Purchasing Definition - Business Unit Options page. |
|
Return Adjust Fees |
Provides information about how return adjustment fees are handled. If this button is enabled, you can enter adjustment fees for the return transaction using the Return Fees page. If this button is not enabled, adjustment fees cannot be entered on the return transaction and only appear on the return transaction if there is a default value on the supplier or item-supplier relationship or if there are return-reversible miscellaneous charges on the receipt. The fees appear on the return Fees page but cannot be changed. |
|
Return Debit Memo |
If this button is enabled, an adjustment voucher or debit memo is created for all return actions according to the Return Adjustment Voucher status setting. |
|
Notify Inventory Manager |
Enable this button to notify the inventory manager that goods are ready to be shipped back to the supplier. The system generates an email notification to the manager when the Disposition field is set to Ship or Destroy for Inventory returns and the Inventory Process is Manual. The default value for this field is set at the business-unit level and is retrieved from the Notify Inventory Manager setting on the Purchasing Business Unit Options page. You can override the value for individual vendors by either deselecting or selecting the check box. The system uses the return inventory process option and the line disposition, to determine the notification messages that the system sends:
|
|
Inventory Manager Notified |
Displays as selected to indicate that the system has sent the return notification or worklist entry to the inventory manager. When the return is saved and the Notify Inventory Manager button is enabled and Inventory Manager Notified is not enabled, the system generates the Errors and Warning notification (email, worklist entry, or both). The system enables the Inventory Manager Notified button as part of the save processing. |
|
Return Adjustment Voucher |
Indicates the adjustment voucher option setting for the return transaction. The system looks at the Return Adjustment Voucher option setting defined on the Supplier - Location: Procurement Options page to determine the default value that appears here. The Return Adjustment Voucher option setting you define on the Supplier - Location: Procurement Options page also defaults to the Payables Definition - Voucher Build page. Values are: Create Adjustment: The Voucher Build process selects and creates an adjustment voucher from the return transaction. No adjustment: The Voucher Build process does not select or create an adjustment voucher from the return transaction. Stage to Pending File: The Voucher Build process selects and stages an adjustment voucher from the return transaction. The adjustment voucher is staged or held in the Quick Invoice Entry component until you update the adjustment vouchers build status to To Build on the Quick Invoice page. |
|
Return Dispatch Method |
Select the method by which you want to dispatch the supplier returns. The dispatch method that appears by default is defined on the Procurement Options page. Values are EDX (electronic data exchange), Email, Fax, and Phone |
|
Return Notification Method |
Select the method by which you want to notify the supplier of an return transaction that is to be dispatched. Values are Email and Phone. |
Use Return Fees page (PV_RTV_LN_FEE_SCF) to enter miscellaneous charges, such as restocking fees for the line items.
Navigation:
Click the Return Line Fees link from the
Related Actions.
This example illustrates the fields and controls on the Return Fees page. You can find definitions for the fields and controls later on this page.

|
Field or Control |
Description |
|---|---|
|
Misc. Charge (miscellaneous charge) |
Select the identification code assigned to the applicable miscellaneous charge. |
|
Fee Action |
Displays the type of fee action. Values are CR (credit) and DB (debit). |
|
Percent |
Enter the fee percentage associated with the return reason. |
|
Fee Amount |
Enter the fee amount. |
|
Accounting Entry Type |
Select the type of accounting entry associated with this fee. |
|
|
Select to add another return fees line. |
|
|
Select to remove the return fees line. |
Return Saved Confirmation Page (PV_RTVSAVEDCONF_FL) provides the return details and navigations to Edit Return, My Returns, and My Receipts.
Navigation:
After completing all the actions for the return, click Save.
This example illustrates the fields and controls on the Return Saved Confirmation page. You can find definitions for the fields and controls later on this page.
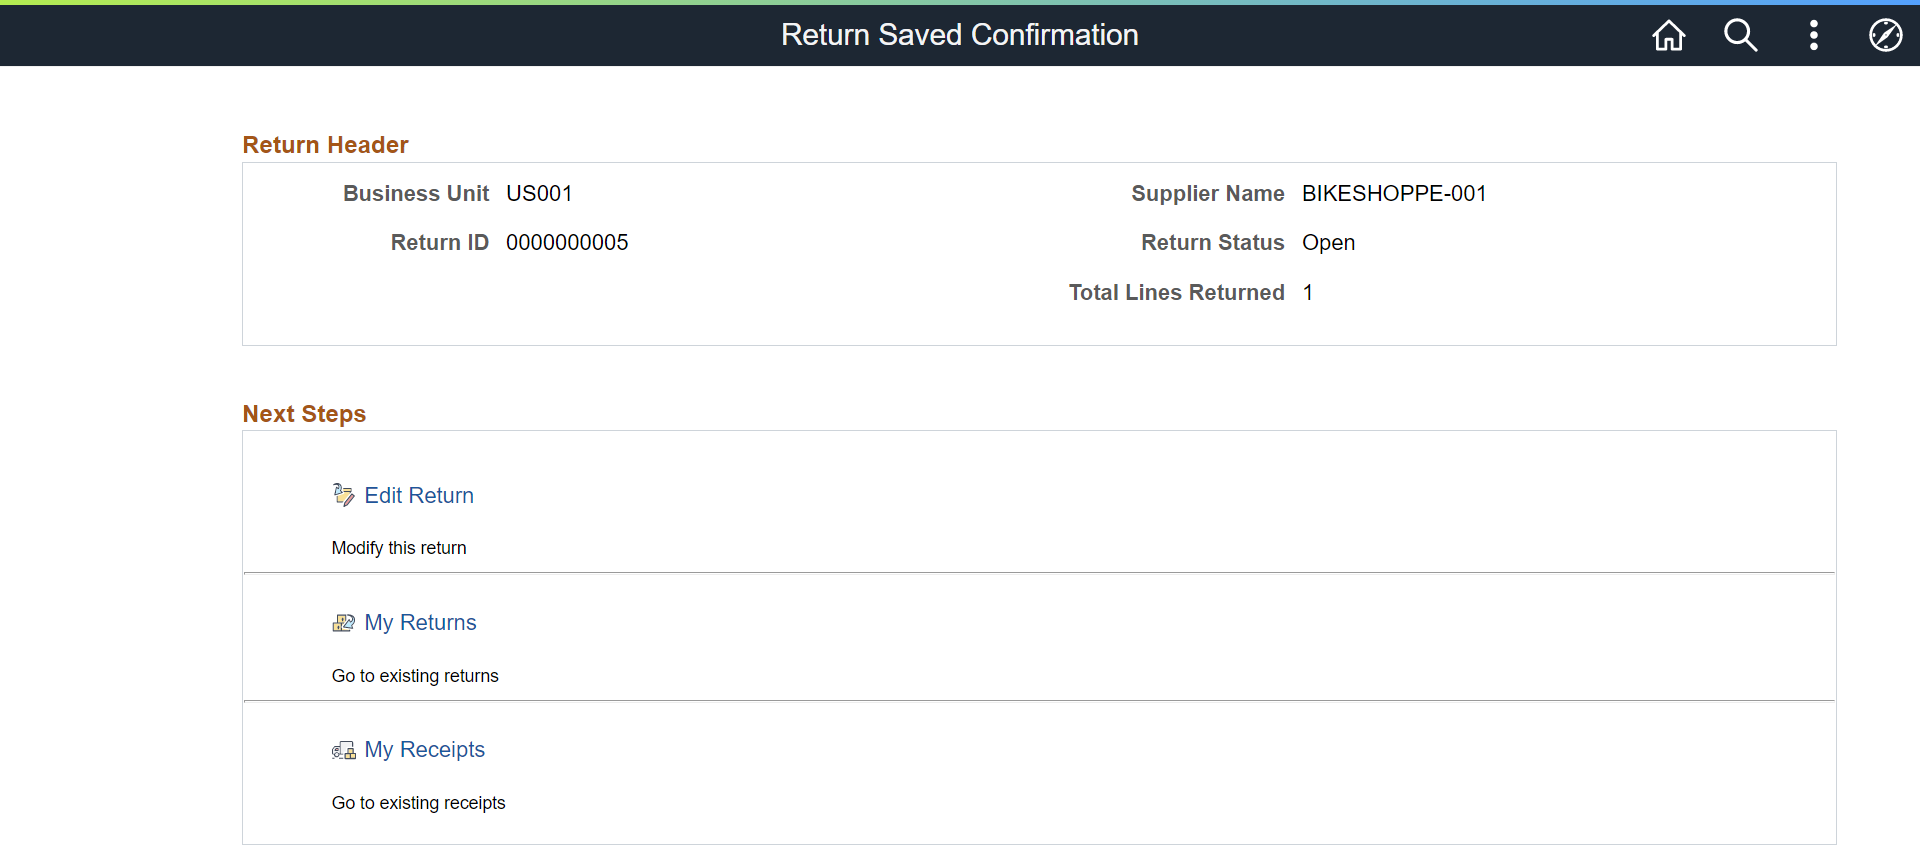
|
Field or Control |
Description |
|---|---|
|
Edit Return |
Click to edit this return. |
|
My Returns |
Click to navigate to My Returns Page. |
|
My Receipts |
Click to navigate to My Receipts Page. |
Use the My Returns page (PV_MOB_RTV_UPD_FL) to view Return entries that have been recorded under the user ID.
Navigation:
This example illustrates the fields and controls on the My Returns page. You can find definitions for the fields and controls later on this page.

|
Field or Control |
Description |
|---|---|
|
|
Click the Filters By icon to view the return Filters page. Enter the filters criteria and click Done. List of all the created returns are displayed as per the applied filter. If none of the fields are selected then the Filters page will be skipped and all the transactions will be displayed. Click Clear button to clear all the selected fields on the Filters page. |
|
Return ID |
Displays the return id for the line item. |
|
Requisition |
Displays the requisition id for the line item. |
|
Item Description |
Select to access the Item Description page to view item details such as Item ID, Manufacturer's Item ID, and UPN ID. |
|
Unit of Measure |
Displays the type of unit requested on the requisition, for example, by box, each, and so on. |
|
Receipt ID |
Displays the receipt id for the line item. |
|
Supplier Name |
Displays the name of the supplier for the line item. |
|
Status |
Displays the status of the RTV: Open: The return form has been entered and saved. Shipped: All lines on the return have been shipped. An RTV line item is considered shipped when the line's shipped quantity equals the return quantity. Closed: All lines on the return are complete. After a return is closed, you cannot change it. Cancelled: The return has been canceled. You cannot change the RTV status to Cancelled if all items on the return have been shipped. |
|
|
Click the Edit Return button to access the Edit Return page, where you can view the information about the original return form. If the return form status is Open, you can change the information. |
 (Filters By icon)
 (Edit Return icon)
Use this page to edit the created return.
Navigation:
Click the Edit Return icon.
This page contains similar fields to the Create Return page.
After updating the required changes to the return, click Save. Return Saved Confirmation Page appears.
This example illustrates the fields and controls on the Edit Return page.