Defining and Maintaining Material Storage Locations
To define default ship staging locations, use the Default Ship Staging Location (DEFAULT_SHIP_LOC) component.
|
Page Name |
Definition Name |
Usage |
|---|---|---|
|
STORAGE_AREA_INV |
Establish or modify definitions for individual storage areas. |
|
|
STOR_LOCATIONS_INV |
Define or modify material storage locations. |
|
|
STORLOC_CAP_INV_SP |
Modify capacity-checking options. |
|
|
Location Handling Page |
LOC_HANDLE_INV_SP |
Modify single-item storage options. |
|
VMI Ship To Page |
IN_LOC_SHIP_TO_SP |
Select a VMI sold to customer and ship to customer. |
|
Location Status Page |
LOC_STATUS_INV_SP, LOC_STATUS_INV_SP2 |
Define or review material storage location status. |
|
DEFLT_SHIP_LOC_INV |
Define a default staging area for shipments by identifying a material storage location for each business unit (for example, a shipping dock). |
|
|
DFLT_CROSS_LOC_INV |
Define default cross-docking locations for a business unit. |
|
|
DFLT_RTV_LOC_INV |
Define a default return to vendor (RTV) location for a business unit. |
|
|
DFLT_PEG_LOC_INV |
Define default material storage locations for the putaway of pegged receipts. |
To create storage areas, use the Storage Areas component.
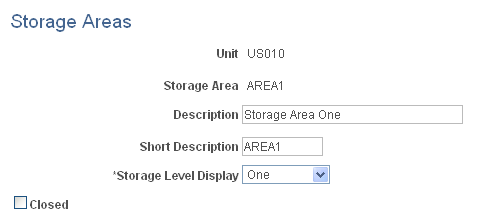
Use the Storage Areas page (STORAGE_AREA_INV) to establish or modify definitions for individual storage areas.
Navigation:
This example illustrates the fields and controls on the Storage Areas page. You can find definitions for the fields and controls later on this page.
Field or Control |
Description |
|---|---|
Storage Level Display |
Enter the number of levels for this storage area. The default value comes from the Inventory Options page; provided that no material storage locations have yet been defined for the area, you can override the default. The system uses the value defined here. |
Closed |
Select to close a storage area that is no longer active. When you save the page, PeopleSoft Inventory closes the storage area and all material storage locations that use the area. Important! Once you close the storage area, it is marked for deletion from the system, and you cannot reopen it. |
To define material storage locations, use the Material Storage Locations component (STOR_LOCATIONS_GBL).
Use the Material Storage Locations page (STOR_LOCATIONS_INV) to define or modify material storage locations.
Material storage locations are a combination of the storage area (defined on the Storage Areas page) and the levels defined on this page.
Navigation:
This example illustrates the fields and controls on the Material Storage Locations page. You can find definitions for the fields and controls later on this page.
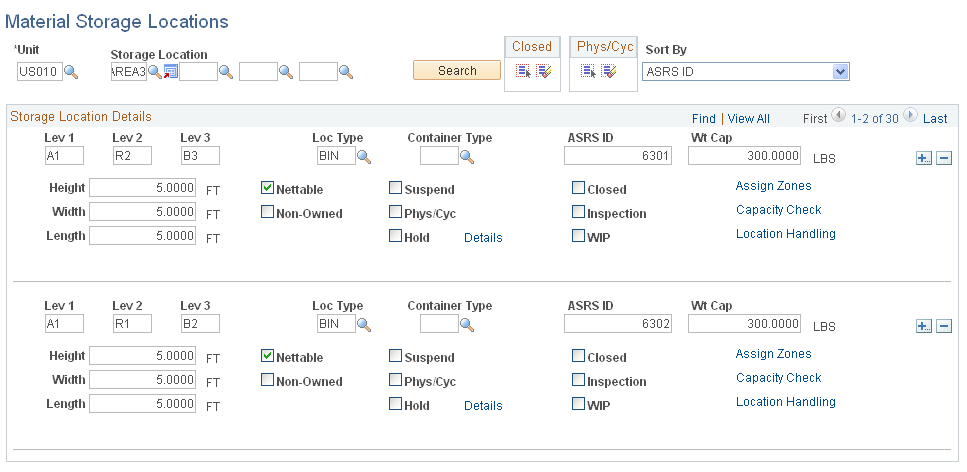
Note: If the Use External Warehouse Control option is active for the business unit, you should not make status changes on this page. Because status changes made here are not sent to the external warehouse application, the available and unavailable balances in PeopleSoft and the external warehouse application will no longer be synchronized.
Field or Control |
Description |
|---|---|
Storage Location |
The value you enter in the first field is the storage area. If the area has multiple levels, the additional storage level fields appear when you press Tab to move out of the first field. Once you have entered the appropriate number of levels, click the Search button to refresh the page with the selected rows of data. If no material storage locations exist for the entered storage area, a message appears asking whether you want to add new material storage locations. |
Sort By |
Specify whether material storage locations returned to the page should be sorted by ASRS ID or by storage area and level. |
Container Type |
Indicate whether the material storage location stores a specific type of container. PeopleSoft Inventory uses this information if you select the Cntr Type (container type) option for the alternate putaway plan on the Alternate Plan page. |
ASRS ID (automated storage and retrieval system ID) |
This informational field enables you to communicate with the controlling software of third-party ASRS machinery to identify the location. PeopleSoft Inventory also uses the ASRS ID to sort the picking plan's location summary generated by the Order Release process. |
Wt Cap (weight capacity) |
The maximum weight the material storage location can hold. The unit of measure for material storage location weight is defined on the Inventory Options page. |
Height, Width, and Length |
The maximum volume the material storage location can hold. PeopleSoft Inventory uses these dimensions to determine maximum volume during cubic capacity checking. |
Nettable |
Select if the quantity in the material storage location is available for reservations and can be released to picking. This option is selected by default; if the quantity in the location should not be used to fulfill orders, create a non-nettable material storage location by clearing the check box. You typically establish non-nettable material storage locations to handle material that you do not want to consider for picking or planning purposes. Non-nettable locations are not available for reservations and are not released to picking by the Order Release process. You can, however, pick from non-nettable locations using the Material Picking Feedback page. To move items from a non-nettable to a nettable location, use the Transfers page. If the business unit is a VMI business unit, this option should not be selected. |
Non-Owned |
Clear if the business unit owns the items stored in this material storage location. If you select this option, you can store only non-owned or consigned items in the location. The system enforces this designation during putaway, physical accounting, container management, and transfer processing. If the business unit is a VMI business unit, this option appears by default from Customer Ship To-VMI Options page and is not available to be updated. If the Goods Consigned at Customer option is selected, this option is not selected. If the Goods Consigned at Customer option is not selected, this option is selected. |
Suspend |
Select to suspend item processing at this material storage location. Items in suspended locations can be adjusted or transferred to non-suspended locations, but they are not release to picking by the Order Release process. Note: Suspending material storage locations does not affect the available quantity at the business unit level. If you have enabled soft reservations, the Reserve Materials process (IN_FUL_RSV) may reserve stock in suspended locations. You cannot, however, release this stock for picking. |
Phys/Cyc (physical/cycle) |
Select to freeze the material storage location for inventory quantity counts. Freezing the location makes it unavailable for putaway, transfers, picking transactions, and adjustments. To freeze or release all material storage location rows, click the Freeze or Un-Freeze button in the Phys/Cyc group box at the top of the page. |
Hold |
Select to put the material storage location on hold. The status of stock that is put away in or transferred to an on-hold location automatically changes to Hold. Except for return-to-vendor orders, on-hold inventory cannot be picked or shipped, but it can be counted and transferred. If you selected the Incl Non Open in Avail (include non open in available) option for the business unit on the Inventory Definition - Business Unit Options page, the system includes stock in on-hold storage locations in the total quantity available for the business unit. If you enabled soft reservations, the Reserve Materials process may reserve stock in on-hold locations; you cannot, however, pick this stock. If you did not select Incl Non Open in Avail, the material is not counted as available quantity and therefore cannot be soft-reserved. Note: You cannot place material storage locations containing allocated quantity on hold. |
Details |
Click to access the Location Status page (LOC_STATUS_INV_SP, LOC_STATUS_INV_SP2) and modify material storage location status information. |
Closed |
Select to close the material storage location. If the business unit is a VMI business unit, the material storage location cannot be closed if there are material movement transaction in progress or the location has quantity on hand. Important! Once you close material storage locations, they are marked for deletion from the system and you cannot reopen them. To inactivate a location temporarily, select Suspend. |
Inspection |
Select to designate the material storage location as an inspection area. Inspection locations are by definition on hold; PeopleSoft Inventory automatically selects the Hold check box and makes it unavailable for entry. Items requiring inspection are put away into inspection material storage locations during the Purchasing Receiving process. |
WIP (work in process) |
If the installation includes PeopleSoft Manufacturing, you can define the material storage location as a WIP location. If the business unit is a VMI business unit, this option should not be selected. Note: A WIP location cannot be defined as an inspection location. |
Assign Zones |
Click to access the Zone Assignments page and assign the material storage location to a picking or putaway zone. |
Capacity Check |
Click to access the Volume/Weight Capacity Checking page and view and modify capacity-checking options. This link is not available for inspection locations, since the system defines such material storage locations as storing multiple items with unlimited capacity. If the business unit is a VMI business unit, this option is not available. |
Location Handling |
Click to access the Location Handling page (LOC_HANDLE_INV_SP) to view and modify single-item material storage location options. |
VMI Ship To |
Click to access the VMI Ship To page (IN_LOC_SHIP_TO_SP) and select a VMI Order Management Unit, a VMI Ship To Customer, and a VMI Sold To Customer. If the business unit is not a VMI business unit, this option is not available. |
Important! Changing the WIP, Nettable, Hold or Inspection options for a material storage location which has stock and transactions linked to that location will result in misrepresentation of the item balances. Though altering these options are allowed technically, users are strongly advised against changing them.
Once the material storage location is created with the required options and saved, the screen would appear frozen. User can query the screen again and update the data if required.
Use the Volume/Weight Capacity Checking page (STORLOC_CAP_INV_SP) to modify capacity-checking options.
Navigation:
Click the link on the Material Storage Locations page.
This example illustrates the fields and controls on the Volume/Weight Capacity Checking page. You can find definitions for the fields and controls later on this page.
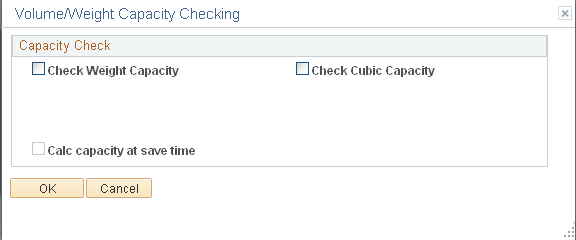
Capacity Check
The following options are only available if you have enabled capacity checking at the SetID level. Default values come from the Inventory Options page.
Field or Control |
Description |
|---|---|
Check Weight Capacity and Check Cubic Capacity |
Select to activate capacity checking for the material storage location. |
Current Location Weight and Current Location Volume |
Displays the current occupied weight or volume of the material storage location, in the unit of measure established on the Inventory Options page. |
Calc capacity at save time (calculate capacity at save time) |
Select to calculate the material storage location's occupied weight or volume when you save the Material Storage Locations page. Use this check box when you enable capacity checking for locations that are not empty and to validate the accuracy of the current capacity. Note: You must select this check box each time you want to recalculate the occupied capacity of a material storage location online. After the capacity of the location is recalculated and updated, the system clears the check box. |
Use the Default Ship Staging Location page (DEFLT_SHIP_LOC_INV) to define a default staging area for shipments by identifying a material storage location for each business unit (for example, a shipping dock).
The shipping process assigns this location to material stock requests. This location can be used by the fulfillment engine to select a picking location for shipments.
Navigation:
This example illustrates the fields and controls on the Default Ship Staging Location page. You can find definitions for the fields and controls later on this page.

Field or Control |
Description |
|---|---|
Default Location Selection |
To assign a new default staging location for shipments, enter the appropriate storage location search criteria, then click the Search button to display a list of all material storage locations. |
|
Click the Select Location button next to the storage location that you want to be the staging default for the shipments. The selected storage location appears in the Default Location group box. |

To define the default cross docking locations for a business unit, use the Default Cross Docking Staging Locations component.
Use the Default Cross Dock Locations page (DFLT_CROSS_LOC_INV) to define default cross-docking locations for a business unit.
The system uses these material storage locations if no item-level cross-dock locations are identified.
Navigation:
This example illustrates the fields and controls on the Default Cross Dock Locations page. You can find definitions for the fields and controls later on this page.

Field or Control |
Description |
|---|---|
Type |
Enter a default location type. For each business unit, you can assign one owned cross-dock type and one non-owned cross-dock type. You cannot use material storage locations that are defined as inspection locations as cross-dock locations. |
Note: The cross-docking material storage locations entered here should not be defined as single-item locations.
Use the Return to Vendor Default Location page (DFLT_RTV_LOC_INV) to define a default return to vendor (RTV) location for a business unit.
The system uses this material storage location as the picking location for the RTV stock requests when no MSL is defined on the RTV ID created in PeopleSoft Purchasing.
Navigation:
This example illustrates the fields and controls on the Return To Vendor Default Location page. You can find definitions for the fields and controls later on this page.
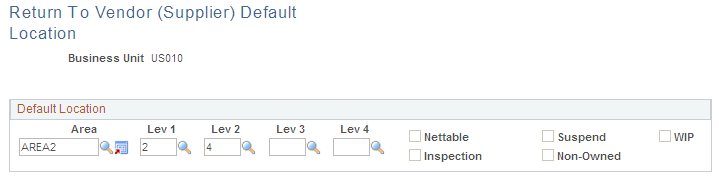
Define a default return to vendor (RTV) location for a business unit. The system uses this material storage location as the picking location for the RTV stock requests when no picking location is defined on the RTV ID created in PeopleSoft Purchasing. In most cases, this default RTV location is defined as your inspection area or the location where you place rejected stock.
Use the Default Pegging Putaway Location Details page (DFLT_PEG_LOC_INV) to define default material storage locations for the putaway of pegged receipts.
Both an owned and non-owned material storage location can be defined for a business unit.
Navigation:
This example illustrates the fields and controls on the Default Pegging Putaway Location Details page. You can find definitions for the fields and controls later on this page.

Define default material storage locations for the putaway of pegged receipts. Both an owned and non-owned material storage location can be defined for a business unit. The system uses the default pegged location if no material storage location is specified on the putaway transaction.
Note: It is highly recommended that you do not use the same material storage locations for pegged receipts and cross-docked receipts.
The pegged putaway, or supply, has been linked to a specific demand, such as an MSR or sales order. The system uses the default pegged location if no material storage location is specified on the putaway transaction.
Field or Control |
Description |
|---|---|
Type |
Enter a default location type. For each business unit, you can assign one owned location and one non-owned location. You cannot use material storage locations that are defined as inspection locations as default pegging locations. |