Maintaining Requisitions
This section discusses how to manage requisitions, view requisition details, maintain requisition distribution and accounting details, change value added tax (VAT) details for distributions, edit requisitions, and cancel or reopen requisitions.
|
Page Name |
Definition Name |
Usage |
|---|---|---|
|
PV_REQ_STATUS |
View and manage requisitions. |
|
|
PV_REQ_PO_DTLS |
View requisition details. |
|
|
Line Attachments Page |
PV_REQ_APP_DATTCH |
Displays the attachments added to this requisition at the line level. |
|
Item Description Page |
PV_NEWSC_ITM_DESCR |
View line item descriptions. |
|
Req Schedule One Time Address Page |
PV_REQ_INQ_ADDR |
Displays the details for a one-time ship to address that was added during requisition creation or edit. This page can only be accessed if a one-time address has been entered for this line and the user is not linked to the eProcurement role action of NO_ONETIME_SHIPTO. |
|
ShipTo Attachments Page |
PV_REQ_SHIP_ATTCH |
Displays the attachments added to this requisition at the ship to level. |
|
VAT Information for Schedule Page |
REQ_INQ_SCHED_VAT |
Review value added tax (VAT) information for the schedule line. The page does not display when the Calculate VAT on Req check box at Purchasing business unit level is not selected, the purchasing business unit is not in a VAT environment, or the VAT_DETAILS eProcurement role action is not used. Using this page, you can override the recovery percentage and rebate percentage, and recalculate or reset VAT defaults changes that are made to VAT determinants. |
|
REQ_INQ_DIST_VAT |
Review value added tax (VAT) information for the distribution line. The page does not display when the Calculate VAT on Req check box at Purchasing business unit level is not selected, the purchasing business unit is not in a VAT environment, or the VAT_DETAILS eProcurement role action is not used. Using this page, you can override the recovery percentage and rebate percentage, and recalculate or reset VAT defaults changes that are made to VAT determinants. |
|
|
PV_REQ_CHECKOUT |
Edit requisition information. This page is accessible only for open requisitions. |
|
|
PV_REQ_CANCEL |
Cancel requisition. |
|
|
Approval Status Page |
PV_REQ_APPROVAL |
View summary information for the requisition including the number of items and the total price. This page is similar in appearance to the Requisition Approval page. |
Use the Manage Requisitions page (PV_REQ_STATUS) to view and manage requisitions.
Navigation:
This example illustrates the fields and controls on the Manage Requisitions page. You can find definitions for the fields and controls later on this page.
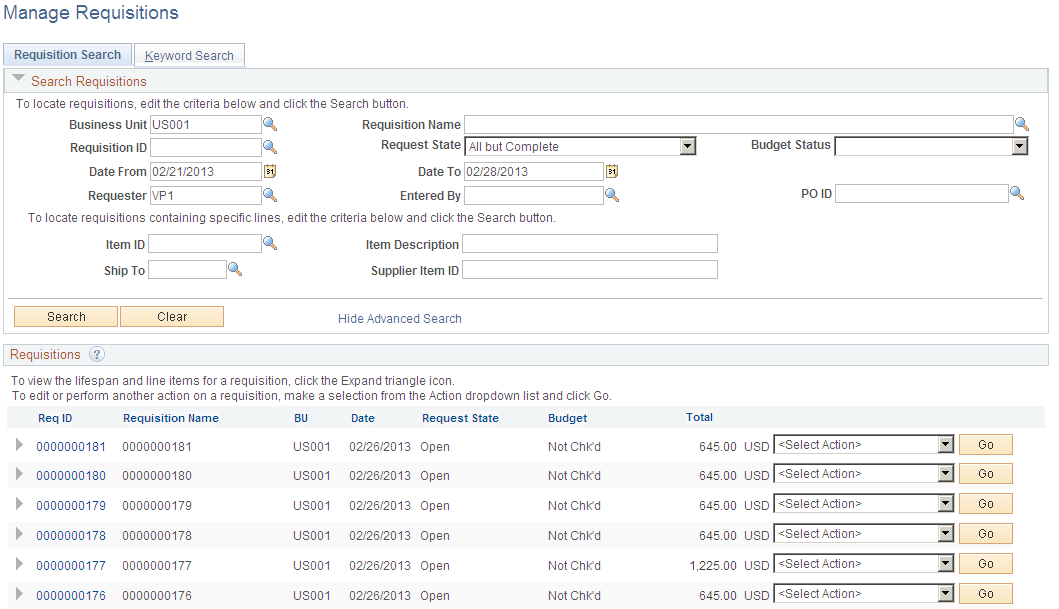
Use this page to review requisitions. From this page, you can access other pages to perform tasks, such as review requisition details, edit or cancel requisitions, create change requests, receive stock, copy requisition, view approvals, or return stock to the supplier.
Before using this page, determine your display options:
Use the eProcurement Installation Options page to define the maximum number of rows that are retrieved and appear on the Manage Requisitions page.
If the eProcurement role action NO_DEFAULT_RESULT is assigned to a user, requisitions do not appear in the scroll area until the user clicks Search.
Search Requisitions
Enter search criteria in this group box and click the Search button to display requisitions below in the Requisitions group box. Search criteria include:
Field or Control |
Description |
|---|---|
Business Unit |
Select the PeopleSoft Purchasing business unit. |
Requisition Name |
To find a specific requisition, enter the description of the request entered by the requester when the requisition was added. |
Requisition ID |
Enter a specific requisition ID to display. |
Request State |
Select the state for the overall requisition (header-level) to limit the requisitions displayed to this status. Leave this field blank to display search results without using request state as a search criteria. The following search criteria are included:
Note: States are defined below for the Request State field (at the requisition header level) in the Requisitions group box. |
Budget Status |
Displays the header results of a budget check initiated by clicking the Check Budget button or the Pre-Check Budget button. The options are:
|
Date From and Date To |
Enter the creation date or range of dates for the requisitions. |
Requester |
Enter the requester of the requisition. |
Entered By |
Enter the user ID of the individual who entered in the requisition. This is usually the requester but can be another individual. |
PO ID |
Enter the Purchase Order ID where the requisition was sourced. |
Show Advanced Search |
Click to view four more search fields, which are:
|
Keyword Search
Enter a word (for example UPN ID) or a string of characters in the Keyword Search box, and then click the Search button to display requisitions having UPN ID in the Requisitions group box.
Requisitions
This group box displays requisitions based on the search criteria in the Search Requisitions group box. Basic information about the entire requisition (requisition header-level) is displayed for each requisition. You can view additional information, including line details by using the Expand Section icon.
Field or Control |
Description |
|---|---|
Req ID (requisition id) |
Click a requisition ID to access the Requisition Details page, where you can view additional details of the requisition. |
Requisition Name |
Displays the description of the request entered by the requester when the requisition was added. The requisition name helps to identify this requisition as it flows through the system. If no requisition name was entered, then the requisition ID is displayed. |
BU |
Displays the PeopleSoft Purchasing Business Unit for this requisition. |
Date |
Displays the date the requisition was created. |
Request State(at the requisition header level) |
This state field displays the request state across the entire procurement cycle, not just the requisition header state. The following states are included:
|
Budget |
View the budget status for the requisition. This column appears when Commitment Control is enabled. |
<Select Action> |
Select an option and click the Go button to perform the action. The available actions vary depending on the status of the requisition. Actions include:
Some additional Actions available are Receive, Process Returns, Check Budget, and Pre-Check Budget . Note: The options that appear for a requisition differ depending on the status of the requisition. For example, you cannot cancel a requisition for which a PO is created. |
Go |
Click to perform the selected action. |
Create New Requisition |
Click to access the Create Requisition page, where you can add another requisition. |
Review Change Request |
Click to access the Change Request List for page, where you can view and process change requests. |
Review Change Tracking |
Click to display the View Requisition Change Tracking History page, where you can view changes to requisitions if you are using the change tracking feature. This page provides an audit trail of key transactional information including, changes to any fields marked for track changes on the change template, the user who modified the requisition, and the date and time of each requisition change request. |
Manage Receipts |
Click to access the Receipts For page, where you can view and maintain receipts. |
Requisition Report |
Click to access the Print Requisition process page, where you can define parameters for creating the printed requisition report (POY1100). |
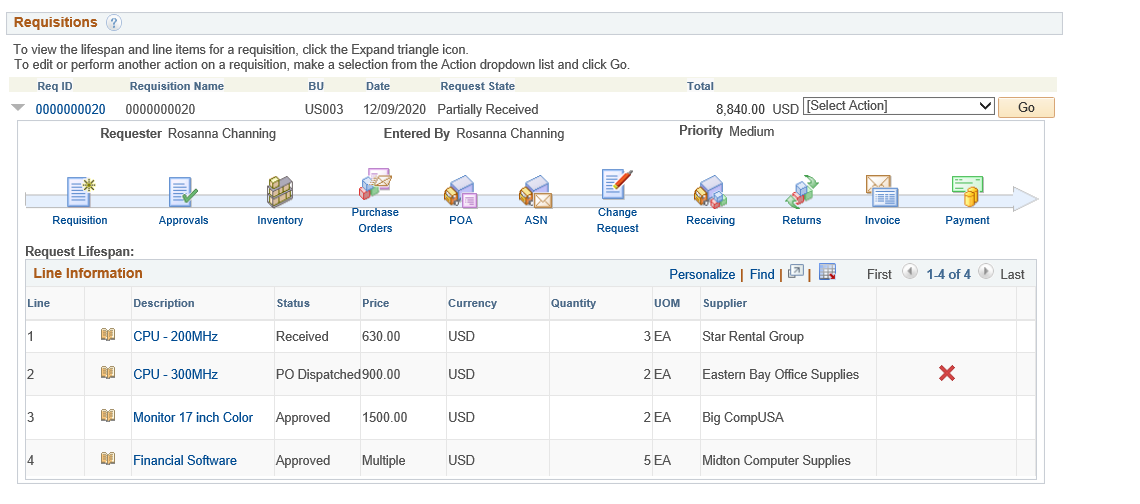
Requisition Cycle
Use the Requisition Cycle page (PV_REQ_CYCLE_PAGE) to displays the business process flow for a requisition with links to various documents.
The business process flow, or lifecycle, includes icons for requisition creation, requisition approval, sourcing to inventory stock, sourcing to a purchase order, purchase order acknowledgments (POA), advanced shipping notices (ASN), change requests, receiving, returns, invoices, and payment. The icons are highlighted when the requisition has completed the step. Some of the icons link you to additional information on a separate page. In order to view the POA and ASN icons you must select the Requisition Cycle Options on the eProcurement Business Unit Options page.
Navigation:
On the Manage Requisitions page, click the Expand Section icon next to a listed requisition.
Access the Requisition Cycle section of the Manage Requisitions page (Click the Expand Section icon next to a listed requisition).
The Requisition Cycle section displays the business process flow for a requisition with links to various documents. The business process flow or lifecycle, includes icons for requisition creation, requisition approval, sourcing to inventory stock, sourcing to a purchase order, purchase order acknowledgments (POA), advanced shipping notices (ASN), change requests, receiving, returns, invoices, and payment.
Stages in the requisition cycle that are complete or in progress are highlighted with active links.
This same information can be viewed on a separate page, the Requisition Cycle for: <requester> page (PV_REQ_CYCLE_PAGE), if the user is linked to the eProcurement role action of VIEW_REQ_CYCLE. To access this page select View Cycle in the Select Action field and click the Go button.
Field or Control |
Description |
|---|---|
Requisition |
Click the Requisition icon to access the Requisition Details page (PV_REQ_PO_DTLS), where you can view detailed information about this requisition. |
Approvals |
Click the Approvals icon to access the Approval Status page (EOAWMA_TXNHDTL_FL), where you can view the current approval status of the requisition and view line approval details. |
Inventory |
Click the Inventory icon to access the Stock Requests page (ORDER_INQ_INV), where you can view the material stock request created from this requisition to fulfill the demand using inventory stock. |
Purchase Orders |
Click the Purchase Orders icon to access the Purchase Order Inquiry page (PV_PO_LINE_INQ_2), where you can view information about the purchase order that this requisition was sourced to; including, the purchase order number, buyer, and supplier. |
POA |
Click the POA icon to access the PO Acknowledgement page (PV_POA_INQUIRY), where you can view the purchase order acknowledgement tied to this requisition. You can select the Details link of a POA to view the acknowledgement history. |
ASN |
Click the ASN icon to access the ASN History page (PV_ASN_INQUIRY), where you can view the advanced shipping notice tied to this requisition. Click the Details icon to navigate to the ASN History page, where you can review the arrival date, bill of lading number, carrier, and other information about the incoming shipment. If three is only one ASN for the selected requisition, the ASN History page is displayed directly. |
Change Request |
Click the Change Request icon to access the Review Change Requests page (PV_CHNG_REQST_LIST), where you can view requisition change request details after it has been sourced to a Purchase Order, view change reason, and processing error if any. |
Receiving |
Click the Receiving icon to access the Manage Receipts page (PV_RECV_UPDATE_REQ), where you can view the purchase order receipt linked to your requisition. |
Returns |
Click the Returns icon to access the Manage Return To Vendor (Supplier)s page (PV_RTV_UPDATE_REQ), where you can view the RTV linked to your requisition. |
Invoice |
Click the Invoice icon to access the PO Inquiry page (PV_PO_INQUIRY), where you can view the requisition, purchase order, receipts, vouchers, and Invoice Number. |
Payment |
Click the Payment icon to access the Payment Inquiry page (PV_PYMNT_INQUIRY), where you can view the payment details for the PO. |
Line Information
The Line Information group box displays information about each line within the requisition.
Navigation:
To access the Line Information group box on the Manage Requisitions page, click the Expand Section icon next to a listed requisition.
This example illustrates the fields and controls on the Line Information group box. You can find definitions for the fields and controls later on this page.
Field or Control |
Description |
|---|---|
Description |
Click the link to access the Item Description page where you can view information about the item. |
Status(at the requisition line level) |
This status field displays the status of the requisition line. The statuses include:
|
|
Click this icon to cancel a line on the requisition. You can cancel a requisition that has been sourced to a purchase order. If the cancellation completes budget checking and workflow approval, then the system creates a change request for cancelling the corresponding purchase order lines. A requisition line cannot be cancelled if you are using Commitment Control and the line has not yet pass budget checking. Also when a requisition line is sourced to multiple purchase orders it cannot be cancelled. If the approval process includes one or more stages that have only header level approval and a requisition line is cancelled, the entire requisition is resubmitted for approval for the entire approval process. For example, all stages are resubmitted. If the approval process includes one or more stages that have only line-level approval and a requisition line is cancelled, the line approval thread is terminated. If the approval process includes two or more stages that have a combination of line-level and header-level approval and a requisition line is cancelled, the line-level approval thread is terminated if the current stage that the approval is on is a line-level approval. If the current stage is a header-level , then the requisition is resubmitted for the entire process. |
 (Cancel Requisition icon)
PeopleSoft Approval Framework
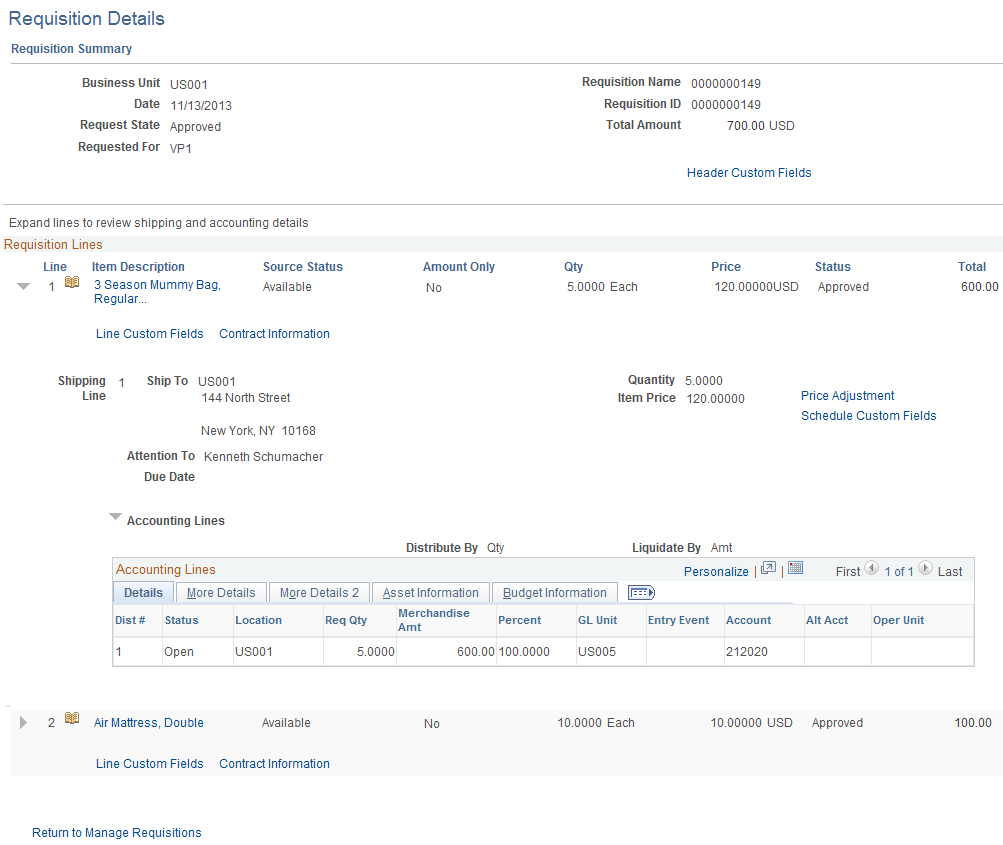
Use Requisition Details page (PV_REQ_PO_DTLS) to view details about individual requisitions. The PO Information header appears only if a PO was created for the requisition.
Navigation:
To access the Requisitions Details page (Click the Req ID link on the Manage Requisitions page).
This example illustrates the fields and controls on the Requisitions Details page. You can find definitions for the fields and controls later on this page.
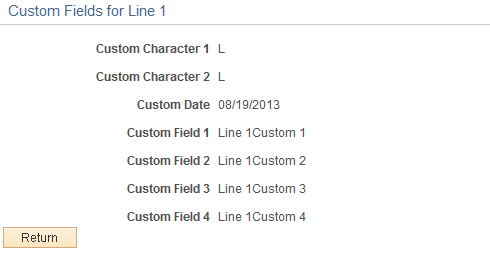
This example illustrates the fields and controls on the Custom Fields for Line 1 page.
Field or Control |
Description |
|---|---|
Header Custom Fields |
Click to view the Custom Fields for Header page that opens in a pop-up window. The custom field values appearing on this page are display only. |
|
Click this icon to access the Line Attachments page where you can view the attachments to this requisition. |
Line Comments |
Displays any comments added at the requisition line-level. See Line Comment Page. |
Item Description |
Click the hyperlink to view the item's detailed description. |
Source Status |
View the stage of the requisition line in the sourcing process. Values include:
|
Amount Only |
A Yes indicates that this line is for an amount value only. The quantity will be 1, and only one schedule line will be available. |
Original Substituted Item |
Displays the original Item ID on the transaction line that was replaced when a Substitute Item was found. Once the field is populated, the original Item ID will not be overridden with another Item ID. If the Item ID field is changed directly by the Requester or Buyer, the Original Substituted Item field is cleared. Similarly, if the Supplier ID/Location field is changed by the Requester or Buyer, then the value in the Original Substituted Item field is cleared and the value is moved back to the Item ID field. |
|
This icon helps the Requester or Buyer to know whether the item has been substituted. This appears on a transaction line whenever the Original Substituted Item field is populated. If Original Substituted Item and Description fields are already displayed in the component, i.e. Requisition and PO, a text ‘Substitute Item in Use’ will appear. |
Description |
Displays the item description for the Original Substituted Item, if the field is populated. |
Sourced from Inventory |
Click the Sourced from Inventory button to access the Requisition to MSR List page, where you can view stock request information. This button only appears if the requisition line item is defined as an inventory item in PeopleSoft Inventory on the Item Definition - General : Common page. |
Requisition Schedule and Distribution |
Click this link to access the Requisition Detailed Summary page, where you can view line details, schedules, and distribution information. Note: If the Amount Only check box is selected in the requisition line and requisition line is associated to Amount Only Work Order schedule, then the Schedule Date, Amount, currency fields are displayed. The Schedule Date, Amount, Currency fields are from WO schedule not from the Requisition. |
Line Custom Fields |
Click to view the Custom Fields for Line 1 page that opens in a pop-up window. The custom field values appearing on this page are display only. |
Schedule Custom Fields |
Click to view the Custom Fields for Line 1 and Schedule 1 page that opens in a pop-up window. The custom field values appearing on this page are display only. |
Price Adjustment |
Click the link to view price adjustments for the schedule. This link is controlled by users with specific role name and eProcurement role action VIEW_PRICEADJUSTMENTS. |
Ship To |
The location code that indicates the location where the supplier should deliver the items. |
|
Select this icon to view the Req Schedule One Time Address page (PV_REQ_INQ_ADDR), where you can view a one-time ship to address added to this requisition line when it was added or edited. The One Time Address icon is not visible if the user is linked to the eProcurement role action of NO_ONETIME_SHIPTO. |
Due Date |
The date the requester would like the items to arrive at the Ship To location. |
Ship Via |
Displays the Ship Via Code value. Note: This field is visible only if SHIPVIA_FREIGHT_DISPLAY role action is enabled. |
Freight Terms |
Displays the Freight Terms Code value. Note: This field is visible only if SHIPVIA_FREIGHT_DISPLAY role action is enabled. |
|
Select this icon to access the ShipTo Attachments page, where you can view the attachments to this requisition at the Ship To level. See Header Comments Page. |
|
Click the Schedule VAT icon to access the VAT Information for Schedule page, where you can review value added tax (VAT) information for the schedule line. The icon does not appear when the Calculate VAT on Req check box at Purchasing business unit level is not selected, the purchasing business unit is not in a VAT environment , or the VAT_DETAILS eProcurement role action is not used and the user eProcurement role is not added to the user ID profile. Using this page, you can override the recovery percentage and rebate percentage, and recalculate or reset VAT defaults changes that are made to VAT determinants. See Understanding VAT. |
Ship To Comments |
Displays comments added to this requisition at the ship to level. See Header Comments Page. |
 (Go To Attachments)
 (One Time Address)
 (Go To Attachments)
 (Schedule VAT icon)
Contract Information
This link appears if a contract ID has been assigned to the requisition line. Click this link to view contract details that opens in a secondary page.
The PeopleSoft eProcurement, PeopleSoft Purchasing, and PeopleSoft Payables applications are integrated with the procurement contract functionality to streamline the use of contacts with requisitions, purchase orders, and vouchers. As part of the contract functionality, you can set up requisitions to automatically search for a contract to use for requisitions. Applying default contract prices to requisitions enables you to receive contract prices for requisition items and to more accurately track budgets and pre-encumbrance balances.
See Applying Contracts to Requisitions.
Field or Control |
Description |
|---|---|
Contract ID |
Displays the purchasing contract used to price this requisition line. The contract ID can be entered manually on the Review and Submit-Line Details page when creating and editing a requisition. A contract ID can also be added automatically by the system when you have selected the Default Contract On Req check box on the Purchasing Definition - Business Unit Options page. |
Version |
Displays the contract version applied to this requisition line. Multiple versions are available when you are using version control. Contract versions enable contract administrators to create and maintain multiple versions of a contract in the procurement system. |
Contract Line |
Displays the contract line applied to this requisition line. |
Category Line |
Displays the contract category line number. Categories enable you to specify groups of items on a contract, rather than having to enter the items one at a time. |
PO Information
This link appears if the requisition item is sourced to PO. Click this link to view the PO information that opens in a secondary page.
Field or Control |
Description |
|---|---|
Receipt Status |
Displays the receipt status for this PO. Values include: PO Not Received: No quantities for this PO line have been received. PO Partially Received: Part or all quantities for this PO line have been received. Even if the quantity is fully received, the status does not change until you run the Match Request process in PeopleSoft Payables. PO Received: All quantities for this PO line have been received. Run the Matching process (AP MATCHING) in PeopleSoft Payables. |
View Receipt |
Click the View Receipt button to access the Receipt For a Casual User page. This button appears if a receipt was recorded for this line. |
Accounting Lines — Details
Field or Control |
Description |
|---|---|
Dist # (distribution number) |
Displays the number the system assigns to this distribution. The system uses this numbering to distinguish between multiple distributions for a single requisition line. |
Status |
Distribution statuses include: Open: The distribution line is open. Complete: The distribution line is closed. Processed: The distribution line has been processed and is unavailable for sourcing. Canceled: The distribution has been canceled. |
Distribution Type |
Displays the distribution type that was selected for the requisition line. Values are Labor and Expense. |
|
Click the Distribution VAT icon to access the VAT Information for Distribution page, where you can review value added tax (VAT) information for the distribution line. The icon does not appear when the Calculate VAT on Req check box at Purchasing business unit level is not selected, the purchasing business unit is not in a VAT environment, or the VAT_DETAILS eProcurement role action is not used. Using this page, you can override the recovery percentage and rebate percentage, and recalculate or reset VAT defaults changes that are made to VAT determinants. See Understanding VAT. |
 (Distribution VAT icon)
Accounting Lines — More Details
Access the Accounting Lines — More Details tab.
Select the More Details tab.
This example illustrates the fields and controls on the Accounting Lines — More Details page.

Along with viewing accounting information, you can access projects. Click the Projects link to view and update projects and activities.
Accounting Lines — More Details 2
Access the Accounting Lines — More Details 2 tab.
This example illustrates the fields and controls on the Accounting Lines — More Details 2 page. You can find definitions for the fields and controls later on this page.

Field or Control |
Description |
|---|---|
Stat Code (statistics code) |
Displays the code used to maintain statistical amounts to facilitate financial analysis and reporting. You can track a variety of non-monetary amounts with statistics. |
Open Amt (open amount) |
Displays the amount that is still open on the requisition that is not sourced to the purchase order(s) when the requisition is distributed by amount. |
Open Quantity |
Displays the quantity that is still open on the requisition that is not sourced to the purchase order(s) when the requisition is distributed by quantity. |
Base Amt (base amount) |
Displays the monetary value for this distribution line. The value appears in the base currency for the business unit. The currency type also appears with the value. If the currency is different than the base currency, an exchange rate also appears. |
|
Click to view the exchange currency information and the exchange rate. |
Custom Fields |
Click to view the Custom Fields for Line 1 and Schedule 1 and Distribution 1 page that opens in a pop-up window. The custom field values appearing on this page are display only. |

Accounting Lines — Asset Information
Access the Accounting Lines - Asset Information tab.
This example illustrates the fields and controls on the Accounting Lines - Asset Information page. You can find definitions for the fields and controls later on this page.

Field or Control |
Description |
|---|---|
Asset Mgmt Bus. Unit |
Displays the Asset Management Business Unit. |
Profile ID |
Displays the default asset profile ID associated with distribution items. |
CAP # (capital acquisition plan ID) |
The CAP identification ties the asset to a capital acquisition plan. |
Sequence |
Displays the sequence number for the capital acquisition plan. |
Tag Number |
If you use tags to track assets, enter the tag number assigned to the asset. |
EmplID (employee ID) |
Employee ID of the custodian for this distribution item. |
Capitalize |
Select to designate this item as a capitalized item. If the item is capitalized, it can be depreciated before the order is paid. |
Cost Type |
Displays the default cost type associated with the item purchase, if applicable. Cost types represent components of the cost of an asset, such as materials, labor, and overhead. |
Accounting Lines - Budget Information
Access the Accounting Lines - Budget Information tab.
This tab is hidden if Commitment Control for Purchasing is not enabled.
This example illustrates the fields and controls on the Accounting Lines - Budget Information page. You can find definitions for the fields and controls later on this page.

Field or Control |
Description |
|---|---|
Budget Status |
When Commitment Control for purchasing is enabled, displays the distribution line results after budget checking is initiated. Values for the field include:
|
Budget Date |
Displays the date used by commitment control to determine the budget period to which this control budget belongs. |
Pre-Encumbrance Balance |
Displays the pre-encumbrance balance for this requisition distribution after it is successfully budget checked. Click the Pre-Encumbrance Balance amount hyperlink to view requisition accounting entries for this distribution only. You can use this page to view accounting information details including the commitment control ledger group and transactions that have been performed against this requisition distribution. When this requisition line and distribution is sourced to a purchase order and budget checked, commitment control liquidates the pre-encumbrance balance from this requisition distribution and establishes an encumbrance for the purchase order. |
Currency |
Displays the currency code for the pre-encumbrance amount at the distribution level of the requisition. The currency code is based on the commitment control ledger group for the distribution level General Ledger business unit. |
Pre-Encumbrance Base Balance |
Displays the pre-encumbrance balance in requisition base currency. |
Base Currency |
Displays the base currency of the pre-encumbrance balance on the business unit. |
Commitment Control Close Flag |
Displays as selected when the Purchase Order associated with the requisition is finalized for less, thus indicating that the outstanding pre-encumbrance has been fully liquidated. This flag also displays as selected when the requisition distribution has been canceled. When the requisition is closed and remaining pre-encumbrance amount liquidated on the budget, this flag displays as selected on the requisition distribution. |
Use the VAT Details for Distribution page (REQ_INQ_DIST_VAT) to review value added tax (VAT) information for the distribution line.
The page does not appear when the Calculate VAT on Req check box at the Purchasing business unit level is not selected, the purchasing business unit is not in a VAT environment, or the VAT_DETAILS eProcurement role action is not used. Using this page, you can override the recovery percentage and rebate percentage, and can recalculate or reset VAT default changes that are made to VAT determinants.
Navigation:
Click the Distribution VAT icon on the Requisition Details page.
Use this page to view VAT details at the distribution line level. Information that appears on the page relates to the requisition line number item and the schedule that you selected on the Manage Requisitions page. The page does not appear when the Calculate VAT on Req check box at the Purchasing business unit level is not selected, the purchasing business unit is not in a VAT environment, or the VAT_DETAILS eProcurement role action is not used. Using this page, you can override the recovery percentage and rebate percentage, and can recalculate or reset VAT defaults changes that are made to VAT determinants.
This example illustrates the fields and controls on the VAT Details for Distribution page. You can find definitions for the fields and controls later on this page.
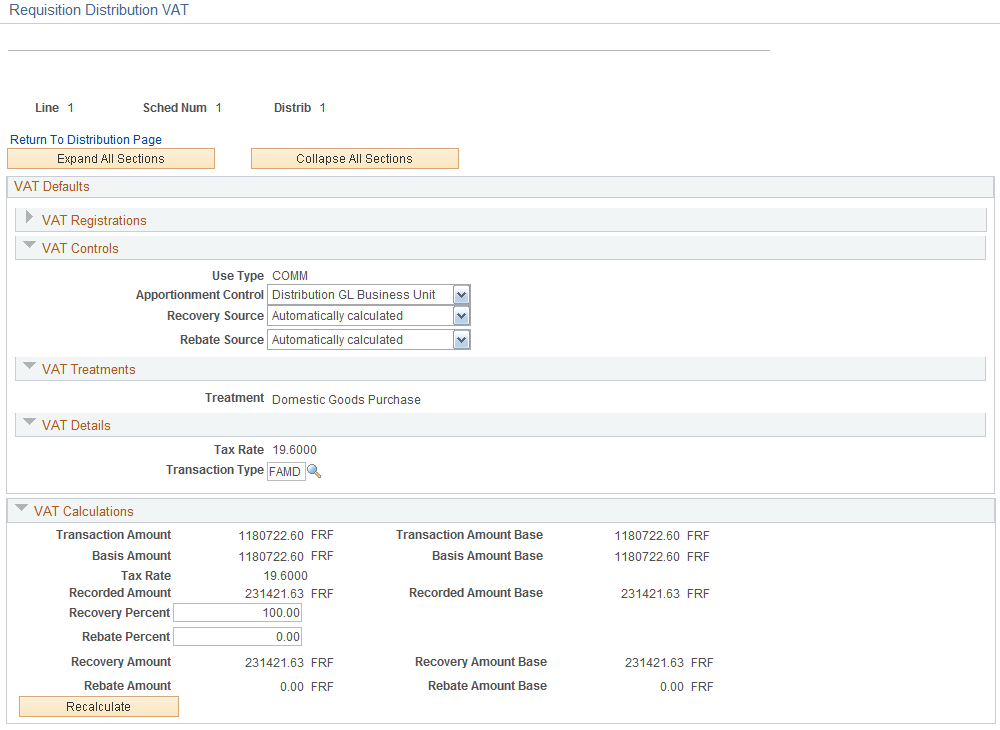
VAT Defaults
Field or Control |
Description |
|---|---|
Use Type |
Determines VAT recoverability. The field value is retrieved from the VAT default hierarchy, but you can override this value. Use type is a type of activity in which a purchased good or service will be used and, therefore, to determine a recoverability percent and a rebate percent (when applicable) that is applied to a transaction line. Activities are categorized as taxable, exempt, or mixed. Where activity is mixed, you can associate either the ratio of taxable activity to exempt activity directly with the use type, or you can indicate that this ratio is determined at the ChartField level. |
Apportionment Control |
Displays the business unit that you want to control the VAT apportionment. This value appears by default from the Purchasing business unit. VAT apportionment is the mechanism that enables you to specify the ratio of taxable activity to exempt activity for individual ChartFields. |
Recovery Source |
Select whether the VAT recovery is Automatic or Manual. This value appears by default from the Purchasing business unit. If you select Manual, enter a value in the Recovery Percent field. |
Rebate Source |
Select whether the VAT rebate is Automatic or Manual. This value appears by default from the Purchasing business unit. If you select Manual, enter a value in the Rebate Percent field. |
Treatment |
Controls default and transaction behavior. A description of how the transaction must be treated for VAT purposes. This value is used to determine how VAT defaults are applied, what accounting entries are required, and how and if the transaction is reported on the VAT return. You can override the values in this field. The VAT defaulting hierarchy determines the value of this field based on the country in which the service is deemed to have been performed, and the countries in which the bank and beneficiary are located and registered. |
VAT Code |
Select a value to specify the rate at which VAT is calculated. The VAT code used to define a percentage the system uses to determine the VAT amount. The VAT code is similar to the sales and use tax code, with a few exceptions. The tax authority tied to the VAT code generally consists of a single authority, and the ChartFields for a VAT code do not reside with the tax authority but are determined by the combination of the VAT code, VAT account type, and VAT transaction type. |
Transaction Type |
Select a value to categorize VAT transactions according to particular VAT accounting and reporting requirements. The VAT code and the VAT transaction type are used in conjunction with the VAT account type to obtain the ChartFields for accounting entries. |
VAT Calculations
Field or Control |
Description |
|---|---|
Transaction Amount |
VAT amount in the transaction currency. |
Transaction Amount Base |
VAT amount in the base currency. |
Basis Amount |
VAT basis amount in transaction currency. |
Basis Amount Base |
VAT basis amount in the base currency. |
Tax Rate |
Displays the rate at which this item is taxed. |
Recorded Amount |
Displays the amount of VAT calculated for the schedule in the transaction currency. |
Recorded Amount Base |
Displays the amount of VAT calculated for the schedule in the base currency. |
Recovery Percent |
Displays a system-calculated value based on the selected VAT use type. You can override the automatic value if the VAT Allow Override Recovery/Rebate field on the business unit indicates that manual override is allowed. This value must be less than or equal to 100 and a positive number. To access the field, select and click the Set VAT Default link. |
Rebate Percent |
Displays a system-calculated value based on the selected VAT use type. You can override the automatic value if the VAT Allow Override Recovery/Rebate field on the business unit indicates that manual override is allowed. This value must be less than or equal to 100 and a positive number. To access the field, select and click the Set VAT Default link. |
Recovery Amount |
VAT recovery amount in the transaction currency. |
Recovery Amount Base |
VAT recovery amount in the base currency. |
Rebate Amount |
Calculated VAT rebate amount in the transaction currency. |
Rebate Amount Base |
Calculated VAT rebate amount in the base currency. |
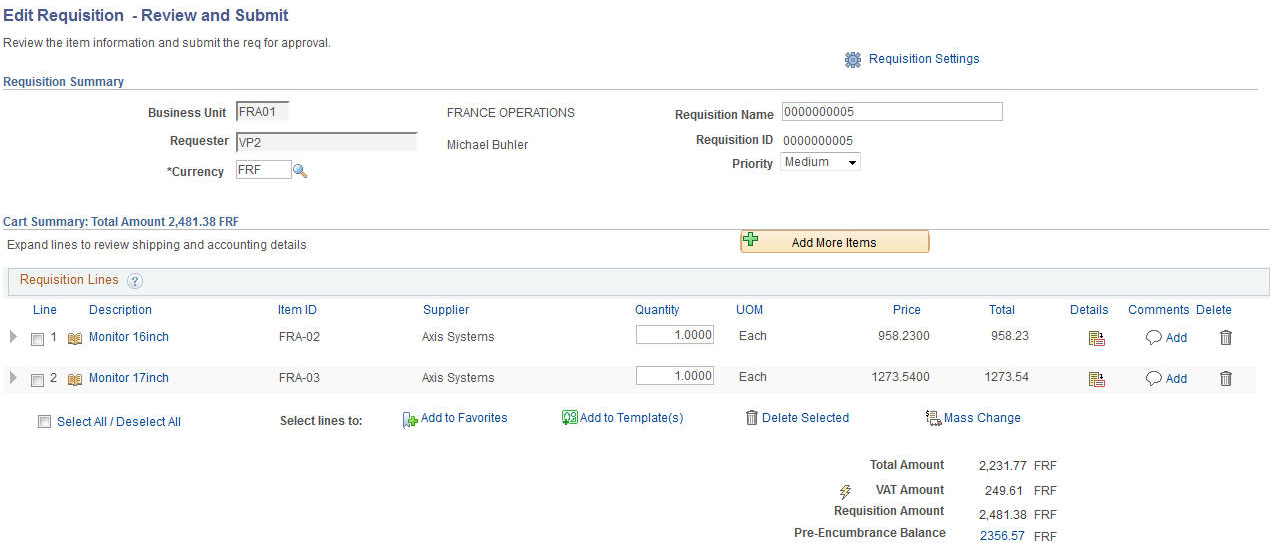
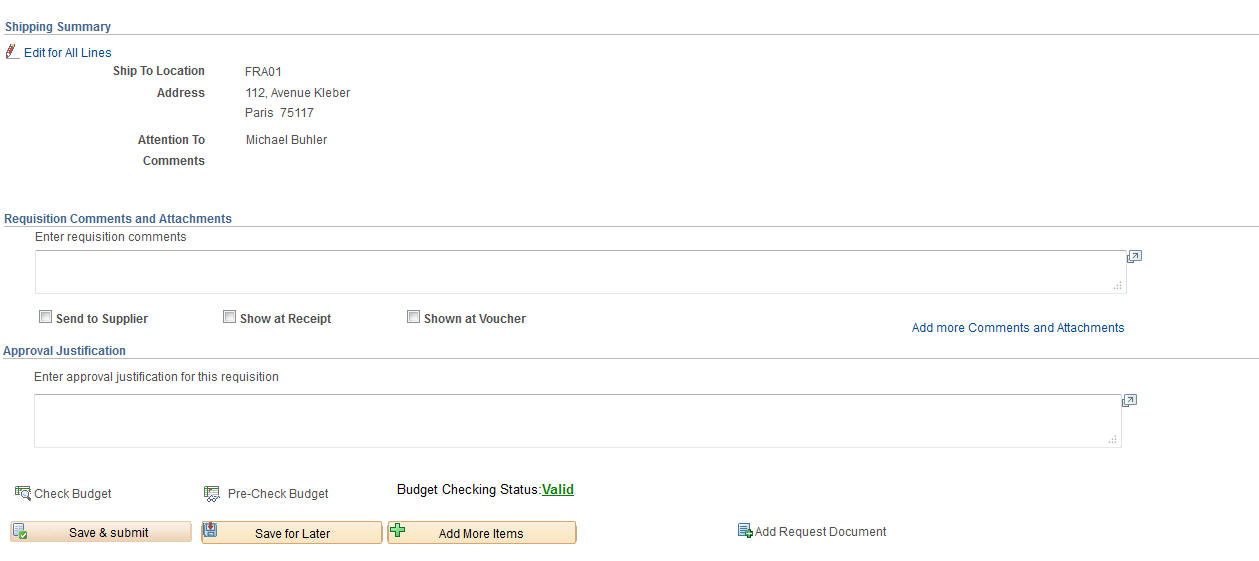
Use the Edit Requisition-Review and Submit page (PV_REQ_CHECKOUT) to edit requisition information.
This page is accessible only for open requisitions.
Navigation:
Select Edit in the Select Action field on the Manage Requisitions page. Click the Go button.
This example illustrates the fields and controls on the Edit Requisition - Review and Submit page. You can find definitions for the fields and controls later on this page.
This example illustrates the fields and controls on the Edit Requisition - Review and Submit page. You can find definitions for the fields and controls later on this page.
This example illustrates the fields and controls on the Edit Requisition - Review and Submit page. You can find definitions for the fields and controls later on this page.

If you add an additional line to an existing requisition, the new line is numbered as the last line of the requisition.
Most field descriptions for the Edit Requisition component are located in the Creating Requisitions section. In the Edit Requisition component, some additional fields appear; these fields are discussed below.
If chunking is enabled, then requisition lines in the first chunk will appear and chunking navigation will be visible on this page.
See Requisition Settings Page.
Field or Control |
Description |
|---|---|
First <#> to <#> of <#> Last |
Displays the number of requisition line rows that are displayed on the page if requisition chunking is enabled. For example, if 21 to 30 of 30 is displayed. It means that the system is displaying the first 20 lines on the page and that there are a total of 30 lines. The number of requisition lines is determined by the requisition value entered on the eProcurement Installation Options page. When clicking on the > or the Last link to retrieve a new set of lines, the system warns you that the requisition will be automatically be saved prior to retrieving the next set of lines if they are changed. Note: These chunking navigation links appear only when editing an existing requisition. They are not displayed during add mode. |
Track Batch |
Displays the track batch (change batch) sequence number. This field only appears if you have changed a field marked for track change on the requisition change template. The first time that you save a changed requisition, the system displays Track Batch 1 in the requisition header. Each time that you make a change to the requisition, the system increases the track batch number by one. The track batch sequence number appears on the View Requisition Change Tracking History page to distinguish one change from another change and from the original field value. |
First, <, >, and Last |
The First, arrow icons (<,>), and Last links appear if requisition line chunking has been enabled on the eProcurement Installation Options page using the Requisition field. Requisition chunking splits the requisitions lines of a large requisition into more manageable groups, such as 10 lines per chunk. The number of requisition lines displayed is determined by the requisition value entered on the eProcurement Installation Options page. The chunking links enable you to move between chunks and they appear only when editing an existing requisition and not when creating a requisition. They are not hidden on the Requisition page when the total number of lines equals or is less than the chunking limit until you click the Save for Later button. When clicking the > or the Last link to retrieve a new set of lines for the first time, the system warns you that the requisition will be automatically saved before retrieving the next set of lines. This enables the system to save any changes made to the first chunk of lines. The warning message will not be issued during subsequent navigation between chunks, and it appears only once per session. |
|
The Sourced to Purchase Order icon displays to the right of the Line number and indicates that the requisition line has been sourced to a purchase order line. If the line has not yet been sourced to a purchase order, no icon appears. |
|
The Unavailable for Edit icon displays to the right of the Line number and indicates that the requisition line cannot be changed. Users cannot edit requisition lines when:
|
|
Click the Details button to access the Line Details (PV_REQ_LINE_DTLS) page to change requisition line details. |
|
Click to have the system recalculate and update VAT amounts for the requisition. |
VAT Amount (value added tax amount) |
Displays the amount of value added tax (VAT) calculated on a VAT-enabled requisition. It does not appear when the Calculate VAT on Requisition check box at Purchasing business unit level is not selected, the purchasing business unit is not in a VAT environment, the VAT_DETAILS eProcurement role action is not used, and the user eProcurement role is not added to the user ID profile. In addition, for Purchasing Requisition in a VAT enabled Business Unit, VAT Amount and icon also do not appear when the User ID Preferences - Requisition Authorizations for Allowed Requisition Actions of View/Override VAT Details is not selected. |
Pre-Encumbrance Balance |
Displays the pre-encumbrance balance amount after requisition is successfully budget checked. When you use commitment control, the system deducts each type of financial obligation from the budget and tracks it according to obligation type. This enables you to determine the money that you have committed in pre-encumbrances. The system extracts these values from commitment control tables by passing the business unit, document ID, and other key information that depends on the display. The system displays this field only when commitment control for purchasing is enabled and if the document has been budget checked successfully at least once. In addition, a default commitment detail ledger must be selected on the Ledgers For A Unit – Commitment Control Options page so that the accounting entries can be summarized to display the respective pre-encumbrance balance for the requisition. Pre-encumbrance balance appears in the transaction currency of the requisition and is based on the transaction budget date, general ledger unit, and commitment control ledger group. Pre-encumbrance balance can be partially or fully liquidated from purchase orders. Click the Pre-Encumbrance Balance amount hyperlink to view Requisition Accounting Entries. You can use this page to view accounting information details including the commitment control ledger group and transactions that have been performed against the requisition. |
Delete |
Click to delete selected requisition lines. You cannot delete a requisition line that has been sourced to a purchase order. You cannot use this button to delete a requisition line that has not passed budget checking when Commitment Control is used. |
Current Change Reason |
Click this link to access the Change Reason page, where you can view the reason code and comments attached to a change request. See Change Reason Page. |
Preview Approvals |
Click this link to save the requisition first before a pop-up modal window of the workflow approval map is displayed within Edit Requisition – Review and Submit page if all requisition lines are available for sourcing. It will display a message if one of the requisition lines is sourced to Purchase Order. If the requisition is in add mode, when you click this link, the requisition is automatically saved and a modal window of the workflow approval map within Edit Requisition – Review and Submit page will pop up. |
Save & Submit |
Click to save the requisition and submit it for approval, sourcing, and dispatching to a supplier. |
Save for Later |
Click to save the requisition for later review or submission. |


Use the Requisition Details for <Requester> page (PV_REQ_CANCEL) to cancel a requisition.
Navigation:
On the Manage Requisitions page, select Cancel in the Select Action field. Click the Go button.
This example illustrates the fields and controls on the Cancel Requisition. You can find definitions for the fields and controls later on this page.
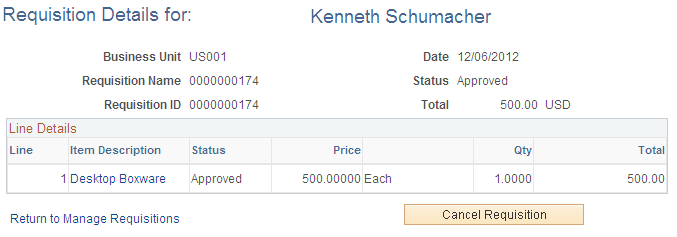
Click a line item link to review the details of that line item.
Field or Control |
Description |
|---|---|
Cancel Requisition |
Click to cancel a requisition. You can cancel any requisition for which a purchase order is not already submitted. |