Creating Requisitions
This section provides an overview of requisition creation and discusses how to define requisitions, find requisition items, select catalog items, select favorite items to include in requisitions, use template items to create requisitions, select forms to include in requisitions, select direct connect suppliers or the Oracle Supplier Network for requisitions, and add special requests to requisitions.
PeopleSoft eProcurement enables users to create requisitions in an efficient manner. The key to entering requisitions quickly is defining a proper default structure that prevents you from changing information on the requisition. For a requisition with no changes to the default structure, you can enter the items, review the request, and submit it. For more complex requisitions, PeopleSoft eProcurement provides a number of links to additional information.
|
Page Name |
Definition Name |
Usage |
|---|---|---|
|
PV_REQ_SETTINGS |
Define requisition settings, including the purchasing business unit and the requester for the requisition. You can also define default values for requisition lines. |
|
|
PV_AcLL_RQST_OPTION |
Find requisition items. |
|
|
PV_REQ_CATBROWSE |
View catalog item details. |
|
|
PV_REQ_NEWFAVS |
Select favorite items and item groups to include in requisitions. Add items to your favorites list and group favorite items into favorite groups. |
|
|
PV_REQ_NEWTEMPL |
Use template items to create requisitions. Create new templates and add items to existing templates. |
|
|
PV_REQ_SERVICES |
Include eProcurement services. |
|
|
SP_REQ_BROWSE |
Include services from Services Procurement . |
|
|
PV_EXP_FORMS |
Select forms to include in requisitions. |
|
|
PV_REQ_MERCHANTS |
Interact directly with a supplier's website. |
|
|
PV_REQ_SPECIAL_REQ |
Add special requests to requisitions. |
|
|
PV_EXPRESS_REQ |
Enter details for express items and add them to the cart. |
|
|
PV_REQ_RECENT_ORD |
View recently approved items. |
|
|
PV_REQ_TPOMERCH |
View a list of all available suppliers. |
Use the Requisition Settings page (PV_REQ_SETTINGS) to define requisitions, including the purchasing business unit and the requester for the requisition. You can also define default values for requisition lines. However you cannot use it to modify requisition lines and requisition schedule lines that are already sourced to PO and other systems.
Navigation:
This example illustrates the fields and controls on the Requisition Settings Page. You can find definitions for the fields and controls later on this page.

This page enables you to define information for a new requisition.
Before using this page, determine the features that your users can access by linking user roles to the following eProcurement role actions:
The CHANGEREQBU role action is required to access the Business Unit and Requester fields on this page. For users without this role action, these fields cannot be changed. The values in these fields are provided by default from the User Preferences component.
The ALLOW_DEFAULT_OPTIONS role action enables users to select between the default options of Default or Override within the Line Defaults group box of this page. Without this role action, users can only enter default values, not override values.
See Maintaining System Users and Roles.
Field or Control |
Description |
|---|---|
Requester |
Enter the name of the person requesting these materials or services. This value can be your name or you can purchase on behalf of another person. For you to purchase on behalf of another user, these requesters must be defined on the User Preferences page. |
Requisition Name |
Enter a description of the request to help you identify this requisition as it flows through the system. If this field is left blank, the system uses the requisition ID as the name. |
Currency |
Displays the currency that is selected for the business unit. This value can be overridden if the business unit allows for multicurrency processing. |
Priority |
Enter a priority for reporting or query purposes. |
Card Number |
Select a card number for procurement card. |
Use Procurement Card |
Select check box to use the procurement card. |
Defining Requisition Line Default Values
The fields that you enter on this page can be applied to the entire requisition at the line, shipment, or distribution levels.
Field or Control |
Description |
|---|---|
Default Options |
Determines how your entries in the Line Defaults group box are applied. The options are:
|
Supplier |
Select the supplier for the items on this requisition. Select Supplier Location. However, be cautious when changing the supplier location. Purchase orders are not sent to marketplace unless the supplier ID and supplier location match those values that are defined on the Linked Supplier Setup page. To access the page, select |
Supplier Location |
Select a suitable value for the Supplier Location. |
Buyer |
Select a buyer for this requisition. At the requisition line level, the system uses the buyer from the item definition or item supplier. |
Category |
Define a default category for this requisition. |
Unit of Measure |
Define the UOM for use on this requisition. |
Shipping Defaults
Field or Control |
Description |
|---|---|
Ship To |
Select the standard address to which most of the requisition is delivered. |
Add Onetime Address |
Click to access the Shipping Address page, where you can override a shipping address that is not in the standard ship to location codes. This link is controlled by NO_ONETIME_SHIPTO role action. It will not appear if this role action is enabled for a user. |
Due Date |
The standard date on which the customer wants to receive the items on this requisition. |
Attention |
Enter the name of the individual who should receive the items or services. Once the shipment is received, this individual should record the receipt, enabling the buyers to track the quality and promptness of the supplier. |
Ship Via |
Select suitable Ship Via Code value by clicking the prompt button. Note: This field is visible only if SHIPVIA_FREIGHT_DISPLAY role action is enabled. |
Freight Terms |
Select suitable Freight Terms Code value by clicking the prompt button. Note: This field is visible only if SHIPVIA_FREIGHT_DISPLAY role action is enabled. |
Distribution Defaults
Field or Control |
Description |
|---|---|
SpeedChart |
Select a SpeedChart Key by clicking the prompt. Based on the SpeedChart key selected, the system automatically distributes the accounting line amounts according to the proration percentage defined for the selected SpeedChart. You can modify the distribution values. Note: This field is visible only if role action ACCOUNTING_DISPLAY is assigned to action Editable and it will be hidden if role action ACCOUNTING_DISPLAY is assigned to action Hide or Display Only . SpeedChart will be invisible if Accounting Tag is enabled. Note: This field will be disabled if Default Options is set to Default and it will be enabled if Default Options is set to Override. |
Accounting Tag |
Click the prompt to select appropriate Accounting Tag that will be used to populate ChartFields on transaction distribution lines. The system automatically prorates the amount of an accounting line according to the proration percentages defined on the Accounting Tag. Note: This field appears only if Accounting Tag check box is selected for eProcurement on the Accounting Tag Registration page. See Setting Up Accounting Tags Note: This field is visible only if role action ACCOUNTING_DISPLAY is assigned to the action Editable. It will be hidden if role action ACCOUNTING_DISPLAY is assigned to the action Hide or Display Only action. This field will be disabled if Default Options is set to Default and it will be enabled if Default Options is set to Override. |
Accounting Defaults
Field or Control |
Description |
|---|---|
Dist |
This column displays the distribution line number. |
Chartfields |
Enter ChartField and asset management information. Note: The ChartField values on this page are described further in this documentation. |
Use the Create Requisition page (PV_REQ_CATBROWSE) to find requisition items.
Navigation:
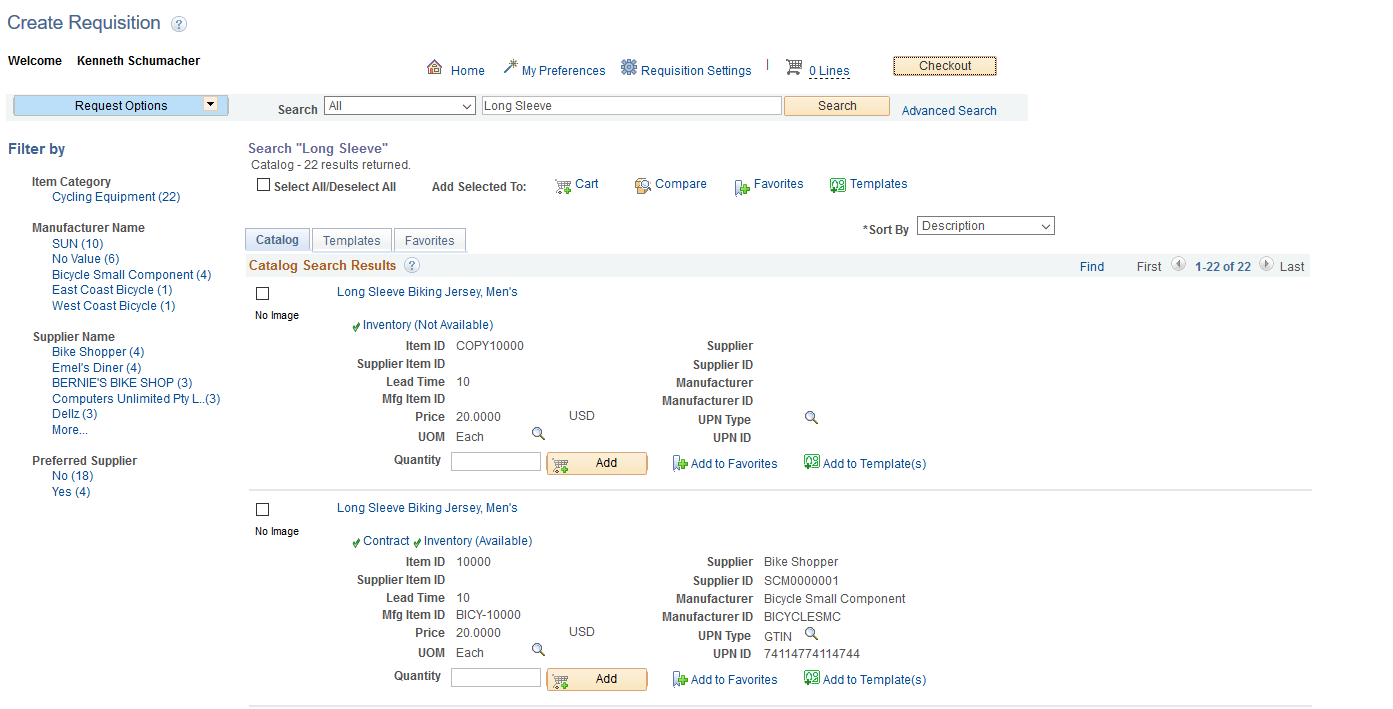
This example illustrates the fields and controls on the Create Requisition page.
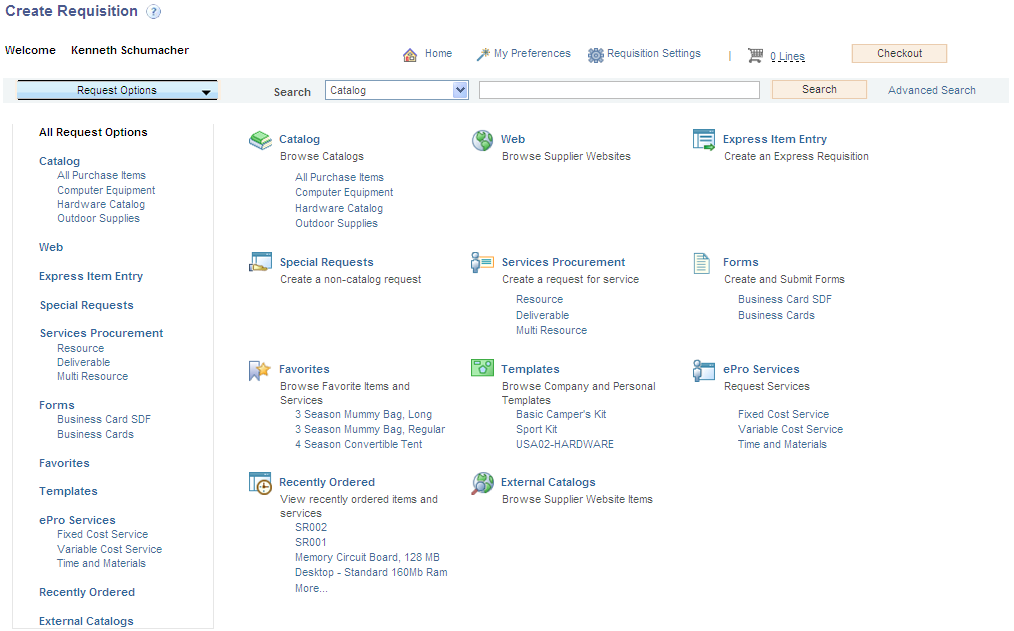
Use this page to find items for a new or existing requisition. Based on the type of search selected in the eProcurement Installation Options page, the requisition items will be searched. Default search type will be SQL search. A SQL search is performed against Item Description.
This example illustrates the fields and controls on the Search Settings.
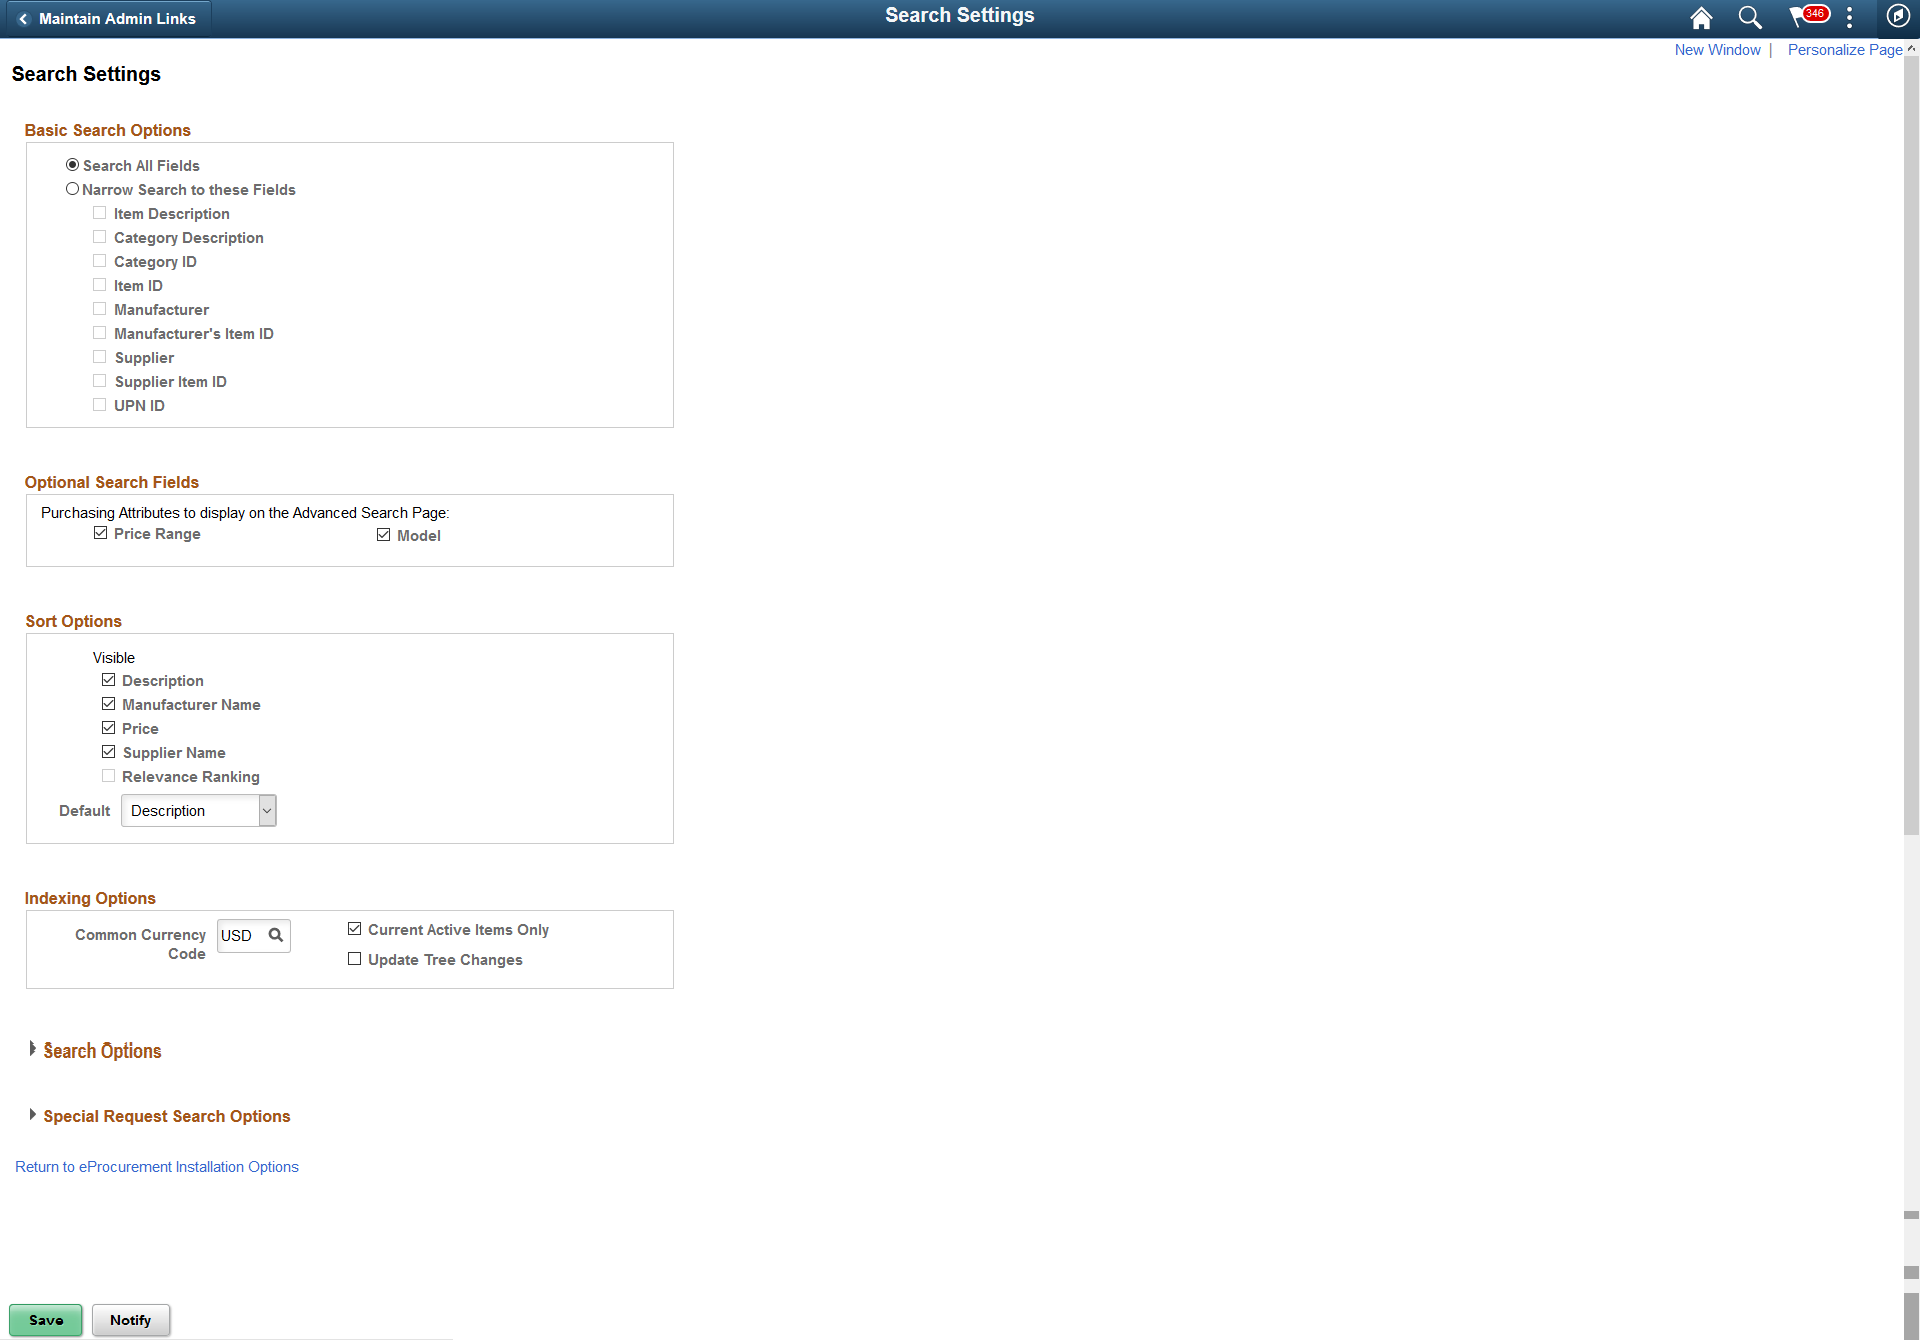
Based on the fields selected on this page the search result is displayed. You can choose the required sort option for the search result from the available five options, Description, Manufacturer Name, Price, Relevance Ranking, and Supplier Name. By default Description option will be selected. If you select Relevance Ranking as the default sort option and marketplace integration is disabled later, then the default sort option will revert back to Description.
Relevance Ranking sort option will return the search results based on the marketplace ranking of the items. This option is available only if the Consolidate Item Search Results and Facets Option check box is selected on the eProcurement Installation Options page. This option is not applicable for sPro items.
Item Search
You can search for items to include in a requisition by:
Basic Search: Enter either a keyword or a phrase and click the Search button. You can choose to search against all the categories or select any specific category/option from the Search drop—down list. If Search framework search is enabled, then indexed fields to search against can be configured on the Search Settings page in eProcurement Installation Options.
Any changes made to items such as price or any of the purchasing attributes requires the catalog information to be exported. This includes changes made to the suppliers as well. This is achieved by performing the Search framework index update. Once catalog export is done the marketplace makes necessary updates to the catalog information including the facets.
Note: None of the basic search criteria is carried over to advanced search.
For more information on Search framework search settings, see Setting Up Installation Options.
Browsing Catalogs: You can browse catalogs either from the left navigation or the All Request Options page. Clicking a catalog or category will initiate a search and return all items in that particular catalog or category.
Advanced Search: You can click the Advanced Search link, which opens the advanced search criteria page in a modal window. Enter the search criteria for required search fields. You can save the search criteria by clicking the Save search Criteria link. Basic search criteria is independent of advanced search criteria.
You can narrow your search to contract by making use of Search By Contract ID. Contract search is independent of advanced search.
This example illustrates the fields and controls on the Advanced Search page.
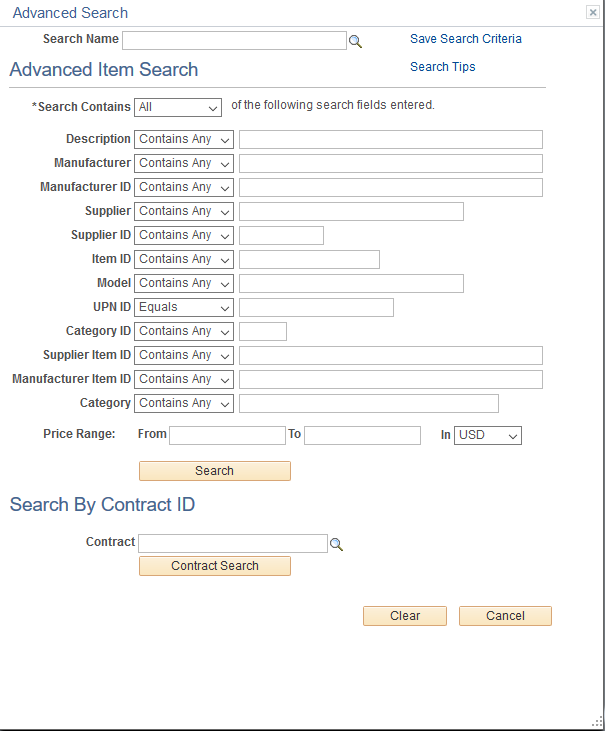
Based on the category attribute defined, Search By Attribute will appear in the Advanced Search page. If no category attributes are defined, it will be hidden.
Click the Search Tips link to view a window that explains how to format searches in the Keywords field.
For the Price Range field, you can specify the price in any currency because it will be converted to the common currency specified in the search settings in the eProcurement Installation Options page.
Options for the Search Contains field perform in the following manner:
All — If selected, will combine all the search criteria specified in the Advanced Item Search page to perform the search AND operator will be used during the search.
Any — If selected, will perform the search for any of the search criteria specified in the Advanced Item Search page OR operator will be used during the search.
This is common for both Search framework and SQL searches.
For the SQL search, the search operators that appear in the drop-down list for the search fields are Begins With, Contains, and Equals. As an example, consider the search result displayed for the following search field—search operator—search data:
Description – Begins with – Long Sleeve
Manufacturer ID – Equals - BICY-10000
Manufacturer – Contains - Bicycle
Note: Due to the highly complex nature of universal product identifiers and the fact that they are unique to a particular item, the UPN ID can only be searched using the Equals operator. This means that the entire identifier must be entered in order to search.
This example illustrates the fields and controls for Search result - SQL search.

For the Search framework search, the available search operators are Begins With, Contains All, Contains Any, and Equal. Here you have the option to search based on All or Any of the search criteria specified in the search fields.
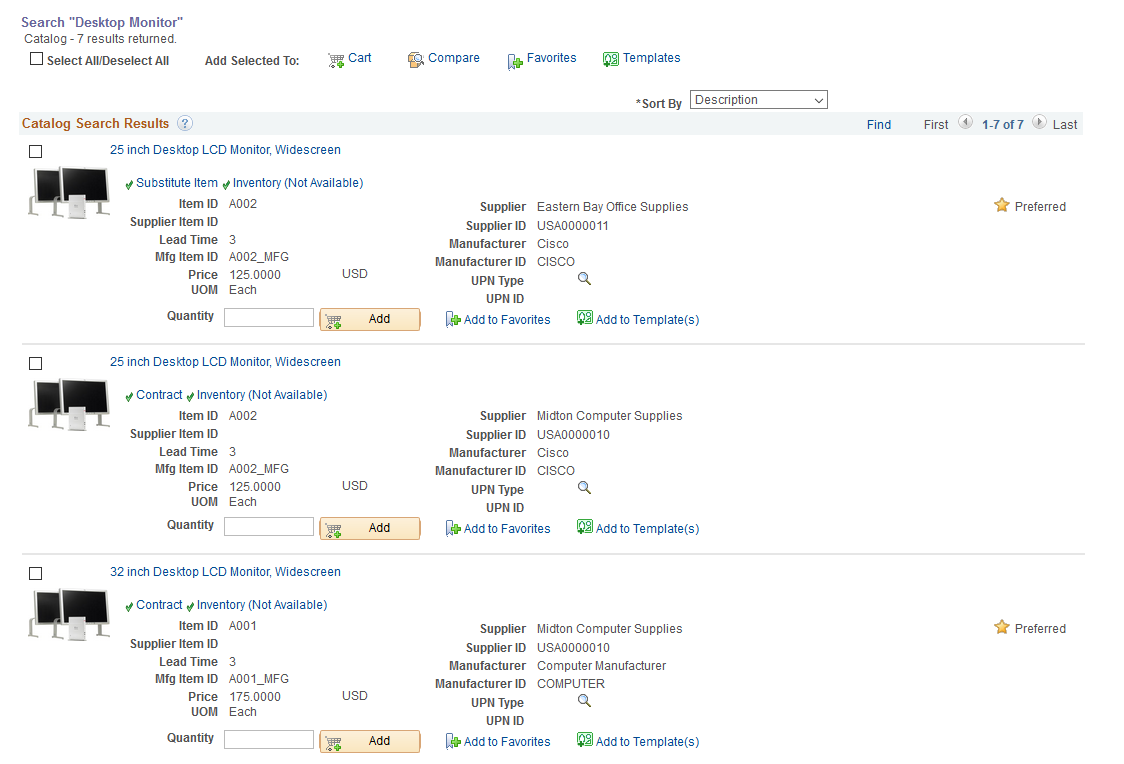
For example, consider the search result when search operator for the Description field is selected as Contains Any and search criteria is given as “Desktop, monitor”:
This example illustrates the fields and controls for Search result - Search framework search - Contains Any.

Next consider the search result when the search operator for the Description field is selected as Contains All and search criteria is given as “Desktop, monitor”:
This example illustrates the fields and controls for Search result - Search framework search - Contains All.
Next consider the search result for the following search field—search operator—search data:
Manufacturer – Contains Any – Bicycle
Supplier – Equal – BIKE SHOP
Note: Advanced search will not return transparent punchout items.
Note: Modal and Price Range fields are not available for a SQL search.
Search Results
The search results will appear after you enter search criteria and search using basic search, advanced search, or by browsing catalogs. It will appear in the workspace area. You can select only multiple items to add to the cart when the user has the ADD_MULTI_ITEMS role action enabled.
This example illustrates the fields and controls on the Search Results page. You can find definitions for the fields and controls later on this page.
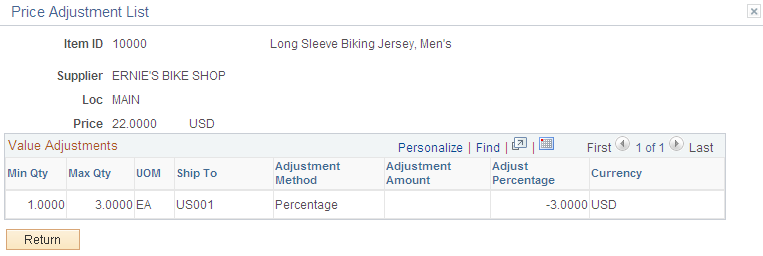
This example illustrates the fields and controls on the Price Adjustment List page.
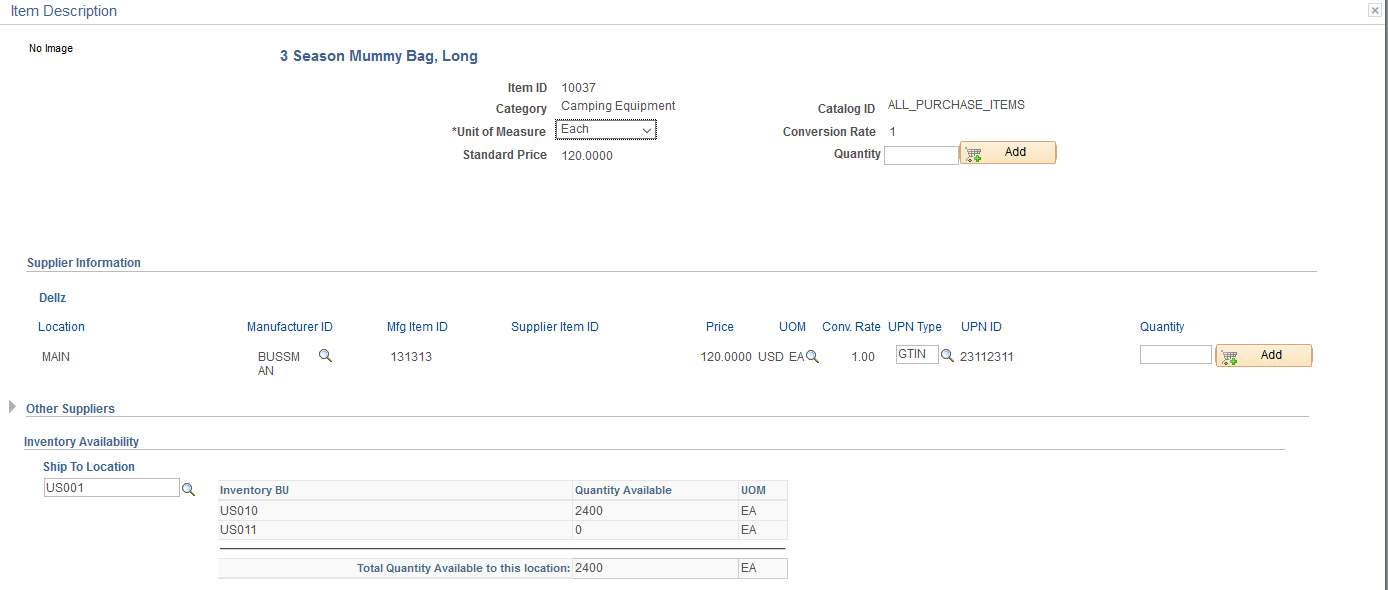
This example illustrates the fields and controls on the Item Description Page. You can find definitions for the fields and controls later on this page.
If Search framework search is selected as the preferred search type, then facets will be used to narrow the search results more precisely. When facets are used, locator links will appear. You can remove any unwanted facets by closing the appropriate locator link or you can return to the original search result.
If the search returns results from multiple sources, then the search result will appear in separate tabs for each source. In the search result, item images will appear if you selected that option in the My Preferences page or Customize Search Results page in eProcurement Installation Options.
This example illustrates the fields and controls on the Multi Image — Item Description. You can find definitions for the fields and controls later on this page.
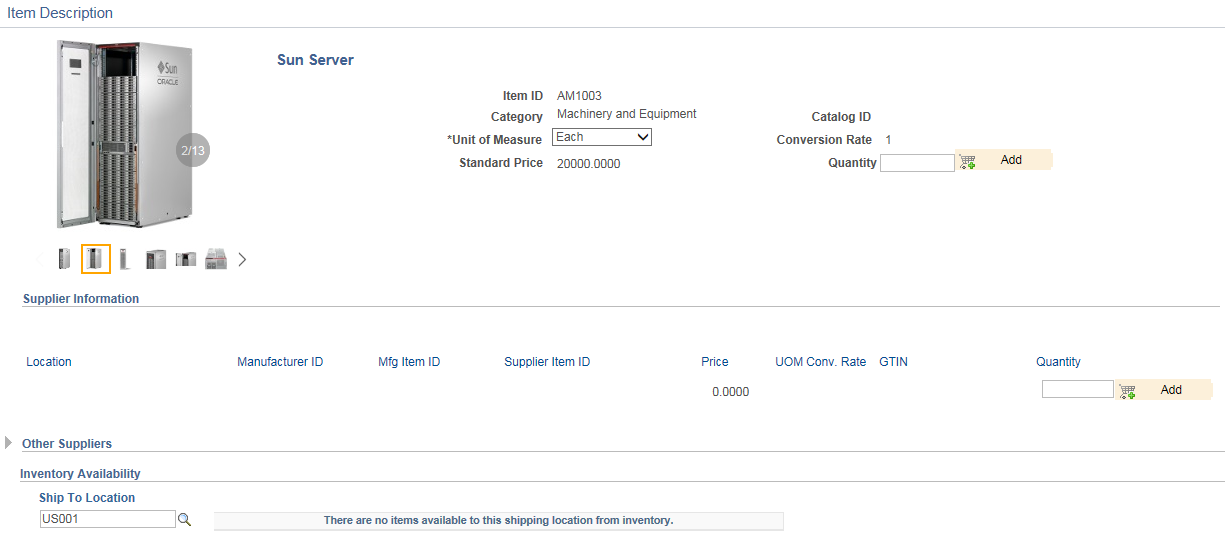
Note: On the eProcurement Installation Options page if the Multi Image check box is selected then multiple images for each item can be added and will be available for viewing on the Item Description page.
Field or Control |
Description |
|---|---|
Compare |
To compare items, select the check boxes to the left of the item descriptions and click this link. You can compare the item results with other items from the selected category that share the same attributes. The comparison result will appear in a pop-up window. This link is role action controlled. Note: You can compare up to five items at a time. You can compare items in Catalog, Favorites, and External sections. |
Sort By |
Select to sort the search results by Description, Manufacturer Name, Price, or Supplier Name. Note: Sort By option is applicable only for Search framework search and not for SQL search. |
UOM |
Displays unit of measure for the requisition. UOM prompt will display only item/supplier/location UOMs if VIEW_SUPPLIER_UOM role action is enabled and VIEW_ORDERING_UOM role action is disabled. |
Add |
Click to add items to the requisition along with the item quantities that you defined. The items with a defined quantity are added to the requisition. Once the item is added to the cart, the number of items in the cart appear as lines at the top. Also, a message Added to cart will appear next to the item. |
Quantity |
Enter the number of items to be added to the cart. |
|
Appears next to any row with a preferred supplier in the Supplier Name column. It is role action controlled. |
Add to Favorites |
Click to add selected items to the Favorite list. A message appears confirming that the item was added to the Favorites list. |
Add to Template(s) |
Click to add selected items to one or more templates. On clicking this link, the Add items to Templates modal window opens, where you can select the required template to add the item. You can also add a new template. |
Item Description |
Click the item name in the search result to access the Item Description page, where you can view details about the item. The information that appears on this page is dependent on the RESTRICT_INV role action. Items can also be added to the cart from the Item Description page. You can add items without a supplier from the Item Description page and add items for a specific supplier from the Create Requisition page. Supplier Attributes icons such as Green Supplier, Woman Owned Business, and Small Business appear as part of the supplier information. However this field is displayed only if the Consolidate Item Search Results and Facets Option check box is selected on the eProcurement Installation Options page. |
Inventory (Available) |
Click to view the inventory details for the particular item. This link is role controlled. When you hover over the link, the value for total quantity with standard UOM is shown. |
Inventory (Not Available) |
This link indicates that the item is inventory but has no quantity available. This link is role controlled. When you hover over the link, the value for total quantity is shown as zero. |
Contract |
Click to view the contracts available for the particular item. You can click any Contract ID to view the Contract Entry page. This link is role controlled. |
Price Breaks |
Click to view the price breaks for the particular item. All the fields on the Price Break List page are display only. This link is role controlled. |
Price Adjustments |
Click to view a list of the value adjustments available for the particular item. This list opens in a pop-up window. This page is display only. This link is role controlled. |
Substitution Item |
Click to view all the item substitutes available for the item. This link is role controlled. |
Marketplace Price and Availability |
Click this button to navigate to the supplier marketplace and retrieve the item price and availability information for the particular marketplace item. Note: This button is available only for marketplace items. |
Item Attributes |
View all the attributes defined for a particular item. |

See the product documentation for
PeopleTools: Search Technology
Understanding Financials and Supply Chain Search
Click to watch a short video about PeopleSoft eProcurement User Interface and Application Search .
Click to watch a short video about PeopleSoft eProcurement 9.2.
Use the Create Requisition — Catalog page (PV_REQ_CATBROWSE) to select and view catalog items.
Navigation:
This example illustrates the fields and controls on the Catalog page.
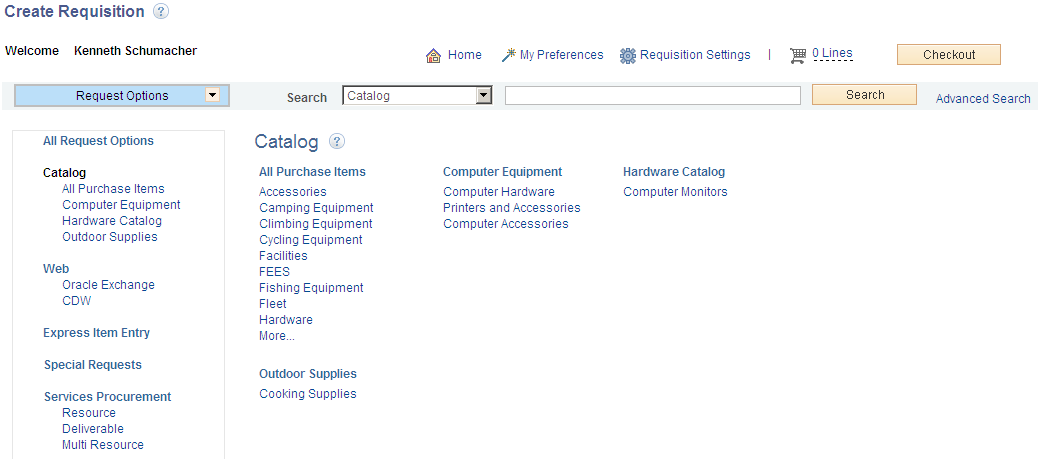
You can view the items available in different sections, such as Web and Forms, in the left navigation menu. The number of items shown is configurable at the installation level but a default of five items will be displayed. You can browse through all the menu item categories and the respective items in the workspace. Items displayed in the workspace are determined by catalog/user security settings. Click any category, such as Accessories, to view all the items that fall under that particular category. Facets are invoked when you browse the catalog items.
You can select the Substitute Items icon to display related substitute items.
Use the Create Requisition — Favorites page (PV_REQ_NEWFAVS) to select favorite items and item groups to include in requisitions.
Add items to your Favorites list and group favorite items into Favorite groups.
Navigation:
. Click the Favorites link
This example illustrates the fields and controls on the Favorites page. You can find definitions for the fields and controls later on this page.
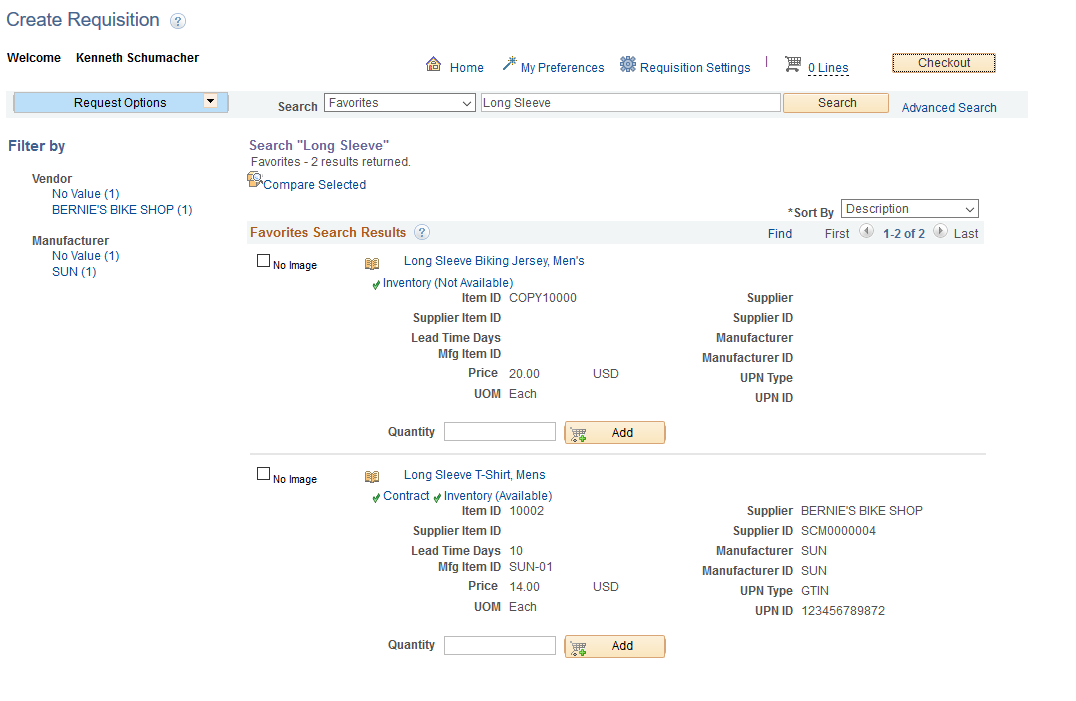
This page displays the most current favorite items and favorite groups defined.
The Favorites page has two functions:
You can add items to the requisition.
You can organize favorite items into favorite groups.
The Substitute Item link in the Favorites page when clicked will display all the substitute items related to the particular favorite item.
Favorites are frequently ordered items and groups of items that you can maintain in a single location. You can create a list of items that are frequently ordered, and you can organize them by creating favorites groups. You can use the list to add items to a requisition without searching the item catalog.
Ungrouped items are private, accessible only to you, and are stored under the Requester ID. The list can be built from items in PeopleSoft eProcurement or PeopleSoft Services Procurement.
Favorites groups can be shared with other roles and users, and they are stored by Requester ID. You create favorites groups by clicking the Manage Favorites Groups link. On clicking this link, the Manage Favorites Groups page opens in a modal window, where you can view or edit all available favorites groups or create a new group. You can also copy another requester's favorite group into your group.
To add a favorite item or groups of items to a requisition, select the check box to the left of the item or item group and click the Add button. You can update quantities when you access the Review and Submit page.
Status and Type Columns
Information about the Favorites includes the current item status and the type of item.
Field or Control |
Description |
|---|---|
|
Displays one of these statuses when you hover over the icon: Inactive: the item is active at the business unit level, the SetID level, or both levels. Unavailable: the user does not have access to the item. Supplier Item Inactive: the item is inactive for the supplier. If the item status is Active, the Status icon will not appear. |
 (Status)
The Type column displays to the left of the Description column and indicates where the item originated. Drag the cursor across the icon to see where the item originated. To view more information about an item, click the Item Description link.
Field or Control |
Description |
|---|---|
|
Item is from the PeopleSoft item tables. |
|
Item is of special request type. |
|
Item is an express form. |
|
Item is a direct connect item using Punchout or Transparent Punchout. For a Punchout item, click this icon to be transferred to the supplier's website in edit mode. On the supplier's website you can inspect the item and change the quantity. After you check out from the supplier's website, the item is added to the requisition with the latest price and item description. To access the supplier website, the Supplier Properties page must have the ALLOW_EDIT and ALLOW_VIEW properties for the supplier. |
|
Item is a direct connect item using Roundtrip. The item price and description are validated in the background against the supplier's online catalog. To validate and update the item, the supplier catalog must support the validate function. |
Substitute Item |
Select to display all the substitute items related to the particular favorite item. |
 (Catalog Item)
 (Special Request)
 (Express Form)
 (Web Supplier Update)
 (Web Supplier)
Adding Items to a Favorites List
You can add items to a favorites list during requisition entry by using the Search field at the top of the page or the Review and Submit page. After your search:
Select one or more items using the check box to the left of the item description.
Click the Add to Favorites link.
A message appears confirming that the items were added to the favorites list.
Adding Items to Favorites Groups
To add items to a favorite group, the items must be in your favorites list.
Select the items from your favorites list.
Click the Add to Favorites Group(s)link.
Select a favorite group or enter the group name and description to create a new favorite group.
Click the OK button.
Note: When an item is added to a favorites group, it no longer appears as an ungrouped item.
Deleting Items from a Favorites List
You can delete favorite items by using the Favorites page. To delete a favorite item, select it and then click the Delete from Favorites link. To delete a favorites group, click the Manage Favorites Groups link.
Using Direct Connect Items on a Favorites List
To add direct connect items to a favorites list:
Place direct connect items on an eProcurement requisition.
On the Review and Submit page, select the direct connect item and click the Add to Favorites button.
Note: Direct connect items cannot be added to the favorites list unless this feature has been enabled on the eProcurement Installation Options page.
To use a direct connect item that was saved as a favorite:
When creating a new requisition, go to the Favorites page and select the desired direct connect item. Use the Type column to identify a direct connect item by dragging the cursor across the icon.
Click the item description of the direct connect item or the Add button:
(Punchout items only) If the Web Supplier Update icon type appears for the direct connect item, then you are transferred to the supplier's website in edit mode. On the supplier's website, you can inspect the item and change the quantity. After you check out from the supplier's website, the item is added to the requisition with the latest price and item description. To access the supplier website, the Supplier Properties page must have the ALLOW_EDIT and ALLOW_VIEW properties for the supplier.
(Roundtrip items only) If the Web Supplier icon appears for the direct connect item, then the item price and description are validated in the background against the supplier's online catalog. To validate and update the item, the supplier catalog must support the validate function.
For all other direct connect items and suppliers without the edit, view, or validate properties, click the Add button on the Favorites page to add the item to the requisition without verification from the supplier that the item information is current. Click the item description on the Favorites page to display the catalog description.
Once you have completed your requisition, access the Review and Submit page and click the Save button. The requisition is now saved and, in addition, any new information obtained from the supplier's website, such as a price change, is used to update the direct connect item in the Favorites list.
Keep in mind the following points when working with direct connect favorite items:
Direct connect items from multiple suppliers cannot be added to a requisition in one step. If you select multiple items from the Favorites list and add them all at one time by clicking the Add button at the bottom of the Favorites page, then the system can only validate the items if you have selected Punchout items using the same supplier. You are taken to the supplier's website to view and edit all of the selected items.
Direct connect items and Services Procurement items cannot be added to a requisition in one step.
Non-direct connect items can be part of the items to be added, along with direct connect items and Services Procurement items.
If multiple suppliers or non-Punchout direct connect items exist, then the item data is not verified against the supplier's website.
If you need to add direct connect items from multiple suppliers to one requisition, you should add each favorite item individually.
Use the Create Requisition — Templates page (PV_REQ_NEWTEMPL) to use template items to create requisitions.
Create new templates and add items to existing templates.
Navigation:
This example illustrates the fields and controls on the Templates page.
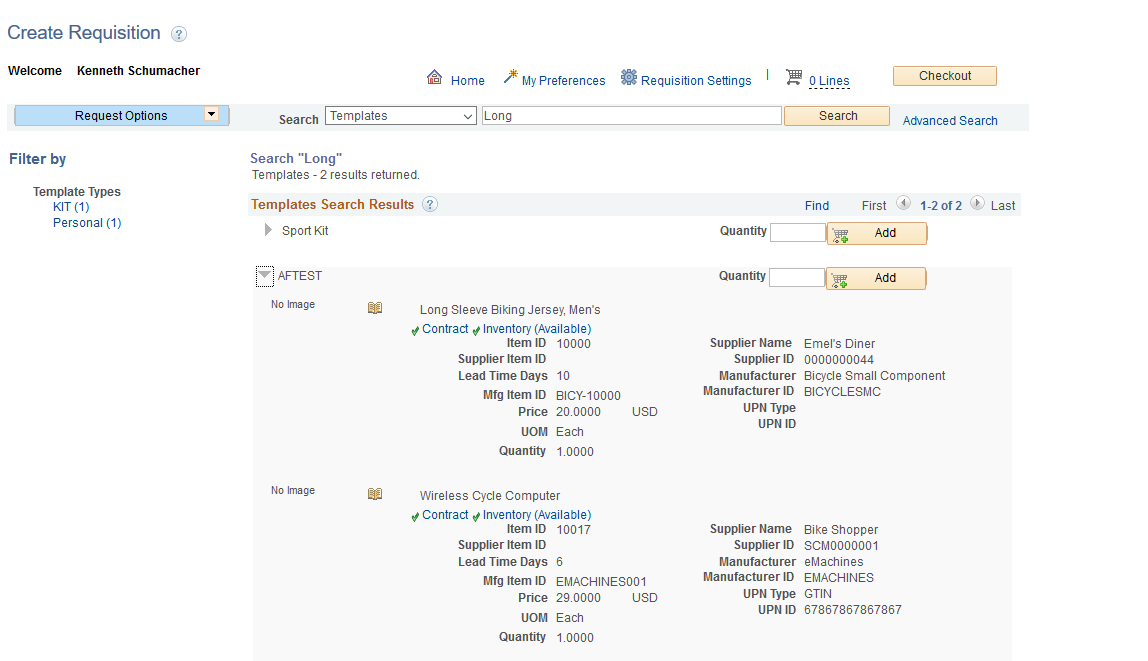
Click the Expand Section button to view items that belong to the template.
Purchasing kits and templates are included in this list. Purchasing kits display the item, quantity, and UOM. Templates display the same information as search results and favorites. It can be customized using the customize search results option.
Use the Quantity field to enter the number of sets that you want.
Click the Add button to add all items in the template to the requisition.
The user can select the Substitute Item icon to display all the substitute items related to the template item.
Create or Add Item to Personal Template
To create or add items to a personal template:
Access the Review and Submit page.
Select the items that you want to add to an existing template or a new template.
Click the Add to Template(s) button.
Select a template or enter the template name and description to create a new template.
Click the OK button.
You can also add items to templates from the Search Results page.
You can view and add personal templates by clicking the Manage Personal Templates link on the Templates page. On clicking this link a modal window opens, where you can view the details of the available templates and add new templates. You can also copy another user’s personal template.
Note: Personal templates can be deleted only from the Manage Personal Templates page.
Using Direct Connect Items on a Personal Template
To add direct connect items to a personal template:
Access the Favorites page or the Checkout — Review and Submit page.
Select the direct connect items that you want to add to an existing template or a new template. For one template, all direct connect items must come from the same supplier. You can mix direct connect items with non-direct connect items; however, you cannot add Service Procurement items into the same personal template with direct connect items.
Click the Add to Template(s) button.
Select a template or enter the template name and description to create a new template.
Click the OK button.
Note: Direct connect items cannot be added to a template unless this feature has been enabled on the eProcurement Installation Options page.
To use a direct connect item that has been saved in a template:
When creating a new requisition, go to the Templates page, find the template, and enter the quantity desired.
Click the Add button:
(Punchout items only) If the Supplier Properties page has the ALLOW_EDIT and ALLOW_VIEW properties for the supplier, you are transferred to the shopping cart of the supplier's website. You can use the shopping cart to review the Punchout items from your template and change the quantities. After you check out from the supplier's website, you are returned to PeopleSoft eProcurement, and the Punchout items are added to the requisition with the latest price and item description.
(Roundtrip items only) If the supplier catalog supports the validate function, the price and description of the Roundtrip items are validated in the background against the supplier's online catalog.
For all other direct connect items and suppliers without the edit, view, or validate properties, the direct connect items on your template are added to the requisition without verification from the supplier that the item information is current.
Once you have completed your requisition, access the Review and Submit page and click the Save button. The requisition is now saved and, in addition, any new information obtained from the supplier's website, such as a price change, is used to update the direct connect item on the template.
Use the Create Requisition — Forms page (PV_EXP_FORMS) to select forms to include in requisitions.
Navigation:
This example illustrates the fields and controls on the Forms Page.
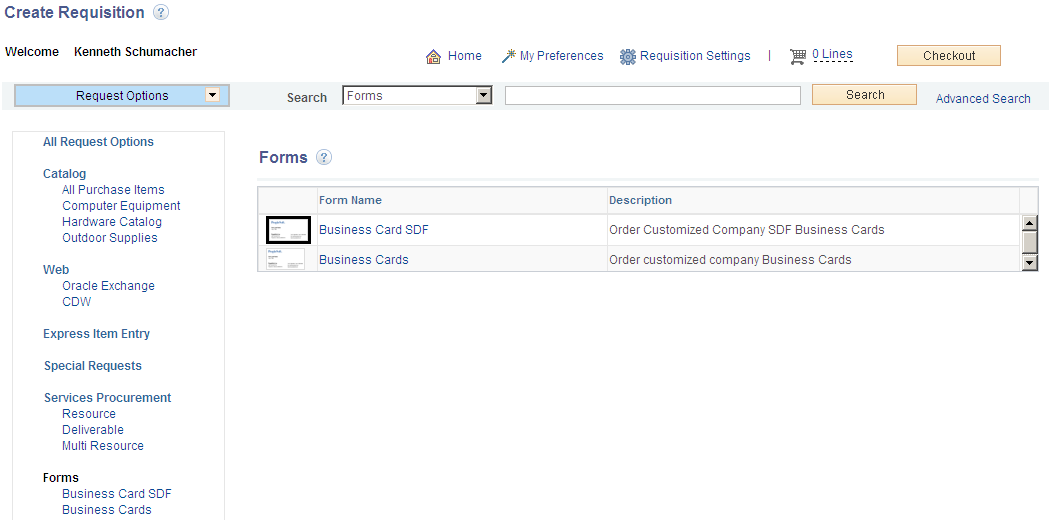
You can access Forms from the left navigation menu or from the workspace. By default, five forms will be shown. You can click any of the available forms to view the complete form detail. If required, you can add it to the cart.
Use the Create Requisition — Web page (PV_REQ_MERCHANTS) to select Punchout or Roundtrip direct connect suppliers for requisitions.
Navigation:
This example illustrates the fields and controls on the Web page.
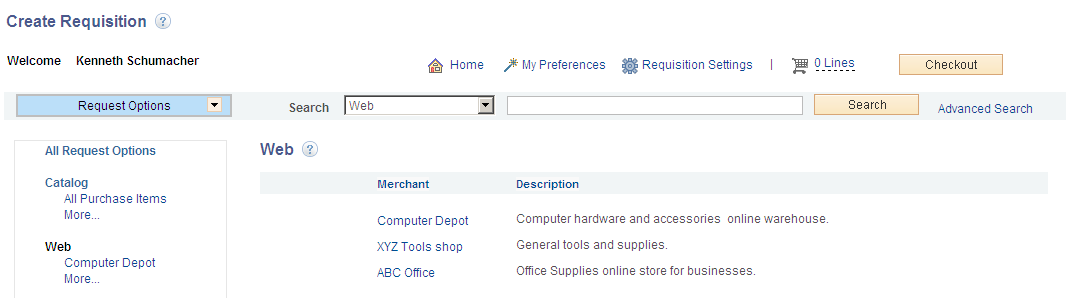
Use this page to select a direct connect supplier that can be added to this requisition. This page uses the direct connect methods of Punchout and Roundtrip.
Use the Create Requisition — Special Requests page (PV_REQ_SPECIAL_REQ) to add special requests to requisitions.
Navigation:
This example illustrates the fields and controls on the Special Request page.
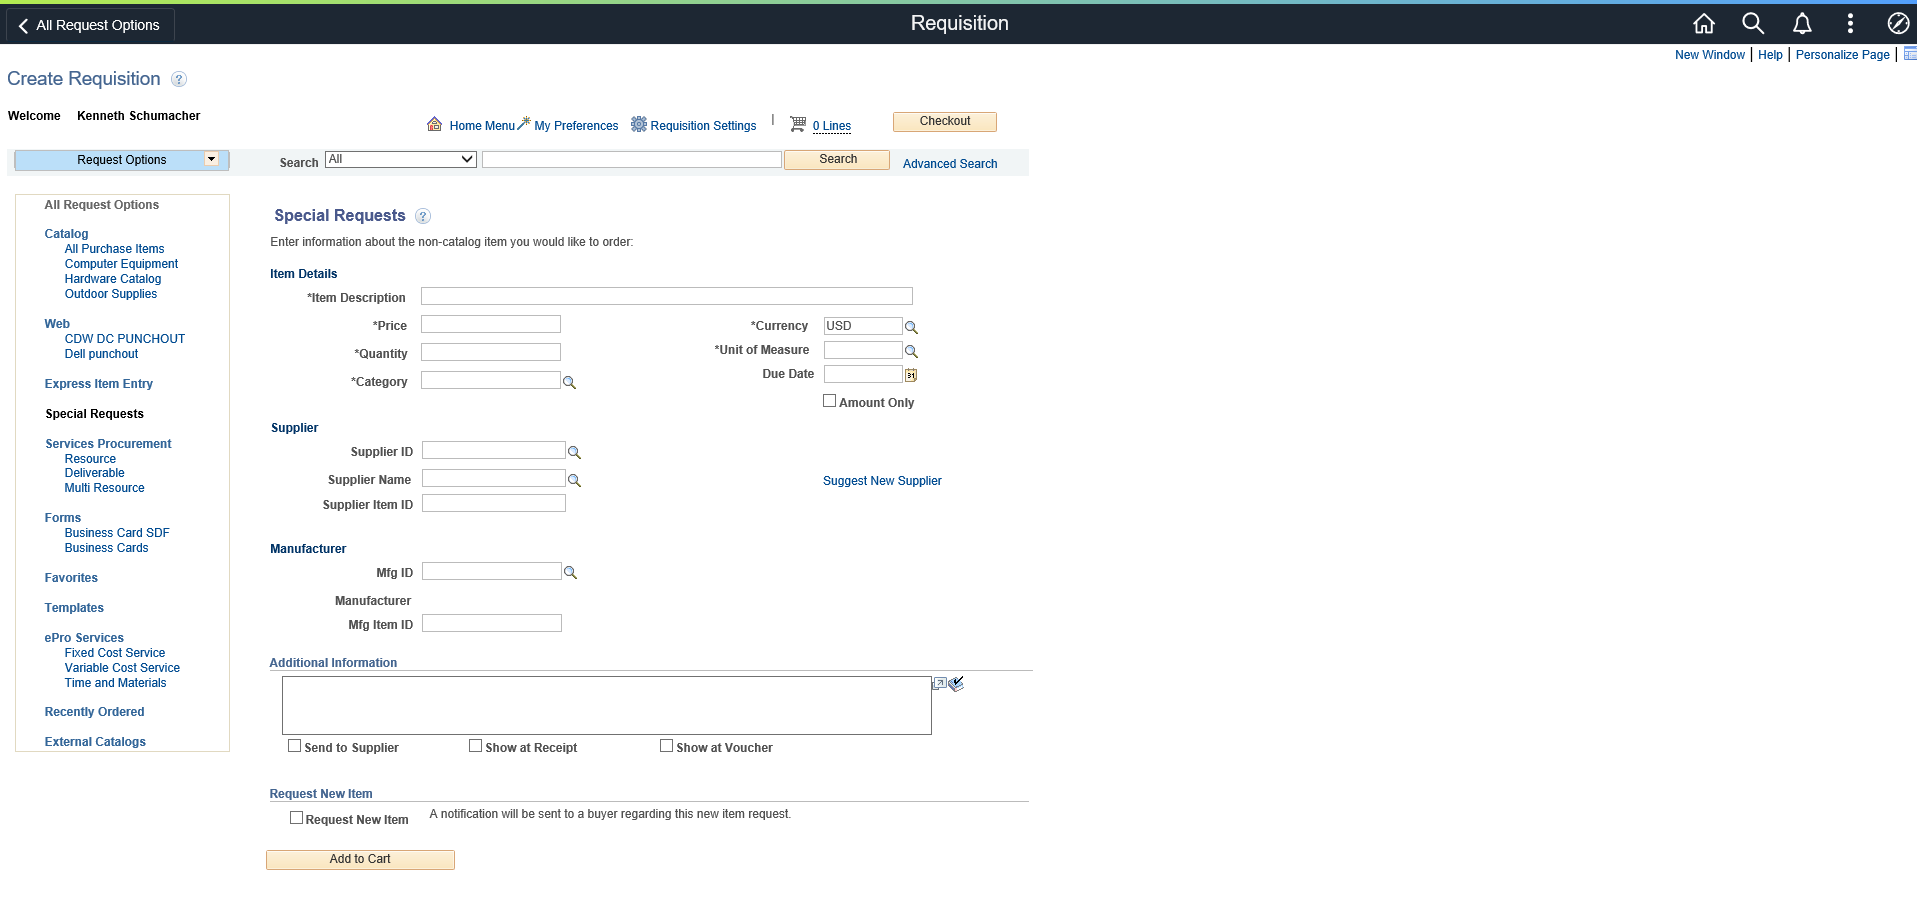
Use the Special Request page to create requisitions for items or goods that are not included in the standard catalog of items in PeopleSoft eProcurement and have no item ID. This special request can be for goods or services.
Use the Create Requisition - eProcurement Services page (PV_REQ_SERVICES) to include services in requisitions.
This page is used for Service Procurement only.
Navigation:
This example illustrates the fields and controls on the eProcurement Services page.

You can click any of the eProcurement services listed in the eProcurement Services page to view that particular service page. You can enter all the required information and add it to the cart.
Use the Create Requisition - Services Procurement page (SP_REQ_BROWSE) to add service requests to requisition.
Navigation:
This example illustrates the fields and controls on the Services Procurement page.

You can access Services Procurement from the left navigation menu or from the workspace. Service requests are divided into three groups. They are Resource, Deliverable, and Multi Resource. Only if Service Procurement is installed are service requests available.
Use the Create Requisition - Express Item Entry page (PV_EXPRESS_REQ) to enter details for express items.
Navigation:
This example illustrates the fields and controls on the Express Item Entry page. You can find definitions for the fields and controls later on this page.
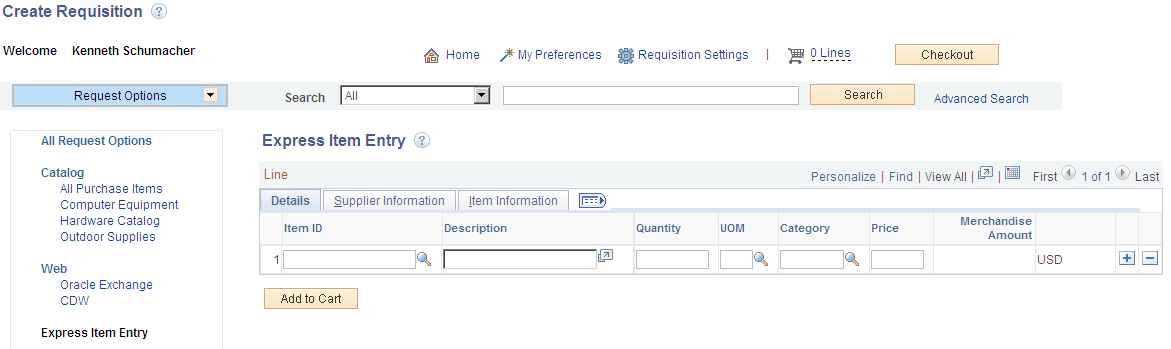
You can enter item details and add this page to the cart. However, the item details entered are not retained the next time you access this page. You will see a blank form again.
Item Information
Click on the Item Information Tab to view or update item details.
Field or Control |
Description |
|---|---|
Supplier Item ID |
Enter the item ID used by the supplier for this item. |
Supplier's Catalog |
Enter the item ID used by the supplier for this item. |
Manufacturer ID |
Enter the item ID that the supplier uses for this item. |
Manufacturer's Item ID |
Enter the manufacturer's item ID that the supplier uses for this item. |
UPN Type |
Select applicable UPN Type Code. |
UPN ID |
Select applicable universal product number that is defined by a unique combination of item ID, manufacturer ID, manufacturer item ID, and Unit of Measure. On selecting the UPN ID, the item line information associated with the selected UPN ID will be populated. For inventory items, if you have set up the information in the Item Manufacturer UPN table, this information appears by default into the contract. If you order by UPN ID, the item ID and related information is copied to the purchase order or requisition line. The system verifies that the UPN ID is valid for inventory items and matches what is set up in the Item Manufacturer UPN table. When the Inventory Item ID has been left blank, an attempt will be made to retrieve the Inventory Item (from the Item Manufacturer UPN table) based on the UPN ID entered. UPN ID is the only value required for looking up the item in the Item Manufacturer UPN table. If a match with the Item Manufacturer UPN Table has been found, all of the fields associated with the UPN ID (Item ID, UPN Type, Mfg ID, Mfg Item, and UOM) will be defaulted onto the transaction line along with other Item attributes required for the requisition like Item description, Price, Supplier etc. No confirmation message will be displayed. Note: For description only items (ad hoc items), you do not have the option to select UPN Type and UPN ID from the prompt. UPN ID and UPN Type values will default from the contract. |
Use the Create Requisition - Recently Ordered page (PV_REQ_RECENT_ORD) to view recently ordered and approved items.
Navigation:
This example illustrates the fields and controls on the Recently Ordered page.
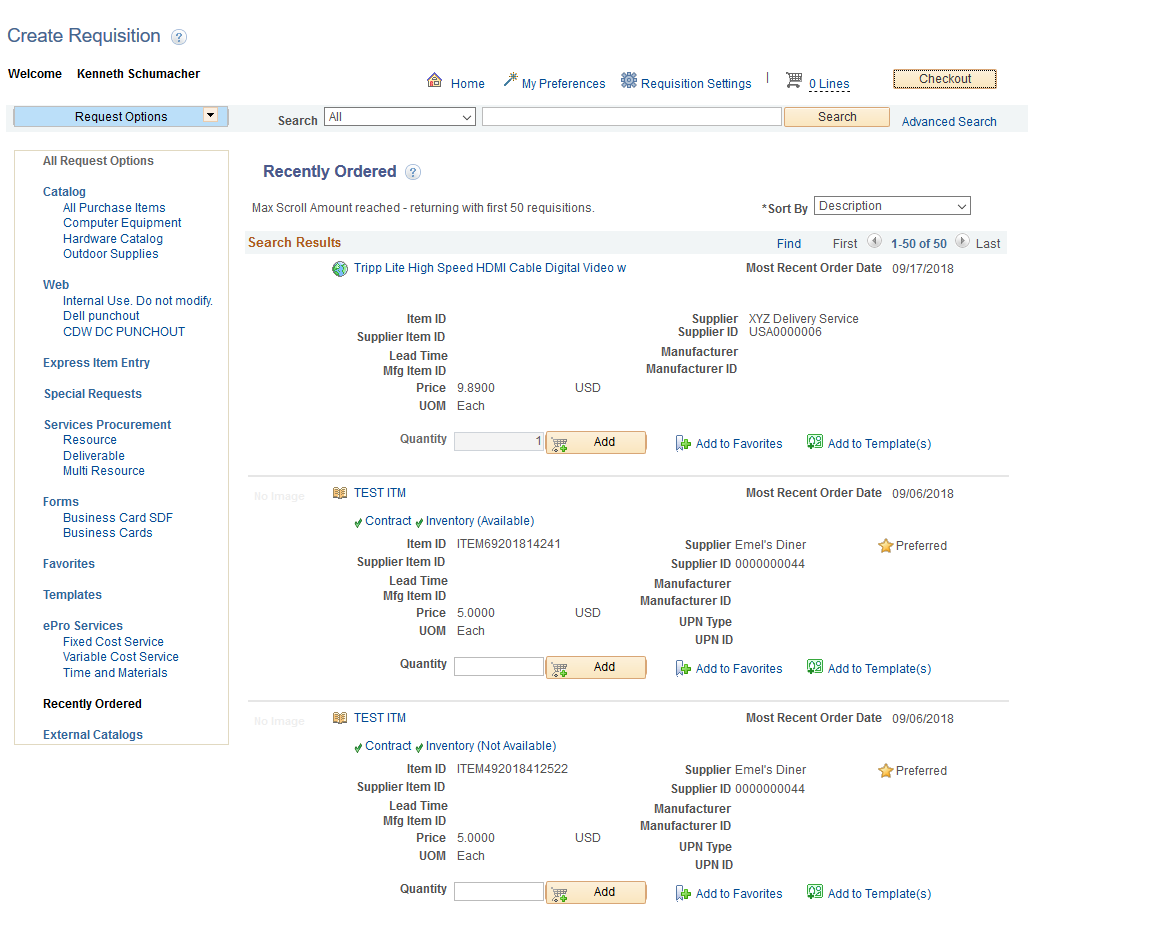
Items displayed on this page are retrieved based on the last modified date. The number of items displayed on this page is based on the settings in the eProcurement Installation Options page.
Use the Create Requisition - External Catalogs page (PV_REQ_TPOMERCH ) to view all available Transparent Punchout suppliers.
For information on supplier setup, see Maintaining Supplier Integration.
Navigation:
This example illustrates the fields and controls on the External Catalogs page.
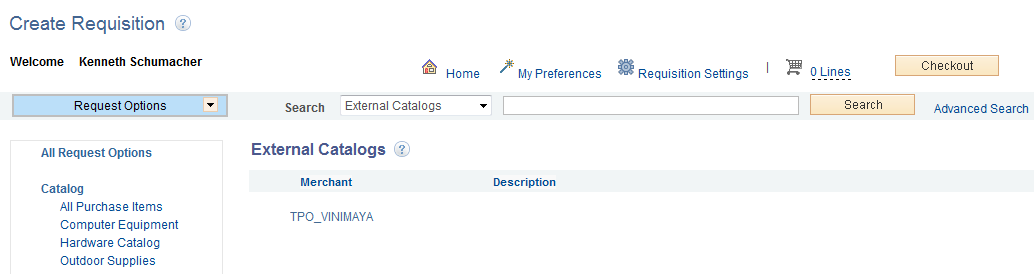
On this page, you can view a list of all available suppliers. When you click any supplier, you can view all the items belonging to the supplier. You can select any required item and add it to the cart.
Note: This page will not be available if the Consolidate Item Search Results and Facets Option check box is selected on the eProcurement Installation Options page.
When the Consolidate Item Search Results and Facets Option check box is selected both internal and external catalog items are combined under the request option Catalog.
This example illustrates the fields and controls on the Create Requisition — Catalog search result page.

Supplier attribute icons such as Green Supplier, Woman Owned Business, and Small Business for external and internal items are displayed in the search result. A maximum of five attribute icons will be shown to the user. Hover over the icons to see the attribute name. If there are more than five attributes then a more... link will be displayed. On clicking this link a popup window opens displaying up to 20 attributes along with the respective icons. A new facet called Supplier Attribute is created so that you can narrow down your search result based on this. The supplier attribute icons and item images are available only when creating a new requisition. During a search, items without suppliers are placed in No Value supplier attribute category.
Note: Supplier attributes and icons are not available if the Consolidate Item Search Results and Facets Option check box is not selected on the eProcurement Installation Options page.