Using Mobile Technician
This topic discusses how to use the Mobile Technician fluid user interface to complete work order tasks.
|
Page Name |
Definition Name |
Usage |
|---|---|---|
|
- |
Access the different mobile technician fluid pages, such as My Tasks, Quick Work Order, Notices, My inspections, and so forth. |
|
|
WM_MBL_NOTICE_FL |
View notices and announcements to the technicians. |
|
|
WM_WOE_WB_FL |
Select, search, and update work order tasks. |
|
|
WM_TSK_SRCH_SCF |
Perform ad-hoc searches, and save and delete views. |
|
|
WM_TIME_ENTRY_FL |
Log work order task and personal hours. |
|
|
WM_TE_MASS_UPD_SCF |
Complete the hours fields for selected tasks on the Weekly Time Entry page en mass. |
|
|
WM_TIME_DTL_SCF |
Add work order task details. |
|
|
WM_TIME_QFILL_SCF |
Add work order tasks or personal (non-work order time) to the Weekly Time Entry. |
|
|
WM_TSK_DETAIL_FL |
View the task and asset details, and change the task status. |
|
|
WM_WO_STATUS_FL |
Quickly complete the task and enter the total hours you spent on the task. |
|
|
WM_WO_TIME_FL |
Enter the total weekly labor time for the specific work order task. You can enter the time worked for each day of a specified time reporting period. |
|
|
WM_WOE_CKLST_FL |
View the checklists associated with the task and mark steps as complete |
|
|
WM_WOE_INST_FL |
View any instructions added for the task. |
|
|
WM_TSK_MATL_FL |
View and edit inventory and purchase/on-hand items that are scheduled for the task. You can also add materials, generate a pick plan, and issue inventory parts to the work order task. |
|
|
WM_TSK_INV_ISS_FL |
View inventory parts available for issuing. You can also edit item quantity and the Process and Pick Line Complete options. |
|
|
WM_TSK_SRVC_FL |
View information about any procured services scheduled for the task. |
|
|
WM_WOE_METER_FL |
Enter the meter readings and view the meter readings history for the asset for which the work order task is performed. |
|
|
WM_WO_PCR_FL |
lassify the issue that caused the task by entering the predefined problem group, problem, cause, and resolution (PCR) codes for a selected work order task. |
|
|
WM_WO_DOWNTIME_FL |
View modify, and add downtime for an asset associated with a work order task. |
|
|
WM_TLS_USAGE_FL |
Enter the usage of checked-out tools for the work order tasks. |
|
|
WM_TSK_NOTES_FL |
Review the existing task notes associated with the work order task and add new notes. |
|
|
WM_WOE_ATTACH_FL |
View, add, and delete attachments associated with the work order task. |
|
|
WM_WO_SEARCH_FL |
View or update work orders or create basic work orders quickly. |
|
|
WM_TASK_DTL_FL |
View or modify the details of the work order. |
|
|
WM_QWO_FILTER_SCF |
Search for a particular work order by entering the required search criteria. |
|
|
WM_WO_ADD_FL |
Create a new work order. |
|
|
WM_WO_INSP_LIST_FL |
View the list of inspections assigned to the technician. |
|
|
PTPG_NUI_VWR |
View the scheduled work order tasks to be completed by a specific date. |
|
|
PTPG_NUI_VWR |
View tasks to be completed according to their priority. |
|
|
PTPG_NUI_VWR |
View the total hours the technician entered for each week. |
|
|
WM_ASSET_SRCH_SCF |
Search for assets to associate with the work order. |
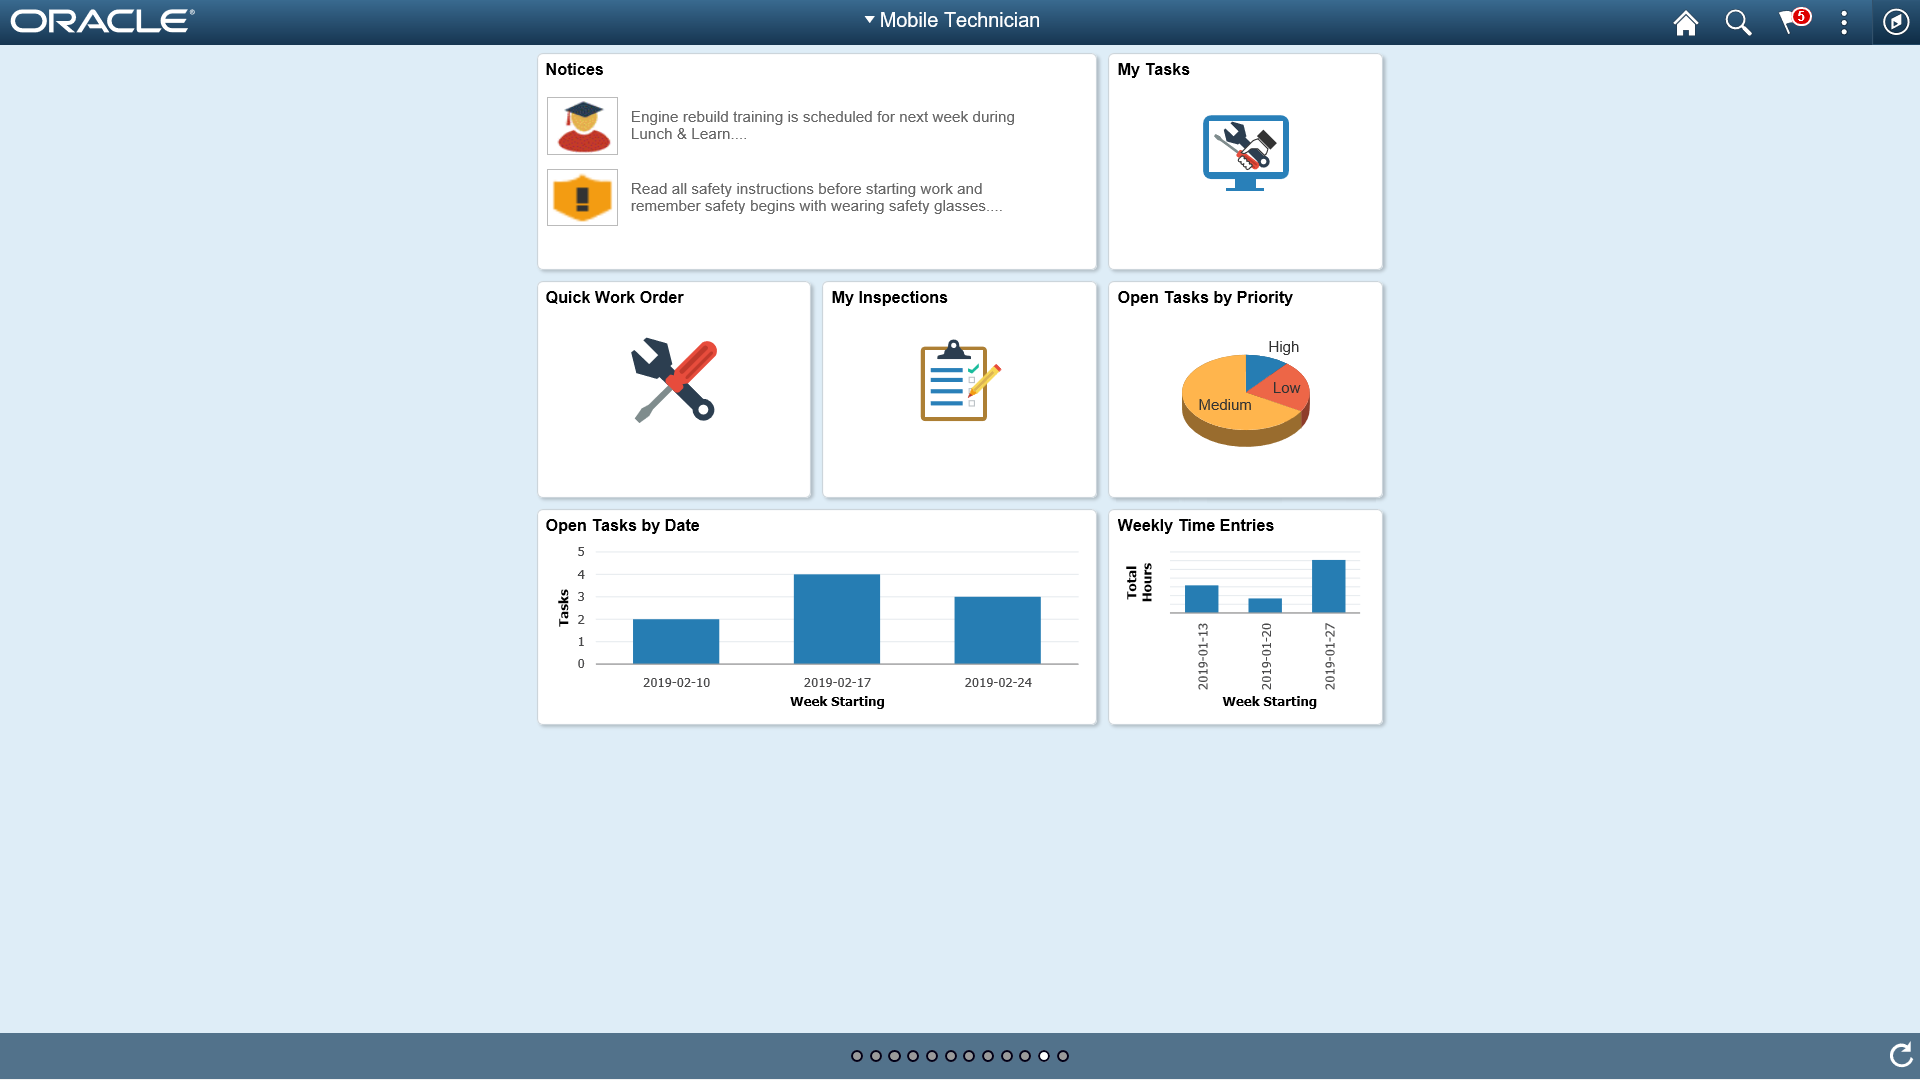
Use the Mobile Technician page to access to different pages such as My Tasks, Quick Work Order, Notices, My inspections, Open Tasks by Priority, Open Tasks, My Service Requests, and Scan Asset to complete the work order tasks assigned to them.
Navigation:
This example illustrates the fields and controls on the Mobile Technician Home page.
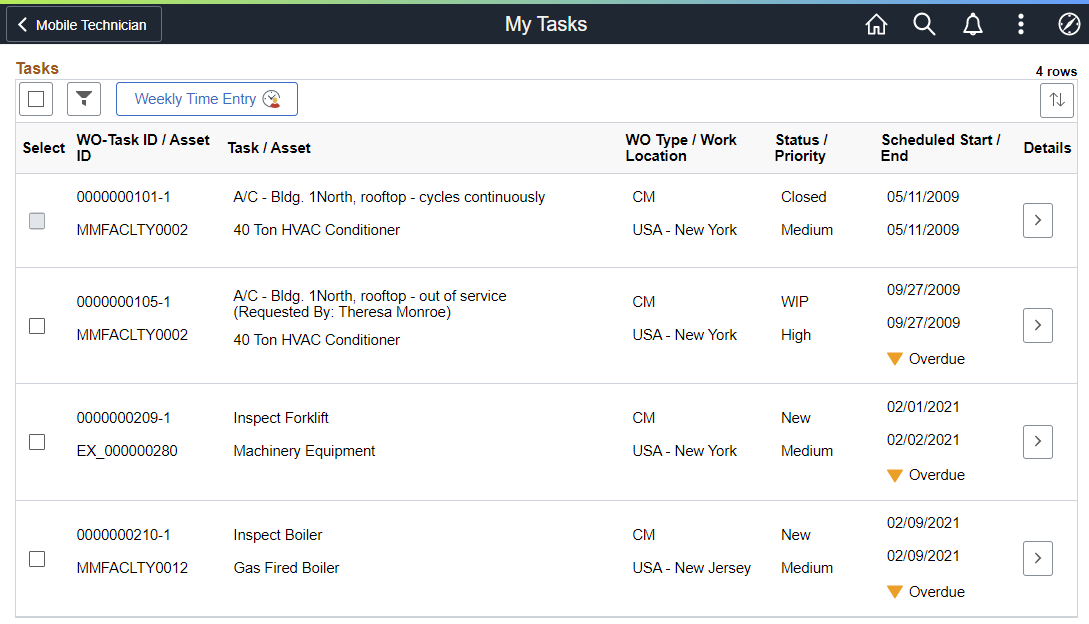
Use the My Tasks page (WM_WOE_WB_FL) to select, search, and update the assigned work order tasks and perform specific activities to complete each task.
Navigation:
The My Tasks page lists the tasks in stacked layout. Each row contains only one subset of the work order. Only one task can be selected and updated at a time. Select each row to view or update the task and asset details.
Navigation:
Select the My Tasks tile on the Mobile Technician Home page.
This example illustrates the fields and controls on the My Tasks Page. You can find definitions for the fields and controls later on this page.
Field or Control |
Description |
|---|---|
|
|
Select to add a check mark next to all tasks. This check box works with the Weekly Time Entry button. Closed or Canceled tasks can not be selected. |
|
|
Select to remove all check marks. |
|
Select to access the Task Filter page to perform ad-hoc views (searches), and save and delete views. |
|
Weekly Time Entry |
Select to access the Weekly Time Entry Page and log work order task hours. All selected rows are transferred to the Weekly Time Entry page. This button works together with the Select All check box. |
|
Select to view the column sort options. The sort options listed are based on the column headers displayed in the Tasks grid. By default, the tasks are sorted by Start Date in ascending order. |
|
Indicates that the scheduled date is lesser than the current date. |
|
|
Select More to access the My Tasks - Task Details Page and view task and asset details. |


 (Details/More icon)
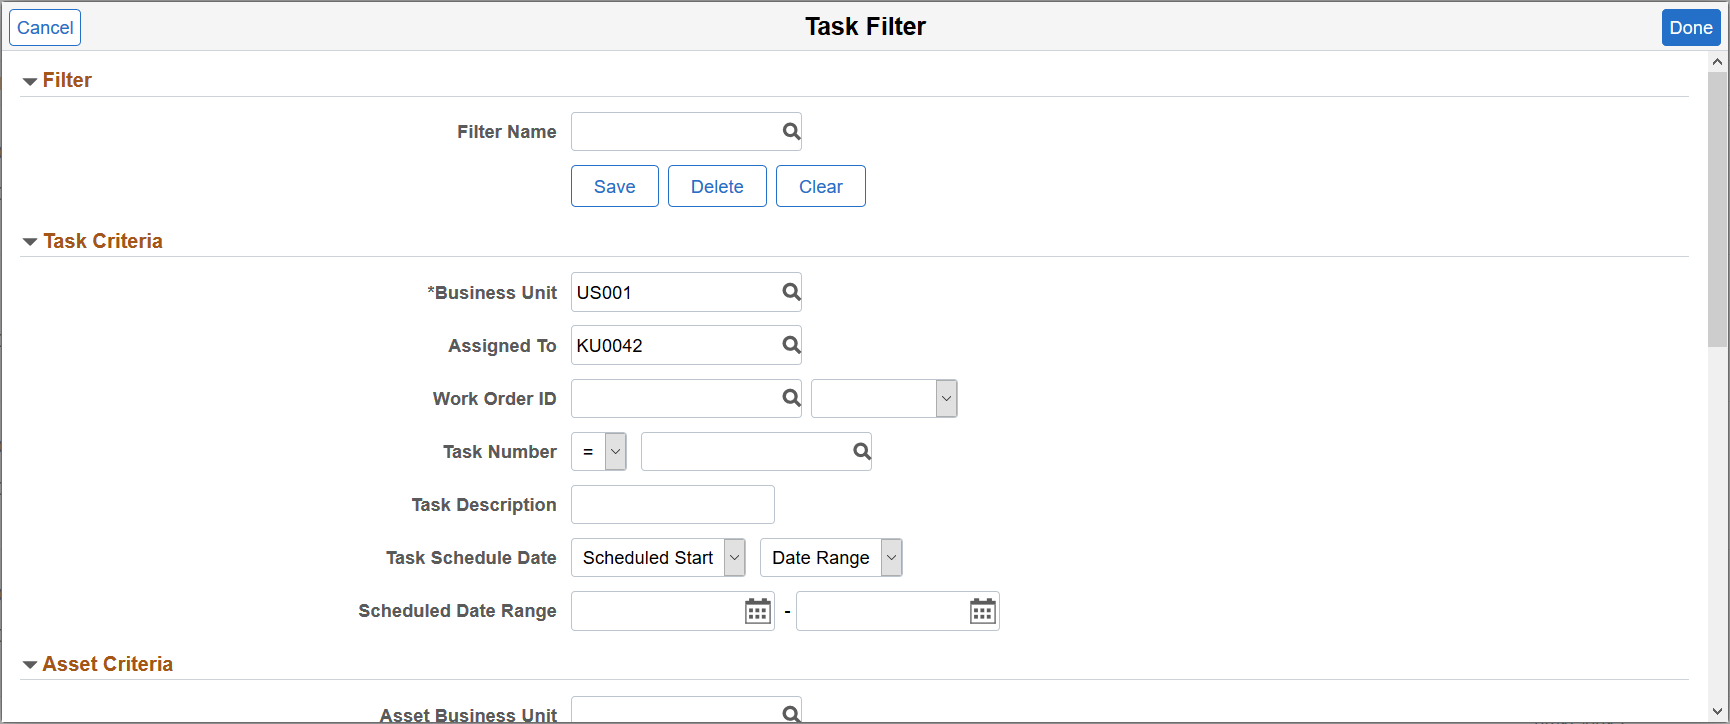
Use the My Tasks - Task Filter page (WM_TSK_SRCH_SCF) to perform ad-hoc views (searches), and save and delete views.
Navigation:
This example illustrates the fields and controls on the My Tasks - Task Filter Page. You can find definitions for the fields and controls later on this page.
Field or Control |
Description |
|---|---|
Save |
Enter search criteria and click this button to save it for reuse. |
Delete |
Click to delete the current saved view. |
Clear |
Click to clear any existing search criteria from the page. |
Done |
Click to search for work order tasks based on the search criteria like filter name, task criteria, asset criteria etc. that you enter on the page. |
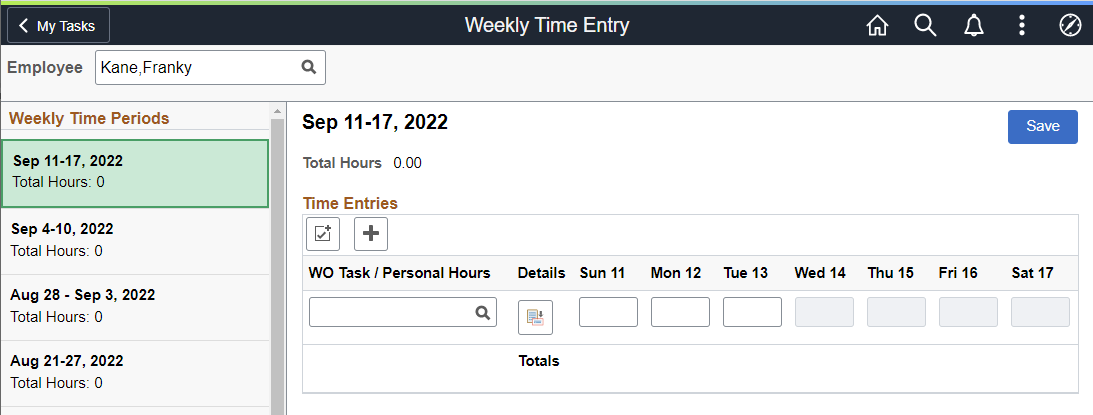
Use the Weekly Time Entry page (WM_TIME_ENTRY_FL) to log work order task and personal hours.
Navigation:
This example illustrates the fields and controls on the Weekly Time Entry page. You can find definitions for the fields and controls later on this page.
This example illustrates the fields and controls on the Weekly Time Entry page after selecting the Update Selected Rows button. You can find definitions for the fields and controls later on this page.
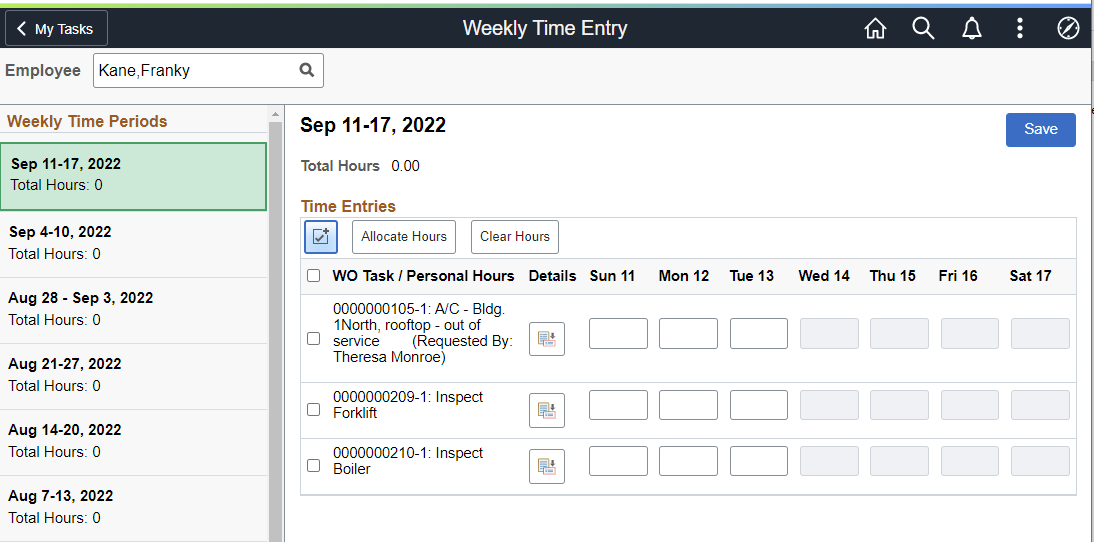
The Weekly Time Entry page provides a Fluid user interface for logging work order task and personal hours. The Weekly Time Periods panel displays the current week, as well as the past 11 time periods. Select past or present time periods to view or update the entries.
The right side of the page displays the selected weekly period and the fields necessary to log work order task or personal hours. Future date fields are disabled.
PeopleSoft recommends that you log work order task hours using only the My Task time entry pages-Weekly Time Entry, Time Entry Hours, or Quick Complete. However, if you do log work order hours in either of the following locations, this page displays those entries here as well:
Classic Technician Workbench
Classic Work Order Completion
Unlike classic time entry using the Technician Workbench, Weekly Time Entry does not require you to submit time for posting. When you save changes to the page, time entries are saved to the MM Schedule Labor table and the Expenses staging table. You can update time entries as often as necessary, and the updates are immediately available to the Cost Collection process.
|
Field or Control |
Description |
|---|---|
|
Employee |
Select the employee for which you want to log work order task hours. |
|
|
Select to display the Select all rows check box, and the Allocate Hours and Clear Hours buttons. |
|
|
Select to add new work order tasks or personal non-work-order time to the Weekly Time Entry. When you add a work order row, a prompt displays that allows you to access the WO Task/Personal Hours Page, where you can specify the work order tasks or personal time codes you want to add. |
|
Allocate Hours |
Select to access the Weekly Time Entry - Allocate Hours Page. Note: Select the Update Selected Rows button to activate this button. |
|
Clear Hours |
Select to clear work order rows. Only rows that have their check box selected are cleared. Note: You must use the Update Selected Rows button to enable check boxes for the work order rows. |
|
Source |
Displays the time entry source. For example, whether you logged time entry task hours using Classic Technician Workbench, Weekly Time Entry, and so forth. This column is only visible when time entry task hours are entered outside of My Tasks (that is, when hours are logged using Classic Technician Workbench or Classic Work Order Completion). |
|
|
Select to access the Work Order Details page and add resource line, craft, and comment details to the task. |
|
Time Entries (Date fields) |
Enter work order task hours for each day of the week, for a given date. Future date fields are disabled. |
|
Totals |
Displays total daily task hours for the work order after hours are entered. |
|
Save |
Select to save changes to the work order time entries. |
 (Update Selected Rows)
 (Add Time Line)
 (Details)
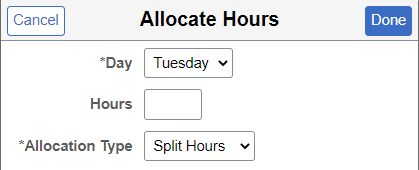
Use the Allocate Hours page (WM_TE_MASS_UPD_SCF) to complete the hours fields for selected tasks on the Weekly Time Entry page en mass.
Navigation:
. Select the Update Selected Rows button, select multiple rows, then select the Allocate Hours button.
This example illustrates the fields and controls when selecting the Allocate Hours button. You can find definitions for the fields and controls later on this page.
|
Field or Control |
Description |
|---|---|
|
Day |
The system defaults to the current day of the week. You can change the day if needed. |
|
Allocation Type |
Select one of these options:
|
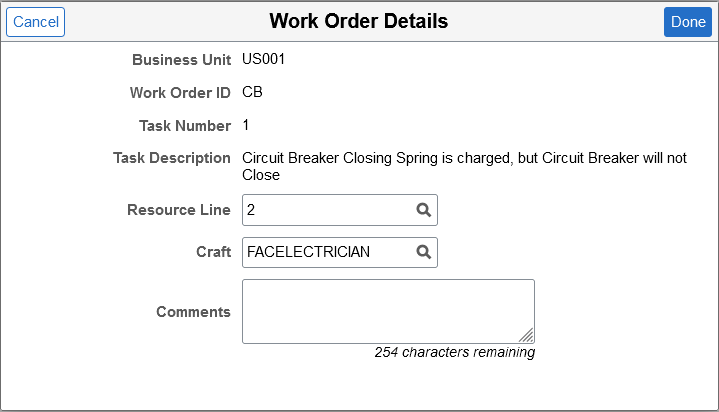
Use the Work Order Details page (WM_TIME_DTL_SCF) to add work order task details.
Navigation:
This example illustrates the fields and controls on the Work Order Details page.
|
Field or Control |
Description |
|---|---|
|
Resource Line |
Select the resource line on which this resource was assigned in the Schedules page of the work order. |
|
Craft |
Select a craft for the employee. |
Note: If you do not update this page, values for Resource Line and Craft are automatically assigned.
Use the WO Task/Personal Hours page (WM_TIME_QFILL_SCF) to add work order tasks or personal (non-work order time) to the Weekly Time Entry.
Navigation:
This example illustrates the fields and controls on the Work Order Task/Personal Hours page.

Use the Recent Work Orders section to select a recent work order task and add it to the Weekly Time Entry.
Use the Personal Time section to select a personal time reporting code (such as Jury Duty or Vacation) and add it to the Weekly Time Entry.
For more information about entering personal time, see Labor and Personal (Non-Work Order) Time Entry.
For more information about setting up time reporting codes, see Setting Up Time Reporting Codes.
Use the Task Details page (WM_TSK_DETAIL_FL ) to view the task and asset details, and change the task status. This is the default page displayed when you select a task on the My Tasks page.
Navigation:
Below the page header, you can view a brief task description, task ID, and the current status of the task. The left pane lists the activities that you can perform for the selected task. These activities are non-sequential.
This example illustrates the fields and controls on the Task Details Page. You can find definitions for the fields and controls later on this page.

Field or Control |
Description |
|---|---|
|
Click to access the Update Status page to change the status of the task. Select the new status. You can optionally enter a note explaining why you changed the status and notify the scheduler. |
Warranties icon |
Indicates that warranties are associated with the selected asset for the work order task. |

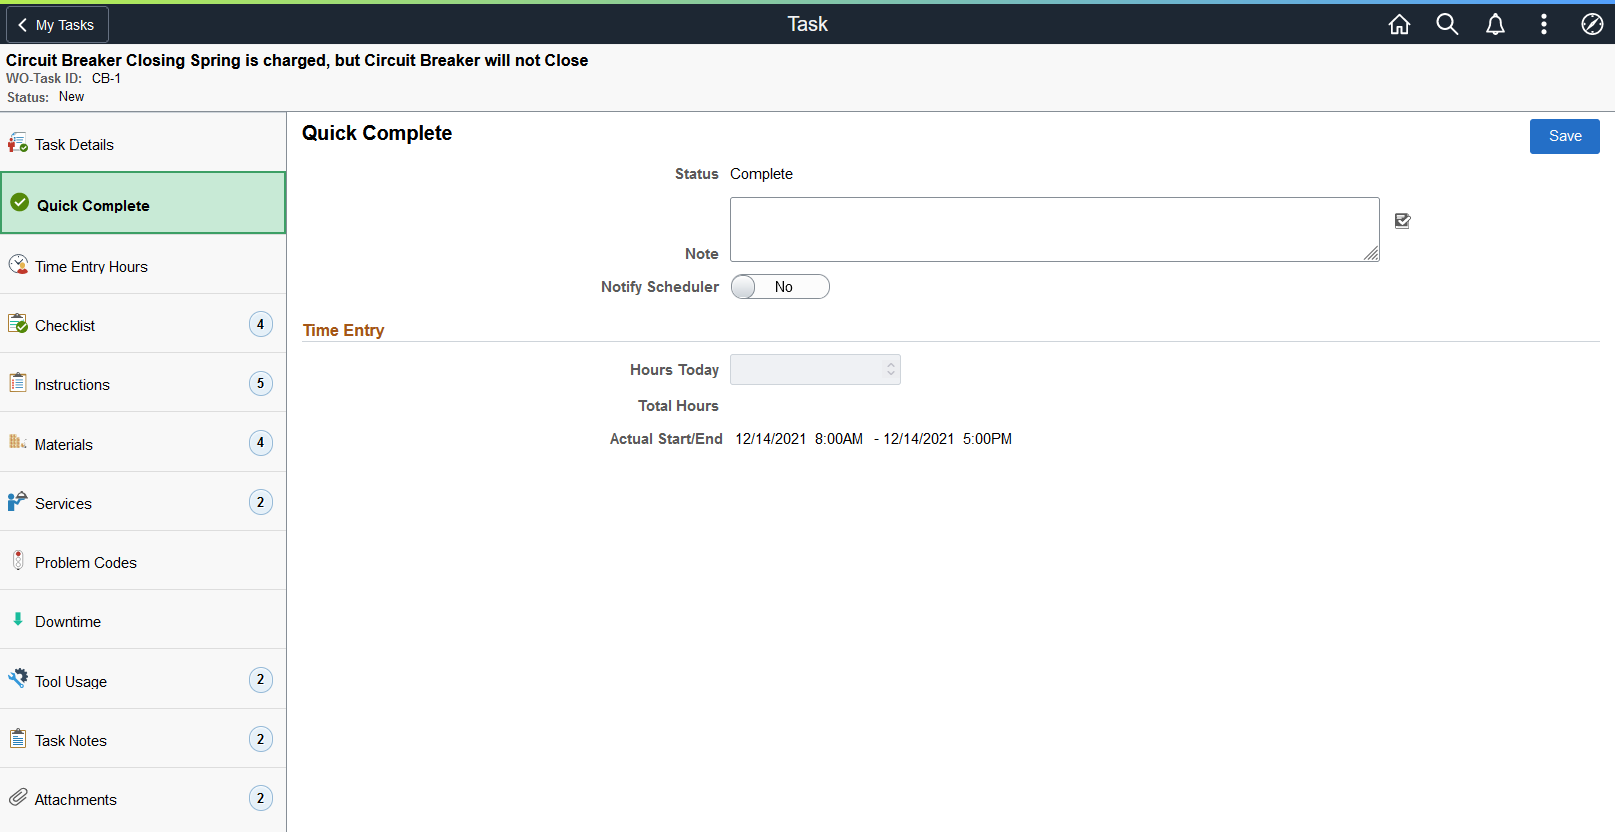
Use the Quick Complete page (WM_WO_STATUS_FL) to quickly complete the task and enter the total hours you spent on the task.
Navigation:
This example illustrates the fields and controls on the Quick Complete page. You can find definitions for the fields and controls later on this page.
Field or Control |
Description |
|---|---|
Status |
Displays the status as Complete when the Save button is clicked. |
Note |
Enter a note explaining about the task completion. |
Notify Scheduler |
Select Yes to send an email and note to the scheduler. |
Hours Today |
Enter the hours you spent on the task on the current date. |
Total Hours |
Displays the total hours you spent on the task. Note: If the total hours is 0, the Actual Start/End field defaults to the current date. When you click the Save button a message is displayed to indicate that you have not entered the time for the task and whether you want to complete the task. |
Actual Start/End |
Displays the actual start and end date and time based on the total hours entered and the time when they were entered. |
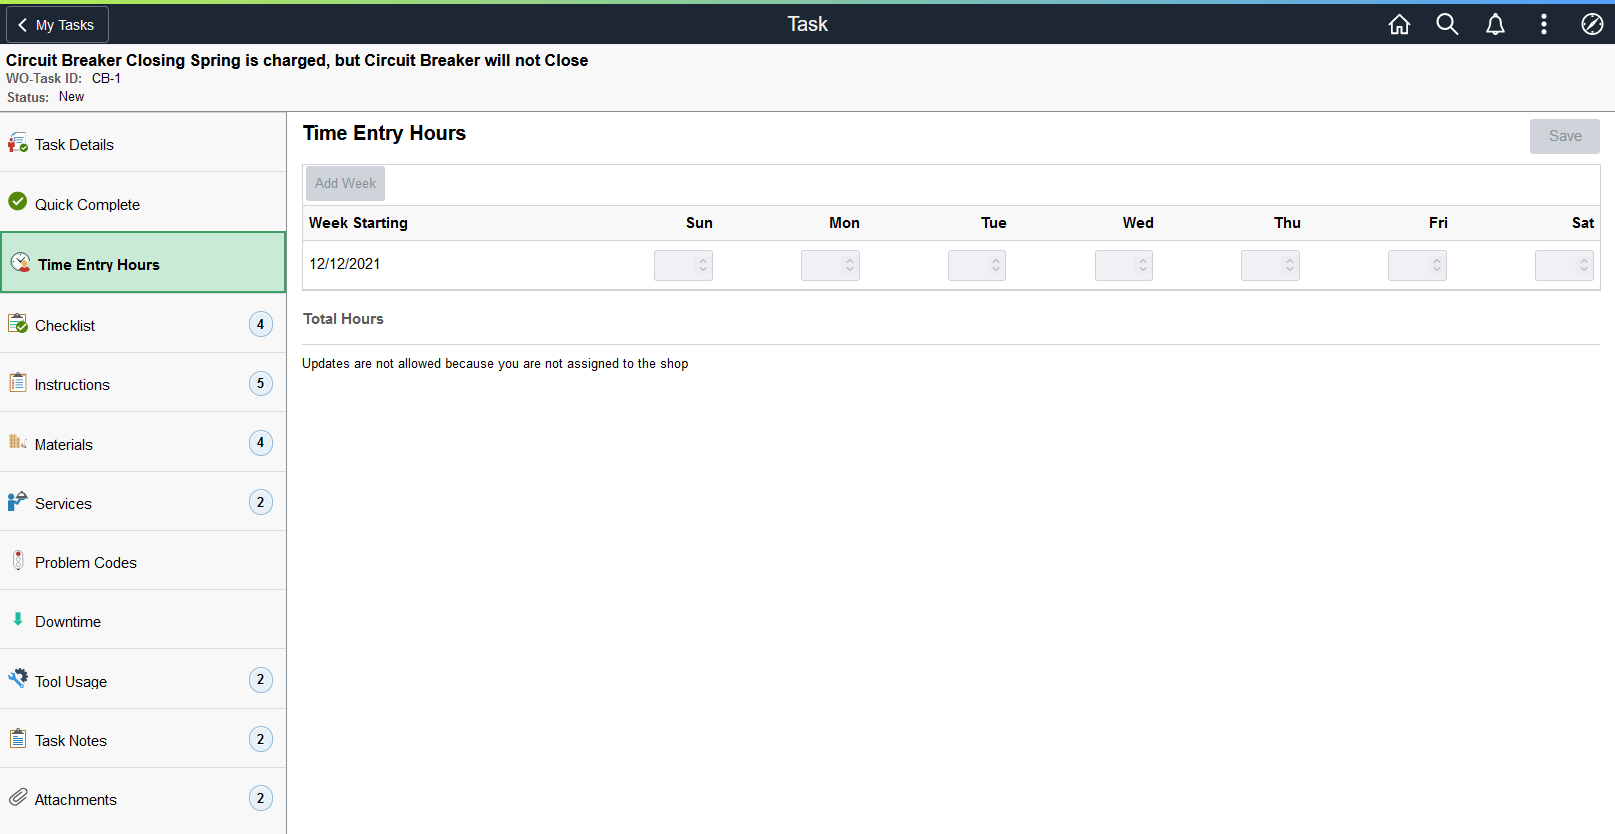
Use the Time Entry Hours page (WM_WO_TIME_FL) to enter the total weekly labor time for the specific work order task. You can enter the time worked for each day of a specified time reporting period. By default, the current week is displayed even if it is blank and the future days will be disabled. Hours worked for the previous weeks will be displayed in the grid. You can increment or decrement hours to any day of any week.
Navigation:
This example illustrates the fields and controls on the Time Entry Hours page. You can find definitions for the fields and controls later on this page.
Field or Control |
Description |
|---|---|
Add Week |
Select to add a week prior to the oldest week in the grid. Note: When you duplicate a week or add a future week, an error message is displayed. |
Total Hours |
Displays the total hours entered for the work order task. It is displayed after you click the Save button. |
Save |
Click to save all the modifications and stage time entries for posting. Note: Time entries are staged immediately similar to Work Order Completion time entries. The Work Order Completion page will list the time entries where the Time Entry Source will be Mobile Work Order. |
Use the Checklist page (WM_WOE_CKLST_FL) to view the checklists associated with the task and to mark the steps as complete. When you select the Complete check box, your (the technician's) name and the time and date that you completed the task appear on the page.
Navigation:
This example illustrates the fields and controls on the Checklist page. You can find definitions for the fields and controls later on this page.
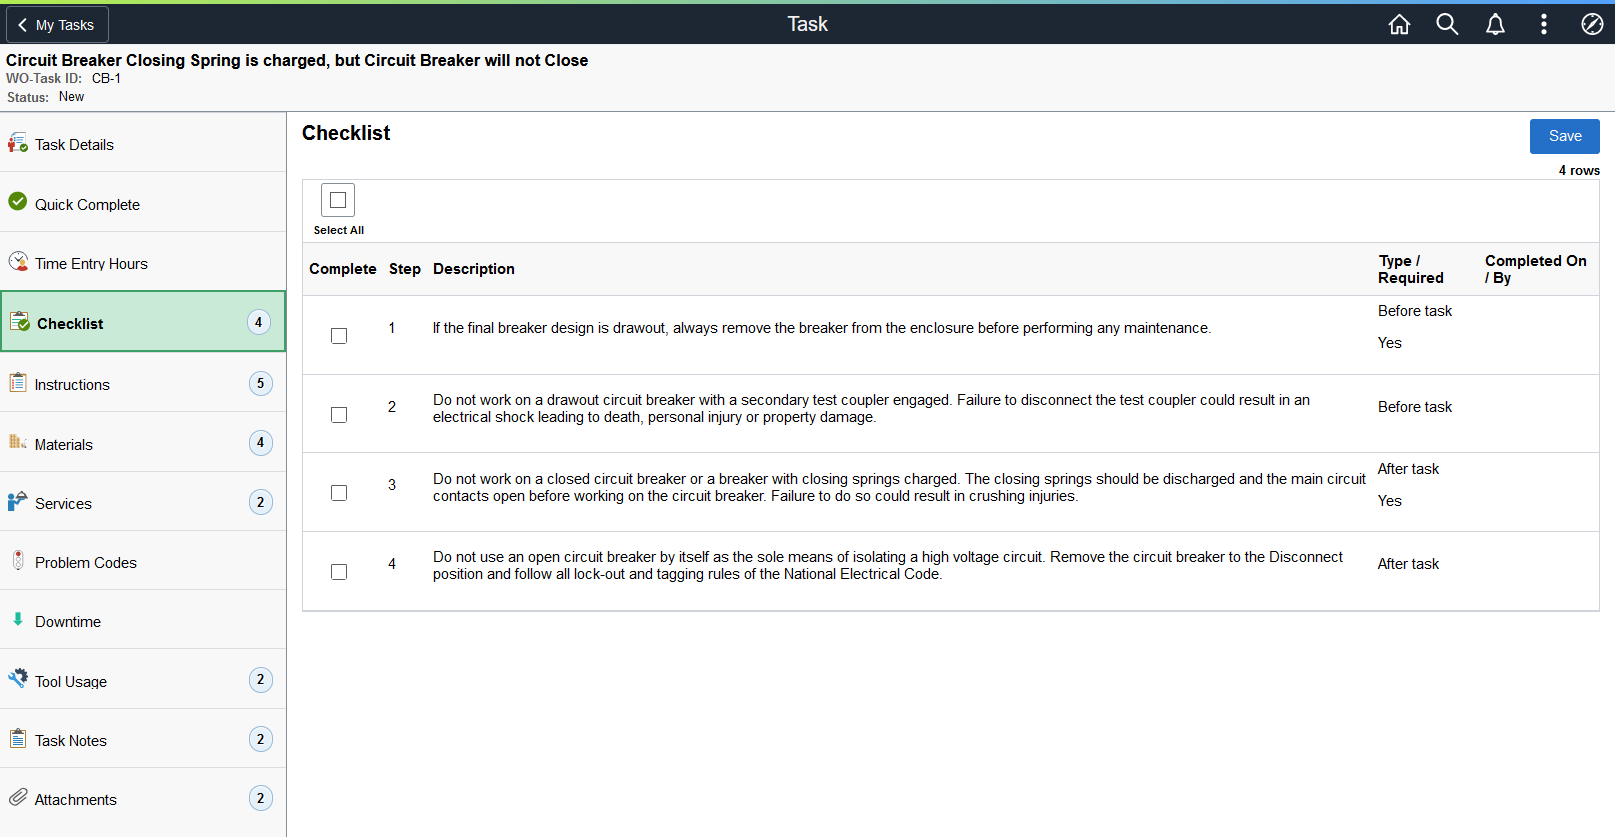
You must complete the required checklist items before you change the task status to Complete. If the task has no checklist items, this activity does not appear on the left pane.
Field or Control |
Description |
|---|---|
Select All check box |
Select this check box if you want to select all the listed items at once. |
Complete check box |
Select this check box for each list item to complete the task. You can also click anywhere on the row to complete the task. |
Use the Instructions page (WM_WOE_INST_FL) to view any instructions added for the task.
Navigation:
This example illustrates the fields and controls on the Instructions page. You can find definitions for the fields and controls later on this page.
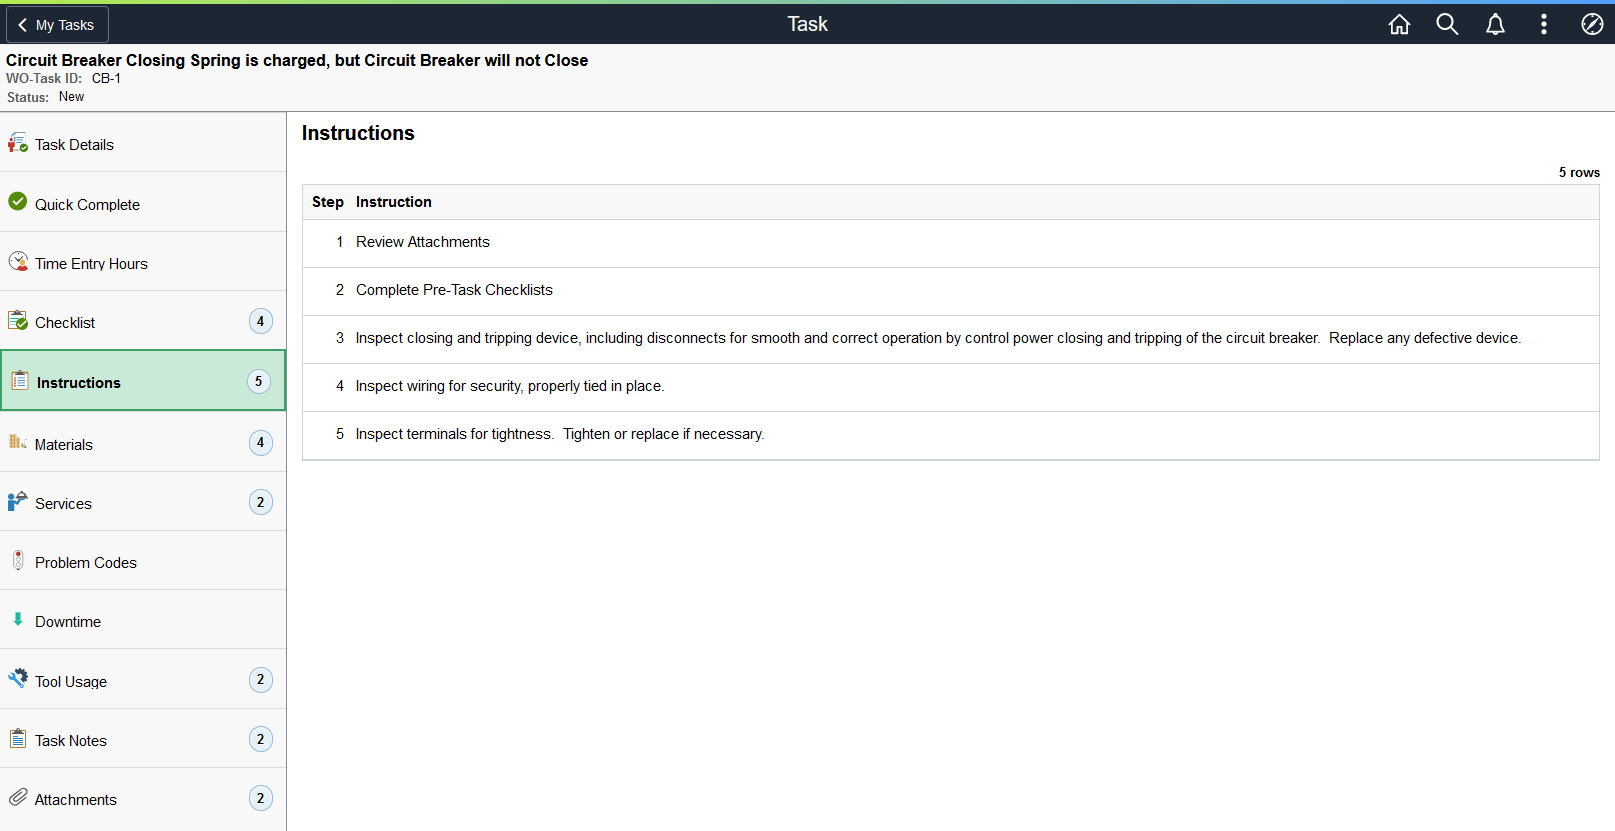
If there are no instructions, this activity does not appear on the left pane.
Use the Materials page (WM_TSK_MATL_FL) to view and edit inventory and purchase/on-hand items that are scheduled for the task. You can also add materials, generate a pick plan, and issue inventory parts to the work order task.
Navigation:
This example illustrates the fields and controls on the Materials page. You can find definitions for the fields and controls later on this page.
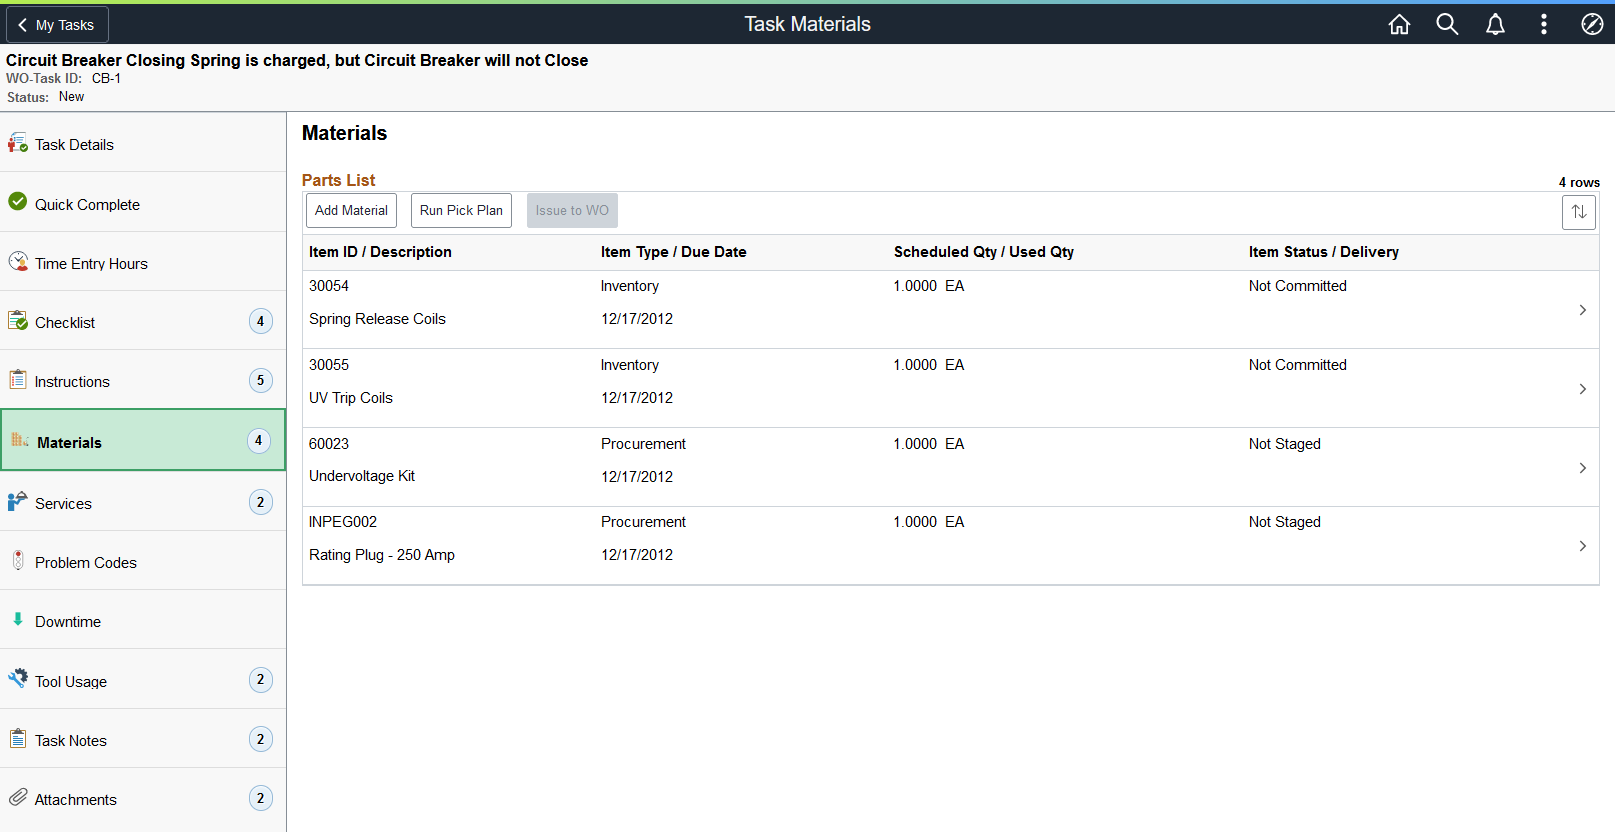
Select an inventory or floor stock row to access the Inventory Detail page and edit item quantity and delivery instructions. You can also view item status details, such as commit status and pick batch ID.
Select a procurement or on-hand row to access the Purchase/On-Hand Detail page and edit item details, such as scheduled or used quantity, due date, and delivery instructions. You can also indicate whether the item is an on-hand item.
|
Field or Control |
Description |
|---|---|
|
Add Material |
Select this button to access the Add Material - Lookup page and search for items to add to the parts list. When you select an inventory item in the lookup page, the Inventory Detail page appears and allows you to enter additional information for the item, such as scheduled quantity and need date. When you select a procurement item in the lookup page, the Purchase/On-Hand Detail page appears and allows you to enter additional information for the item. This button is only visible when you select View Scheduled Resources on the User Preferences - Maintenance Management Page, plus at least one of the following options:
The button is only available when the task status is either new or awaiting schedule. |
|
Run Pick Plan |
Select this button to generate a picking plan for the materials in the pick list. This button is only visible when the Run Picking Plan option is selected on the User Preferences - Maintenance Management Page: This button is only available when the task status is New, Awaiting Schedule, Assigned, or WIP, and at least one pick-eligible item exists. |
|
Issue to WO (Issue to Work Oder) |
Select this button to access the Issue Inventory Parts Page and view inventory parts available for issuing. You can also edit item quantity and the Process and Pick Line Complete options. This button is only visible when:
This button is only available when the task status is New, Awaiting Schedule, Assigned, or WIP, and at least one issue-eligible item exists. An item must be pre-picked to be eligible. |
|
Item ID/Description |
Displays the item ID and description for the inventory or procurement item. |
|
Item Type/Due Date |
Displays the item type and due date for the inventory or purchase/on-hand item. Item type values are:
|
|
Scheduled Qty/Used Qty(Scheduled Quantity/Used Quantity) |
Displays the item scheduled quantity and used quantity for the inventory or purchase/on-hand item. |
|
Item Status/Delivery |
Displays the item status and delivery instructions for the inventory or purchase/on-hand item. Item status indicates its overall lifecycle status, and is derived from multiple status attributes. |
Use the Issue Inventory Parts page (WM_TSK_INV_ISS_FL) to view inventory parts available for issuing. You can also edit item quantity and the Process and Pick Line Complete options.
Navigation:
This example illustrates the fields and controls on the Issue Inventory Parts page.
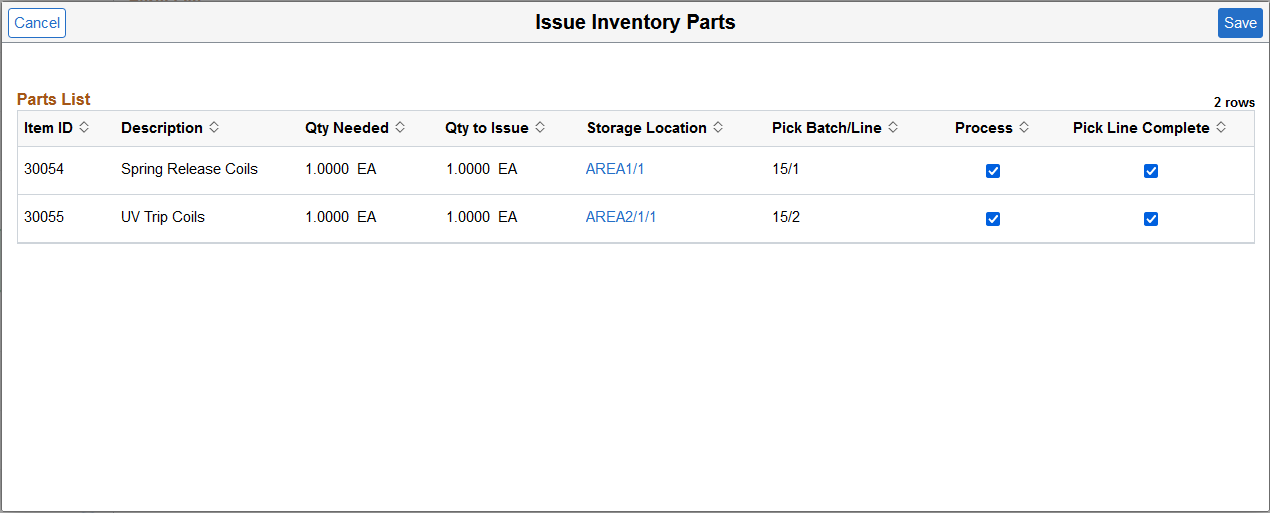
Select Save to confirm item quantities and the Process and Pick Line Complete option selections.
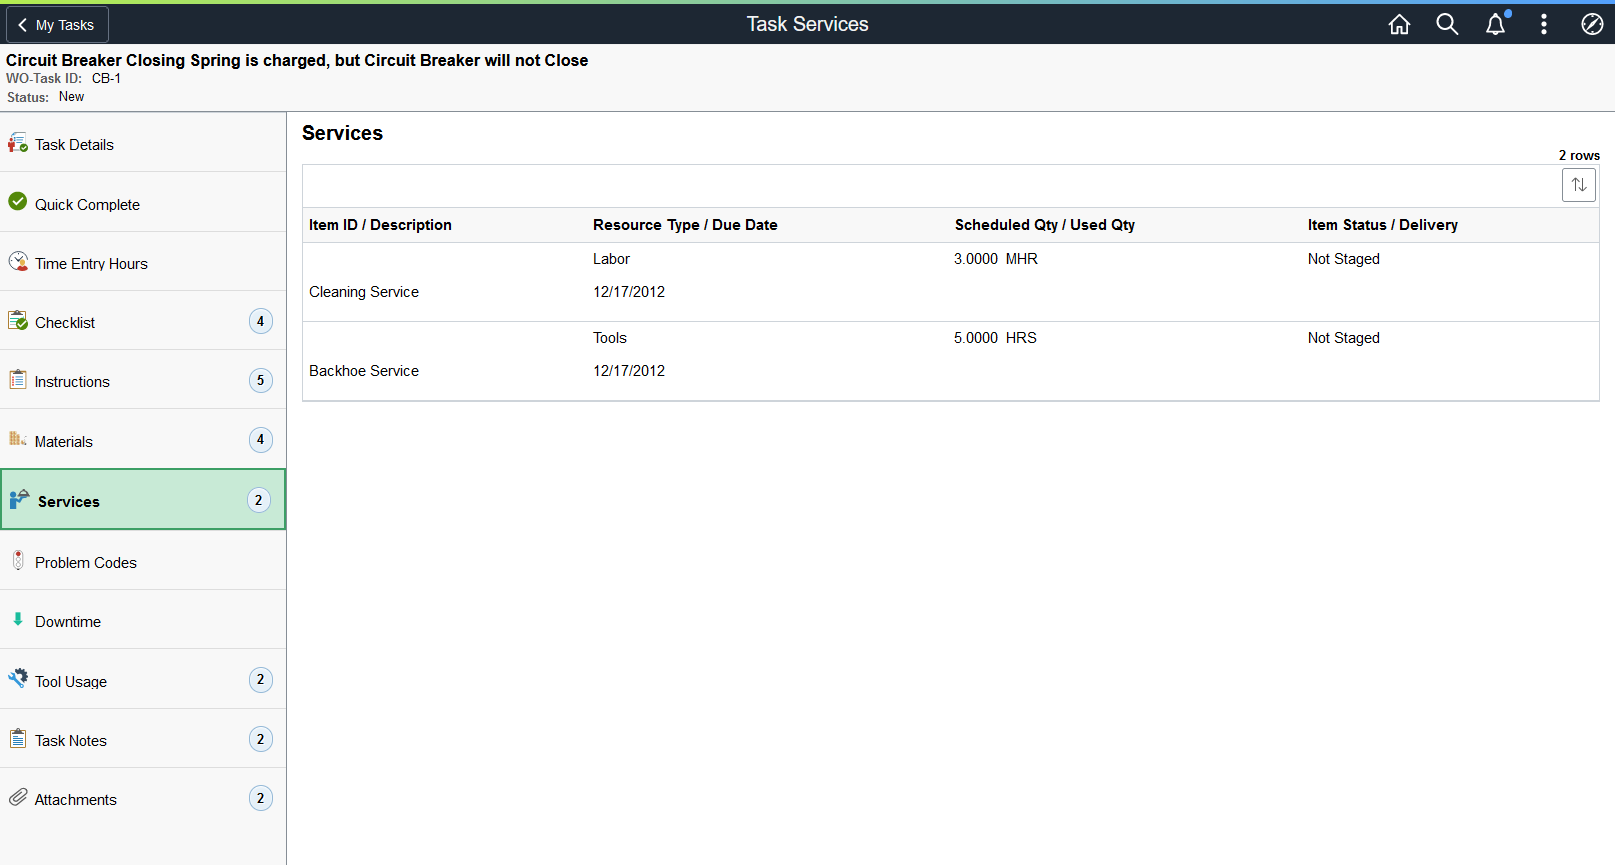
Use the Services page (WM_TSK_SRVC_FL) to view information about procured services scheduled for the task.
Navigation:
This example illustrates the fields and controls on the Services page.
Use Meter Readings page (WM_WOE_METER_FL) to enter the meter readings and view the meter readings history for the asset for which the work order task is performed. Technicians update the meter readings of an asset to reflect usage information.
Navigation:
For more information, see Meter Readings.
Use the Problem Codes page (WM_WO_PCR_FL) to classify the issue that caused the task by entering the predefined problem group, problem, cause, and resolution (PCR) codes for a selected work order task.
Navigation:
Field or Control |
Description |
|---|---|
Problem group |
Select the user-defined problem group that describes the overall nature of the problem. |
Problem |
Select the problem or the nature of the maintenance or repair issue. |
Cause |
Select the cause or underlying reason for a specific problem. |
Resolution |
Select the resolution or solution to the problem as reflected in the work task detail and overall job content of the work order. |
Use the Downtime page (WM_WO_DOWNTIME_FL) to view modify, and add downtime for an asset associated with a work order task. Planned downtime entry is read-only.
Navigation:
Field or Control |
Description |
|---|---|
Actual |
Displays the actual time that it took to repair the asset. |
Planned |
Displays the proposed time that you think the asset will be not available for use. |
Add |
Click to add a new actual downtime entry. Select a reason for the downtime and enter the actual dates and times that the asset was down and the number of hours that it was down. |
To update an existing actual downtime, click on the specific row and modify the details as required. If there is no asset associated with the task, the downtime activity does not appear on the left pane.
Use the Tool Usage page (WM_TLS_USAGE_FL) to enter the usage of checked-out tools for the work order tasks.
Navigation:
This example illustrates the fields and controls on the Tool Usage page. You can find definitions for the fields and controls later on this page.
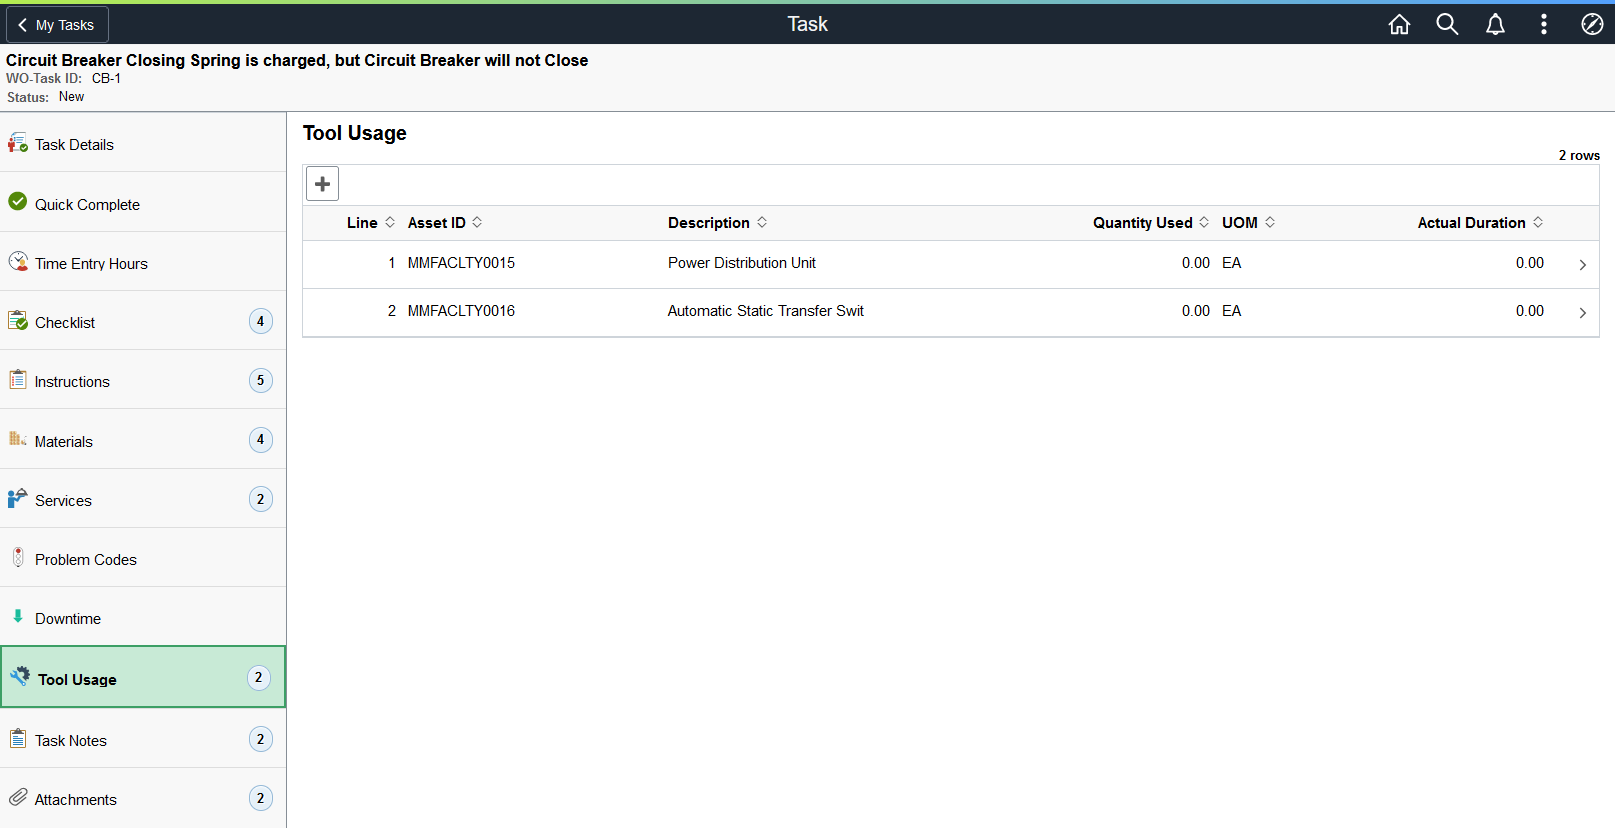
To update an existing entry, select the specific row and modify the details as required. Click the Add button to insert a new tool usage row. Select the tool, quantity used, and the actual start and end dates and the actual duration.
For more information, see Tool Usage.
Use the Task Notes page (WM_TSK_NOTES_FL) to review the existing task notes associated with the work order task and add new notes.
Navigation:
This example illustrates the fields and controls on the Task Notes page. You can find definitions for the fields and controls later on this page.

Click the Add Note button to add notes to the work order task. You can send notes to the scheduler.
Note: When you add a new note, the Send to Requester filed appears if the work order was created from a service request and the requester has an email address in their User Profile. If the notes are added to the service requests, the Needs Reply field appears and can be responded by the requester.
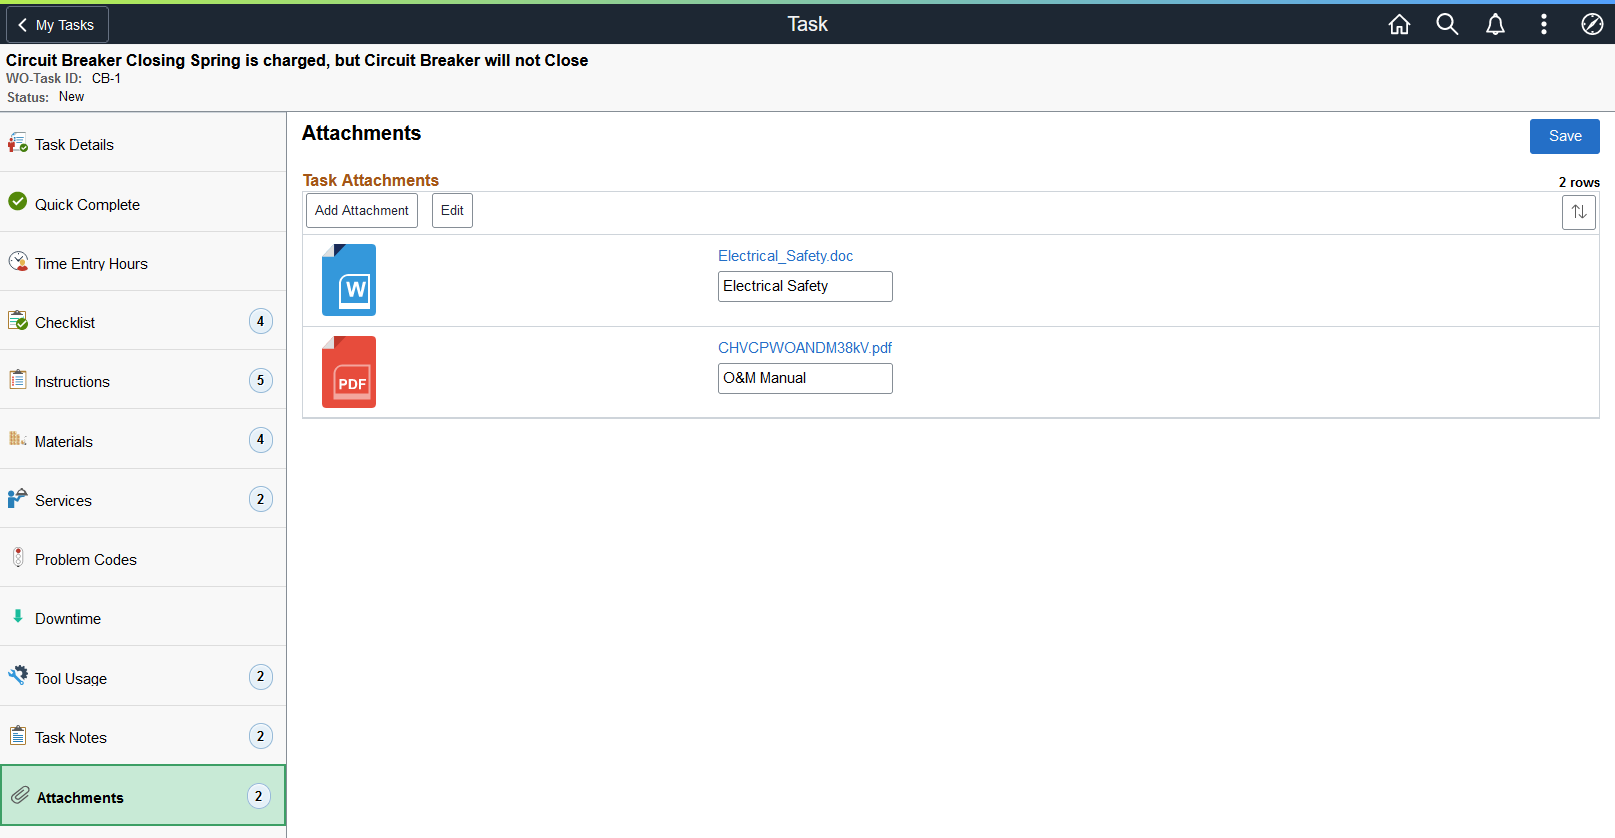
Use the Attachments page (WM_WOE_ATTACH_FL) to view, add, and delete attachments associated with the work order task. To view an attachment, click the attachment image or the link.
Navigation:
This example illustrates the fields and controls on the Attachments page. You can find definitions for the fields and controls later on this page.
Field or Control |
Description |
|---|---|
Add Attachment |
Click to browse and upload any files essential to this service request, such as a screen shot of an error message, an authorization from a manager to move, or an image of the readings, taken with the device’s camera, from a piece of equipment. |
Edit |
Click to enable the deletion of the attachments. To delete an attachment, click the Delete button. |
Note: You can also review service request attachments, if the work order is associated with a service request. Similarly, if there are work order header attachments, the Work Order Attachments grid displays. Service Request Attachments and Work Order Attachments are read-only.
Use the Notices page (WM_MBL_NOTICE_FL) to view notices and announcements to all mobile technicians.
Navigation:
Select the Notices tile on the Mobile Technician Home page.
Select a notice from the left pane to view its details.
For more information about updating the notices, see Notices/Announcements Page.
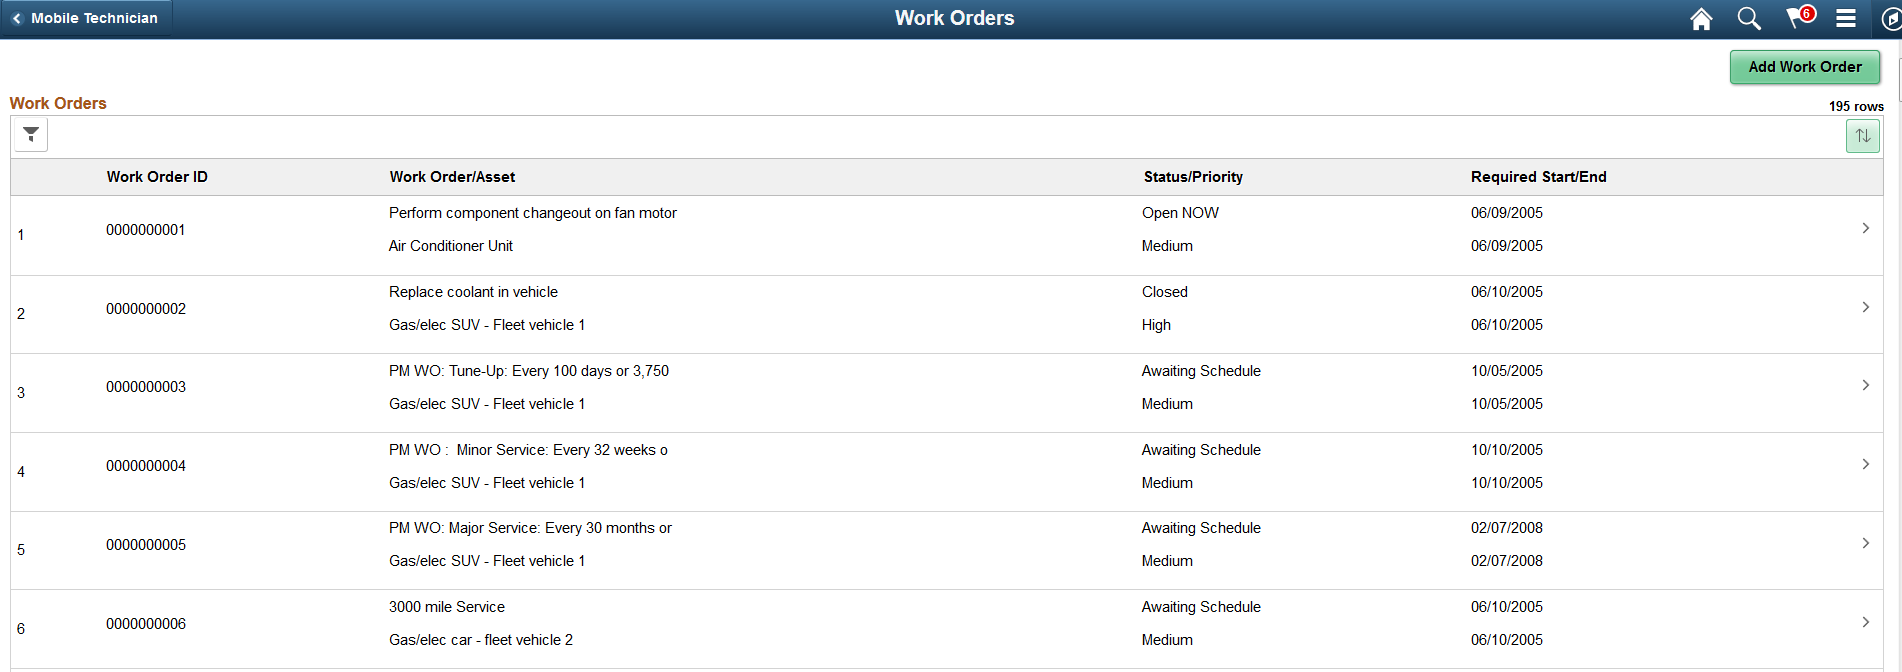
Use the Work Orders page (WM_WO_SEARCH_FL) to view or update existing work orders, work order tasks, and requirements of each work order and to update them if required. You can also create a new work order and add tasks and requirements to the new work order.
Navigation:
This example illustrates the fields and controls on the Work Orders Page. You can find definitions for the fields and controls later on this page.
Field or Control |
Description |
|---|---|
|
Select to search for work orders by entering the search criteria. Work orders that fall within the entered criteria are displayed. |
|
Select to view the column sort options. The column headers displayed in the Work Orders grid are based on the sort options selected. |
Add Work Order |
Select to create new work orders. |
To view the details of a work order or to update it, click anywhere on a work order row.
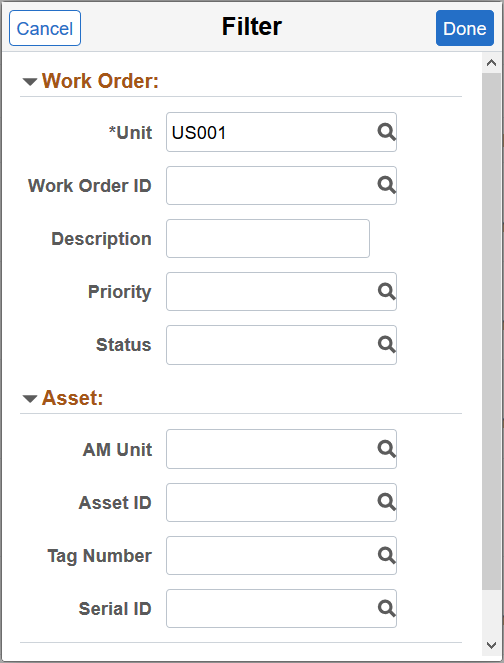
Use the Quick Work Order - Filter Work Orders page (WM_QWO_FILTER_SCF) to search for a particular work order by entering the required search criteria. The last used search criteria is saved automatically and reused when you access the Filter page the next time.
Navigation:
Select the Filter icon on the Quick Work Order page.
This example illustrates the fields and controls on the Quick Work Order - Filter Work Orders Page. You can find definitions for the fields and controls later on this page.
Field or Control |
Description |
|---|---|
Clear |
Click to delete the existing field values. All fields except the business unit field will be cleared. |
Done |
Click to apply the search criteria. |
Cancel |
Click to return to the Work Orders page without applying the filters. |
Note: AM Business Unit and Status are not required for searches.
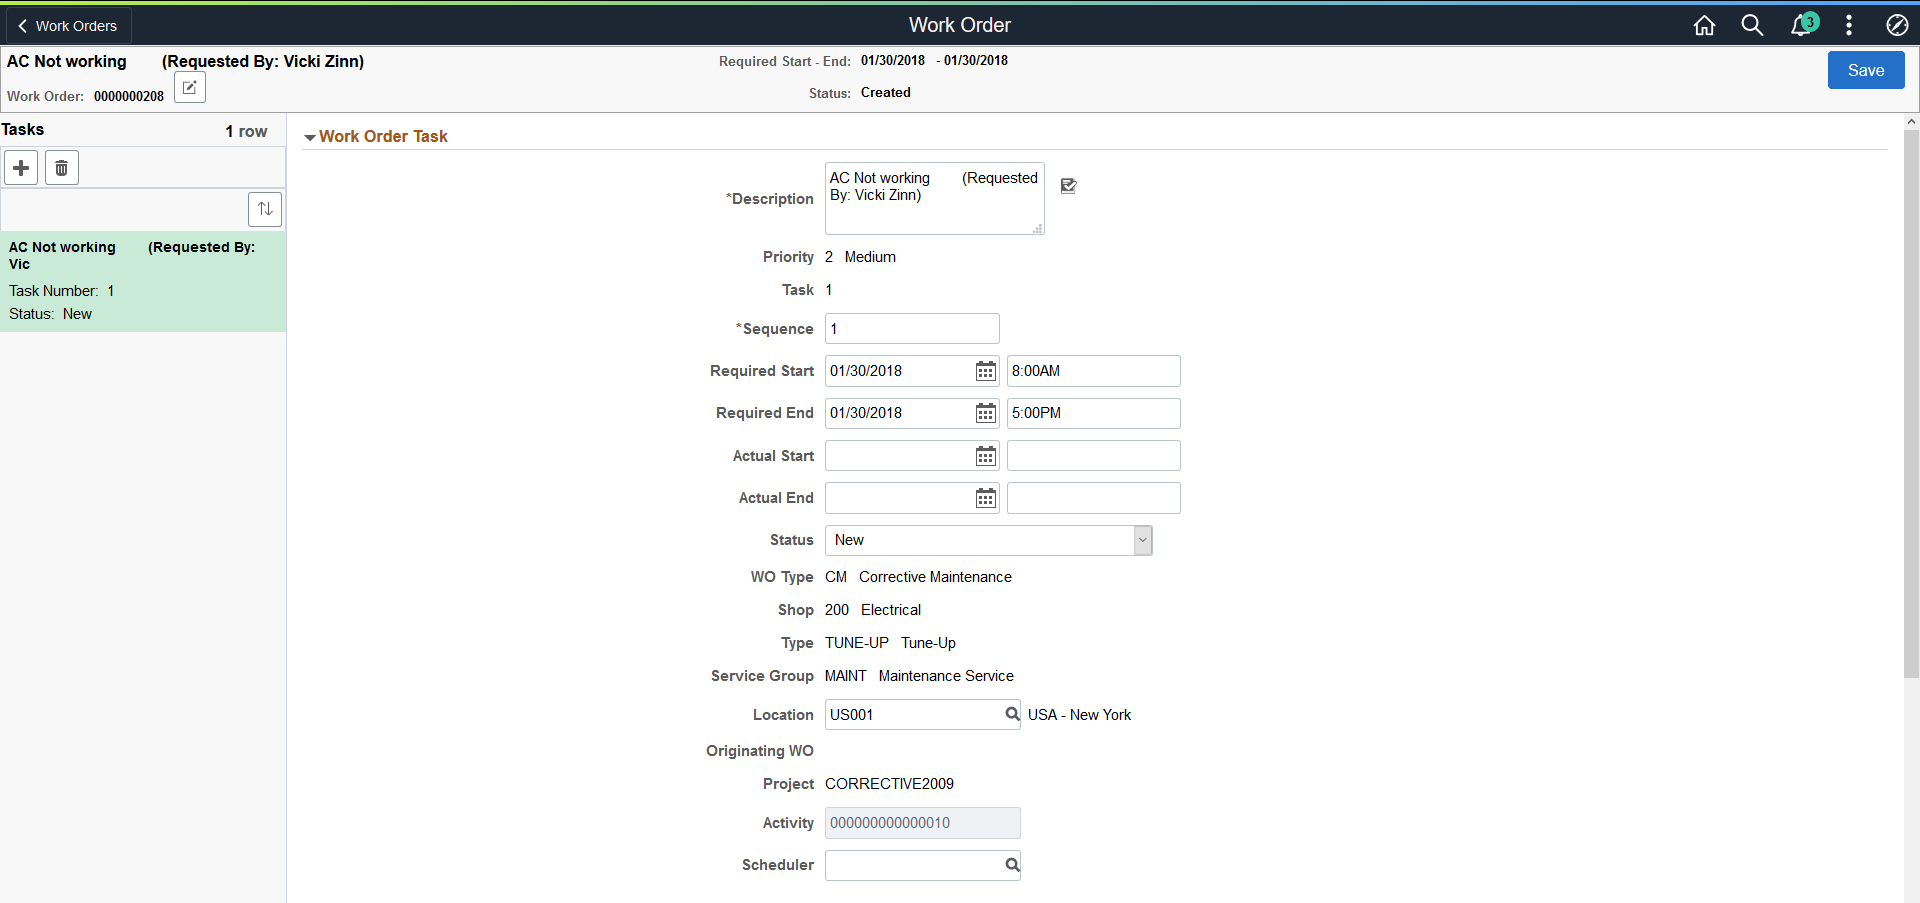
Use the Work Order - Task Details page (WM_TASK_DTL_FL) to view or modify the details of the work order. For each work order, the assets and the resources needed for the work order tasks are displayed under the Asset Details and Resource Requirements sections.
Navigation:
Select a work order on the Work Orders page.
This example illustrates the fields and controls on the Work Order - Task Details page. You can find definitions for the fields and controls later on this page.
This example illustrates the fields and controls on the Work Order - Task Details page. You can find definitions for the fields and controls later on this page.
Field or Control |
Description |
|---|---|
|
Click to modify the details of the work order. |
|
Click to add a new task to the work order. |
|
Click to delete a task from the work order. |


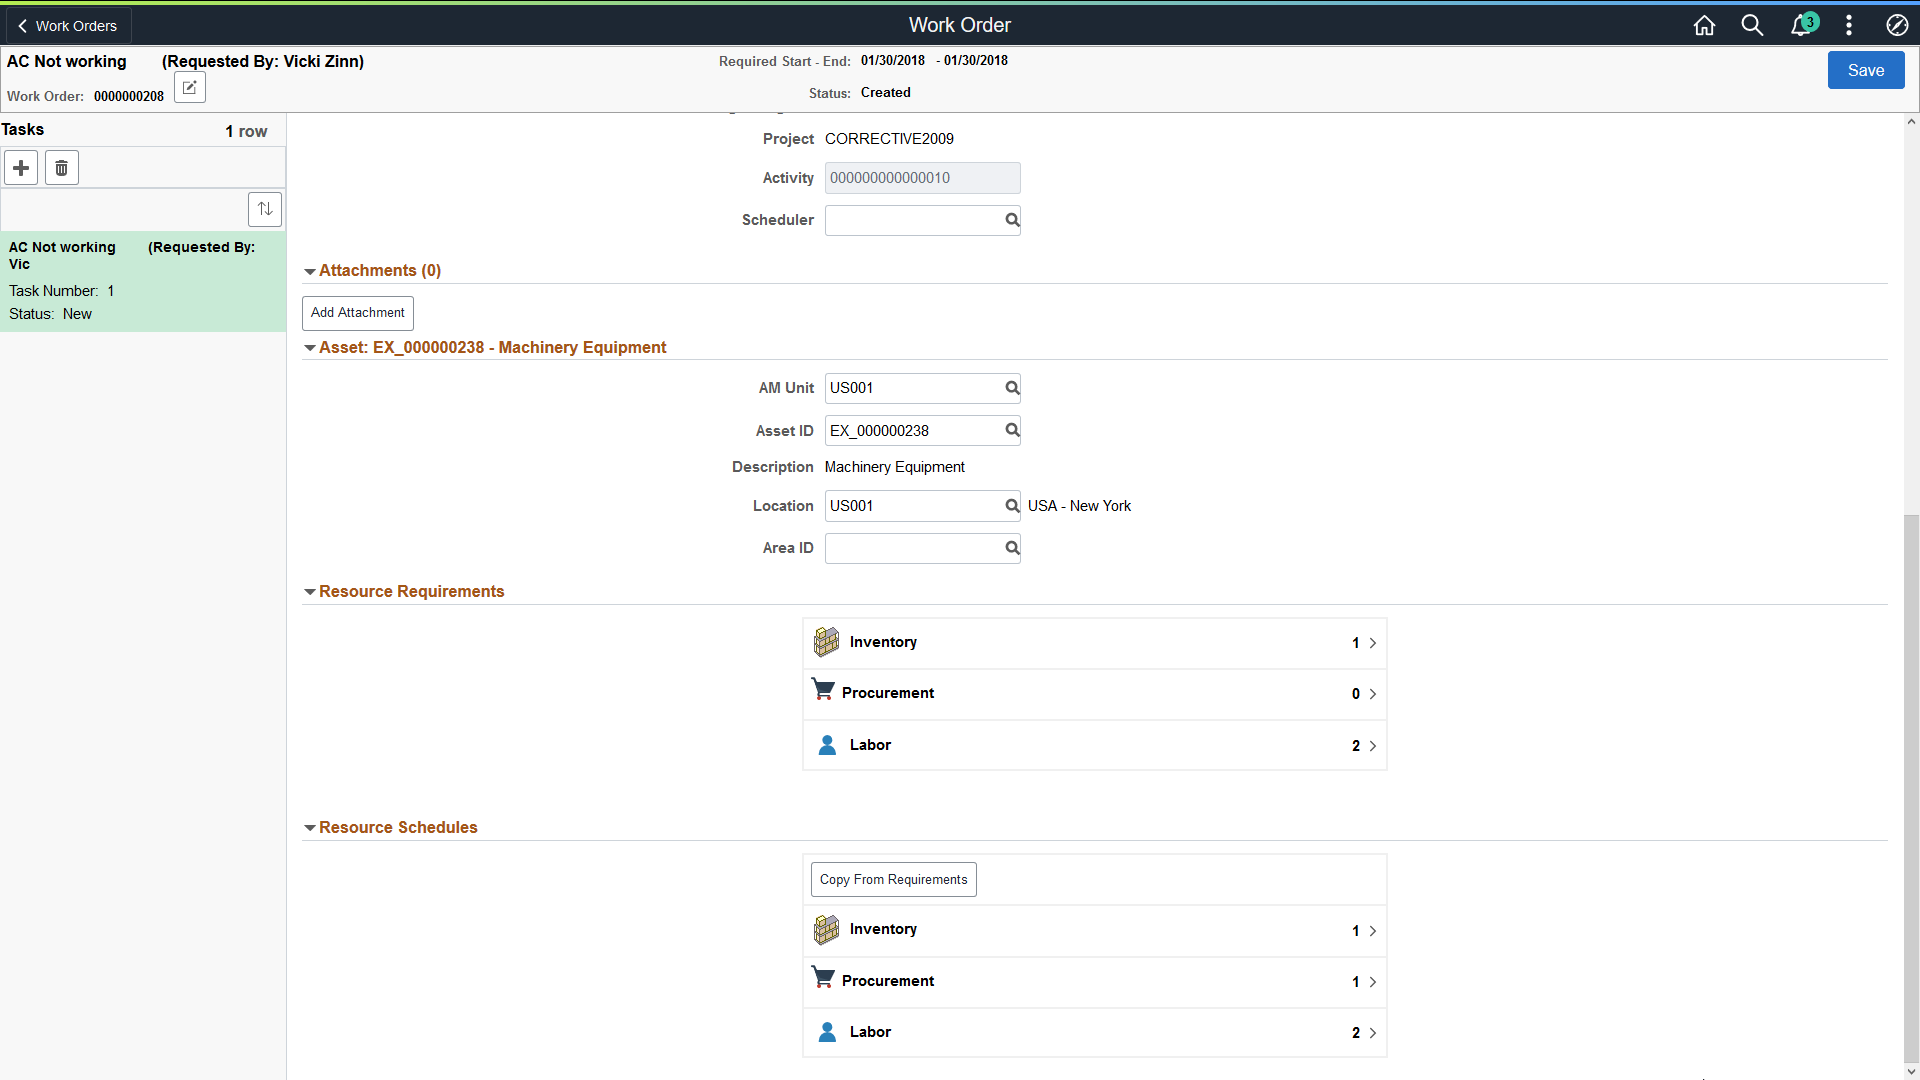
Attachments
Use this section to add attachments to the work order task.
Asset
Use this section to edit asset information for the work order task.
Resource Requirements
Use this section to edit labor, inventory, and procurement resource requirements for the work order task.
Resource Schedules
Use this section to edit labor, inventory, and procurement resource schedules for the work order task.
Use Copy From Requirements to copy requirements information to the schedules.
Use the Work Order Header page (WM_QWO_HDR_SCF) to provide an overall information about the work order such as description, status, and maintenance type.
Navigation:
Select the Edit icon on the Work Order page.
This example illustrates the fields and controls on the Work Order Header Page.
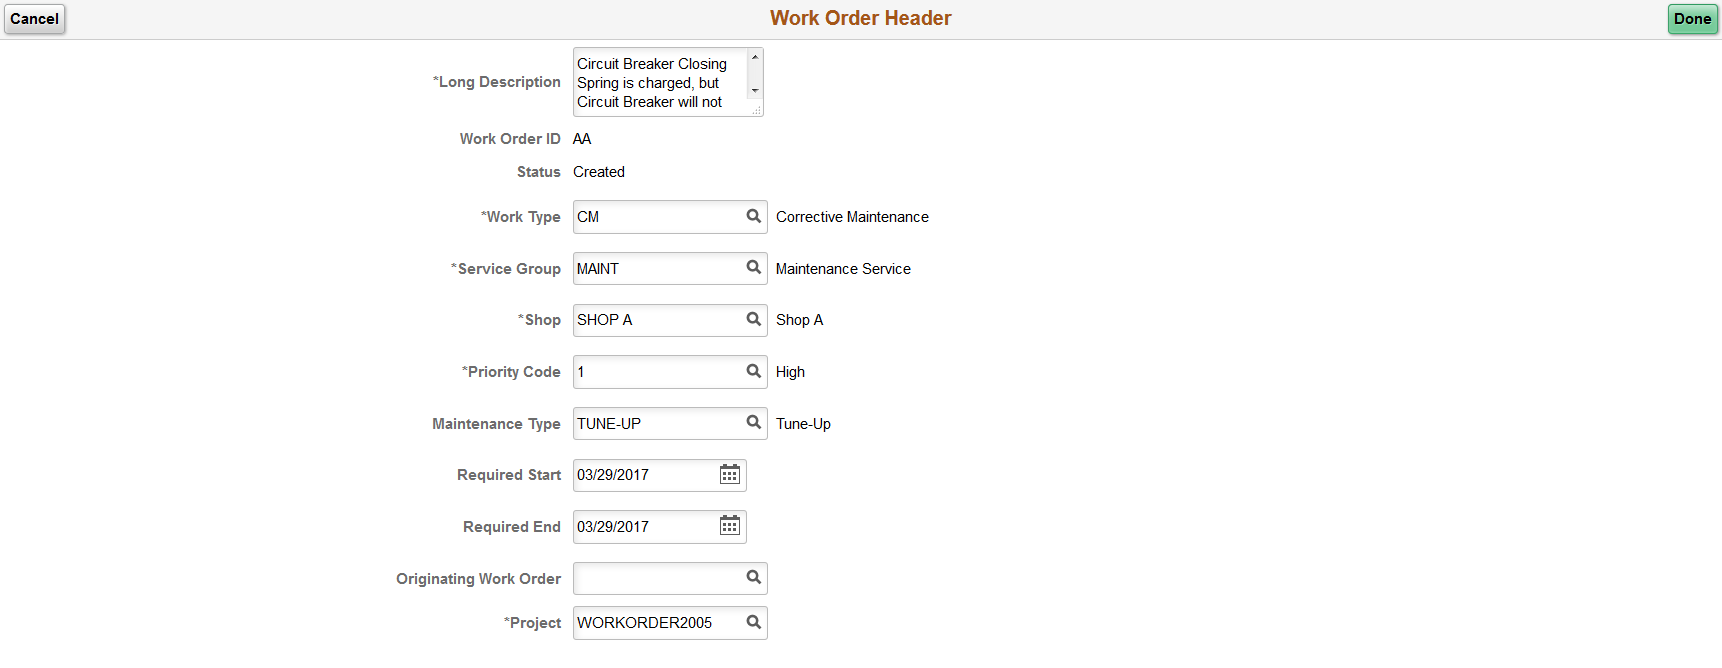
Note: You cannot directly modify the status of the header. The work order status is indirectly changed when you change the work order task status and is only changed when you save the work order.
For more information, see The Work Order Header.
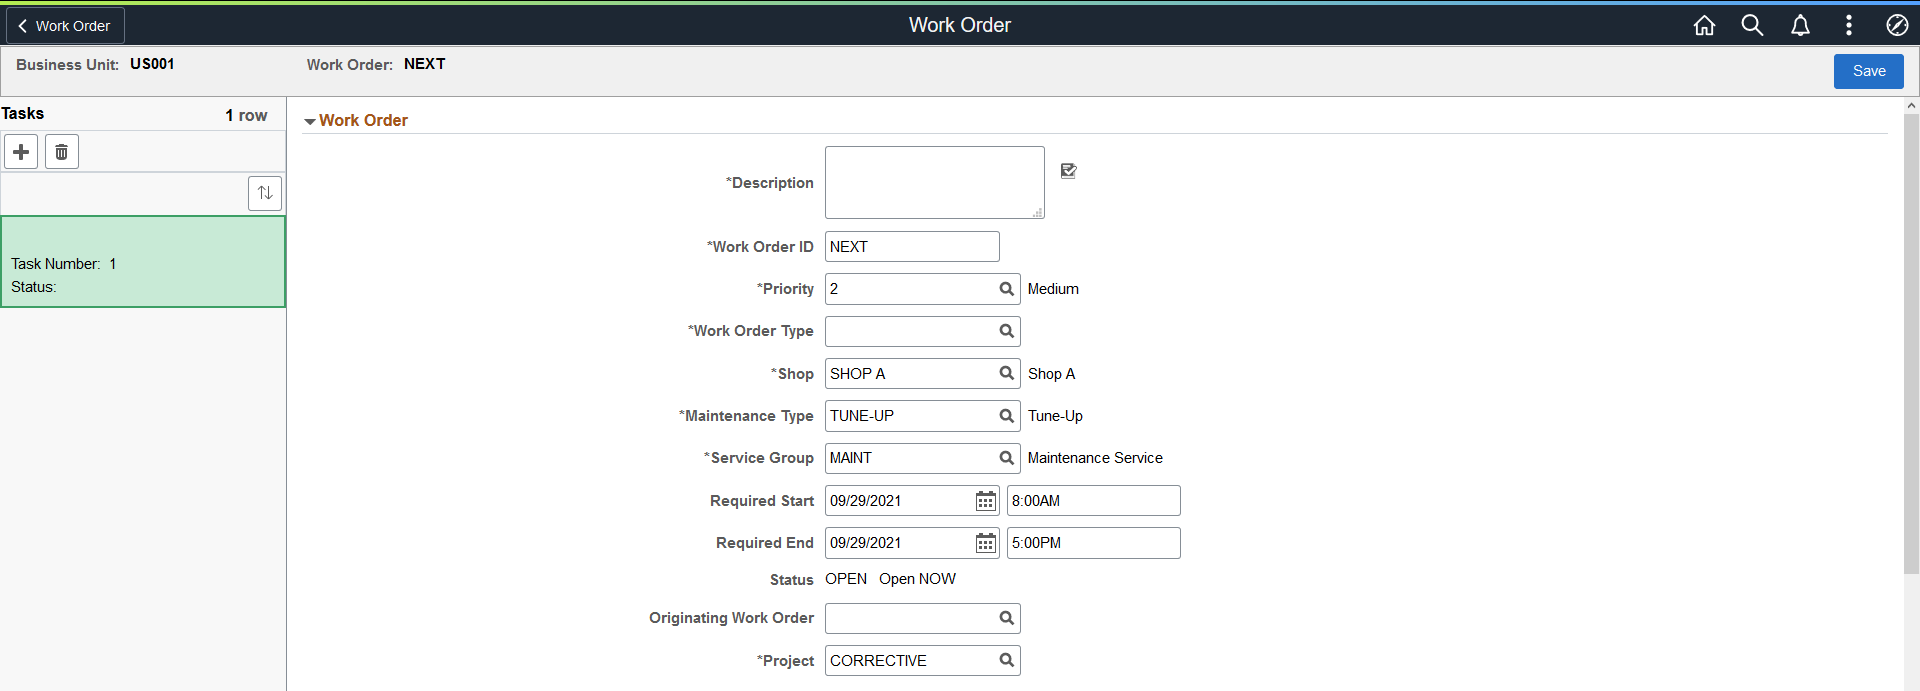
Use the Add Work Order page (WM_WO_ADD_FL) to create a new work order. While creating a work order you can define the work order header information, work order tasks, Asset details, and the resource requirements for each work order task. Work order tasks within the work order specifically define all aspects of each activity that is needed to create a work order.
Navigation:
Select the Add Work Order button on the Work Orders page.
This example illustrates the fields and controls on the Add a Work Order Page (1 of 3). You can find definitions for the fields and controls later on this page.
This example illustrates the fields and controls on the Add a Work Order Page (2 of 3). You can find definitions for the fields and controls later on this page.
This example illustrates the fields and controls on the Add a Work Order Page (3 of 3). You can find definitions for the fields and controls later on this page.

Work Order
Field or Control |
Description |
|---|---|
Description |
Enter a description of the problem being addressed by this work order. |
Work Order ID |
If the selected business unit indicates auto-numbering, then the system assigns the NEXT number after the last Work Order ID created. If auto-numbering is not selected for the business unit, you can enter a number manually. |
Priority |
Set a priority to sort and track work orders based on their level of importance. |
Work Order Type |
Select tentative user-defined value for the type of work order you are creating. Typical work order types are:
|
Shop |
Select the primary shop. Shops group and manage the labor and tool resources that are defined in the work order. |
Maintenance Type |
Select the type of maintenance required for the asset associated with the work order. |
Service Group |
Select a service group for defining specific work order behaviors. |
Required Start and Required End |
Select the start and end dates and times. |
Status |
Displays the overall work order status. The work order status reflects the most outstanding status of the work order task statuses. You cannot directly change this work order header status. |
Originating Work Order |
Select the work order that this work order originated from. For example, if a work order is closed and there is still work pending, you can create a new work order and indicate that it originated from the closed work order. |
Project |
Select the project to which your work order is associated with. |
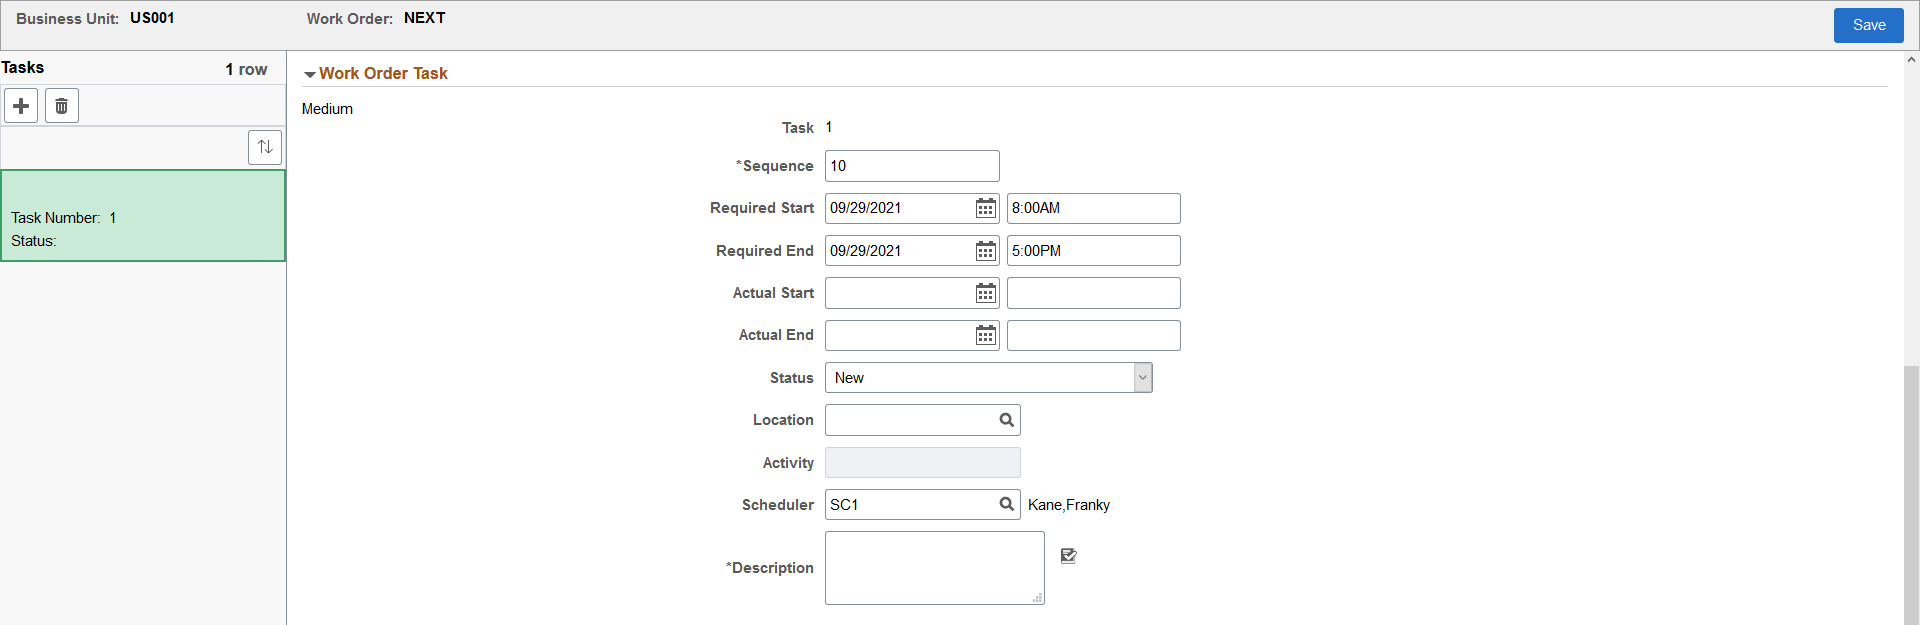
Work Order Task
Field or Control |
Description |
|---|---|
Description |
Enter a brief description about the task to be performed. |
Task |
Displays the system generated number for each task. |
Sequence |
Enter the number that represents the numerical order within the work order in which to complete this task. |
Required Start and Required End |
Select the start and end dates and times by when the task should be completed. |
Status |
Select the user-defined status for this task based on the statuses in the list. |
Location |
Select the location where this work order task should be performed. |
Activity |
Displays the value based on the project. |
Scheduler |
Select the scheduler code. The name of the selected scheduler appears on the page. |
Another option to create a new task is to click the Add icon on the left pane.
To delete a task from the work order, select the task to be deleted and click the Delete icon on the left pane. Confirm deletion in the message displayed.
Asset Details
Field or Control |
Description |
|---|---|
|
Asset Search |
Click to access the Asset Search Page and search for assets to associate with the work order. You can search across all Asset Management business units, and by description, status, asset ID, serial ID, and tag number. All other fields in the Asset Details section populate automatically once you select an asset from the Asset Search page. |
|
Asset ID |
Displays the asset ID associated with the work order. |
AM Unit (Asset Management Business Unit) |
Displays the business unit associated with the asset, based on the selected asset ID. |
Description |
Displays the description based on the selected asset ID. |
Location |
Displays the current location of the asset, based on the selected asset ID. |
Area ID |
Displays the specific area in which the asset is located, based on the selected asset ID. |
Resource Requirements
Field or Control |
Description |
|---|---|
Inventory |
Click to add the required inventory items for a work order task. You can enter the planned quantity, unit of measure, and supplier reference for each inventory item. |
Procurement |
Click to add the specific materials, tools, and labor to be purchased for a work order task. |
Labor |
Click to add the labor resources for a work order task. Select the quantity and schedule hours to the selected resources. You can also assign the task to yourself. |
Attachment |
Click to add attachments pertaining to the work order such as drawings, schemas, and more. |
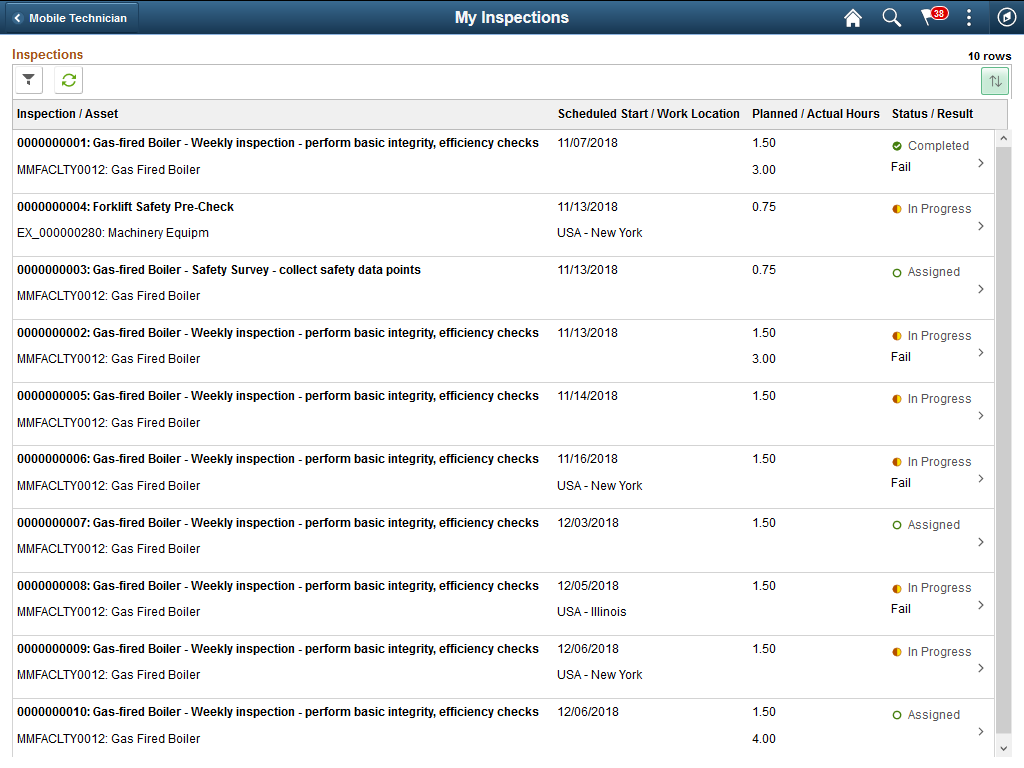
Use the My Inspections page (WM_WO_INSP_LIST_FL) to view the inspections assigned to you and start working on them.
By default, the My Inspections tile is added to the Mobile Technician Home page when the feature is installed. However, it can be added to any home page as required.
Note: You must set up inspection plan templates and create actual inspection instances before using this feature. Also, internet connectivity should be ensured while working on mobile inspections.
The following are some key functional differences in the fluid version, as opposed to the classic version:
The status of mobile inspections can be Assigned, In Progress, or Completed. Classic inspections also include inspections with Created (unassigned) status.
Activity checklists are split into separate Pre-Checklist and Post-Checklist items.
Trigger Evaluation activity work response actions are slightly different for mobile inspections. In some cases, this means that the capabilities to make parameter changes and review the resulting transactions have been streamlined over what is available in the Classic version. For example, the Schedule one-time PM action performs its update directly. It does not provide the option to review the PM Schedule content that has been modified.
Each inspection activity includes a separate Activity Completion sub step. Technicians must change the status of an activity to Completed before moving on to the next inspection activity.
Navigation:
This example illustrates the fields and controls on the My Inspections page. You can find definitions for the fields and controls later on this page.
Field or Control |
Description |
|---|---|
Filter icon |
Select the Filter icon to narrow down the list of inspections. To search for inspections, you can enter the inspection criteria or the asset criteria as required. The system always saves the last used filter criteria and restores it the next time you select the Filter icon or the Refresh icon. |
Refresh icon |
Select the Refresh icon to quickly update the inspections list. |
Sort icon |
Select the Sort icon and choose the required column header to sort the inspections list. The Sort option displays all the column headers of the inspection list. By default, the list is sorted by Scheduled Start Date in ascending order. |
Inspection/Asset |
Lists all the inspections assigned to you. Each inspection displays the inspection ID and its description. You can also find the asset ID and description. Note: Asset ID may be replaced with Tag Number or Serial ID depending on the WO business unit setting. |
Scheduled Start/Work Location |
Displays the start date of the inspection and the work location. |
Planned/Actual Hours |
Displays the estimated duration for completing the inspection and the actual time taken for its completion. |
Status/Result |
Displays the current status (Assigned, In Progress, and Completed) and result of the inspection. |
Details icon |
Select to view the details of the inspection. |
Use the Inspection Summary page (WM_WO_INSP_SUMM_FL) to view the summary of the selected inspection and start working on it. The left pane displays the inspection activities defined on the inspection plan template.
Navigation:
Select an inspection on the My Inspections page.
This example illustrates the fields and controls on the Inspection Summary page. You can find definitions for the fields and controls later on this page.
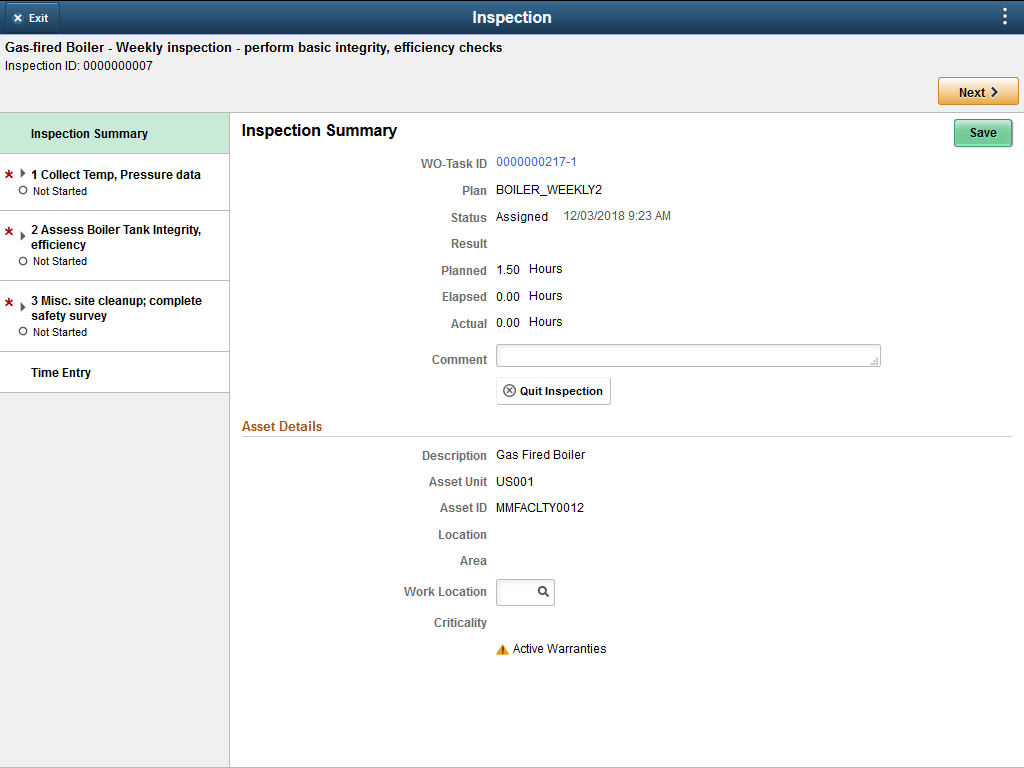
The inspection page header displays a brief description about the inspection and the inspection ID. Besides inspection summary, the page displays the main inspection activities and the time entry option in the left pane. Select each activity to view its sub steps such as Data Points, Trigger Evaluation, Checklists, Instructions, Attachments, and Notes. Notes, Attachments, and Activity Completion sub steps are always included for the inspections. The Checklist activity sub step can contain both Pre-Checklist and Post-Checklist items. You must complete the activities in the specified order. Select the Next and Previous buttons to navigate through the inspection sub steps or select the steps in the left pane. The Red asterisk icon indicates that the step is mandatory.
Use the Time Entry option to log the total weekly labor time.
Field or Control |
Description |
|---|---|
WO-Task ID |
Displays the WO Task ID to which the inspection is linked. Select this ID to view the Task Details page. |
Plan |
Displays the inspection plan template. |
Status |
Displays the current status of the inspection. It can be:
|
Result |
Displays the result of the inspection after its completion. |
Planned |
Displays the total hours planned to complete all the activities of the inspection. |
Elapsed |
Displays the total amount of time elapsed while completing the inspection. It is only for informational purpose and can be edited if required. |
Actual |
Displays the total actual time entered by the technician to complete all the activities of the inspection. |
Comment |
Displays the comments about the inspection. You can update it if required. |
Quit Inspection |
Select to terminate the inspection before its completion. Note: While quitting an inspection, you can either choose to retain all the data you collected for tracking purpose or terminate the entire inspection without retaining any data. In such cases, the Inspection header displays the status as Terminated. |
Description |
Displays a description about the asset being inspected. |
Asset Unit |
Displays the business unit to which the asset is assigned. |
Asset ID |
Displays the Asset ID that is specified in the Asset LookUp Field on the work order business unit Definition page. |
Location |
Displays the current location of the asset. |
Area |
Displays the current area of the asset. |
Work Location |
Displays the work location of the inspection. |
Criticality |
Displays how critical the asset is to the organization’s operation. Note: A Warranty icon or Hazardous icon will appear next to an asset's criticality code if there are active warranties or the asset is hazardous. |
To start an inspection activity, select the Next button or select the first activity in the left pane.
Inspection – Pre-Checklist Items
The Pre-Checklist Items include any steps to be performed before conducting the inspection. You cannot proceed to the next sub-step until you complete this step. This sub step does not appear in case of no checklist items.
The instructions are read-only. Select the Complete check box of an instruction to mark it as completed. Complete all the required steps and save your changes. The sub step status changes to Complete when you finish saving the required checklist items.
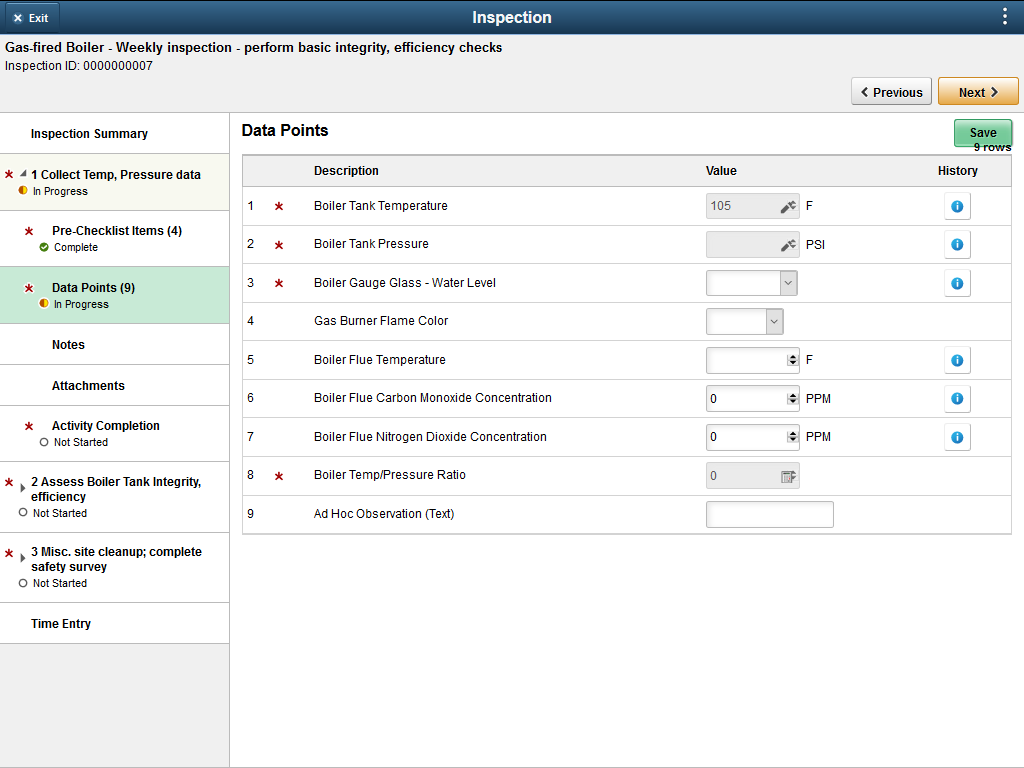
Inspection – Data Points Page
Data collection activity involves collecting and entering various inspection data.
Navigation:
Select the Data Points sub step in the left pane.
This example illustrates the fields and controls on the Inspection – Data Points page. You can find definitions for the fields and controls later on this page.
Field or Control |
Description |
|---|---|
Description |
Displays the inspection codes defined on the inspection plan. |
Value |
Enter values for each inspection code. The Edit icon indicates a meter reading. Select the icon, enter the reading in the Add Meter Reading window, and save it. For measurements codes with tolerance range specified, enter a value within the limits specified. Select the Calculate icon to calculate the numeric calculation data values. |
History |
Select this link to view the Asset Data Collection History page. If enabled for a particular inspection code, you can view a maximum of 5 values recorded previously for this inspection code. You can compare the current value with the previous readings. |
After entering all the required values, save the activity.
See Data Collection Activity — Work Order Inspection-Activity Detail Page.
Inspection- Notes and Attachments Page
Select the Notes and Attachments sub steps to view or add any notes or attachments about the activity.
Inspection – Activity Completion Page
After performing all the required sub steps, you can change the status of the activity to Completed and move on to the next inspection activity.
Navigation:
Select Activity Completion in the left pane.
Field or Control |
Description |
|---|---|
Activity Status |
Select the Completed status from the drop-down list. |
Planned |
Displays the planned hours to complete the activity. |
Elapsed |
Displays the total amount of time since you initiated the first activity step. |
Change the status and save the activity. The status of the activity changes to Completed. Next, you can select the subsequent activity in the left pane.
Inspection – Evaluation Triggers Page
In the Trigger Evaluation step, you can run the saved data points to identify the failure or exception conditions of the target asset.
Navigation:
Select the Evaluation Triggers step in the left pane.
This example illustrates the fields and controls on the Inspection – Evaluation Triggers page.
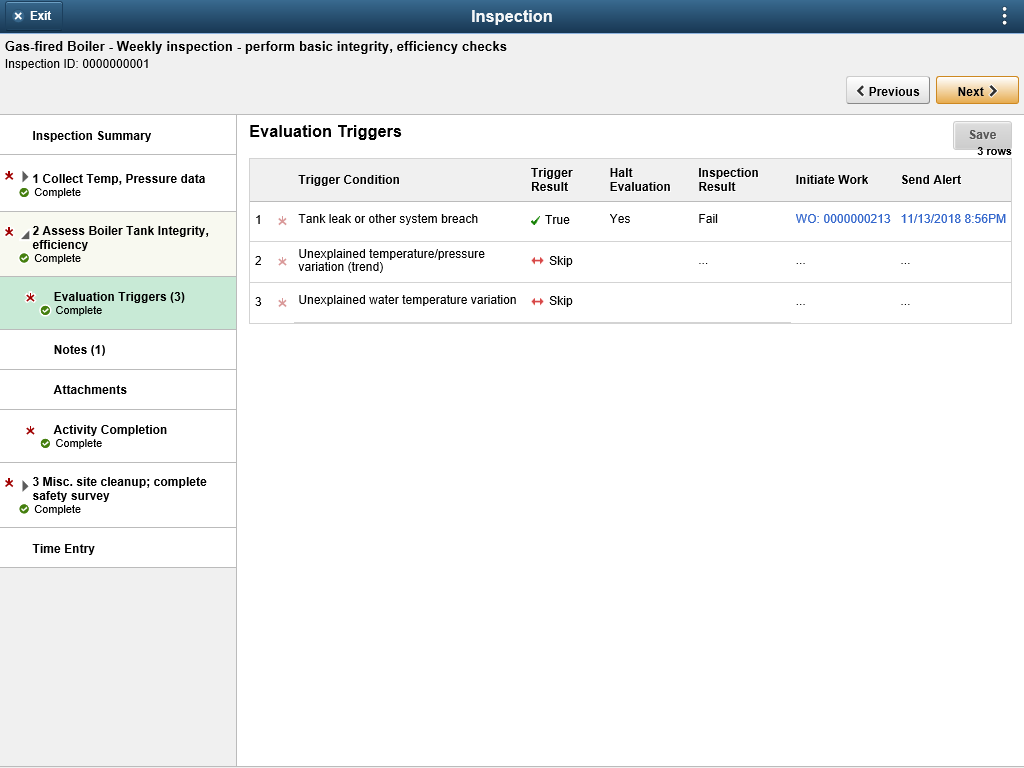
See Trigger Evaluation Activity — Work Order Inspection-Activity Detail Page.
Use the Scheduled Tasks page to view a pivot grid of work order tasks by their scheduled date.
Navigation:
Select the Open WO Tasks by Date tile on the Mobile Technician Home page.
This example illustrates the fields and controls on the Scheduled Tasks page.
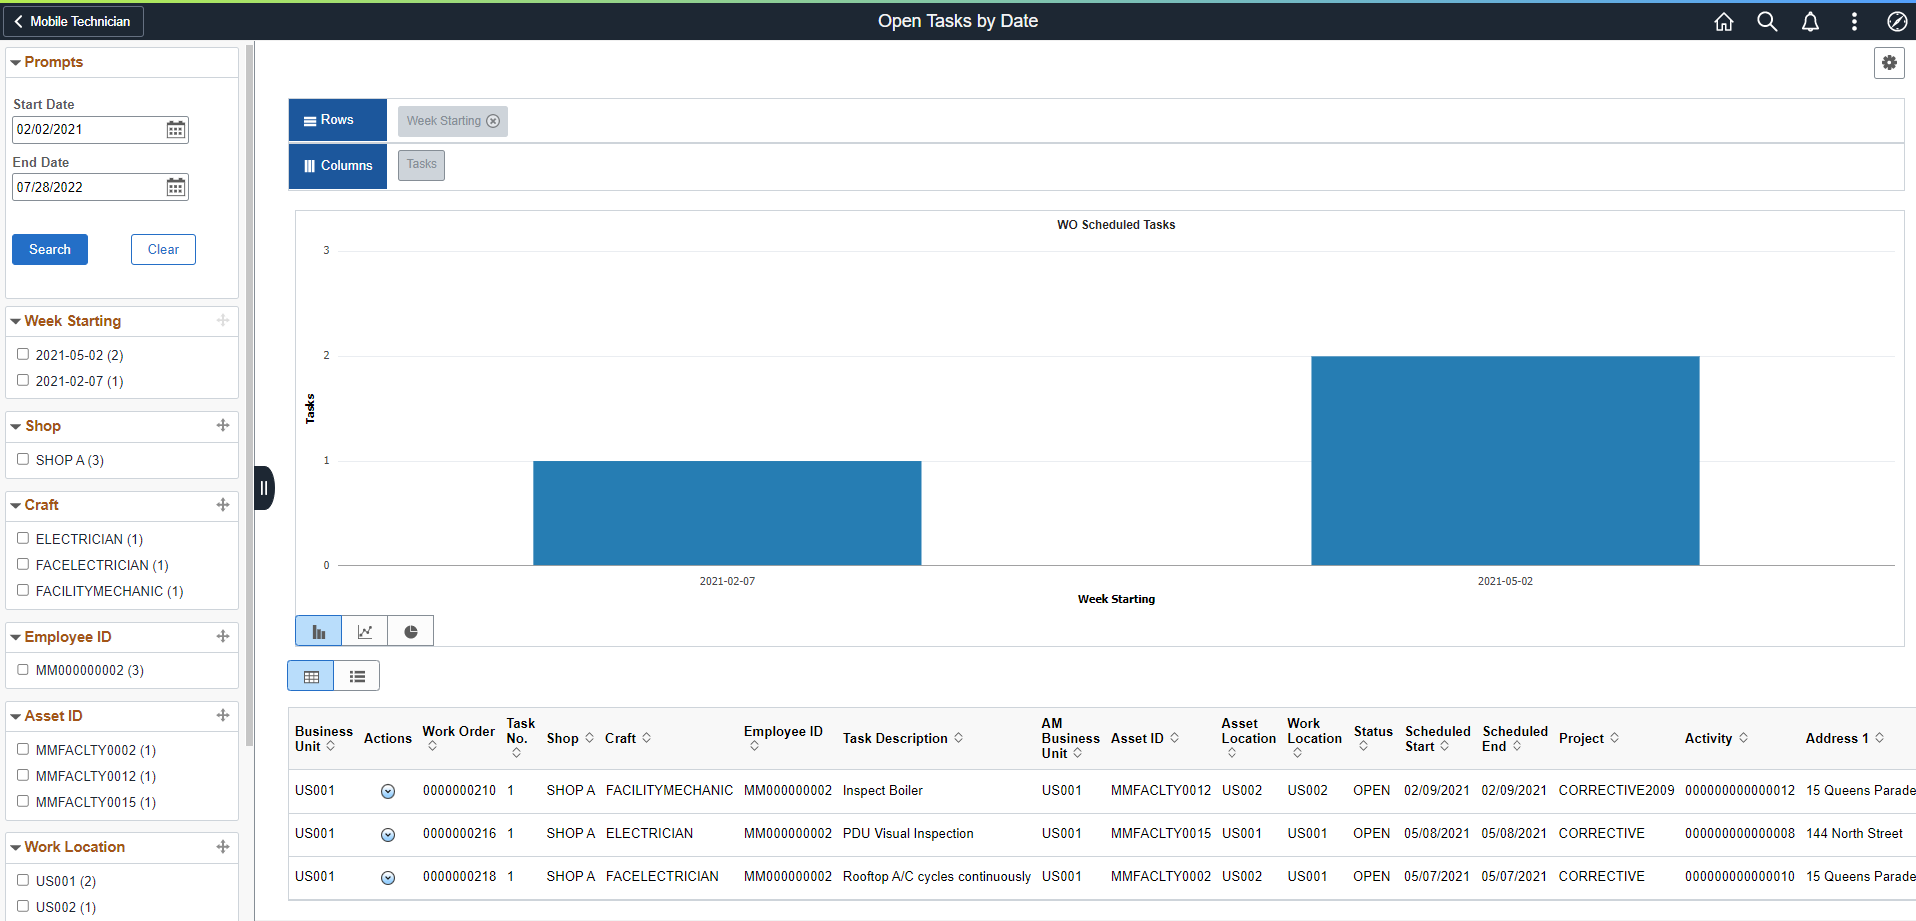
Note: The pivot grid is displayed based on the default date range configured on the Open Work Orders Page.
Use the Tasks by Priority page to view a pivot grid of work order tasks on the basis of their priority.
Navigation:
Select the Open WOs by Priority tile on the Mobile Technician Home page.
This example illustrates the fields and controls on the Tasks by Priority Page.
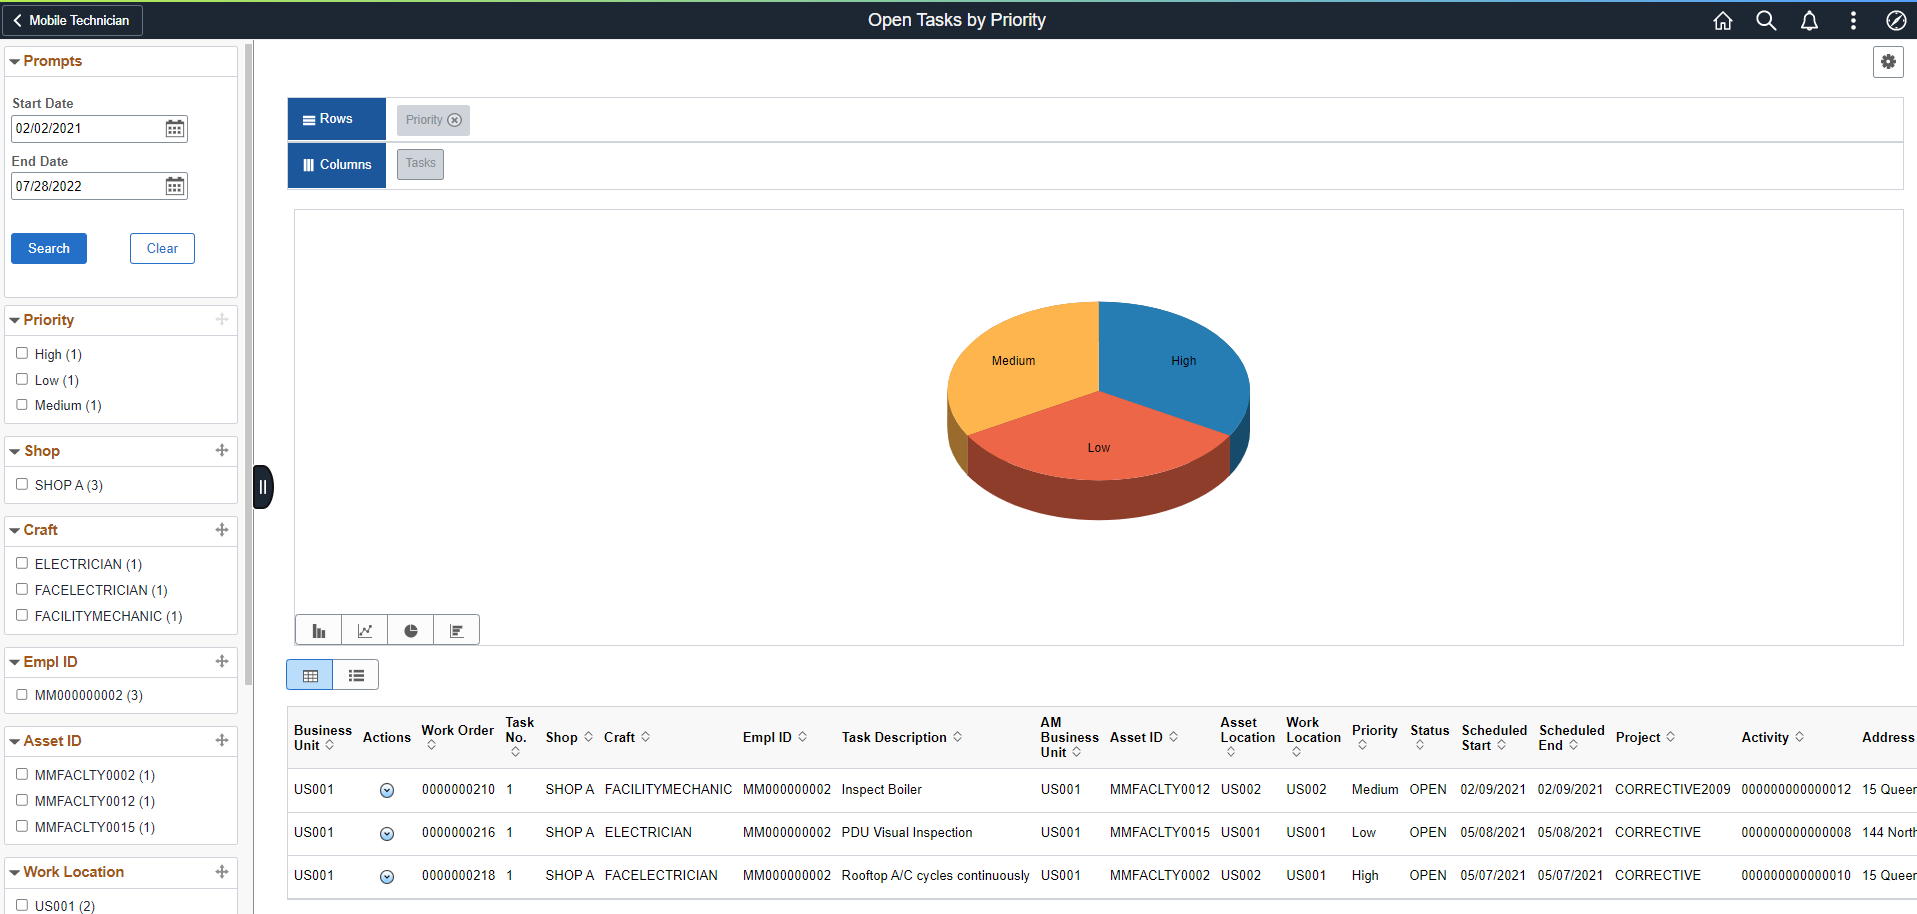
Note: The pivot grid is displayed based on the default date range configured on the Open Work Orders Page.
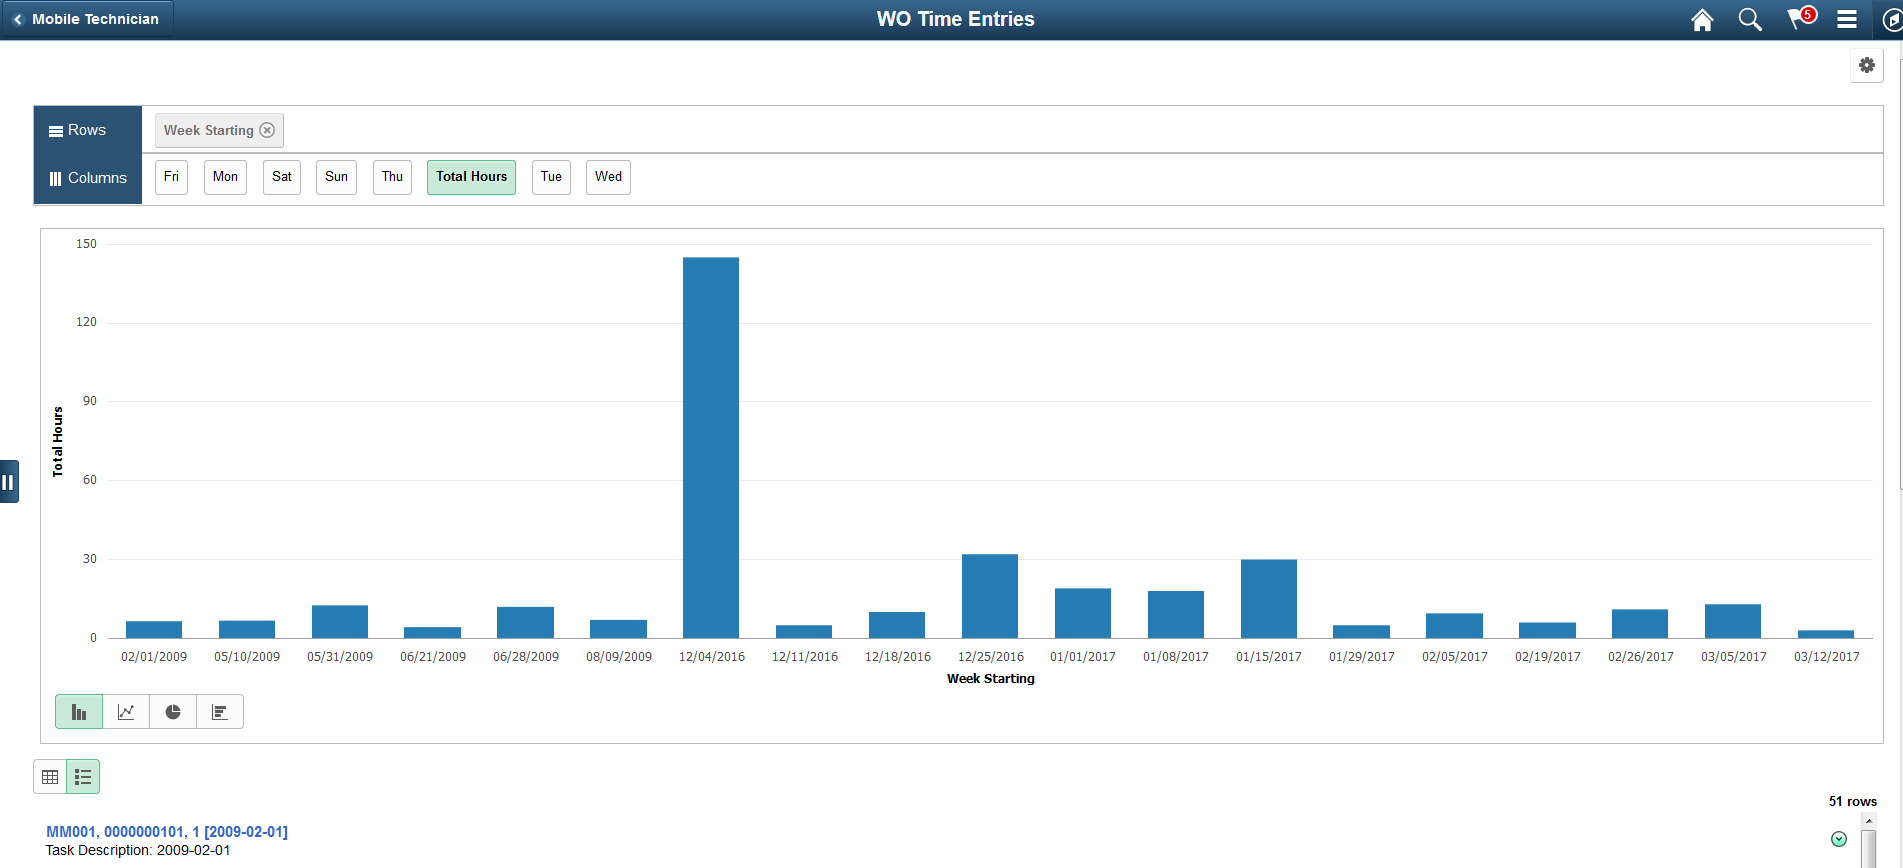
Use the WO Time Entries page to view a pivot grid of total hours the technician entered for each week.
Navigation:
Select the Weekly WO Time Entry tile on the Mobile Technician Home page.
This example illustrates the fields and controls on the WO Time Entries Page.
Use the Asset Search page (WM_ASSET_SRCH_SCF) to search for assets to associate with the work order.
Navigation:
Select Asset Search on the Add Work Order page.
This example illustrates the fields and controls on the Asset Search Page.
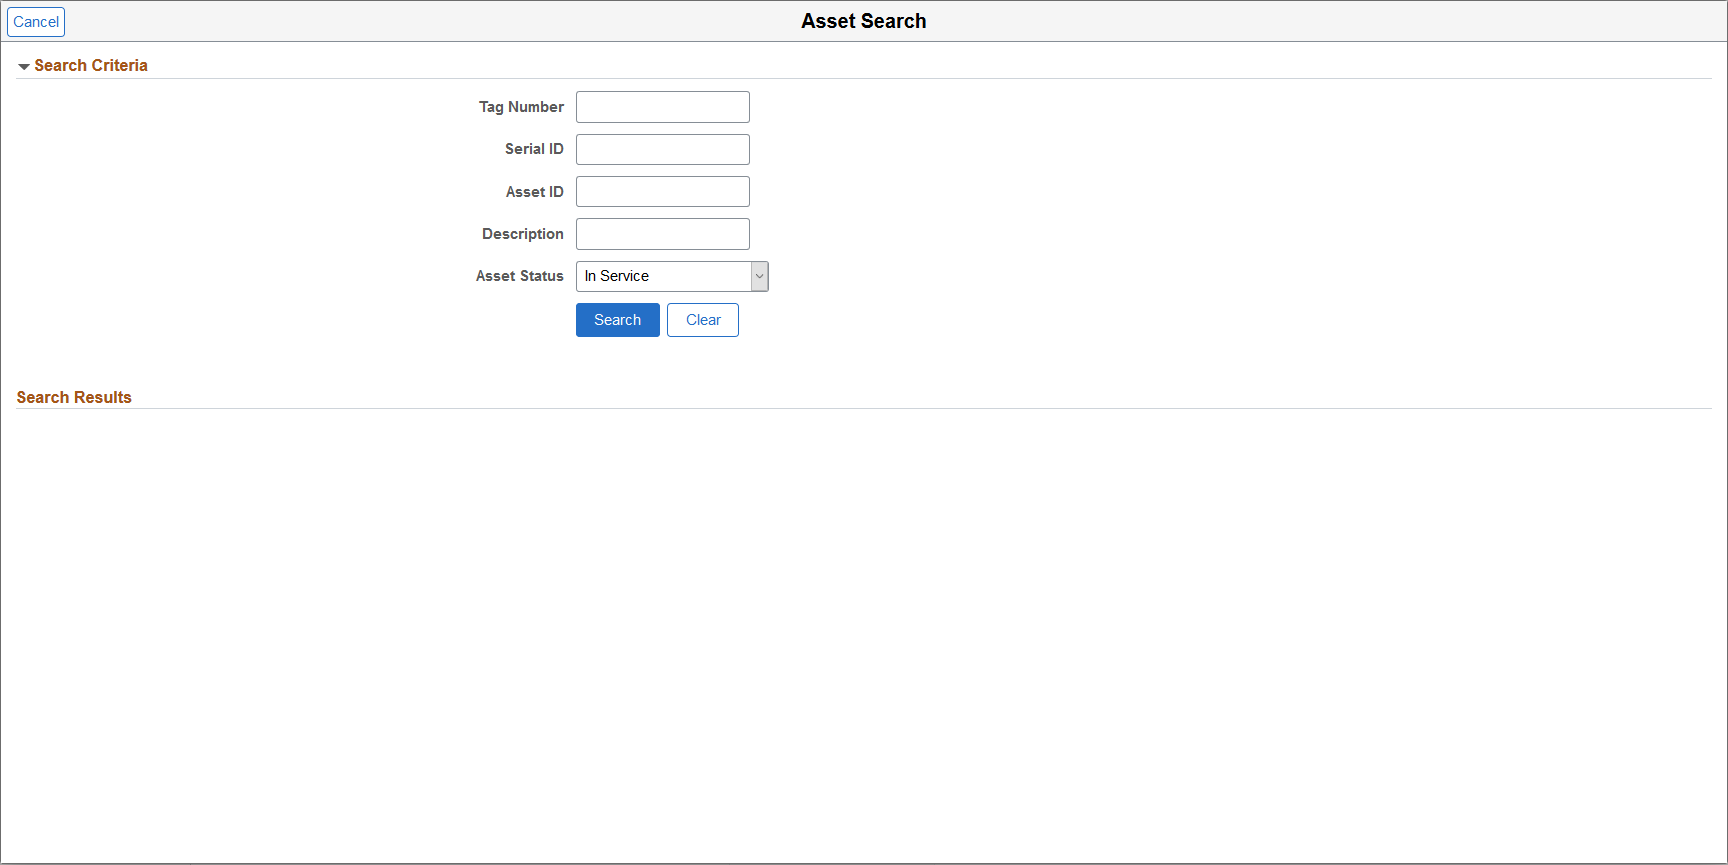
Use this page to search across all Asset Management business units, and by asset description, status, asset ID, serial ID, and tag number.