Using PeopleSoft Mobile Expenses
Click to view a Video Feature Overview (VFO) of PeopleSoft Mobile Expenses.
PeopleSoft Mobile Expenses provides the following functionality from a mobile phone or tablet:
Enter, maintain, and submit expense reports (with business rule validation).
Review expense report history - reports and statuses for the past six months.
Add, review, and edit My Wallet transactions.
Add, review, and edit attachments, which includes images and other supporting documents.
Receive notices that alert you to travel advisories, expense policy changes, and so on.
View delivered expense report analytics and metrics.
Upon completing a mobile transaction and returning to the expense report summary page, your entries automatically update the database.
Change currency code.
Specify accounting distribution ChartField values (Department, Fund, Project ID, and Activity ID).
Interchangeably use link to full site for complex expense reporting needs.
Accelerometer technology automatically determines portrait or landscape display (phone versus tablet).
Web based (Wi-Fi connection needed). No AppStore installation required.
To use Mobile Expenses, you must configure system-wide settings. See Fluid Approval Setup - General Settings Page. Enable receipt attachments and images for expense reports from the Installation Options - Expenses PageTo view non-image attachments, you must specify the Process Server on the Mobile Approval Options page for report node setup. See Fluid Approval Setup - General Settings Page
To use Mobile Expenses, you must configure system-wide settings. See
From the , select Approvals, and then select the Expenses button:
This example illustrates the fields and controls on the Mobile Expenses Sign In page (tablet only). You can find definitions for the fields and controls later on this page.

Once you have signed in with your User ID and password, you are presented with the Expenses primary homepage. The Expenses homepage is virtually identical whether you launch from a mobile phone or a tablet and includes the same functionality. The only difference is that the mobile phone version is scaled to fit the smaller screen size of the mobile phone device.
This topic presents the Expenses homepage and discusses how to:
Add My Wallet expenses (Quick Expense).
Review My Wallet transactions.
Create mobile expense reports.
Add and view attachments and images.
Review expense history.
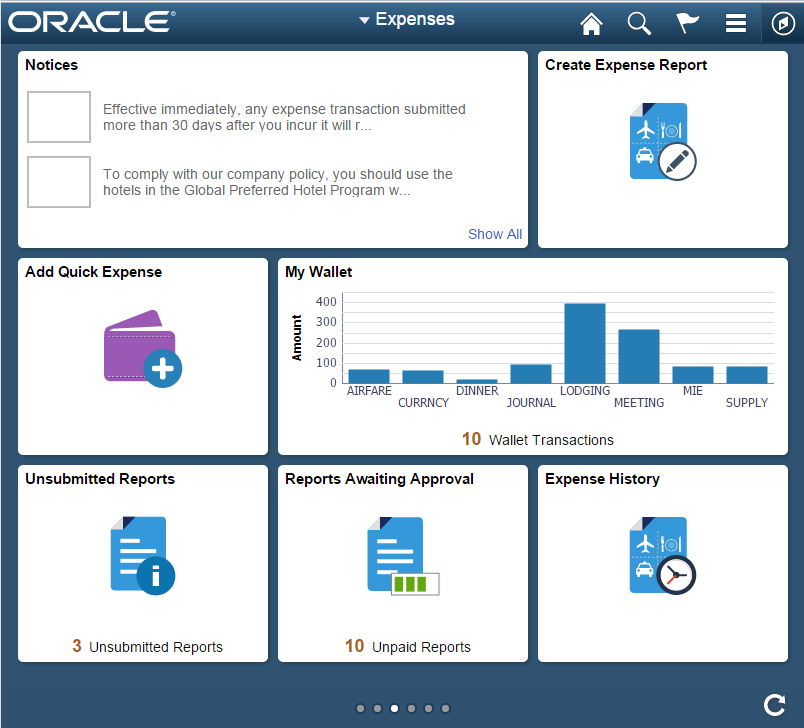
When you sign in from a mobile tablet, the Expenses homepage automatically adjusts to fit the screen:
This example illustrates the fields and controls on the Mobile Expenses homepage (mobile tablet view).
|
Buttons |
Description |
|---|---|
|
Add Quick Expense |
Select to add transactions directly to My Wallet. See Adding My Wallet Expenses |
|
My Wallet |
Select to review and edit My Wallet transactions. See Reviewing My Wallet Transactions |
|
Create Expense Report |
Select to add a new expense report. See Creating Mobile Expense Reports |
|
Expense History |
Select to review past expense reports and their statuses for the past 6 months. See Reviewing Expense History |
|
Unsubmitted Reports |
Select to access your pending expense reports. Entry of expenses is limited to the employee associated with the user ID with which you logged in. You can then open the reports and edit further before submitting for payment. |
|
Reports Pending Approval or Payment |
Select to access your submitted expense reports that are awaiting approval or payment. You can open the reports and check on their status. Once a report is paid, it is no longer available on this page, but you can view it in Expense History. |
|
Reports to Approve |
Select to access the Mobile Approvals application that displays all expense reports that require your review and approval. |
|
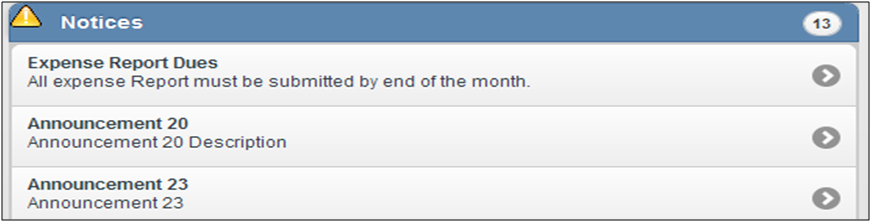
Notices |
Displays messages regarding expense policy notices, changes in travel security, and so on. You set up these notices using the Notices/ Announcements page. See Notices/Announcements Page |
|
(Analytics and metrics charts) |
A maximum of three analytic charts can be displayed on the tablet view of the homepage: My Wallet by Type, My Expense Reports by Status, and Expense Reports to Approve. All charts are available on the mobile phone view as well, but only one is shown at a time (swipe to advance to the next chart). |
Footer Buttons
The following buttons appear in the footer of most of the Mobile Expense application pages:
|
Buttons |
Description |
|---|---|
|
Full Site |
Select from any Mobile Expenses page or subpage to access the full PeopleSoft Full Site, which includes all PeopleSoft menus, including the traditional Expenses user interface. You can go back and forth between the mobile interface and the traditional application. The default view on the full site is the worklists page. |
|
Refresh |
Select to refresh the homepage. |
|
Sign out |
Select to log out of the Mobile Expenses application. |
|
Home |
Select to return to the Expenses homepage from anywhere in the application. |
When you select the Full Site footer button, you access the PeopleSoft Full Site:
This example illustrates the fields and controls on the Worklist page. You can find definitions for the fields and controls later on this page.
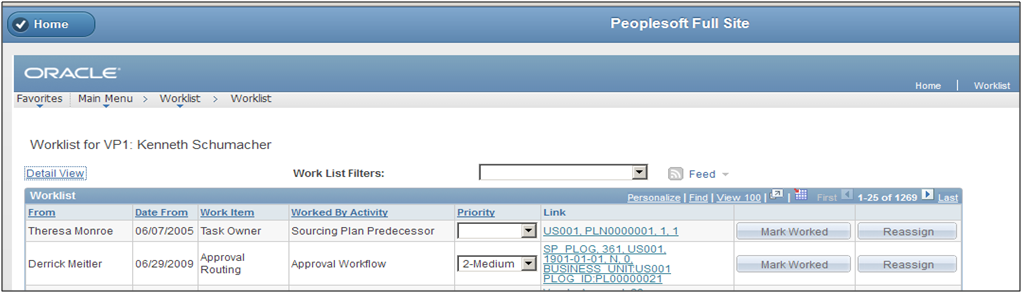
By default, you are directed to your Worklist. From here, you can navigate anywhere in the traditional PeopleSoft application. When you have performed the intended functions, select the Home button to return to the Mobile Expenses application.
Add My Wallet transactions from your mobile device by selecting the Add Quick Expense button from the Expenses homepage:
This example illustrates the fields and controls on the Add My Wallet Transaction page. You can find definitions for the fields and controls later on this page.
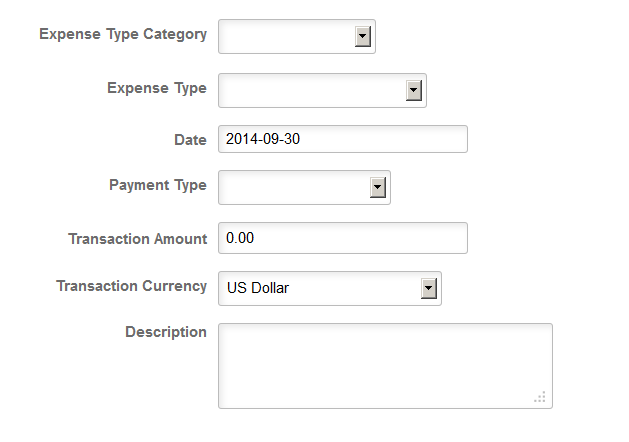
This page contains a minimal set of fields to keep entry as simple as possible.
Note: Additional fields are dynamically displayed on this page based on required fields that are designated for the particular expense type on the Expense Types setup pages (EX_EXPENSE_TYPES1). For example, when you select Air Travel, the Ticket Number and Merchant fields appear (some exceptions apply). For more information, see Setting Up Expense Types
For information on My Wallet transactions, see Understanding My Wallet Transactions.
Field or Control |
Description |
|---|---|
Expense Type Category |
Select the arrow to select from a list of expense categories. Depending on the expense category you select, the corresponding expense types will be filtered and displayed in the Expense Type drop-down list. If you do not select any expense type category, then all the expense types will be displayed in the Expense Type drop-down list. |
Expense Type |
Select the arrow to select from a list of expense types. Once you save the transaction, you can no longer change the expense type. You will need to delete the row and create a new one. |
Date |
Enter the transaction date. The current date is the default value. |
Payment Type |
Select a payment type. If your Employee Profile - User Defaults page (EX_EE_USER_PREF) has a Payment Type default specified, that default appears here; otherwise, this field is not populated with a default value. For more information, see PeopleSoft Expenses product documentation, Viewing or Modifying User Defaults. If you have more than one credit card for a payment type (more than one American Express, for example), you can select the Full Site button to access the correct credit card for selection. |
Transaction Amount/Transaction Currency |
Enter the amount of the expense transaction and select the transaction currency. The currency default value is the same here as is specified on the Employee Profile – User Defaults page. See Employee Profile - User Defaults Page |
Use this page to review and edit My Wallet transactions.
Navigation:
Select the My Wallet button from the Expenses homepage
This example illustrates the fields and controls on the My Wallet page.
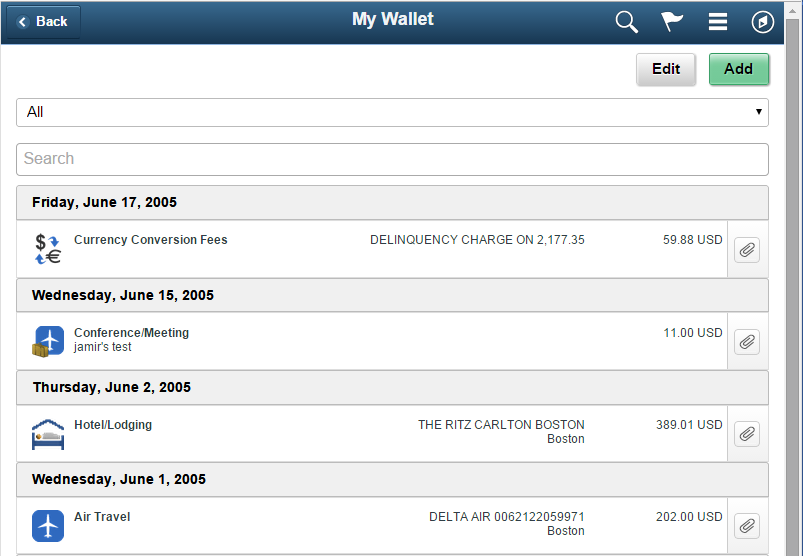
This page provides a listing of all outstanding wallet entries that have not yet been imported into an expense report for reimbursement. Transactions can come from multiple sources: credit card data feeds, traditional My Wallet component, and the Add Quick Expense in Mobile Expenses.
You can review and edit transactions prior to import, as well as delete one or many transactions. Credit card feed transactions cannot be edited or deleted here.
To filter your transactions by expense type, select the arrow button on the right in the top row.
Delete one or many transactions, select the Edit button at the top of the My Wallet page. A column is added to the left of the transactions so that you can select them for deletion (a Delete button appears at top of page).
To view and edit individual transactions, select the arrow button on the far right within the transaction line. You can save or cancel your changes.
Use the Expense Header page to start a new, blank report.
Navigation:
Select the Create Expense Report button from the Expenses homepage,
This example illustrates the fields and controls on the Expense Header page.
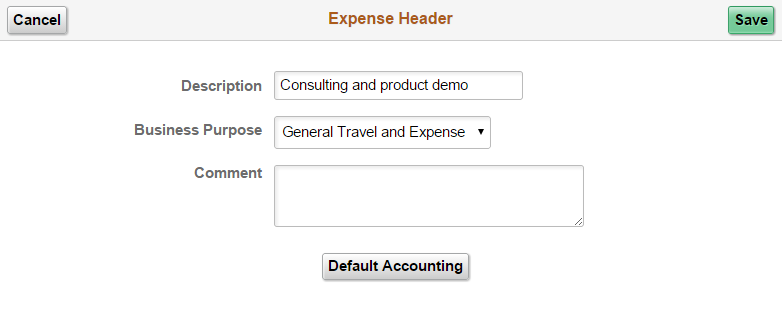
You are first presented with the Expense Header page where you can add a description, select a business purpose, and add a comment. Click the Save button when you are finished.
Select the Default Accounting button to establish default ChartField values for your expense report:
This example illustrates the fields and controls on the Default Accounting page.
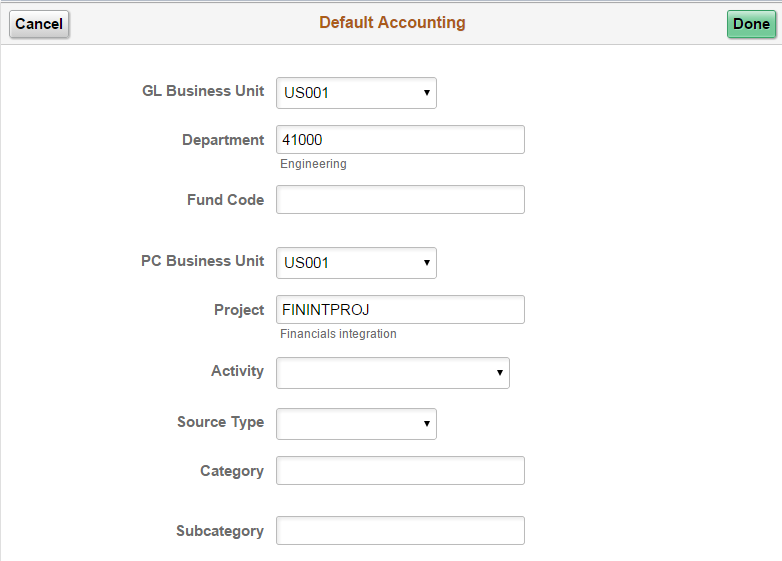
Because these defaults are established at the header level, all transactions on this expense report are charged to this department, fund, project, and activity combination, unless overridden at the line level. There is no header level percentage split for mobile expenses; although, you can provide a single override at the transaction line level. If you need to have a percentage or line level split among multiple lines, you should use the full site (standard user interface entry page).
The Department, Fund, Project, and Activity fields are only available here for a given user if they are established for the role in the Employee Privilege Template (EX_EE_PRIV_TMPL).
For more information, see Understanding Employee Privilege Templates.
For Department and Fund Code to appear, the GL ChartFields privilege must be set to Modify or View. For Project and Activity to appear, the PC ChartFields must be set to Modify (only if Project Costing is an installed product; if not, these fields do not appear). If the user does not have the proper privileges as described, the Accounting Default button does not appear either.
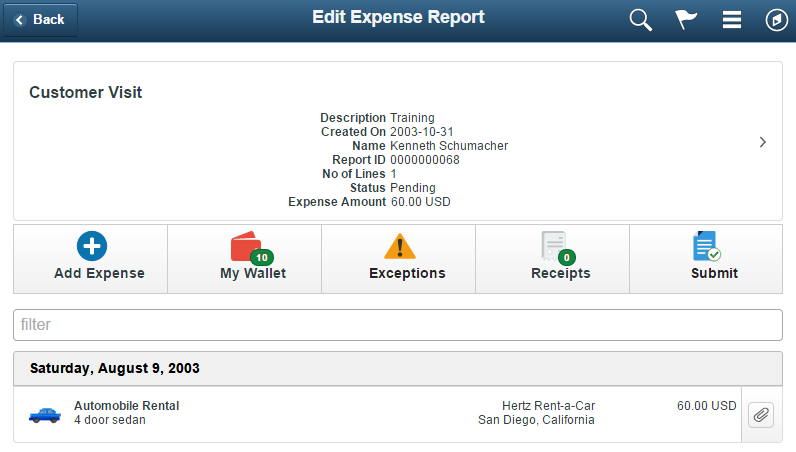
Select the OK button when you have supplied the ChartField default values for your expense report. Once you return to the Expense Header page, select the Save button. You are presented with the Edit Expense Report page:
This example illustrates the fields and controls on the Edit Expense Report page.
Field or Control |
Description |
|---|---|
Add Expense |
Select to add a new expense transaction directly to the expense report (not the wallet). |
My Wallet |
Select to select the Wallet transactions to be imported into this expense report for submission. Once you select the transactions, select the Import button. The transactions you selected appear on your expense report. |
Exceptions |
Select to show all exceptions that were triggered in this expense report (such as location limit exceeded, non-preferred merchant, and so on). A red bubble count indicates how many exceptions exist. When you select this button, only the expense lines with exceptions are displayed. You can drill into each transaction to provide comments for the exceptions. |
Submit |
Select to submit the expense report for approval. If any errors exist, you are presented with the errors, highlighting the additional information needed. You must correct your errors to submit successfully. |
Select the arrow button to the right of the header information to edit header details, if needed.
When you select the Add Expense button to add expense lines directly, you access the Expense Line page:
This example illustrates the fields and controls on the Expense Line page.

Select the Expense Type and complete the related dynamic fields.
Note: Expense types using per diem defaulting are not supported. Any expense types with the per diem check box activated (in expense type setup) is excluded from the available list of expense types in Mobile Expenses. If you open an existing expense report with a per diem expense type, you will be able to view the transaction in Mobile Expenses, but you cannot edit or copy it.
Select the Distribution button to override the ChartField value defaults for this expense line. The same information applies at the line level as described for the header level defaults. See Default Accounting page.
Some of the key features available with Mobile Expenses Attachments are:
Attachment functionality for Mobile Wallet transactions and Mobile Expense Reports for report header and report line levels. Similar to the existing Expense Report functionality, the Mobile attachments functionality can be enables from the Installation Option - Expenses page.
Upload attachments using a camera or choosing an image from the device gallery.
View attachments (images, pdf, Word document, and text files). Some restrictions and different behavior exist on mobile devices when viewing supported non-image files.
Copy wallet transaction attachments into the mobile expense report lines when importing wallet transactions.
Restore wallet transaction attachments when the expense lines associated with the wallet transactions are deleted from the expense report.
Delete one or multiple attachments.
You can perform the following attachment actions within Mobile Expenses:
From a mobile device, upload attachments using a camera or choosing an image from the device gallery. When you select the Add Receipt button from either the Wallet Receipts page or from the Expense Report header or line Receipts Page, you are presented with options to take a photo or video, choose an existing image, or cancel. Presented below is an example of the options as displayed on an smartphone (note that the user interface varies depending on the mobile devices):
View attachments immediately after uploading. Once you take a photo, you have the option to Retake, Preview, or Use the photo. Presented below is an example of this option on an smartphone (note that the user interface varies depending on the mobile device):
Delete a single Attachment with a swipe motion.
Delete attachments in mass by using the Edit and Delete buttons.
Copy attachments into the expense report line when importing wallet transactions to the expense report.
Automatically restore wallet attachments when the wallet transaction is deleted from the expense report.
Restrictions for Mobile Device Attachments
A primary feature of Mobile Expenses is uploading and viewing image files. Whereas you are able to upload all file types from the desktop, and Mobile Expenses supports viewing of the image files, there are some limitations when viewing non-image files. The following restrictions apply to Mobile device attachments:
These supported image files are treated similarly across platforms: gif, jpg, jpeg, bmp, and png.
Note: TIF files and image file types other than those listed above are not supported for viewing.
PDF file attachments:
Android - automatically downloaded for viewing. You may need to wait for the attachment to be distributed to the report node.
Apple Devices – viewing.
Desktop/Apple Safari browser: file open in a new browser tab. Note that you need to allow pop-up for this to work.
Word Documents
Android - automatically downloaded for viewing. You may need to wait for the attachment to be distributed to the report node.
Apple Devices – viewing is not supported in full screen mode.
Desktop/Apple Safari browser: file open in a new browser tab. Note that you need to allow pop-up for this to work.
Text Files supported similarly across platforms.
Attachments are view-only (adding and deleting attachments is not allowed) for reports with a status of Awaiting Approval and for History Expense Reports.
Access the My Expenses History page by selecting the Expense History button from the Expenses home page:
This example illustrates the fields and controls on the My Expenses History page. You can find definitions for the fields and controls later on this page.
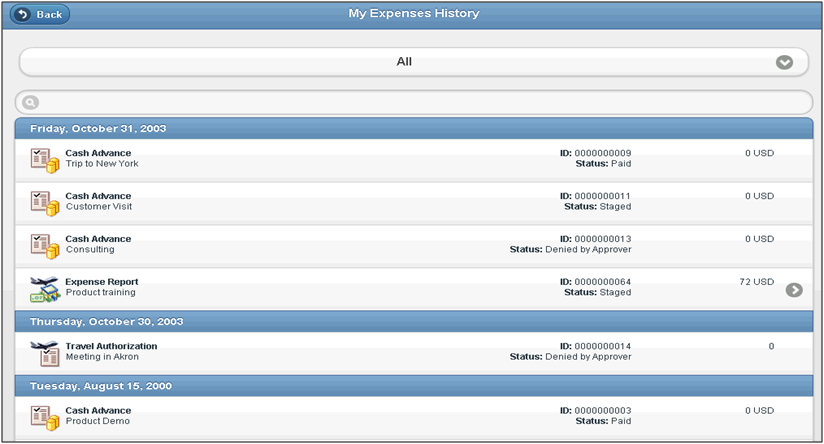
View all expense reports, cash advances, and travel authorizations and their statuses for the past 6 months. You are able to view the summary of cash advances and travel authorizations, but there is no drill down page to see the details, since that functionality is not available for Mobile Expenses.
Select the right arrow to view (only) expense report details.
To maximize the user experience, it is recommended that you upload an image for each frequently-used expense type. You may use the sample images that are provided or create and add your own.
Locate the Mobile Expenses Setup.zip file under the ../MIN_SETUP folder. Unzip the file (unless you previously completed the steps in the topic) and find the sample images in the Expense Type Sample Images folder. Upload an image for each frequently-used expense type. These images are used to render the mobile expense application pages on the mobile devices. . If no image is associated with an expense type, the system uses the default expense type image for the Mobile Expenses page.
Use the Expense Type 1 page to upload images for Expense Type definitions used in Mobile Expenses (from Mobile Expenses, select the Full Site button for PeopleSoft applications.
Navigation:
This example illustrates the fields and controls on the Expense Types 1 page. You can find definitions for the fields and controls in the PeopleSoft Expenses documentation.

Select the Update Image link to access the Expense Type Image Page and update (or remove) an image for the icon:
This example illustrates the fields and controls on the Expense Type Image Page.

Use the Notices/ Announcements page to add or modify notices for display on the Mobile Expenses Homepage.
Navigation:
.
(If you want to access this page from your mobile device, you can select the Full Site footer button from the Mobile Expenses homepage or any other page. Use the same navigation from above):
This example illustrates the fields and controls on the Notices/ Announcements search page.
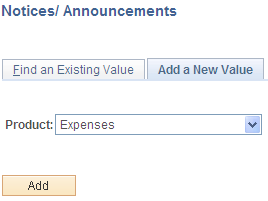
When adding a new notice or announcement, be sure to select the Expenses value from the Product field and select the Add button:
This example illustrates the fields and controls on the Notices/ Announcements page.
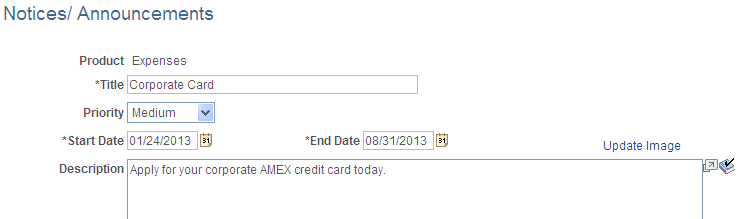
Supply a title for your notice, priority, start date and end date for the notice duration. The text that you add in the Description field is the notice that appears on the Mobile Expenses homepage. Optionally, select the Update Image link to add an icon that will appear in the Notices section of the Expenses homepage
This example illustrates the fields and controls on the Notices page.