Completing Work Order Inspections
After creating an inspection instance for a parent work order task, you can work on the inspection to complete it. The process of working on the inspection involves performing the required data entry for the various activities one at a time, in sequence, to move the inspection through its lifecycle to completion.
Note: You must complete the activities in the specified order and ensure that the status of the previous activity is set to Completed before you begin the subsequent activities.
Each inspection activity has its own status to indicate its progression. The aggregate status of all inspection activities in turn determines the status of the overall inspection instance. The available set of Activity Statuses includes:
Created - The default status of a new unassigned activity for which data entry has not started.
Assigned - The next status of an activity that has an Employee ID assigned and saved for it.
In Progress - The next status of an assigned activity for which data entry or processing has started.
Completed - The final status of an activity for which data entry and/or processing has completed.
If a technician or inspector explicitly terminates an inspection that is created, assigned, or in progress, then the inspection header displays the status as Terminated.
Note: Work Order inspection header status does not display the status as Completed until you complete all activities of the particular inspection.
To complete the work order inspection activities, use the Work Order Inspection (WM_WO_INSPECTION) component.
|
Page Name |
Definition Name |
Usage |
|---|---|---|
|
WM_WO_INSPECT_MAIN |
View work order details, inspection details, assign employees to activities, and view the total time spent on the activities. |
|
|
WM_WO_INSPECT_ACTV |
Check the activity steps and capture the required data. |
Use the WO Inspection page (WM_WO_INSPECT_MAIN) to view the parent work order task details, view the asset inspection information including activity details, assign labor resources to perform the activities, and view the total time spent on the inspection activities.
Navigation:
This example illustrates the fields and controls on the WO Inspection page. You can find definitions for the fields and controls later on this page.
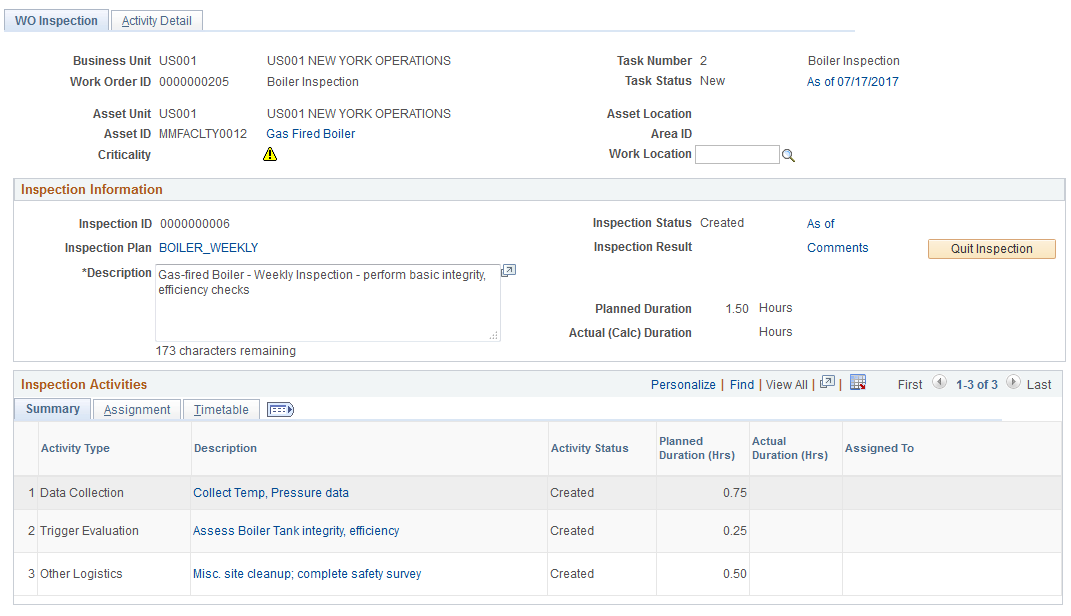
Work Order Inspection Header
Field or Control |
Description |
|---|---|
Business Unit and Work Order ID |
Displays the business unit associated with the work order and the work order task to which this inspection instance is linked. |
Asset Unit |
Displays the business unit to which the asset is assigned. |
Asset ID |
Displays the Asset ID that is specified in the Asset LookUp Field on the work order business unit Definition page. Click the Asset Information link to view the details about the asset. |
Criticality |
Displays how critical the asset is to the operation of the organization. A Warranty icon or Hazardous icon appear next to an asset's criticality code. You can click the Warranty icon and access the Asset Warranties page for this asset to check if the warranty covers the repair or partial repair of this asset. You can click the Hazardous icon and access the Asset Information page, which provides more information about any hazardous condition related to the selected asset. |
Task Number |
Displays the work order task number. |
Task Status and As of link |
Displays the current work order status. The date that the task was created displays as a link. Click this link to review the Task Status History page. |
Asset Location |
Displays the current location of the selected asset. |
Work Location |
Displays the work location where the current inspection is conducted. |
Inspection Information
Field or Control |
Description |
|---|---|
Inspection ID |
Displays the inspection ID number. |
Inspection Plan |
Displays the selected inspection plan. Click to view the details. |
Description |
Displays the description about the inspection plan. |
Inspection Status |
Displays the current status of the inspection. Click the As of date link to view the inspection status history. The status of inspection activities include:
|
Inspection Result |
Displays the result of the inspection after its completion. |
Comments |
Displays the comments about the inspection. Click the link to view or enter any comments. |
Planned Duration |
Displays the total hours planned to complete all the activities of the inspection. |
Actual Duration |
Displays the total elapsed time taken to complete all the activities of the inspection. |
Quit Inspection |
Click to terminate the inspection before its completion. While quitting an inspection you can either choose to retain all the data you collected for tracking purpose or terminate the entire inspection without retaining any data. In such cases, the Inspection status ID is displayed as Terminated. |
Inspection Activities – Summary Tab
Use this tab to view the overall summary of the inspection instance.
Field or Control |
Description |
|---|---|
Activity type |
Displays the type of inspection activity to be performed. |
Description |
Displays a brief description of the activity as specified in the inspection plan. Click the link to navigate to the Activity Details page and start entering data for the activity. |
Activity Status |
Displays the latest status of the activity. |
Planned Duration |
Displays the total time estimated for the activity in the inspection plan. |
Actual Duration |
Displays the total elapsed time taken to complete all the activities of the inspection. |
Assigned To |
Displays the employee's name assigned to perform the activity. |
Inspection Activities – Assignment Tab
After creating the inspection, use this tab to assign employees to perform the activities. After assigning the employees and saving the details, the Summary tab displays the assigned employee’s name against each activity.
Field or Control |
Description |
|---|---|
Default Craft |
Select the craft that is preferred to complete the specific activity. By default, the field displays the craft (if any) specified in the inspection plan. Note: This field allows modifications only until you select an employee to perform the craft. |
Employee ID |
Select the employee to perform this activity. The prompt table displays valid employees based on the following criteria:
Note: To perform any activity, it is mandatory that you first assign an employee for it. |
Employee Name |
Displays the selected employee’s name. |
Inspection Activities – Timetable Tab
Use this tab to track the actual start and end date time to complete each activity.
Field or Control |
Description |
|---|---|
Activity Start Date Time |
Displays the date and time when you started the activity. |
Activity End Date Time |
Displays the date and time when you completed the activity. |
Actual Duration |
Displays the total elapsed time taken to complete the activity. |
Use the Work Order Inspection-Activity Detail Page (WM_WO_INSPECT_ACTV) to individually work on different activities created for the inspection.
Note: It is recommended that you complete the activity steps in the specified sequence. You cannot perform data collection or trigger evaluation activity steps, until you mark any Before Activity type checklist items as completed. Any After Activity type checklist items must be marked completed before you set the status of particular activity to Completed.
Navigation:
Click the Activity Detail tab.
You can also click the activity description link on the WO Inspection page.
This example illustrates the fields and controls on the Work Order Inspection-Activity Detail page. You can find definitions for the fields and controls later on this page.
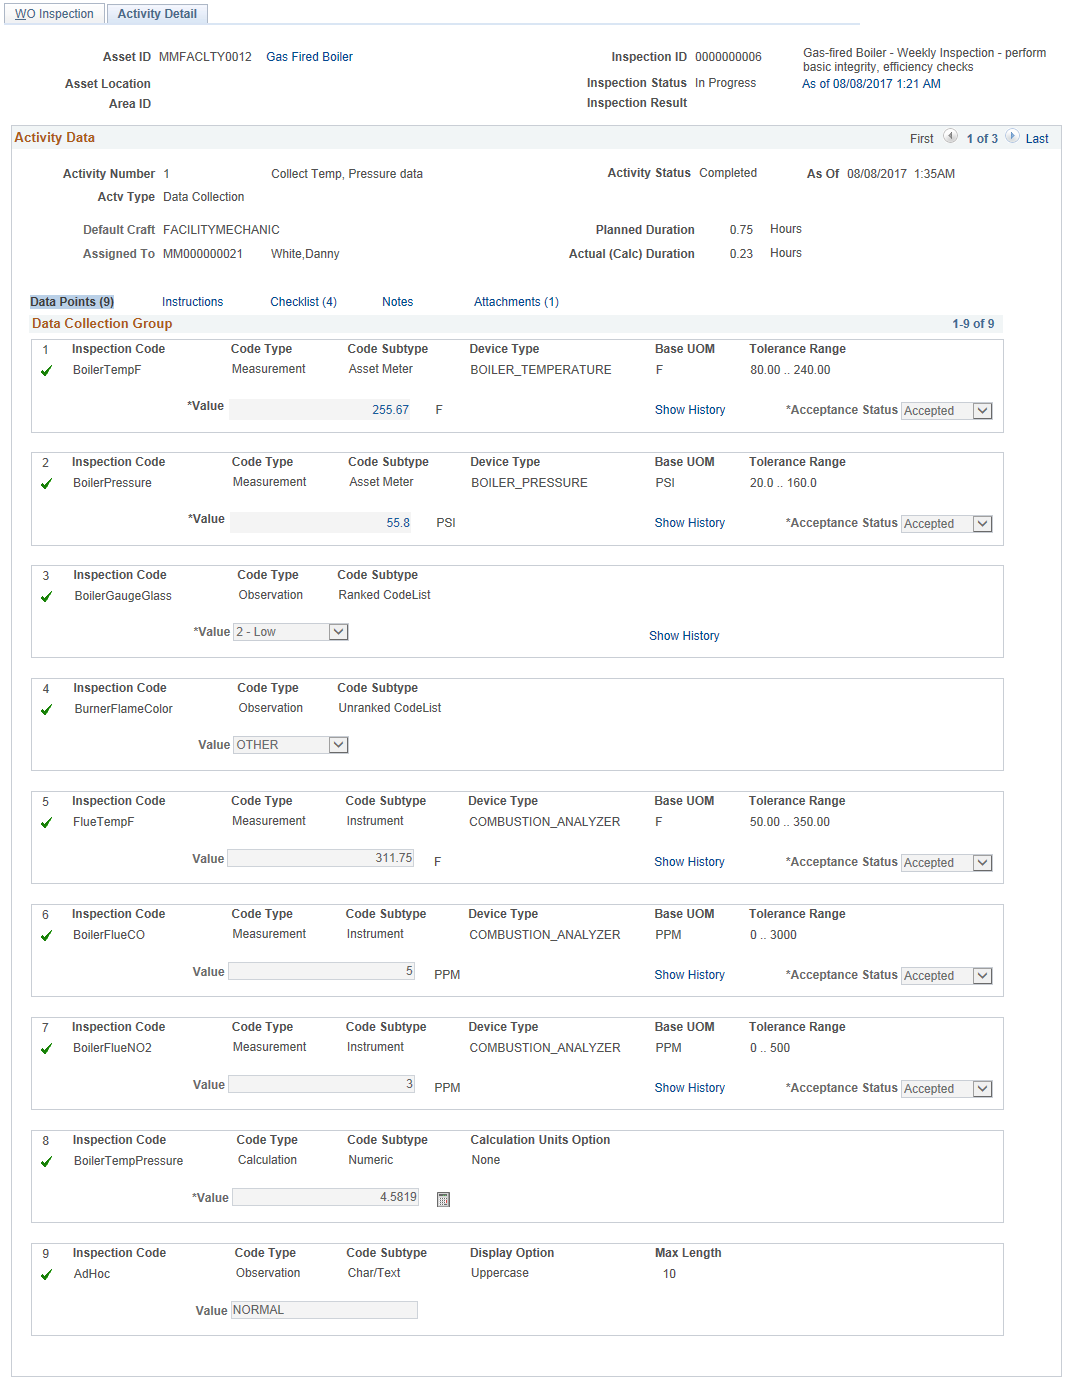
For each activity, the label of the primary data label link varies. The Data Collection activity displays the label as Data Points. For the Trigger Evaluation Activity, the label is Triggers, and for the Other Logistics activity, it is Other. Before beginning an activity, check the instructions, checklist items, notes, and attachments links. If the Checklist contains any Before Activity steps, finish them to proceed with data collection. Otherwise, a message displays prompting you to complete the required checklist items.
Data Collection Activity
The Data Collection activity enables to record various inspection code values that represent both quantitative and qualitative asset attribute values. You can enter numeric values according to the actual decimal precision displayed on the asset meter or measuring device. After entering the required values, you can analyze them using the evaluation activities to detect the asset failure or exception conditions. For a Data Collection activity, the numbers associated with the Data Points label indicate the total number of steps to be performed to complete the activity.
Field or Control |
Description |
|---|---|
Value |
Click the Enter Meter Reading link. In the new window displayed, click the Activate option to enable the Reading field. Enter the value and click Apply, and then click OK. The value field displays the data entered. For measurements codes with tolerance range specified, enter a value within the limits specified. |
Show History |
Click this link to view the previous readings captured for this inspection code and compare the current value with them. If enabled for a particular inspection code, you can view a maximum of 5 values recorded previously. |
Acceptance Status |
Select the Accepted or Rejected option. The Acceptance status options are enabled after you enter the meter reading value. If you accept the value, a green check mark appears to indicate that the entry is completed. If you reject the value, a red x replaces the green check mark. Select the Accepted or Rejected value to:
Note: The Accepted status overrides the normal validations and accepts the exceptional values logged. |
Calculate icon |
Click this icon to calculate the numeric calculation data values. |
Save |
Click to save the values entered and complete the activity. Confirm the activity completion in the confirmation message displayed. Note: Before you save the activity details, complete the required After Activity type checklist items, if any. The summary tab of the WO Inspection page displays the Activity Status as Completed and a green check mark appears. Now, you can proceed to the next activity. |
Trigger Evaluation Activity
The Trigger Evaluation activity type enables you to execute one or more trigger type calculation code formulas in a series of steps for the activity to identify the failure or exception conditions of the target asset. If the trigger condition returns a True value, you can take a necessary or appropriate response action. The work response actions include creating a work order, service request, or scheduling a one-time PM work order.
The number associated with the Triggers label indicate the number of trigger conditions to be executed for the trigger evaluation activity.
Navigation:
Click the description for the Trigger Evaluation activity or select the Show next row arrow in the Activity Data group box.
This example illustrates the fields and controls on the Work Order Inspection-Data Collection Activity Detail page. You can find definitions for the fields and controls later on this page.

Different pre-execution icons for the trigger evaluation activity include:
Field or Control |
Description |
|---|---|
|
The Pending Previous Activity icon indicates that you need to complete the preceding activity to start working on this activity step. |
|
The Pending Activity Assignment icon indicates that the execution of an activity step is blocked until the status of the parent activity is set to Assigned. |
|
The Ready to Evaluate icon indicates that the activity step is ready for evaluation. Note: To execute the evaluation, this is the only icon you can click. The evaluation steps are executed sequentially until the first exception (True or Error) is detected. |
|
The Pending Prior Evaluation Step icon indicates that the execution is prevented for this activity step until the preceding activity step is evaluated. |


Different post-execution icons for the trigger evaluation activity include:
Field or Control |
Description |
|---|---|
|
The Completed Evaluation icon indicates the successful execution of the activity step. |
|
The Skipped Evaluation icon indicates that execution is skipped for an activity step due to the Halt Further Evaluation option being triggered for a prior evaluation step in the same activity. |
|
The Invalid Expression icon indicates that an evaluation step cannot be executed or the execution of an evaluation step failed. This returns the trigger result value as Error. |


The Trigger Evaluation grid displays the following fields:
Field or Control |
Description |
|---|---|
Trigger Result |
Displays the result of the trigger evaluation activity. The possible evaluation results are False, True, or Error. |
Halt further Evaluation |
Indicates that you can skip any subsequent evaluation steps if the trigger result is True and the field displays Yes. |
Set Inspection Result |
Displays the inspection result as set in the inspection plan for a True result. |
Initiate Work Response |
Displays the work response action set in the inspection plan for a True result. Performing a work response action is optional. You can complete the activity without performing a work response action. |
Send Alert Message |
Indicates that the user can send an alert message for a True or Error result, according to the default parameters established in the inspection plan. |
Other Logistics Activity
Check the Other Logistics activity type for details consisting only of instructions, checklist items, notes and attachments.
For a True evaluation result, you can creating a service request, a work order, or schedule a one-time PM work order as set in the inspection plan to notify the respective roles about severity of the asset exception conditions. You can also send alert messages that briefly describe the nature of the problem detected. If the evaluation result is Error, you can only send an alert message to the defined alert roles.
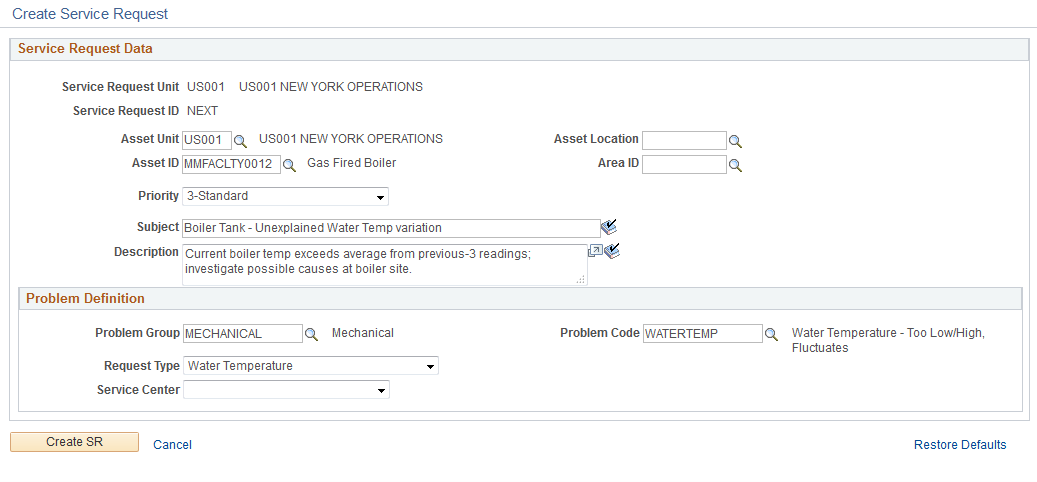
Create Service Request Page
Use the Create Service Request page (WM_WO_INSP_CREA_SR) to review or modify service request parameters defined in the inspection plan for a particular trigger condition if the trigger evaluation steps returns a True result.
Navigation:
Click the Create SR link in the Initiate Work Response column of the trigger exception condition.
This example illustrates the fields and controls on the Create Service Request page. You can find definitions for the fields and controls later on this page.
Field or Control |
Description |
|---|---|
Asset Unit, Asset ID, Asset Location, and Area ID |
Displays the asset data of target asset as set in the inspection plan. You can modify the values if required. |
Priority |
Displays the priority for the service request. Change the priority if required. |
Subject and Description |
Displays the subject and description for the service request. You can modify the details as required. |
Problem Group and Problem Code |
Displays the category and the code defined for the problem. The fields help to narrow your search for the available request types. You can modify this details if the problem detected is different. |
Request Type |
Displays options that best describes this service request problem. |
Service Center |
Displays the service center to route the service request to the location where the agent works. |
Restore Defaults |
Click this link if you want to reset the original values defined in the inspection plan. |
Enter the required details and click the Create SR button to create the service request.
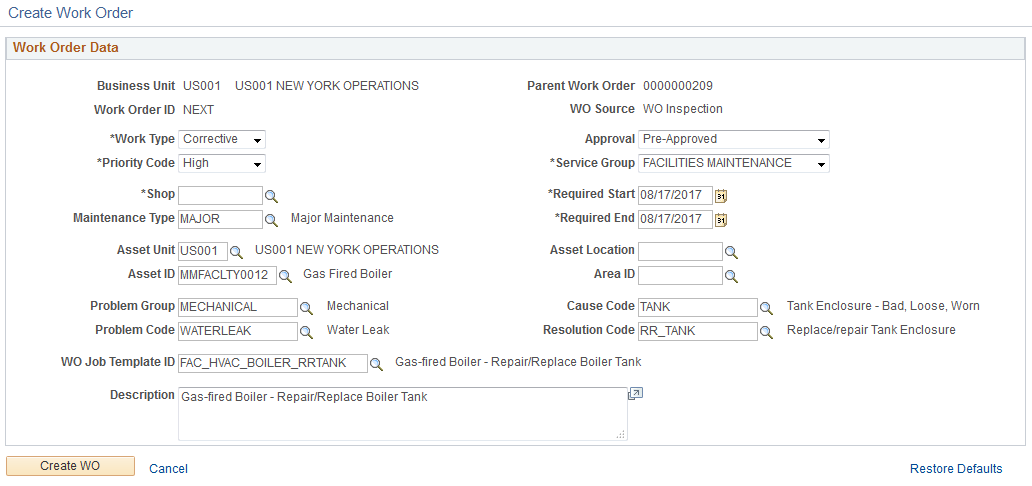
Create Work Order Page
Use the Create Work Order page (WM_WO_HDR) to create a work order if a particular trigger condition result displays the initiate work response action as Create WO. By default, the Create Work Order page populates the details based on the exception indicated by the trigger condition. You can modify them if required.
Navigation:
Click the Create WO link in the Initiate Work Response column of the trigger exception condition.
This example illustrates the fields and controls on the Create Work Order page. You can find definitions for the fields and controls later on this page.
Field or Control |
Description |
|---|---|
Business Unit |
Displays the work order business unit. |
Parent Work Order |
Displays the parent work order ID to which an inspection plan is associated. |
Work Order ID |
Displays NEXT as the default work order ID. When the work order is saved, a numeric value replaces this. |
WO Source |
Displays the source for a new work order. |
Work Type |
Displays the work type specified in the inspection plan. You can modify this value if required. |
Approval |
Displays the work order approval status. |
Priority Code |
Displays the work order urgency level. |
Service Group |
Displays the category that best describes the work order. |
Shop |
Displays the shop ID assigned for this business unit. |
Maintenance Type |
Displays the work order maintenance type as defined in the inspection plan. You can change this if needed. |
Required Start and Required End |
Displays the start and end dates of the work order. |
Asset Unit, Asset ID, Asset Location, and Area ID |
Displays the asset data of target asset as set in the inspection plan. You can modify the values if required. |
Problem Group and Problem Code |
Displays the category and the code defined for the problem. You can modify this details if the problem detected is different. |
Cause Code |
Displays the cause code based on the problem code. You can select a possible cause for the problem. |
Resolution Code |
Displays the resolution code based on the cause code. Select a possible resolution for this problem. |
WO Job Template ID |
Displays the job template ID from which the associated task and resource requirements will be copied to the new work order. |
Description |
Modify the problem description if required. |
Create WO |
Click this button after entering all the required details to create a new work order. |
Restore Defaults |
Click this link if you want to reset the original values defined in the inspection plan. |
Schedule 1-Time PM Page
Use the Schedule 1–Time PM page (WM_PM_SCHD) to schdule PM work orders if a particular trigger condition result displays the initiate work response action as Sched PM. When you run the Preventive Maintenance process, it generates work orders depending on the way that you set up your preventive maintenance schedules.
Navigation:
Click the Sched PM link in the Initiate Work Response Column of the of the trigger exception condition.
This example illustrates the fields and controls on the Create 1–Time PM page. You can find definitions for the fields and controls later on this page.
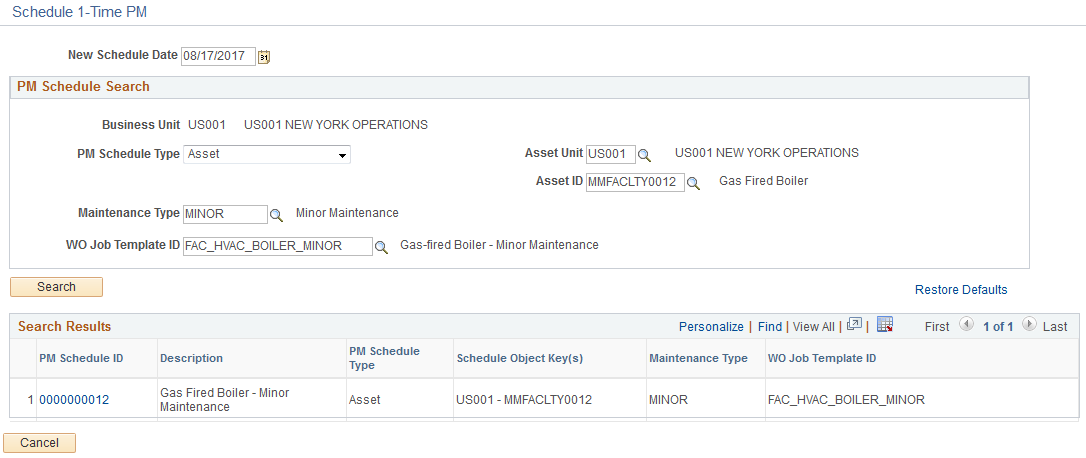
Field or Control |
Description |
|---|---|
New Schedule Date |
Enter the date for the new PM schedule. |
PM Schedule Search group box |
By default, displays the values as set in the inspection plan.
|
Search |
Click this button to search for the most appropriate PM schedule ID to be updated to override its scheduled date to process the PM schedule on the newly scheduled date. |
Search Results group box |
Displays an appropriate PM schedule ID on the basis of the PM Schedule Search group box details. Click the desired PM Schedule ID to access its definition and accept or save the proposed schedule change. After saving the Activity Details page replaces the Sched PM link with the updated PM schedule ID. |
Note: To generate PM Work orders, the Generate PM Asset Inspections option must be selected in the Work Order Definition page.
Send Alert Message
Use the Send Alert Message (WM_WO_INSP_SAM_SEC) to optionally send alert messages with a subject line and message body content indicating the precise nature of the problem detected to a targeted set of key personnel based on their organizational roles and responsibilities. The Send Alert option displayed for a trigger exception condition indicates that the option is set in the inspection plan for the particular trigger condition. At any point prior to activity completion, you can optionally access this link to finalize and send an email notification according to the default parameters established in the inspection plan.
Navigation:
Click the Send Alert link if displayed in the Send Alert Message column of the of the trigger exception condition.
This example illustrates the fields and controls on the Send Alert Message page. You can find definitions for the fields and controls later on this page.
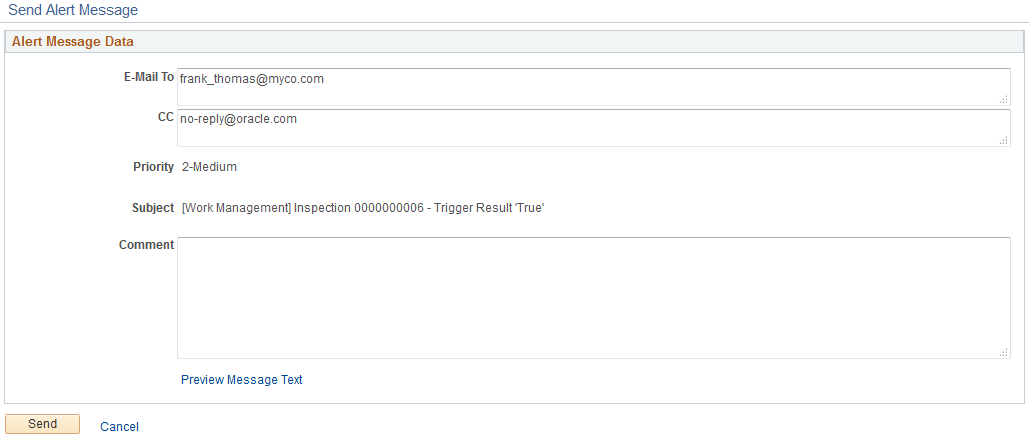
Field or Control |
Description |
|---|---|
E-Mail To |
Enter the primary recipient’s email address. |
Cc |
Enter the email address of other recipients. |
Priority |
Displays the message’s priority level as set in the inspection plan. |
Subject |
Displays the message’s subject as set in the inspection plan. |
Comment |
Enter your comments about the problem. |
Preview Message Text |
Click this link to view the final message content. The message will display the latest inspection values. |
Send |
Click this button to send the message. |