Establishing PeopleSoft Program Management Business Unit Options
To set up business unit options, use the Program Management Options component (PGM_BUS_UNIT_OPT).
|
Page Name |
Definition Name |
Usage |
|---|---|---|
|
PGM_PROG_MGMT_OPT |
Define business unit options. You can specify program management options, designate the enterprise program tree, and establish various default settings for specific business units. |
|
|
PGM_BU_HLTH_OPT |
Specify default project health options. |
Use the Program Management Options page (PGM_PROG_MGMT_OPT) to define business unit options. You can specify program management options, designate the enterprise program tree, and establish various default settings for specific business units.
Navigation:
This example illustrates the fields and controls on the Program Management Options page.
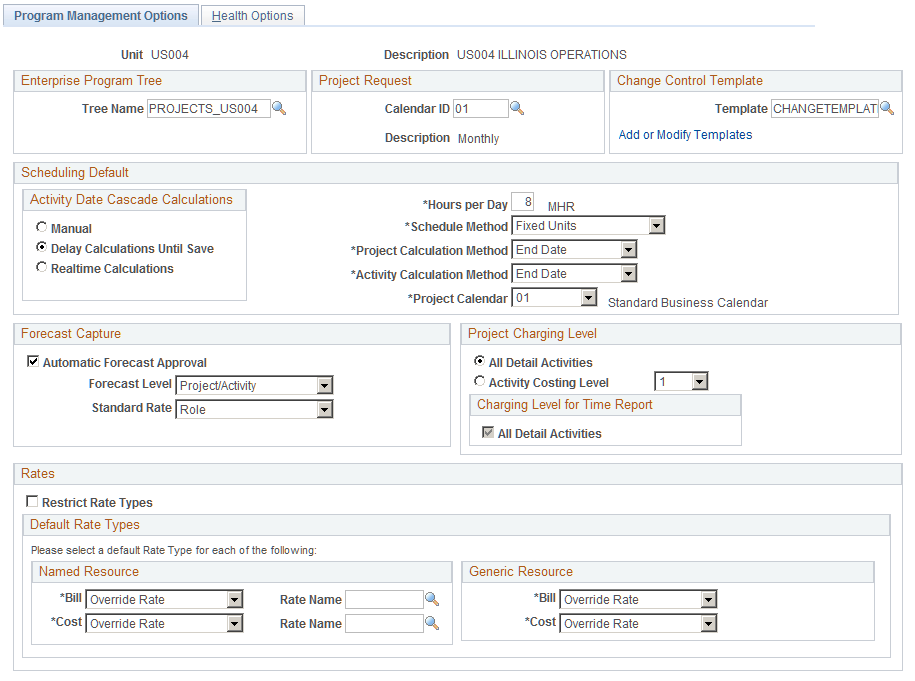
Enterprise Program Tree
The system uses the enterprise program tree to establish the relationships among all programs and projects that are within the business unit. You do not need to create and maintain enterprise program trees if the organization does not need to create a hierarchy of programs and detail projects for analysis and organization. However, if you want to take full advantage of the ability of PeopleSoft Program Management to create programs as umbrellas for detailed projects and other programs for the purposes of management, reporting, and analysis, you must maintain at least the programs and projects that you want to be able to analyze in the tree. Although you are not required to do so, you should enter and maintain all projects and programs in an enterprise program tree for maximum control, organizational clarity, and reporting sophistication with respect to the projects and programs.
Field or Control |
Description |
|---|---|
Tree Name |
Select an enterprise tree or enter the name of a new tree, and click the Initialize Enterprise Tree button. This is the enterprise tree that is associated with the selected business unit. |
Initialize Enterprise Tree |
Click to create a new enterprise program tree for the business unit. You must enter the name of the new tree in the Tree Name field before you can initialize the tree. |
Project Request
Field or Control |
Description |
|---|---|
Calendar ID |
Select the calendar to use for project requests that are within the selected business unit. This calendar determines the periods and years into which users can enter project request costs and benefits. The calendar that you specify should contain entries for years as far into the future as you anticipate that users will forecast benefits and returns on any given request. For instance, if the organization intends to use project requests to approve capital requests for large-scale assets such as land and buildings, you are likely to need 30 or more future years' worth of entries set up in the calendar that you specify. Note: Avoid using daily detail calendars for project requests because such calendars result in many rows of data. Instead, use monthly calendars (preferred), or if you need more details for budgeting purposes, use weekly calendars. |
Change Control Template
Field or Control |
Description |
|---|---|
Template |
Select a template that defines the default change control settings for projects and activities that are created within the selected business unit. |
Add or Modify Templates |
Click to access the Change Control Template Page, on which you can specify change control attributes for projects, activities, transactions, budget plans, resources, and estimates to complete. |
Scheduling Default
Select an Activity Date Cascade Calculations option to determine how the system rolls up start and end dates on summary activities.
Field or Control |
Description |
|---|---|
Manual |
Select to manually enter the start date, end date, and duration for projects on the Project General page and for activities on the Project Activities page. The system does not perform any date calculation. |
Delay Calculations Until Save |
Select to have the system roll up activity start and end dates to summary activities at save time. This is the default option in PeopleSoft Program Management. |
Realtime Calculations |
Select to have the system roll up activity start and end dates to summary activities as soon as you change the detail activity dates. Note: For optimal performance, do not select this option if you have large work breakdown structures, such as those with greater than 100 activities and four levels. |
Hours per Day |
Enter the number of hours that define a work day for this business unit. The system uses this field to calculate the duration in days. |
Schedule Method |
Select the default method for calculating schedules in the business unit. The scheduling method determines what element of a project schedule remains constant when one of the three scheduling variables (work, duration, or units) changes. Select one of these scheduling methods:
|
Project Calculation Method and Activity Calculation Method |
Select the default method for calculating schedules at the project and activity levels. Select one of these methods:
|
Project Calendar |
Select a default calendar to use for calculating schedules at the project and activity levels. The system uses this calendar to determine business holidays and nonwork days and to factor them into the calculation of start dates, end dates, and durations. If you use PeopleSoft Resource Management, the system does not schedule resources on project calendar holidays on assignments that are created in PeopleSoft Program Management. |
Note: You can override each of these defaults, except for the project request Calendar ID for individual programs and projects.
Forecast Capture
Field or Control |
Description |
|---|---|
Automatic Forecast Approval |
Select to indicate that project managers do not have to approve forecasts to make them accessible to PeopleSoft Program Management for the purposes of time, cost, and revenue forecasts. Deselect the option to indicate that approval is required on the forecast review page before forecasts can be used. Note: Forecast data is available for utilization calculations, with or without approval. |
Forecast Level |
Select Project or Project/Activity to indicate the default level at which forecasting is to occur in this business unit for each project. Warning! If forecasting occurs at the project level, the activity is not required when you enter a forecast. This affects the ability to report forecasts at the activity level. Select Project only if you do not need activity level time, cost, and revenue forecasts. |
Standard Rate |
Select to determine where the system obtains standard cost rates and bill rates when generating estimates. Project estimates are based on the cost and bill rates that are associated with a job code, resource, or role. |
Note: You can override these defaults for individual programs and projects.
Project Charging Level
Select options on this page to establish project charging-level options by default for new projects that you create for the business unit. You can override the business unit default values at the project level, for pending projects only, on the Project General - Program Management page. You can override the business unit default values for new projects that you create from Microsoft Project on the Create Project from Microsoft page.
Field or Control |
Description |
|---|---|
All Detail Activities |
Select to enable users to charge transactions on all detail activities regardless of an activity's WBS level. This is the default project-charging level. You must select this option if you want to select the Enforce Team option of Project Activity Resource Pool on the Project Costing Options page. |
Activity Costing Level |
Select a costing level of 1, 2, or 3, to restrict charging to a single costing level of the WBS. Users can charge to both summary and detail activities that reside in the specified costing level. This option is not available if the Enforce Team option on the Project Costing Definition page is Project Activity Resource Pools. |
Charging Level for Time Reports |
Select All Detail Activities to enable time reporting in PeopleSoft Expenses at the detail level, even though all transactions are entered at the costing level. Deselect this option to require time reporting at the same costing level as specified for the project. Note: This group box appears if you use PeopleSoft Expenses and select an activity costing level for the project charging level. If you select All Detail Activities as the project charging level, the system automatically selects All Detail Activities as the time-report charging level. |
Rates
Field or Control |
Description |
|---|---|
Restrict Rate Types |
Select to restrict rate types for named and generic labor resources. Doing so limits the rate types that you can select for cost and bill rates on the Resources and Resources by Activity pages. Additionally, the rate options that are available on the Rate Sets - Target page are based on the rate types that you specify for the project business unit. If you do not restrict rate types, select the default bill and cost rate types that appear on the Resources and Resources by Activity pages for named resources and generic labor resources. |
(Named Resource) Bill and Cost |
Select the specific bill and cost rate types that you want to be available when you add a named labor resource to the project or activity team. You can override the default rate type on the Resources and Resources by Activity pages with another rate type. Available options are: Custom: Users enter the custom rate name in the Rate Name field. The custom rates that are available on this component are limited to those with criteria fields EMPLID, JOBCODE, PROJ_ROLE, and/or REGION_CD, and have a value of Source Quantity in the Apply Rates to field on the Define Custom Rates Page. Custom rates containing any other criteria field will not be available for use on this component. The system assigns the rate based on the Populate Custom Rate page for the rate name. Override: Users enter the resource's rate type when they add a resource. Employee: The system assigns the rate that is set up for the employee on the Rates by Employee page in PeopleSoft Project Costing. Job Code: The system assigns the rate that is set up for the employee's job code on the Rates by Job Code page in PeopleSoft Project Costing. Project Role: The system assigns the rate that is set up for the employee's project role on the Rates by Role page in PeopleSoft Project Costing. |
(Generic Resource) Bill and Cost |
Select the specific bill and cost rate types that you want to be available when you add a generic labor resource to the project or activity team. You can override the default rate type on the Resources and Resources by Activity pages with another rate type. Available options are Override and Project Role. |
Use the Health Options page (PGM_BU_HLTH_OPT) to specify default project health options.
Navigation:
This example illustrates the fields and controls on the Health Options page.
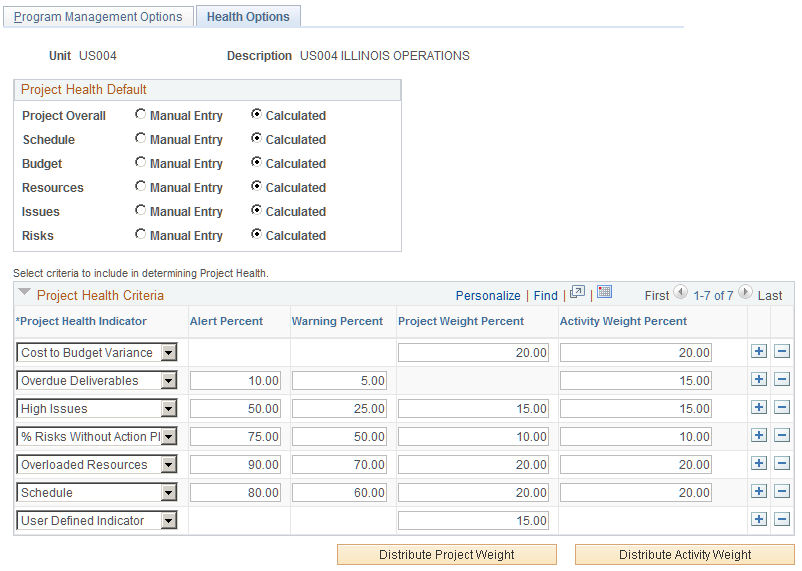
Use this page to configure the project and activity health indicators that appear on the Manager Workbench page.
Project Health Default
Select the default method for calculating project health for Project Overall, Schedule, Budget, Resources, Issues, and Risks that are generated in the project business unit. Select from these options:
Manual Entry: A project team member manually enters health values into the system. The system does not calculate any health values.
Calculated: The system calculates the health value based on parameters that you define in the Project Health Criteria grid.
Note: You can override these defaults for individual programs and projects.
Project Health Criteria
Field or Control |
Description |
|---|---|
Project Health Indicator |
Select one or more default health indicators that the system uses to measure how well a project or activity is doing in this business unit. The health indicators that you select appear on the Manager Workbench and Activity pages. The indicator options are:
|
Alert Percent |
Enter a numerical value that triggers an alert status (displayed as a red symbol) for the corresponding project health indicator. All project health indicators with calculated percent values that are equal to or higher than the alert percent trigger a red alert status on the Manager Workbench page. |
Warning Percent |
Enter a numerical value that triggers a warning status (displayed as a yellow symbol) for the corresponding project health indicator. All project health indicators with calculated percent values that are equal to or higher than the warning percent but less than the alert percent trigger a yellow warning status on the Manager Workbench page. |
Project Weight Percent |
Enter the percent to weigh the health indicator for the project as compared to other health indicators. The system calculates overall project health as the weighted average of the health indicators. Note: The sum of the project weight percents for all of the project health indicators must total 100 percent. |
Activity Weight Percent |
Enter the percent to weigh the health indicator for the activity as compared to other health indicators. The system calculates overall activity health as the weighted average of the health indicators. Note: The sum of activity weight percents for all of the project health indicators must total 100 percent. |
Distribute Project Weight |
Click to evenly spread 100 percent to the project weight of each health indicator. |
Distribute Activity Weight |
Click to evenly spread 100 percent to the activity weight of each health indicator. |
Note: The health indicators on the Manager Workbench do not appear if you do not set up health criteria for them and you select the Calculated method to determine health for that indicator. A user can override the default method used to calculate project health at the project level. For example, you set the project health defaults at the business unit level to Manual Entry and you do not set up the project health criteria indicators. If a user changes the Project Health Default settings to Calculated for a particular project, the system will not have any project health criteria set up to determine how to calculate the health. Therefore, you should set up project health criteria for each project health indicator at the business unit level.