 Understanding Receiving and Putaway Processing
This chapter provides an overview of receiving and putaway processing and discusses how to:
Use cross docking.
Set up putaway defaults and rules.
Call directed putaway.
Stage items manually for putaway processing.
Stage interunit transfers and RMA receipts.
Stage interunit transfers using an electronic data collection system.
Stage RMA Receipts using an electronic data collection system.
Load items into the putaway staging tables.
Prepare putaway plans.
Generate the Putaway Plan report.
Enter stockroom feedback.
Enter stockroom feedback using an electronic data collection system.
Put items away.
Record express putaway.
Record interunit expensed issue returns.
Understanding Receiving and Putaway ProcessingReceiving and putaway processing plays a key role in any material management strategy. How and where you store materials in the facility affects the total storage capacity and the efficiency of the putaway and picking operations.
 Material Receipts and Staging
In a typical storage facility, receiving and inspection departments accept stock and route it to a putaway staging area. In PeopleSoft Inventory, received items are staged until you run the Complete Putaway process (INPPPTWY), which assigns stock to a material storage location in the PeopleSoft Inventory business unit and adjusts the location and business unit quantities.
Materials that must be put away come from a variety of sources, such as receiving docks, manufacturing shop floors, or quality control departments. Using PeopleSoft, you can put away material from purchase order (PO) receipts, manufacturing completions, RMA (returned material authorization) receipts, interunit transfer receipts, interunit expensed issue returns, or manually enter receipts into inventory. You might also put away stock from canceled or short-shipped orders. Whether received from Inventory business units or from other applications, all items requiring putaway processing are inserted into the Staging Interface table (STAGED_INF_INV), which serves as the reservoir for all incoming material and acts as a virtual staging area. PeopleSoft Purchasing also inserts separate landed cost information into the Costing Staging Interface table (STGCOST_INF_INV). For canceled or short-shipped orders, the system stores item information in the Staging Interface table, bypassing the Load Staged Items process (INPSSTGE). You can review staged items using the Review Plan and Stockroom Feedback pages before running the Complete Putaway process.
When you receive material from PeopleSoft Purchasing or Manufacturing, these applications update the appropriate PeopleSoft Inventory tables automatically. PeopleSoft Purchasing provides receipt information and PeopleSoft Manufacturing provides completion information. If you process material receipts in a third-party application, you can write specific receiving lines to the PeopleSoft Inventory staging interface tables (STAGED_INF_INV and STGCOST_INF_INV) using a database load facility or a process that reads a data flat file. You can also receive information from third-party systems through the Interunit Receipt EIP (enterprise integration point).
When the putaway is the result of a canceled order or short shipment, and the putaway material storage location is different from the item’s picked material storage location, the system treats this as a transfer and does not perform the costing procedures associated with a regular stocking transaction. In this case, the system writes a transfer transaction to the Transaction History table (TRANSACTION_INV) and, if you use location accounting, it performs the necessary costing and accounting. If the putaway and picked material storage locations are identical, no transaction is written to the Transaction History table, and no costing or accounting occurs.
See Also
Staging Interunit Transfers Using an Electronic Data Collection System
Canceling or Holding Orders Within PeopleSoft Inventory
The Procure-to-Pay Business Process in a WMS Integration
Putaway Processing
Different environments and stocking situations require different levels of stocking control. PeopleSoft provides three methods of putaway processing:
Multistep putaway provides the tightest control over the stocking processes.
Auto-putaway automates much of the stocking process.
Express putaway enables you to process exceptions to the regular stocking routine.
Multistep putaway processing enables you to validate item data in the putaway staging tables and adjust the default putaway location to reflect the actual putaway location before you update the system tables.
Use multistep putaway processing when:
You want to control each step in the putaway process.
You use an electronic data collection system to gather putaway information.
Note. If you are putting stock away through an electronic data collection system but do not want to use multistep putaway processing, use the Auto-Putaway multiprocess job to put stock into a central, temporary material storage location. Then use the electronic data collection transfer transactions to transfer the stock to the proper locations.
To perform multistep putaway processing:
Insert items that must be put away into the staging interface tables (STAGED_INF_INV and STGCOST_INF_INV).
The InterUnit and RMA Receiving component and applications such as PeopleSoft Purchasing or PeopleSoft Manufacturing insert items into these tables automatically. You can also insert items manually using the PeopleSoft Inventory Manual Staging page.
To perform multistep putaway for items that are received using the InterUnit and RMA Receiving component, select Stage for Putaway at Save Time on the InterUnit and RMA Receiving - Putaway Details page. To perform multistep putaway for items that are completed using the Record Completions and Scrap component, select Stage for Putaway at Save Time on the Record Completions/Scrap page.
Run the Load Staged Items process.
This process pulls items from the staging interface tables and loads them into the putaway staging tables (STAGED_ITEMS_INV and STAGED_COST_INV). If you do not specify a material storage location, the process assigns appropriate material storage locations using either the default putaway location or (if enabled) the directed putaway rules. For pegged items, the process determines whether stock should be placed in the pegging location, the default putaway location, or the location suggested by directed putaway rules. For cross docked items, the process determines whether stock should be placed in the cross docking location, the default putaway location, or the location suggested by directed putaway rules.
Correct item data errors.
If you selected the Perform Validation option on the Setup Putaway page, the Load Staged Items process validates item data. Use the Correct Staged Errors page to correct any errors.
Review the default putaway plan.
Review the default plan on the Review Plan page and, if necessary, modify it on either the Review Plan page or the Alternate Plan page. If you have enabled directed putaway for the business unit, the default putaway plan includes the material storage locations that best match the putaway rules defined for the business unit on the Directed Putaway Rules page or for the item on the Setup Item Putaway page. Otherwise, the default plan lists either the default putaway location that you established on the Default Putaway Locations page or the location the system assigned during receiving or completion processing.
Generate putaway instructions.
If you are using the PeopleSoft Inventory online pages, use the Review Plan page to print the Putaway Plan Crystal report (INC3500).
If you are using an electronic data collection system, use the Putaway Plan page to print the Material Putaway Plan SQR report (INS3500), with the Print Bar Code option selected.
Record any changes that were made to the putaway plan during the physical putaway process.
If you’re using the online pages, record changes to the Putaway Plan using the Stockroom Feedback page, and select the Putaway option. If you are using an electronic data collection system, run the Inventory Putaway process (INPZPWFB) to update the putaway plan with the actual putaway locations.
Run the Complete Putaway process to update the PeopleSoft Inventory system tables with the putaway data.
The Complete Putaway process uses the data in the putaway staging tables to update the available quantity and inbound cost in the appropriate system tables. For lot-controlled items, the Complete Putaway process calculates lot availability, retest, and expiration dates if you have defined shelf life, availability lead time, and retest lead-time values on the Define Business Unit Item - Inventory: Shipping/Handling page.
See Managing Item Lots.
See Monitoring Inventory Quantity Balances.
With auto-putaway processing, you can streamline the putaway operations by launching the Load Staged Items process, the Putaway Plan report, and the Complete Putaway process in one step.
Use auto-putaway processing when:
You do not need tight controls over the putaway process.
You want all items to be put away automatically into the material storage locations assigned at receiving or those selected by the system (locations matching pegged locations, cross docking, the directed putaway rules, if enabled, or the default material storage location).
Note. Auto-putaway processing does not allow you to record exceptions to system-selected putaway material storage locations.
To perform auto-putaway processing:
Insert items that need to be put away into the staging interface tables. The InterUnit and RMA Receiving component and applications such as PeopleSoft Purchasing or PeopleSoft Manufacturing insert items into these tables automatically. You can also insert items manually using the PeopleSoft Inventory Manual Staging page.
Run the Auto-Putaway multiprocess job.
You can launch this job (consisting of the Load Staged Items process, the Putaway Plan report, and the Complete Putaway process) from the Load Staged Items page or directly from interfacing applications.
If you run the job from the Load Staged Items page, select the Flag Items for Auto-Putaway option.
If you launch the job from PeopleSoft Purchasing, select the Flag Items for Auto-Putaway option on the User Preferences - Inventory page.
If you initiate the job from the InterUnit and RMA Receiving component, select the Putaway at Receipt Save Time option on the InterUnit and RMA Receiving-Putaway Details page. If you initiate the job from the Record Completions and Scrap component, select Putaway at Receipt Save Time on the Record Completions/Scrap page.
You can configure the Auto-Putaway job definition (or add a new definition) to include only a certain subset of the processes. For example, to run the Load Staged Items process and Putaway Plan report (SQR) immediately and perform stockroom feedback, configure the job to include only those two processes and then run the Complete Putaway process separately. If you do not need the putaway plan, you can remove the report from the job definition.
Use the express putaway option to put away stock that is not tied to a receipt or for which no receiving information is available.
To perform express putaway processing:
Enter item putaway information in the Express Putaway component.
Save the Express Putaway component to:
Update the available quantity and inbound costs.
Calculate lot availability, retest, and expiration dates (for lot-controlled items), if you have defined shelf life, availability lead time, and retest lead-time values on the Lot Control Information page.
See Setting Up Putaway Defaults and Rules.
See Managing Item Lots.
See Monitoring Inventory Quantity Balances.
This diagram illustrates the level of control over putaway processes that is offered by the multistep putaway, auto-putaway, and express putaway methods:
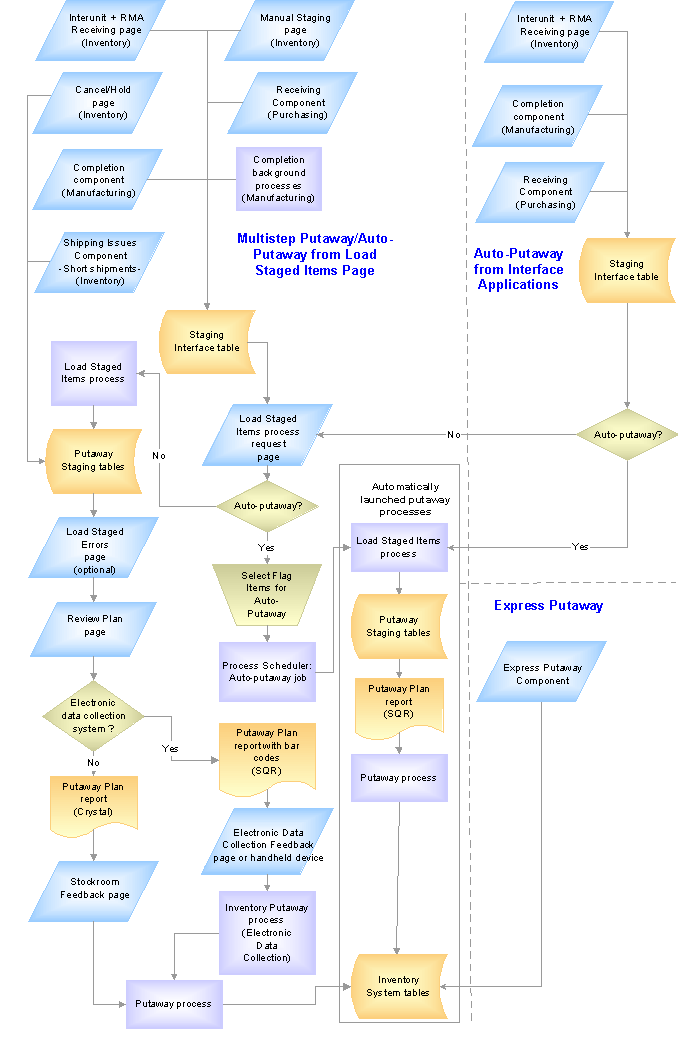
Putaway processing options
PrerequisitesBefore you begin putaway processing:
Define a default material storage location for each item by using the Default Putaway Locations page.
This step is optional if directed putaway is active for the business unit. If you do not define a default material storage location and no material storage location is specified on the receipt, you can enter a material storage location on the Correct Staged Errors page.
Define a cost element to use as the default for all receipts by using the Define Business Unit Item - General: Common page.
The cost element is required for average, actual, and standard cost items. For standard cost items, you must also establish cost information on the Item Production Costs page.
Set up putaway processing defaults on the Setup Putaway page.
Define pegging locations.
This step is optional if you are not using the pegging feature.
Define cross docking defaults.
This step is optional if you are not using the Cross Docking feature.
See Also
Defining Default Putaway Information
Using Standard Costing for Purchased Items
Using Cross DockingThe Cross Docking feature enables you to move items for which there is open demand from the receipt staging area directly to the shipping dock for immediate picking and shipping. This feature saves time and effort, because you do not need to put the receipt quantity away before picking it for order fulfillment. Cross docking reduces labor costs and accelerates inventory turnover.
When you receive an item that has been defined as a cross dock item, the Load Staged Items process calculates open demand for the item to determine whether some or all of the receipt quantity should be placed on the shipping dock (the item's cross dock location). If open demand exists for the item, the Load Staged Items process places enough stock to fulfill the demand in the cross dock location. The Order Release process (IN_FUL_RLS) selects quantities from the cross dock location first before selecting stock in other material storage locations.
You typically use cross docking for high-volume items. The Cross Docking feature must be defined for the business unit and item.
See Also
Setting Up Putaway Defaults and RulesYou specify putaway processing defaults and directed putaway rules using the Setup Putaway component. The processing defaults that you specified on the Setup Putaway page govern whether the Load Staged Items process validates item data, the material storage location that you should use for RMA putaway transactions, and the default values for the Putaway Plan report.
On the Directed Putaway Rules page, you can enable directed putaway for the business unit and prioritize up to six different putaway rules. (You can modify these rules for specific items on the Setup Item Putaway page.) Each rule defines a type of material storage location: default locations, fixed picking locations, empty locations, locations containing existing items, randomly selected locations, or storage containers. For each rule, specify additional criteria to determine the best material storage locations for the business practices. When the system calls the Directed Putaway function from online pages or by application processes, it attempts to find material storage locations that meet the highest priority rule. If it does not find locations, the function attempts to find a material storage location that meets the second priority rule, then the third rule, and so forth.
If you do not enable directed putaway and establish putaway rules on the Directed Putaway Rules page, all system processes that move materials to putaway material storage locations select the default putaway location that you defined for each item, regardless of the available capacity of the location or its zone assignment. You can specify alternate material storage locations on the Review Plan and Alternate Plan pages. If there are exceptions to the putaway plan, you can modify system-selected material storage locations on the Stockroom Feedback page.
The following exceptions exist:
If the business unit is a VMI business unit, putaway rules and directed putaway can not be set up.
If the incoming receipt has been pegged, the stock is placed in the pegging location for that item, if the demand associated to this pegged supply is within the lead days range, or the stock is placed in the default putaway location if outside of the range.
If the item uses cross docking and open demand exists, then the system applies the putaway quantity to the cross docking location before using the directed putaway rules or the default putaway location. For cross docking purposes, the quantity can be split between locations even if the putaway rules do not specify the split quantity option.
Using Directed Putaway RulesThe rules and rule options defined on the Directed Putaway Rules page and Setup Item Putaway page govern which material storage locations the Directed Putaway function returns for a particular putaway transaction quantity. The options for the Putaway Rule field are:
|
Default Location |
The system suggests the default material storage location that you defined for the item on the Default Putaway Locations page. |
|
Fixed Picking |
The system suggests the fixed picking location that you defined for the item on the Fixed Picking Locations page. |
|
Empty |
The system suggests an empty material storage location. Only matching locations with item quantity balances that are equal to zero are eligible. The system checks for zero quantity in the physical location (PHYSICAL_INV.qty=0) and pending putaways into that location (STAGED_ITEM_INV.qty=0). |
|
Find Existing Item |
The system suggests a material storage location that already contains a quantity of the item. |
|
Random |
The system suggests the first eligible material storage location it finds that matches the options that you defined for the rule. |
|
Containers |
The system suggests a storage container from the set of available storage containers that meet the options that you defined for the rule. The Directed Putaway function suggests containers only, if you select this rule. For items that require container storage, either select this rule or enter the container ID manually during online putaway transactions. |
For each rule, you can activate the following options:
|
Default Rule |
Specifies the putaway rule to use when no eligible material storage locations meet capacity requirements. If no valid locations are available for the transaction quantity, a message appears. You must select one default rule for each set of rules that you define. |
|
Split Quantity |
Specifies whether the putaway transaction quantity can be divided among multiple material storage locations. This option is only available for business units that implement the Capacity Checking feature. If you do not select this option, the Directed Putaway function only returns locations that can hold the entire transaction quantity. For cross docking purposes, you can split the quantity between locations even if the putaway rule does not specify this option. |
|
Mix Staged Dates and Lots |
Specifies whether you can store the transaction quantity in locations that contain items with different lots or staged dates than the transaction quantity. Select this option only if the business rules permit storage of different stage dates and lots of an item in one location. |
|
Maximum Capacity Available |
Specifies that material storage locations with the most available capacity should be evaluated as potential putaway locations first. This option is only available for business units that implement the Capacity Checking feature. With this option, the Directed Putaway function sorts the matching material storage locations by available capacity and assigns the transaction quantity to those having the most capacity first. Selecting this option results in the smallest number of suggested putaway locations, even if you permit splitting of transaction quantities. |
|
Minimum Capacity Available |
Specifies that the system should evaluate the material storage locations that have the least available capacity first. This option is only available for business units that implement the Capacity Checking feature. With this option, the Directed Putaway function sorts the matching material storage locations by available capacity and assigns the transaction quantity to those having the least capacity first. Select this option if the business rules prioritize maximum capacity utilization above putaway transaction efficiency. If you permit splitting of putaway transaction quantities, the system suggests multiple material storage locations (thus requiring multiple putaway transactions). |
|
Check Zone |
Specifies that only material storage locations belonging to putaway zones associated with the item should be considered. This option is only available for business units that implement putaway zones. If you select this option, the Directed Putaway function only looks for matching material storage locations in the putaway zones associated with the item on the Assign Zones page, using the defined priority for each zone. |
See Also
Establishing Putaway and Picking Zones
Pages Used to Set Up Default Putaway Information and Rules|
Page Name |
Object Name |
Navigation |
Usage |
|
Default Putaway Locations |
DEFAULT_LOC_INV |
|
Assign or update default putaway locations for an item. |
|
Setup Putaway |
PTWY_SETUP_INV |
Inventory, Putaway Stock, Setup Putaway, Setup Putaway |
Define default putaway information for a business unit. |
|
Directed Putaway Rules |
PTWY_RULE_INV |
Inventory, Putaway Stock, Setup Putaway, Directed Putaway Rules |
Define putaway rules and rule priorities for a business unit. |
|
Setup Item Putaway |
PTWY_ITEM_RULE_INV |
Inventory, Putaway Stock, Setup Item Putaway |
Establish putaway rules and rule priorities for items in the business unit. |
Assigning Default Putaway LocationsTo define default putaway locations for an item, use the Default Putaway Locations (DEFAULT_LOCATION) component. Use the Default Putaway Locations component interface to load data into the tables for this component.
Access the Default Putaway Locations page.
When you usually store an item in the same location, you can improve the efficiency of the putaway processing by defining a default putaway location for the item on the Default Putaway Locations page. If you are not using directed putaway for the business unit then the default putaway location is used for every putaway. If you are using directed putaway, you can select the putaway rule, Default Location, to use the default putaway location. Putaway rules are defined for the business unit level on the Setup Putaway component, and for the item level on the Setup Item Putaway page.
Depending upon the type of item with which you are working, you can select multiple default putaway locations. Here are a couple of examples:
For items that require inspection, define a default inspection location.
Because PeopleSoft Inventory only inspects items received from PeopleSoft Purchasing, you can also specify a second location to use when receiving these items from other sources. (You cannot, however, select an inspection location as the default for items that do not require inspection.)
For both owned and non-owned items, you can select an owned default location and a non-owned default location.
For items that are cross docked, you can establish material storage locations for both owned and non-owned stock putaways (Owned Cross Dock and Non-Owned Cross Dock types). The system then uses these cross dock locations to pick stock and fulfill orders. If you do not define cross dock material storage locations for cross docked items, then the system uses the cross dock locations that you defined at the business unit level on the Default Cross Dock Locations page. You cannot select an existing pegging location or an inspection location to be a cross dock location.
For items that are pegged, you can establish material storage locations for both owned and non-owned stock putaways (Owned Peg and Non-Owned Peg types). The system then uses these pegged locations to putaway pegged supply (receipts) and pick stock to fulfill the order that this supply was pegged to. If you do not define pegged material storage locations for this item, then the system uses the Default Pegging Putaway Location Details page that you defined at the business unit level. You cannot select an existing cross dock location or inspection location to be a pegged location.
Defining Default Putaway InformationTo define putaway defaults at the business unit level, use the Putaway Setup (PTWY_SETUP_INV) component.
Access the Setup Putaway page.
Load Staged Items
|
Perform Validation |
Select to validate the staging data during the Load Staged Items process. If there is invalid data for the items that are loaded, the errors appear on the Correct Staged Errors page.
Note. PeopleSoft recommends selecting this option to prevent storage of invalid information in PeopleSoft Inventory tables. |
Complete Putaway Options
|
Commit Count |
Enter a value that is used during the Complete Putaway process (INPPPTWY). This value indicates the number of items to be processed before issuing a commit statement. |
An RMA default material storage location is useful if you have a Material Review Board that reviews and tests returned stock to see whether it can be put into inventory or whether it should be scrapped. Inspection locations are for items received from a vendor that require inspection. Customer returns do not go through the same inspection process.
|
Storage Location |
Enter the default material storage location that you want to use for returned items received through the InterUnit and RMA Receiving page. |
|
Storage Location Search |
Click the Storage Location Search button to access the Storage Location Search page. |
Putaway Plan Report Defaults
These values become the defaults on the Putaway Plan page that you use to generate the putaway report.
|
Sort Order |
Select how the items included in the Putaway Plan report should be sorted. Values are: Item ID: By item ID, in ascending order. The full sort order is item ID, lot ID, serial ID, storage area, and storage levels 1, 2, 3, and 4. Receiver ID: By receiver ID, in ascending order. The full sort order is receiver ID and receiver line. Storage Location: By material storage location, sorted alphabetically by storage area name. The full sort order is storage area, storage levels 1, 2, 3, and 4, item ID, lot ID, serial ID. |
|
Print Bar Code |
Select to print 128-formatted bar codes on the Putaway Plan report. These codes, which consist of the Putaway Plan number, the line number, and the four optional bar code scanning control flags, can be scanned during the Complete Putaway process. The Putaway Plan number on the report header is bar coded, and a single bar code appears for each detail line on the report. The format for the bar code printed for each detail line is LSDAH:99999, where: L = Lot ID Control Flag S = Serial ID Control Flag D = Staged Date Control Flag A = Actual Cost Control Flag H = Shipping Serial ID Control Flag : = Constant 99999 = Line Number |
|
Print Bar Coded Control Flags |
Select to attach the item's control flags to the bar code that is printed on each line of the Putaway Plan report. The bar-coded control flags enable the electronic data collection system to prompt for the lot ID, serial ID, staged date, or receiver ID and line number immediately after the user scans the bar-coded line number field. The option to print these flags is for cases in which the Putaway Plan number and the line number bar code are scanned by a wedge directly into the online Inventory Putaway transaction page. You do not need to prompt for the detailed item information. |
See Also
Loading Items Into the Putaway Staging Tables
Searching for Material Storage Locations
Defining Putaway Rules and Rule PrioritiesAccess the Directed Putaway Rules page.
|
Directed Putaway |
Select to enable directed putaway algorithms for the business unit. All putaway transactions call the Directed Putaway function to select optimal putaway locations for the transaction quantity, based on the putaway rules that you defined for the item or the business unit. If you do not select this option, putaway transactions suggest the material storage location that you established for the item on the Default Putaway Locations page. |
|
Locations to Include |
Select the material storage locations that should be included in the directed putaway processing. |
|
Priority |
Enter a rule priority and select the rule options that meet the needs of the business unit. The priority of the first row automatically appears as 1. For each row that you add, the default priority value increases by 1. You can override the default values. |
|
Putaway Rule |
Select putaway rules for the business unit by inserting up to six rows (one for each available putaway rule). |
|
Default Rule |
Indicate which of the defined rules is the default. The system initially selects this check box for the first rule that you define. |
See Also
Checking Storage Location Capacity
Establishing Putaway and Picking Zones
Establishing Putaway Rules and Priorities for ItemsTo define putaway defaults at the item level, use the Setup Item Putaway component.
Access the Setup Item Putaway page.
|
Copy |
Click this button to copy the business unit’s putaway rules (established on the Directed Putaway Rules page) to the item level. The copy overrides any existing rules for the item. You can modify the rules, as necessary, for a specific item. |
See Also
Checking Storage Location Capacity
Establishing Putaway and Picking Zones
Calling Directed PutawayThe directed putaway functionality determines the potential material storage locations to stage items for putaway. To find the putaway locations, direct putaway:
Determines if the putaway receipt is in a VMI business unit. If it is and the user has not specified a putaway location, then the stock is putaway into the location specified in the VMI Ship-to location (IN_STOR_LOC_VMI) defined in Material Storage Locations page using the VMI Ship-to link.
Determines if the putaway receipt is pegged as supply to an outgoing demand, such as a stock request or sales order. If the putaway is pegged, then the stock is placed in the pegged location if it is within the pegging lead days; otherwise, the stock is placed in the default putaway location. The stock can be reserved or allocated at putaway time to prevent other orders from picking the stock.
Determines whether the item is a cross dock item.
If cross docking is used, then the system calculates open demand. If open demand exists, then the system applies all or part of the putaway quantity to the item's cross docking location. It applies any remaining quantity according to the next step. For cross docking purposes, the quantity can be split between locations even if the putaway rules do not specify the split quantity option. Cross dock calculations do not consider pegged supply or demand.
Determines whether the item uses directed putaway rules.
If it does not use putaway rules, then the directed putaway function uses the default putaway location for the item. If you defined directed putaway rules for the item, then the function determines the putaway location based on these rules.
Directed putaway rules can range from very simple (in which putaway plans are based solely on the item’s default putaway location) to complex (in which material storage locations are selected based on available capacity and zone assignment). Using these rules, the system can suggest the optimal material storage location for each material putaway transaction in each of the storage facilities.
The Load Staged Items process calls directed putaway for receipts in the staging table that have not been associated with a material storage location. You can call the Directed Putaway function online from the following pages in various PeopleSoft applications:
PeopleSoft Inventory:
Manually Stage Putaway page
InterUnit and RMA Receiving - Putaway Details page
Review Plan page
Express Putaway page
PeopleSoft Purchasing:
Inventory Putaway Information page
Inspection & Putaway Information page
PeopleSoft Manufacturing: Kit Issues/Returns page.
PeopleSoft eProcurement: Receive page.
When you call the Directed Putaway function from online pages, you can override the suggestions on the Directed Putaway Locations page. When an application process calls the Directed Putaway function and auto-putaway is not active, you can modify the system-selected putaway locations on the Review Plan page or (if you’re bypassing the putaway plan) on the Stockroom Feedback page. Putaway rules do not need to be defined to use the Directed Putaway function or to override the suggested location.
Note. If you are using the Directed Putaway function from an online page, then it is assumed that the item does not need to be inspected and the quantity is put away in a non-inspection material storage location.
See Also
Entering Mandatory Express Putaway Information
Setting Up Putaway Defaults and Rules
Entering Override Inventory Putaway Information
Specifying Putaway Location Overrides
Processing Kit Issues and Returns
Page Used to Call Directed Putaway|
Page Name |
Object Name |
Navigation |
Usage |
|
Directed Putaway Locations |
IN_PTWY_LOC, IN_PTWY_LOC_SP |
Click the Putaway Locations link or button on any of these pages: Manual Staging, InterUnit and RMA Receiving - Putaway Details, Review Plan, Express Putaway, Expensed Issue Return, Inventory Putaway Information, Inspection & Putaway Information, Record Completions/Scrap and Kit Issues/Returns. |
View and select material storage locations that meet putaway rules that you established for the item or business unit. Modify the suggested locations and change the distribution of the transaction quantity. |
Selecting Direct Putaway LocationsAccess the Directed Putaway Locations page.
|
Area, Lev 1, Lev 2, Lev 3, Lev 4, and Container ID |
The material storage locations or containers that best match the putaway rules defined for the transaction quantity, sorted by location. |
|
Quantity and UOM (UOM) |
The suggested allocation of the transaction quantity among the material storage locations. You can modify location information, add or delete storage rows, or redistribute the transaction quantity as necessary. Select the material storage locations that you want to use. The total quantity allocated to the selected locations must equal the original transaction quantity. You cannot alter the stocking quantity UOM for a location. |
See Also
Setting Up Putaway Defaults and Rules
Staging Items Manually for Putaway ProcessingAlthough most putaway items are inserted into the interface staging tables (STAGED_INF_INV and STGCOST_INF_INV) automatically, you can use the Manually Stage Putaway page to insert items manually.
Page Used to Stage Items Manually for Putaway Processing|
Page Name |
Object Name |
Navigation |
Usage |
|
Manually Stage Putaway |
PUTAWAY_STAGE1_INV |
Inventory, Putaway Stock, Manually Stage Putaway |
Add items manually to the staging interface table (STAGED_INF_INV). |
Staging Items ManuallyAccess the Manually Stage Putaway page.
|
Receipt No (receipt number) |
If you do not require receiver information, enter the installation default or leave this field blank. You can also enter NEXT to generate a unique number automatically. |
|
Sort |
Select to sort the information by receiver line number, or if there is no receipt line information, by item ID. |
Staging Details
|
Receipt Line and Item ID |
Enter the receipt line number (if necessary) and the item ID for each receiver line. If you enter the installation default or leave the Receipt No field blank, you do not need to enter receipt line information. |
|
Putaway Locations |
Click to access the Directed Putaway Locations page, where you can view and select material storage locations that meet putaway rules that you established for the item or business unit. Enter the item, quantity, and UOM before you call directed putaway. |
|
Storage Location |
If you do not want the Load Staged Items process to assign a putaway location automatically, select an alternate storage location; otherwise, leave this field blank. |
|
Container ID and Container Sequence |
To assign multiple items to the same container in a business unit that generates container IDs automatically, enter NEXT as the container ID and enter the container sequence. The system assigns items with the same container sequence to the same container. For example, suppose that you are putting away two items and the business unit permits automatic generation of container IDs, assign these items to the same container by defining NEXT as the container ID and entering the same container sequence for both items. |
|
Unit Cost |
If the item is using actual or average cost, enter the unit cost. This field only appears if required. |
|
Non-Owned |
Select to indicate that the business unit does not own the item. If the item is non-owned, the putaway transaction is not costed. If the item uses average cost, the average cost calculations for this item are not affected. |
|
Stock Type |
Indicates the type of item (standard item or leased material, for example). This field is required for non-owned items. |
|
ChartField Overrides |
Click to access the ChartField Overrides page, where you can override credit accounting information for the received item. |
|
PO Information (purchase order information) |
If the item is from a PO, enter the information from the receiving paperwork. |
Note. If the business unit does not allow the automatic addition of new lots, you must create a new lot before using the Lot ID field on this page.
See Also
Setting Up Putaway Defaults and Rules
Defining Your Operational Structure in PeopleSoft Inventory
Searching for Material Storage Locations
Managing Inventory by Item Status
Defining and Using ChartFields
Working With Configuration Codes
Staging Interunit Transfer and RMA ReceiptsThis section discusses staging interunit transfer and RMA receipts and how to:
Receive interunit transfers and RMAs.
Search for a specific RMA to put away.
Search for a specific interunit transfer to put away.
Search for available lot and serial information.
Define the status of individual items in a receipt.
View and update receiving lot and serial information.
Record quantity received.
Specify appropriate action for received items.
Common Elements Used in This Section
|
Unit |
The PeopleSoft Inventory business unit that is receiving the stock.
Note. To create a single receipt for items received by multiple PeopleSoft Inventory business units, enter a business unit that is not the business unit in which the item actually resides. For example, you can create a receipt for a centralized receiving business unit and specify the business unit in which the item resides at the line level of the receipt. |
|
Receipt Number |
The number that you enter (or have the system assign automatically) when creating the receipt. |
|
Receipt Type |
When you add a new receipt, the system presents you with a search dialog in which you must specify the type of receipt. Your selection determines which fields appear in the InterUnit and RMA Receiving component. Values are: Interunit Transfer: Select to enter a receipt for an interunit transfer. Return Material Authorization: Select to enter a receipt for an RMA. |
Pages Used to Stage Interunit Transfers and RMA Receipts|
Page Name |
Object Name |
Navigation |
Usage |
|
InterUnit and RMA Receiving - Receipt Header |
INV_RECV_HDR |
Inventory, Putaway Stock, Interunit and RMA Receiving, Receipt Header |
Determine which interunit transfer or RMA to receive, enter the actual quantity received, and specify the receipt status. |
|
Select Receiving Lot/Serial |
INV_RECV_SEL_LOT |
Click the Select All button or select the check box next to an item and then refresh the InterUnit and RMA Receiving - Receipt Header page. |
Search for available lot and serial information for any lot-controlled or serial-controlled items. Update this information on the Receipt Details page or the Putaway Details page. |
|
InterUnit and RMA Receiving - Receipt Line |
INV_RECV_LN |
Inventory, Putaway Stock, Interunit and RMA Receiving, Receipt Line |
Define the status of individual items in a receipt. |
|
InterUnit and RMA Receiving - Receipt Line Details |
INV_RECV_SERIAL |
Inventory, Putaway Stock, Interunit and RMA Receiving, Receipt Details |
View and update the receiving lot and serial information for lot-controlled and serial-controlled items that you selected on the Receipt Header page. |
|
Select Ship Serial IDs |
INV_RECV_SHP_SER |
Click the Enter Ship Serials link on the InterUnit and RMA Receiving - Receipt Details page. |
Record quantity received by serial ID, and if applicable, by lot ID. |
|
InterUnit and RMA Receiving - Putaway Details |
INV_RECV_LN_PUTWY |
Inventory, Putaway Stock, Interunit and RMA Receiving, Putaway Details |
Specify the appropriate putaway action for received items. |
Interunit Transfer and RMA Item Receiving and PutawayHere are the basic steps involved in receiving interunit transfers and RMAs:
Define the type of receipt on the InterUnit and RMA Receiving - Receipt Header page.
Update item information on the InterUnit and RMA Receiving - Receipt Line page.
Define an appropriate putaway action on the InterUnit and RMA Receiving - Putaway Details page.
When you save the InterUnit and RMA Receiving component, either initiate auto-putaway processing or insert the items into the staging interface table (STAGED_INF_INV) for multistep putaway processing.
For lot- and serial-controlled items, select lot and serial information for the entire receipt or enter this information manually.
Interunit Shipping and Receiving Adjustments
When the source business unit ships items to the receiving business unit, the default expected quantity received is the quantity shipped, in the shipping UOM. If you override the quantity received and the resulting quantity is either greater than or less than the quantity shipped, the system writes a transfer adjustment entry (Interunit Business Transfer Adjustment - Transaction Group 042) to the transaction history record (TRANSACTION_INV) upon closure of the receipt line to account for the gain or loss.
In addition to adjusting for quantity differences, the system compares the lot IDs and serial IDs shipped from the source business unit with the lot IDs and serial IDs received. If there are any differences, the system makes an adjustment entry at the lot or serial level. This following table provides examples of possible lot, serial, and quantity differences:
|
Shipped Lot ID |
Received Lot ID |
Shipped Quantities |
Received Quantities |
042 Transactions Generated |
|
No lot |
No lot |
15 |
5 |
-10 |
|
Lot A |
Lot A |
10 |
5 |
-5 for Lot A |
|
Lot B |
Lot B |
5 |
5 |
N/A |
|
Lot C |
Lot D |
20 |
20 |
-20 for Lot C + 20 for Lot D |
|
Lot E |
Lot F |
15 |
10 |
-15 for Lot E +10 for Lot F |
See Also
Understanding Receiving and Putaway Processing
Receiving Intercompany Transfers
RMA Receipt CostingThe unit cost varies according to the costing method that you used for the items in the receipt:
For standard cost items, the unit cost is the current effective-dated total standard cost in the Standard Cost table.
For perpetual average cost items, the unit cost is the current unit cost in the Perpetual Average Cost table.
For actual cost items, the unit cost is the default actual cost for the destination business unit.
For consigned stock, non-owned items, and periodic average cost items, the unit cost is the default average cost for the destination business unit.
For non-cost items, the unit cost is zero.
Receiving Interunit Transfers and RMAsAccess the InterUnit and RMA Receiving - Receipt Header page.
Click the Search link to access either the RMA Search dialog (if you entered Return Material Authorization as the receipt type) or the Interunit Transfer Search dialog (if you entered Interunit Transfer as the receipt type), where you can search for a specific RMA or interunit transfer to put away.
For both searches, use wildcards as necessary.
For RMAs, the RMA business unit is required.
Open RMA lines matching the search parameters populate the corresponding fields in the InterUnit and RMA Receiving component.
For interunit transfers, the source business unit is required.
In-transit interunit transfers matching the search parameters populate the corresponding fields in the InterUnit and RMA Receiving component.
Select a receipt status: Closed, Open, or Pending.
The receiving transaction varies depending upon the receipt status, the receipt type, and whether the Auto Close Receipts option (on the Inventory Definition - Business Unit Options page and enables the system to close an interunit or RMA receipt automatically) is active:
|
Receipt Type |
Transactions Performed |
Automatic Receipt Closure Conditions |
|
RMA |
You can only receive RMAs with an Open RMA line status using this page. Once the full quantity of the RMA is received, the system changes the status of the RMA line to Closed. |
If the received quantity on the line is greater than or equal to the shipped quantity, the system sets the status of the receipt line to Closed when you save the page. Once all receipt lines have been closed (either manually or automatically), the system sets the status of the header to Closed. |
|
Interunit transfer |
The system displays interunit transfers with a status of Open or Pending as stock in transit. Setting the status to Closed updates the shipping information. After a receipt is closed, the interunit transfer is no longer considered in transit; if the value received is greater or less than the value transferred, the system creates a gain or loss transaction. If other receivers for the shipment line exist, the system closes those receiver lines upon saving the component. You cannot update bill of lading information for a closed interunit transfer receipt. |
The system performs the same automatic closure validation and processing as for an RMA receipt with the following exception: since an interunit transfer can be received under multiple receiver IDs, the system includes cumulative interunit transfer receipt IDs. When the system determines that the entire interunit transfer has been received, it closes the lines and headers of every receiver ID associated with the transfer. |
Select the check box next to an item to indicate that it has been received; click Select All to mark all items as received.
If you are receiving lot- or serial-controlled items, refreshing the page or accessing a different page takes you to the Select Receiving Lot/Serial page, where you can search for lot and serial information.
For RMA receipts, the lot or serial information comes from the data that you entered for the RMA line. For interunit receipts, the lot or serial information and container ID, if applicable, come from the original shipment. You can also update this information on the InterUnit and RMA Receiving - Putaway Details page or the InterUnit and RMA Receiving - Receipt Details page.
The receipt quantity and its corresponding UOM are derived as follows:
For interunit transfers: Quantity shipped in the shipping UOM minus any quantity already received for the shipment line (not less than 0).
For RMAs: RMA line quantity in the returned UOM minus any quantity already received from the RMA line.
Note. If the cumulative quantity received exceeds the shipped quantity, the value in the quantity field automatically changes to 0 but can be modified.
Note. To receive an item in a UOM other than the shipping UOM, select a new UOM from the list of available UOMs. If whole number precision is defined for the shipping or return UOM (on the Units of Measure page) and previous receipts in a different UOM exist for the interunit transfer or RMA, the Receipt Quantity appears in the standard UOM for the item.
The previously received quantity is the cumulative quantity received on this receipt ID for the interunit ID.
The Non-Owned field, which only appears for interunit transfers, indicates whether the quantity is from a non-owned material storage location.
This field enables you to identify quantities for which a demand line has been picked from both owned and non-owned locations; however, you cannot receive an item from both owned and non-owned locations on the same receipt ID.
Searching for Lot and Serial InformationAccess the Select Receiving Lot/Serial page.
|
Search |
Click to search for a specific lot or serial ID. (The system restricts the search to the items listed in the scroll area.) |
|
Quantity |
For serial-controlled items, the quantity must always be 1. Alternatively, you can select the appropriate lots on this page and later change the quantities on the InterUnit and RMA Receiving - Putaway Details page. |
Select the check box next to the line of lot and serial IDs that you want to receive, or click the Select All button.
Entering Receipt Line InformationAccess the Interunit and RMA Receiving - Receipt Line page.
|
Status |
Indicate the receipt line’s status. If you select Closed, the system performs different transactions, depending upon the receipt type. For interunit transfers: A Closed status updates the shipping information. After a receipt line is closed, the interunit transfer is no longer considered in transit and the system creates a gain or loss transaction if the value received is greater or less than the value transferred. For RMAs: A Closed status updates the RMA line status as Closed. |
|
Quantity Received and Recv Date/Time (received date and time) |
Update these fields if a physical inspection reveals differences between the defaults shown on the page and what you are staging for putaway. |
|
ChartField |
For RMAs, click to override the credit accounting information for the received item on the ChartField Overrides page. |
The Intrastat Interunit Returns and Replacement fields are only available for Intrastat interunit transfers. If both the source and destination business units are members of the European Union and require Intrastat reporting, mark the interunit receipt as a replacement or a return. The system populates these two fields based on the values that you entered during creation of the transfer order on the Detail Override/Exceptions page or the Accounting/Interunit Detail page.
|
Intrastat InterUnit Returns |
The interunit or intercompany transfer contains goods that were previously sent to another business unit but are now being returned. The transfer is reported on the Intrastat return with a Nature of Transaction code indicating that it is a return. (If you clear this option, the transfer is a normal transfer and is reported on the Intrastat return with a Nature of Transaction code indicating that it is a purchase. If you select this option, the Replacement field value is NA (not applicable). A transfer can be a return or a replacement, but not both. |
|
Replacement |
This field works in conjunction with the Intrastat InterUnit Returns field. Values are: NA: The interunit transfer is a normal transfer order or a return. This is the default value when the Intrastat InterUnit Returns option is selected. RN (replacement of goods not returned): The transfer replaces an order that had been previously received but was scrapped or otherwise disposed of. The transfer order is reported on the Intrastat return with a Nature of Transaction code indicating that it is a replacement of goods that have not been returned. RR (replacement of returned goods): The transfer replaces an order that was returned to the source business unit. The transfer order is reported on the Intrastat return with a Nature of Transaction code indicating that it is a replacement of goods that have been returned. |
Note. To receive an item in a UOM other than the shipping UOM, select a new receiving UOM from the list of available UOMs.
See Also
Identifying Interunit and Intercompany Transfers for Export and Intrastat Reporting
Defining and Using ChartFields
Setting Up and Running Intrastat Reports
Updating Receipt Lot and Serial InformationAccess the InterUnit and RMA Receiving - Receipt Details page.
|
Enter Ship Serials |
Click to access the Select Ship Serial IDs page, where you can mark quantity received by serial or lot ID for shipping serial-controlled items. |
|
Copy Lines to Putaway Page |
Click to populate the fields on the Putaway Detail page with the data that you select or enter here. |
Note. The system retrieves default material storage location information for the item, but it overwrites any previously existing information on the Putaway Details page.
The system automatically updates the Receipt Header and Receipt Lines pages with any quantity changes that you make here.
Recording Received Quantity for Shipping Serial-Controlled ItemsAccess the Select Ship Serial IDs page.
Eligible shipping serial ID numbers that you entered during shipment of the interunit transfer or creation of the RMA appear. Select the shipping serial ID number or numbers that you want to receive.
Note. Shipping serial-controlled items are not tracked by a serial number in the warehouse. Rather, the shipping serial number is associated with lines or items that are shipped to a customer or other location. If these items are returned, note the serial ID or lot ID on the Receipt Details page for reference. If the item is put away without serial IDs and you want to ship it again, either reenter the original shipping serial ID or create a new one.
Entering Putaway DetailsAccess the InterUnit and RMA Receiving - Putaway Details page.
|
Putaway Action |
Select one of the following actions to determine when items should be put away. Values are: Stage for Putaway at Save Time: Insert items into the staging interface table (STAGED_INF_INV). You can then use multistep putaway processing to put these items away. Putaway at Receipt Save Time: Launch auto-putaway processing automatically upon saving the InterUnit and RMA Receiving component. |
|
Quality Item |
Appears for RMA receipts if your installation includes PeopleSoft Quality. If the item has a control plan in PeopleSoft Quality, this check box is selected; if the item does not have a control plan, the check box is clear. Once the receipt line status is Closed, saving this page calls a function to create a quality data-entry session, where you can enter quality control information for the RMA receipt.
Note. If you want to track quality information, initiate the quality data entry session and enter quality control information before you put the item away. |
|
Storage Area |
The default putaway location for RMA or interunit transfers appears, but you can specify a different putaway material storage location.
Note. The business unit’s default display options determine how many location levels appear upon entry to this page. If you are entering a material storage location that requires additional levels, enter the storage area, then refresh the page to display the remaining levels for that area. If necessary, split the item quantity across material storage locations by adding a putaway line on the page. The new putaway line displays the item data from the row on which you clicked the Add button, with the business unit and location information copied from the line above. All other fields must be populated where applicable. If the receiving business unit is a VMI business unit, and the source business unit is not a VMI business unit, and the demand source is OM, then a non-owned location can be selected for an owned item. |
|
Transfer |
Click to access the Storage Location Search page. |
|
Directed Putaway |
If directed putaway is active for the business unit, click to access the Directed Putaway Locations page, where you can view and select material storage locations that meet putaway rules established for the item or business unit. |
|
Configuration Code |
The default comes from the value that you entered for the RMA or (for interunit receipts) for the shipment from the originating business unit. You can use any configuration code that is valid for the PeopleSoft Inventory business unit and lot ID.
Note. The Configuration Code tab only appears for configured items. |
Note. If you click the Copy Lines to Putaway Page button on the InterUnit and RMA Receiving - Receipt Details page, the copy overrides any information that you have already entered here.
See Also
Staging Interunit Transfer and RMA Receipts
Understanding Receiving and Putaway Processing
Setting Up Putaway Defaults and Rules
Searching for Material Storage Locations
Defining PeopleSoft Inventory Business Unit Display Options
Receiving Intercompany Transfers
Understanding Inventory Material Storage Structures
Integrating With PeopleSoft Inventory
Working With Configuration Codes
Performing Vendor Managed Inventory Processes
Staging Interunit Transfers Using an Electronic Data Collection SystemIf you have an electronic data collection system, you can use the interunit receiving transactions to receive items transferred between business units. Third-party material management systems can stage interunit receipt transactions for processing in PeopleSoft Inventory by using the InterUnit Receipt EIP. The InterUnit Receipt EIP is an asynchronous inbound batch subscribe message that also supports the requirements of the industry standard EDI transaction set: X.12 944 - Warehouse Stock Transfer Receipt Advice transaction set and acknowledges that a third-party has received an interunit transfer shipment.
To use the InterUnit Receipt EIP:
Setup in PeopleTools:
Activate the INTERUNIT_RECEIPT message.
Activate InterunitReceipt subscription.
Set up a transaction defining the INTERUNIT_RECEIPT message on each node that can send the message to your system. Set up an inbound asynchronous transaction if receiving an XML message directly from the source node. Set up an outbound asynchronous transaction on the default local node for loading a flat file using the Inbound File Publish utility.
Verify the INTERUNIT_RECEIPT message channel is in Run mode.
Setup in Enterprise Components: If you are using flat file input, then activate the inbound file rule through the Inbound File Rule page. The system is delivered with a sample file rule, SCM_INBOUND_EDI. You can use the sample or create a custom file identifier.
Setup at the Application Level: None.
The above setup instructions assume that the message environment has been set up in PeopleSoft Integration Broker.
PeopleSoft Inventory provides three transactions: InterUnit Receipt (0120), InterUnit Receipt Lines (0121), and InterUnit Receipt End Tran (0125). This series of transactions processes interunit receipts arriving from third-party systems and prepares them for putaway into PeopleSoft Inventory.
Note. Any third-party material management system can stage interunit receipt transactions for processing in PeopleSoft by using the Interunit Receipt EIP.
Use the InterUnit Receiving page to enter transaction details. When you save the transaction, PeopleSoft Inventory inserts the information into the transaction log. You then run the InterUnit Receipt process (INPJIURV), which retrieves the information from the transaction log, processes the transactions, and updates the appropriate system tables. If errors occur during the InterUnit Receipt process, you can use the Transaction Maintenance - InterUnit Receiving page to correct the errors and resubmit the transaction.
The logic for the interunit receiving transactions is similar to that for the online InterUnit and RMA Receiving component, with the following exceptions:
ChartField overrides are not permitted.
The InterUnit Receipt process does not create an Interunit Business Transfer Adjustment (transaction group 042) when the received quantity does not equal the quantity originally shipped. Instead, the system handles the receipt in one of the following ways:
If the interunit receipt total for the order equals the original quantity shipped, and if the Auto Close Receipts option on the Inventory Definition - Business Unit Options page is selected, the InterUnit Receipt process automatically closes the receipt header and line and marks the order line as received. When comparing the quantities for lot-controlled items, the comparison occurs at the lot level instead of the receipt level.
If the interunit receipt total for the order does not equal the original quantity shipped, the corresponding receipt header and lines remain in Open status and the order line is not marked as received. You must use the online InterUnit and RMA Receiving pages to close the interunit order and create the transfer adjustment.
Once all lines on the interunit order have been received and all receivers have been closed, the InterUnit Receipt process sends an InterUnit Expected Receipt transaction to the third-party system with the action set to Close.
The InterUnit Receipt transactions ignore conditions that trigger a warning message in the online InterUnit and RMA Receiving component. These conditions include an interunit receipt header with no associated receipt lines; a Closed receiver line status for an interunit ID that contains other open or pending lines; and putaway of items into lots or material storage locations that are restricted, rejected, on hold, or suspended.
Note. You cannot use the interunit receiving transactions to receive shipping containers.
See Also
Enterprise PeopleTools 8.46 PeopleBook: Integration Broker
Pages Used to Stage Interunit Transfers Using an Electronic Data Collection System|
Page Name |
Object Name |
Navigation |
Usage |
|
InterUnit Receiving |
BCT_INV_IURCV |
SCM Integrations, Create Transactions, Inventory, Interunit Receiving |
Correct or modify transactional data for interunit transfers staged with an electronic data collection system or received from a third-party material management system. |
|
Inventory IU Receipts |
BCT_INV_REQIURV |
SCM Integrations, Process Transactions, Inventory, InterUnit Receiving, InterUnit Receiving |
Define run control parameters for the InterUnit Receipt process. |
Entering InterUnit Receiving TransactionsAccess the InterUnit Receiving page.
Transaction code options are:
|
0120 - InterUnit Receipt |
Use to enter basic receipt information. |
|
0121 - InterUnit Receipt Lines |
Use to enter detailed receipt information. You can complete the receipt using only this transaction (by selecting Transaction Complete) or using the InterUnit Receipt End Transaction. Note. This transaction code is the default value when you first open the page. |
|
0125 - InterUnit Receipt End Tran (interunit receipt end transaction) |
Use to complete an interunit receipt. When you save the transaction, PeopleSoft Inventory sets the transaction log status for the receipt to New, enabling the InterUnit Receipt process to pick up the transaction for processing. |
Note. The system displays or hides certain fields on this page depending upon the transaction code that you select.
|
Grouping |
Indicate how records belonging to this receipt should be identified. Values are Carrier, Bill of Lading, Receiver ID, Source BU (source business unit), InterUnit ID, and Dest BU (destination business unit). |
|
Receiver ID/Line |
These fields are optional. If you do not enter values here, the system assigns them automatically during the InterUnit Receipt process. Any values that you enter must be unique within the business unit. If you include a receiver ID for one transaction, include it for all transactions that you enter for this receipt, and set the Grouping field value to Receiver ID. |
|
InterUnit ID/Line |
If you are conducting an InterUnit Receipt Lines transaction, include an interunit ID and either an interunit line or an item ID. If you include only the item ID, the InterUnit Receipt process verifies that this item occurs only once in the demand fulfillment table (IN_DEMAND). If the item exists in more than one row, the system rejects the transaction. |
|
Port Of Unloading |
If Intrastat reporting is required, enter the appropriate information. |
The Intrastat Interunit Returns and Replacement fields are only available for Intrastat interunit transfers. If both the source and destination business units are members of the European Union and require Intrastat reporting, mark the interunit receipt as a replacement or a return.
|
Intrastat InterUnit Returns |
The interunit or intercompany transfer contains goods that were previously sent to another business unit but are now being returned. The transfer is reported on the Intrastat return with a Nature of Transaction code indicating that it is a return. (If you clear this option, the transfer is a normal transfer and is reported on the Intrastat return with a Nature of Transaction code indicating that it is a purchase). If you select this option, the Replacement field value is NA (not applicable). A transfer can be a return or a replacement but not both. |
|
Replacement |
This field works in conjunction with the Intrastat InterUnit Returns field. Values are: NA: The interunit transfer is a normal transfer order or a return. This is the default value when the Intrastat InterUnit Returns option is selected. RN (replacement of goods not returned): The transfer replaces an order that had been previously received but was scrapped or otherwise disposed of. The transfer order is reported on the Intrastat return with a Nature of Transaction code indicating that it is a replacement of goods that have not been returned. RR (replacement of returned goods): The transfer replaces an order that was returned to the source business unit. The transfer order is reported on the Intrastat return with a Nature of Transaction code indicating that it is a replacement of goods that have been returned. |
Note. The business unit defaults that you established on the Inventory Display Options page govern whether lot, serial, staged date, and configuration fields appear upon entry to this page. Any fields for which the default is Yes always appear. Any fields for which the default is No appear when you save or refresh the page, and only if they apply to the item in question.
Note. The business unit’s default display options determine how many location levels appear upon entry to this page. If you are entering a material storage location that requires additional levels, enter the storage area, then refresh the page to display the remaining levels for that area.
|
Transaction Complete |
If you are conducting an InterUnit Receipt Lines transaction, select to complete the receipt without entering an InterUnit Receipt End Tran transaction. |
When you save the page, PeopleSoft Inventory inserts the transaction into the transaction log and clears the page; therefore, you can enter a new transaction.
See Also
Processing Intrastat Replacements and Returns
Searching for Material Storage Locations
Defining PeopleSoft Inventory Business Unit Display Options
Understanding Inventory Material Storage Structures
Setting Up and Running Intrastat Reports
Staging RMA Receipts Using an Electronic Data Collection SystemThe Returned Material Authorization EIP is a synchronous inbound PeopleCode subscribe message that receives RMA receipt messages from a third-party system.
To use the Returned Material Authorization EIP:
Setup in PeopleTools:
Activate the RMA_LOAD message.
Activate RMALoad subscription.
set up an inbound asynchronous transaction defining the RMA_LOAD message on each node that can send the message to the system.
Verify the RMA message channel is in Run mode.
Setup in Enterprise Components: None.
Setup at the Application Level: None.
The above setup instructions assume that the message environment has been set up in PeopleSoft Integration Broker.
See Also
Enterprise PeopleTools 8.46 PeopleBook: Integration Broker
Loading Items Into the Putaway Staging TablesAfter the items slated for putaway have been inserted into the staging interface tables (STAGED_INF_INV and STGCOST_INF_INV), launch the Load Staged Items process to perform these tasks:
If the item’s UOM is valid for stocking, no conversion occurs.
Assign a staging ID to provide easy reference to the group of items that the system is processing.
If the receipt is pegged and no putaway location was specified in the receipt transaction (for example, a PO receipt), places the stock in the pegging location, if within the pegging lead days. Also, determines which demand the receipt (that is, pegged supply) will satisfy if more than one demand line exists for the supply.
If you enable cross docking, calculate open demand and move sufficient quantity to cover demand to the cross docking location.
Assign a material storage location, if none was specified when the item was received.
If directed putaway is active, the Load Staged Items process calls the Directed Putaway function; otherwise, it uses the default location assigned for the item. The process also ensures that items requiring isolation are not mixed with other stock and, in capacity-checking environments, verifies that the location can hold the receipt quantity.
Insert the items into the putaway staging tables (STAGED_ITEM_INV and STAGED_COST_INV).
If the Perform Validation option is selected on the Setup Putaway page, validate the incoming data.
The manner in which the Load Staged Items process handles the item’s UOM varies according to the situation:
If you do not define a stocking UOM for the item, or if the item is serial-controlled and the UOM is not the standard UOM, the process ends in error.
You can correct the error on the Correct Staged Errors page.
If the item's putaway material storage location is a fixed picking location and the stocking UOM for the item is different from that of the fixed picking location, the system converts the quantity to the picking location’s UOM.
If the item’s UOM is not a valid stocking UOM, the system converts the quantity to the standard UOM defined for the item.
If you are using multistep putaway processing, you can override the UOM using either the Review Plan page or the Stockroom Feedback page after the Load Staged Items process is complete.
Here’s how to load items into the putaway staging tables:
Run the Load Staged Items process.
Review and correct staging errors.
View putaway details for a staging ID.
See Also
Storage Location Capacity Checking
Setting Up Putaway Defaults and Rules
Understanding Receiving and Putaway Processing
Pages Used to Load Items Into the Putaway Staging Tables|
Page Name |
Object Name |
Navigation |
Usage |
|
Load Staged Items |
STAGED_REQ_INV |
Inventory, Putaway Stock, Load Staged Items |
Define parameters for the Load Staged Items process. |
|
Correct Staged Errors |
STAGED_ITEM_E_INV |
Inventory, Putaway Stock, Correct Staged Errors |
Review and correct any errors found by the Load Staged Items process. |
|
Correct Staged Errors - Putaway Detail |
STAGED_ITEM_E_SEC |
Click the Details link on the Correct Staged Errors page. |
View putaway information for items on the Correct Staged Errors page. |
Running the Load Staged Items ProcessAccess the Load Staged Items page.
|
Load Option |
Indicate which items the process should load into the putaway staging tables. Values are: All Items: Load all items for the business unit. User ID: Load items received by the specified user. Production ID: Load items associated with the specified production ID. Available if the installation includes PeopleSoft Manufacturing. Production Schedule: Load items associated with a production schedule. Select the production area, production type and item ID. Available if the installation includes PeopleSoft Manufacturing. Receiver ID: Load items associated with the specified receiver number. Transaction Source: Load items according to the transaction that inserted the item into the staging interface tables. Values are Adjustment, Component Kit Returns, Inventory, Purchasing, WIP Completionor WIP Component. |
|
Flag Items for Auto-Putaway |
Select to use auto-putaway processing. |
See Also
Understanding Receiving and Putaway Processing
Maintaining Production Orders and Production Schedules
Reviewing and Correcting Staging ErrorsAccess the Correct Staged Errors page.
Field Errors
The Staged Item Fields group box lists fields that can be in error. Errors can be caused by data that is missing or incorrect.
|
Item |
Define and approve the item ID as an inventory item. If the item is not approved, approve it on the Item Approval page, then return to this page to clear the error. If an identical item (including lot, serial, container, staged date) in the putaway location has a Restricted status, the system issues a warning; if the item’s status is Hold or Rejected, the system issues an error. However, if the status of the location itself is Hold, or if the item is lot-controlled and the lot status is not Open, no warning or error occurs. For average, actual, and standard cost items, a default cost element must be specified on the Define Item - General: Common page. Specify the cost element and then return to this page to clear the error. If the item is standard cost, standard costs must be defined. Define a standard cost, then return to this page to clear the error. |
|
Storage Location |
Putaway material storage location information must exist before you can load staged items. The specified material storage location cannot have a suspended status. If you are putting the item into an existing container that already contains item quantity, the putaway location must match the material storage location of the container. If the item requires inspection, the putaway location must be an inspection location. |
|
Container ID Container Sequence |
Unless the business unit permits automatic container creation, you can only assign items to an existing container ID. If automatic container creation is permitted, you can assign multiple items to the same container by entering NEXT as the container ID and then entering a container sequence. The system assigns the Items with the same container sequence to the same container. If the item requires single-item storage, the item ID must match that defined for the container unless the Item ID field was left blank when creating the container. In the latter case, the item ID must match the first item put away into the container. |
|
Lot ID, Serial ID, and Configuration Code |
For lot- and serial-controlled items, the lot or serial ID is required and must not match the default filler value that you defined on the Installation Options - Inventory page. If the item is configured, a configuration code is required. If the item's lot already exists, the configuration code associated with the lot must match the configuration code for the putaway item. If the lot already exists and the lot status is not Open, the system issues a warning. If the business unit does not allow the automatic addition of new lots, you must create the new lot before using the Lot ID field here. |
|
Quantity |
This is a required field. If the item is serial-controlled, the quantity must be 1 and the UOM must be the item’s standard UOM. |
|
Non-Owned |
If the items being staged are non-owned, you must put them into a non-owned material storage location. Similarly, you must put owned items into an owned location. However, if the receiving business unit is a VMI business unit, and the source business unit is not a VMI business unit, and the demand source is OM, then a non-owned location can be selected for an owned item. |
|
Stock Type |
If you selected the Non-Owned option, this field is required. |
|
ChartField Overrides |
Click to access the ChartField Overrides page, where you can override the credit accounting information for the received item. ChartField overrides are not allowed for interunit receipts and items staged from PeopleSoft Manufacturing. |
Application Errors
Only application error messages appear in the Edit Errors group box. For errors due to invalid values or missing required fields, click Save and PeopleSoft Inventory identifies the field in error during the save validation.
You cannot change these fields:
For PeopleSoft Purchasing receipts: Item, Quantity, and Non-Owned.
For PeopleSoft Manufacturing completions: Item, Quantity and UOM, Dist Type, and Non-Owned.
For interunit receipts: Item, Quantity, and Non-Owned.
For RMA receipts: Item and Quantity.
To change the overall putaway quantity for items staged from PeopleSoft Purchasing, update the original receipt quantity using the Inventory Putaway Information page.
See Also
Working With Configuration Codes
Using Standard Costing for Purchased Items
Defining and Using ChartFields
Managing Inventory by Item Status
Defining Your Operational Structure in PeopleSoft Inventory
Defining and Maintaining Material Storage Locations
Performing Vendor Managed Inventory Processes
Preparing Putaway PlansThis section discusses how to:
View putaway plans and generate putaway move documents.
Select alternate putaway locations.
Pages Used to Prepare Putaway Plans|
Page Name |
Object Name |
Navigation |
Usage |
|
Review Plan |
PUTAWAY_REVIEW_INV |
Inventory, Putaway Stock, Review Plan |
View the suggested putaway plan, generate putaway move documents, and select alternate putaway locations. |
|
Alternate Plan |
PUTAWAY_ALT_INV |
Click the Find Alternate Location link on the Review Plan page. |
Search for and select an alternate putaway material storage location for any item in a staging ID. |
|
Putaway Location |
IN_PTWY_LOC |
Click the Putaway Locations link on the Review Plan page. |
View and select material storage locations that meet putaway rules established for the item or business unit. |
|
ChartField Overrides |
PUTAWAY_DETAIL_INV |
Click the ChartField Overrides link on the Review Plan page. |
Override the credit accounting information for the received item. ChartField overrides are not available for interunit receipts or for items staged from PeopleSoft Manufacturing. |
Viewing Putaway PlansAccess the Review Plan page.
|
Staging ID |
If Canceled appears after the staging ID, the items are the result of a canceled order that was picked but not shipped. If Short Shipment appears after the staging ID, the items are the result of a short shipment. In both cases, you must now put the items away. |
|
Total Staged |
The number of items staged. |
|
Total in Error |
The number of items that were in error during the staging process. Staged items with errors do not appear on this page. |
|
Error Detail |
Click to access the Correct Staged Errors page, where you can correct staging errors. All staging errors should be corrected before you run the Complete Putaway process. If this link is not available, no errors need correction. |
|
Default Container ID and Container ID |
To assign all or most of the items in the staging ID to the same container ID, enter the default container ID. This default appears for all items in the plan for which a container ID has not already been specified. Override the default for any item that you want to assign to another container. |
|
|
Click to print the Material Putaway Plan by Staging ID report, which lists the pending putaway lines.
Note. Make sure that you save the page first. |
Putaway Line Details
|
Storage Location |
The putaway material storage location that the Load Staged Items process assigns or specifies during receiving. Note. The business unit’s default display options determine how many location levels appear for new rows. If you are entering a material storage location that requires additional levels, enter the storage area, then refresh the page to display the remaining levels for that area. |
|
Container ID and Container Sequence |
Enter a container ID to assign the item to a container. If you are assigning the item to an existing container, leave the Container Seq field blank. If the business unit allows automatic generation of container IDs, you can assign multiple items to the same new container by defining the container ID as NEXT and entering a container sequence number. The system puts all items with the same container sequence into the same container. |
|
Quantity and Base Qty (base quantity) |
Enter the received quantity and select a stocking UOM. If the stocking UOM differs from the standard UOM, the system converts the entered quantity to the standard UOM and displays the base quantity. For serial-controlled items, the quantity must be 1 and the stocking UOM must be the same as the standard UOM. You cannot modify the UOM for serial-controlled items or for items staged from PeopleSoft Manufacturing. |
|
Lot ID |
Enter a lot ID if the item is lot-controlled. If the business unit does not allow the automatic addition of new lots, create the new lot before adding a lot ID here. |
|
Config Code (configuration code) |
Select the appropriate configuration code if the item is also configured. |
|
Serial ID |
If the item is serial-controlled, the assigned serial ID appears. This field is display-only and cannot be changed here. |
|
Comments |
Enter a comment using up to 254 characters for the putaway plan. These comments will print on the Putaway Plan report (INC3500). |
|
Storage Rules |
Displays the storage rule used. |
|
PO Number, Purchase Lot, Src BU, Receipt No, Receipt Line, Purchase Order Date, Vendor ID, Receiver Shipping Sequence, Distribution Line, and Distribution Sequence |
Displays values that come from a purchase order if the transaction source is Purchasing. Otherwise these fields are not displayed. |
Note. For items staged from PeopleSoft Purchasing receipts, PeopleSoft Manufacturing completions, RMAs, or interunit receipts, you can split the quantity among multiple locations, but you cannot update the overall quantity. To change the overall putaway quantity for items staged from PeopleSoft Purchasing, update the original receipt quantity using the Receiving component.
See Also
Setting Up Putaway Defaults and Rules
Defining Your Operational Structure in PeopleSoft Inventory
Searching for Material Storage Locations
Defining PeopleSoft Inventory Business Unit Display Options
Understanding Inventory Material Storage Structures
Defining and Using ChartFields
Working With Configuration Codes
Selecting Alternate Putaway Storage LocationsAccess the Alternate Plan page.
|
Putaway Plan |
Select the type of alternate location for which you want to search. Values are: Cntr Type (container type): Storage locations with containers matching the container type for the container ID that you defined on the Review Plan page. Empty: Empty material storage locations. Item Match: Storage locations in which the item already exists. Random: Storage locations that match the location search criteria. Spatial: Storage locations with dimensions (height x width x length) that are greater than or equal to the item's dimensions. If you have not set up the item dimensions on the Define Item - General: Dimensions page, the system issues a warning that this value is an invalid selection. |
|
Search |
Click to return available material storage locations. PeopleSoft Inventory does not return locations that have been suspended. |
|
Select Location |
Click the button next to the location into which you want to put the item. The system returns you to the Review Plan page, with the selected material storage location shown as the material storage location for the item. |
Location Search Criteria
To limit the search, enter additional material storage location information. For the Random value, enter at least the storage area.
Note. The business unit’s default display options determine how many location levels appear upon entry to this page.
See Also
Defining and Maintaining Material Storage Locations
Searching for Material Storage Locations
Understanding Inventory Material Storage Structures
Generating the Putaway Plan ReportIf you run the Putaway Plan report as part of the auto-putaway job, it lists all items being put away. Otherwise, the report lists all items not marked for putaway that satisfy the criteria that you specified on the Putaway Plan page.
Page Used to Generate the Putaway Plan Report|
Page Name |
Object Name |
Navigation |
Usage |
|
Putaway Plan Report |
RUN_INS3500 |
Inventory, Putaway Stock, Putaway Plan Report, Putaway Plan |
Define parameters for the Putaway Plan report. |
Running the Putaway Plan ReportAccess the Putaway Plan Report page.
All default values come from the Setup Putaway page.
|
Reprint |
Select if a staging ID already has a Putaway Plan ID. (Only staging IDs with no putaway plan IDs and no items marked for putaway are included in the report.) |
Note. When you run the Putaway Plan report as part of the Auto-Putaway multiprocess job, it does not print any bar-coded information.
Entering Stockroom FeedbackWhen items are not put away according to the original putaway plan, use the Stockroom Feedback component to record what actually occurred in the stockroom.
Pages Used to Enter Stockroom Feedback|
Page Name |
Object Name |
Navigation |
Usage |
|
Stockroom Feedback |
PUTAWAY_FEEDBK_INV |
Inventory, Putaway Stock, Stockroom Feedback |
Enter the actual putaway information when at least some items in a staging ID are not put away according to the original putaway plan. |
|
ChartField Overrides |
PUTAWAY_DETAIL_INV |
Click the ChartField Overrides link on the Stockroom Feedback page. |
Override the credit accounting information for the received item. ChartField overrides are not available for interunit receipts or for items staged from PeopleSoft Manufacturing. |
Entering Putaway InformationAccess the Stockroom Feedback page.
|
Staging ID |
If Canceled appears after the staging ID, the items are the result of a canceled order that was picked but not shipped. If Short Shipment appears after the staging ID, the items are the result of a short shipment. In both cases, you must now put the items away again. |
|
Total Staged |
The number of items staged. |
|
Total in Error |
The number of items that were in error during the staging process. Staged items with errors do not appear on this page. |
|
Error Detail |
Click to access the Correct Staged Errors page, where you can correct staging errors. All staging errors should be corrected before you run the Complete Putaway process. If this link is not available, no errors need correction. |
|
Putaway Items |
Click to run the Complete Putaway process for all items in this staging ID that are ready to be put away. If you have not selected at least one row for putaway, the system issues an error. |
|
Select All and Deselect All |
Select or clear the Putaway check box for all rows. |
Putaway Line Details
|
Storage Location |
If the item was not stored in the location specified on the putaway plan, enter the correct material storage location.
Note. The business unit’s default display options determine how many location levels appear for new rows. If you are entering a material storage location that requires additional levels, enter the storage area, then refresh the page to display the remaining levels for that area. |
|
Putaway |
Select to indicate that the item was physically put away in the material storage location that appears. When you run the Complete Putaway process, the system updates the quantity for the location. |
|
Container ID and Container Sequence |
Enter a container ID to assign the item to a container. If you are assigning the item to an existing container, leave the Container Sequence field blank. If the business unit allows automatic generation of container IDs, you can assign multiple items to the same new container by defining the container ID as NEXT and entering a container sequence number. The system puts all items with the same container sequence into the same container. |
|
Lot ID |
Enter a lot ID if the item is lot-controlled. If the business unit does not allow the automatic addition of new lots, create the new lot before adding a lot ID here. |
|
Config Code |
Select the appropriate configuration code if the item is also configured. |
|
Serial ID |
If the item is serial-controlled, the assigned serial ID appears. This field is display-only and cannot be changed here. |
|
Quantity and Base Qty (base quantity) |
Enter the received quantity and select a stocking UOM. If the stocking UOM differs from the standard UOM, the system converts the entered quantity to the standard UOM and displays the base quantity. For serial-controlled items, the quantity must be 1 and the stocking UOM must be the same as the standard UOM. You cannot modify the UOM for serial-controlled items or for items staged from PeopleSoft Manufacturing. To split the item quantity across material storage locations, insert a line in the scroll area. The new receiving line displays the item data from the selected line with the quantity set to 0 and no material storage location information. To ensure that the Complete Putaway process works correctly, enter the second material storage location on the new receiving line and adjust the quantity on both rows before saving your changes. |
|
Distrib. Type (distribution type) |
You cannot change the distribution type for items staged from PeopleSoft Manufacturing. |
|
Comments |
Enter a comment using up to 254 characters. These comments are informational only. |
|
PO Number, Purchase Lot, Src BU, Receipt No, Receipt Line, Purchase Order Date, Vendor ID, Receiver Shipping Sequence, Distribution Line, and Distribution Sequence |
Displays values that come from a purchase order if the transaction source is Purchasing. Otherwise these fields are not displayed. |
Note. The Complete Putaway process can only be launched from the Stockroom Feedback page if you have specified a server name under Set Up Financials/Supply Chain, Common Definitions, User Preferences, Define User Preferences, Inventory.
Note. Because you use this page to provide feedback on what you have already stocked, you might receive warnings from PeopleSoft Inventory when you save the data on this page. For example, if you put an item into a material storage location that contains the identical item (including lot ID, serial ID, and staged date, if applicable) with an inventory status of Rejected, or if the putaway location is suspended or shut down for cycle counting, you receive a warning instead of an error.
See Also
Understanding Receiving and Putaway Processing
Defining PeopleSoft Inventory Business Unit Display Options
Understanding Inventory Material Storage Structures
Defining and Using ChartFields
Working With Configuration Codes
Entering Stockroom Feedback Using an Electronic Data Collection SystemIf you have an electronic data collection system, you can enter stockroom feedback using one of three putaway transactions:
Putaway Location (0201)
Putaway Plan Line Complete (0202)
Putaway Plan Complete (0203)
To enter feedback using the putaway transactions:
Enter transaction details using XML application messages. The Inventory Putaway page can be used to enter or review transaction details.
When you save the transaction, PeopleSoft Inventory inserts the information into the transaction log.
Run the Inventory Complete Putaway process, which retrieves the information from the transaction log, processes the transaction, and updates the staging tables.
If errors occur during the process, use the Transaction Maintenance component to correct the errors and resubmit the transaction.
Once information is in the staging tables, the Complete Putaway process updates the available quantity and inbound cost in the appropriate system tables.
The Inventory Putaway page differs from the online Stockroom Feedback page in the fields that are available for entry and in the edits that are made by the system. You can use this page rather than the Stockroom Feedback page if, for example, you want the user to be able to change the location and the quantity but not the lot ID, or if you are using a keyboard wedge.
Setting Up the Inventory Putaway EIP
The Inventory Putaway message is an asynchronous inbound batch subscribe EIP that receives putaway data into PeopleSoft from an electronic data collection system.
To use the Inventory Putaway EIP:
Setup in PeopleTools:
Activate the INVENTORY_PUTAWAY message.
Activate InventoryPutaway subscription.
Set up an inbound asynchronous transaction defining the INVENTORY_PUTAWAY message on each node that can send the message to your system.
Verify the INVENTORY_PUTAWAY message channel is in Run mode.
Setup in Enterprise Components: None.
Setup at the Application Level: None.
The above setup instructions assume that the message environment has been set up in PeopleSoft Integration Broker.
See Also
Enterprise PeopleTools 8.46 PeopleBook: Integration Broker
Pages Used to Enter Stockroom Feedback Using an Electronic Data Collection System|
Page Name |
Object Name |
Navigation |
Usage |
|
Inventory Putaway |
BCT_INV_PUTAWAY |
SCM Integrations, Create Transactions, Inventory, Putaway, Inventory Putaway |
Enter stockroom putaway information using an electronic data collection system. |
|
Inventory Putaway (process) |
BCT_INV_REQPWFB |
SCM Integrations, Process Transactions, Inventory, Putaway, Inventory Putaway |
Define run control parameters for the Inventory Putaway electronic data collection process. |
Entering Stockroom Putaway TransactionsAccess the Inventory Putaway page.
Transaction code options are:
|
0201 - Putaway Location |
Report any quantity or location exceptions to a putaway plan. |
|
0202 - Putaway Plan Line Complete |
Put away all quantities as planned for a specific putaway line. |
|
0203 - Putaway Plan Complete |
Put away all quantities as planned for all lines on a putaway plan. |
The remaining fields are available for entry only if you are conducting a Putaway Location transaction.
If you enter a Putaway Location transaction and then enter a Putaway Plan Line Complete transaction for the same line, only the remaining open quantity for the line is put away into the originally entered material storage location. Similarly, if you enter a Putaway Plan Complete transaction after entering either a Putaway Location or Putaway Plan Line Complete transaction for the same line, only the remaining open quantity for the plan is put away into the originally planned material storage location.
Note. The business unit’s default display options determine how many location levels appear upon entry to this page. If you are entering a material storage location that requires additional levels, enter the storage area, then refresh the page to display the remaining levels for that area.
Note. The business unit defaults established on the Inventory Display Options page govern whether lot, serial, staged date, and configuration fields appear upon entry to this page. Any fields for which the default is Yes always appear. Any fields for which the default is No appear when you save or refresh the page, and only if they apply to the item in question.
See Also
Defining PeopleSoft Inventory Business Unit Display Options
Searching for Material Storage Locations
Understanding Inventory Material Storage Structures
Putting Items AwayThe Complete Putaway process updates the available quantity and inbound cost in the appropriate system tables.
For the putaway of pegged supply, the Complete Putaway process can reserve or allocate the pegged receipt (supply) to its associated pegged demand thereby preventing the supply from being allocated to some other demand. The choice to reserve or allocate the putaway stock is defined on the Pegging Setup page or the Pegging Item Setup page.
See Also
Page Used to Put Items Away|
Page Name |
Object Name |
Navigation |
Usage |
|
Complete Putaway |
PUTAWAY_REQ_INV |
Inventory, Putaway Stock, Complete Putaway, Complete Putaway |
Define parameters for the Complete Putaway process. |
Running the Complete Putaway ProcessAccess the Complete Putaway page.
The Complete Putaway process uses the Commit Count value that is entered on the Setup Putaway page. This value indicates the number of items to process before issuing a commit statement, which improves performance.
Note. If you are creating custom reports and queries, PeopleSoft Inventory inserts the installation default staged date as the item's staged date for items that do not use staged-date tracking. The default date is established on the Installation Options - Inventory page.
Recording Express PutawayUse express putaway processing when you want to put incoming materials into their material storage locations without taking the time to receive the items and create a putaway plan.
The Express Putaway component does not update original or expected receipt information; therefore, you cannot use this processing method to put away material from POs, interunit transfers, or RMAs. To receive POs, use the Receiving component in PeopleSoft Purchasing; to receive and put away interunit transfers or RMAs, use the InterUnit and RMA Receiving component. Once receipt information for stock has been staged to the PeopleSoft Inventory staging interface table (STAGED_INF_INV), use auto-putaway or multi-step putaway processing to put away the stock.
When you save the Express Putaway component, the system performs the same validation as that performed by the Load Staged Items process. If you specify a new lot for a lot-controlled item, the system also calculates lot availability, retest, and expiration dates, provided that you have defined shelf life, availability lead time, and retest lead-time values on the Lot Control Information page.
Availability Date = Creation Date + Availability Lead Time
Retest Date = Creation Date + Retest Lead Time
Expiration Date = Creation Date + Shelf Life
Note. If the business unit requires closure calendar validation and processing for materials management activities as defined on the Closure Calendar page, and if the calculated lot retest date falls on a defined closure date, the system uses the first previous valid date.
Here’s how to record express putaway:
Enter mandatory express putaway information.
Specify tracking information.
Define information common to all putaway lines.
See Also
Understanding Receiving and Putaway Processing
Staging Interunit Transfer and RMA Receipts
Establishing Operation Closure Dates
Understanding the Receiving Business Process
Pages Used to Record Express Putaway|
Page Name |
Object Name |
Navigation |
Usage |
|
Express Putaway |
PUTAWAY_ENTRY1_INV |
Inventory, Putaway Stock, Express Putaway |
Enter mandatory information for the express putaway method. |
|
Edit Cost |
IN_PTWY_CST_ELEMT |
Click the Edit Cost link on the Express Putaway page. |
Enter the unit cost by cost element. |
|
Express Putaway - PO Information |
PUTAWAY_ENTRY2_INV |
Click the PO Information link on the Express Putaway page. |
Use if the items being put away require specific tracking information, such as PO information. |
|
Express Putaway - Putaway Line Defaults |
PUTAWAY_ENTRY3_INV |
Click the Line Defaults link on the Express Putaway page. |
Define information common to all of the putaway lines that you are processing. |
Entering Mandatory Express Putaway InformationAccess the Express Putaway page.
|
Receipt No(receipt number) |
Enter a receipt number. To generate a unique number automatically, select NEXT. If you do not require receiver information, enter the installation default or leave the field blank to enable the system to populate it with the installation default. |
|
Putaway Date |
The default is today's date. If the items were put away at a different time, enter the correct date. This field is for informational purposes and is not used when costing the putaway transaction. |
|
Sort Display |
Click to sort the information by receiver line, or if receipt line information is not available, by item ID. |
Putaway Detail
|
Receipt Line |
For each putaway line, the default receipt line number is either the next sequential line number or the installation default. |
|
Storage Location |
If you defined a default putaway location for the item, that location appears. If you are not putting the item into an existing container, you can override the default putaway location. If no default putaway location exists, or if you are overriding the default, enter the material storage location where you want to put the item. If the business unit is a VMI business unit, you can place owned items into non-owned locations without invoicing the customer. Note. The business unit’s default display options determine how many location levels appear upon entry to this page. If you are entering a material storage location that requires additional levels, enter the storage area, then refresh the page to display the remaining levels for that area. |
|
Putaway Locations |
Click to access the Directed Putaway Locations page, where you can view and select material storage locations that meet putaway rules established for the item or business unit. Enter the item, quantity, and UOM information before calling the Directed Putaway function. |
|
Container ID and Container Sequence |
To assign the item to a container, enter a container ID. If you are assigning the item to an existing container, leave the Container Sequence field blank. If the business unit allows automatic generation of container IDs, you can assign multiple items to the same new container by defining the container ID as NEXT and entering a container sequence number. The system puts all items with the same container sequence into the same container. |
|
Lot ID and Lot Creation Date |
If the item is lot-controlled, enter the lot ID and, if necessary, the lot creation date. The default lot creation date is today’s date.
Note. If the business unit does not allow the automatic addition of new lots, you must create the new lot before entering a lot ID here. |
|
Config Code |
If the item is configured, enter a configuration code. When you enter an existing lot ID for a configured item, the configuration code appears automatically. |
|
Serial ID |
Enter a value if the item is serial-controlled. Each item must have a unique serial identifier.
Note. The business unit defaults that you established on the Inventory Display Options page govern whether lot, serial, and configuration fields appear upon entry to this page. Any fields for which the default is Yes always appear. Any fields for which the default is No appear when you save or refresh the page, and only if they apply to the item being put away. |
|
Quantity and Base Quantity |
Enter the received quantity and select a stocking UOM. If the stocking UOM differs from the standard UOM, the system automatically converts the entered quantity to the standard UOM and displays the base quantity. For serial-controlled items, the quantity must be 1 and the stocking UOM must be the same as the standard UOM. |
|
Total Unit Cost |
Enter the cost per unit if the item uses actual or average cost; otherwise, leave the field at 0. |
|
Use Current Cost |
Selecting the Use Current Costs check box overrides the entries on the Edit Costs page. |
|
Edit Costs |
Select to access the Edit Cost page, where you can enter the unit costs by cost element. This link cannot be used if you have selected the Use Current Costs check box. |
|
Stock Type |
Reflects the type of item being put away. Required if the item is non-owned. |
|
Non-Owned |
Select if the item is not owned by the business unit and is not consigned. The system does not cost the putaway transaction for a non-owned item. In addition, if the item uses average cost, this transaction does not affect the average cost calculations. |
|
ChartField Overrides |
Click to access the ChartField Overrides page, where you can override the credit accounting information for the putaway line. |
|
PO Information |
Click to access the Express Putaway - PO Information page if any of the items that you are entering require specific PO tracking information. |
|
Line Defaults |
Click to access the Express Putaway - Putaway Line Defaults page if you are entering multiple items on this page that share putaway information. |
See Also
Managing Inventory by Item Status
Defining PeopleSoft Inventory Business Unit Attributes
Setting Up Putaway Defaults and Rules
Understanding Inventory Material Storage Structures
Defining and Using ChartFields
Performing Vendor Managed Inventory Processes
Specifying Tracking InformationAccess the Express Putaway - PO Information page.
Entering information about the PO is optional and is informational only. The purchase order, PO date, vendor, and purchase lot information should come from the receiving paperwork.
Defining Information Common to All Putaway LinesAccess the Express Putaway - Putaway Line Defaults page.
Putaway Line Defaults
If you enter information here during entry of the first putaway line or after entering other items on the Express Putaway page, click the Copy button to copy the default information to the current or already existing express putaway lines. The copied information overwrites any line-specific information that you have defined. The system only copies defaults with specified values to the lines. If you do not click this button, the changes that you make here apply only to newly created lines.
ChartField Overrides
Enter default credit accounting information for the express putaway items.
See Also
Defining and Using ChartFields
Recording InterUnit Expensed Issue ReturnsAn interunit expensed issue is a stock request that issues material from a PeopleSoft Inventory business unit to an internal department that is not reporting to the same PeopleSoft General Ledger unit as the PeopleSoft Inventory unit. Occasionally, the stock from an interunit expensed issue must be returned to inventory. Use the Expense Issue Return page to record the return receipt of stock originally shipped as an interunit expensed issue. The stock can be received into the original sending PeopleSoft Inventory business unit or another PeopleSoft Inventory business unit. If the stock is received into a different PeopleSoft Inventory unit than originally shipped from, then both PeopleSoft Inventory units must share the same set of items and ChartFields. You can enter the returned items on the Expense Issue Return page with or without the original interunit expensed issue stock request. In order to have an audit trail back to the original shipment, you must retrieve the original interunit expensed issue transaction. You can return the full shipment or just part of the items or quantities shipped.
Note. To record a return of an interunit expensed issue, the base currency of both PeopleSoft General Ledger business units must be the same. For transactions with multiple currencies, enter an intercompany transaction (interunit sales approach) described in the Transferring Stock between Inventory Business Units chapter.
See Also
Creating and Reversing Interunit Expensed Issues
Pages Used to Record InterUnit Expensed Issue Returns
|
Page Name |
Object Name |
Navigation |
Usage |
|
Expense Issue Return |
PUTAWAY_EXP_INV |
Inventory, Putaway Stock, Expense Issue Return |
Enter a return of stock originally issued as an interunit expensed issue transaction. |
|
Search History |
INV_EXP_ISS_SRCH |
Click the Search History link on the Expense Issue Return page. |
Search and select interunit express issues to be reversed on the Expense Issue Return page. This populates the return with the historical data from the original shipment. |
|
ChartField Overrides |
PUTAWAY_CF3_INV |
Click the ChartField Overrides link on the Expense Issue Return page. |
Enter the ChartField combination to be used to post the credit side of the accounting entry. This is the returning PeopleSoft General Ledger business unit's expense account. |
Entering ReturnsAccess the Expense Issue Return page.
Use this page to enter a return of stock issued as an interunit expensed issue. On this page, you can enter the information manually (without knowing the originating PeopleSoft Inventory unit or stock request) or you can retrieve the data from the originating stock request. This page places the stock back into inventory and reverses the accounting entries for the interunit expensed issue.
|
Receipt No(receipt number) |
Enter a receipt number. To generate a unique number automatically, enter NEXT. |
|
Putaway Date |
The default is the current date. If the items were put away at a different time, enter the correct date. This field is for informational purposes and is not used when costing the putaway transaction. |
|
Search History |
Select to search for the original interunit expensed issue transactions and add the historical data to this return receipt. To create a return receipt linked to the original shipment, you must use the Search History page. Using this page, you can create one receipt with multiple receipt lines combining several different items shipped to several different general ledger (GL) units. |
|
Sort |
Click to sort the information by receiver line, or if receipt line information is not entered, by item ID. |
Putaway Detail
|
Receipt Line |
For each putaway line, the default receipt line number is either the next sequential line number or the installation default. The system creates a receipt line for each returned stock request line. |
|
Item ID |
This field cannot be changed if the item ID was retrieved from the original shipment by the Search History page. This page generates an error and is not saved if the item ID that you entered is not defined for both the original inventory unit and the inventory unit receiving the return. |
|
Storage Location |
If you defined a default putaway location for the item, the location appears. If you are not putting the item into an existing container, you can override the default putaway location. If no default putaway location exists, or if you are overriding the default, enter the material storage location where you want to put the item. Note. The business unit’s default display options determine how many location levels appear upon entry to this page. If you are entering a material storage location that requires additional levels, enter the storage area, then refresh the page to display the remaining levels for that area. |
|
Putaway Locations |
Click to access the Directed Putaway Locations page, where you can view and select material storage locations that meet putaway rules that you established for the item or business unit. Enter the item, quantity, and UOM information before calling the Directed Putaway function. |
|
Container ID and Container Sequence |
To assign the item to a container, enter a container ID. If you are assigning the item to an existing container, leave the Container Sequence field blank. If the business unit allows automatic generation of container IDs, you can assign multiple items to the same new container by defining the container ID as NEXT and entering a container sequence number. The system puts all items with the same container sequence into the same container. |
|
Lot ID and Lot Creation Date |
If the item is lot-controlled, enter the lot ID, and if necessary, the lot creation date. The default lot creation date is today’s date. If the lot ID appeared by default from the Search History page, you can still change the value. Note. If the business unit does not allow the automatic addition of new lots, you must create the new lot before entering a lot ID here. |
|
Config Code |
If the item is configured, enter a configuration code. When you enter an existing lot ID for a configured item, the configuration code appears automatically. |
|
Serial ID |
If the item is serial-controlled, then it must have a unique serial identifier. If the serial ID appeared by default from the Search History page, you can still change the value. Note. The business unit defaults established on the Inventory Display Options page govern whether lot, serial, and configuration fields appear upon entry to this page. Any fields for which the default is Yes always appear. Any fields for which the default is No appear when you save or refresh the page, and only if they apply to the item being put away. |
|
Quantity and Base Quantity |
Enter the returned quantity and select a stocking UOM. If this field is populated by the data retrieved from the original interunit expensed issue, then the quantity here must be less than or equal to the remaining shipment quantity. If the stocking UOM differs from the standard UOM, the system automatically converts the entered quantity to the standard UOM and displays the base quantity. For serial-controlled items, the quantity must be 1 and the stocking UOM must be the same as the standard UOM. |
|
Total Unit Cost |
This unit cost can be retrieved from the original interunit expensed issue that is being reversed. If this return is not tied to a stock request, then enter the unit cost if known. If the field is left blank, then the system follows the receipt costing method for the item based on its cost profile. |
|
Use Current Costs |
Select this check box to override the entries on the Edit Costs page. |
|
Edit Costs |
Click to access the Edit Cost page, where you can enter the unit costs by cost element. This link cannot be used if you have selected the Use Current Costs check box. |
|
Stock Type |
Reflects the type of item being put away. Required if the item is non-owned. |
|
Non-Owned |
Select if the item is not owned by the business unit and is not consigned. The system does not cost the putaway transaction for a non-owned item. In addition, if the item uses an average cost method, this transaction does not affect the average cost calculations. |
|
ChartField Overrides |
Click to access the ChartField Overrides page, where you can override the credit accounting information for the putaway line. |
Expense Issue Information
|
From Inventory Unit |
Displays the PeopleSoft Inventory business unit from which the original interunit expensed issue was shipped. This information is retrieved from the Search History page. |
|
Order,Line,Schedule,Demand |
Displays the order number, line, schedule, and demand line numbers from the original material stock request (interunit expensed issue). This information is retrieved from the Search History page. |
|
Return GL |
Enter the PeopleSoft General Ledger business unit that is returning the stock. This is the GL unit of the department that was originally sent the interunit express issue. To reverse the original shipment, a debit is made to the GL unit's intercompany payables account in the amount of the transfer price. The GL unit entered here cannot be the same GL unit used by the PeopleSoft Inventory business unit. Both GL units must use the same base currency. If this information was retrieved from the Search History page, this field cannot be changed. This field is required. |
|
Transfer Price |
Used to reverse the intercompany payables and expense accounts of the original shipment. This field displays the transfer price from the originating interunit expensed issue (if you retrieved it from the Search History page), or you must enter the transfer price that is to be used. You can also override the transfer price from the original shipment. This field is required. |
|
Reason |
(Optional) Enter a reason code to classify this return. Define the reason codes using the Reason Type of Expense Issue Return. |
|
Document |
(Optional) Enter an identification number or reference number to supporting documentation for this return. Entering the originating material stock request number does not recreate a link to the original shipment. You must use the Search History page to create the link. |
Searching for the Original InterUnit Expensed IssueAccess the Search History page.
The Search History page uses several different criteria to retrieve interunit expensed issues for you to select and place on the Expense Issue Return page. To place a stock request onto the Expense Issue Return page, select one or more demand lines and click OK. For one receipt, you can select multiple lines from different stock requests and different returning GL units. By using the Search History page, the system can tie the return receipt back to the original transaction and retrieve the original information for use on the return receipt. The search retrieves only interunit expensed issues with remaining quantities. Once the entire quantity has been returned, the interunit express issue does not appear in future search results.
Note. Be sure to narrow the search results to a reasonable size by using multiple search criteria. It is recommended that you populate the From Ship Date and To Ship Date fields for all searches.
|
Business Unit |
Displays the PeopleSoft Inventory business unit where you are creating the expensed issue return transaction. |
|
From Ship Date and To Ship Date |
Enter a date range for the shipment dates of the original interunit expensed issue transactions. Be sure to enter a value in these fields. If blank, the system returns all dates, resulting in a large number of transactions. |
|
From Inventory Unit |
Enter the PeopleSoft Inventory business unit that shipped the original interunit expensed issue. The system initially populates this field with the inventory unit that you are currently in. Change this field if you are receiving returned stock issued by another PeopleSoft Inventory business unit. If this field is left blank, the system retrieves interunit expensed issues from all inventory units; this could be too many transactions. |
|
Return From Location |
Enter the department that received the shipment and is returning the stock. This was the location code that you entered on the original interunit expensed issue transaction (stock request using a request type of internal issue). |
|
Return GL Unit |
The PeopleSoft General Ledger business unit linked to the department that received the stock from the original interunit expensed issue. This is the GL unit where the expense and intercompany payables were recorded. |
|
Search |
Click to start the search based on the search criteria that you entered above. |