Using the PeopleSoft Fluid Interface For Team Learning
This topic describes how to use the PeopleSoft Fluid Interface to add and manage learning for your team members.
This section discusses on the pages used for team learning.
|
Page Name |
Definition Name |
Usage |
|---|---|---|
|
LM_MSS_HM_FL |
Access a collection of frequently-used team learning management components. |
|
|
LM_MSS_TEAM_FL |
Search for team members and assign learnings (course or program) for them. |
|
|
LM_FND_LRN_RSLT_FL |
Search for learnings (course or program) and add to team members. |
|
|
LM_MSS_TEAM_FL |
Add external learning for team members. |
|
|
LM_MSS_LEARNING_FL |
Review learnings for your team members. |
User Access
|
User Role |
Access |
|---|---|
|
Learning Manager Fluid |
Provides access to the Team Learning tile. |
Use the Team Learning page (LM_MSS_HM_FL) to access a collection of frequently-used team learning management components.
Navigation:
This example illustrates the fields and controls on the Team Learning page.
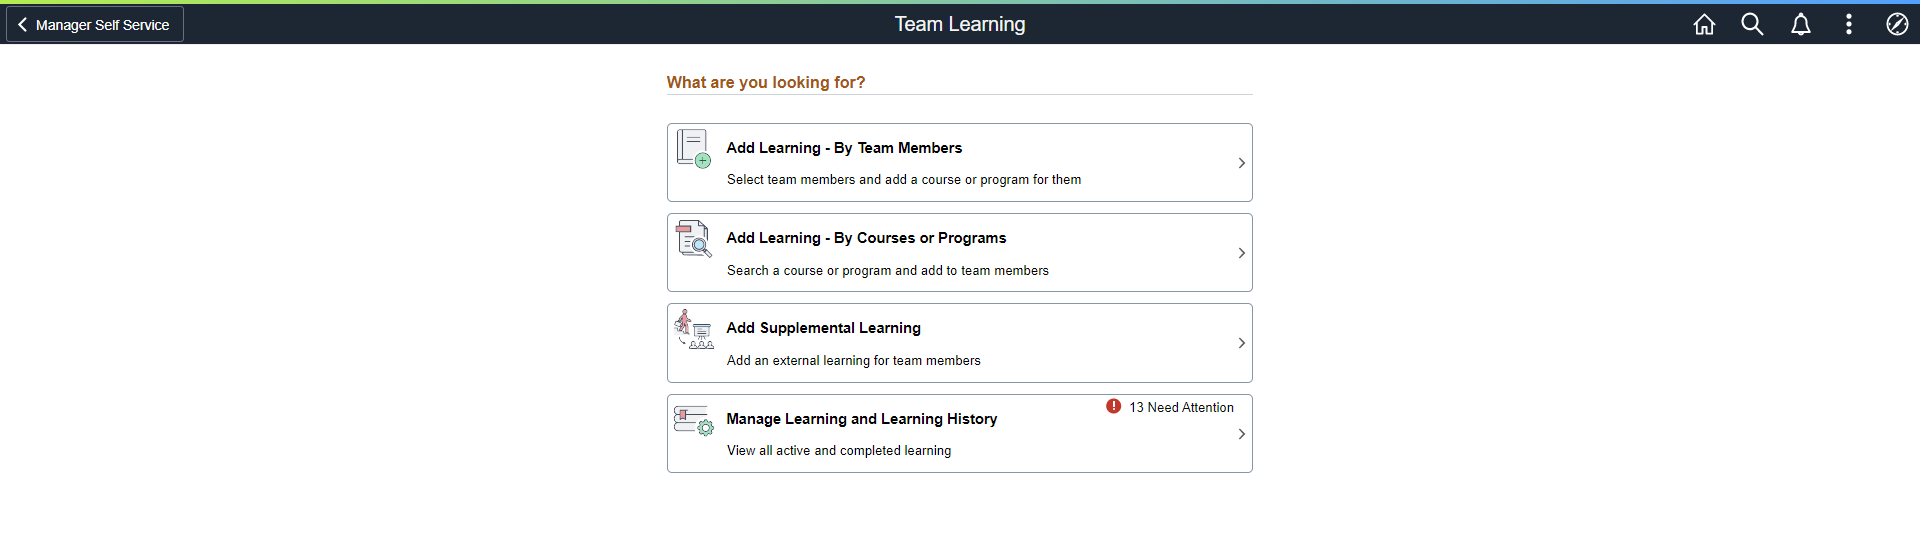
Team Learning Pages
The Team Learning page provides the following actions for the logged-in manager:
If the manager does not have any direct reports, then all the actions on the Team Learning home page are disabled.
If any team member has an overdue course or an expired certification, then the system marks the Manage Learning and Learning History action with a red alert icon (!) along with the number of learnings that are overdue or expired learning. This helps the manager to identify the number of learnings he needs to take action on from the Team Learning home page.
Use the Add Learning – By Team Members (LM_MSS_TEAM_FL) page to select the team members (learners) and add them to a learning (course or program).
Navigation:
The Add Learning – By Team Members page allows the managers to add the team members to a learning through a series of steps:
Step 1: Select Team Members
Step 2: Find Learning
Step 3: Select Classes
Step 4: Review and Confirm
Confirmation
Use the Previous and Next buttons to navigate through the steps.
Step 1 : Select Team Members
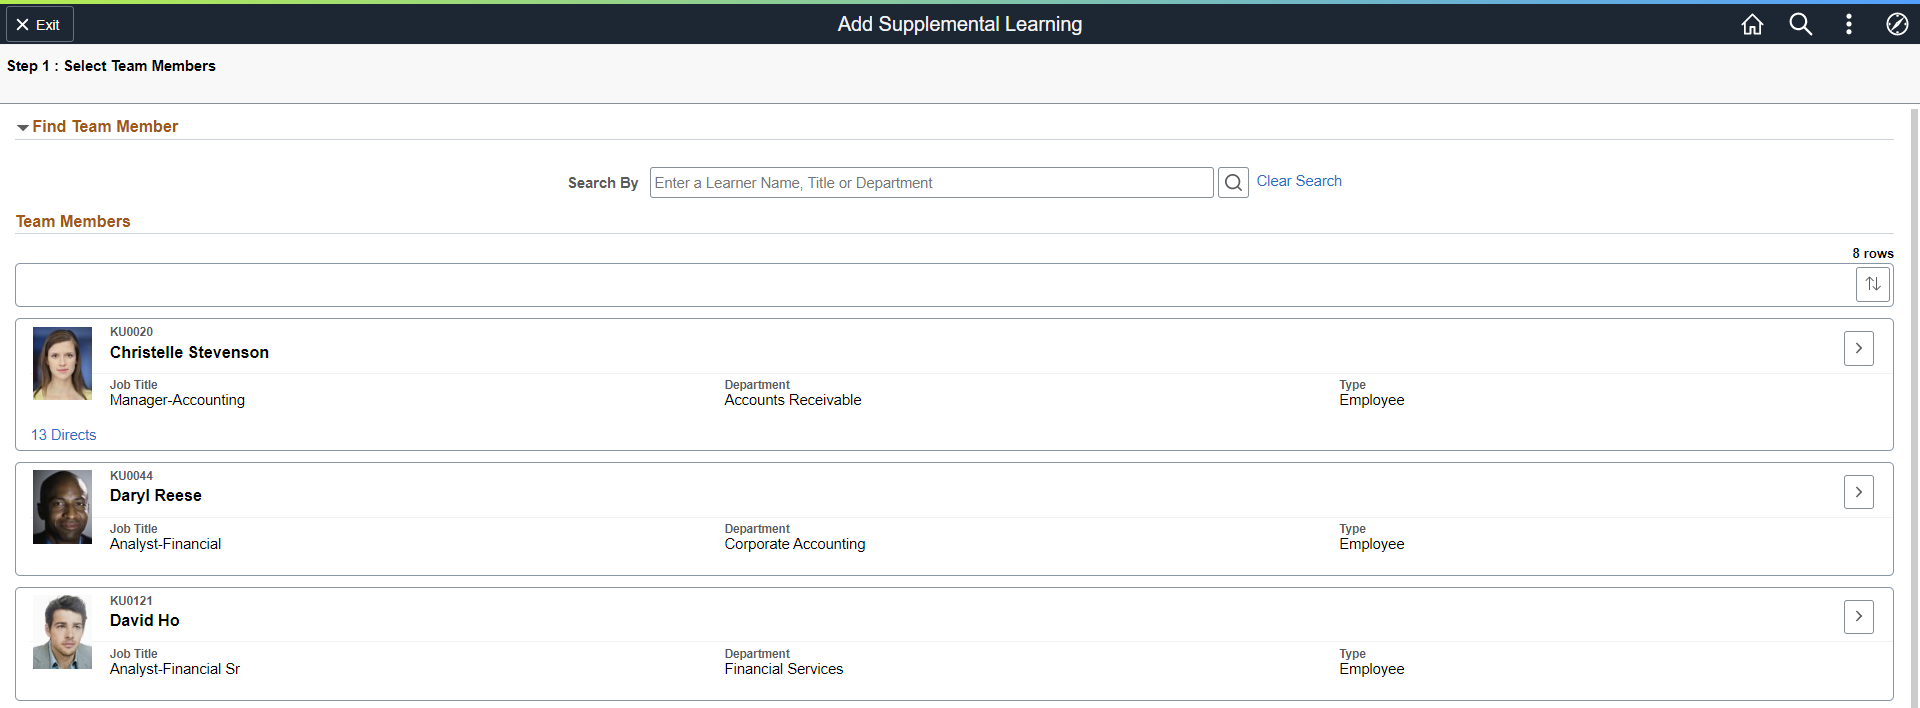
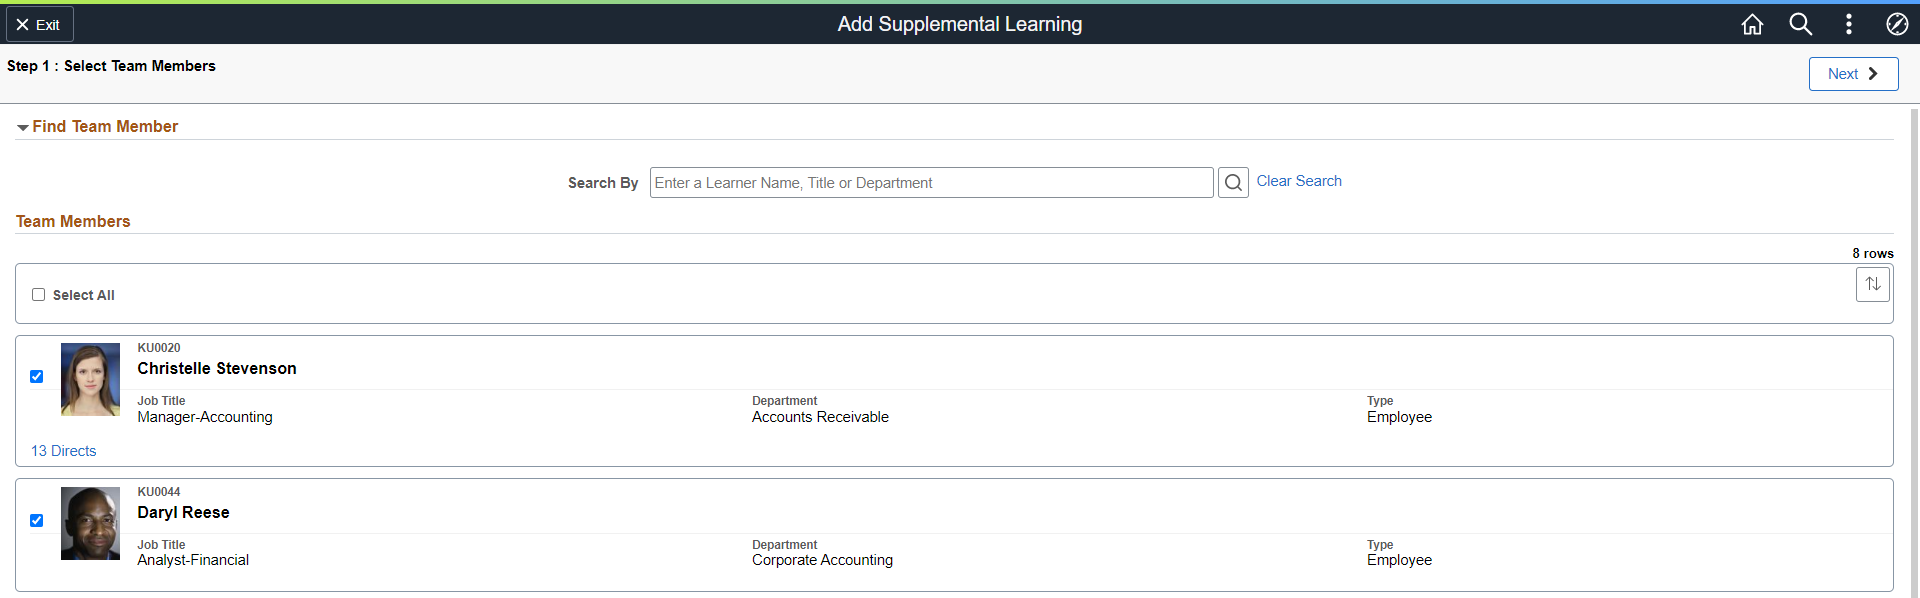
Use the Step 1 : Select Team Member (LM_MSS_TEAM_FL) page to view a list of your direct reports and select team members to assign to a learning.
This example illustrates the fields and controls on the Step 1: Select Team Members page.
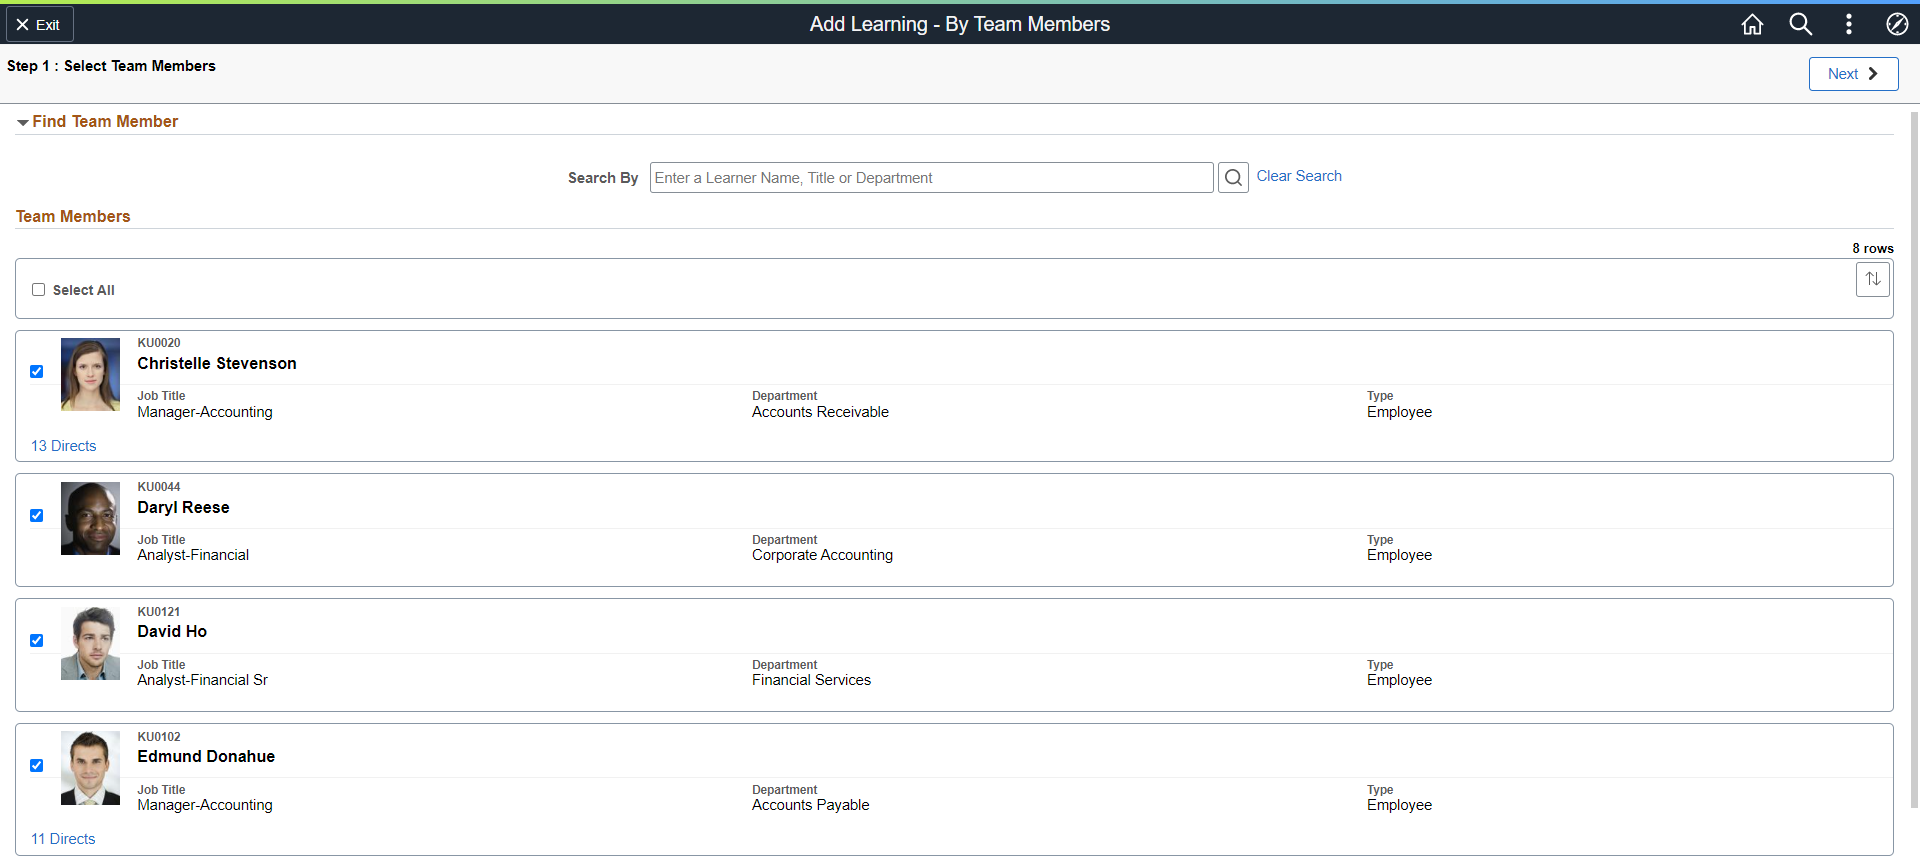
This page displays all your direct reports and provides an option to view their directs (if any) by clicking on the <n> Directs link below the profile photo of your direct report. User can only view their directs and direct reports of those directs (next level). Expand the Find Team Member section to narrow the search for your team members. Select one or more team members from the Team Members grid and click Next button to go to the Step 2: Find Learning page.
Note: If the manager tries to enroll or register an external learner in a course or program that has cost associated, the system displays a message that external learners cannot be enrolled. To proceed with the enrollment, the manager has to remove the external learner or add a learning that does not have a cost associated.
|
Field or Control |
Description |
|---|---|
|
Search By |
Enter a keyword to search for team members by name, title, or department. Note: The manager can only search for his team members (direct reports). To view the direct reports of any of his team members, use the <Number> Directs link displayed in the team member row. |
|
|
Click to search for and view the list of team members that meet the search criteria. |
|
Clear Search |
Click to clear the search text entered in the Search By field. |
|
|
Select the check box in the header to select all the team member rows. Select the check box corresponding to each row to select individual team members. |
|
|
Click to sort the rows by Employee ID, Learner Name, Job Title, Department, Type or Directs. A colored sort icon button indicates that you have specified one of these grid sorts. |
|
Employee Photo |
Displays the photo of the team member. |
|
<Number> Directs link |
When a team member has direct reports, the number of this person’s direct reports appear as a link at the bottom left of the person’s row. Click the link to drill down and have the page display a list of this person’s direct reports. When managers drill down into the reporting hierarchy, breadcrumbs appear above the Team Members grid to show the management hierarchy from the user to the currently displayed group of employees. Select a person’s name in the breadcrumbs to navigate back to that person’s list of direct reports. When managers view their own direct reports, no breadcrumbs appear. |

 (Select All) or (Select) check box
Step 2 : Find Learning
Use the Step 2 : Find Learning page (LM_FND_LRN_RSLT_FL) to view and assign the learnings (courses or programs) for your selected team members.
This example illustrates the fields and controls on the Step 2: Find Learning page.
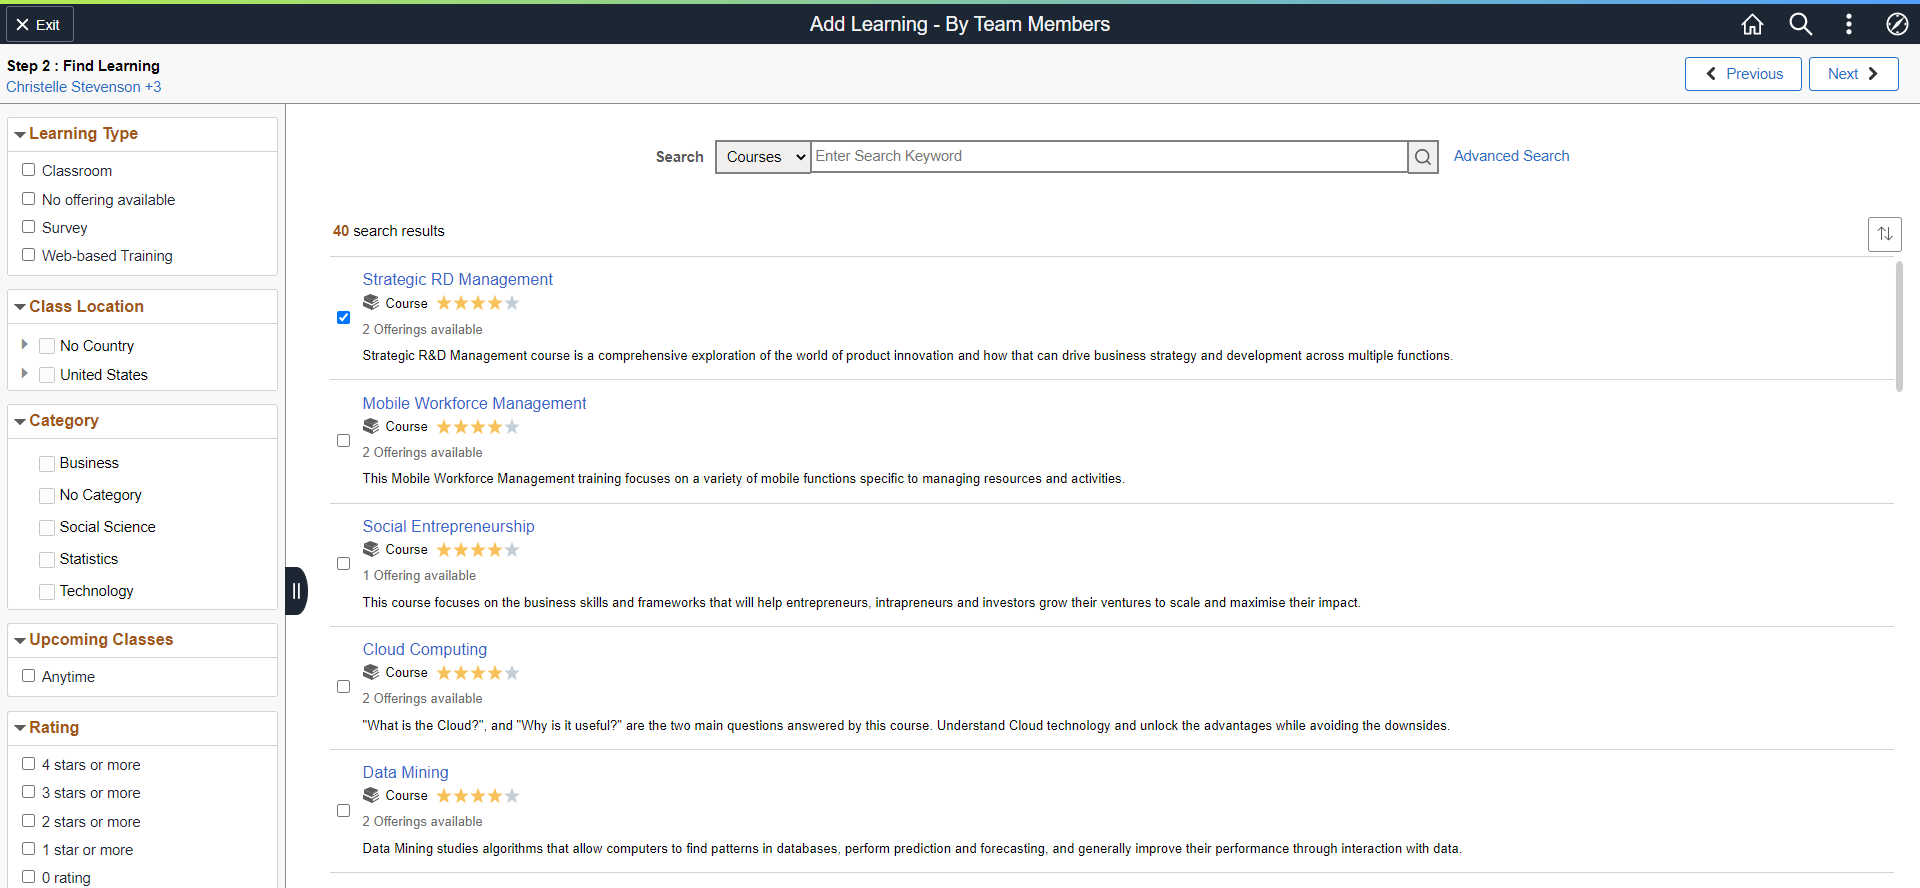
This page displays all the available courses and programs for the team members. You can narrow down your search by entering a search keyword. Use Advanced Search to search with additional search criteria. The managers can search for and select one or multiple courses or programs.
|
Field or Control |
Description |
|---|---|
|
<Team member name> + <n-1> |
Click to view the selected team members in a modal window. The link displays the team member's name (the one selected first in the previous page), and (n-1), where n is the total number of selected team members. |
|
Search |
Enter a keyword to search for learnings. Select Courses or Programs from the Search drop down to search individually by courses or programs. |
|
|
Click to view results of your learning searches. |
|
Advanced Search |
Click to search for courses or programs using advanced criteria. To know more, refer Advanced Search Page |
|
Left facet |
The left panel of the page enables you to quickly filter your search results by Learning Type, Class Location, Category, Upcoming Classes and Rating. Select from the available options to view the learnings associated with that type. |
|
Search Results |
Each search result row displays the learning title, an icon and descriptor indicating whether the learning is a course or a program, star rating, description of the learning, and the number of class offerings (in case of courses). Click on the learning title to view the course details in a modal window. |
|
|
Select the check box corresponding to each row to assign a course or program for the selected team members. |
|
|
Click to sort the rows by Learning, Type, Mandatory, or Relevance. A colored sort icon button indicates that you have specified one of these grid sorts. |
This example illustrates the fields and controls on the Advanced Search page.
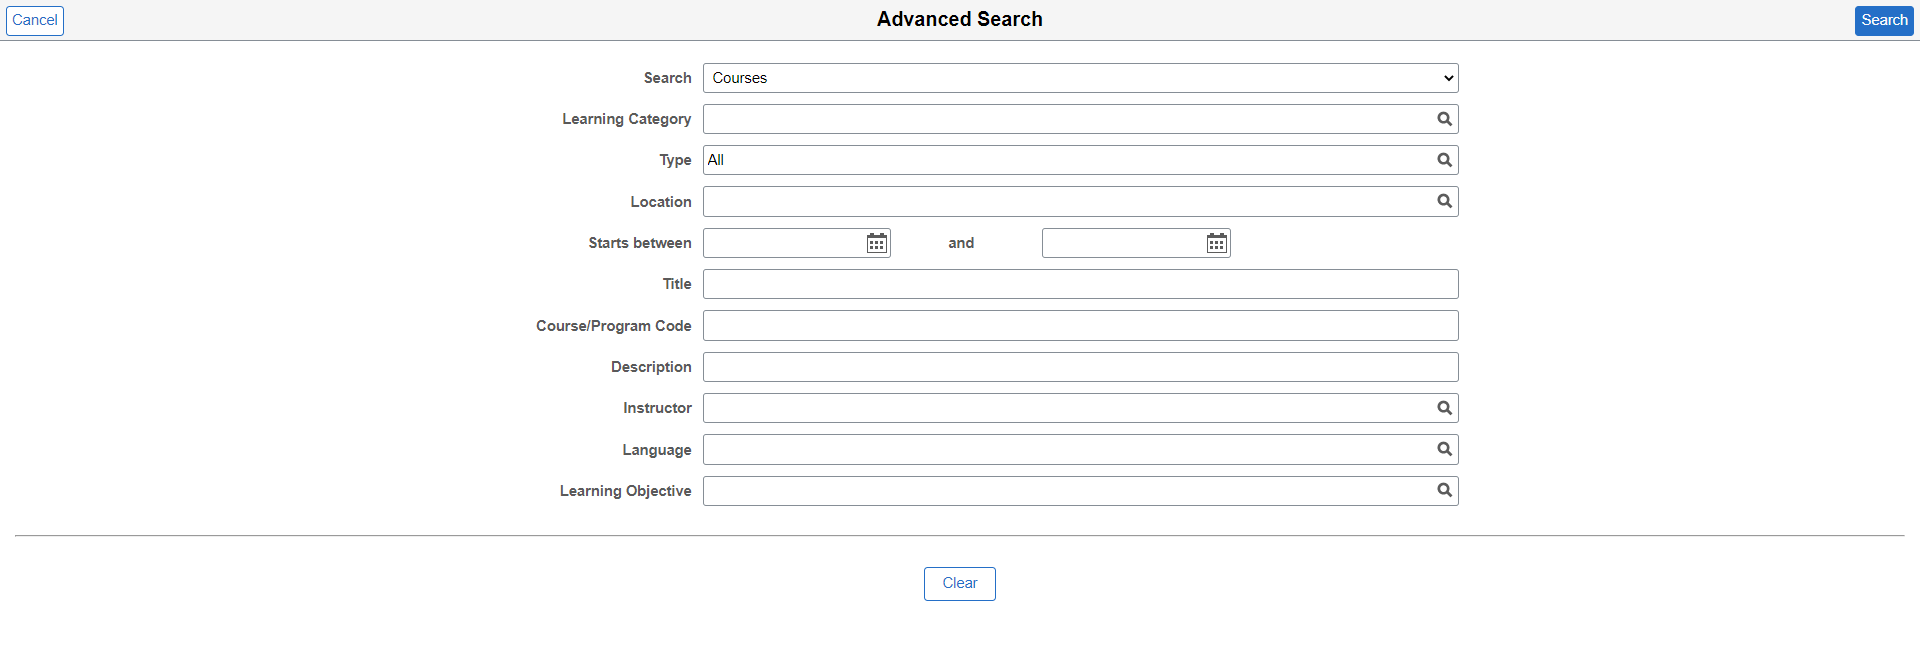
Select Courses or Programs in the Search to refine your search by courses or programs.
Step 3 : Select Classes
Use the Step 3 : Select Classes page (LM_CI_ACT_DTLS_FL) to view and enroll in the classes for the selected courses.
Note: This step is applicable only for courses. In case, you have selected programs for your team members, then the manager is taken directly to the Review and Confirm step.
This example illustrates the fields and controls on the Step 3 : Select Classes Page.
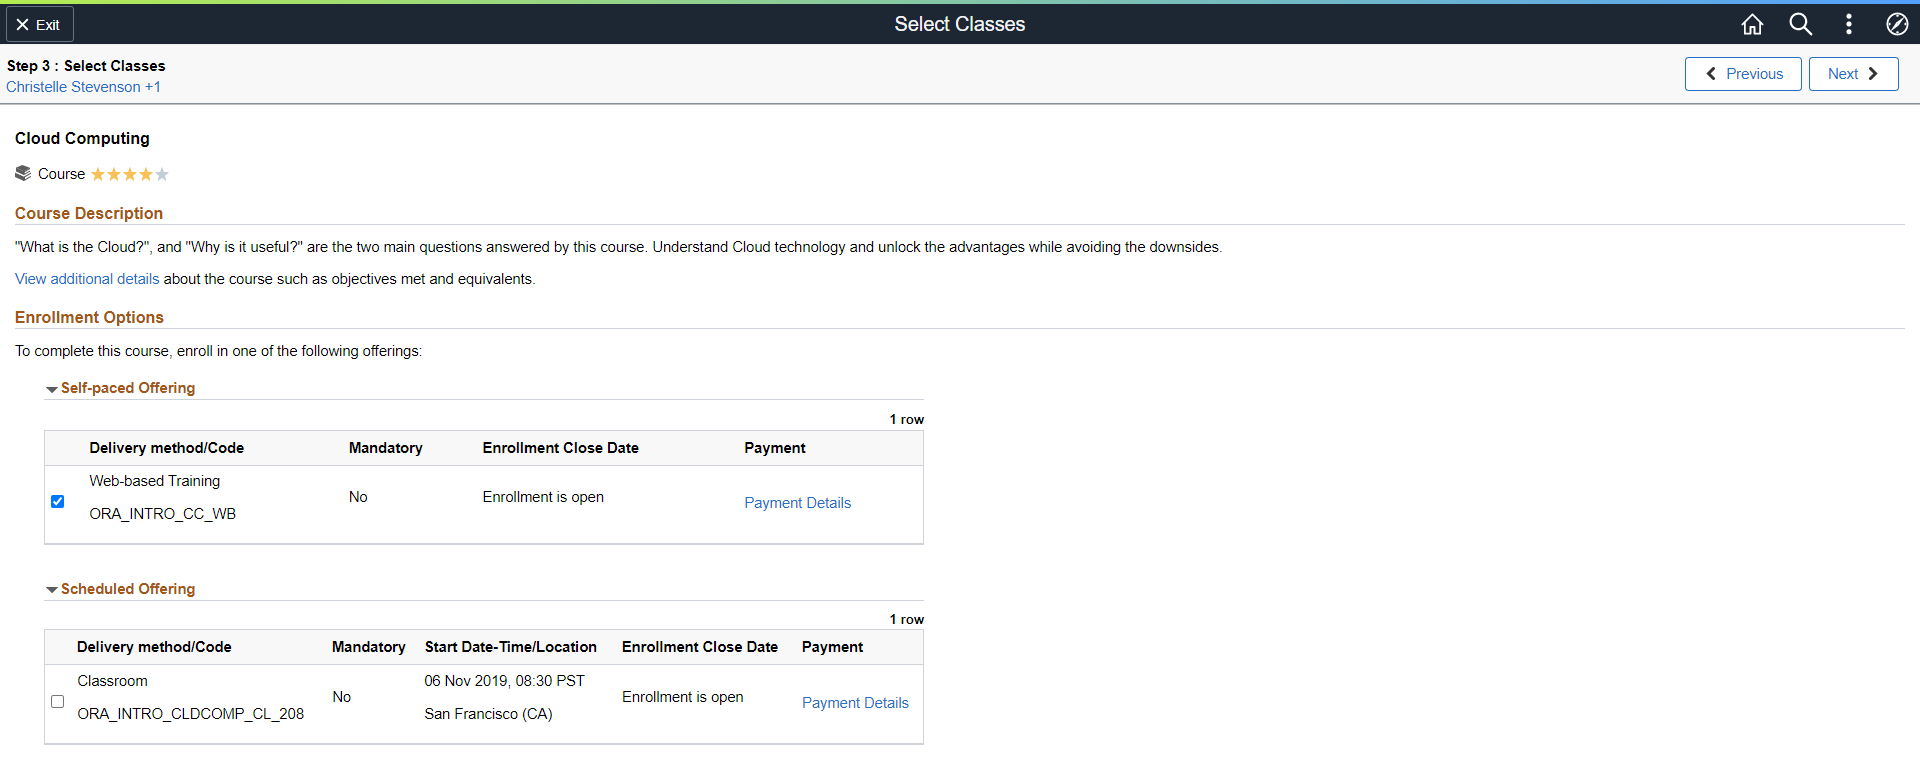
This page displays the available classes to enroll your selected team members. The page lists the self-paced and scheduled offerings for the course. If you meet the prerequisites for this course, you can enroll in the offerings in this page. You can select one or more offerings for your team members.
|
Field or Control |
Description |
|---|---|
|
View additional details |
Click to view the abstract, the objectives met, and the prerequisites of the course in a modal window. |
|
|
Select the check box corresponding to each row to add the course offering to the selected team members. |
|
Payment Details |
Click to view the pricing details of the course. |
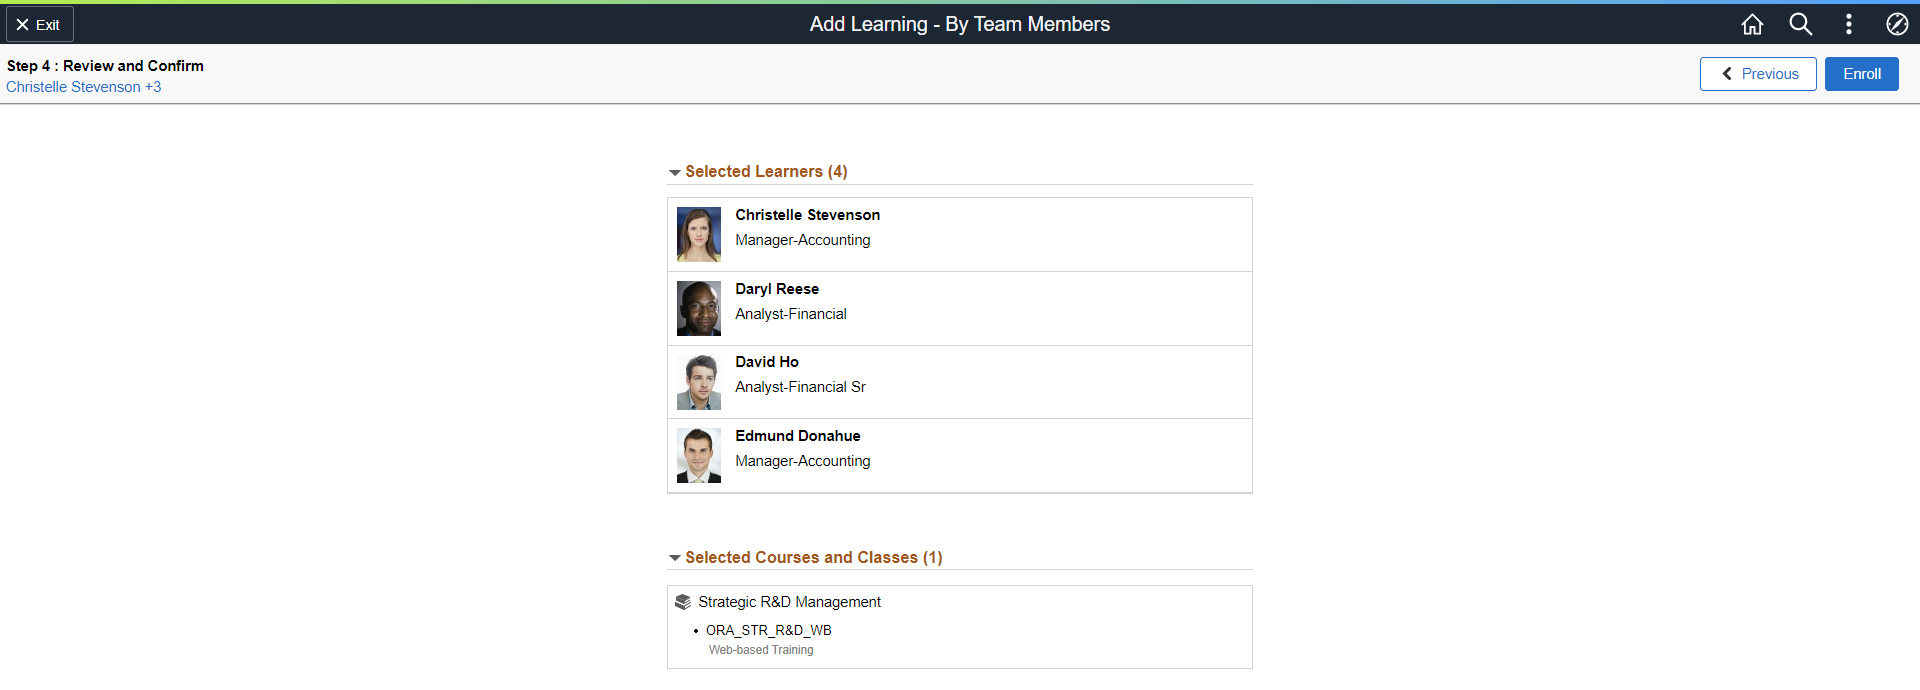
Step 4 : Review and Confirm
Use the Step 4 : Review and Confirm page (LM_MSS_REVIEW_FL) to review and confirm your team members and the assigned learnings.
This example illustrates the fields and controls on the Review and Confirm Page when the manager selects courses for team members.
This example illustrates the fields and controls on the Review and Confirm Page when the manager selects programs for team members.
This page displays the selected team members and the selected courses or programs. In the case of courses, the system displays the opted classes as well. Click Previous to go back to previous steps and update the team members or courses or programs.
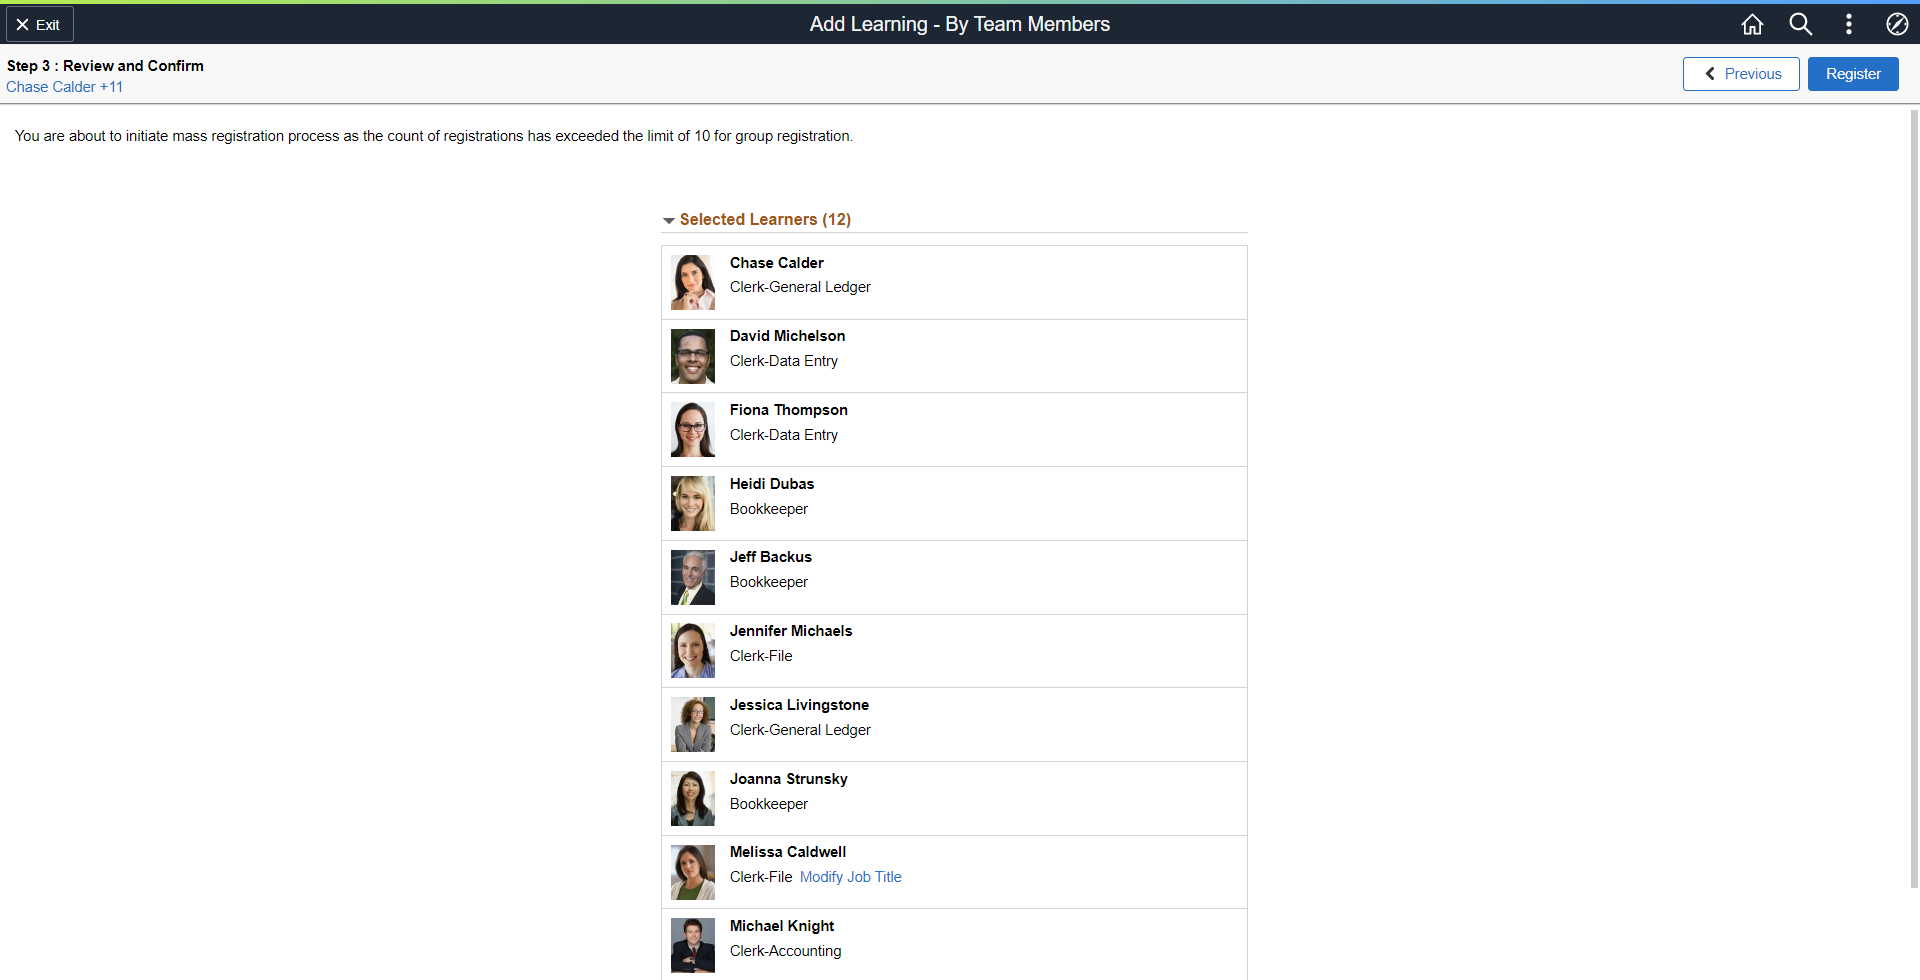
The system triggers a mass enrollment when the manager attempts to enroll or register more learners than the number specified in the Group Enroll Maximum field on the Install Defaults – Enrollment Page. A message displays below the header to indicate that you are about to begin a mass enrollment (course) or registration (program). Same applies when you try to enroll or register a learner to many courses or programs, and this number exceeds the threshold defined in Group Enroll Maximum field.
This example illustrates the fields and controls on the Review and Confirm Page when the manager is about to initiate a mass enrollment.
|
Field or Control |
Description |
|---|---|
|
Enroll |
Click to enroll in a course. |
|
Register |
Click to register in a program. |
|
Modify Job Title |
Click to select the Job Title of the learner. This field appears to the right of the learner's job title in the Selected Learners grid. Applicable only when the learner has multiple job titles. |
Confirmation
Use the Confirmation page (LM_MSS_CONFIRM_FL) to view the learners that are enrolled or registered to the courses or the programs.
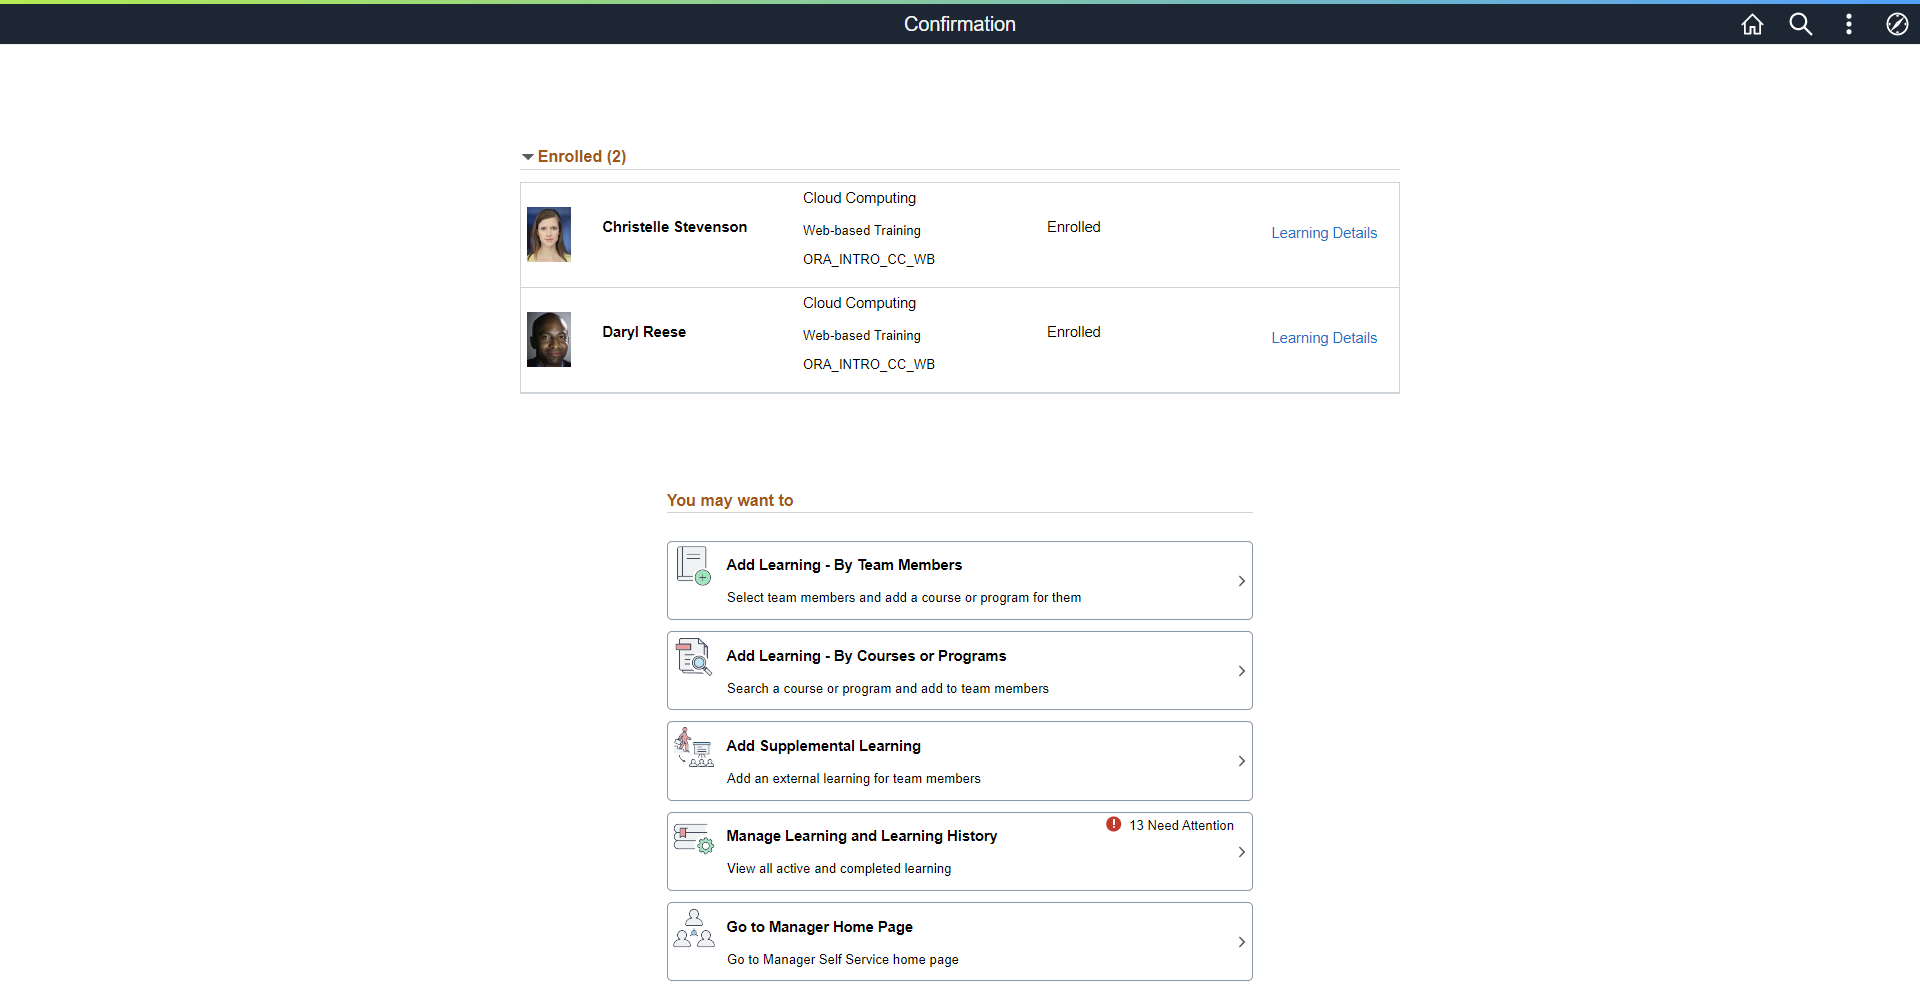
This example illustrates the fields and controls on the Confirmation Page when the team members are enrolled to the selected courses.
This example illustrates the fields and controls on the Confirmation Page when the team members are registered to the selected programs.
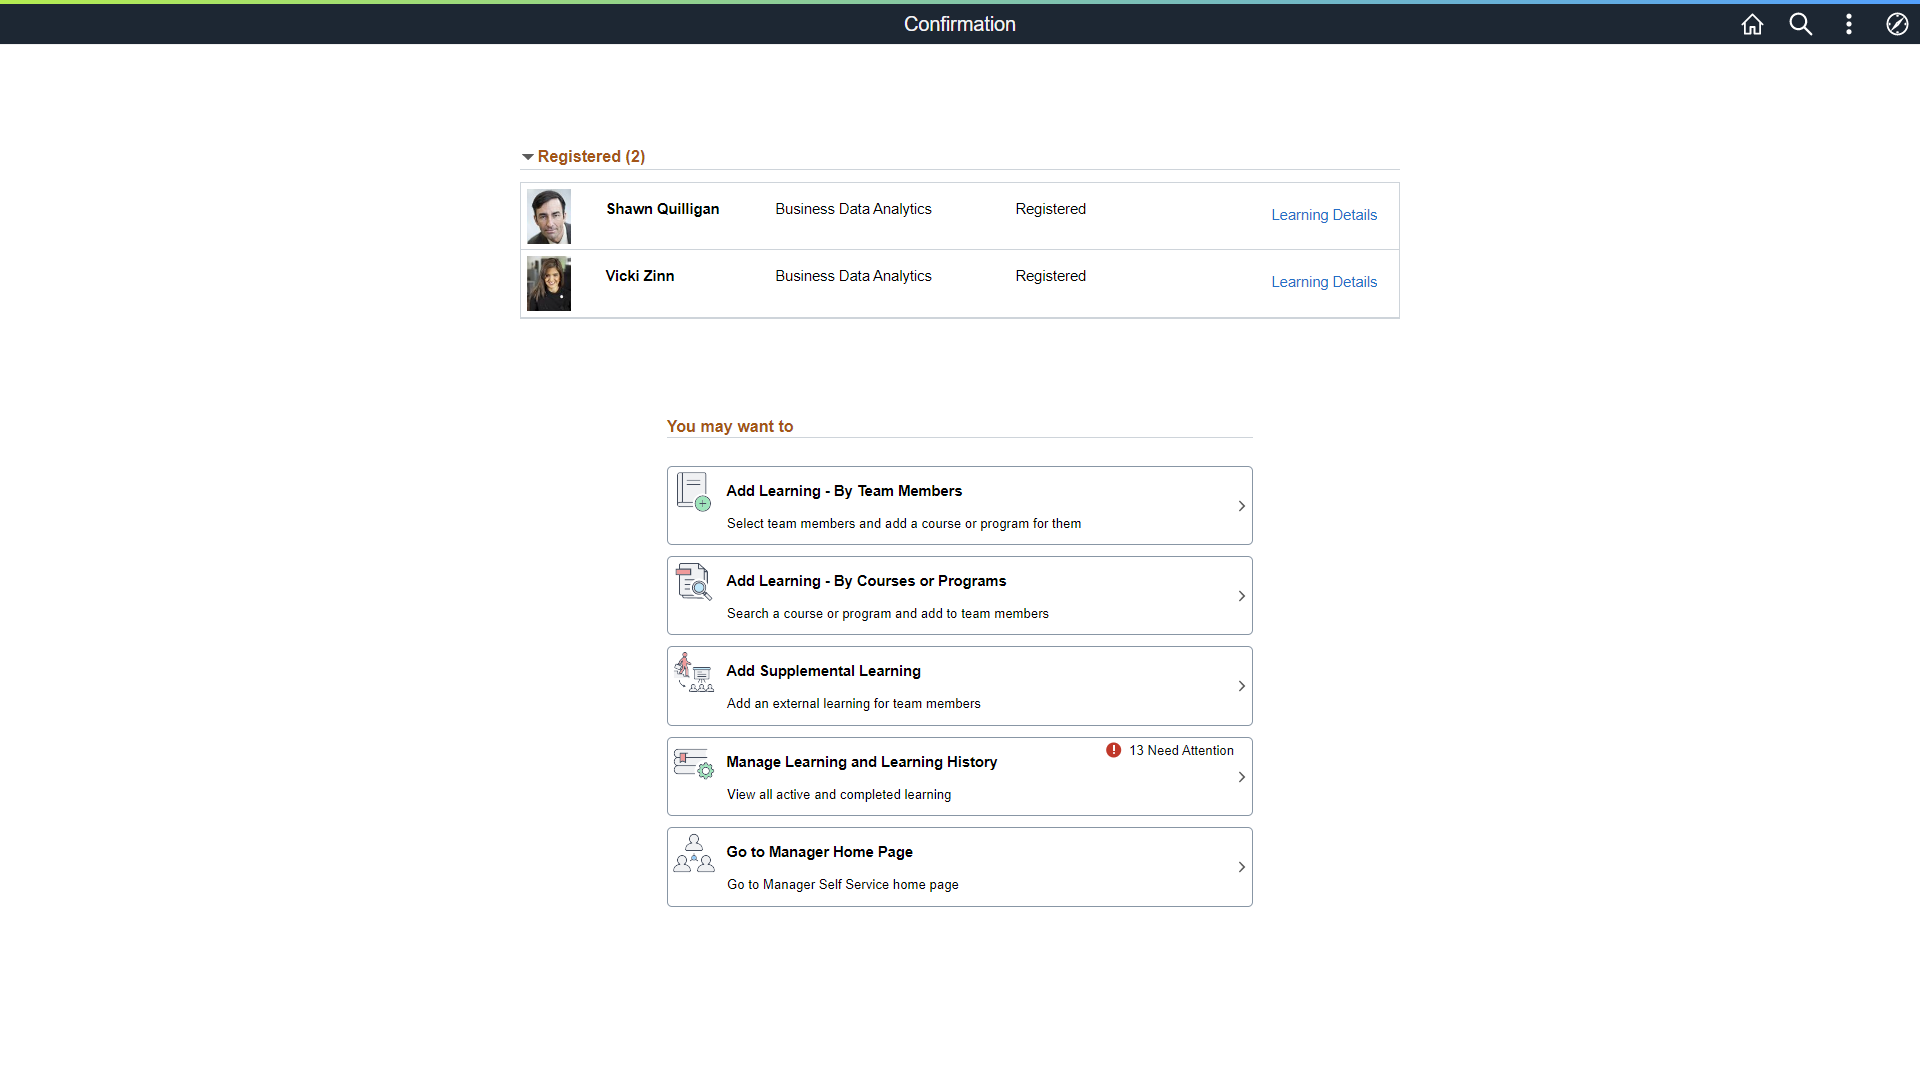
This page displays the enrolled (for course) or registered (for program) learners under the Enrolled (n) or Registered (n) sections, where n is the total number of learners enrolled or registered in the course or the program. Each row under this section displays the photo of the team member, the team member's name, the name of the course or program, enrollment or registration status, and a Learning Details link.
The manager can also perform the following actions from this page:
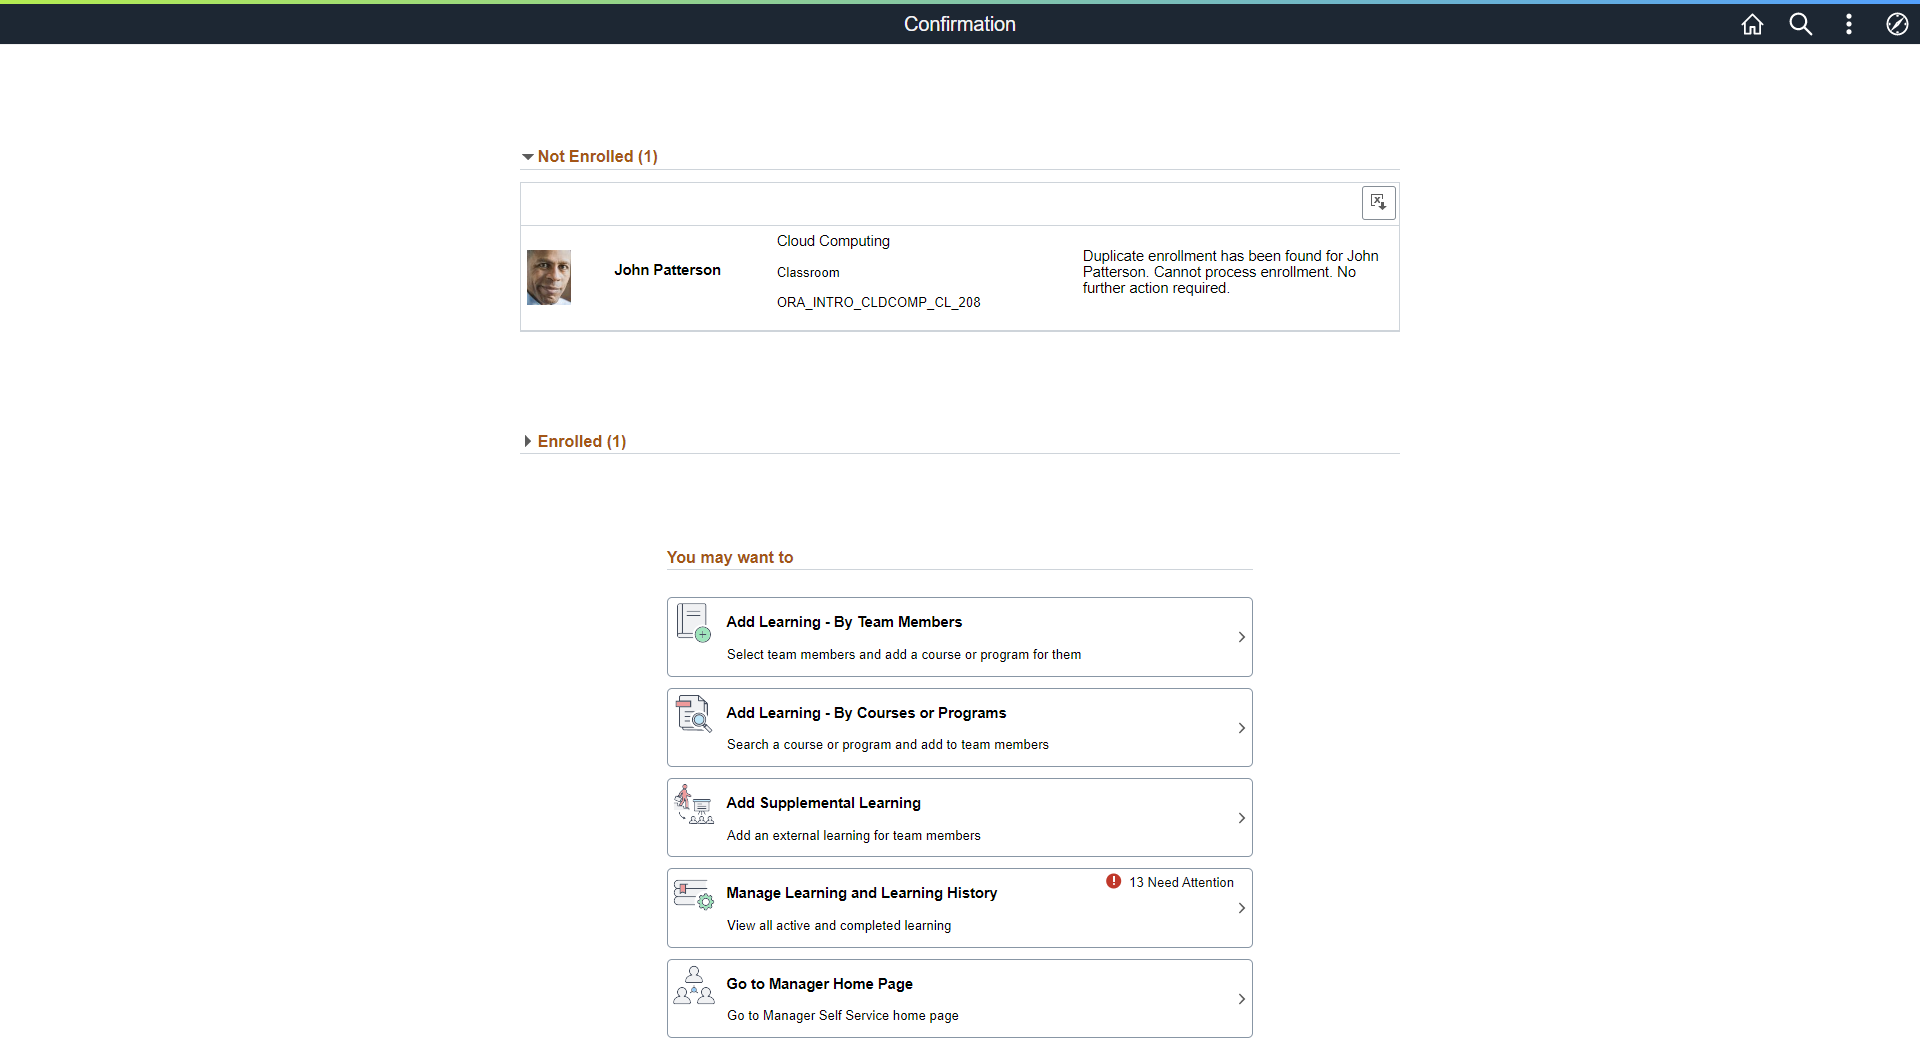
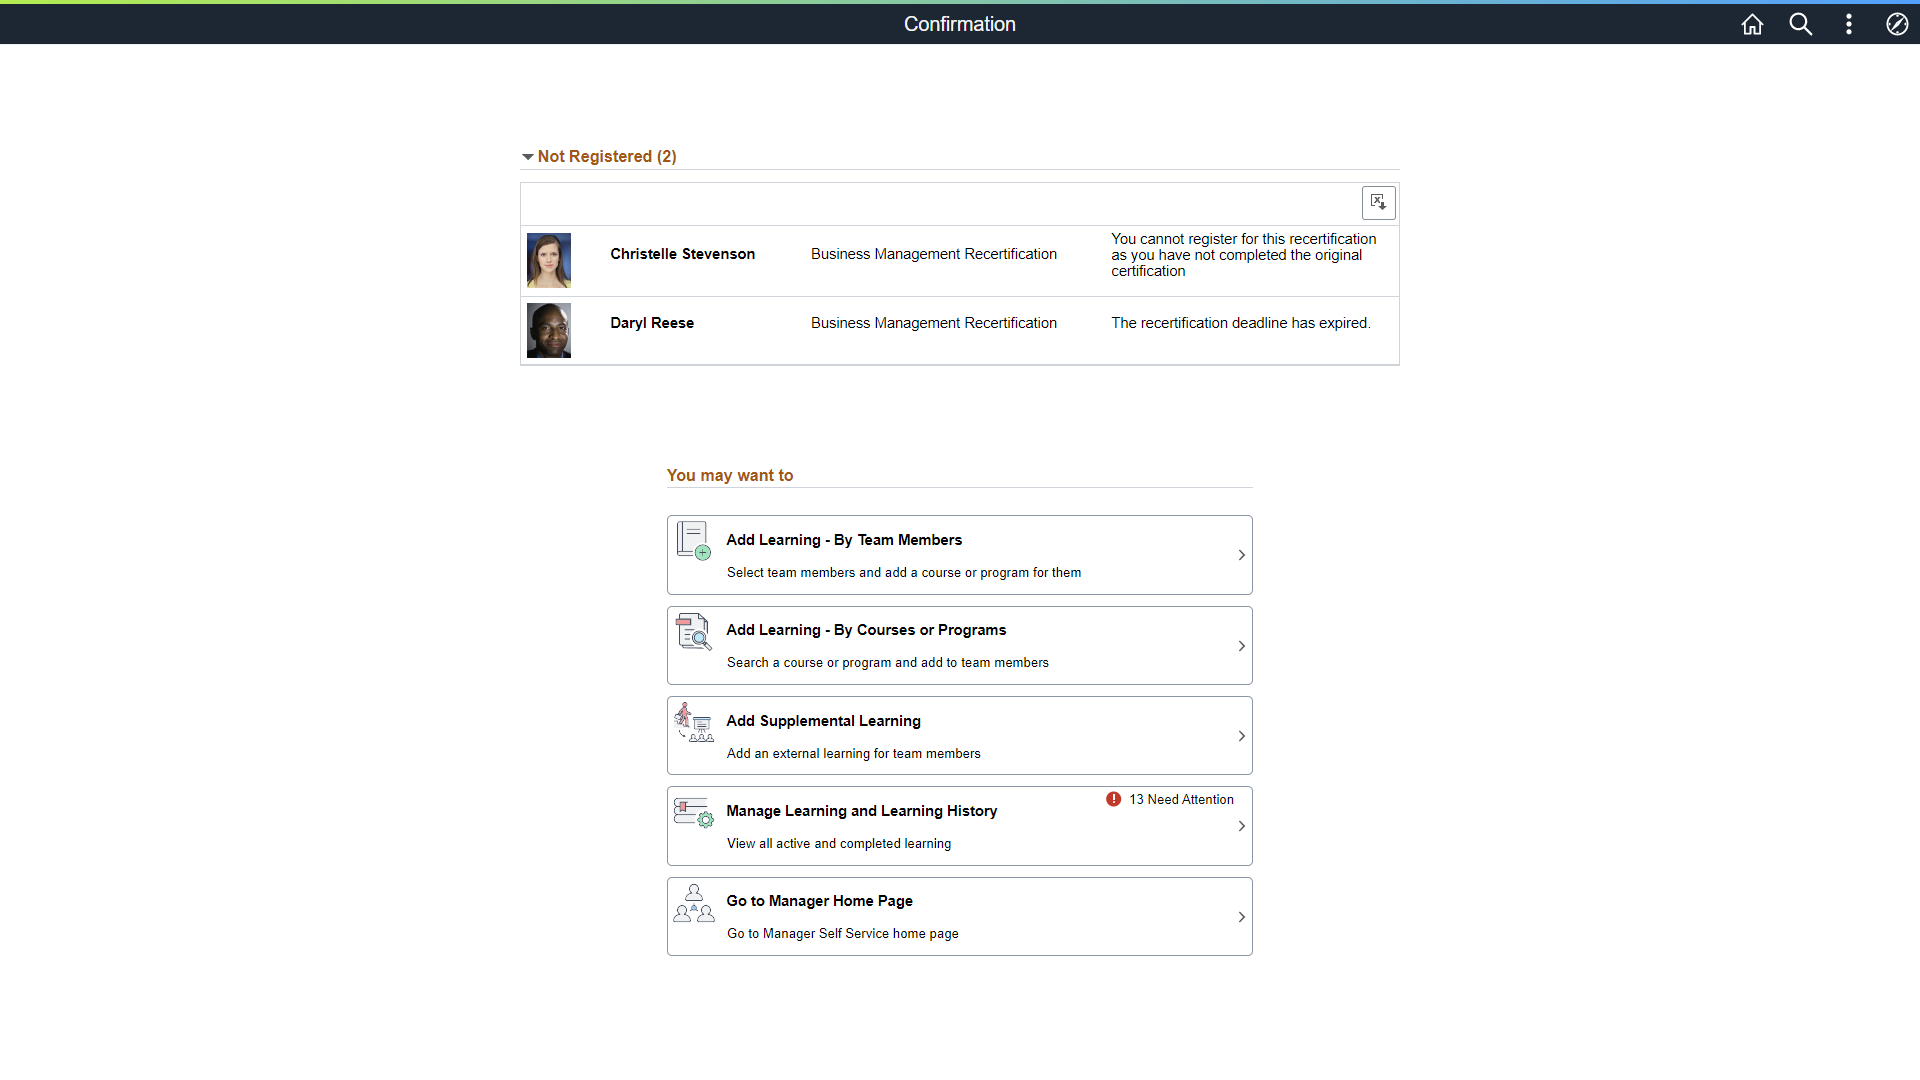
The team members that are not enrolled in the course are displayed under the Not Enrolled (n) section. The team members that are not registered in the program are displayed under the Not Registered (n) section, where n is the total number of team members not registered in the program. Each row under this section displays the photo of the team member, the team member's name, the name of the course or program, and reason for non-registration or non-enrollment. In this case, the Enrolled and Registered sections are collapsed by default. Click to expand to view the enrolled or registered members.
This example illustrates the fields and controls on the Confirmation Page when the team members are not enrolled to the selected courses.
This example illustrates the fields and controls on the Confirmation Page when the team members are not registered to the selected programs.
|
Field or Control |
Description |
|---|---|
|
Learning Details |
Click to view the learning progress of the selected team member for the course or program. |
|
|
Click to download the list of team members not registered or enrolled to an excel. |

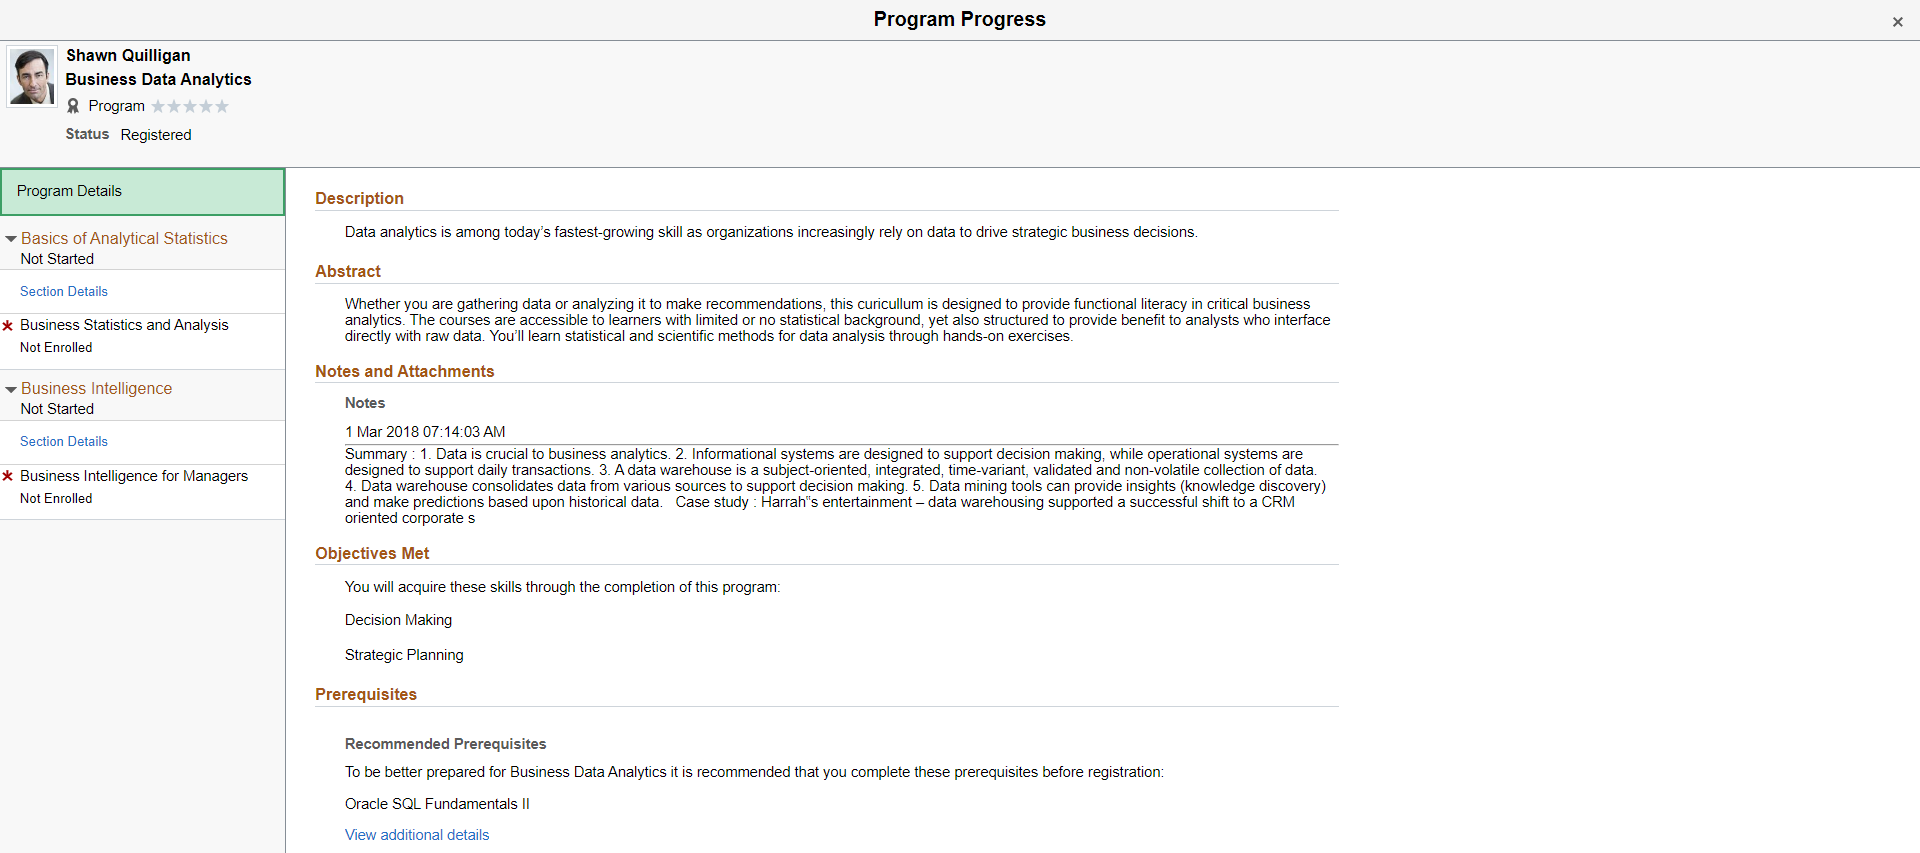
This example illustrates the fields and controls on the Program Progress Page when the user clicks on the Learning Details link under the Registered (n) section.
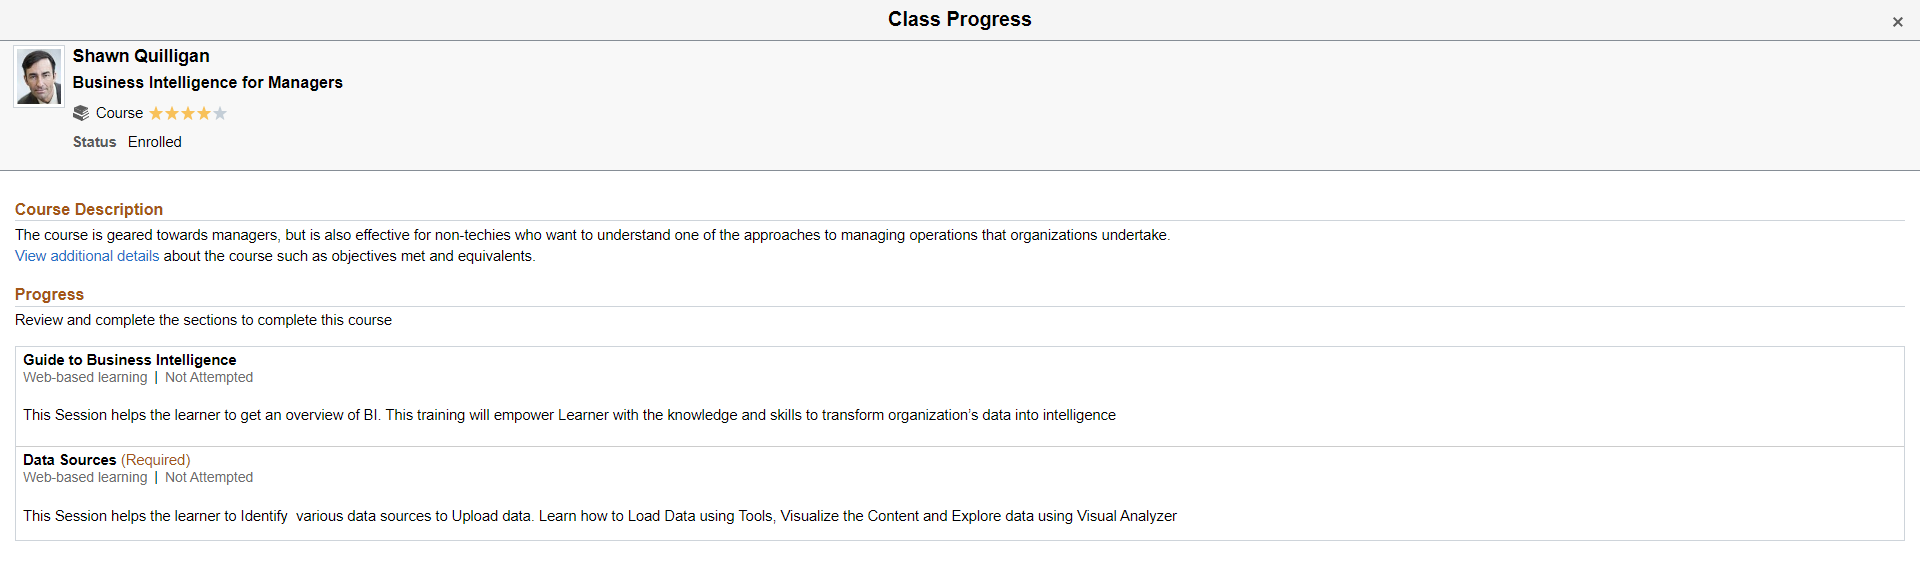
This example illustrates the fields and controls on the Class Progress Page when the user clicks on the Learning Details link under the Enrolled (n) section.
Use the Add Learning – By Courses or Programs (LM_FND_LRN_RSLT_FL) page to search a learning (course or program) and assign to your team members.
Navigation:
The Add Learning – By Courses or Programs page allows the managers to assign the learning to the team members through a series of steps:
Step 1: Find Learning
Step 2: Select Classes
Step 3: Select Team Members
Step 4: Review and Confirm
Confirmation
Note: The Add Learning – By Courses or Programs action is similar to the Add Learning – By Team Members action, the only difference is in the sequence of the steps. To know details on each step, refer Add Learning – By Team Members
Use the Add Supplemental Learning (LM_MSS_TEAM_FL) page to add external learning for your team members (learners).
Navigation:
This page allows the managers to add supplemental learning for the team members through a series of steps:
Step 1: Select Team Members
Step 2: Add Supplemental Learning
Confirmation
Use the Previous and Next buttons to navigate through the steps.
Step 1 : Select Team Members
Use the Step 1 : Select Team Member (LM_MSS_TEAM_FL) page to search for and select the team members to add supplementary learning.
This example illustrates the fields and controls on the Step 1: Select Team Members page.
To allow supplemental learning for multiple learners, select the Supplemental Group Enrollment check box on the Install Defaults – Enrollment Page.
This example illustrates the fields and controls on the Step 1: Select Team Members page when group enrollment is enabled.
|
Field or Control |
Description |
|---|---|
|
Search By |
Enter a keyword to search for team members by Name, Title, or Department. |
|
|
Click to search for and view the list of team members that meet the search criteria. |
|
Clear Search |
Click to clear the search text entered in the Search By field. |
|
|
Select the check box in the header to select all the team member rows. Select the check box corresponding to each row to select individual team members. |
|
|
Click to sort the rows by Employee ID, Learner Name, Job Title, Department, Type or Directs. A colored sort icon button indicates that you have specified one of these grid sorts. |
|
|
Click to go to the Step 2: Add Supplemental Learning page. This icon is not available when group enrollment is enabled. |

Step 2: Add Supplemental Learning
Use the Step 2: Add Supplemental Learning (LM_SUPP_LNR_ADD_FL) page to add supplemental learning for the selected team member.
This example illustrates the fields and controls on the Step 2: Add Supplemental Learning page.
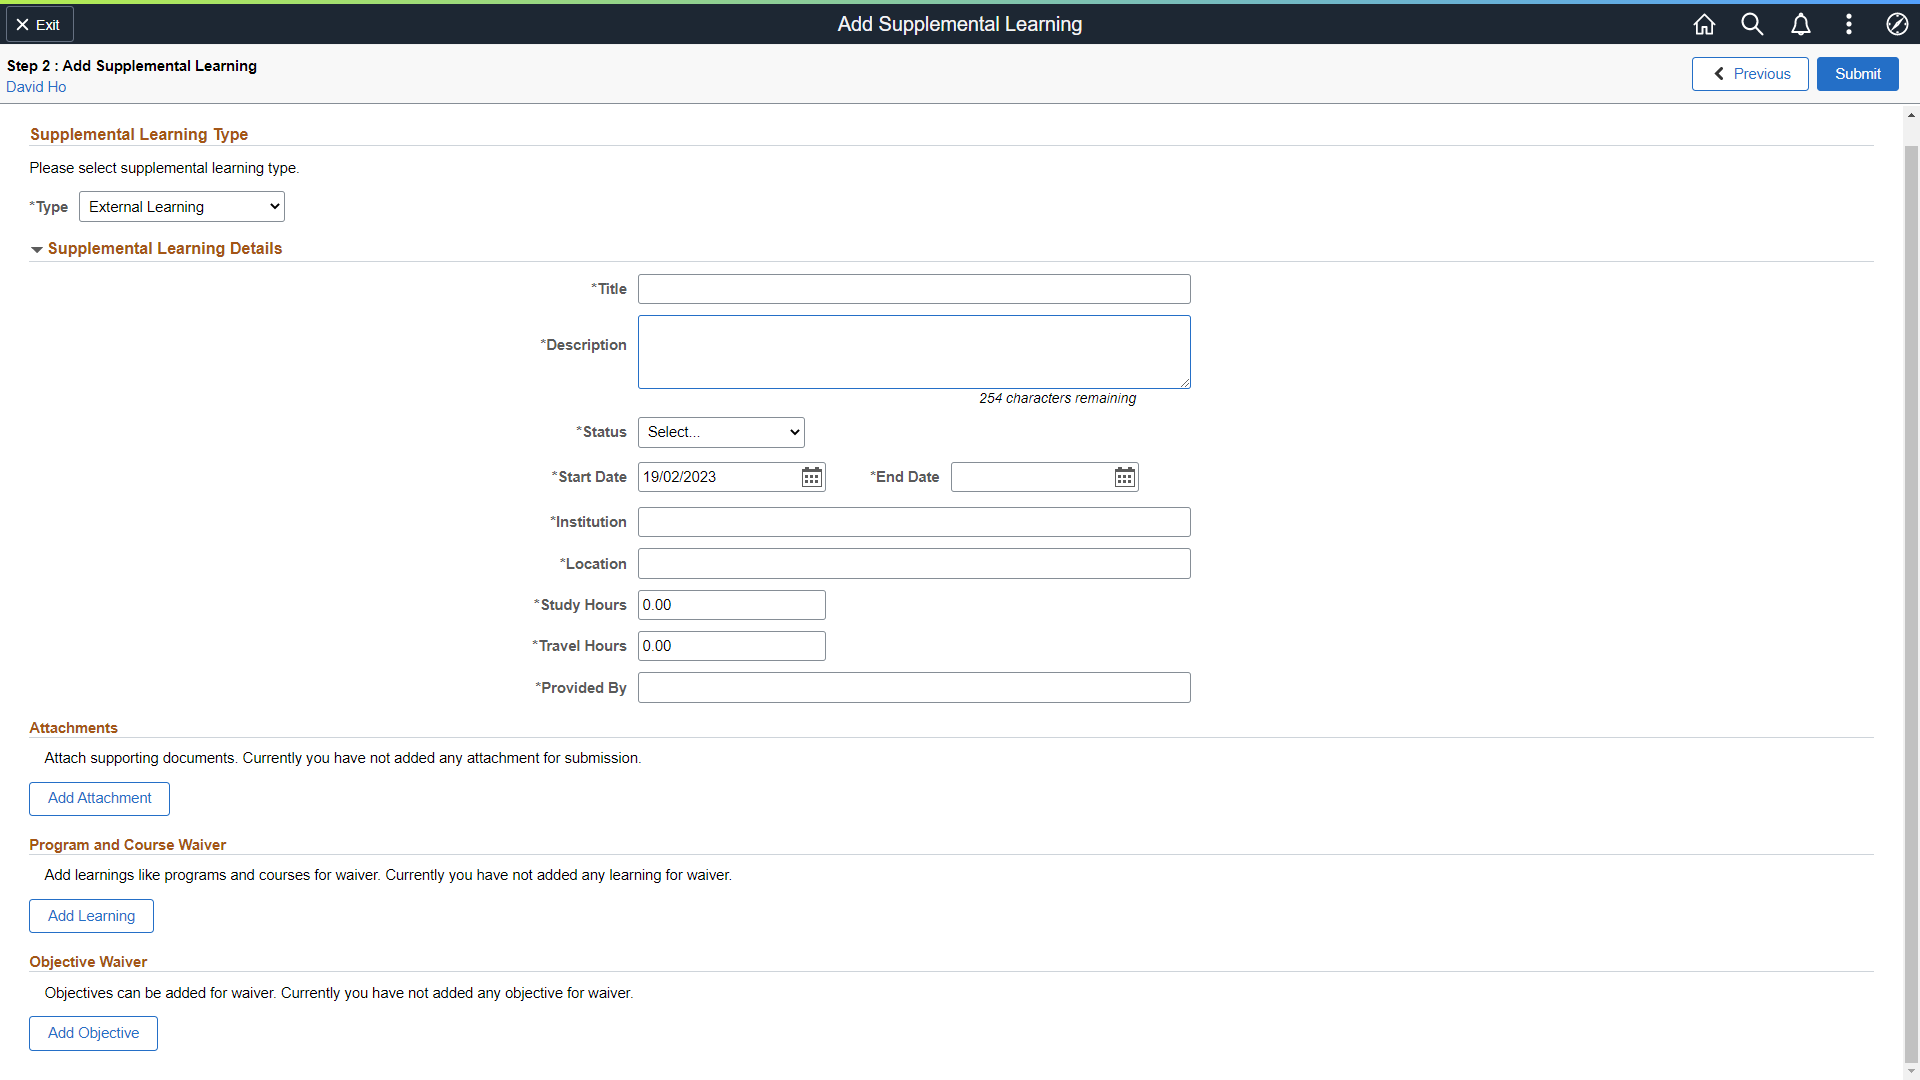
To know more, see Add Supplemental Learning.
Confirmation
Use the Confirmation (LM_SUPP_CONFIRM_FL) page to view a summary of the learners and their supplementary learning.
This example illustrates the fields and controls on the Confirmation – Add Supplemental Learning page.
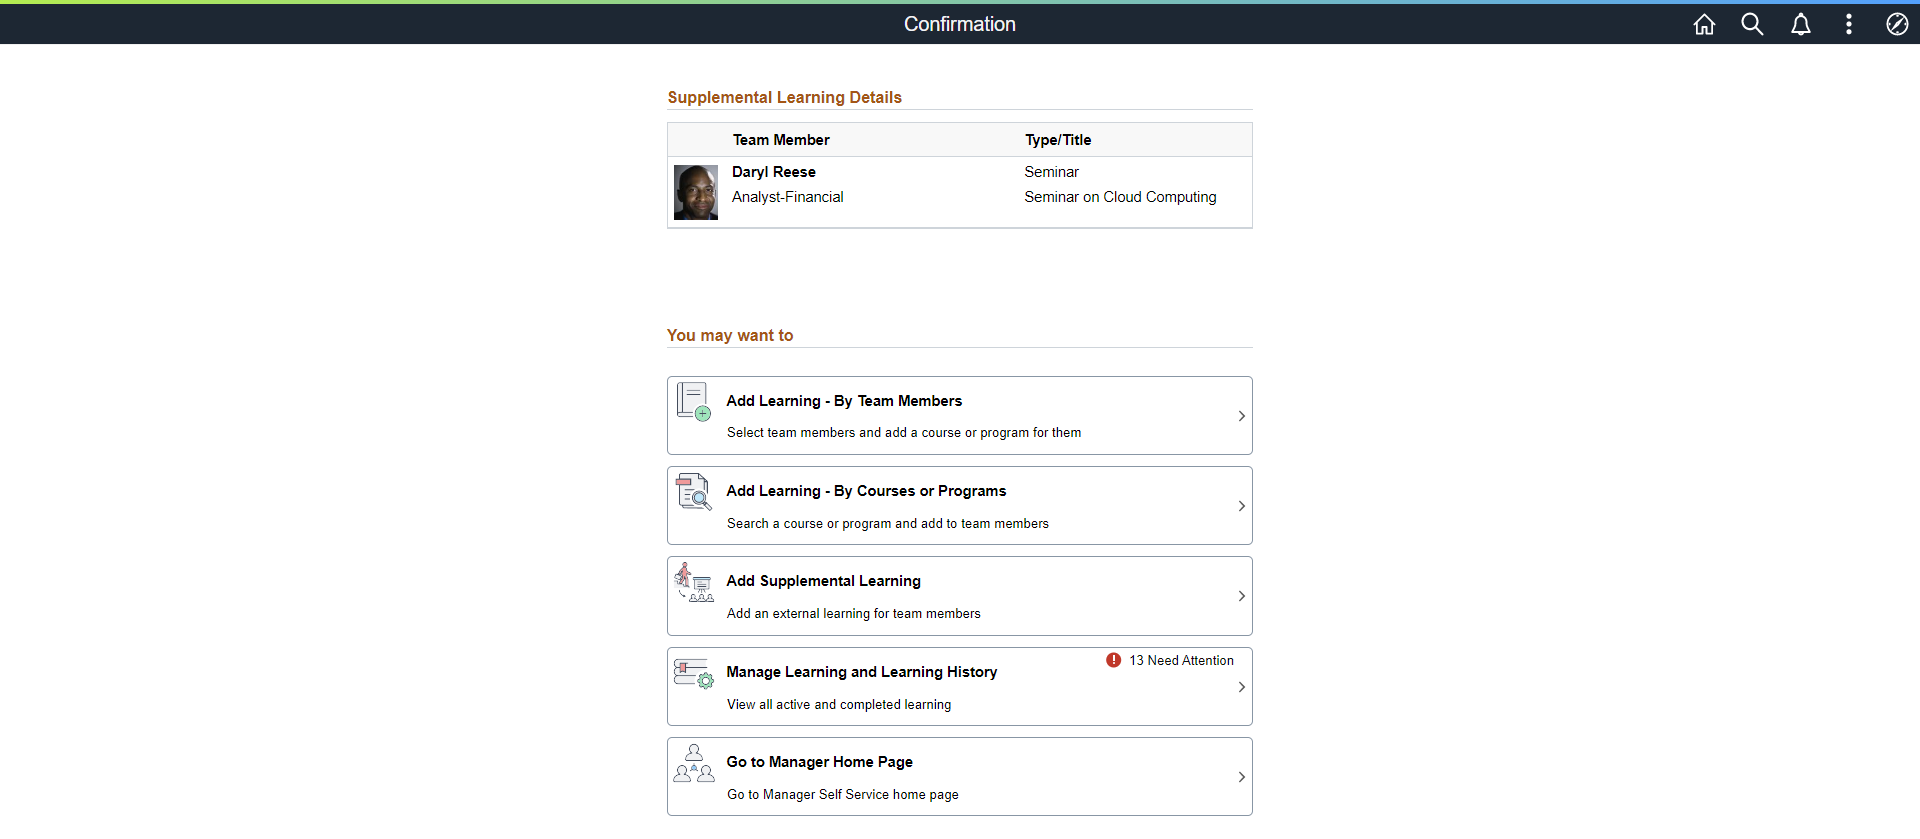
The manager can also perform the following actions from this page:
Use the Manage Learning (LM_MSS_LEARNING_FL) page to view your team members and access the learning details page.
Navigation:
This example illustrates the fields and controls on the Manage Learning page.
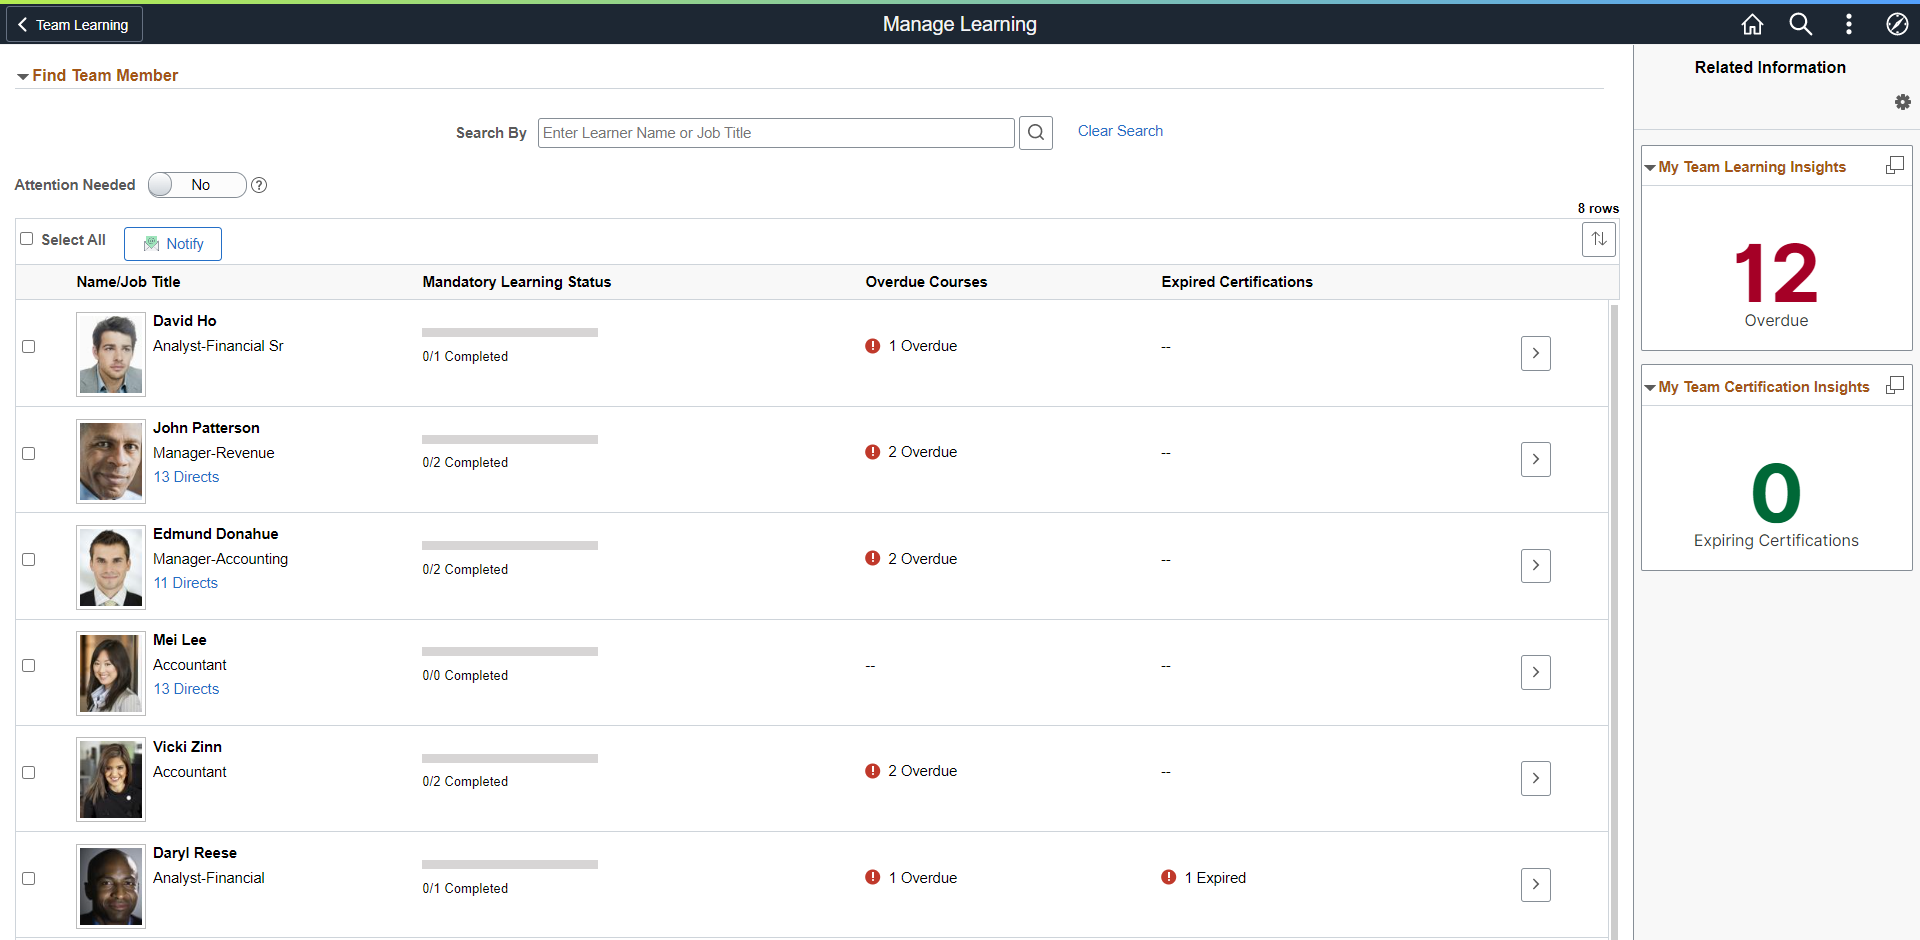
This page allows the managers to view the learning status of their direct reports (team members). They can also review the learnings that need attention, such as the learnings that are overdue or expired. The related information panel on the right helps to view and analyze the learning analytics.
|
Field or Control |
Description |
|---|---|
|
Search By |
Enter a keyword to search for team members by Name, or Title. |
|
|
Click to view the team members that meet the search criteria. |
|
Clear Search |
Click to clear the search text entered in the Search By field. |
|
Attention Needed slider |
Click to filter the search results by the learners with overdue (course) or expired (certification) learnings. By default, the slider is set to No. |
|
|
Click to view the help text for Attention Needed slider. |
|
Notify |
Click to send alert or email to selected team members. |
|
|
Click to open the Related Information panel and view the related content. |
|
Related Information |
The Related Information is displayed as a supplementary panel on the right. it includes the following related content:
Note: The dashboard displays data for the logged-in user (manager), even if the manager navigates to the team view of any of his directs. |
|
|
This icon appears at the top right of the Related Information panel. Click to open the Personalize page. This page lists the available related content so you can choose whether the Related Information panel shows or hides each item. |
|
|
This icon appears at the top of each individual related content item in the Related Information panel. Click to open a modal dialog with a larger interactive version of the content. |
|
Team members grid |
Each row in the grid displays the name, photo, job title, mandatory learning status, overdue courses, and expired certifications. Click on the chevron to view the learning details of the team member. If a course or certification is overdue or expired, then an alert icon appears along with the number of days the learning is overdue or expired. When a team member has direct reports, the number of this person’s direct reports appear as a link at the bottom left of the person’s row. Click to view the Manage Learning page for the directs. Breadcrumbs appear above the Team Members grid to show the management hierarchy from the user to the currently displayed group of employees. Select a person’s name in the breadcrumbs to navigate back to that person’s list of direct reports. Note: The manager can view only his team members (directs) who has a learning associated. Enrollments of the directs of the team members are not available in the Manage Learning page. To view the enrollments of any directs of the team members, the manager has to search for the team member and select the n Directs link. |
|
|
Select the check box in the header of the team members grid to select all the team member rows. Select the check box corresponding to each row to select individual team members. |
|
|
Click to sort the rows by name, title, or directs. |
|
|
Click to view the Manage Learning – Details page for the team member. |


Notify
Use the Notify page (LM_NOTIF_ADH_FLU) to compose and send notifications (alert or email) to the selected team members.
Navigation:
Click Notify button in the Manage Learning page.
This example illustrates the fields and controls on the Notification page.
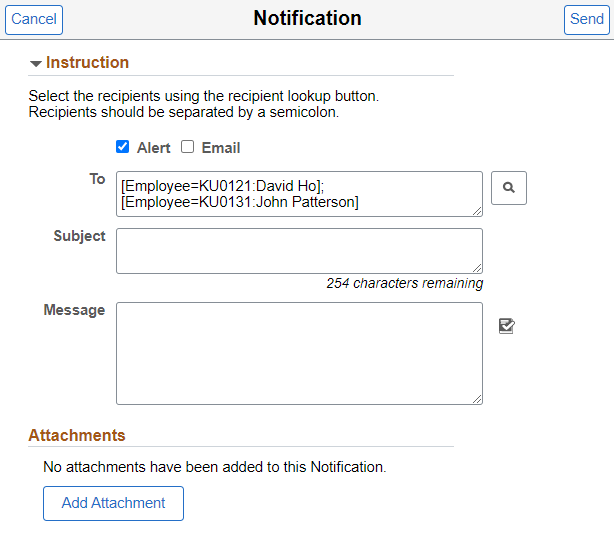
Select the type of notification to be delivered to the intended recipients. Options include using an alert, an email, or combination of both
|
Field or Control |
Description |
|---|---|
|
Alert |
Select this option to post an alert to the recipients. |
|
|
Select this option to email messages to recipient's mailboxes. When you select this option, the CC/BCC field becomes available. |
|
CC/BCC |
This check box is enabled when you select Email as a delivery method. Select this option to show the CC and BCC fields to copy other individuals on the email notification. |
|
|
Click to search for recipients to send notification. |
|
To, CC, or BCC |
Select recipients for the notification using the Recipient lookup icon. The selected recipients are populated in the To, CC, or BCC fields. |
|
Subject |
Enter the subject of the notification. This Alerts page will display the subject line on the Notification window of fluid. |
|
Message |
Enter the content of the notification. |
|
|
Click to spell check the message text. |
|
Add Attachment (button) |
Click to upload a file attachment to the notification. |
|
Send (button) |
Click to send the notification. |
|
Cancel (button) |
Click to cancel the notification. |


Use the Manage Learning – Details (LM_LEARNING_DTL_FL) page to review all the learnings (class, program, or supplemental learning) for a selected team member.
Navigation:
Click the chevron for a team member to view his learning details.
This example illustrates the fields and controls on the Manage Learning – Details page.
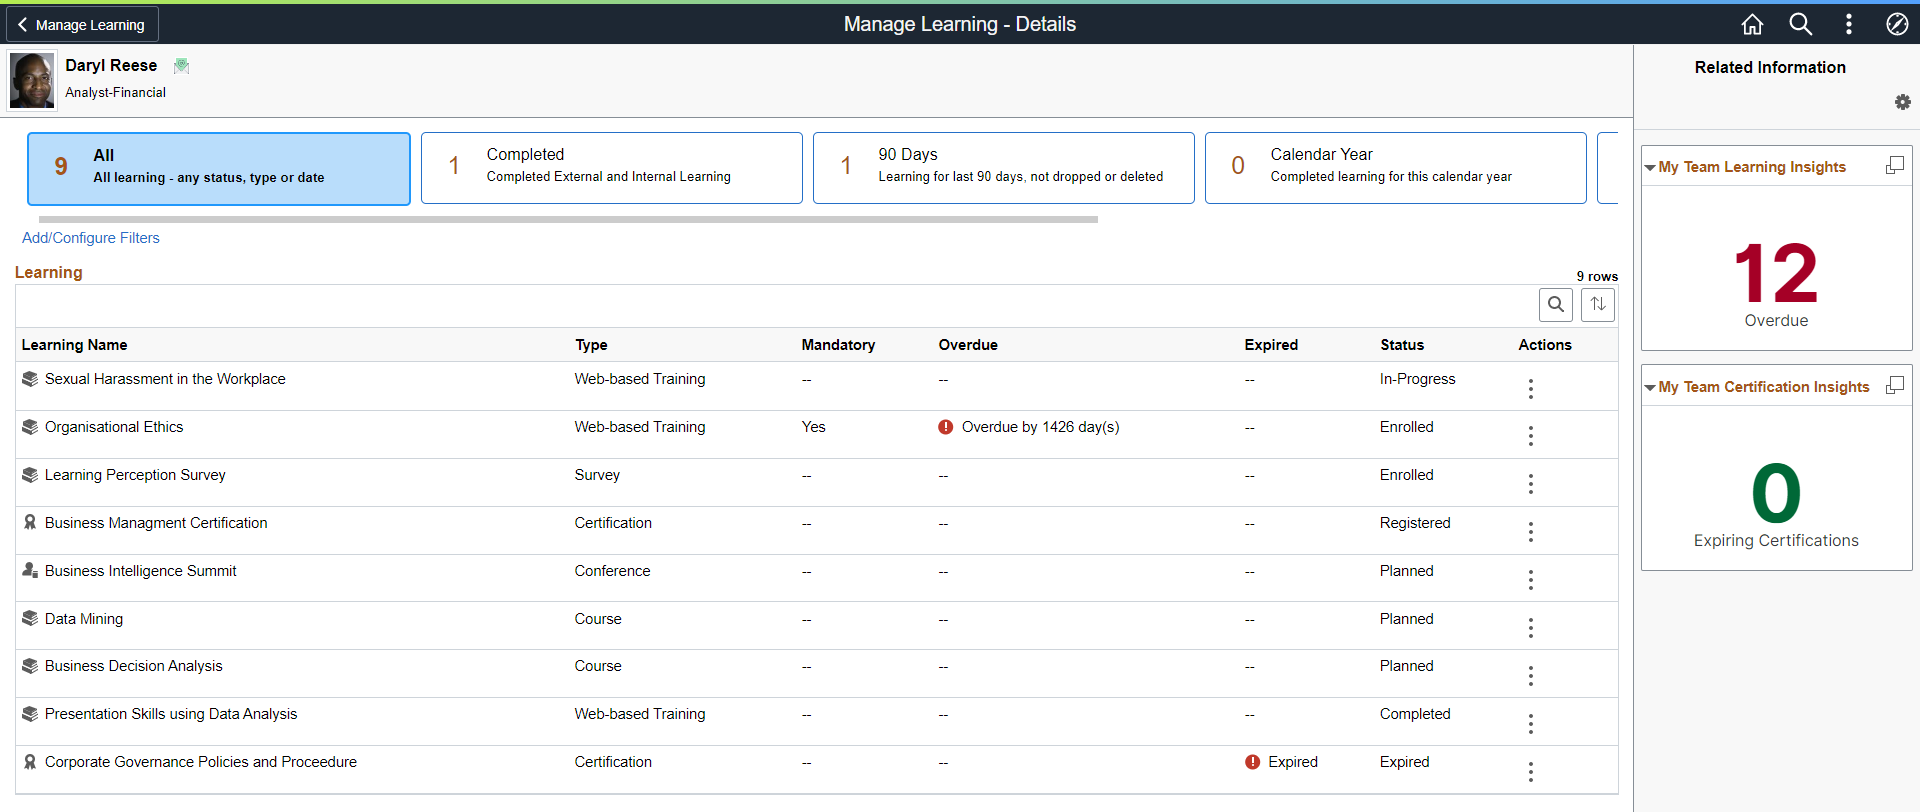
The Manage Learning – Details page allows the managers to view the list of classes that the team members are enrolled in and curricula and certifications for which they are registered. Managers can view the details, the progress status, and the schedules for the learning. They can also enroll or drop the learner from the classes and programs, or modify the learning requests.
Note: If a learner is enrolled in more than one class for the same course, then multiple rows are displayed in the Manage Learning – Details page.
|
Field or Control |
Description |
|---|---|
|
Header section |
The page header displays the name, the job title and the photo of the selected learner. |
|
|
Click to send alert or message to the learner. |
|
Search filters |
Click to view the learnings in the learning grid by the pre-defined filter.The search filters appear on the top of the page below the header section. The filter shows the count of matching results along with the short description and the description defined in the Learning Filter Page. By default, the filter All is selected. The All filter displays the learnings of any type, status, and date. |
|
Add/Configure Filters |
Click to define the display conditions for the pre-defined search filters. |
|
Learning grid |
Each row in the Learning grid displays the learning name, the type (class, program or supplemental learning), indicators to show if the learning is mandatory, overdue or expired, the learning status and the actions for the learning. If a learning is expired or overdue, then the system displays an alert icon along with the number of days the learning is expired or overdue. The available options for status includes Planned, Enrolled, Registered, In-Progress, Waived, Expired, Completed, and Not Completed. Based on the learning type and the status, the managers can perform the following actions:
|
|
|
Click to search the learning grid by a search keyword. |
|
|
Click to sort the learning grid by learning name, type, or status. |
|
Related Information |
For Manage Learning – Details, this supplementary pane includes the following related content:
Note: The dashboard displays data for the logged-in user (manager), even if the manager navigates to the team view of any of his directs. |

This example illustrates the fields and controls on the Add Filter page when manager clicks on Add/Configure Filters link.

|
Field or Control |
Description |
|---|---|
|
New Order |
Enter a number to define the order of display of the filters. |
|
Display |
Click to enable the display of the filter. |
|
Default |
Click to set the filter as default. The learning grid displays the learnings based on the default filter. |
Actions
The Manage Learning – Details page allows the manager to perform different actions based on the type of learning and its status.
Navigate to the Manage Learning –
Details page and click the chevron for any team member to view the
learning details. Click the  button for a learning to view the actions.
Managers can perform the following actions:
View Details
View History
Select Class and Enroll
Register
Modify
Recertify
View Approval Request
Drop
Delete
|
Field or Control |
Description |
|---|---|
|
View Details |
Click to view the details and the progress of the learning (course, program, or supplemental learning). This action is available for all the learnings of any type or status. |
|
View History |
Click to view the history of the certification. The modal page displays the learning statuses and the status change date for the learning. This action is available when the status of the certification is Expired. |
|
Select Class and Enroll |
Click to go to the Course page, view the enrollment options, and enroll to a preferred class. This action is available when the status of the course is Planned. Note: Managers can enroll the learners to only one class per course. |
|
Register |
Click to go to the Program page, view the program details and register to the program. This action is available when the status of the program is Planned. |
|
Modify |
Click to update the details of the supplementary learning. This action is available for supplementary learnings with status Planned, In-Progress, or Pending Approval. |
|
Recertify |
Click to view the details of the recertification programs and register to the program. Notification is sent to the learner on successful registration. This action is available when the status of the program is Expired. |
|
View Approval Request |
Click to view the learning page with the approval chain. If the approval is pending with the logged-in manager, the system displays the option to approve or deny the learning request. Click the Approval Chain to view the approval workflow and the reviewer with whom the request is pending. |
|
Drop |
Click to drop the learner from the learning. System displays a warning to confirm the drop action. This action is available when the status of the learning (course or program) is Enrolled, Registered, In-Progress, or Pending Approval. |
|
Delete |
Click to delete the learning for the learner. System displays a warning to confirm the delete action. This action is available when the status of the learning (course or program) is Planned. |