Defining Programs
To define programs, use the Maintain Programs (LM_PROG) component.
Note: When you create a curriculum or certification program or modify certain aspects of an existing one, you must rebuild the catalog index before your changes are reflected in the learning catalog. See page discussions for lists of the modifications that require rebuilding the catalog index.
|
Page Name |
Definition Name |
Usage |
|---|---|---|
|
Search Programs Page |
LM_PRG_SRCH |
Search for or add a certification program or curriculum program. |
|
LM_PRG_PG |
Define general program information and details about payments, approvals, vendors, and external data. For certifications, also define completion and expiration information. |
|
|
Update Program Page |
LM_PRG_PUSH |
Enter the date on which the system will notify learners of revised certification requirements. |
|
LM_PRG_SCN_PG |
Define sections for a program and the item details for each section. |
|
|
LM_PRG_SCN_RULE_PG |
Specify which sections of the program the learner must complete. |
|
|
LM_PRG_ATTRIB_PG |
Link a program to one or more categories and specify the relevant keywords and objectives. |
|
|
LM_PRG_PRQ_PG |
Identify other items, objectives, and programs that the learner must complete or that you recommend the learner complete prior to registering for this program. |
|
|
LM_PRG_EQUIV_PG |
Identify courses and programs that are equivalent to a given program. |
|
|
LM_PRG_NANDA_PG |
Enter notes for a program and attach files. You can optionally include notes and attachments elsewhere in the system, such as for an item or class. |
|
|
LM_PRG_SEC_PG |
Identify the learning environment and learner groups that can access this program. |
|
|
LM_PRG_CLONE_PG |
Copy a program and modify it to create a new program. |
You can create programs in two ways: you can add a new program, or you can search for an existing program, clone it, and modify the cloned version.
Adding a Program
To add a new program:
Access the Program Search page.
Click the Add Certification link or the Add Curriculum link.
Define program details such as pricing, approval rules, and—for certification programs—completion rules.
If you are defining a certification program that has a single set of expiration rules, you define the expiration rules at this time as well.
Define the sections that make up the program and, if applicable, the expiration rules for each section.
Note: To have a single course expire before the other sections of a program, you must create a section with that course only.
Specify program attributes—category relationships, keywords for catalog searches, and learning objectives.
Identify required and recommended prerequisites.
Identify equivalent courses and programs.
Add notes and attachments to the program.
Define security for the program.
Activate the program by changing its status on the Manage Programs - Details page from Pending to Active.
Update the catalog search index.
Cloning a Program
To clone an existing program:
Use the Program Search page to locate the program.
Click the Clone icon on the tool bar.
Enter a new program code.
This step may not be necessary depending on the settings on the Install Defaults component.
Identify the options to clone and click Continue.
When the Manage Program - Details page appears, make any changes that are needed.
Update the catalog search index.
To modify a program:
Use the Program Search page to locate the program.
Update the program by modifying an existing effective-dated row or inserting a new effective-dated row.
Note: Correction mode is the default state for the Manage Programs component. If Correction mode is not enabled on your permission list for this component, the default mode is Update/Display All.
(Optional) Enter a revision code for the program on the Manage Programs - Details page.
(Optional) You can automatically notify affected learners and their managers of program changes.
Click the Update <Program> button at the bottom of the Manage Programs - Details page.
Enter the date on which to notify learners.
On the specified date, when you run the Send New Program Updates Notification (LM_CERT_UPD) process, the system will send an email notification to learners whose program status is Registered, In Progress, Completed, or Warning. The notice alerts learners to the program change, but does not explain what modifications have been made. Learners can view new requirements on the self-service program detail pages. For more information on program notifications, see Sending Program Notifications.
(Optional) Update the certification status of affected learners.
In some cases, you may want to require that learners complete the new requirements immediately rather than during the next recertification period. You can use the group action feature of the Administer Program Roster component to update the certification status of those who have completed the program to Warning. Learners will able to see their new certification status on the self-service pages.
To delete a program, two conditions must be met:
The program cannot be nested within another program.
No registration records can exist for the program.
Once a learner registers for a program you can no longer delete it, even if the learner is dropped from the program. You can, however, change the program status to Inactive on the Manage Programs - Details page. Inactive programs are accessible to administrators only.
To delete a program:
Use the Program Search page to locate the program.
Check for linked programs.
If this program is contained within another program, a Nested Program Relationship link appears near the top of the Manage Programs - Details page. Click the link to display the names of the parent programs. You must remove this program from the parent programs before you can proceed.
Click the Delete link on any page of the Manage Programs component.
Update the catalog search index.
To use the following features, you must first activate them at the system level or for the administrator's learning environment:
Nested programs
This feature enables you to include a program within another program. To set the system-wide default, use the Allow Nested Program check box on the Install Defaults - Details page. The setting for the administrator's learning environment determines whether this feature is available when creating a program. One level of nesting is supported, meaning that program A can contain program B, but program B cannot contain other programs.
Cascading expirations
With cascading expirations, you can define expiration rules at the section level, rather than for a certification program as a whole. To define a program with this feature, the Allow Cascading Expirations option must be enabled for the administrator's learning environment.
Approvals
To define approval requirements for program registrations, the Program Registration check box must be selected on the Install Defaults - Programs page.
eSignature sign off
To require that administrators validate manual updates to a learner's certification status, the Require eSignature on Updates option must be activated for the administrator's learning environment.
Duplicate program codes
To assign the same program code to more than one program, the Program Code option on the Install Defaults - Details page must be set to Allowed. If it is set to Restricted by LE, each program that is associated with the same learning environment must be assigned a unique code.
Note: The Install Defaults component also controls conditions for updating and tracking a learner's certification status.
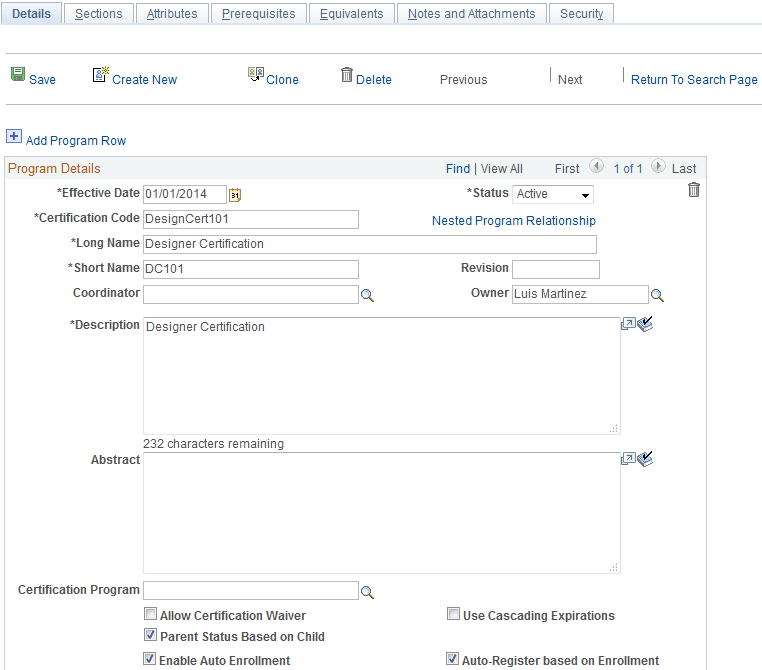
Use the Maintain Programs - Details page (LM_PRG_PG) to define general program information and details about payments, approvals, vendors, and external data.
For certifications, also define completion and expiration information.
Navigation:
To edit an existing program, search for the program and click the Title link.
To create a new program, click the Add Certification or Add Curriculum button.
This example illustrates the fields and controls on the Maintain Programs - Details page (1 of 2).
This example illustrates the fields and controls on the Maintain Programs - Details page (2 of 2).
Note: When you modify the Certification Code, Curriculum Code, Effective Date, Long Name, Short Name, Status, Certification Program, or Expiration Date fields, you must rebuild the catalog index before the changes are reflected in the learning catalog. Changes to approval and payment information also require that you rebuild the index.
See Updating the Catalog Indexes.
Program Details
Field or Control |
Description |
|---|---|
Certification Code or Curriculum Code |
Enter a code for the program. The system displays the code in the catalog. You may be required to enter a unique program code, depending on the program code option on the Install Defaults - General page. |
Effective Date |
The program displays in the catalog on or after the effective date, provided that the status is set to active. |
Nested Program Relationship |
This link is useful after you define a program. It only appears when this program is contained within another program. Click to see the names of the parent programs. Clicking a parent program opens the Items component so that you can view and edit that program. Because you cannot delete a program that is nested within another program, this link provides a convenient way to check for and remove the association with parent programs before you delete this program. |
Long Name and Short Name |
The system displays these program names in the catalog. For recertification programs, it's recommended that you include the term recertification in the name so that learners can easily spot these programs in the catalog. |
Status |
Possible values are: Pending: Select to indicate that this program is under construction and not yet published. These programs are only accessible by administrators. When you create a new program, the system automatically sets the status to this value. Active: Select to indicate that this program is ready to be published in the catalog, making it available to learners for registration. The system displays only the programs with active status and valid effective date in the catalog. For this program to appear in the catalog search, you must regenerate the catalog index. Inactive: Select to indicate that this program is no longer in use. These programs are only accessible by administrators. |
Coordinator |
Select as a coordinator for this program an instructor within your learning environment, as defined on the Instructor page. |
Revision |
To track different revisions of this program, enter a distinguishing value. For example, if you revise a program twice you might enter A for the original, B for the first revision, and C for the second revision. It is recommended that you also change the effective date if you change a revision because effective dating provides true revision control. |
Owner |
As a reference, enter the name of the person responsible for constructing or managing this program. |
Description |
Enter a description of the program, such as topics covered and intended audience. This description is available to learners through the catalog. |
Abstract |
The abstract does not appear in the catalog. |
Certification Program |
If you are creating a certification program, leave this field blank. If you are creating a recertification program, enter the name of the original certification that this recertification applies to. For example, if you are defining a recertification program for Sales Director called Sales Director Refresher, you would enter Sales Director in this field. You can define multiple recertification programs for a single certification program. This field is hidden when you select Use Cascading Expirations. |
Approval Type |
If registration in the program requires approval, select the approval process definition here. The approval process definition defines the conditions under which registration must be approved and who must give their approval. This field only appears when program registration approvals are enabled on the Install Defaults - Programs page. |
Special Approver |
This field is applicable when you select a value in the Approval Type field. You can designate any Enterprise Learning Management user as a special approver for registration. The approval process definition selected in the Approval Type field determines when the person named here is required to approve the registration. If the approval process does not require a special approver, the system ignores the name entered here. |
Allow Certification Waiver or Allow Curriculum Waiver |
Select to permit a manager or administrator to waive this program for a learner using the supplemental learning feature. (Administrators can always use the program roster to waive programs regardless of the selection here.) With a waived program, the learner gets credit for having the knowledge or experience equivalent to this program without having to register for it and complete it. The system marks the program as waived for the learner. When a program is waived, the system automatically assigns learning objectives that are associated with the program to the learner in Met status. A program waiver does not translate to waivers for the items that make up the program. See Understanding Supplemental Learning. Deselect this check box to indicate that learners cannot get a waiver for this program. |
Use Cascading Expirations |
(Certification programs only.) Select if you want to define expiration rules at the section level. Each section of courses can have its own expiration rules, which enables a single section of the program to expire rather than the entire certification. The check box appears only when the Allow Cascading Expiration option is enabled for the administrator's learning environment. When selected, the Expiration Information group box on this page is hidden and appears on the Sections page instead. Note: When you select this check box, the system selects the Parent Status Based on Child check box and makes it unavailable to deselect. |
Parent Status Based on Child |
Select to have the status of parent programs be based on the status of child programs. For example, if you select this check box and a child program expires, the parent program also expires. If you deselect this check box, the status of parent program is not based on the status of child programs. With this check box deselected, the system sets the status of parent programs as follows:
Note: This check box is available only if you select the Allow Nested Programs check box on the Install Defaults - Programs page. If you select the Parent Status Based on Child check box on the Install Defaults - Programs page, the Parent Based on Child check box on the Maintain Programs - Details page is selected by default. |
Require eSignature on Updates |
Select to indicate that manual updates to a learner's program status require eSignature validation. When an administrator uses the program roster to update a learner's program status, the system will prompt for the user's Enterprise Learning Management password. The check box appears only when the Require eSignature on Updates option is enabled for the administrator's learning environment. |
Enable Auto Enrollment |
Select to enable the system to automatically enroll learners in classes associated with the program when they register for it. This also enables the system to automatically register learners into programs nested within this program at the time of registration. Whether this check box appears for a program depends on the value that you select for the Program Auto-Enrollment Option field on the Install Defaults - Programs page. If this check box appears for a program, it is selected by default. |
Auto-Register based on Enrollment |
Select to enable the system to automatically register learners in this program when they enroll in classes associated with this program. Whether this check box appears for a program depends on the value that you select for the Auto-Register based on Enrollment field on the Learning Environments - Defaults page. If this check box appears for a program, it is selected by default. |
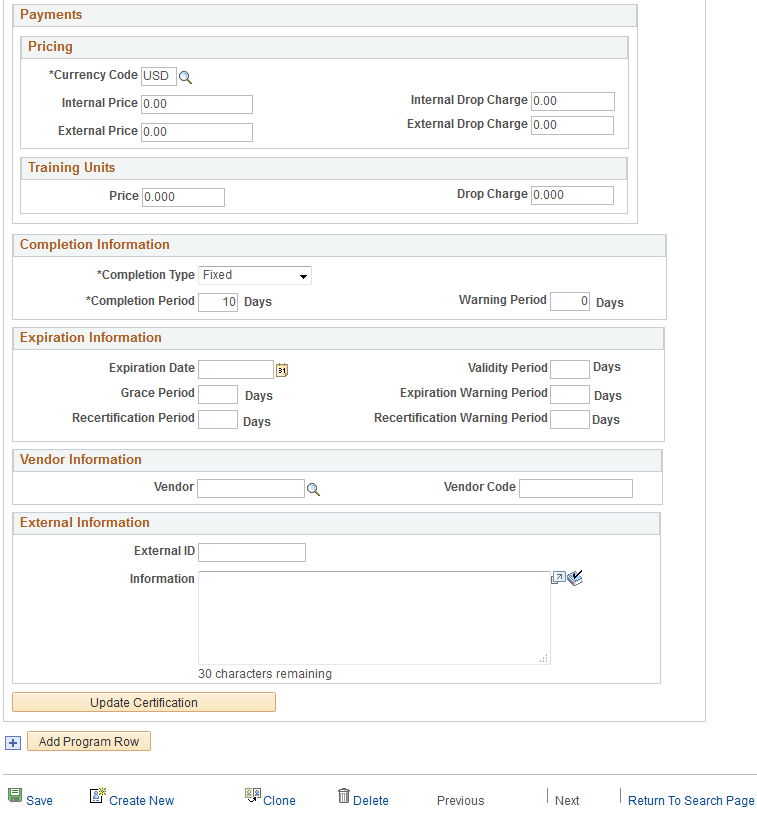
Pricing
Use this group box to enter the base price that the learner must pay to register for the program. When a learner registers for a program, the system tracks the learner's payment method and payment details. The price for the program is independent of the price for items that make up the program. The learner pays for each separately. No discounts exist for items or objectives completed before program registration. No charges are incurred for waiving a program.
Field or Control |
Description |
|---|---|
Currency Code |
Select the currency for all monetary amounts that you define for this program. Currency codes are delivered with your system as translate values and you can modify them. |
Internal Price |
Enter the registration price for internal learners. |
Internal Drop Charge |
Enter the price charged if an internal learner drops the program. |
External Price |
Enter the registration price for external learners. |
External Drop Charge |
Enter the price charged if an external learner drops the program. |
Training Units
Field or Control |
Description |
|---|---|
Price |
Enter the price in training units for this program when the payment method is training units. |
Drop Charge |
Enter the training units charged if a learner pays in training units and then drops the program. |
Completion Information
Completion information applies to certifications only.
Field or Control |
Description |
|---|---|
Completion Type |
Select how you want to calculate the completion period for the certification: Fixed: Select to calculate the completion period from the date the learner registers. Delayed: Select to calculate the completion period from the date the learner completes the first item in the program. |
Completion Period |
Enter the number of days within which the learner must acquire the certification. The system uses this value and the completion type to calculate the learner's target completion date for the certification. For example, let's say the completion period is 60 days and the completion type is fixed. If the learner registers on January 1, then the system immediately sets the target completion date to March 3 and the learner must complete the certification by that date. Let's change the completion type to delayed. If the learner registers for the certification on January 1 but does not complete the first item until February 1, then on February 1 the system sets the target completion date to April 3. Until then, no target completion date is set. Note that the target completion date is only calculated once, which is the first time an item within the program is completed successfully. Therefore, re-taking any item will not change the target completion date to a new date. If the learner does not complete all requirements for certification by the target completion date, the system updates the learner's completion status to not completed when the Process Program Updates process (LM_CERT_STAT) runs. The administrator has the ability to override the target completion date (extend it) through the program roster, provided the administrator has the appropriate security authorization. Historical credit does not affect the target completion date. If the program is set to allow historical credit and the registration process determines that the learner has already completed at least one item, the process marks that item as complete within the program. However, the target completion date remains blank. If the Completion Type field is set to delayed, the learner must enroll in and complete (or have waived) an item within the program in order to set the target completion date. |
Warning Period |
Enter the number of days in advance of the target completion date from which you want to send an email notification. This notification warns the learner to complete the certification requirements before time expires. If the learner has already completed the certification, the system no longer generates an email warning. For example, if the target completion date is October 14, enter 14 to notify the learner on October 1 that only two weeks remain to complete the certification. |
Expiration Information
Expiration rules apply to certifications only. Use the fields in this group box to define the expiration rules for the certification program as a whole. When the Use Cascading Expirations check box is selected, this group box is hidden and you define expiration rules for each section of the program on the Sections page.
Field or Control |
Description |
|---|---|
Validity Period |
Specify the number of days the certification remains valid for the learner after the learner completes the certification. The certification expiration date adjusts according to the completion date and this value. For example, if a learner completes a certification on May 1, 2006, and you have specified 365 in this field, the learner's certification will expire on April 30, 2006. Alternatively, you can enter a fixed expiration date in the Expiration Date field. |
Expiration Date |
Specify the fixed date on which the certification expires. Use this field as an alternative to specifying a validity period. The Expiration Date and Validity Period fields are mutually exclusive; if you specify the expiration date, the Validity Period field becomes unavailable to edit. Clear both fields to indicate that the certification has no expiration. |
Grace Period |
Enter the number of days the certification remains valid after the certification expiration date. During the grace period, the certification remains active in the learner's history. After the grace period, actual certification expiration occurs. The grace period gives the learner and the certifying entity time to validate certification efforts. For example, if the learner takes three days to send recertification test information to the certifying entity, the grace period allows the learner to remain certified during this time. This date never appears to learners. |
Expiration Warning Period |
Enter the number of days before certification expiration to indicate when you want the system to send a reminder notification to the learner about the upcoming certification expiration. Clear this field or enter 0 to indicate that you want the system to send the email on the actual certification expiration date. |
Recertification Period |
Enter the number of days before actual certification expiration within which the learner must complete the recertification program to reinstate certification status. If the recertification period expires, the learner is ineligible for recertification and must complete the original certification again. For example, if the learner needs 30 days to complete a recertification program, set the Recertification Period to 30, to indicate when the learner should receive a notification that it is now time to begin recertification. The learner would then have 30 days to complete the recertification after they reach the soft expiration. Then, after the Grace Period expires, the certification status would changed to Expired. Clear this field or enter 0 to indicate that learners can obtain recertification at any time. |
Recertification Warning Period |
Enter the number of days before recertification expiration to indicate when you want the system to send a reminder notification to the learner. For example, if you enter 14, then 14 days before the Recertification Period ends the learner would receive a notification. Clear this field or enter 0 to indicate that you do not want the system to send this email notification to the learner. |
Note: The certification expiration date defined by the Validity Period or Expiration Date field is the soft expiration date that the system communicates to the learner in notifications. Actual certification expiration (hard expiration), occurs after both the recertification and the grace periods have elapsed.
Vendor Information
Field or Control |
Description |
|---|---|
Vendor and Vendor Code |
If this program is provided by an external vendor, select the name of the vendor and enter the vendor's code for this program. This information helps reconcile data from an external load. |
External Information
Field or Control |
Description |
|---|---|
External ID and Information |
If this program contains data imported or migrated from an external source, enter the external source's unique ID for this program plus any additional information from the external source that doesn't fit into this program structure. For example, you might enter in the Information field a description, notes, and comments from the external data source about this program, such as information about format, rules, historical certification codes, and so on. These fields are for administrator use only. |
Update <Program>
As program requirements change, administrators can publish new or revised requirements to learners whose program status is Registered, In Progress, Completed, or Warning. After updating the requirements, click the Update <Program> button to access the Update Program page. This page lists the number of learners who are currently registered or who have completed the program. You can enter a date on which the Send New Program Updates Notification (LM_CERT_UPD) process sends an email notification to affected learners and their managers. The program's effective date appears by default. For more information on program notifications, see Sending Program Notifications.
The email does not describe the nature of the change, so you may want to use the email feature accessed through the program roster pages to send a second email that highlights the new or revised requirements.
Note: We recommend you insert a new effective date before updating existing requirements, if you want to track revisions to the program. Otherwise, all learners registered in the program will need to complete the new requirements once their status has changed.
Use the Maintain Programs - Sections page (LM_PRG_SCN_PG) to define sections for a program and the item details for each section.
Navigation:
This example illustrates the fields and controls on the Maintain Programs - Sections page.
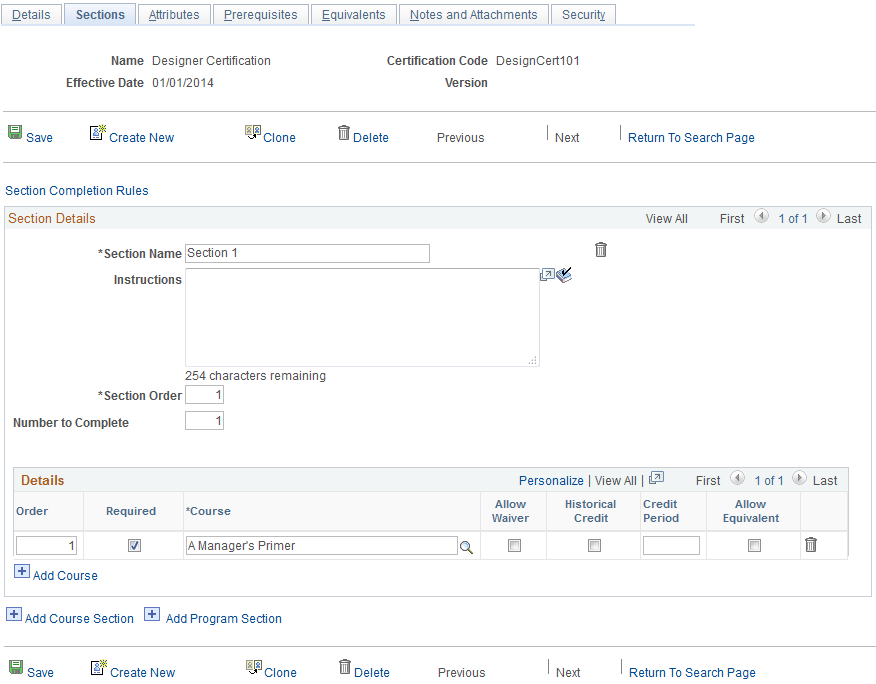
Each program must include at least one section. Each section can include one or more courses or another program. To create a section that contains courses, click the Add Item Section link at the bottom of the page and identify the items to include. To create a section that includes a program, click the Add Program Section link and identify the program to include. (Separate sections are required for items and programs.) Classes are part of each course and cannot stand alone within a program.
Note: The Add Program Section link appears only when the nested program option is activated for the administrator's learning environment.
Section Details
Each item section must include at least one item. A program section can include only one program.
Field or Control |
Description |
|---|---|
Section Name |
Enter a name for the section to distinguish it from other sections within the program. The system displays to the learner the section name in the catalog. |
Instructions |
Enter instructions for the learner about how to complete this section. These instructions appear in the catalog and the learning plans of those who register for the program. |
Section Order |
Enter the recommended order in which the learner should complete this section of the program in relation to the other sections, going from lowest number to highest. This number determines the sequence in which sections are listed in the program's description in the catalog. The number for each section must be a whole integer and unique. The system does not enforce this order. |
Items to Complete |
Enter the total number of items that the learner must complete from this section to fulfill the requirements for the section. The number must include the required items for the section. |
Item Details
Use this group box to select the items or program for the section.
Field or Control |
Description |
|---|---|
Order |
This field applies to item sections only. Enter a number to specify the recommended order in which the learner should complete the items within the section. If two or more items have the same number, the learner can complete those items in any order before continuing to the next order number. The system does not enforce this order. |
Required |
For item sections, select this check box to specify that the item is required for completion of the section. Deselect to indicate that the item is optional within the section. For program sections, this check box is automatically selected. |
Item or Program Long Name |
Select the item or program. If selecting a program, you can only select from active programs that have no nested programs. In addition, the program you select must have an effective date that is equal to or less than the effective data of the parent program. |
Allow Waiver |
Select to permit a manager or administrator to allow learners to waive this item. With a waiver, learners get completion credit for having the knowledge or experience equivalent to the item without actually having to complete the item. Waivers are granted through the Supplemental Learning component. Deselect this check box to indicate that the learner cannot waive this item. |
Historical Credit |
Select to permit the learner to get credit for this item or program if the learner has completed it before registration. The system grants the learner completion credit upon registration, provided that the learner completed the item or program (or the item or program was waived) within the historical credit validity period, as defined in the Credit Period field. Deselect this check box to require the learner to enroll in and complete the item or program regardless of whether the learner previously completed it. Note: If the learner enrolls in and completes classes for the same item or program multiple times, the system uses the most recent completion for the historical credit. Note: When creating a nested program, consider enabling the use of historical credit. If historical credit is not allowed, a learner who completes the nested program before registering for the parent program, may be prevented from meeting the parent program's requirements. |
Credit Period |
If you have allowed historical credit, enter the number of days from the date of registration within which the learner must have completed the item or program. For example, if you set this value to 90, then the learner must have completed the corresponding item within the last 90 days before program registration. Leave this field blank if you want no time restriction on when the learner must have completed the item or program to receive historical credit. |
Allow Equivalent |
Select if the requirement can be satisfied by completing an equivalent course or program. |
Expiration Information
Expiration rules apply to certification programs only. This group box appears for item sections when the Use Cascading Expirations check box is selected on the Maintain Programs - Details page.
Enter the expiration rules that pertain to this section only. The fields are similar to the expiration fields on the Maintain Programs - Details page; however, the rules you define here apply to this section only.
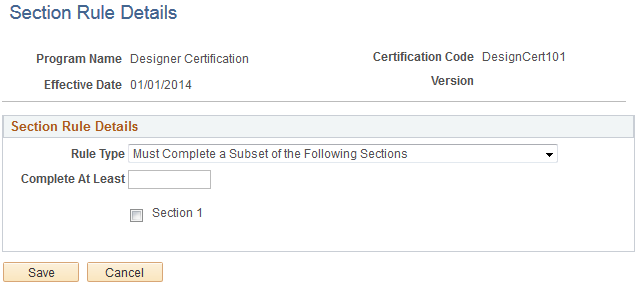
Use the Section Rule Details page (LM_PRG_SCN_RULE_PG) to specify which sections of the program the learner must complete.
Navigation:
Click the Section Completion Rules link on the Maintain Programs - Sections page.
This example illustrates the fields and controls on the Section Rule Details page.
Field or Control |
Description |
|---|---|
Rule Type |
You can require that learners complete all sections that you specify or a subset of those sections. Select the appropriate rule:
|
Complete at least |
This field appears when you select Must Complete a Subset of the Following Sections. Enter the minimum number of sections the learners must complete. |
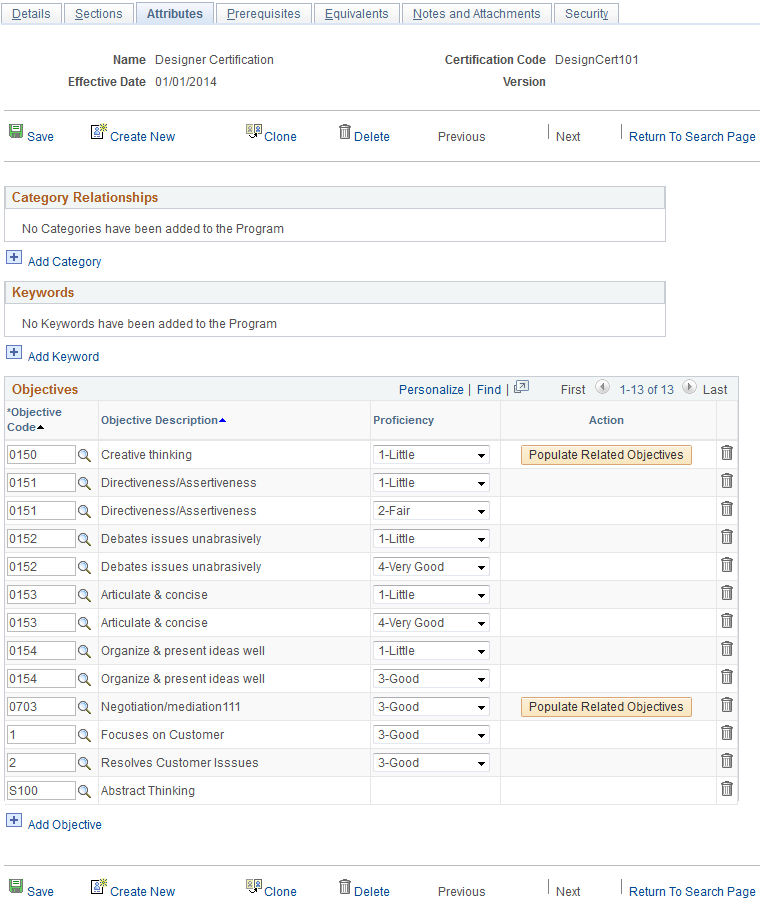
Use the Maintain Programs - Attributes page (LM_PRG_ATTRIB_PG) to link a program to one or more categories and specify the relevant keywords and objectives.
Navigation:
This example illustrates the fields and controls on the Maintain Programs - Attributes page.
Note: When you add, remove, or modify categories, keywords, or objectives, you must rebuild the catalog index before the changes are reflected in the learning catalog.
See Updating the Catalog Indexes.
Category Relationships
Select the categories under which you want to list this program in the learning catalog.
See Defining Learning Categories.
Field or Control |
Description |
|---|---|
Category |
Select the category within your learning environment to which this item belongs. |
Keywords
Keywords help users locate this program when searching the catalog.
Field or Control |
Description |
|---|---|
Keyword Type |
Select the keyword type or category. |
Keyword |
Select a keyword for this program. You can only select keywords that belong to the selected keyword type. |
Objectives
Identify the objectives and, if applicable, corresponding proficiency levels that learners meet by completing this program. Learners receive credit for meeting the objectives that have been directly assigned to them.
A program's objectives have no relation to its constituent course objectives. The objectives at either level function independently of one another. Define objectives on the Objectives page.
Field or Control |
Description |
|---|---|
Populate Related Objectives |
Click to add all the parent objective’s related objectives to the Objectives grid for the program. Note: This button appears only for objectives imported from PeopleSoft HCM that are associated with one or more sub-items (related objectives). For more information about related objectives, see Understanding Objectives. |
Use the Maintain Programs - Prerequisites page (LM_PRG_PRQ_PG) to identify other items, objectives, and programs that the learner must complete or that you recommend the learner complete prior to registering for this program.
Navigation:
This example illustrates the fields and controls on the Maintain Programs - Prerequisites page.
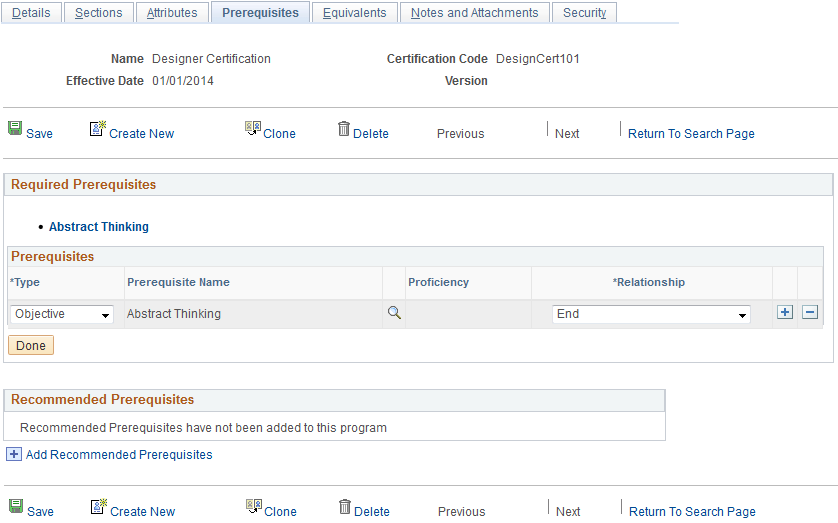
Required Prerequisites
The program registration process checks that the learner has met all required prerequisites for this program, before confirming the learner's registration. The registration process does not check prerequisites for courses within a section of a program because the course prerequisites function independently of the program prerequisites. Administrators can override prerequisites during group and mass enrollment. Managers cannot override prerequisites for a learner directly, but can use the Supplemental Learning page to give learners waivers on courses, objectives, and programs.
To add a prerequisite for the program, click the Add Required Prerequisites link and enter the prerequisites.
Field or Control |
Description |
|---|---|
Type |
Select the type of prerequisite: Course, Objective, or Program. |
Prerequisite |
Select the name of the prerequisite course, objective, or program. |
Proficiency |
This field pertains to objectives that are selected as prerequisites. If the objective is associated with a rating model, select the proficiency level. |
Relationship |
Select one of the following values to build a phrase expressing how prerequisites within this program relate to each other:
|
Done |
Click to hide the data entry fields for required prerequisites. |
Recommended Prerequisites
These fields are similar to the Required Prerequisites fields. Use them to select courses, objectives, and programs that you recommend learners complete before taking the current program. Recommended prerequisites that the learner does not meet do not prevent the learner from registering for the program.
Use the Maintain Programs - Equivalents page (LM_PRG_EQUIV_PG) to identify courses and programs that are equivalent to a given program.
Navigation:
This example illustrates the fields and controls on the Maintain Programs - Equivalents page.
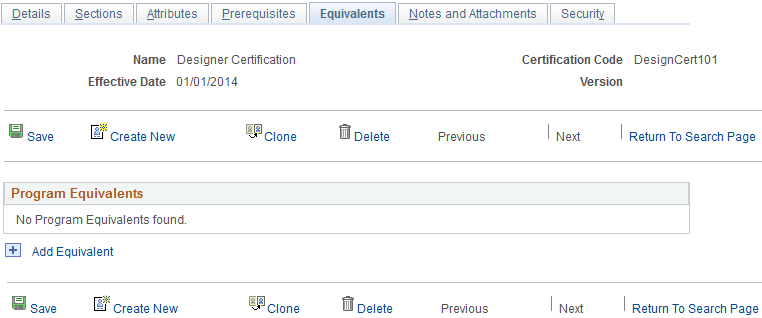
Select the courses or programs that are equivalent to this one. When a program or course has a prerequisite, learners can complete an equivalent program or course to meet the prerequisite.
If the learner completes more than one equivalent item or program, the system refers to the item or program that was completed most recently, for the certification requirement.
Use the Maintain Programs - Notes/Attachments page (LM_PRG_NANDA_PG) to enter notes for a program and attach files.
Navigation:
This example illustrates the fields and controls on the Maintain Programs - Notes/Attachments page.
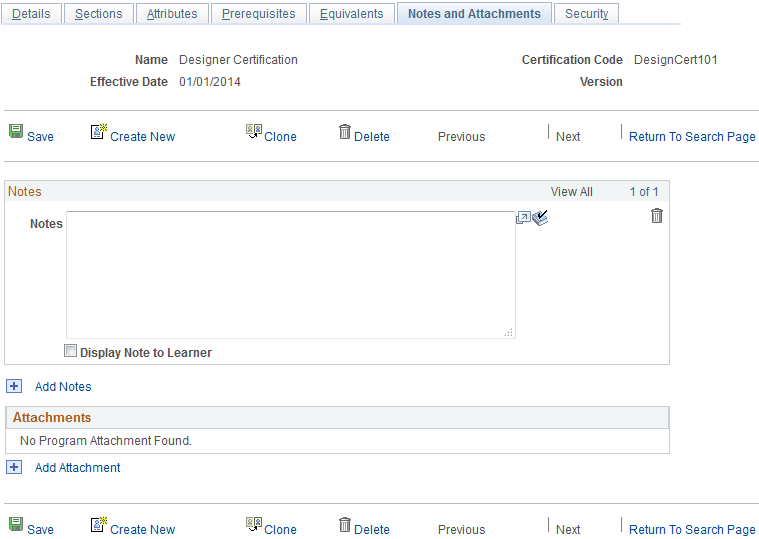
Notes
Enter any notes about the program and, if applicable, select the Display Note to Learner check box for the note.
Attachments
To add an attachment, click the Add Attachment link. Then either enter the path to and the name of the attachment, or click the Browse button to locate the attachment, and click the Upload button. After you upload the attachment, the system displays the attachment file name in the description field. You can edit this description.
To display attachments to the learner, select the Display check box next to the attachment description.
To delete an attachment, select the check box next to the attachment description and click the Delete Attachment button.
Other aspects of attachments are discussed in the Managing Classes topics.
Note: Your system configuration determines the size of the files that you can attach.
See the product documentation for PeopleTools: PeopleCode Developer's Guide.
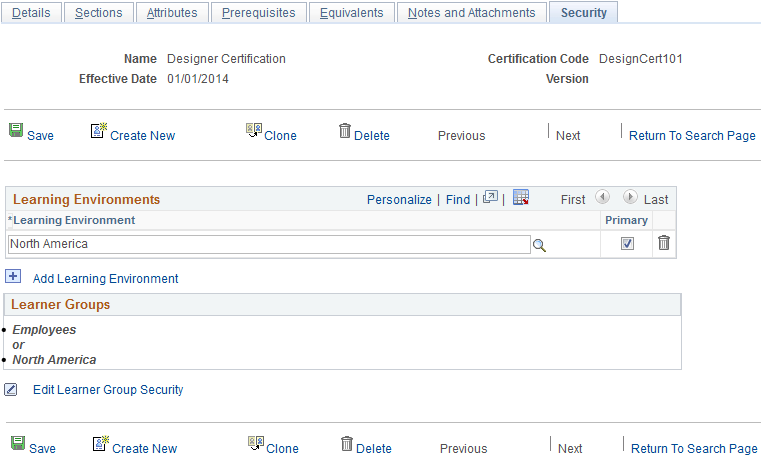
Use the Maintain Programs - Security page (LM_PRG_SEC_PG) to identify the learning environment and learner groups that can access this program.
Navigation:
This example illustrates the fields and controls on the Maintain Programs - Security page.
Note: When you add or remove learning environments or learner groups, you must rebuild the catalog index for programs before the changes are reflected in the learning catalog.
See Updating the Catalog Indexes.
Learning Environments
Use these fields to specify the learning environments for which this program is valid.
Field or Control |
Description |
|---|---|
Learning Environment |
For new programs, the system displays the administrator's learning environment as the default. By adding other learning environments, you enable administrators of those environments to update this program and associate classes with it as well. Important! If you are creating a program, be careful not to delete your learning environment. If it's not, you will lose the ability to access this program after you leave this component. |
Primary |
This object must be associated with at least one learning environment. In this field, select the primary environment with which this object is associated. You cannot remove the primary learning environment from this page without first selecting another environment as the primary. You can change the primary learning environment on this page at any time. |
Learner Groups
Identify which learner groups can access this program in the catalog. The administrator can select from the learner groups that have been defined for any of the learning environments associated with the program. To access this program in the catalog, a learner must meet the group membership criteria that you define here.
Learner groups assigned to the program are not automatically assigned to constituent courses and programs. For example, you might grant the North America learner group access to the Professional Development curriculum, but only a subset of learners within the North America group may be able to complete the program. This is possible if only some members of the North America group are also members of learner groups associated with the courses in the program. Assigning a learner group to the program does not mean that all learners in that group will have access to all items and programs within the program.
It is the responsibility of the administrator to ensure that there are no conflicts or inconsistencies between learner groups assigned to the program and learner groups assigned to constituent courses and programs.
To add learner groups, click the Add Learner Group Security link.
Field or Control |
Description |
|---|---|
Name |
Select the name of the learner group. |
Relationship |
Specify how this learner group is related to others in the list when used to determine whether or not a person has access to the program Values are: And: A learner must be a member of both this learner group and the next in the list. Or: A learner must be in this learner group or the next in the list. End: A placeholder for the last learner group in the list. The system ignores any learner groups that are listed after End. To define security such that a learner must be a member of learner group A, and a member of learner group B or C, you must reuse learner group A. The resulting security would look like this: Learner group A and Learner group B or Learner group A and Learner group C end. Important! Associate the program with at least one learner group. If you do not select a learner group, learners cannot access this program. |
Done |
Click to hide the data entry fields for learner groups. |
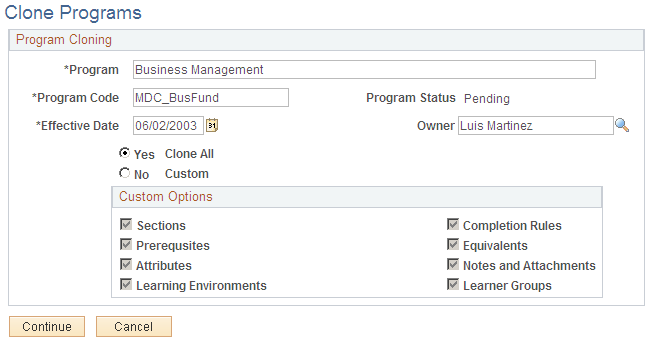
Use the Clone Programs page (LM_PRG_CLONE_PG) to copy a program and modify it to create a new program.
Navigation:
Click the Clone link on the Details page.
This example illustrates the fields and controls on the Clone Programs page.
See Understanding Program Creation.
Field or Control |
Description |
|---|---|
Program |
Enter the name of the new program. By default, the system displays the name of the copied program. |
Program Code |
Enter the code for the new program. By default, the system displays the code for the copied program. The value that you enter must be unique if the Program Code Option on the Install Defaults - General page is set to restricted. |
Effective Date |
Enter the effective date of the new program. By default, the system displays the effective date of the copied program. |
Owner |
By default, the system displays the name of the administrator who is cloning the program. |
Program Status |
The system automatically sets the status of the new program to Pending. After you save the new program, update its status on the Maintain Program - Details page. |
Clone All or Custom |
To copy all values from the existing program, select Clone All. To copy selected values, select Custom. |
Custom Options
The check boxes in this section become available when you select the Custom option. Select the program attributes that you want to copy from the existing program to the new program. When you click Continue, the Details page appears with the cloned data, which you can update.
Note: Selecting Sections is an all or none option; either all the sections are cloned or none of the sections are cloned. If you do not select Learning Environments, the new program inherits your learning environment and corresponding learner groups.