
 Understanding Call Center Prompt Tables
Call Center prompt tables refer to a group of relatively simple setup tables that hold the values for various drop-down list box fields in the Case component.
This chapter provides overviews of the call center prompt tables and discusses how to:
Set up basic prompt tables for all call center application cases.
Set up problem codes for PeopleSoft Support material returns.
Set up reason codes.
Set up case relationship types and labels.
See Also
Understanding Call Center Prompt TablesThis section discusses:
Basic call center prompt tables.
Delivered values in basic call center prompt tables.
Call Center Prompt TablesThis section explains the different types of prompt tables that you must set up for all call center application prompt tables.
Prompt Tables for All Cases
To get your PeopleSoft Customer Relationship Management (PeopleSoft CRM) call center application up and running, define values for these case fields:
Case Status (required)
Case Type
Impact
Priority
Severity
Source
Category, Specialty Type, and Details
Quick Code
Note. Each code is associated with values for at least three and up to seven case fields. Values referenced by a currently active quick code cannot be deleted. When an agent enters a quick code into a case, the system automatically enters all of the related data. It does not save the quick code to the case.
Note. Problem types are defined by the product for which a case is being created. Use problem types to associate products with the competencies that one needs to resolve a problematic gives you an additional level of categorization for the problem. Because Problem Type is a child of Product, the Problem Type field on the Case page derives its values from Product. The Product must be set up before Problem Type. Competencies for Problem Type are not restricted, however.
See Setting Up Products.
Problem Codes for PeopleSoft Support Material Returns
This topic is specific to PeopleSoft Support.
Problem codes identify why a customer is returning stock on return material authorizations (RMAs) created in PeopleSoft Support. If your PeopleSoft Support system is integrated with PeopleSoft Inventory, the problem codes that you select on RMAs must match reason codes defined in PeopleSoft Inventory. In addition, the matching reason codes in PeopleSoft Inventory must be defined with a reason type of Return Material Authorization. When the RMA is staged in PeopleSoft Inventory, the problem code is used as the reason code. If the reason code on the RMA form does not exist in PeopleSoft Inventory, the system logs an error when the RMA EIP (return material authorization enterprise integration point) application message is processed.
See Setting Up Problem Codes for PeopleSoft Support Material Returns.
Enter a reason codes that defines reasons for various actions. There are three different reason types that are associated with a reason code:
Reasons why a person has been associated with a case as an interested party.
Reasons why a self-service user is closing a case.
Reasons why a self-service user is reopening a case.
Cases can be related to each other for many reasons. Here are some examples:
A global case affects many people, but one resolution solves the problem for everybody.
Suppose that your Website is down because of a problem with the Web server. Many people are reporting the same problem. You only need to fix the problem once—this resolves everyone's problem. Create a global case for the problematic Web server and child cases (sometimes called tickets) where each person is reporting the problem. Maintain a parent-child relationship between the global case and all of the tickets. Based on this relationship, you can close all of the child tickets once the global case is closed.
A common case affects many people, but each affected person requires a separate resolution.
Suppose that a software bug is causing problems. Again, many people are reporting the problem, but this time each individual must apply a software patch. Create a common case to track the problem and create child cases for each individual reporting the problem. Based on this relationship, you can track the impact of the problem across your organization. This common-case parent-child relationship differs from the Web server global case, because you do not want to close the child cases when the common case is closed.
A similar case helps an agent to resolve another case.
Suppose that two people have reported problems with their desktop computers. The problems sound similar, and each assigned agent wants to monitor activity on the other case. Similar cases are functionally related, but they do not have a hierarchical relationship.
There are also duplicate cases, cause-and-effect cases, and any other kind of case relationships that you can imagine.
Establish valid case relationship types on the Case Relationship Type page. Each relationship is marked as hierarchical or equivalent (non-hierarchical). Each case in a relationship has a relationship label. If the relationship is hierarchical, there are separate labels for the parent case and the child case. If the relationship is equivalent, there is only one valid label.
Note. If this is not a hierarchical relationship, this field controls how the relationship is described on the Related Cases page. If you look at either one of the related cases, the Relationship field displays the equivalent label. This field is only enterable if the Hierarchical check box is clear. Was able to enter data into the Equivalent Label field and save even when the Hierarchical check box was not clear.
See Also
Working with Self-Service Application Transactions
Integrating with PeopleSoft Applications
PeopleSoft Enterprise 8.8 Application Fundamentals for Financials, Enterprise Service Automation, and Supply Chain Management PeopleBook
Delivered Values in Call Center Prompt TablesThis section discusses delivered relationship types. All of the values are associated with the SHARE setID.
These values are used in PeopleSoft's Active Analytics Framework (AAF). For example, PeopleSoft delivers AAF policies to cascade case statuses and to send notifications to owners of related cases when a case status changes. If you use the delivered policies, you must use the delivered values or change the event processing rules to reference new values.
This table lists the delivered relationship types:
|
Type |
Hierarchical |
Short Name |
Labels |
|
COMMO |
Yes |
Common |
Parent, Child |
|
EQUAL |
No |
Equivalent |
(none) |
|
GLOBE |
Yes |
Global |
Parent, Child |
See Also
Understanding Active Analytics Framework
Common Elements Used in this Chapter |
SetID |
Enter a setID. Except for quick codes, which are associated with business units, all of the prompt tables described in this chapter are associated with setIDs. This enables you to set up different sets of values for different call center business units. If you're setting up one set of values for all of your call centers, use the same setID for all of the values. If you're setting up different sets of values for different call centers, enter the appropriate setID for each value. |
|
Self-Service |
Select this check box to inform the system as to which values self-service application users can select when creating new cases. Select this check box to allow self-service application users to select priorities of Low and Standard, but not High. This check box does not affect the self-service application users' ability to see the value when viewing an existing case; it only affects their ability to select the value when creating a new case. This check box is relevant only for fields that self-service application users can edit. |
|
Short Name |
Enter a short name that describes the value to users of the Case page. Note. Although you can enter up to twenty characters, names longer than fifteen characters might be truncated in the drop-down list boxes on the Case page. |
|
Self-Service Description |
Enter a description regardless of whether the Self-Service check box is selected. This entry describes the value to self-service application users. Even if users can't select a value (the behavior controlled by the check box), they still may be able to view it. If you don't enter a description, the system copies the short description to this field when you save. If the value appears on any of the self-service pages, the self-service description appears instead of the regular short description. |
|
Long Description |
Enter a long name, up to fifty characters, that describes the value. |
|
Effective Date |
Enter the effective date of the value. Most prompt table values are not effective-dated; only quick codes and reason codes have effective dates. |
|
Status |
Select a status to determine whether an effective-dated item (a quick code or a reason code) is active or inactive as of the associated effective date. |
Setting Up Prompt Tables for CasesThis section discusses how to set up the following prompt tables:
Case status.
Case type.
Priority.
Severity.
Impact.
Source.
Problem Type.
Category.
Types and Detail within each Category.
Quick Code.
Prerequisites
Before you set up the prompt tables for your call center application, consider the following:
Before you set up quick codes, set up all of the values to be referenced by the quick code.
Quick codes must reference a category, a specialty type, and a detail. Quick codes can optionally reference a case priority, a solution, a provider group, and an agent.
You must set up product before you set up problem types.
If you want to use competencies in case assignment, establish competencies before you set up the Category, Type, Detail, and Problem Types pages.
You must set up product before you set up problem types.
See Also
Setting Up and Maintaining Provider Groups and Group Members
Setting Up Competency Information in PeopleSoft CRM
Pages Used to Set Up Prompt Tables for All Cases|
Page Name |
Object Name |
Navigation |
Usage |
|
RC_STATUS |
Set Up CRM, Product Related, Call Center, Status, Case Status |
Set up case statuses. |
|
|
RC_CASE_TYPE |
Set Up CRM, Product Related, Call Center, Case Type, Case Type |
Set up case types. |
|
|
RC_PRIORITY |
Set Up CRM, Product Related, Call Center, Priority, Priority |
Set up case priorities. |
|
|
RC_SEVERITY |
Set Up CRM, Product Related, Call Center, Severity, Severity |
Set up case severity values. |
|
|
RC_SOURCE |
Set Up CRM, Product Related, Call Center, Source, Source |
Set up valid methods people can use to report cases. You can track cases that are created through self-service or cases that are initially created by your computer and telephony integration system. |
|
|
RC_PROBTYPE |
Set Up CRM, Product Related, Call Center, Problem Type, Problem Type |
Set up problem types. Associate problem types to products and the competencies that one would need to resolve the particular problem. |
|
|
RC_CATEGORY |
Set Up CRM, Product Related, Call Center, Category/Type/Detail, Category |
Set up case categories. |
|
|
RC_CA_TY_DE_PNL |
Set Up CRM, Product Related, Call Center, Category/Type/Detail, Type and Detail. |
Set up case specialty types and details within each category. |
|
|
RC_CA_TY_DE_PNL |
Set Up CRM, Product Related, Call Center, Impact |
Set up case impacts. |
|
|
RC_QUICK_CODE |
Set Up CRM, Product Related, Call Center, Quick Code |
Set up quick code shortcuts that an agent can use to enter data automatically into various fields on the Case page. |
Setting Up Case Statuses
|
Category |
Select a case status value—this value drives many of your call center metrics. Because the actual values vary by implementation, certain hard-coded status processing is based on the category field rather than the actual case status. All statuses fall into one of these categories: Open: Case needs to be resolved. Closed:Case is resolved and no further work is necessary. Canceled:Case is not resolved, but there is no longer any need to resolve the case. On-Hold:Case is on-hold, and the case needs to be resolved. |
|
Billable |
Select if you bill for support and integrate with a billings system. |
See Also
Delivered Values in Call Center Prompt Tables
Setting Up Case TypesSetting Up Case Priorities
|
Category |
Select a category—all priority values are associated with a priority category. Values are High, Medium, or Low. The association between a priority and a priority category enables the High Priority Problem Reports chart on the Manager's Dashboard to identify high priority cases. |
Setting Up Case Severity Values
Setting Up Case SourcesSetting Up Problem Types
|
Problem Type |
Enter an abbreviation to represent the problem type. There is a five character maximum. |
Problem Type Competency Information
|
Description |
Enter the competency needed to resolve the problem. |
|
Minimum Level |
Select the minimum skill level that a person would need to resolve the problem for the selected competency. |
|
Weight |
Select the level of importance that you want to assign to the competency. The system uses this weighting factor during the assignment process to locate the best person available to resolve the problem. |
Setting Up Case Categories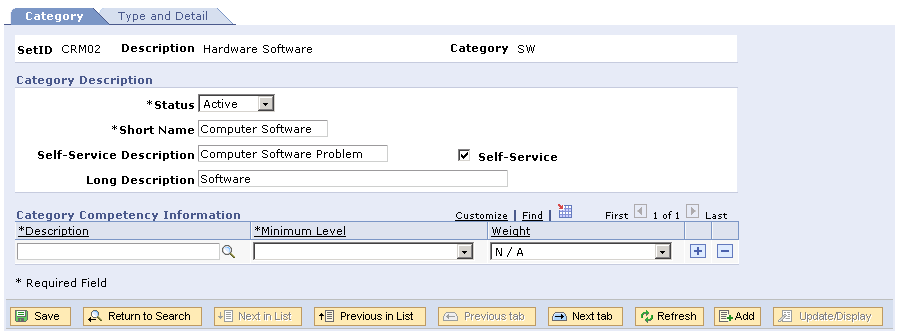
Category page
Category Competency Information
|
Description |
Select the competency needed to resolve problems in the category that appears. |
|
Select the minimum skill level that a person would need to resolve the problem for the selected competency. |
|
|
Weight |
Select the level of importance that you want to assign to the competency. The system uses this weighting factor during the assignment process to locate the best person available to resolve the problem. |
Setting Up Case Specialty Types and Details Within Each CategoryAccess the Type and Detail page.
|
Types |
This page displays the specialty types that already exist for the specified category. The specialty type that is not a link is the one that currently appears in the main area of the page. To view or modify a different specialty type, click the corresponding link. |
|
Create a New Type |
Click to create a new specialty type. |
Type and Detail Competency Information
|
Description |
Select the competency needed to resolve problems for the type of problem that appears. |
|
Minimum Level |
Select the minimum skill level that a person would need to resolve the problem for the selected competency. |
|
Weight |
Select the level of importance that you want to assign to the competency. The system uses this weighting factor during the assignment process to locate the best person available to resolve the problem. |
|
Create a New Detail |
Click to create a new detail. The system displays a set of blank fields in the Details group box, so you can enter new information. |
Setting Up Quick Codes You can used quick code to have the system suggest an action and to populate other fields on the case page.
Quick Code page
|
Quick Code |
This page displays a unique code that agents can use to populate multiple fields on the Case page automatically. |
|
Business Unit |
Enter the business unit of the call center that is to use this quick code. |
|
Description |
Enter a short text description of the code. There is a twenty character maximum. |
Problem Information
When an agent enters a quick code, the system assigns the information in these fields to a case.
|
Summary |
Select the summary associated with this quick code. |
|
Description |
Select the description associated with this quick code. |
Case Information
When an agent enters a quick code, the system assigns the information in these fields to a case.
|
Case Type |
Select the case type associated with this quick code. |
|
Case Sub Type |
Select the case sub type associated with this quick code. |
|
Case Status |
Select the case status associated with this quick code. |
|
Provide Group |
Select the provider group associated with this quick code. |
|
Assign To |
Enter the agent to whom the case is to be assigned. If you've specified a provider group, you can select agents who are part of that group only. |
|
Product ID |
Select the product ID associated with this quick code. |
|
Category |
Select the category associated with this quick code. |
|
Specialty Type |
Select the specialty type associated with this quick code. |
|
Detail |
Select the detail associated with this quick code. |
|
Case Priority |
Select the priority to be assigned to a case. |
|
Case Impact |
Select the impact to be assigned to a change request. |
|
Case Severity |
Select the severity to be assigned to a case. |
|
Error Code |
Select the error code to be assigned to a case. |
|
Error Message |
Select the error message to be assigned to a case. |
Suggested Actions
When an agent enters a quick code, the system assigns an action to the case.
|
Link Category |
Enter the link category to be associated with a case. |
|
Version |
Enter the link category's version to be assigned to a case. |
|
Link Name |
Enter the link name to be associated with a case. |
Notes
When an agent enters a quick code, the system assigns the information in these fields to a case.
|
Summary |
Enter the notes summary to be associated to the case. |
|
Description |
Enter the notes description to be associated to the case. |
See Working with Notes and Attachments.
Keywords
Enter the keywords to be associated with a case. These keywords will appear in the Keywordsfield on the Solutions page of the Case component, thus driving the search for solutions for the case.
Interested Parties
When an agent enters a quick code, the system assigns the information in these fields to a case.
|
Interested Parties |
Enter the interested parties to be associated with a case. |
Setting Up Problem Codes for PeopleSoft Support Material ReturnsThis section discusses how to set up problem codes for PeopleSoft Support material returns.
Note. This is not applicable to PeopleSoft HelpDesk applications.
See Also
Understanding Material Return Processing
Page Used to Set Up Problem Codes
|
Page Name |
Object Name |
Navigation |
Usage |
|
RF_PROBLEM_CD |
Set Up CRM, Common Definitions, Codes and Auto Numbering, Problem Codes |
Set up the problem codes used to identify reasons for material returns on the return material authorization (RMA) form. |
Setting Up Problem CodesAccess the Problem Codes page.
Note. If you integrate with PeopleSoft Inventory, the problem codes established on this page for use with RMAs must match the reason codes that are established on the Reason Code page in PeopleSoft Inventory. In addition, the matching reason codes in PeopleSoft Inventory must be defined with a reason type of Return Material Authorization.
See PeopleSoft Enterprise 8.8 Application Fundamentals for Financials, Enterprise Service Automation and Supply Chain Management PeopleBook.
Setting Up Reason CodesThis section discusses how to set up reason codes.
Page Used to Set Up Reason Codes
|
Page Name |
Object Name |
Navigation |
Usage |
|
RB_REASON_CD |
Set Up CRM, Common Definitions, Codes and Auto Numbering, Reason Codes, Reason Code |
Create reason codes for various actions. |
Creating Reason Codes
|
Reason Type |
Select a reason type. |
Setting Up Case Relationship Types and LabelsThis section discusses how to set up case relationship types and labels.
Page Used to Set Up Case Relationship Types and Labels
|
Page Name |
Object Name |
Navigation |
Usage |
|
RC_RELATION_TYPE |
Set Up CRM, Product Related, Call Center, Case Relationship Type |
Set up types of case relationships and define relationship labels that will appear on the Related Cases page. |
Setting Up Case Relationship Types and Labels
Access the Case Relationship Type page.
Relationship
Example
Consider a Global relationship type with a parent label of Global Case and a child label of Ticket:
On the Related Cases page for the child case, the parent case appears in the Existing Related Cases grid.
In that grid, the Type field value is Global and the Relationship field value is Ticket.
On the Related Cases page for the parent case, the child case appears in the Existing Related Cases grid.
In that grid, the Type field value is still Global, but the Relationship field value is Global Case.