
 Understanding Case, Service Order, and Defect Resolution
This chapter provides an overview of case, service order, and defect resolution and discusses how to find and attempt solutions
Note. PeopleSoft's email response management system (ERMS) and many of its self-service applications also use solutions.
Understanding Case, Service Order, and Defect ResolutionPeopleSoft Support, HelpDesk, HelpDesk for Human Resources, Quality Management and Integrated FieldService applications enable you to track both the final solution (the one that resolved the caller's problem) and other solutions that were considered. By tracking all solution usage, you capture valuable information about the effectiveness of the solution set.
This section discusses:
Resolved cases, service orders, and defects.
Allowing multiple resolutions to resolve a case, service order, or defect
Attempted solutions.
Resolved Cases, Service Orders and DefectsSolutions describe the ways you might be able to resolve the caller's problem. A solution can succeed or fail. When a solution resolves a case, service order, or defect, it is considered a resolution. Resolutions exist in the context of a case, service order, defect, or email only.
A resolved case is a case that's associated with a successful solution. A resolved case is not necessarily a closed case; the case status is independent of the solution status. You can use the Case Defaults page to set up a default status for resolved cases. If a default status exists, the system changes the status when you resolve the case.
Note. If no default exists, an agent must update the status manually. You can, however, close a case without a successful solution. You can do this if you have a solvable action that is related on the case; so a successful resolution isn't the only way to close a case.
On a service order the field service technician can record repair actions they have attempted and identify the actions that were successful. The system feeds the successful actions data to the solution database, so that a technician's repair actions become available to other technicians. The result of these solutions when added to the solution database is that new, more efficient and effective solutions become available to the entire work force
In PeopleSoft Quality Management, a technician can select a fix ID or search for and add a solution to indicate what they have done to resolve the customer's problem.
See Also
Defining Call Center Business Units and Display Template Options
Defining Business Units in PeopleSoft Integrated FieldService
Allowing Multiple Resolutions to Resolve a Case, Service Order, or DefectYou can use more than one solution to resolve a case, service order, or defect. If you use multiple solutions, more than one can have the status of successful.
To allow more than one successful resolution, you must configure it on the Business Unit setup pages for the applications you are implementing. For PeopleSoft FieldService, however, you do not need to configure the system to allow multiple resolutions.
Since you set up the system to close the case automatically when a solution is successful, PeopleSoft has made these modifications to this process:
The automatic closing of the case on the solution status field is a save event.
This enables the user to change the status on more than one resolution before the case, service order, or defect is closed.
The status field is editable even when the case is closed if the status is In Consideration or Failed, so the agent, technician, or manager can identify other solutions as successful. The system makes any resolution with the status of Successful read only
Note. This is only applicable when cases are configured to allow multiple resolutions; otherwise, the system makes all the statuses read only after the case is closed
Attempted SolutionsThis section discusses:
Potential solutions.
Methods for finding solutions.
Resolution statuses.
Resolution process.
Managing attempted solutions.
The Case page includes a Solutions Considered for this Case grid that lists all of the solutions that you've identified as potential solutions.

Solutions Considered for this Case grid
The Service Order page includes an Attempted Solutions grid that lists the solutions that may resolve the service order. The grid includes a relevance score for how well the solution matches the ability to solve the problem or complete the service, a description of the solution, and a link to the Solution Summary page.
The Quality Management page includes a Solutions Considered for this Defect grid that lists the solutions, solution IDs, date modified and status of all solutions that may resolve the defect or implement the enhancement.
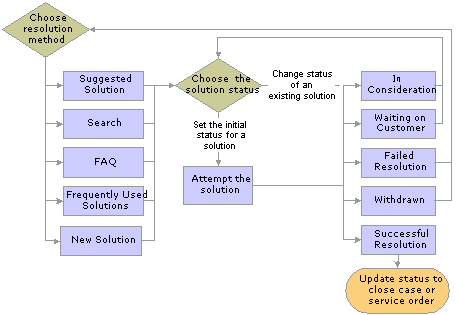
There are five ways to find and attempt potential solutions in the Attempted Solutions grid on the Solutions page for cases.
For service orders there are three ways to find and attempt potential solutions using the Attempted Solutions grid on the Solutions page.
For quality management there are two ways to find and attempt potential solutions using the Solutions Considered for this Defect grid on the Solutions page.
Note. When searching for solutions, expired solution do not show up in search result. When you expire a resolution, the user needs to create a new search collection instead of updating it to hide it from the search result.
This table describes the methods that are used to find and attempt solutions:
|
Page |
Tab |
Description |
|
Solution |
Suggested Solution Used for cases, service orders, and quality management. |
Select the solutions that will most likely resolve the problem and then click the Attempt button. The system adds the selected solutions into the Solutions Considered grid. From this tab you can choose to use the basic, advanced, or more search options modes when searching for solutions. |
|
Solution |
Search Used for cases, service orders, and quality management. |
Enter text to search for solutions that might relate to the case and then click the Search button. Select the solutions that are most likely to resolve the problem and then click the Attempt button. The system adds the selected solutions into the Solutions Considered grid. |
|
Solution |
FAQ Used for cases only. |
Select the library of frequently asked questions that are most likely to resolve the problem associated with the case. The system displays a list of solutions. Select a solution and then click the Attempt button. The system adds the selected solutions to the Solutions Considered grid. |
|
Solution |
Frequently Used Solution Used for cases only. |
Select the type of solutions that are most likely to resolve the problem associated with the case. The system displays a list of solutions. Select a solution and then click the Attempt button. The system adds the selected solutions to the Solutions Considered grid. |
|
Solution |
Enter New Solution Used for both cases and service orders. |
Enter text that describes the solution that you used to resolve the problem. Click the Attempt button. The system adds the selected solutions into the Solutions Considered grid. |
Each solution attempt is associated with one of these statuses:
In Consideration
You have not suggested this solution. The solution is in the list and is available when you're ready to try it.
Waiting on Customer
You have suggested this solution, but you don't know whether the solution worked.
Failed Resolution
The caller or technician attempted the solution, but the solution did not solve the problem.
Successful Resolution
The solution solved the problem. This status can only be associated with one solution in a case, or defect. Service orders allow more than one successful resolution. When you select this status for a solution, the Case, Service Order, or Quality Management page prevents you from considering additional solutions or updating the status of other solutions.
Note. Successful statuses can be applied to multiple solutions based on the way the business unit is set up. When a case is closed and multiple solutions are required, users can select other non-successful solutions as successful. When the case is reopened, however, successful resolutions are changed to failed resolutions.
Withdrawn
The solution should not have been associated with the case, service order, or defect and is to be disregarded in all solution-related metrics. Selecting Withdrawn does not remove the solution entirely. It informs the system that it shouldn't have been there in the first place. Withdrawn solutions are ignored in solution usage statistics and are not visible through self-service.
This graphic illustrates the resolution process for cases. For PeopleSoft FieldService successful resolutions do not change the status of the service order.
There are other methods of attempting a solution from a page other than the Case or Service Order page. You can launch a troubleshooting guide (a type of script) directly from the solution search grid or the Related Actions page. Or, if the case is a child of another case, you can set up active analytics frameworks (AAF) to cascade the successful resolution from the parent to the child.
Note. This is not applicable to service orders.
Once you've added solutions to the Attempted Solutions grid for the case, service order, or defect, you can do one of three things with the solutions:
Update the solution status.
View the solution details.
The Solutions grids show summary information about each solution. Click the summary text to display the Solution Details page. On the Solution Details page, you can see the full text of the solution, and you can add notes or attachments to the solution.
Email the solution.
Often the most efficient way to communicate a solution to a caller, manager, or technician is to send an email with the solution text. Attachments are not included in the email.
Solve the case, service order, or defect by selecting the solution and then click the Solve button. This changes the status to Successful Resolution.
View the text of the solution by selecting the solution and then click the View button.
Click the Add a New Note button to the right of the solution description to add notes to the solution.
Note. PeopleSoft Quality users can view solution details only. They cannot update solution statuses. They also cannot add resolution notes or attachments from the Solution Details page.
See Also
Setting Up Solution Management
Finding and Attempting SolutionsThis section provides an overview on solutions and discusses how to:
Use suggested solutions.
Search for solutions.
Use FAQs to search for solutions.
Use frequently used solutions.
Enter new solutions.
Email solutions.
Review details of attempted solutions.
View external content solutions.
Add resolution notes and attachments.
Understanding Solutions
This section discusses:
Suggested solutions.
Solution advisor searches.
FAQs.
Frequently used solutions.
New solution creation.
External content and Verity searching.
How external content works.
The Suggested Solutions tab is only available to customers who also purchase Banter, a third-party product. Banter's Natural Language Process (NLP) engine is used to suggest which solutions may solve the problem related to the case, service order, or defects.
When you select the Suggested Solutions tab, the system calls the NLP engine and passes input parameters resulting in the NLP engine returning a list of suggested solutions:
When a solution is identified as successful or failed, the system sends the information to NLP so that the NLP engine can learn which solutions are successful and which ones fail. This information is sent to NLP. Every time the user accesses the Suggested Solutions page, the NLP search automatically runs to take advantage of any changes that would affect the solutions suggested.
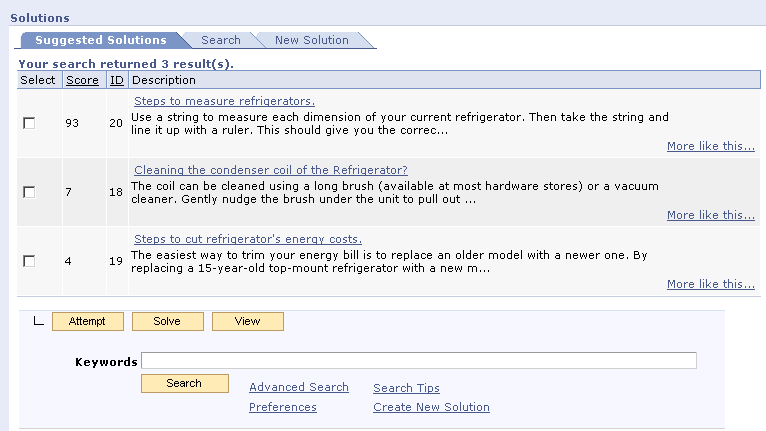
Suggested Solutions tab
The Suggested Solutions tab also displays the Verity basic search fields under the results grid. This is available so that if none of the suggested solutions apply, a user can search on a text string that they enter. When the user clicks the Search button, the Verity basic search runs and the user accesses the Search tab, where the system displays the search results.
You can also use the search functionality to search by solution ID. The user can enter the solution ID in the Keyword field and click search. The solutions appear in the results grid. If the customer has not purchased NLP, then the Suggested Solutions functionality is not available. The default tab delivered out of the box is the Search tab. (If NLP does not return any results, then the user is automatically directed to the Search tab).
See Setting Up Natural Language Processing.
The Solution page has three search modes: basic, advanced, and more search options:
Basic Search:
This is a Verity that looks at all objects in the search collection. The system ranks the search results by percentage according to how close the match is. It contains these characteristics:
Basic search is the default when the user selects the tab, unless the user has changed his preferences.
The value in the Search field automatically changes to the problem summary value if it is not set yet. Click the Search button to launch a Verity search against all domains in the search collection. Domains can include solutions, cases, fixes, defects, troubleshooting guides, internet sites, intranet sites and file servers.
Note. Click the Search button to launch a Verity search against all the domains that are defined in the user's preferences. There is additional logic that the system uses to display the search text on the Case page. The system first tries to pull information from the quick code, then from the previous search (the saved search), and then the problem summary.
When the system performs a search, the text is stored as a keywords that the next time the user opens the page, the previously used search text is automatically entered.
The system displays a message listing common or stop words that were not included in the search (examples are the, a, and, or and so on) above the search results, if they were set as a configuration option at the component level during implementation.
Advanced Search
Includes a series of text boxes used to perform a natural language internet-type search. Advance search gives you the ability to perform these types of searches:
With all the Words: Works like a logical AND. All of the words must be in the text for which you are searching
With the Exact Phrase: The exact phrase must appear in the text for which you are searching.
With any of the Words: Works like a logical OR. If any of the words in the search text appear, the system returns results.
Without the Words: None of the search text entered can appear in the text for which you are searching.
Rows to Display: Controls the number of rows in the search results grid.
Use Word Variations: Select one of the options to expand the search using different spellings of words or synonyms.
Note. These are additional search options available, but they are delivered as hidden out of the box: Words in a Sentence and Words in a Paragraph. You can enabled or disabled these options through user preferences options.
The FAQ tab displays a predefined list of solutions that the agent can choose from to resolve the case. If the FAQ check box is selected during implementation on the solution setup page, then the solution qualifies as an FAQ.
The View by Type field contains a list of libraries with associated solutions that have been identified as FAQ.
The results grid displays a list of the solutions that have been set up for the library selected. FAQs are sorted by the date and time that they were last modified on the solution so that the user sees the most up-to-date solutions first.
Note. This feature is only used for PeopleSoft call center applications (PeopleSoft HelpDesk, Support, and HelpDesk for Human Resources).
The Frequently Used Solution tab lists frequently used solutions by type: either All, Category/Type/Detail, Error, or Product.
Solutions are sorted based on their solved counts. For example, the solution that solved the most cases for the product on the current case would be first, and so on. This tab must be turned on when you are configuring the system during implementation.
Note. This feature is only used in PeopleSoft call center applications (PeopleSoft HelpDesk, Support and HelpDesk for Human Resources, and verticals).
If a user is unable to locate an existing solution, they can use the New Solution tab to enter a new solution. When the user enters a new solution and clicks the Attempt button, the system inserts the solution into the Attempted Solutions grid with the status of In Consideration. If they click the Solve button, the system inserts the solution in the grid with the status of Successful.
Note. The Attempt and Solve button are visible and applicable on all sections and tabs on the Solutions page, not just new solutions. This feature is not used in PeopleSoft Quality Management.
External Content and Verity Searching
Included in the Verity search options is external content searching using the intranet, internet and file servers. The system includes external link matches in the Verity search results, if you have enabled it during your implementation.
When external content solutions appear in the search results grid, the description includes a link that opens the external content in a new window. If the external content is a file, it opens in the appropriate application. The user can turn external search on or off by selecting or clearing the external content domain on the Advanced Search - More Search Options page.
When a user selects multiple items from the searching grid, it transfers the user to the Solution Detail page. If external content is selected, it displays as a link with a description. Users can navigate into the solution to see the details or click Attempt or Solve to solve the case, service order, or defect
Whenever a technician or agent uses external content to resolve a service order or case, the system creates a solution type of Link or File in the background to represent it. The next time an external content search is used and the same content is found and used, the system checks to see whether a solution already exists for it and uses the existing solution by matching the URL or FILE path in summary.
Here's how it works:
Verity indexes HTTP files and documents (Word docs, text files, PDF files, and so on) in addition to regular solutions in the database.
For example you can index PeopleSoft Planet Intranet and do keyword searches on those files.
When you search on external content (HTTP or File) and then click an item in the results set, the system opens a new browser with the actual external content using the URL in your browser; so if you index something on the Planet PeopleSoft website, it opens the page on the website; or it will open the actual PDF or Word document.
When you attempt one of the solutions using external content, the system create a solution behind the scenes and then attempts the solution to the case
When you attempt one of external content solutions, the system looks in the database to see if the external content has already been created as a solution.
It does this by comparing the URL of the external content to the existing solutions that were created from external content. If it has already been created, it uses the existing solution and attempts it. If it is the first time that user has attempted the external content solution and there is no existing solution for it, it creates a new solution and attempts it.
When you open an attempted solution that has external content on the attempted solutions grid, it opens the solution.
The system does not open the actual external content. This is different than step 2 where, if you click the external content solution from the search results grid, it opens the actual external content. In this case, it opens the solutions and displays is a link with the URL. If you click the URL, the system opens the actual external content.
Common Elements Used in This Section
|
Select |
Select the check box next to the solution that you want to either attempt, use as a solution, or view and then click the appropriate button that corresponds to the action that you want to take. |
|
Attempt |
Click this button to attempt the solution that you selected. The system adds the solution to the Solutions Considered grid for the service order, case or defect with the status of In Consideration. |
|
Solve |
Click this button to use the solution that you selected to resolve the issue. The system adds the solution to the Solutions Considered grid for the service order, case or defect with the status of Successful Resolution. |
|
View |
Click this button to view the solution that you selected. The system displays the Solution Details page. |
|
Search |
Click to search for solutions that match the search criteria or text that you entered. |
Pages Used to Find and Attempt Solutions
|
Page Name |
Object Name |
Navigation |
Usage |
|
Solutions |
|
Find and attempt solutions to resolve cases, service orders, and defects. |
|
|
Select a solution from the Solutions Considered grid and then click the Email button. |
Email solution information to customers or contacts. |
||
|
Click a solution summary on the Case page, Service Order page or Quality Management page. |
Review details of attempted solutions. |
||
|
Click a solution summary on the Case page, Service Order page or Quality Management page for a external content solution of type link or file |
View solution details. |
||
|
Click the Add Resolution Note or Attachment button on the Solutions Detail page (in attempted solutions mode). |
Add notes and attachments that are associated with a resolution. |
Using Suggested Solutions
Access the Solution - Suggested Solutions page.
Select the solution that you want to either attempt or that you have used to resolve the problem. To move the solution to the Solutions Considered grid, click either Attempt or Solve. The system assigns it an appropriate status.
To email the solution to a customer, employee or agent, select the solution in the Solutions Considered grid and click Email. The system displays the Email page or the Email Reply or Start New Thread page.
To view a solution, select it and then click View. The system displays the Solution Details page. You can also click the Summary link to open the solution detail. From there you can attempt, solve, and add notes to the solution.
|
|
Click the Add a New Note button to access the Resolution Notes page. The button changes slightly based on whether it is a note to an attempted resolution or a successful resolution. If there are no notes attached to the resolution, the system displays the Add a New Note button. If there are already notes attached to the resolution, the system displays the View Notes button. The Add a New Note button only shows up in the Attempted Solutions grid, not in the search results grid. |
Note. The system displays the Suggested Solution tab only if NLP (Banter) is installed. The Suggested Solutions tab is delivered as hidden out of the box. To enable this functionality access the Display Template page. If you are not an NLP customer you do not need to enable this functionality.
See Configuring Display Templates.
Searching for SolutionsAccess the Solution - Search page.
This page is a view of the Solution - Search page in the Advanced Search mode. There are additional search modes that you can access in addition to the Advanced Search mode. To access the Basic Search and More Options search pages, click the appropriate links. Information on using these search options is detailed in the Searching for Solutions section.
Using FAQs to Search for Solutions
Access the Solution - FAQ page.
|
Select the library that you want to use to search for solutions. Once you find a solution, select it and use the Attempt, Solve or View buttons to indicate the action that you want to take. To open the Resolution Details page, click the Summary link |
Using Frequently Used SolutionsAccess the Solution - Frequently Used Solutions page.
|
Type |
Select the type of solution that you want the system to use for the search. Once you find a solution, select it and then click the Attempt, Solve or View button to indicate the action that you want to take. To open the Resolution Details page, click the Summary link |
Entering New SolutionsAccess the Solutions - New Solution page.
Enter text describing the solution that you are either attempting or have used to resolve the problem. Click either the Attempt or the Solve button to send the solution to the Solutions Considered grid, where it is assigned a status of either In Consideration or Successful Resolution.
Emailing SolutionsAccess the Outbound Email page.
Use this page to email the text of a solution to the customer or contact for the case, service order, or defect.
Use the From and To fields to indicate who you are sending the email to and from whom ii is originating. Expand the Template Search section to select a category, type, product group, product, keywords, and template to use in the email you are sending.
You can also select a template from the Template field to add standard text that was set up at installation. To preview the text, click the Preview button. To add the text to the email, click the Apply Template button.
To add any disclaimer information that was set up when the application was installed, click the Add Closing button
To redraft the email, click the Restart Response button. The Clear Template Search button clears the Category, Type, Product, and Keywords fields.
Reviewing Details of Attempted Solutions
Access the Resolutions Details page.
Use the Resolutions Details page to view the details of a solution and to add resolution notes.
|
Datetime Added and Last Modified |
Displays the date when the solution was attempted and last modified. |
|
Add Resolution Note or Attachment |
Click to add a resolution note that is specific to this solution attempt. |
Resolution Notes
This group box appears with data only if the solution is associated with resolution notes.
|
Summary |
Click the note's summary link to display note details on the Resolution Notes page. |
Viewing External Content SolutionsAccess the Solution page.
The system displays this page when a user clicks a solution that uses external content. The solution type for external content solutions is either Link or File.
Whenever a technician or agent uses external content to resolve a service order or case, the system creates a solution type of Link or File in the background to represent it.
When external content solutions appear in the search results grid, the description includes a link that opens the external content in a new window. If the external content is a file, it opens in the appropriate application.
Adding Resolution Notes and AttachmentsAccess the Resolution Notes page.
Resolution notes created on this page are intermingled with notes on the Notes pages in PeopleSoft FieldService, PeopleSoft Support, PeopleSoft HelpDesk, and PeopleSoft HelpDesk for Human Resources.
PeopleSoft CRM provides a similar interface for working with notes and attachments across all the components that use this functionality. You can access resolution notes from the Solutions Considered grid, Attempted Solutions grid, and the Notes page.
See Also
Working with Notes and Attachments