 Understanding Cube Instance Definitions
This chapter provides an overview of cube instance definitions and discusses how to:
Build cube instances.
Build cubes.
Use API and command-line specifications.
Understanding Cube Instance Definitions
Cube Manager provides a powerful template feature that enables you to set up cube instance definitions for use and reuse when building and updating cubes. Having a cube instance definition simplifies your work in managing updates to the cube structure, loading and reloading data, and setting platform-specific options when you create the cube. Without the benefit of Cube Manager—and the Cube Instance Definition feature in particular—building or updating a cube would require tedious and error-prone steps.
Each cube instance definition is associated with a single physical cube. You typically have one cube instance definition for each cube. At times you might find having more than one useful. For example, you might have one cube instance definition for Cognos PowerPlay and one for Oracle Essbase.
Up to this chapter, everything that this PeopleBook has described for creating a cube is more or less generic, and does not require you to specify the platform (Cognos PowerPlay, Oracle Essbase, or Star Schema) that you will ultimately use. Thus, if you decide to switch platforms, the majority of your cube design remains unchanged. When building the cube instance definition, however, you must designate the specific platform for which you are creating the cube.
Building Cube Instances
This section discusses how to:
Build a cube instance definition.
Define cube settings and select dimensions, measures, and attributes.
Create the cube filter.
Define cube settings for Oracle Essbase.
Define cube settings for Cognos PowerPlay.
Add a prefix to field and record objects.
Note. The definition of a cube instance creates the link between the platform-independent definition of the cube and the actual physical storage mechanism of the cube. In essence, you set up a location that Cube Manager uses to create the cube that you have defined.
 Pages Used to Build Cube Instances
|
Page Name |
Definition Name |
Navigation |
Usage |
|
ANALYSIS_DB |
PeopleTools, Cube Builder, Cube Manager, Cube Instances Create a new cube instance or search for an existing one. |
Define cube settings (such as platform), and select dimensions, measures, and attributes to be included as cube instance definition components. |
|
|
CUBE_FILTER |
PeopleTools, Cube Builder, Cube Manager, Cube Instances Create a new cube instance or search for an existing one. On the Cube Inst Def page, select the Filter subtab, and click the Updt Filter (update filter) button. |
Create the cube filter for use on the Filters tab of the Cube Inst Def page. |
|
|
ANALYSIS_DB_ESS |
PeopleTools, Cube Builder, Cube Manager, Cube Instances Create a new cube instance or search for an existing one. On the Cube Inst Def page, select the Oracle Essbase option from the Platform list, and click the Platform Options link. |
Define cube settings specifically for Essbase. |
|
|
ANALYSIS_DB_PPL |
PeopleTools, Cube Builder, Cube Manager, Cube Instances Create a new cube instance or search for an existing one. On the Cube Inst Def page, select the Cognos PowerPlay option from the Platform list, and click the Platform Options link. |
Define cube settings specifically for Cognos PowerPlay. |
|
|
ANALYSIS_DB_SS |
PeopleTools, Cube Builder, Cube Manager, Cube Instances Create a new cube instance or search for an existing one. On the Cube Inst Def page, select the Generic Star Schema option from the Platform list, and click the Platform Options link. |
Identify the field and record objects generated by Cube Manager. |
Building a Cube Instance Definition
To build a cube instance definition:
Design the cube definition.
See Designing Cubes.
Select PeopleTools, Cube Builder, Cube Manager, Cube Instances.
Select the Add a New Value tab.
Enter a cube instance ID and click the Add button to define the cube platform and included components.
You must provide a unique name for each cube instance definition that you define. After you enter a cube instance ID, the Cube Inst Def page appears.
Enter a description and long description.
Specify the platform.
Specify the criteria for this cube instance definition: either a cube definition or an existing star schema-based cube instance.
Remove any dimensions or measures that you do not want to be created in this cube instance.
By default, Cube Manager adds all of the dimensions and measures to the cube instance definition. However, if you do not need them all, you can remove unwanted dimensions or measures by clicking the Remove (-) button to the right of the dimension name.
Click the Platform Options link to display platform-specific options, based on which platform you selected from the drop-down list box.
Which page appear depends on which platform you select. Platform options are:
Oracle Essbase
Cognos PowerPlay
Generic Star Schema
Defining Cube Settings and Selecting Dimensions, Measures, and Attributes
Access the Cube Inst Def page by selecting PeopleTools, Cube Builder, Cube Manager, Cube Instance.
Common Page Information
|
Cube Instance ID |
Enter a generic name to identify the cube instance. |
|
Description |
Enter a description to be used for prompting within Cube Manager only. This description is not passed to the resulting cube. |
|
Long Description |
Enter a description to be used for prompting within Cube Manager only. This description is not passed to the resulting cube. |
|
Platform |
Select one of the following options: Oracle Essbase, Cognos PowerPlay, or Generic Star Schema. |
|
Platform Options |
Click to access platform pages, where you can define cube settings for Essbase, Cognos PowerPlay, or star schema. See Defining Cube Settings for Oracle Essbase. |
|
Based On |
Select one of the following options: Cube Definition: Refers to the cube definition ID that you specified when designing your cube definition. Cube Instance: Refers to a physical star schema that was created based on a particular cube definition. The value is the cube definition ID that was used to create the actual star schema. You can use this schema to create smaller data marts based on a previously created star schema. |
|
|
Click the Open button to open the selected cube definition. |
Dimension Tab
|
Dimension ID |
Enter the name of the dimension or measure to include in the cube. |
|
Role |
Displays the role of the dimension, measure, or attribute. |
|
Dim Type (dimension type) |
Displays the dimension type that is specified on the Dimension page. |
|
Status |
Displays whether your dimension has been mapped. Note. If your dimension has not been mapped, you must map it before you can use the dimension in a cube. |
|
Sparsity |
Appears specific to Essbase and refers to the Essbase option page. |
Filter Tab
|
Updt Filter (update filter) |
|
|
Filter |
Indicates whether a filter has been created for this dimension. |
|
Label |
Indicates how the dimensions label appears in the results. |
Creating the Cube Filter
Use these steps to access the Cube Filter Criteria page:
Select PeopleTools, Cube Builder, Cube Manager, Cube Instance.
Create a new cube instance or search for an existing one.
Select the Filter subtab, and click the Updt Filter (update filter) button.
|
Member Value |
Enter the value for the criteria. If your source dimension has more information than you want to report, you can create a filter to eliminate selected information. For example, if you have data from the United States, United Kingdom, and Japan, but want to view only the data for Japan, create a Japan filter to eliminate the United States and United Kingdom data from the cube dimension. |
Defining Cube Settings for Oracle Essbase
Use these steps to access the Essbase Advanced Options page:
Select PeopleTools, Cube Builder, Cube Manager, Cube Instances.
Create a new cube instance or search for an existing one.
From the Cube Inst Def page, select the Oracle Essbase option from the Platform list.
Click the Platform Options link.
Oracle Essbase supports multicurrency cubes. An Oracle Essbase multicurrency cube contains two databases: the regular main database and the currency rate database. The currency rate database is created out of the main database.
Before you can generate the currency rate database from the main database, the main database must have the appropriate dimensions:
Accounts dimension contains items that you want to measure, such as profit and inventory, and makes Essbase built-in accounting functionality available.
Time dimension defines the time period for which you report and update data.
Country dimension contains data about where business activities take place.
You can also specify the currency partition dimension (or Currency Dimension) in the main database for the Essbase multicurrency cube. The currency partition dimension is for separating local currency members from a base currency that are defined in the application. If the base currency for analysis is U.S. dollars, the local currency members contain values that are based on the currency type of the region. The currency partition dimension is used only in the main database for currency conversion, using Essbase script or other tools.
The following steps outline what you specify for the account dimension and the country dimension, specifically for Essbase multicurrency cubes. You create attribute queries for the Account and Country dimensions, and specify the queries as an input source on the Rollup Inputs page.
To create a multicurrency cube in Essbase:
Select PeopleTools, Cube Builder, Cube Manager, Dimensions, Rollup Inputs.
Click the Field Map link for the appropriate input name.
Specify the currency category in your accounts dimension, for example P&L (for profit and loss).
Specify the currency name in your country dimension, for example $US.
Defining Cube Settings for Cognos PowerPlay
Use these steps to access the PowerPlay Options page:
Select PeopleTools, Cube Builder, Cube Manager, Cube Instances.
Create a new cube instance or search for an existing one.
From the Cube Inst Def page, select the Cognos PowerPlay option from the Platform list.
Click the Platform Options link.
Defining Cognos PowerPlay Cube Instance Definition Options
This diagram shows both the optional and the required steps that enable Cube Manager to build a Cognos PowerPlay cube.
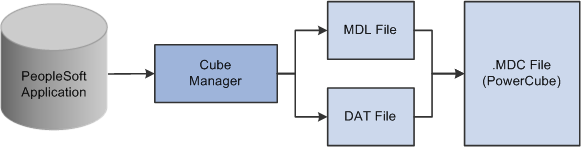
The .mdl and .dat files merge to create the PowerCube (.mdc file)
Note. Cube Manager and the enterprise server must be set up to run on the same machine.
To define Cognos PowerPlay cube instance definition options:
Select PeopleTools, Cube Builder, Cube Manager, Cube Instances.
Create a new cube instance or search for an existing one.
From the Cube Inst Def page, select the Cognos PowerPlay option from the Platform list.
Click the Platform Options link.
The PowerPlay Options page appears.
On the PowerPlay Options page, specify the file names to be created when the cube is built.
Enter the data working directory.
When building a PowerCube, Cube Manager sends output from each query used in the PowerCube to a flat data file before sending this data to the PowerCube (.mdc) file. This flat data file has a .dat extension, and is written to the data working directory that you specify.
Note. The data file created in the data working directory is not automatically deleted or overwritten when Cube Manager builds a PowerCube. You must manually delete the files.
If necessary, select a language override.
Click the OK button if you are not using the enterprise server; otherwise, continue to the next step.
Select the Enterprise Server option to use the enterprise server functionality.
The Cube Instance Definitions page appears.
Note. Cube Manager assumes that the enterprise server is running locally, and that it retrieves the local machine name from the system to connect to the enterprise server.
Cube Manager uses Ppadmtool.exe to communicate with the local enterprise server to add or remove cubes. Cube Manager first attempts to remove the cube from the enterprise server. If the cube already exists, Cube Manager removes the cube from the enterprise server. This action prevents other users from trying to access the cube through the enterprise server while Cube Manager is actually creating it. After removing the cube from the enterprise server, Cube Manager uses the transformer to generate the .mdc file.
If the cube is not listed in the enterprise server, Cube Manager uses the transformer to generate the .mdc file.
After creating the .mdc file, Cube Manager uses the Ppadmtool.exe to add the .mdc file to the enterprise server. After the cube has been added to the enterprise server, any user connected to it from a local or remote machine can view the newly added cube.
If you do not select the Enterprise Server option on the PowerPlay Options page, Cube Manager creates the cube by using the transformer.
Note. Cognos PowerPlay does not allow duplicate details in the same hierarchy, but it does allow duplicate details across hierarchies for the same dimension.
See Also
Adding a Prefix to Field and Record Objects
Use these steps to access the Star Schema Options page:
Select PeopleTools, Cube Builder, Cube Manager, Cube Instances.
Create a new cube instance or search for an existing one.
From the Cube Inst Def page, select the Generic Star Schema option from the Platform list.
Click the Platform Options link.
|
PeopleTools Object Name Prefix |
Enter the prefix to be applied to each record and field definition that is created by Cube Manager. The prefix provides some control over the record and field names. The default is DW_. |
Building Cubes
This section provides an overview of building cubes and discusses how to:
Define the cube build specifications and bind variables.
Define bind variables.
Define a cube build process using Process Scheduler Manager.
Run the process to build the cube.
Understanding Cube Creation
When you are ready to build a cube, you need a place to specify the runtime parameters to be passed during the creation or update of the data cube using Oracle PeopleSoft Process Scheduler. The Build Cube page in Cube Manager provides an example of how to pass this information from a PeopleSoft page to the resulting cube by using a PeopleSoft Process Scheduler run control. Most likely, you are building cubes using pages that were either supplied with your PeopleSoft applications or pages that you have built yourself.
You can configure the process in which a cube is built by creating your own run control pages and process definitions using the Cube Manager process type. Certain PeopleSoft applications deliver their own pages for building cubes that leverage product-specific metadata.
Note. If you are building an Essbase cube and it contains time, account, and country dimension types, Cube Manager automatically builds a currency cube, if one is defined. The calculation for the currency cube always has a default value of Division.
Note. After you have built an Essbase cube, Oracle does not support your changing the dimension name by changing the cube instance definition. The work-around is to access Essbase and manually change the dimension name to match the one in the cube instance. Another option is to re-create the cube with the Metadata Create and Data Create options.
Pages Used to Build Cubes|
Page Name |
Definition Name |
Navigation |
Usage |
|
RUN_MAKE_ANL_DB |
PeopleTools, Cube Builder, Cube Manager, Build Cubes |
Define the cube build specifications and bind variables. |
|
|
CUBE_BUILD_BIND |
PeopleTools, Cube Builder, Cube Manager, Build Cubes Create a new run control ID or search for an existing one. Select the Bind Variables tab. |
Define bind variables that limit the data that is used to build a cube by prompting users for information when they start the build process. |
|
|
GL_OLAP_LED_REQ |
Financial Application, Build Ledger Cubes |
Run the background process that creates ledger cubes. |
|
|
PRCSDEFN |
PeopleTools, Process Scheduler, Processes |
Define a cube build process request to run on the system. |
|
|
PRCSRQSTDLG |
PeopleTools, Cube Builder, Cube Manager, Build Cubes Create a new run control ID or search for an existing one. Enter the appropriate value in the Build Cube page, and click the Run button. |
Run the process that builds the cube. |
Defining the Cube Build Specifications and Bind Variables
Access the Build Cube page by selecting PeopleTools, Cube Builder, Cube Manager, Build Cubes.
|
|
Click the Open Cube Instance Definition icon to access the Cube Inst Def page, where you can view the cube instance definition with the instance definition that you specify. See Defining Cube Settings and Selecting Dimensions, Measures, and Attributes. |
|
Meta-Data |
Select an option from the following options: Create: Create the cube. If the cube already exists, Cube Manager re-creates it, overwriting any existing dimensions and data. Update: This option updates the metadata in Generic Star and the structure of the cube according to the setting for the Meta-Data Update Action field on the Cube Instance Definition page in Essbase. It has a same effect as Create in Cognos PowerPlay. None: Do not make any changes to the structure of the cube or its individual dimensions. (You may want to update the data only.) |
|
Data |
Define the data action to take place when you update the cube: Create: Reload the data and overwrite any existing data. Update: Update the existing data in the cube. This option is linked to the Data Update Action option that is selected on the Cube Instance Definition page of Essbase. None: Do not make any changes to the data in the cube. (You may want to update the structure only.) |
|
Aggregation |
Select one of the following options: Create: Reload the aggregates and overwrite any existing data. None: Do not make any changes to the aggregates in the cube. (You may want to update the structure only.) |
|
Business Unit |
Enables you to get the appropriate setIDs for tree metadata. Leave this field blank if your trees do not use set IDs. |
|
As of Date |
Enables you to get the appropriate effective dates for tree metadata. |
|
Bookmark |
Bookmarks identify a set of facts in the Generic Star Schema cube. These facts are used to determine whether facts are loaded for the first time or reloaded. The first time that you create a build cube definition, the bookmark is set to Initial. You can also add a build script. |
|
Script |
Refers to platform-specific, post-build scripts, such as the .mdl file for Cognos PowerPlay or any command line for Windows. This feature enables you to extend the capabilities of Cube Manager. For example, you can specify an Esscmnd script that sets up security. Then, rather than having to configure security manually every time that you build a cube, you can write a script once and specify it in the Script field to carry it out for each build. |
|
Report Manager |
|
|
Process Monitor |
|
|
Run |
Click to display the Process Scheduler Request page. |
Build the cube instance definition.
Select PeopleTools, Cube Builder, Cube Manager, Build Cubes.
If you add a new cube definition, enter a run control ID and click the Add button.
Alternatively, if you update and display an existing cube definition, click the OK button.
In the Cube Specification section of the Build Cube page, select a cube instance ID.
Define the run control information in the Run Time Parameters section.
Note. If you specified the default calculation script on the Cube Instance Definition page of Essbase, the default calculation script runs first. The command line is then invoked to run a subsequent script.
Define the metadata action that should occur during the build.
Define the data action that you want to occur during the build.
Define the aggregate action that you want to occur during the build.
Set your Process Scheduler parameters and save the page.
See Enterprise PeopleTools 8.50 PeopleBook: PeopleSoft Process Scheduler.
Note. When working in a three-tier environment, you must build your cubes on a Windows Process Scheduler server, not on the client.
Defining Bind Variables
Use these steps to access the Bind Variables page:
Select PeopleTools, Cube Builder, Cube Manager, Build Cubes.
Create a new run control ID or search for an existing one.
Select the Bind Variables tab.
To use dynamic queries , you must create a query that joins the run control with the desired record and joins the operator ID and the run control ID.
You can make any Cube Manager query—dimension query, data source query, or attribute query—dynamic by joining in runtime parameters. The parameter value must be stored in the database on a Cube Manager run control record or on a record to which the run control record can join. Then, in PeopleSoft Query, join the run control record and set prompts for the operator ID and the run control ID. These prompts are completed at runtime with the operator ID and run control ID of the run control that is used to launch the Cube Manager process. The Description and Bind Value fields on the sample Build Cube run control page provide one way to join the parameters.
To add bind variables to a run control page:
Identify the run control record that is used to launch the Cube Manager process.
If the sample Build Cube page is delivered in the PeopleTools Demo database (PTDMO), this record is MAKE_ANL_DB_REQ.
Identify the fields that you want to use for parameters for runtime queries.
For example, values for From and To for time periods.
Ensure that the fields identified in the previous step are available on the run control record, or that they are on a record that can be joined with the run control record.
Ensure that these same fields are available on a page so that users can enter values for them.
If these fields exist on the run control record, they most likely also exist on the run control page.
In PeopleSoft Query, join the records that contain the fields mentioned previously to the query that you want to make dynamic.
For example, assume that you want to bind in values for the From and To periods and that these fields exist on the run control record. In the data source query, join the From and To periods on the run control record to the From and To fields in the main data record (the primary record in the query that contains the data that you want to return).
See Joining Records.
In PeopleSoft Query, set up prompts for the operator ID (first) and the run control ID (second).
Instead of prompting for these values at runtime, Cube Manager automatically supplies the bind values that the user entered on the run control page.
Open the Bind Variables page by selecting the Bind Variables tab in the Build Cubes component.
Alternatively, select PeopleTools, Cube Builder, Cube Manager, Build Cubes, Build Cube; enter a cube instance ID; and select the Bind Variables tab.
Add variables and save your changes.
Enter a short text description and give value of the variable.
See Also
Oracle PeopleSoft 9.1 PeopleBook: General Ledger
Defining a Cube Build Process Using Process Scheduler Manager
Access the Process Definition page by selecting PeopleTools, Process Scheduler, Processes.
This is an example of the Process Definition page:
Running the Process to Build the Cube
Use these steps to access the Process Scheduler Request (PRCSRQSTDLG) page:
Select PeopleTools, Cube Builder, Cube Manager, Build Cubes.
Add a new run control ID or search for an existing one.
Enter the appropriate values in the Build Cube page, and click the Run button.
|
Server Name |
Select the name of the server on which you want the process to run. Note. PSNT is a Microsoft Windows server. Cube Manager runs only on a Windows server. |
|
Recurrence |
Select the recurring time intervals for a process request to run. Select either Daily Purge or M-F at 5pm. See Enterprise PeopleTools 8.50 PeopleBook: PeopleSoft Process Scheduler. |
|
Time Zone |
Select the time zone in which your process runs. For example, you could be in Eastern Standard Time (EST) and schedule a process to run in Pacific Standard Time (PST). |
|
Run Date |
Select the date on which your process runs. |
|
Run Time |
Select the time when your process runs. |
|
Reset to Current Date/Time |
Click to set the run date and runtime to the present date and time. |
|
Select |
Specify the cube to be built. If you select this option, the process is included in the build process. |
|
Description |
Displays a description that uniquely identifies the process. |
|
Process Name |
Displays the name of the process as it appears in the definition. |
|
Type |
Select the type of output. Select None. |
|
Format |
Select the format of the output. Select None. |
|
|
Click the Distribution button to view a list of people who have the correct security to receive the output of this process. |
|
OK |
Click to run the process. |
Using API and Command-line SpecificationsPSOLAP (PeopleSoft Online analytical processor) can be run from the Process Scheduler component or from the command line.
This table lists the parameters that PSOLAP uses when PSOLAP runs from the command line:
|
Parameter |
Description |
|
A |
Cube Name. |
|
B |
Business Unit (for example, B -US008). |
|
R |
RUN Control. |
|
I |
Process Instance ID number (for example, I42) usually passed by process scheduler. |
|
m |
Metadata action.
For example, -mC. |
|
D |
Data Action.
|
|
CT |
Database type (for example, -CTORACLE). |
|
CD |
Database name (for example, -CDPT820RC1). |
|
CO |
Operator ID (for example, -COPTDMO). |
|
CP |
Password (for example, -CPPTDMO). |
|
t |
As of date (for example, -t1997-07-21). |
|
L |
Trace level (for example, L31). |
|
X |
Action.
|
|
Y |
This string contains the single factory or the single dimension that is specified in the X parameter. This string is not valid if X=C (Complete). |
Example: By setting the following command line, you cause the processing for dimension DEPARTMENT-FIN to be executed:
PSOLAP  -CX -CTORACLE -CDPT820RC1 -COVP1 -CPVP1 -I279 -RTEST_SAN_GLACCT_CII -aFIN_
GLACCT_CII -mC -dR -b SHARE -kINITIAL -t2001-03-01 -s -X D -Y "DEPARTMENT-FIN"
Logging
You can pass the log level with the L option to the command line of psolap.exe; for example, L2 or L6, and so on.
This table lists the log level and what is recorded in each log level:
|
Log Level |
What is recorded |
|
1 |
Basic logging |
|
2 |
Detail logging |
|
4 |
Dimension member logging |
|
8 |
Fact map logging |
|
16 |
API logging |
For example, to obtain the Basic, Detail, Member, and Fact map logging in the Parameter List field on the Type Definition panel, we specified –L15, where 15 = 1 (Basic) + 2 (Detail) + 4 (Member) + 8 (Fact):
psolap.exe -CX -CTMICROSFT -CDPT820RC1 -COPTDMO -CPPTDMO -I42 -REMPLOYMENT -a
EMPLOYMENT -mC -dR -b -kINI IAL -t1997-07-21 -s -L31

psolap.exe -CX -CTMICROSFT -CDPT820RC1 -COPTDMO -CPPTDMO -I42 -REMPLOYMENT -a
EMPLOYMENT -mC -dR -b -kINITIAL -t1997-07-21 -s -L31

PSOLAP.EXE -CX -CTMICROSFT -CDPT820RC1 -COPTDMO -CPPTDMO -A EMPLOYMENT -I43 -B  -
L31 -X F -Y "OLAP_EMP_DATA_QRY" -t1997-07-21
See Also