 Designing a Cube
This chapter discusses how to:
Design a cube.
Design cube definitions.
Design attribute names.
Designing a CubeThis section discusses how to:
Define the dimensional structures of the cube.
Define dimension options.
Define rollup options.
Specify the source of the metadata for each rollup.
Map fields to a role in the rollup.
 Pages Used to Design a Cube
|
Page Name |
Definition Name |
Navigation |
Usage |
|
DIMENSION |
PeopleTools, Cube Builder, Cube Manager, Dimensions |
Define the structure of each dimension, and define the PowerPlay time dimension. |
|
|
DIM_OPTIONS |
|
Name blank members of a hierarchy so that you can see them in your cube. |
|
|
DIM_ROLLUP_OPTIONS |
|
Name blank members of a hierarchy so that you can see them in your cube. |
|
|
DIM_ROLLUP_INPUTS |
PeopleTools, Cube Builder, Cube Manager, Dimensions Add a new dimension or search for an existing one. Select the Rollup Inputs tab. |
Define the source of the metadata for each rollup. |
|
|
DIM_INPUT_FLD |
PeopleTools, Cube Builder, Cube Manager, Dimensions Add a new dimension or search for an existing one. Select the Rollup Inputs tab, and then click the Field Map link on the Rollup Inputs page. |
Map the fields to a role in the rollup. |
Defining the Dimensional Structures of the CubeTo define the dimensional structures of the cube:
Select PeopleTools, Cube Builder, Cube Manager, Dimensions.
Create a new dimension, or search for an existing one.
The Dimension page appears.
The structure of a dimension is based on a PeopleSoft tree that you build, but dimensions can also be based on queries. You must create one dimension definition for each dimension of your cube.
Because dimensions are independent of cubes, you can use them in any number of cube definitions. Where possible, such as in star schemas, Cube Manager creates dimensions that can be shared across conforming dimensions (unless the underlying data relies on different business units). This method ensures consistent results across different data marts.
To design a dimension:
Select PeopleTools, Cube Builder, Cube Manager, Dimensions to access the Dimension page.
Select the Add a New Value tab.
Enter a value for the Dimension/Measure/Attribute field, and click the Add button.
You must provide a unique name for each dimension that you define. The dimension ID uniquely identifies the dimension of the target OLAP database. After you enter a dimension ID, the Dimension page appears.
Warning! After you create and save a dimension ID, you cannot rename or delete it. You can change the description, but you cannot remove the ID from the system.
Enter a description and specify the dimension type.
Set additional parameters for the dimension by clicking the Dimension Options link.
The Dimension Options page appears.
Enter the dimension options, and click the OK button.
Define the rollups for the dimension.
Define the level name or names.
Define additional rollup parameters by clicking the Rollup Options link.
The Rollup Options page appears.
Define the sources of the rollup structure and attributes by selecting the Rollup Inputs tab.
The Rollup Inputs page appears.
Note. The Rollups section on the Dimension page determines which rollup appears on the Rollup Inputs page.
Defining PowerPlay Time Dimensions
For a PowerPlay time dimension, you do not need to set a tree or query as an input source. Instead, you must perform the following tasks:
Identify the dimension as time.
Define the levels.
Set the corresponding date formats and date functions on the Dimension page.
Select the earliest date and latest date for the time dimension by using the Cognos PowerPlay options.
See Defining Cube Settings for Cognos PowerPlay.
See your Cognos PowerPlay Transformer documentation.
If you are creating a time dimension specifically for another platform, you should build the dimension as you would any other dimension, ignoring the Date Function and Format columns on the Dimension page. If you create a dimension that has both input source and the Cognos PowerPlay options, you can use it on any platform. Cube Manager ignores the unnecessary information for the specific platform and uses only what is required on that platform.
To define a PowerPlay time dimension:
Select PeopleTools, Cube Builder, Cube Manager, Dimensions.
Add a new dimension or search for an existing one.
On the Dimension page, specify Time as the dimension type.
This value also sets the DimType in the .mdl file to Date when the cube is finally built, enabling the cube to use the Cognos PowerPlay date wizard.
Note. When building PowerPlay time dimensions, you are not required to complete the fields on the Dimensions - Rollup Inputs page or the Rollup Options page (prefix and suffix information for node and details). However, to build a time definition for a platform-independent cube, you should still specify them. Cube Manager ignores the input source while building a Cognos PowerPlay cube, even if you specify the source.
Identify each level name with a date function.
When you create a Cognos PowerPlay cube, the levels in the hierarchy must be identified by one of the following date functions. The cube build process ignores this information if the cube is intended for another platform.
Note. Do not combine lunar calendar and standard calendar in the Date Function column when setting levels. To use both calendars, create two different time dimensions—one for the lunar calendar and one for the standard calendar.
Date functions include:
None
Year
LunarYear
Quarter
LunarQuarter
Month
LunarMonth
LunarMonth445
LunarMonth454
LunarMonth544
Week
Day
Identify each level name with a date format.
Specify the format—in which you want to see a year, quarter, month, and so on—from the following available formats:
|
Format |
Description |
Comments |
|
YY |
Two-digit year |
01 |
|
YYYY |
Four-digit year |
2001 |
|
Q |
One-digit quarter indicator |
1 |
|
MM |
Two-digit month |
01 |
|
MMM |
Abbreviated month name |
Jan |
|
MMMM |
Full name of month |
January |
|
DD |
Two-digit day |
01 |
|
DDDD |
Day of week |
Sunday |
|
/, –, or space character |
Separator characters |
01/01/2001, 01-01-2001 |
|
Any quoted string |
The quoted string |
AD displays the abbreviation AD |
Select the earliest and latest date options on the Cognos PowerPlay Options page.
These settings are optional. The default values are 1901-01-01 for Earliest Date and 2100-12-31 for Latest Date. The Current Date option is controlled by settings in Cognos PowerPlay. The As of Date option instructs the system to use the as of date that is specified on the run control page.
Set up a fact query to return the lowest level of detail.
Defining Dimension Options
Use these steps to access the Dimension Options page:
Select PeopleTools, Cube Builder, Cube Manager, Dimensions.
Add a new dimension or search for an existing one.
Click the Dimension Options link on the Dimension page.
Alternatively, select the Rollup Inputs tab, and then click the Dimension Options link on the Rollup Inputs page.
Not all data in the cube is associated with every dimension. For example, some data might be related to an account, but not to a product. In that case, the product dimension has blank members for that data . This means that an additional implied valid value of the product dimension exists that might not be on the product tree—blank (or No Product). You must provide a name to this blank member and make sure that it is on your dimension hierarchy because every valid member of a dimension must have a unique, nonblank name.
You can either add the unique, nonblank name to your tree or query and then specify it in the Dimension Options page, or just enter a name and let the Cube Manager add it to your dimension for you. Then, when the Cube Manager is building the cube, it creates a new node directly off the top node of the dimension with the blank member name that you specify. All blank members are grouped under this node name for this dimension. However, the name of the blank member does not accumulate cube data into a single-dimension member.
|
Blank Member |
The default name is based on the dimension name. Enter a name for each dimension that might have data that is not already associated with a named hierarchy. The default value is a name based on the dimension name that you create. Change this name if necessary. However, remember that different dimensions within a single cube must have unique names for blank members. Thus, if a cube has a Department dimension and a Product dimension, and both of these dimensions have blank members, the blank member names must be different—for example, [No DEPARTMENT] and [No PRODUCT]. Some dimensions, such as the Time dimension, may not have blank members. If you are sure that a dimension falls into this category, you can delete the default blank member value and leave the field blank. If you do this and a blank member is found in the dimension, it is excluded from the dimension. Note. Your blank member name can match a node or detail value elsewhere in the cube structure. This enables you to insert blank members at a level other than directly below the current dimension. |
|
This is a required field. The default value is None. Both Oracle Essbase and Cognos PowerPlay require unique member names and labels. You can apply a unique prefix or suffix to each member label to fulfill this requirement. To do so, select either the Prefix or Suffix option from the Label Prefix/Suffix drop-down list box. To bypass this option, select the None option. |
Defining Rollup Options
Use these steps to access the Rollup Options page:
Select PeopleTools, Cube Builder, Cube Manager, Dimensions.
Add a new dimension or search for an existing one.
Click the Rollup Options link on the Dimension page.
Alternatively, select the Rollup Inputs tab, and then click the Rollup Options link on the Rollup Inputs page.
Specifying the Source of the Metadata for Each Rollup
Use these steps to access the Rollup Inputs page:
Select PeopleTools, Cube Builder, Cube Manager, Dimensions.
Add a new dimension or search for an existing one.
Select the Rollup Inputs tab.
Defining the Levels from Top Example
Use the following example for calculating the number of levels from top:
|
Definition |
Description |
|
Source Input |
QE_PERS_DATA tree |
|
Top Node |
10100 Office of President |
|
Top Node Level |
Company |
|
Stop Level |
Department |
This is an example of Top Node Level:
![]()
Top Node Level
The Stop Level is Department, so the system calculates the Levels From Top value by counting the number of levels from Company (1) to Department. Using the following list of levels, the system calculates the Levels From Top value as three.
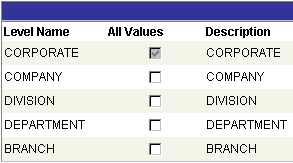
Example of organization levels for calculating Levels from Top
After you have defined the high-level dimensional metadata (identifying the dimension name, defining the number of different rollups, defining prefix and suffix options, and so on), you define the source of each rollup’s metadata.
If multiple rollups exist for an Essbase dimension, only the total from the first rollup for the dimension is aggregated to the dimension total.
Note. Rollup level names that you enter on the Rollup Inputs page appear in an Essbase cube only if the cube contains a dimension with a multiple rollup. Rollup level names are always used in Cognos PowerPlay.
To add rollup inputs:
Select PeopleTools, Cube Builder, Cube Manager, Dimensions.
Add a new dimension or search for an existing one.
Select the Rollup Inputs tab.
The Rollup Inputs page appears.
Define cube inputs, such as queries or trees, and their associated field mappings.
In the Src Type field, select the source input.
In the Input Name field, click the Lookup button to display and select from the valid values.
If you selected the Tree option as the source type, specify a value for the Top Node field by clicking the Lookup button and specifying a valid value.
If you selected the Tree option as the source type, select a value for the Levels from Top field by clicking the Lookup button and selecting a valid value from the list.
If you selected the Query option as the source type, define how each field in the result set is used in the rollup.
Mapping Fields to a Role in the Rollup
Use these steps to access the Dim Input Field (Dimension Input Field) page:
Select PeopleTools, Cube Builder, Cube Manager, Dimensions.
Add a new dimension or search for an existing one.
Select the Rollup Inputs tab.
Click the Field Map link on the Rollup Inputs page.
The Dim Input Field page appears.
Now that you have created the high-level rollup information, you must map each of the fields in the query-based rollup inputs to a role.
To define the fields that you want to map from the input to the cube:
Select PeopleTools, Cube Builder, Cube Manager, Dimensions.
Add a new dimension or search for an existing one.
Select the Rollup Inputs tab.
Click the Field Map link on the Rollup Inputs page.
The Dim Input Field page appears with the source query fields already completed.
In the Input Field Map section, specify the fields, roles, levels, and attributes of the cube dimension.
Note. Use unique attribute names when configuring a dimension with multiple attributes. If you duplicate a name, Cube Manager populates only the first instance.
Click the OK button to save your changes.
Alternatively, click the Cancel button to exit the page without saving changes.
Designing Cube Definitions
This section discusses how to:
Map data sources to dimensions and select dimensions for the cube.
Add cube inputs to a cube definition.
Map source query fields to cube components.
Pages Used to Design Cube Definitions|
Page Name |
Definition Name |
Navigation |
Usage |
|
CUBE_DEF |
PeopleTools, Cube Builder, Cube Manager, Cube Definitions |
Map data sources to any dimension that you have defined using the Dimension page, and select which dimensions to use in the cube. |
|
|
CUBE_DEF_INPUTS |
PeopleTools, Cube Builder, Cube Manager, Cube Definitions Select the Cube Inputs tab. |
Add cube inputs to your cube definition. |
|
|
CUBE_INPUT_FLD |
PeopleTools, Cube Builder, Cube Manager, Cube Definitions Select the Cube Inputs tab. Click the Field Map button on the Cube Inputs page. |
Map the fields of the source query to the appropriate cube components to associate the data from the source query with a dimension. The cube inputs are the source values for the facts to be created in the OLAP database. |
Mapping Data Sources to Dimensions and Selecting Dimensions for the
Cube
Access the Cube Definition page by selecting PeopleTools, Cube Builder, Cube Manager, Cube Definitions.
After creating data source queries and defining the dimensions, you must define a cube definition by mapping fields from the data source queries to the dimensions you have defined. For each dimension, you must specify which field in the data source query is the source field for the dimension. You must define the dimensions, measures, and attributes that Cube Manager uses to pull data into the cube that you are defining. When you define a component, its dimension and rollup types appear, as well as the mapped status.
To design a cube definition:
Select PeopleTools, Cube Builder, Cube Manager, Cube Definitions.
Select the Add a New Value tab.
Enter a cube definition ID, and click the Add button.
Provide a unique name for each cube definition that you define. After you enter a cube definition ID, the Cube Definition page appears.
Enter a description and a long description for the cube definition.
In the Components section, define the role of the cube definition—Cube Attribute, Dimension, or Measure.
Specify a dimension, measure, or attribute to be used in the cube.
Because you can reuse the same dimension for various cubes, you can rename dimensions for use with this particular cube definition. By default, the label that you enter here corresponds to the name of the dimension that you have specified and is used as the dimension’s alias or label in the resulting cube. You might want to put the word ALL in front of the dimension name—ALL PRODUCTS, ALL REGIONS, and so on.
The number to the left of the Role column determines the order in which the dimensions and measures appear to the user in the OLAP tool. When you add dimensions and measures, this number increments automatically.
Click the Add button to add additional dimensions and measures.
For each additional dimension or measure, repeat the previous two steps.
Click the Save button to save your cube definition and all of the components that you have added.
Saving your new cube definition at this stage is important so that you can effectively add cube inputs.
Adding Cube Inputs to a Cube Definition
Use these steps to access the Cube Inputs page:
Select PeopleTools, Cube Builder, Cube Manager, Cube Definitions.
Add a new cube definition or search for an existing one.
Select the Cube Inputs tab.
|
Input Name |
Add the name of inputs by selecting one value from the list of valid values. Click the Add button to insert new rows for additional input names. Specify as many input sources as you want; however, you must completely map all of them to save the cube definition. |
|
Field Map |
Click to view how each field in the fact source data is mapped to a dimension. |
|
Mapped |
The system automatically selects the Mapped option after you map source query using the Cube Input Field page. This option indicates whether fields have been mapped for this cube input. |
Mapping Source Query Fields to Cube Components
Use these steps to access the Cube Input Field page:
Select PeopleTools, Cube Builder, Cube Manager, Cube Definitions.
Add a new cube definition or search for an existing one.
Select the Cube Inputs tab.
Click the Field Map button on the Cube Inputs page.
|
Query Fld Name (query field name) |
This field is populated with data from the Cube Inputs page. |
|
Dimension/Measure/Attribute |
Specify the dimension, measure, or attribute to which you want to map the corresponding source field. |
|
Role |
Indicates whether a field has been mapped to a dimension, measure, or attribute. |
|
OK |
Click to save your changes. The system automatically selects the Mapped option on the Cube Inputs page. The Mapped option indicates whether fields have been mapped for this cube input. |
Designing Attribute Names
You can specify member attributes by using the Attribute Name page. This feature enables you to specify user-defined attributes for members. Users can also set these attributes in Oracle Essbase and Star Schema platforms. You can then use calculation scripts to search for and manipulate members with particular user-defined attribute values. PeopleSoft workbenches use calculation scripts extensively.
See Also
Specifying User-Defined Attributes for Members
Access the Attribute Name page (OLAP_ATTRIB_NAM) by selecting PeopleTools, Cube Builder, Cube Manager, Attribute Definitions.
|
Attribute Number |
If you are working with large numbers of attributes, this field enables you to group the attributes into more manageable categories. For example, you might want to list human resource attributes in the 100–300 range, and finance attributes in the 400–600 range. The attribute number is not used anywhere else in the system. |
|
Attribute Name |
Enter a descriptive name for the attribute. |