
 Understanding Mobile Application Elements
This chapter provides overviews of mobile application elements and time zones and date formats and discusses how to:
Build mobile pages.
Define content appearance and characteristics.
Display prompts.
Use dynamic enumerations.
Use the time picker and calendar prompts.
Register mobile pages.
Maintain security.
Understanding Mobile Application ElementsEvery mobile application is made up of mobile pages, as well as the PeopleCode programs that filter the data or set synchronization rules or business rules. Mobile pages are based on synchronizable component interfaces.
This section discusses:
Navigation menus.
List views.
Detail views.
See Also
Navigation MenuAll mobile applications that have been downloaded to a mobile device appear in a single navigation menu. In addition, some common menu items, such as Synchronization, are also listed, as shown in the following illustration:

You enter the application names that appear in the navigation menu when you register the mobile page (the content reference label). You also enter the pop-up window that appears when the user places the cursor over the menu item (the long description).
All items in the navigation menu are links to list view pages. From a list view page, the user can navigate to a detail view page.
List ViewsList view pages are created from the top level of a component interface (level zero), or from a collection in a component interface. A list view can also be thought of as a search page.
Each instance of a component interface has a level-zero row. Each of these instances is displayed on a list view page generated from the top level of a component interface.
The following list view page has two instances of data. It is created from level zero of the component interface (the top level of the mobile page):
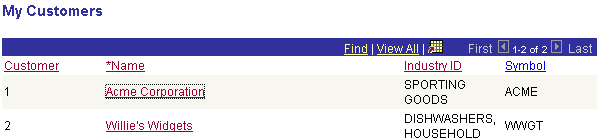
My Customers mobile list view page
The properties (fields) that make up the list view page include:
You specify the layout of the list view for the mobile page in PeopleSoft Application Designer. All content properties that are specified as list box items appear in the list view.
A list view that is generated from a collection (level one, level two, and so on) in a component interface is made up of the following:
Information from the collection.
Instances of data in that collection.
The following is an example of a list view generated from a collection, with two instances of data:
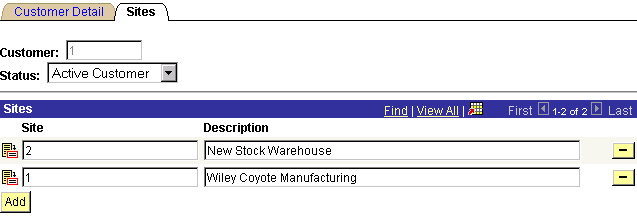
Sites list view page created from component interface collection
You can change the instances of data that appear on a list view page created from a collection. You can also add instances of data.
All properties, as well as any keys, that are specified as read-only on the underlying synchronizable component interface are automatically set as read-only on the mobile page, and cannot be changed to read-write. In the previous example, the Customer field is the key and is not available to the user.
The list view header sits on top of a list view and allows the user to navigate to the next group of items in a list view, view all items, or go to the last group of items in a list view. A new option has been added to the Mobile Page Collections Property dialog box enabling developers to hide the list view header on a mobile page for usability purposes. To hide the list view header, select Suppress List Header.
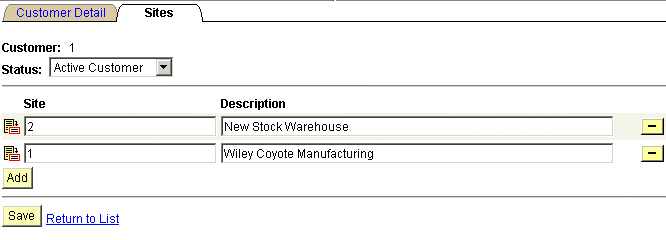
Sites list view page with list view header suppressed
Detail ViewsDetail view pages are created from the content properties (fields) in a mobile page. Where and how a property appears on a page is determined by the content properties page for that property.
In the following detail view, the value in the customer ID is not available to the user. It is the level-zero key and cannot be changed.
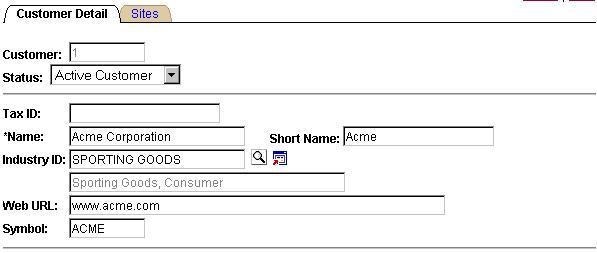
Customer Detail detail view page
A prompt button and detail button appear next to the Industry ID field. This field is defined as a reference property in the underlying synchronizable component interface in PeopleSoft Application Designer.
If you click the prompt button, a list view of a different component interfaces appears. The list view is generated by the level-zero data from a new component interface, as shown in the following example:
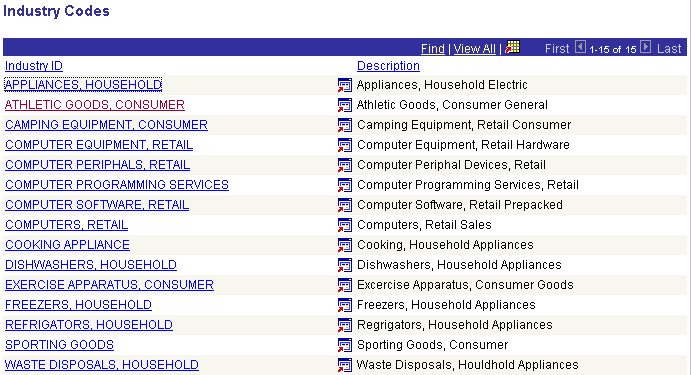
Industry Codes list view page
If you click the detail button, a different component interface, the one specified by the reference property, appears, as shown in the following example:
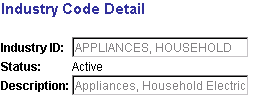
Industry Code Detail page
Understanding Time Zones and Date FormatsFrom the perspective of the server, each database stores time and datetime data according to the base time of the database. When rendered on a page, the time or datetime data is either displayed in the database’s base time or converted to a user time or specified time, as defined in the record definition.
PeopleSoft Mobile Agent displays time and datetime data on the device similarly, but must account for the possibility that the data on the mobile device originates from multiple databases, and those databases might have different base times. For this reason, time and datetime data is stored on the mobile device according to a base time selected for the device. Time and datetime data that is sent to the mobile device during synchronization is converted to the base time for the device. The server knows the base time for the device, so it performs the conversion for time and datetime data that is both sent to and received from the mobile device.
The exception is if the time or datetime data has a time zone attached in the record definition. In this case, the server converts from the base time of the database to the specified time zone for time and datetime data that is both sent to and received from the mobile device. With this architecture, the mobile device handles both user time or datetime data and specified time or datetime data. No time zone conversions take place on the mobile device.
For display purposes, the time appears as it is stored on the device. If it is specified time or datetime data, the time zone field should be included by the developer on the mobile page. If a time or datetime field does not include a specified time zone, the developer can control the display of the device time zone in PeopleSoft Application Designer.
The only time zone conversion that may occur on the device is for datetime fields (but not time fields) that do not have a specified time zone, and daylight savings time applies to the device time zone. All time and datetime data is stored in the device’s base time. If datetime data falls within the daylight savings time date range, the value and time zone are displayed appropriately. If the field is time only, no conversion is done. If the base time zone for a device is changed, the user must perform an Update Applications synchronization.
Note. PSTIMEZONE is a component interface used to support timezone prompting on the mobile device. Synchronizable component interfaces that contain Time Zone Control Fields can have references built over the Time Zone field, using this component interface as the related component interface for the reference.
Building Mobile PagesTo build a mobile page, one or more synchronizable component interfaces must already exist. You can also build mobile pages that include other mobile pages.
This section describes how to:
Create mobile pages.
Define mobile page appearance.
Build mobile pages that include other mobile pages.
Creating Mobile PagesUse the Select source Component Interface dialog box to begin defining a mobile page.
To create a mobile page:
From the PeopleSoft Application Designer menu, select File, New.
The New Definition dialog box appears.
From the New Definition dialog box, select Mobile Page.
The Select source Component Interface dialog box appears.
Only synchronizable component interfaces appear in the list of definitions matching selection criteria. If a specific component interface does not appear in the list, the component interface might not be defined as synchronizable.
Specify the component interface on which you are basing the mobile page.
PeopleSoft Application Designer imports all properties of the selected component interface. Retain the default mobile page content, or delete the content that is not required. You can add content by dragging properties from the component interface. Click the View Component Interface toolbar button to open the associated component interface.
Save the new mobile page with a unique name.
Note. PeopleSoft Application Designer does not update a mobile page when the underlying component interface changes, but it does display a warning message when you edit the mobile page if the underlying component interface has changed. If you change the component interface underlying a mobile page by adding properties after creating the mobile page, add the properties to the mobile page by dragging from the component interface to the mobile page in PeopleSoft Application Designer.
Note. Deleting a component interface also deletes all mobile pages based on the deleted component interface.
Defining Mobile Page AppearanceUse the Mobile Page Properties dialog box to define the appearance of a selected mobile page. Access the Mobile Page Properties dialog box by opening the mobile page in PeopleSoft Application Designer and clicking the Properties button.
The name of the mobile page and the corresponding component interface appear on the page.
|
Description |
Describe the mobile page. |
|
Comments |
Enter comments describing the function or purpose of the mobile page. |
|
Owner Id |
Enter the owner ID of the person who created the page. |
Laptop Tab
To specify properties for the mobile page as it appears on the laptop, select the Laptop tab.
Select the following options to define page properties.
|
List view pages are created from the top level of a component interface (the level zero), or from a collection in a component interface. A list view can also be thought of as a search page. See List Views. |
|
|
Detail view pages are created from the content properties (fields) in a mobile page. Where and how a property appears on a page is determined by the content properties page for that property (field). See Detail Views. |
|
|
Enter the number of rows to display initially at runtime. Select a row greater than zero, or no information will appear. |
|
|
Allow Add |
|
|
Allow Delete |
|
|
Use This Page for Errors |
|
|
Select to exclude the page from the Go To drop-down list box. The Go To drop-down list box is for end-user navigation between components and is not present when navigating between parent and child pages within the same component. You may want to exclude a page from the navigation list box when the user has navigated to another component and the context is no longer valid to return to. |
|
|
Specify the help message set associated with this content for context-sensitive help. This applies only to fields, not references. The help for references comes from the mobile page to which you point. |
|
|
Help Message Number |
Specify the help message number associated with this content for context-sensitive help. This applies only to fields, not references. The help for references comes from the mobile page to which you point. |
Note. Help on mobile devices displays the message explanation rather than the message text. This allows display of help messages up to 32K long. The browser on the laptop and the PDA wrap long help message explanations appropriately.
PDA Tab
To specify properties for the mobile page as it appears on a PDA, select the PDA tab.
You can accept the laptop properties as the properties for display on a PDA or override the laptop properties by selecting the Override Laptop Properties check box. If you override laptop properties, you can specify the same settings as for the laptop properties.
Defining Content Appearance and CharacteristicsThis section discusses how to:
Set mobile page content properties.
Set mobile page reference properties.
Set mobile page collection properties.
Understanding Mobile Page Content
Use the Mobile Page Content Properties, Mobile Page Reference Properties, and Mobile Page Collection Properties dialog boxes to define the appearance and characteristics of content within the selected mobile page.
Content refers to the component interface properties (fields and references) that you select to display on a mobile page. If the content is a reference, special considerations apply, as described in this section.
Each dialog box includes a tab for each supported mobile device. Specify display properties for the selected content for each device. To specify display options for PDAs that are different from the display options for laptops, select Override Laptop Properties on the PDA tab.
Setting Mobile Page Content Properties
Access the Mobile Page Content Properties dialog box by right-clicking the content property and selecting Content Property.
Select the options for the content of your mobile page. The content name appears as read-only text at the top of the dialog box.
Creating Mobile Page Content Properties for the PDA
You can accept the laptop properties as the properties for display on a PDA or override the laptop properties by selecting the Override Laptop Properties check box. If you override laptop properties, you can specify the same settings as for the laptop properties.
Specify horizontal space for list columns as a percentage. The developer can specify this percentage, or it can be calculated automatically. Specify percentages for list view allocation as laptop properties, which can be overridden for other devices.
If the percentage is calculated automatically, it is based on each field’s size as a percentage of the total of all fields. For example, if there are four fields with widths of 128, 32, 20, and 20 characters, the total width is 200; the percentage for each field is 64, 16, 10, and 10 percent, respectively.
The percentage width definition applies across multiple devices. For example, using the preceding percentages, on a laptop page width of 500 pixels, the column widths are 320, 80, 50, and 50. On a PDA page width of 200 pixels, the column widths are 128, 32, 20, and 20 pixels.
Specify percentages for fields for which you want to control the width, and use the default value for the remaining fields. The field with a specified percentage width occupies the specified space, and the remaining field width percentages are calculated based on their percentages of the total remaining. For example, the application developer specifies a 60 percent column width for the first field, leaving 40 percent to be allocated automatically to the remaining fields. The remaining fields have widths of 32, 20, and 20, for a total of 72, representing 44, 28, and 28 percent of the balance of 40 percent of the device space. The final space allocation is 60 percent for the field defined by the developer and 18, 11, and 11 percent for the automatically calculated fields.
If the data to be displayed is larger than the allocated column width, the data wraps to the next line. The browser wraps both labels and values when possible. The browser does not break words, so if a single word exceeds the requested column width, the browser resizes the column to fit the word.
Defining the Detail View Layout
Fields on detail view pages are ordered based on the sequence in which the fields and references appear in Mobile Page Designer. Fields marked with the property Horizontal Layout are placed to the right of the preceding displayed property. A standard amount of space is displayed between the end of one field and the start of the next label or field. All labels displayed in the left-most position are left-aligned; the label column expands to the width of the longest label.
The space allocated to each field is based on the field length, but it can be overridden by the Custom Size property. For example, a field defined with a length of 50 (but that usually only has 10−20 characters of data in it) might be defined with a custom size of 20 so that another field can be placed next to it without excess blank space in the field. The values are not truncated, but can be scrolled.
Building Mobile Pages That Include Other Mobile Pages
A mobile page displays data that is exposed on a component interface. The mobile page displays references on the same page (inline) and contained collections on the same page (inline) or on a tab. These references must be defined in the component interface on which the main mobile page is based, and their appearance must be defined on another mobile page. We sometimes refer to these as mini-pages, because of the small amount of information displayed. The mini-page defines the display appearance of each referenced element.
Each content element with Details Icon or Hyperlink selected must have a detail mobile page object defined, which formats the appearance of associated information. Create a mini-page for each such content element.
To create a referenced page:
Create a component interface.
Create a mobile page.
Define content properties.
Create another component interface.
Specify reference relationships.
Create another mobile page.
Specify reference properties.
Note. While developing mobile pages in PeopleSoft Application Designer, right-click on a reference property and select Open Related Mobile Page.
Using an HTML Area on Mobile Pages
You can create an HTML area on a mobile page in either list view or detail view, which can include an HTML tree. To set up an HTML area for mobile pages:
Add a long text field to the synchronizable component interface that the mobile page is built on.
Create a mobile page from the synchronizable component interface.
If you change the underlying component interface, any mobile page based on that component interface is not automatically changed.
On the Mobile Page Content Properties dialog box for the long text field, select Render as HTML Area.
Decide where the HTML area is to appear. HTML areas are either displayed inline on the same page or on a separate tab. To display the HTML area inline, select the Display Inline on Same Page check box for the property on the property page.
In the OnInit event, populate the HTML area using PeopleCode.
You can either use HTML in your PeopleCode, or you can use the GetHTMLText function to access an existing HTML definition. To use images in HTML, use the %IMAGE(Imagename) meta-HTML function.
Add the HTML definition to a project.
Specify the project that you added the HTML definition to as the project to be synchronized with the component interface.
On the Synchronization tab of the component interface properties, specify a project to be synchronized with the component interface using the Related Content Project field. This project should contain all the HTML definitions, as well as all the images to distribute to the mobile device.
Note. Include an HTML tree in an HTML area in much the same manner as for pages built for PeopleSoft Pure Internet Architecture.
Specify a project containing HTML and images for display in the HTML area on the Mobile Page Properties Related Content Project field.
The following is an example of a test in PeopleCode:
/* HTML Area for Company  */
%ThisMobileObject.QE_COMMENTS_LV0 = "<H1>This is HTML for Company Page,
testing Mobile HTML Area</H1><H2>This is more HTML, testing Mobile HTML Area</H2>";
See %Image.
Setting Mobile Page Reference PropertiesAccess the Mobile Page Reference Properties dialog box by selecting a reference, right-clicking it, and selecting Content Properties.
The name of the reference appears as read-only text at the top of the dialog box.
Note. Multiple collections can be on any tab. Collections are rendered in the order they are defined. If a collection is specified to be on a tab, then any collections that follow immediately and are specified to be inline on the same page are rendered on the same tab.
Creating Mobile Page Reference Properties for the PDA
You can accept the laptop properties as the properties for display on a PDA or override the laptop properties by selecting the Override Laptop Properties check box. If you override laptop properties, you can specify the same settings as for the laptop properties.
Setting Mobile Page Collection PropertiesAccess the Mobile Page Collection Properties dialog box.
A mobile page collection includes all of the detail rows displayed for a specified content element. Appearance is controlled similarly to mobile pages. The name of the collection appears at the top of the page as read-only text.
|
List view pages are created from the top level of a component interface (the level zero), or from a collection in a component interface. A list view can also be thought of as a search page. See List Views. |
|
|
Detail view pages are created from the content properties (fields) in a mobile page. Where and how a property appears on a page is determined by the content properties page for that property (field). See Detail Views. |
|
|
Occurs Count (Max Number of rows in list) |
Enter the number of rows to display initially at runtime. Select a row greater than zero, or no information will appear. |
|
Allow Add |
Select to enable the user to add data. |
|
Edit in List View |
Select to enable users to add the row and create edits directly edit in table. |
|
Allow Delete |
Select to enable the user to delete data. |
|
Suppress List Header |
Select to hide the list view header on the page. |
|
Display Inline on Same Page |
Select to display an HTML area on the same page. If not selected, the HTML area appears on a detail page. If not selected, the HTML area appears on a tab. |
|
Tab Label |
If the properties appear on a separate page (Display Inline on Same Page is not selected), you can specify a tab label different from the list view label. |
|
Help Message Set |
Specify the help message set associated with this content for context-sensitive help. This applies only to fields, not references. The help for references comes from the mobile page to which you point. |
|
Help Message Number |
Specify the help message number associated with this content for context-sensitive help. This applies only to fields, not references. The help for references comes from the mobile page to which you point. |
Creating Mobile Page Collection Properties for the PDA
You can accept the laptop properties as the properties for display on a PDA or override the laptop properties by selecting the Override Laptop Properties check box. If you override laptop properties, you can specify the same settings as for the laptop properties.
Displaying PromptsThis section discusses:
Creating prompts on mobile pages
Partial prompting
Creating Prompts on Mobile Pages
You can display a prompt to enable the user to select from a list.
To create a prompt on a mobile page follow these general steps:
Create a component interface.
Create two mobile pages.
Specify content appearance properties.
Create a reference.
Specify reference relationships.
Specify reference appearance properties.
Partial PromptingIn PeopleSoft Pure Internet Architecture, if a default value appears in the edit box, clicking the prompt button returns all rows. Or, you can enter a partial value in a prompt edit box, and the list view returns:
Only rows containing the entered value, if there is a partial but not an exact match.
Only the row matching the entered value, if there is an exact match.
In disconnected applications running under PeopleSoft Mobile Agent, if a default value appears in the edit box, clicking the prompt button returns all rows. However, if you enter a partial value in a prompt edit box, the list view returns:
Only rows containing the entered value, if there is a partial but not an exact match.
All rows, if the entered value exactly matches a listed value.
PeopleSoft Mobile Agent does not support partial prompts on fields using dynamic enumeration.
Using Dynamic EnumerationsThe following sections discuss using dynamic enumerations in Mobile pages.
Understanding Dynamic Enumerations
PeopleSoft Mobile Agent dynamic enumerations enable the value displayed in one field to be dependent on the value in a related (referenced) field. This is the mobile version of display control/related field for pages created for PeopleSoft Pure Internet Architecture.
As shown in the following example, you can make the valid prompts for a State field dependent on the value in the referenced Country field, such that only valid U.S. states appear if USA is selected in the country field, or only valid Mexican states if MX is selected in the Country field.
The following sections illustrates the steps required to create a dynamic enumeration of valid state values based on the value in the Country field.
Create the Records
Create three records:
Country, with a search key on the country field and an alternate search key on the description field.
A child record for the state, with search keys on the Country and State fields.
A grandchild record for a company, with search keys on the Country, State, and Company fields.
See Creating Record Definitions.
Create the Pages
Build one page for each of the records:
On the Country page, place Country and Description fields in level zero and Country and State fields in level one; these fields provide the basis for the subsequent mobile page references.
On the State page, place the Country, State, and State Description fields in level zero.
On the Company page, place the Company, Country, Country Description, State, and State Description fields in level zero.
Note. Dynamic enumerations process in the order of the fields (properties) on the page. Properties used in a dynamic enumeration must come before the property with the dynamic enumeration.
See Designing Pages for Optimal Performance and Accessibility.
Create the Components, Component Interfaces, and References
Create a component for each page.
Create a component interface for each component.
Keep the State component interface simple, with all properties on level zero.
Include properties for the Country component interface on both level zero and level one:
Drag the Country property from the component's level one into the component interface's State collection.
Since it is now a duplicate property, you must rename this property.
Create a reference in the State collection of the Country component interface, relating the reference to the State component interface. Map the level one Country property to the Country property in the State component interface, and the level one State property to the State property in the State component interface.
The valid reference path should be in the form current_ci.referenced_ci,which identifies the originating component interface.
Note. To include both properties in the related key mapping, select both properties in the component interface workspace, then right-click and select Create Reference.
Keep all properties for the Company component interface at level zero, and include two references.
Create a singular reference on the Country property, relating it to the Country property in the Country component interface.
Create another reference on both the Country and State properties, relating them to their counterparts in the State component interface. The valid reference path should “walk” from the Country reference on the Company component interface to the State reference on the Country component interface, then to the Country reference in the State collection of the Country component interface, then to the State component interface.
Create the Mobile Pages
To create mobile pages:
On the Country mobile page, include the Country, Country Description, and the Country reference to the State property.
On the State mobile page, include only the State and State Description records.
On the Company mobile page, display the Company name, and Country and State fields with prompt buttons using the references.
The Country reference points to the Country mobile page, and the State reference points to the State mobile page.
Note. When you create the Company mobile page, you can delete Country and State properties imported from the component interface, because the references replace them.
Using the Time Picker and Calendar PromptsThis section discusses how to:
Use the time picker.
Create calendar prompts.
Using the Time Picker
You can specify that a time field displayed in detail view includes a time picker. The field must be of type Time for this option to be available.
On the Mobile Page Content Properties dialog box, select Time Picker, and select an interval from the drop-down box.
The time format displayed depends on the format specified in the user’s personalizations.
On the mobile device, the time picker appears as a drop-down list. If the time field is not display-only and time picker is not enabled, then the field appears as a text edit box.
Time can be entered in either 12-hour or 24-hour format, regardless of the user’s time format personalization. After a time value is entered, PeopleSoft Mobile Agent reformats the entry to the user’s time format (12-hour or 24-hour format). If the time field is display-only, then the time appears as a non-editable text field.
Creating Calendar Prompts
PeopleSoft Mobile Agent supports a calendar prompt on fields of type Date. Calendar prompts can be included on search pages, on detail pages, and on editable list views.
To display the calendar prompt on detail mobile pages, the field must be of type Date and not display-only. To place a calendar prompt on the page, you must associate the date field with an edit box control and select Show Prompt Button in the Display Options of the record properties of the edit box.
See Also
Registering Mobile PagesYou must register mobile pages, just as you must register pages built for PeopleSoft Pure Internet Architecture.
This section discusses how to:
Register mobile pages in PeopleSoft Application Designer.
Register mobile pages in the mobile portal.
Understanding Mobile Page Registration
Group mobile pages together as content references in folders in the mobile portal to provide a navigational scheme for the application’s mobile pages. Create as many folders as necessary to provide access to mobile pages in a logical scheme.
The synchronization server searches for mobile pages requiring synchronization based on the folders registered in the Mobile folder in the mobile portal. Even if a mobile page is otherwise synchronizable, if it is not registered in the Mobile folder in the mobile portal, the mobile page is not synchronized.
Registration of mobile pages is like registration of any other content reference, with these requirements and exceptions:
The Mobile folder is made up of only one level of folders.
These folders generally group mobile applications, but also include synchronization and alerts.
Register mobile pages in a child folder to the Mobile folder.
Do not register mobile pages directly in the Mobile folder.
Register only mobile pages in the Mobile folder’s child folders.
No other objects are valid.
If you delete a mobile page in PeopleSoft Application Designer, also delete the mobile page from its folder in the mobile portal.
Note. To be viewed and synchronized from a mobile device, a mobile page must be registered in a child folder of the Mobile folder in the mobile portal.
Registering Mobile Pages in Application Designer
In Mobile Page Designer, right-click on any property and select Register Mobile Page; or click the Register Mobile Page button. The Registration Wizard appears for you to enter the information that pertains to the mobile page.
See Also
Registering Mobile Pages in the Mobile PortalPeopleSoft delivers a mobile portal to enable registration of mobile pages. You can administer mobile pages from the mobile portal.
To register a mobile page in the mobile portal:
Sign in to the mobile portal.
You can change the default portal selection to mobile portal, or edit the following URL to reference the mobile portal:
http://localhost/psp/ps/MOBILE/QE_LOCAL/c/UTILITIES.PORTAL_DEFINITIONS.GBL
Select PeopleTools, Portal, Structure & Content.
The Root Structure and Content page appears.
On the Root Structure & Content page, select the Mobile folder.
The Mobile Structure and Content page appears.
Either select an existing folder for an application, or add a new folder for an application.
Add or edit content references.
On the content reference page, use the Mobile Device drop-down list to specify the mobile devices on which a mobile page is available.
You cannot add a folder at this level.
Click Save.
See Also
Maintaining SecurityAdminister security for PeopleSoft mobile pages the same way that you administer security for any other page created for PeopleSoft Pure Internet Architecture: through the Security function. Define security for each mobile page, rather than for the folder.
Note. Maintain security for both component interfaces and mobile pages. If the user does not have permission to an underlying component interface, the associated mobile page fails.
This section discusses how to:
Add mobile pages to existing permission lists.
Create new permission lists for mobile pages.
Create roles for mobile users and associate permission lists to the roles.
See Also
Understanding PeopleSoft Security
Adding Mobile Pages to Existing Permission ListsTo add a mobile page to a permission list:
Select PeopleTools, Security, Permissions & Roles, Permission Lists.
On the Find an Existing Values page, search for and select the appropriate permission list.
On the Pages page, click the Mobile Page Permissions link.
Specify the mobile page or pages, or click the Lookup Mobile Page Name link to look up a mobile page or range of pages.
Click OK.
Click Save.
Creating New Permission Lists for Mobile PagesYou can create a new permission list specifically for mobile pages and associate the permission list with appropriate roles.
To create a mobile page permission list:
Select PeopleTools, Security, Permissions & Roles, Permission Lists.
On the Add a New Value page, specify the name for a new permission list.
On the Pages page, click the Mobile Page Permissions link.
Specify the mobile page or pages, or click the Lookup Mobile Page Name link to look up a mobile page or range of pages.
Click OK.
Click Save.
Creating Roles for Mobile Users and Associating Permission Lists to the RolesYou can create one or more roles specifically for mobile users and associate permission lists that contain mobile pages to the roles.
To create a new mobile user role:
Select PeopleTools, Security, Permissions & Roles, Roles.
On the Add a New Value page, enter the new name and click Add.
On the General page, specify the description of the new role.
On the Permission Lists page, specify the permission list or lists to associate with this role.
Specify other attributes of this role as required.
Click Save.
Assign this mobile user role to a user profile.
See Also