Submitting or Editing Menu Item Requests
This topic discusses submitting and editing menu item requests.
|
Page Name |
Definition Name |
Usage |
|---|---|---|
|
EPPMI_ITM_EDIT |
Submit or edit menu item requests |
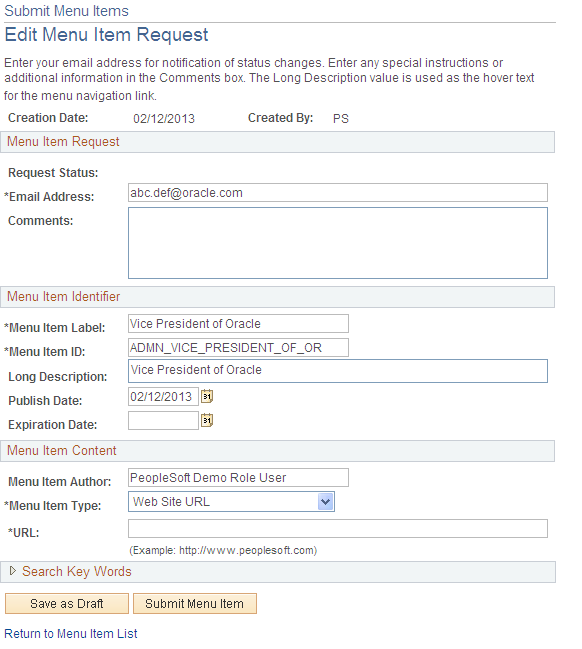
Use the Edit Menu Item Request page (EPPMI_ITM_EDIT) to submit or edit menu item requests.
Navigation:
.
Click the Add Menu Item Request button.
This example illustrates the fields and controls on the Edit Menu Item Request page. You can find definitions for the fields and controls later on this page.
Menu Item Request
Field or Control |
Description |
|---|---|
Request Status |
Displays the current status of this request. If this is a new request, the field is clear. |
Email Address |
If available, the email address will default from the user profile, but can be overridden. Status change notifications will be sent to this address. |
Comments |
Enter special instructions or additional information. |
Menu Item Identifier
Field or Control |
Description |
|---|---|
Menu Item Label |
Enter the link text that will appear for the menu item in the portal menu. |
Menu Item ID |
Defaults from the menu item label, but can be changed. Special characters are removed, spaces are replaced with underscores, the defined prefix is added, and text is changed to uppercase. For example, My Submitted Item is stored as ADMN_MY_SUBMITTED_ITEM, where ADMN is the prefix as defined on the Installation Options page. |
Long Description |
Enter text that you want to appear as hover text for the menu item link. |
Publish Date |
Select the date on which you want to publish the menu item. Defaults to today's date. |
Expiration Date |
Select the date on which you want to discontinue the menu item. Leave this field clear if there is no expiration date for the menu item. |
Menu Item Content
Field or Control |
Description |
|---|---|
Menu Item Author |
This value initially defaults from information available in the user profile, but can be edited. |
Menu Item Type |
Select the content type for the menu item. Available values include: File Attachment. Managed Content. PeopleSoft URL. Web Site URL. Note: Remaining fields discussed in this section are based on the content type selected. |
Add Attachment |
Click to access a page where you can browse for the file for which you want to submit a menu item request. This button displays when the Content Type field is set to File Attachment. |
File Name |
The name of the selected file attachment displays as a link to the contents of the file. This field displays when the Content Type field is set to File Attachment. |
Delete Attachment |
Click to delete the file attachment from the menu item request. This field displays when a file attachment has been added to a menu item request. |
Date Added |
Displays the date and time at which the file attachment was added to the menu item request. This field displays when a file attachment has been added to a menu item request. |
Select Content |
Click to access the Select Managed Content page, where you can access a list of content that is available for selection. Only approved content that is in a publishable category and for which you have viewer privileges is listed. Click the Content Title link to select the content and return to the Edit Menu Item Request page. See Importing Managed Content into Other Features. This field displays when the Content Type field is set to Managed Content. |
Content Title |
The name of the selected content displays as a link to the content. This field displays when the Content Type field is set to Managed Content. |
Re-Select Content |
Click to access the Select Managed Content page, where you can select different managed content for your menu item request. This field displays when managed content has been added to a menu item request. |
Content Type |
Displays the content type. File Attachment, Text, or HTML, for example. This field displays when managed content has been added to a menu item request. |
Content ID |
Displays the identifier of the content. This field displays when managed content has been added to a menu item request. |
Market |
Select the market for the PeopleSoft URL. This field displays when the Content Type field is set to PeopleSoft URL. |
Menu Name |
Enter a valid menu name for the PeopleSoft URL. This field displays when the Content Type field is set to PeopleSoft URL. |
Component Name |
Enter a valid component name for the PeopleSoft URL. This field displays when the Content Type field is set to PeopleSoft URL. |
Parameters |
Enter any existing parameters for the PeopleSoft URL. For example: ?P1=value1&P2=value2&P3=value3. This field displays when the Content Type field is set to PeopleSoft URL. |
URL |
Enter the website URL for your menu item request. For example: http://www.peoplesoft.com. This field displays when the Content Type field is set to Web Site URL. |
Search Key Words
Use the Search Key Words group box to enter up to three key words. Entering a keyword creates an attribute on a registered menu item with a KEYWORD parameter that contains the keyword value you enter.
Field or Control |
Description |
|---|---|
Save as Draft |
Click to save your request in draft mode. Use this option when you want to save the menu item request, but are not ready to submit it for review and approval. Note: No email notifications are triggered for requests with a status of Draft. |
Submit Menu Item |
Click to submit your menu item request for review and approval. This action triggers an email notification to the submitter with a link to the Submit Menu Item page. The submitted status is defaulted from the email. This action also triggers an email notification to the designated navigation manager with a link to the Manage Menu Item Requests page. The email URL sets the filter to display only submitted items. |
If you also have permissions to approve menu item requests or if you have permissions to approve and register these requests, an additional button will be displayed after you submit the menu item request to facilitate administration of your request. Depending on your permissions, one of the following or no additional button will be displayed:
Approve – If you have permissions to approve menu item requests, click the Approve button to approve your request. See Manage Menu Item Requests Page for additional information on managing menu item requests.
Approve & Register– If you have permissions to both approve and register menu item requests, click the Approve & Register button to approve the menu item and begin the process to register the menu item. See Define Menu Item Registry Page to continue the process to register the menu item.