Approving and Registering the Menu Item Requests
This topic discusses methods to define menu item registry entry and view details. It also discusses how to register approved menu item requests.
|
Page Name |
Definition Name |
Usage |
|---|---|---|
|
EPPMI_REG_LST |
Register approved menu item requests. |
|
|
EPPMI_REG_DFO |
Register approved menu item requests. |
|
|
EPPMI_ITM_EDIT_SEC |
Access and edit details of a menu item request. |
|
|
View Menu Item Request |
EPPMI_ITM_VIEW_SEC |
View menu item request details. |
|
EPPMI_REG_DFN |
Determine how the menu item will be rendered online, such as the site and menu folder to which it will be published. |
|
|
EPPMI_REG_FLD |
Choose the parent folder in which you want to register the menu item. |
|
|
EPPMI_REG_CNF |
Confirm menu item registration. |
|
|
EPPMI_REG_VIEW |
Review registry information for the menu item, or remove the menu item from registry. |
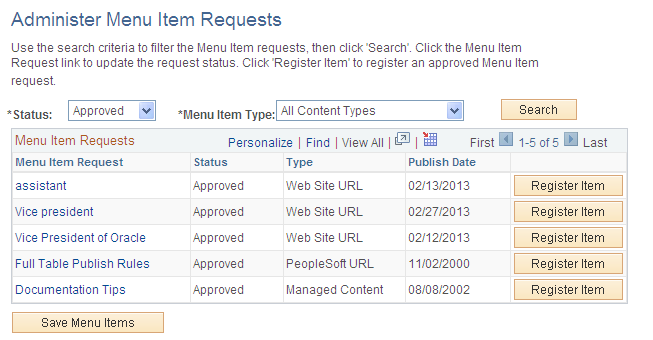
Use the Administer Menu Item Requests page (EPPMI_REG_LST) to register approved menu item requests.
Navigation:
This example illustrates the fields and controls on the Administer Menu Item Requests page. You can find definitions for the fields and controls later on this page.
Field or Control |
Description |
|---|---|
Menu Item Request |
Click for a menu item request in Rejected, Submitted, Rework, or Approved status to access the Edit Menu Item Request page. Click for a menu item request in Registered status to access the View Menu Item Request page. |
Register Item |
Click to access the Define Registry page, where you can register the menu item. This button displays for menu item requests in Approved status. |
Registry Details |
Click to access the Registry Details page, where you can view registry details for a menu item, or remove the menu item from the registry. This button displays for menu item requests in Registered status. |
Save Menu Items |
Click to save the changes made on the Edit Menu Item Request page. Warning! Even though you clicked OK to update the request on the Edit Menu Item page, your changes will not be saved, until you click Save Menu Items. This action will trigger an email notification to the submitter with a link to the Submit Menu Item page. Note: Only requests with a status of Registered have the Registry Details option available. |
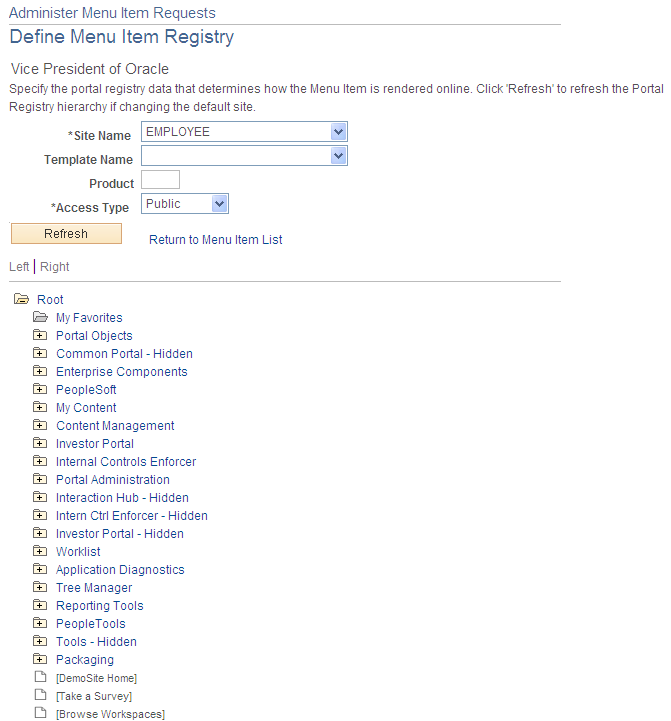
Access the Define Menu Item Registry page( EPPMI_REG_DFO)(click the Approve & Register button on the Edit Menu Item Request page).
Navigation:
This example illustrates the fields and controls on the Define Menu Item Registry page. You can find definitions for the fields and controls later on this page.
Term |
Definition |
|---|---|
Site Name |
Select the portal or site in which you want to register the menu item. This value defaults to the current portal or site. |
Node Name |
This field displays when the Content Type field is set to PeopleSoft URL. Select the database node that contains the PeopleSoft page that you want to register as a menu item. The node is used to derive the web server URL used to access the content provider database. Select Always use local to indicate that you want to use the current portal database. |
Template Name |
This field displays when the Content Type field is set to PeopleSoft URL or Web Site URL. Select a template to determine how the URL content will be displayed on the page. PeopleSoft delivers a number of standard templates, or you can design your own. PeopleSoft recommends leaving this field clear unless there is a special circumstance. Leaving this field clear,allows the system to use the default template. |
Product |
Optionally, enter text to tag menu items for SQL queries against the registry tables. |
Access Type |
Select the type of security access you want to grant for the menu item. Available values include: Permission. Select to indicate that you want to specify permission lists that define access rights to the menu item. Public. Select to indicate that you want the menu item to be accessible by all users. |
Author Access |
This option displays when the Access Type field is set to Permission. Select to indicate that you want the user who submitted the menu item request to have access to the menu item regardless of any other permissions that are defined for the menu item. However, if the user does not have access to the menu component, the system will issue an authorization error. |
Permissions |
This option displays when the Access Type field is set to Permission. Select the permission lists that you want to have access to the menu item. |
Click the folder icons to navigate through the portal registry hierarchy. Click a folder link to select the desired folder and access the Confirm Registry page, where you can confirm the registration of the menu item.
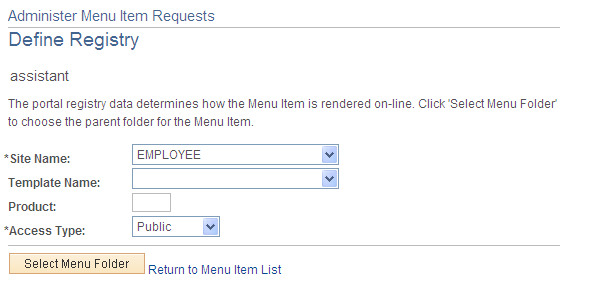
Use the Define Registry page (EPPMI_REG_DFN) to determine how the menu item will be rendered online, such as the site and menu folder to which it will be published.
Navigation:
Click the Register Item button on the Administer Menu Item Requests page.
This example illustrates the fields and controls on the Define Registry page. You can find definitions for the fields and controls later on this page.
Field or Control |
Description |
|---|---|
Site Name |
Select the portal or site in which you want to register the menu item. This value defaults to the current portal or site. |
Node Name |
This field displays when the Content Type field is set to PeopleSoft URL. Select the database node that contains the PeopleSoft page that you want to register as a menu item. The node is used to derive the web server URL used to access the content provider database. Select Always use local to indicate that you want to use the current portal database. |
Template Name |
This field displays when the Content Type field is set to PeopleSoft URL or Web Site URL. Select a template to determine how the URL content will be displayed on the page. PeopleSoft delivers a number of standard templates, or you can design your own. PeopleSoft recommends leaving this field clear unless there is a special circumstance. Leaving this field clear, invokes the system to use the default template. |
Product |
Optionally, enter text to tag menu items for SQL queries against the registry tables. |
Access Type |
Select the type of security access you want to grant for the menu item. Available values include: Permission. Select to indicate that you want to specify permission lists that define access rights to the menu item. Public. Select to indicate that you want the menu item to be accessible by all users. |
Author Access |
This option displays when the Access Type field is set to Permission. Select to indicate that you want the user who submitted the menu item request to have access to the menu item regardless of any other permissions that are defined for the menu item. However, if the user does not have access to the menu component, the system will issue an authorization error. |
Permissions |
This option displays when the Access Type field is set to Permission. Select the permission lists that you want to have access to the menu item. |
Select Menu Folder |
Click to access the Select Menu Folder page, where you can choose the parent folder for the menu item. |
Use the Select Menu Folder page (EPPMI_REG_FLD) to choose the parent folder in which you want to register the menu item.
Navigation:
Click the Select Menu Folder button on the Define Registry page.
This example illustrates the fields and controls on the Select Menu Folder page.

Click the folder icons to navigate through the portal registry hierarchy. Click a folder link to select the desired folder and access the Confirm Registry page, where you can confirm the registration of the menu item.
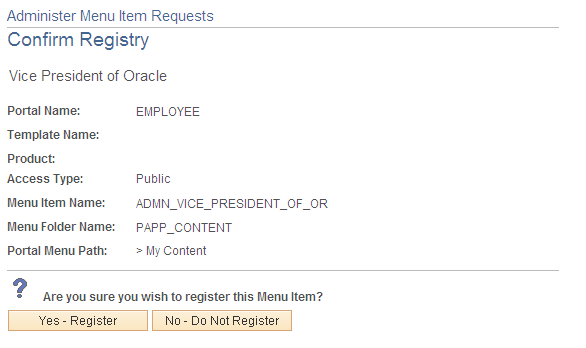
Access the Confirm Registry page (EPPMI_REG_CNF) (Click a folder link to select the desired folder).
Navigation:
This example illustrates the fields and controls on the Confirm Registry page. You can find definitions for the fields and controls later on this page.
Field or Control |
Description |
|---|---|
Yes - Register |
Click Yes - Register button to register the menu item |
No-Do Not Register |
Click No — Do Not Register to cancel the registration and return to Select Menu Item Folder page. |
Use the Registry Details page (EPPMI_REG_VIEW) to review registry information for the menu item, or remove the menu item from registry.
Navigation:
Click the Yes - Register button on the Confirm Registry page.
Click the Registry Details button on the Administer Menu Item Requests page.
This example illustrates the fields and controls on the Registry Details page. You can find definitions for the fields and controls later on this page.
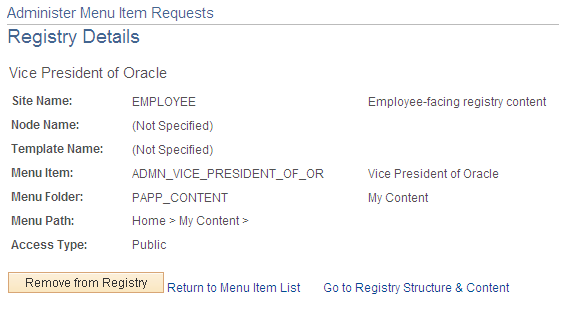
Field or Control |
Description |
|---|---|
Site Name |
Displays the portal or site in which the menu item is registered. |
Node Name |
Database node that contains the PeopleSoft page. |
Template Name |
Determines how the menu item content is displayed on the page. A value of (Not Specified) indicates that the default template will be used to display the page. |
Access Type |
Valid values include: Public. All users can access the menu item. Permission. Only users who are associated with the selected permission list are able to access the menu item. |
Remove from Registry |
Click to remove the menu item from the registry. A new page displays confirming the removal. |
Go To Registry Structure & Content |
Click to access the Content Ref Administration page for the menu item. This link displays if the current user has security access to the Structure and Content component. |