Performing Guided Self-Service Transactions in Manager Self-Service
This topic provides overviews of guided self-service pages, of how managers access guided self-service transactions, and of administrator approvals for guided self-service transactions. It then discusses the self-service transaction pages.
These videos provide overviews and demonstrations of guided self-service:
Video: PeopleSoft Fluid HCM Guided Self Service
Video: PeopleSoft HCM 9.2 Image 22 Highlights: Creating a New Position Using Fluid Guided Self-Service
Video: PeopleSoft HCM 9.2 Image 22 Highlights: Changing Work Schedule Hours Using Fluid Guided Self-Service
Note: Guided self-service transaction steps are rendered using the PeopleTools Activity Guide framework as long as you have PeopleTools 8.55 or later. As you can see in the following table, sometimes different page definitions are used if you are on an earlier version of PeopleTools, but the pages function the same.
|
Page Name |
Definition Name |
Usage |
|---|---|---|
|
HC_NAVCOLL_7 (this is the cref for the tile) |
Access the Update Team Information page, a navigation collection for initiating guided self-service transactions. |
|
|
Update Team Information (this is the name of the navigation collection) |
Initiate guided self-service transactions. |
|
|
<Transaction Name> - Find Team Member Page for Selecting Employees |
HR_PSEL_FLU |
Select one or more employees for a guided self-service transaction. |
|
HR_MSS_CT_QUES_FL |
Answer questions that determine which pages and fields users will see during the guided self-service transaction. |
|
|
HR_MSS_CT_DSUP_FL |
View decision support topics that are defined in the transaction configuration. This page appears in PeopleTools 8.55 or later. With earlier versions of PeopleTools, decision support appears in a panel on the Questionnaire page. |
|
|
not applicable |
The common header provides navigation buttons and contextual information for the steps in a transaction. |
|
|
HR_MSS_CT_PG1_AGFL (PeopleTools 8.55 or later) HR_MSS_CT_PG1_FL (PeopleTools versions before 8.55) |
Enter work and job changes for an employee. |
|
|
HR_MSS_CT_PG2_AGFL (PeopleTools 8.55 or later) HR_MSS_CT_PG2_FL (PeopleTools versions before 8.55) |
Enter compensation changes for an employee. |
|
|
HR_MSS_POSN_AGFL |
Enter or update position data to create a new position based on an existing one. This page requires PeopleTools 8.55 or later. The Clone Position transaction is not available with earlier versions of PeopleTools. |
|
|
HR_MSS_CT_SBM_AGFL (for employee transactions using PeopleTools 8.55 or later) HR_MSS_CT_SUBMT_FL (for employee transactions using PeopleTools versions before 8.55) HR_MSS_CT_PSNSB_FL (for the Clone Position transaction) |
Review transaction information, add comments, and submit the request. |
|
|
Transaction Confirmation Page |
HR_MSS_CT_CONF_FL |
Confirms that the transaction was submitted. If approvals are used, this page also displays the approval chain. This page appears immediately after a transaction is submitted. |
|
<Transaction Name> Page for Reviewing Submitted Transactions |
HR_MSS_CT_EE |
Submitters use this page to review read-only information about a guided self-service transaction that has been submitted for approval. |
This overview describes how guided self-service transactions work.
Guided Self-Service Pages
The framework for guided self-service transactions displays the pages and fields that are relevant for a specific purpose. All guided self-service transactions use the same pages, but each transaction’s configuration determines which pages appear and which fields appears on those pages. To complete a transaction, users step through the pages sequentially.
These are the pages that can appear in a guided self-service transaction that updates employee data:
Questionnaire Page: this appears only if the transaction is configured with questions that are not hidden.
Work and Job Information Page: this appears if the transaction is configured to show job data.
Compensation Details Page: this appears if the transaction is configured to show compensation data.
Review and Submit Page: this page summarizes the transaction and is always the last step in transactions.
Oracle delivers one transaction, Clone Position, that does not update employee data. This transaction is configured using the same framework, but the nature of the transaction means that it does not use the standard employee-related pages. Instead, it uses these pages:
Clone Position page: this displays position data fields with default values from the position being cloned.
Review and Submit page: this page summarizes the transaction and is always the last step in transactions.
Special Processing for Employees in Positions
Guided self-service includes the following special processing for employees in positions:
The fields shown for the Promote Employee, Demote Employee, and Transfer Employee transactions enable a manager to change which position an employee is assigned to.
With partial position management, the system can make automatic database updates only if the employee’s position data has not been overridden. Otherwise, an administrator must manually make the change after the transaction has been approved.
The Change Full/Part Time or Hours, Request Location Change, Request Reporting Change, and Update Job Details for Group transactions can be optionally configured to make changes to position data as long as the position has just one incumbent and the incumbent’s position data has not been overridden.
The Update Job Details for Group transaction enables you to process multiple employees. If you assign a new supervisor to a group that includes a mix of position employees and non-position employees, it is possible to choose a new supervisor who is not in a position. In this scenario, a message indicates that the supervisor cannot be automatically assigned as the manager for the position employees. All position employees in the group are sent to an administrator for processing.
See Understanding Updates to Position Data for a more detailed description of the position update configuration option, including information about what happens when positions have multiple incumbents and when employee position data has been overridden.
Allowing Multiple Guided Self Service Transactions for an Employee
As delivered, PeopleSoft HCM allows a manager to initiate one job data transaction request at a time per employee. When a transaction is in progress, such as a job promotion that is pending approval, the manager cannot submit another request for that employee until the promotion request is resolved.
However, you can grant managers who are using the guided self-service pages the ability to submit multiple job data transactions for an employee. This functionality can be enabled for all or specific transactions.
All guided self-service transactions.
Select the Allow Multiple Transactions for Employee option on the Installation Table - HCM Options Page.
This enables the functionality across all guided self-service transactions. For example, a manager can submit multiple job transaction requests for an employee, such as a promotion and a reporting change.
Important! When this global option is enabled, you cannot turn off the functionality at the individual transaction level. Multiple transactions will be allowed for all transactions and effective dates. Therefore, it is recommended that you do NOT enable multiple transactions at the global (Installation Table) level.
Individual guided self-service transactions.
Select the Allow Multiple Transactions for Employee option on the Transaction Configuration - Configuration Page for the transactions in which a manager can submit a request even though another transaction is in progress.
This allows you to enable the functionality for specific transactions while restricting others. For example, if this feature is enabled for the Request Ad Hoc Salary Change transaction, a manager can request a salary change for an employee, even when another transaction is in progress. However, if this is not enabled for a transaction, such as Promote Employee, the manager cannot submit a promotion request until the current in progress transaction request is resolved.
Note: By selecting this option at the individual transaction configuration level, you override the OFF setting on Installation Table. The system treats the transaction as an exception. Note, however, that it does not work in reverse. If the functionality is enabled globally at the Installation Table level, you cannot turn the functionality off at the individual transaction level.
Transaction Summary
The following table lists the delivered guided self-service transactions, identifies the pages that appear during the transaction, and notes which transactions support position-specific processing. The Review and Submit page is part of every transaction and is not listed.
|
Transaction |
Questionnaire Page |
Work and Job Information Page |
Compensation Details Page |
Notes for employees in positions |
|---|---|---|---|---|
|
Demote Employee |
Yes |
Yes |
Depends on questionnaire answer. |
Employee is assigned to a new position. |
|
Change Full / Part Time or Hours |
No |
Yes |
No |
Can be configured to automatically update position data. |
|
Clone Position This uses the Clone Position page, which is unique to this transaction and does not appear in this table. |
No |
No |
No |
Does not impact existing employee position data. |
|
Request Location Change |
No |
Yes |
No |
Can be configured to automatically update position data. |
|
Request Leave of Absence |
No |
Yes |
No |
No special processing. |
|
Request Paid Leave of Absence |
No |
Yes |
No |
No special processing. |
|
Request Reporting Change |
No |
Yes |
No |
Can be configured to automatically update position data. |
|
Promote Employee |
Yes |
Yes |
Depends on questionnaire answer. |
Employee is assigned to a new position. |
|
Retire Employee |
No |
Yes |
No |
No special processing. |
|
Request Ad Hoc Salary Change |
No |
No |
Yes |
No special processing. |
|
Terminate Employee |
No |
Yes |
No |
No special processing. |
|
Transfer Employee |
Yes |
Depends on questionnaire answer. |
Depends on questionnaire answer. |
Employee is assigned to a new position. |
|
Update Job Details for Group |
Yes |
Yes |
No |
Can be configured to automatically update position data. Managers can select a non-position supervisor if the group includes both position and non-position employees, but the system will not assign this supervisor to the position employees. An administrator must manually update supervisor information for those employees. |
The following table describes the various navigation options for accessing guided self-service transactions.
|
Navigation Method |
Description |
Transaction-Specific Details |
|---|---|---|
|
Update Team Information tile |
Click the Update Team Information Tile on the Manager Self Service home page. On the Update Team Information page:
|
All transactions are listed in the left frame of the Update Team Information page. |
|
Menu Navigation |
Use standard menu navigation to select a specific transaction under the Manager Self-Service menu. The <Transaction Name> - Find Team Member Page for Selecting Employees appears. Use this page to select the employee(s) whose data will be updated. |
The menu path for most transactions is These are the exceptions:
|
|
|
Select a specific transaction from the related actions menu that appears next to team member names on various pages including, but not limited to, the My Team – Summary Page. This navigation method identifies both the transaction and the employee up front, so the manager goes directly into the guided self-service transaction. For more information about related actions, see Related Actions for Manager Self Service Pages. |
The related actions menu path for most transactions is These are the exceptions:
|
|
|
On the My Team page, click the Actions list icon in the page header, then select Update Job Details for Group. See also My Team Page: Actions List Menu Options. |
The Update Job Details for Group transaction is the only guided self-service option under the Actions List menu. On the My Team page, all other guided self-service transactions are available from the employee-specific related actions menus, but the Update Job Details for Group transaction is not because it gives users the option to select multiple employees. Therefore, access to this transaction is through the Actions list menu instead. |
 Related Actions Menu
 Actions List on the My Team page
Note: The PeopleSoft Classic versions of the Request Location Change and Request Reporting Change transactions allow managers to select multiple employees. However, when you implement guided self-service, conditional navigation redirects users to the guided self-service version of these transactions instead. These support a single employee only. To update information for multiple employees at once, use the Update Job Details for Group transaction. This transaction lets you request changes to any combination of department, location, and supervisor.
Use the Update Team Information tile (HC_NAVCOLL_7) to access the Update Team Information page, a navigation collection for initiating guided self-service transactions.
Navigation:
The Update Team Information tile is on the delivered Manager Self Service home page.
This example illustrates the Update Team Information tile
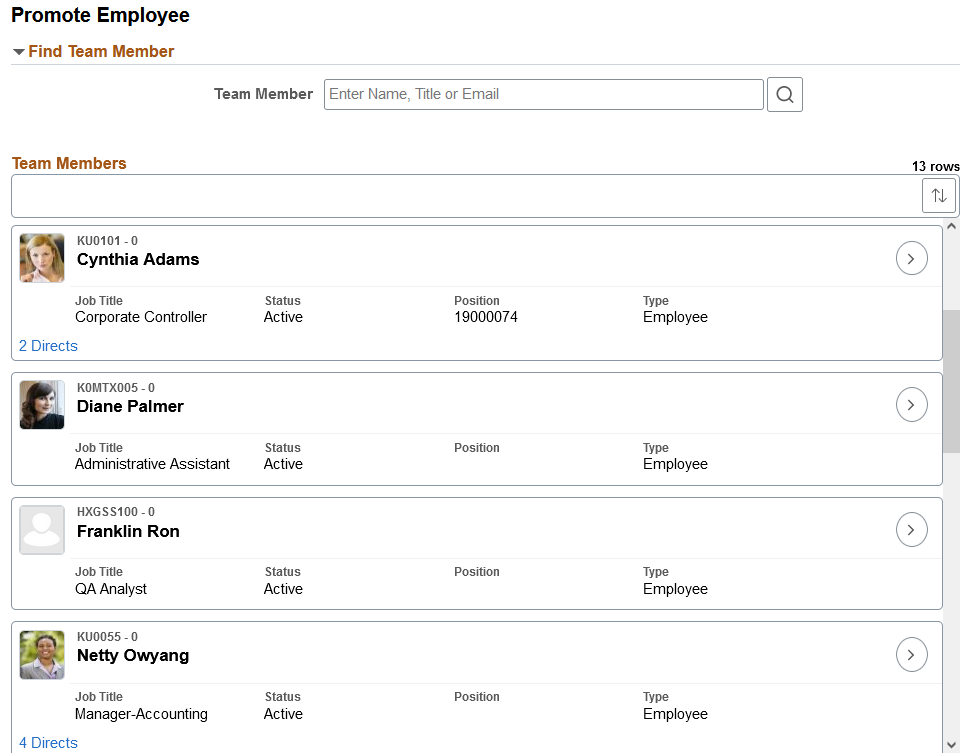
The Update Team Information page is a navigation collection where you can initiate a guided self-service transaction.
Navigation:
Click the Update Team Information Tile.
This example illustrates the Update Team Information page.
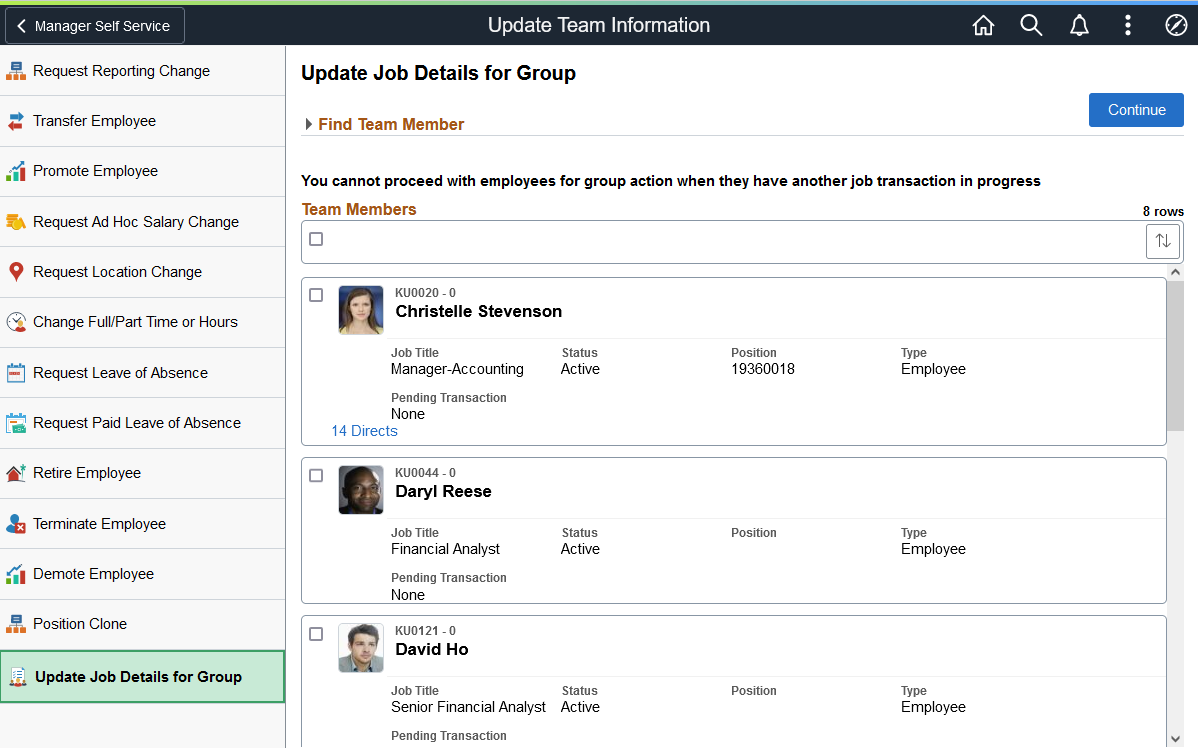
On this page:
The left frame lists the delivered guided self-service transactions.
The right frame displays the <Transaction Name> - Find Team Member Page for Selecting Employees, where you choose employees for the selected transaction.
Note: Throughout the remainder of these topics, the page illustrations will often show the transaction page of the Update Team Information process without the context of the left guided self-service navigation collection. Even though the left frame is not illustrated, remember that pages appear within that layout.
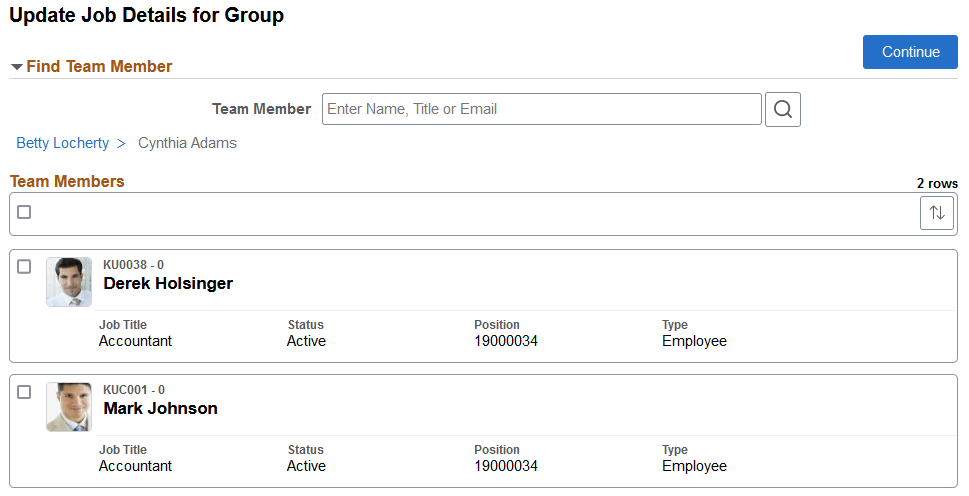
Use the <Transaction Name> - Find Team Member page (HR_PSEL_FLU) to select one or more employees for a guided self-service transaction. The page name matches the transaction name.
Navigation:
This page appears when users access a guided self-service transaction using the Update Team Information tile or using menu navigation.
When you use a related action for an employee to initiate the transaction, the system bypasses this page.
This example illustrates the <Transaction Name> - Find Team Member page when the Allow Multiple Transactions for Employee has not been enabled on the Installation Table - HCM Options Page.
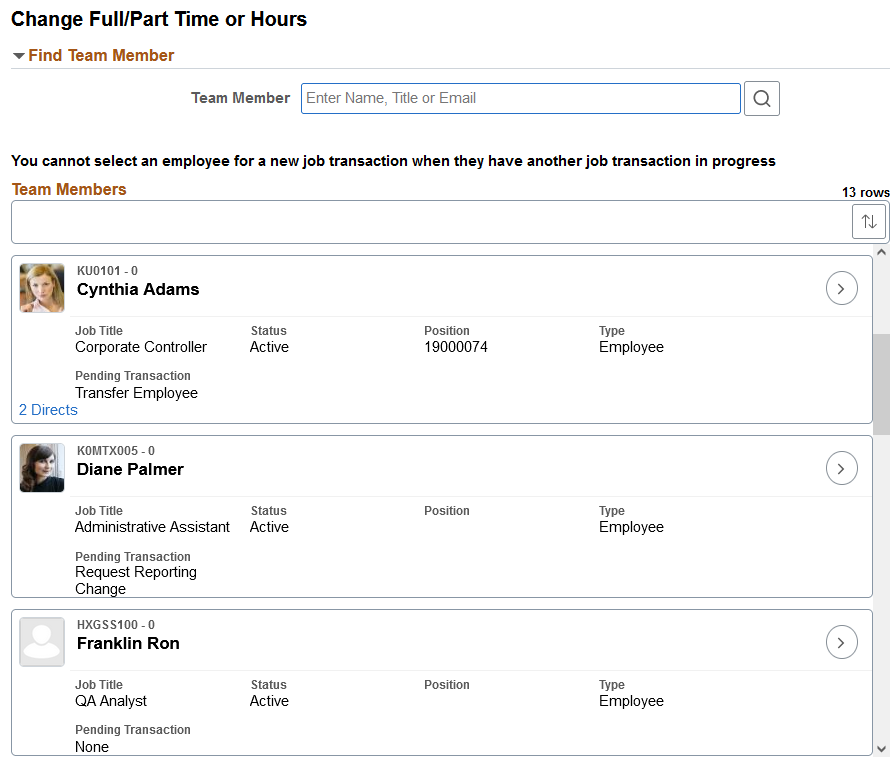
Note: As delivered, a manager can initiate only one job data transaction request at a time for an employee. This screenshot shows the page when multiple transactions for an employee is prohibited. For more information on allowing multiple transactions, see the "Allowing Multiple Guided Self Service Transactions for an Employee" subtopic under the Understanding Guided Self-Service Transactions discussion in this topic.
The reporting hierarchy is the same hierarchy that managers see on the My Team – Summary Page.
Page Elements
For descriptions of common fields and controls on this page, see (Fluid) <Transaction Name> - Find Team Member Page.
When Multiple Transactions for Employee is Not Allowed
When multiple transactions for an employee is not enabled globally at the Installation Table level, the page displays text below the Find Team Member search section indicating that you cannot select an employee or group for a new job transaction when an employee has another job transaction in progress.
|
Field or Control |
Description |
|---|---|
|
Pending Transaction |
This field appears on the page when multiple transactions for an employee is not enabled at the Installation Table. Shows whether the employee has a job request in progress by displaying one of the following:
|
Note: Although you may have allowed multiple transactions for individual transactions, the message and field still appear for all transaction types with the exception of the leave transactions or when cloning a position.
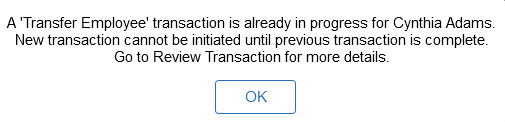
When you select a person, or a group that has a person with a transaction in progress, the system will issue a warning, such as shown in the following screenshots:
Example of the warning message when an employee has a job transaction in progress
Example of the warning message when a group of people you have selected has an employee that has a job transaction in progress

When Multiple Transactions for Employee is Enabled Globally
These screenshots show the page when multiple transactions for an employee are enabled on the Installation Table - HCM Options Page, overriding the delivered setting.
This example illustrates the <Transaction Name> - Find Team Member page for transactions where you can select only one employee.
This example illustrates the <Transaction Name> - Find Team Member page for the Update Job Details for Group transaction, which allows you to select multiple employees.
In this example, The user (Betty Locherty) has drilled down in her reporting structure, so the reporting structure for the current list of employees appears above the team members list.
For more detailed information on enabling multiple transaction for an employee, see the "Allowing Multiple Guided Self Service Transactions for an Employee" subtopic under the Understanding Guided Self-Service Transactions discussion.
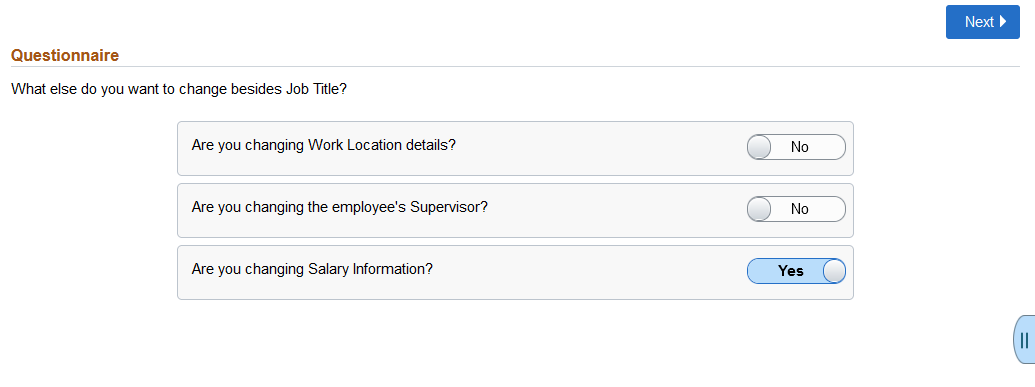
Use the Questionnaire page (HR_MSS_CT_QUES_FL) to answer questions that determine which pages and fields appear in the guided self-service transaction.
Note: This page appears only for guided self-service transactions that are configured with at least one non-hidden question. The only delivered transactions that include the Questionnaire page are Promote Employee, Demote Employee, Transfer Employee, and Update Job Details for Group.
Navigation:
Access a guided self-service transaction that includes a questionnaire.
This example illustrates the Questionnaire page for the Promote Employee transaction. All transactions except Update Job Details for Group are for a single employee, whose information appears at the top of the page.
This example illustrates the Questionnaire page for the Update Job Details for Group transaction. Because this transaction allows multiple employees, the page displays a Selected Employees list rather than displaying a single employee’s information at the top of the page.

Employee Information
For transactions other than Update Job Details for Group, the Questionnaire page includes a header with identifying information about the employee whose data is being updated.
Questionnaire
The on-page instructions, the questions that follow the instructions, and the default answers to the questions are all configured on the Transaction Configuration - Questionnaire Page. When you configure questions, you can choose alternate text to use on small form factors.
Field or Control |
Description |
|---|---|
Yes or No |
Swipe a Yes/No slider to answer a question. The selected answers determine the pages and fields that appear in the transaction. |
Next |
Select this button to move to the next step in the guided self-service transaction. An error appears if the Update Job Details for Group transaction includes employees from multiple business units and your questionnaire answers indicate that you want to change department or work location data. |
Selected Employees
This section appears only for the Update Job Details for Group transaction. It lists the employees whose data is being updated. The list appears even if the user selects just one employee.
Field or Control |
Description |
|---|---|
|
Click this icon to remove an employee from the Update Job Details for Group transaction without going back to the page for selecting employees. If there is only one employee in the list, you cannot delete that employee. You cannot add employees on this page. To add employees, restart the transaction. |

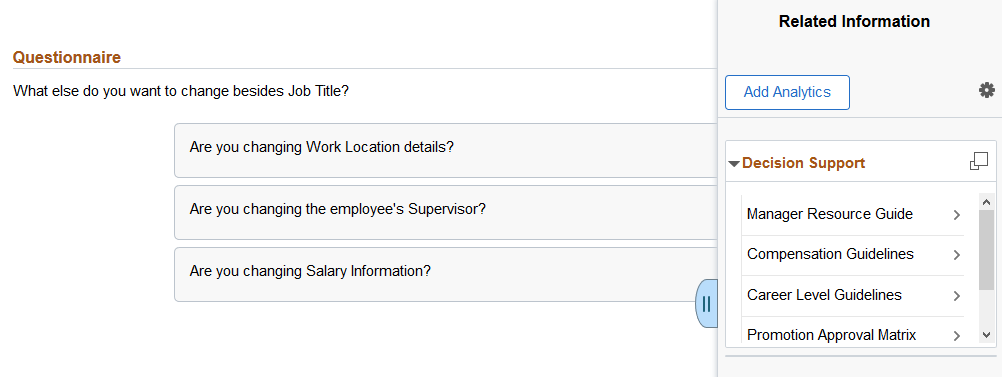
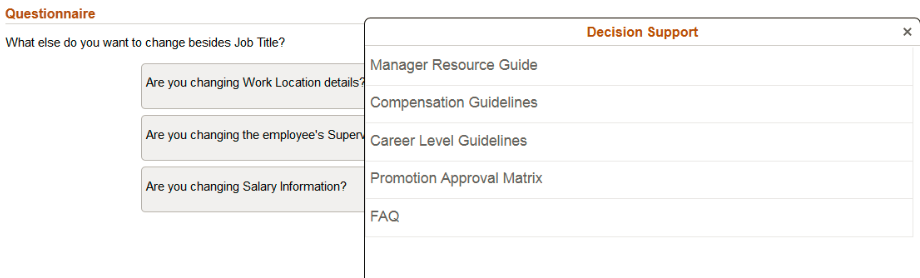
Related Content and Decision Support
Guided self-service transactions include an infrastructure than enables you to provide managers with decision making support and other related content. When you configure the transaction, you list message catalog entries for specific topics that you want managers to be able to access.
If you use PeopleTools 8.55 or later, you can also give managers access to PeopleTools simplified analytics. The delivered role PivotGridSuperUser gives users the ability to create and publish reports. Because guided self-service analytics can contain sensitive employee data, users should not publish such reports to the tile repository.
For more information about simplified analytics, see PeopleTools: Pivot Grid.
Use these page controls to access related information:
Field or Control |
Description |
|---|---|
|
This tab appears only in PeopleTools 8.55 or later. Click this tab to open the Related Content panel. The Related Information pane lists topics that have been configured for the transaction. Note: This tab appears on the guided self-service pages as well as on the Questionnaire page. |
 (Supplementary Panel tab button)
This example illustrates the related content panel on the Questionnaire page in PeopleTools 8.55 and later.
This example illustrates the related content panel for non-Questionaire pages in PeopleTools 8.55 and later.
Field or Control |
Description |
|---|---|
Add Analytics |
Click to access the simplified analytics capabilities provided by PeopleTools 8.55 and later and create a new chart. When you select to add a new analytic report, the system opens the Create Analytics page where you will use the Analytics Wizard to guide you through the process of creating a new report. The system uses templates based on transaction page from which you are creating the new report. The templates determine the fields and prompts in the next step of the wizard. The delivered role PivotGridSuperUser gives users the ability to create and publish reports. For information on how to create simplified analytics, see PeopleTools: Pivot Grid, “Working with Simplified Analytics,” Creating Simplified Analytics. |
|
Click this icon to expand and open the Decision Support Page in a modal window, where you can view the complete list, text and details of the decision support topics. |
 (Display Decision Support in Modal icon)
This example illustrates the Decision Support panel in PeopleTools versions older than 8.55
Click the Decision Support button then click an area of interest to view specific content. Use the back arrow buttons or use the Exit icon (X) to return to previous pages.
Use the Decision Support page (HR_MSS_CT_DSUP_FL) to view decision support topics that are defined in the transaction configuration.
Note: This page appears in PeopleTools 8.55 or later. With earlier versions of PeopleTools, decision support appears in a panel on the Questionnaire page.
Navigation:
Open the Related Information panel on the Questionnaire page. On the Decision Support tab, click the Display Decision Support in Modal Window icon (this icon is next to the Decision Support title).
This example illustrates the Decision Support page.
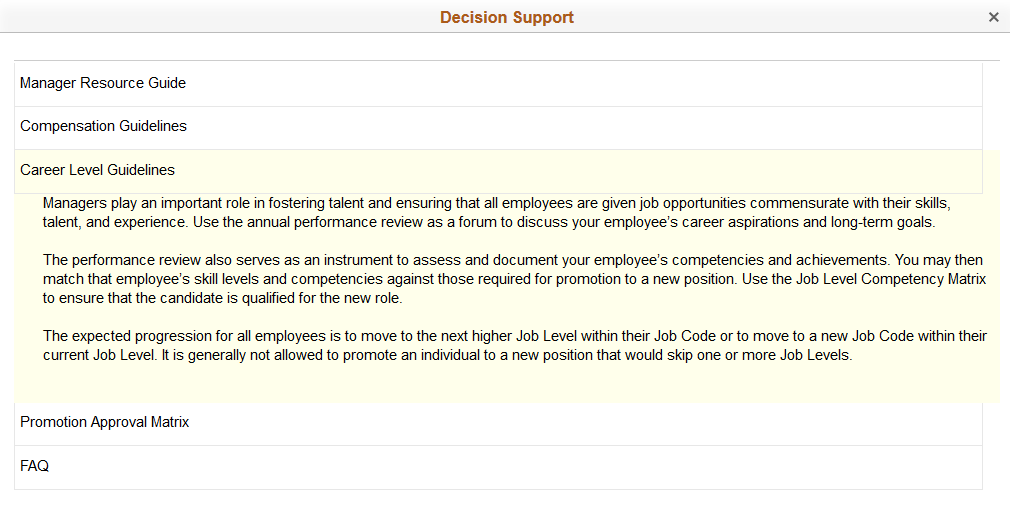
This page lists the decision support topics that are defined in the transaction configuration. Click a topic title to expand it and view the full text for the topic, then click again to hide the text and return to the list of topics.
A common header appears on the pages for each post-questionnaire step in a guided self-service transaction. Use this header for navigation and to provide context.
The header on small form factor devices (phones) differs from the standard header.
This example illustrates the guided self-service header on larger devices.

This example illustrates the guided self-service header on small form factors.
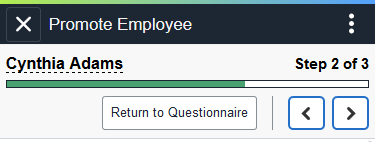
The common header in PeopleTools 8.55 and higher is rendered by the Activity Guide framework and is slightly different from the header that appears with earlier versions of PeopleTools. These differences are pointed out in the following documentation.
Field or Control |
Description |
|---|---|
|
Click to exit the transaction entirely and return to the page where the transaction was invoked. In pre-Activity Guide systems, users see the standard fluid return button, labeled with the name of the page that will appear when the user exits. |
<Standard Banner Icons> |
When the common header is rendered by the Activity Guide framework, most of the standard banner icons are hidden, including icons such as Home and Navigator which would lead the user away from the activity. This keeps users focused on completing the steps in this transaction. The Notifications icon is still available in guided self-service transactions. On larger devices it appears as a banner icon, but on small form factor devices, it appears as an option in the Actions List menu. |
|
Click to navigate to the previous or next step in the transaction. In pre-Activity Guide systems, these buttons appear below the header area rather than in the header area. |
|
The icon for the Action List button depends on your version of PeopleTools. Click the icon to access a menu with these options:
In pre-Activity Guide systems, the Return to Questionnaire action is not in the actions menu. Instead, a Questionnaire button appears next to the Previous and Next buttons. |
<employee information> |
For the Update Job Details for Group transaction, the page displays a Group Update label and icon along with text stating how many employees are included. For all other transactions, the page displays the name, job title, and photo for the individual employee whose data will be updated. On small form factor devices, only the name or the Group Update label appears at the top of the page, but users can tap the text to display the additional information. In pre-Activity Guide systems, a related actions button appears next to an individual employee’s name. When the common header is rendered by the Activity Guide framework, this button is hidden to keep users focused on completing the steps in this transaction. |
<graphical representation of steps> |
On larger devices, the header area includes a graphical representation of the steps in the transaction. This list includes step names and numbers. Users can click a step to go directly there as long as steps are completed sequentially. On small form factor devices, the header shows an overall progress indicator. The progress indicator does not show step names, but is shows the text Step n of n along with a progress bar that gets filled in to indicate the percentage completion. You cannot click this header to navigate to different steps. |
 or
or 

 or
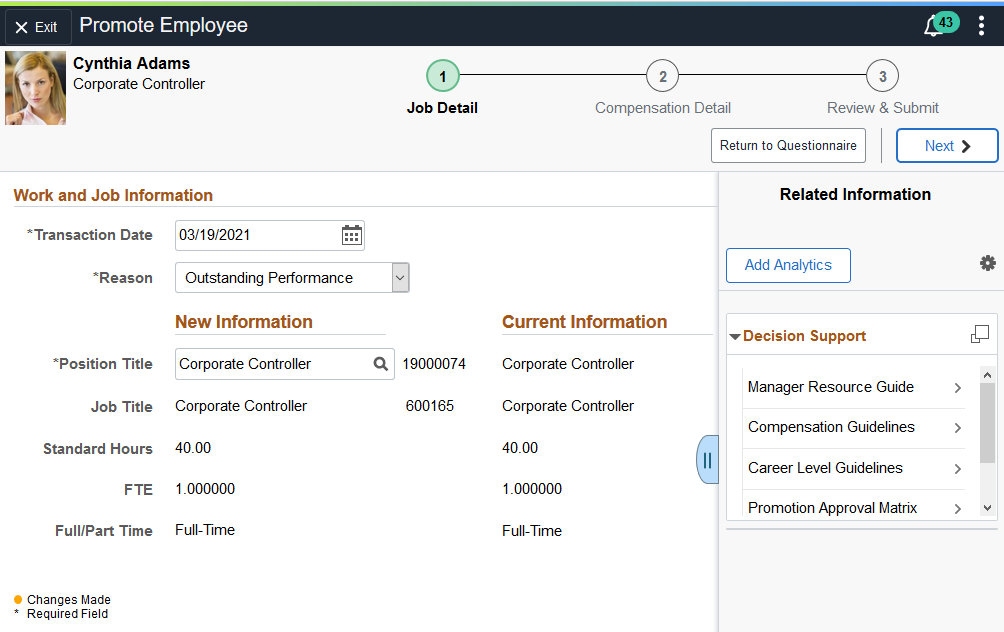
or Use the Work and Job Information page (HR_MSS_CT_PG1_AGFL or HR_MSS_CT_PG1_FL) to enter work and job changes for an employee.
Navigation:
For transactions that include the Work and Job Information page but do not include a questionnaire, this page appears immediately when the user navigates to the transaction.
For transactions that include a questionnaire, select the Next button from the Questionnaire page. (Answers to the questions might control whether the Work and Job Information page appears at all.)
Select the Work and Job Information step in the graphical map of the steps in the transaction.
This example illustrates the Work and Job Information page, which appears under the Job Detail step in the guided process.
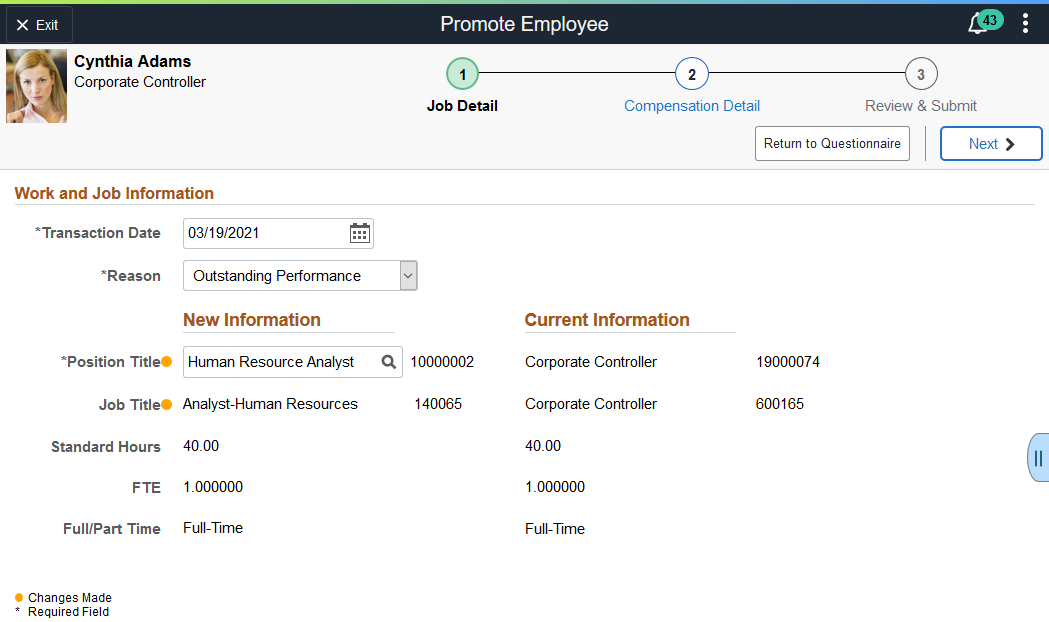
Guided self-service transactions include this page when the transaction includes an update to the job or work location data. The fields on this page vary based on setup and on the answers to the questions on the Questionnaire Page.
Note: Guided Self Service will not update Job Data with blank field values.
Field or Control |
Description |
|---|---|
Transaction Date |
The default transaction date is the current date. This date is used as the effective date of the data changes. If a transaction has been configured to include the Last Date Worked field, the last date worked must be equal to or earlier than the transaction date. The default last date worked is the day before the transaction date. The Last Date Worked field is normally relevant only to the Terminate Employee and Retire Employee transactions. |
Reason |
Select an action reason to use for the job data row that will be created when this transaction is submitted and approved. The transaction configuration controls whether this field appears, whether it is required, the list of available values, and the default value. |
Position Data Message |
If you use the Promote Employee, Demote Employee, or Transfer Employee transaction to change which position an employee holds, a message appears if the position data is overridden in the employee’s job data. The message states that job data must be updated manually. If the employee is in a position and the position data is not overridden in the employee’s job data, a message appears when you make changes to data that is derived from the position:
|
New Information |
Enter the new data for the employee in this column. The fields that appear on this page depend on the transaction configuration. If the Standard Hours field appears, a read-only FTE (full-time equivalent) field also appears, and the system updates the FTE value when the user changes the standard hours. The employee’s business unit controls the valid values for fields such as Department and Location that are controlled by setID. The Update Job Details for Group transaction requires that all selected employees have the same business unit. Some page elements can vary depending on whether the employee is in a position:
|
Current Information |
This column displays the employee’s current data. With the Update Job Details for Group transaction, it is possible for the selected employees to have different current information. When this occurs, the field indicates that there are multiple values. For example, if the selected employees are currently in different locations, the current information for the Location field is Multiple Locations. |
Selected Employees |
For the Update Job Details for Group transaction, this section lists the employees whose data is being updated. If the list includes position employees whose data cannot be automatically updated, a lock icon appears in the last column of the grid. Additionally, the page includes informational text to explain that an administrator will complete the processing for the position data. Position data cannot be automatically updated when an employee has a position data override, when a position has multiple incumbents, or when position data is not activated for the Update Job Details for Group transaction. |
Use the Compensation Details page (HR_MSS_CT_PG2_AGFL or HR_MSS_CT_PG2_FL) to enter compensation changes for an employee.
Navigation:
Select the Next button from the previous page in the guided self-service transaction.
Select the Compensation Details step in the graphical map of the steps in the transaction.
For transactions that include the Compensation Details page but do not include a questionnaire or the Work and Job Information page, this page appears immediately when a user navigates to the transaction.
This example illustrates the Compensation Details page.
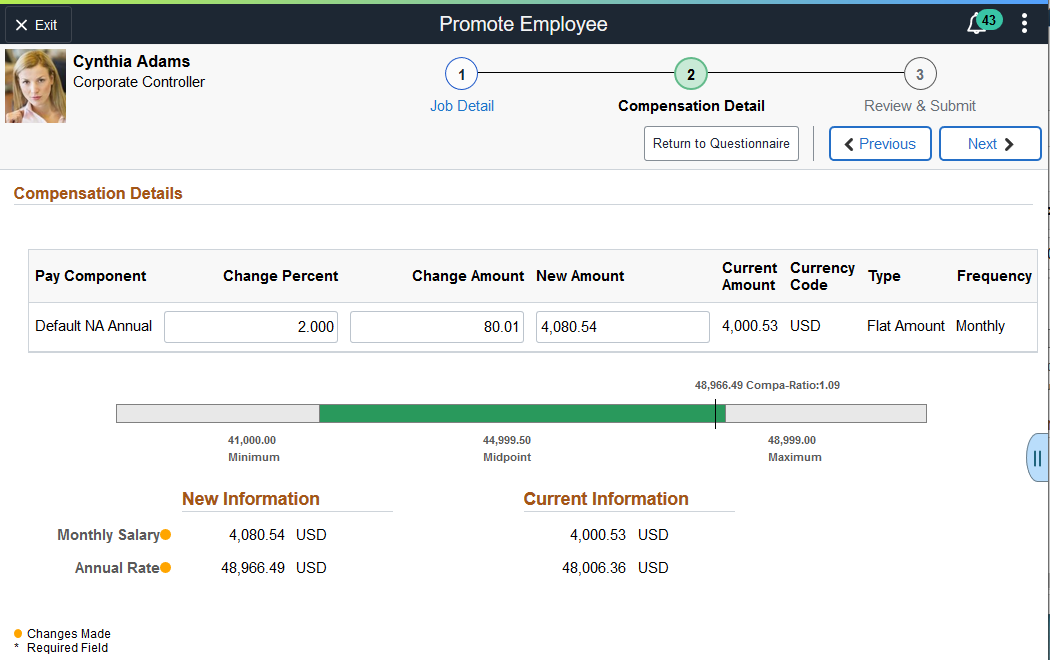
The guided self-service transaction includes this page when the transaction requires an update to the compensation data. The fields on this page vary based on setup and on the answers to the questions on the Questionnaire Page.
Note: Guided Self Service will not update Job Data with blank field values.
The navigation buttons (Questionnaire, Previous, and Next) are the same on this page as on the Work and Job Information page.
Field or Control |
Description |
|---|---|
Pay Component |
For each pay component listed, enter the salary change details. When you enter a number in either the Change Percent, Change Amount, or New Amount fields and move from the field, the system automatically calculates and updates the other fields based on your entry. Note: To decrease the employee’s salary enter a negative adjustment in the Change Percent or Change Amount field. The Demote Employee transaction displays a warning if you enter an adjustment that is not negative. |
Salary Range Graphic |
The graphical representation of the annual pay range for the employee’s job or position provides a helpful visualization of where the new salary amount falls in that range. If this transaction includes a new job or position, the visualization is based on the new pay range. |
New Information |
Displays the new salary information. |
Current Information |
Displays the employee’s current salary information. |
Use the Clone Position page (HR_MSS_POSN_AGFL) to enter or update position data to create a new position based on an existing one.
Note: This page is available only with PeopleTools 8.55 or later.
Navigation:
Start a Clone Position guided self-service transaction.
This is the first of two examples illustrating the Clone Position page.
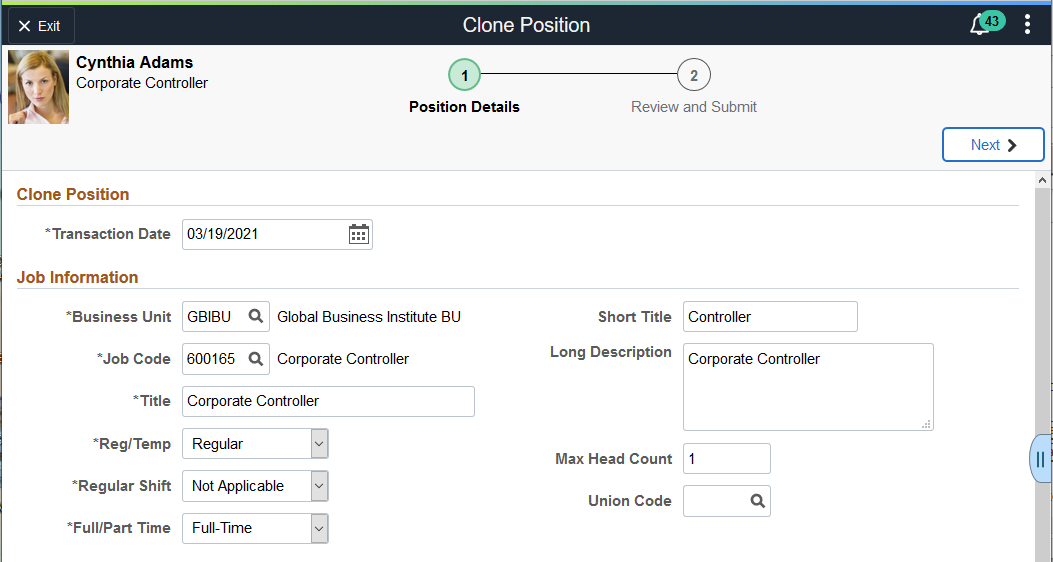
This is the second of two examples illustrating the Clone Position page.
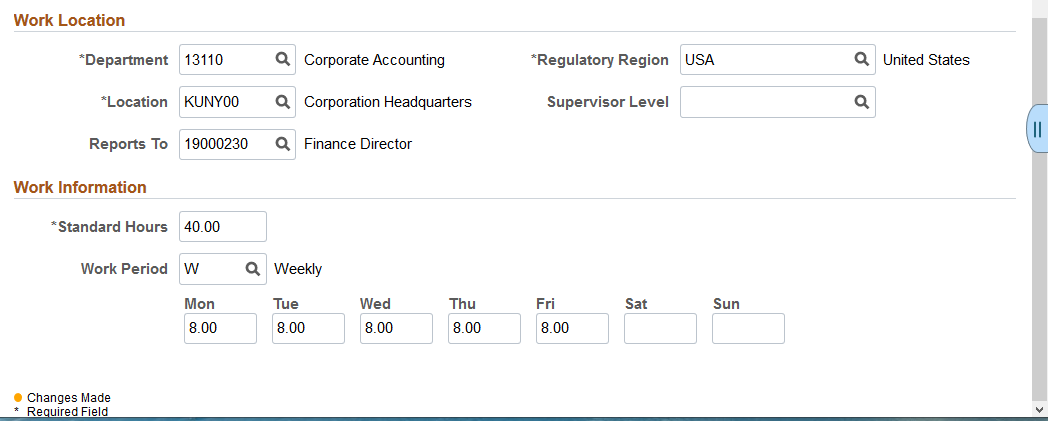
Use the Next button to continue to the Review and Submit page after looking at the position data fields and making any necessary changes.
The position data fields on this page vary based on setup. They correspond to the fields on the Position Data - Description Page and the Position Data - Specific Information Page.
The default values in all of the fields come from the position of the employee whose position is being cloned. Unlike other guided self-service transaction, there is no requirement for the user to change any data. However, there is also no requirement to retain any of the data. Managers are free to keep all, some, or none of the default values in the fields that appear on this page.
Here is additional important information about certain fields on this page:
The Mon through Sun day-of-the-week fields for daily hours are visible only if the work period is W (weekly).
When these fields are visible, and the user updates the standard hours, the system automatically updates the Mon through Sun fields by distributing the an equal number of hours across Monday through Friday.
As delivered, the transaction does not display the Company field. Even when the Company field is hidden, its value can change if the manager selects a Department that is in a different company.
As delivered, the transaction does not display the encumbrance related fields.
The encumbrance-related fields are Position Pool ID, Encumbrance Indicator, Encumber Salary Option, Classified/Unclassified Ind, FTE, and Adds to FTE Actual Count.
The clone process copies data from all fields that can be configured to appear, even those that are hidden due to the transaction configuration.
The clone process also copies the original position’s salary plan, grade, and step unless the Business Unit is changed or cleared, in which case the system clears this data for the new position.
The salary-related fields are not part of the transaction configuration, so they are never visible on this page. An administrator is responsible for verifying that the newly created position has the correct salary information. If administrator approvals are required, this review can be done on the administrator approval page, where the administrator can update the fields before approving the transaction.
If the Business Unit is changed or cleared, the system also clears the Department, Job Code, and Location fields, and the user sees a warning.
The Update Incumbents check box is always selected in new positions that are created by the delivered Clone Position transaction.
Use this Review and Submit page (HR_MSS_CT_SBM_AGFL or HR_MSS_CT_SUBMT_FL) to review transaction information, to add comments, and to submit a request.
Navigation:
Select the Next button from the previous page, or select this step in the graphical representation of the transaction steps.
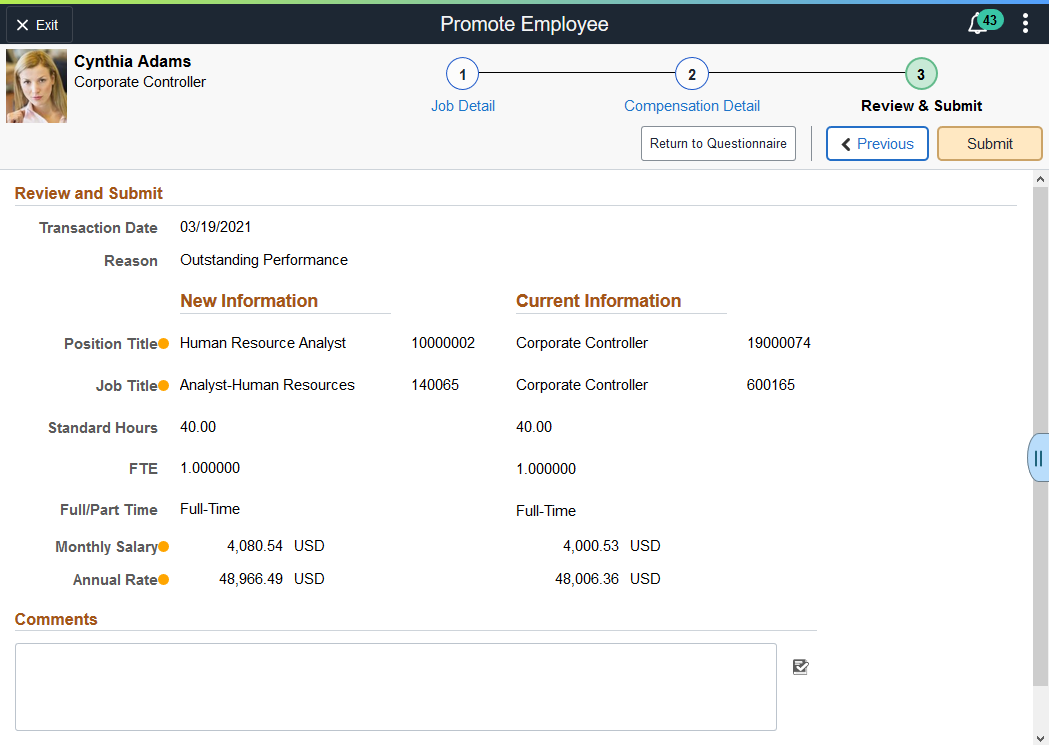
This example illustrates the fields and controls on the Review and Submit page for an employee transaction.
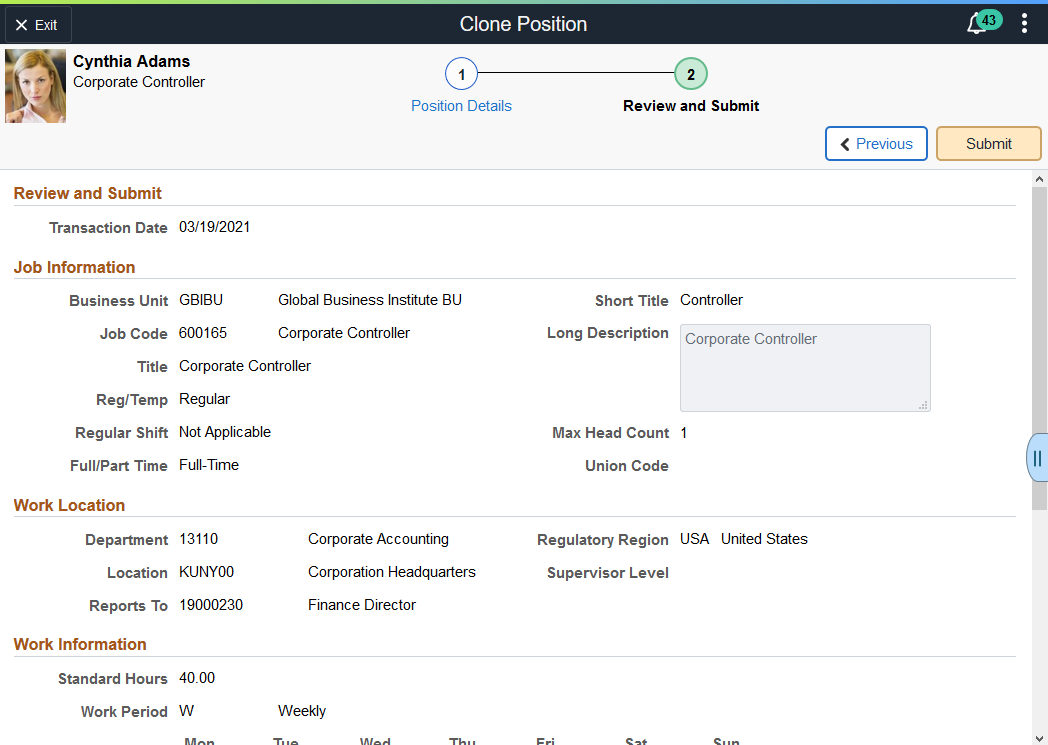
This example partially illustrates the Review and Submit page for the Clone Position transaction. The Comments and Attachments sections are not shown, but they are the same for the Clone Position transaction as for employee transactions.
Note: Guided Self Service will not update Job Data with blank field values.
Field or Control |
Description |
|---|---|
Submit |
Select this button to finalize the transaction and, if approvals are required, to begin the approval process. If no errors are encountered, the system displays a confirmation page that shows the approval chain. If errors are encountered, the HR administrator is notified. If approvals are not required, the confirmation page appears after the system makes the related database updates. For the Update Job Details for Group transaction, processing time increases with the number of employee records that are being updated. |
Note: Oracle PeopleSoft delivers Notification Composer Framework to manage the setup and administration of all notifications in one central location.
Once you have adopted the Notification Composer feature, you must use it to create new notifications and manage your existing notifications.
Notifications delivered with HCM Image 47 or later must use Notification Composer.
For more information about Notification Composer Framework, see Understanding Notification Composer.
Transaction Details for Employee Transactions
Transactions other than the Clone Position include a Review and Submit area that displays transaction information. The transaction date appears at the top of the page.
Field or Control |
Description |
|---|---|
Reason |
Employee data changes are associated with an action and an action reason. This field displays the action reason for that transaction. The action is never visible, but the transaction configuration determines whether the Reason field is visible. |
New Information |
This column displays the data that will take effect when the transaction is approved. A yellow dot between the field name and the field value indicates data that is changing. To change a value, return to the appropriate page in the transaction to make the changes. |
Current Information |
This column displays the employee’s current data so that you can easily see the changes that are being requested. |
Selected Employees |
For the Update Job Details for Group transaction, this section lists the employees whose data is being updated. |
Transaction Details for Clone Position
The same sections and fields that appeared on the Clone Transaction page appear on the Review and Submit page for the transaction. The transaction date appears at the top of the page.
Comments
Field or Control |
Description |
|---|---|
Comments |
Enter additional comments for the transaction’s approvers and reviewers. Comments entered here are visible throughout the approval process. |
Attachments
Use the Attachments section of this page to attach supporting documents for a transaction. This section is visible only if the transaction is configured to allow attachments.
The attachments that you add here will appear in all transaction detail pages, including pages for approvers, administrators, and reviewers. The file itself is never duplicated, there are just multiple pointers to the file.
The list of transactions on the fluid Pending Approvals page includes a count of attachments for transactions that have attachments.
Approval-related notifications do not include information about attachments.
After you add an attachment to the transaction, a grid appears in the Attachments area of the page.
This example illustrates the Attachments grid on the Review and Submit page.

Field or Control |
Description |
|---|---|
|
Click to open a dialog box where you can select and upload a file. Your device and browser determine the appearance and behavior of this dialog box. Allowable file types depend on your configuration and can be further restricted by the type of device you use. For example, iOS phones allow you to attach photos or videos, but they do not provide access to a full file system where you can select other types of attachments. This button has a text label when no attachments have been added yet. If attachments exist, an icon button appears instead. |
File Name |
Displays the original file name of the attachment. Click the link to open the attachment. |
Description |
The default description is the file name, but you can modify this to provide more descriptive text. |
DateTime Attached |
Displays the date and time that the file was uploaded. |
|
Click to remove the attachment. |

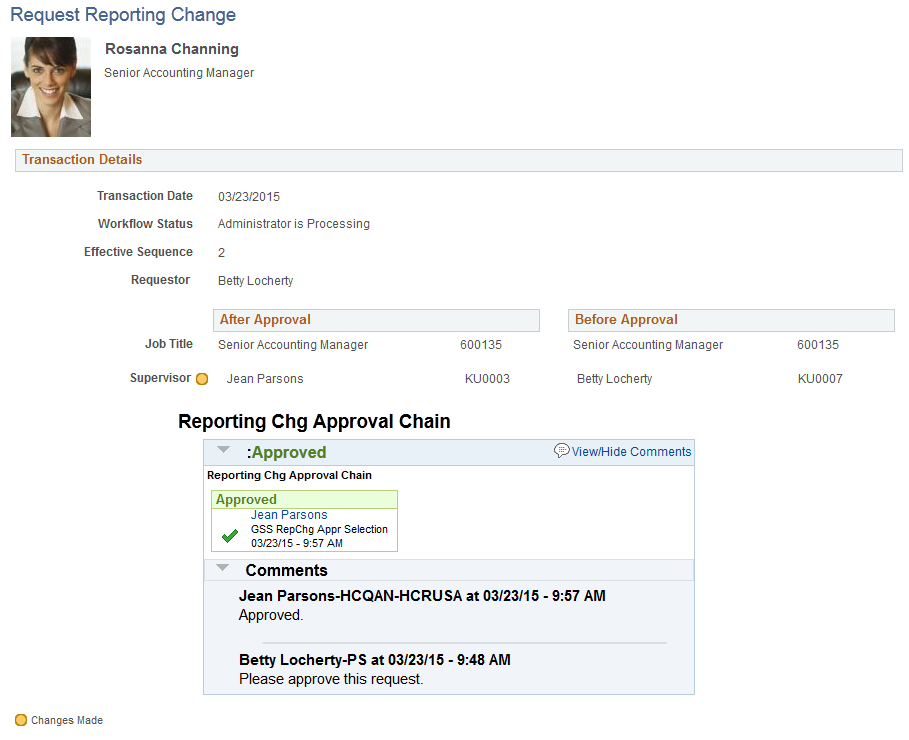
Requestors and reviewers use the <Transaction Name> page (HR_MSS_CT_EE) to review read-only information about a guided self-service transaction that has been submitted for approval.
The page name varies depending on the transaction type.
Navigation:
This page is accessible only using an email link. The system sends requestors and reviewers an email with this link after the requestor submits a guided self-service transaction.
This example illustrates the read-only page that submitters and reviewers use to view a guided self-service transaction that updates employee data.
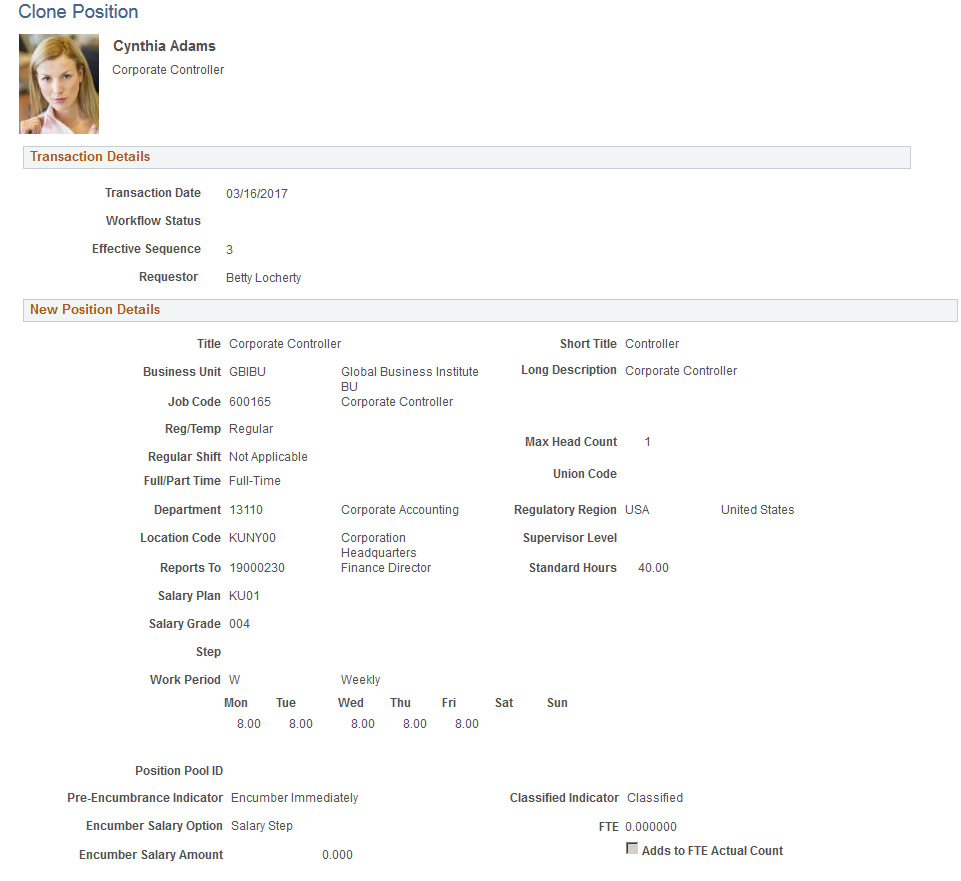
This example illustrates the read-only page that submitters and reviewers use to view a Clone Position transaction.
Note: Guided Self Service will not update Job Data with blank field values.