Configuring Guided Self-Service Transactions for Manager Self-Service
To set up guided self-service transactions, use the Transaction Configuration (HR_MSS_CT_CFG) and Clone Transaction (HR_MSS_CT_CLONE) components.
This video provides a demonstration of guided self-service configuration options for regulatory regions and action reasons.
Video: PeopleSoft HCM 9.2 Image 17 Highlights: Guided Self-Service Enhancements
|
Page Name |
Definition Name |
Usage |
|---|---|---|
|
HR_MSS_CT_CFG |
Configure guided self-service transactions for managers. |
|
|
HR_MSS_CT_CLNE_SEC |
Create a new row for an existing transaction ID, and specify the effective date and regulatory region for the new row. |
|
|
HR_MSS_CT_SEQ |
Add questions for guided self-service transactions. |
|
|
HR_MSS_CT_RSN_SEC |
Choose the valid action reasons for the job data row that the transaction creates, and choose a default action reason. |
|
|
HR_MSS_CT_FLDS_SEC |
Choose which fields to display on the guided self-service transaction, and choose whether those fields are display-only. |
|
|
HR_MSS_CT_POSN_SEC |
Configure position data updates based on guided self-service updates to incumbent data. |
|
|
HR_MSS_CT_CLONE |
Clone guided self-service transactions for manager self-service. |
Oracle delivers several preconfigured transactions. Part of the transaction configuration is choosing which fields to include. The available fields are those from records that exist specifically to support guided self-service.
This overview lists the delivered transactions and lists which fields are available to use with guided self-service.
Delivered Transactions
The PeopleSoft application delivers configurations for the following guided self-service transactions:
HR_DEMOTION (Demote Employee)
HR_FULL_PART_STATUS (Change Full/Part Time or Hours)
HR_GROUP_UPDATE (Update Job Details for Group)
Note: The ability to process multiple employees is hard-coded into this transaction. You cannot configure other transactions to support multiple employees.
HR_LOA_PAID (Request Paid Leave of Absence)
HR_LOA_UNPAID (Request Leave of Absence)
HR_LOCATION_CHANGE (Request Location Change)
HR_POSITION_CLONE (Clone Position
HR_PROMOTE_PAY (Promote Employee)
HR_REPORTING_CHANGE (Request Reporting Change)
HR_RETIREMENT (Retire Employee)
HR_TERMINATE (Terminate Employee)
HR_SALARY_CHANGE (Request Ad Hoc Salary Change)
HR_TRANSFER_PAY (Transfer Employee)
Types of Delivered Fields
When you configure the fields for a guided self-service transaction, you first choose the page that contains the record and field definitions that you will use.
These are the supported pages:
HR_MSS_CT_JOB_SBF (Job Details subpage) for job data fields.
HR_MSS_CT_COMP_SBF (Compensation Details subpage) for compensation data fields.
HR_MSS_CLPOSN1_SBF (Clone Position subpage) for position data fields.
Oracle also delivers an additional job data subpage, HR_MSS_CT_JOBC_SBF that your organization can modify if you need to add additional fields for guided self-service. As delivered, this page does not include any fields.
Delivered Fields for Job Data
These fields are available on the Job Details subpage HR_MSS_CT_JOB_SBF:
Business Unit
Department ID
Expected Return Date
Full/Part Time
Job Title
Last Date Worked
Location Code
Position Number
Reports To (for employees in positions)
Standard Hours
If the Standard Hours field from the Job Details subpage is made visible, the transaction also displays a read-only FTE (full-time equivalent) field. The value in the FTE fields is automatically updated when the manager changes the employee's standard hours.
Supervisor ID (for employees who are not in positions, or whose Reports To position data has been overridden with a Supervisor ID)
Delivered Fields for Compensation Details
These fields are available on the Compensation Details subpage HR_MSS_CT_COMP_SBF:
Annual Rate
Previous Salary
Delivered Fields for Clone Position
These fields are available on the Clone Position subpage HR_MSS_CLPOSN1_SBF:
Title
Short Title
Business Unit
Department
Job Code
Max Head Count
Reports To
Location
Standard Hours
Work Period
Union Code
Regular Shift
Reg/Temp
Full/Part time
Mon
Tue
Wed
Thu
Fri
Sat
Sun
Regulatory Region
Supervisor Level
Long Description
Company
Position Pool ID
Pre-Encumbrance Indicator
Encumber Salary Option
Encumber Salary Amount
Classified Indicator
FTE
Adds to FTE Actual Count
For the Clone Position subpage, the Standard Hours field and the FTE field are configured independently. This is different from the Job Data subpage, where configuring the Standard Hours field to appear in the transaction automatically causes a display-only FTE field to appear as well.
The Salary Plan, Salary Grade, and Salary Step fields cannot be configured to appear in the transaction. The delivered Clone Position transaction automatically copies the original position’s salary plan, grade, and step unless the values are cleared because the manager who requests the position clears the Business Unit value while updating data for the new position. An administrator is responsible for verifying that the newly created position has the correct salary information. If administrator approvals are required, this review can be done on the administrator approval page, where the administrator can update the fields before approving the transaction.
You also cannot configure the setting for the Update Incumbents check box on the new position; that check box is always selected in new positions that are created by the delivered Clone Position transaction.
For additional important information about the fields in the Clone Position transaction, refer to the documentation for the Clone Position Page.
This overview discusses considerations for employees in positions.
Note: This topic is not relevant to the Clone Position transaction, which creates a new position without changing any existing employee information.
Updating Data for an Employee’s Position
If you are changing certain information related an employee’s current position (rather than changing which position is associated with the employee), you can configure these delivered transactions to update position data:
Change Full/Part Time or Hours
Request Location Change
Request Reporting Change
Update Job Details for Group
Important! These are the only transactions that support position data updates.
If you enable position data updates, the updates occur only if both of these conditions are met:
The employee’s position data has not been overridden.
There is a one-to-one relationship between the employee and the position.
When position data updates are enabled and a manager submits a request for an employee who meets both conditions, both managers and approvers see messages stating that position data will be updated as a result of the request. When the system makes automatic database updates, it inserts a new effective-dated row into the position data record. As long as the Update Incumbents check box on the Position Data - Specific Information Page is selected, the new position data row triggers the Update Incumbent process, which adds a corresponding row to the employee’s job record.
Important! If you use Guided Self-Service to update positions, make sure that the Update Incumbents check box is selected in the Position Data component so that the position changes can flow through to employee’s job data records.
Conditions that Prevent Automatic Position Data Updates
The system does not make position data updates in the following situations:
Position data updates are not enabled, or the transaction is not one of the ones that supports position data updates.
In these situations, the transaction is always routed to an administrator after any other approvals are complete. The administrator does not have the option to let the system make automatic updates. Instead, the administrator is instructed to update the data manually.
There is not a one-to-one relationship between the employee and the position.
In this situation, the transaction works as if position data updates were not enabled, so the administrator who processes the transaction must make the database updates manually.
The employee’s position data is overridden in the job data record.
In this situation, the employee is handled like an employee who is not in a position. If administrator approval is required, the administrator still has a choice between allowing automatic updates and making manual updates, but automatic updates are made to the job record rather than to the position data.
The employee has been given a new supervisor who is not in a position.
This situation is possible only through the Update Job Details for Group transaction. The the group action includes a mix of position employees and non-position employees, and the manager chooses to change the employees’ supervisor, it is possible to select a new supervisor who is not in a position. The system can assign this new supervisor to the non-position employees, but an administrator must manually update the Reports To field for the position employees.
In this scenario, the Update Job Details for Group transaction can still update the department and location for employees in positions.
Changes to Which Position is Associated With an Employee
Position configuration applies only to changes that you make to position data. No configuration is needed to change which position an employee holds. You can change an employee’s position using the delivered Promote Employee, Demote Employee, and Transfer Employee transactions.
With partial position management, the system can make automatic database updates only if the employee’s position data has not been overridden. Otherwise, an administrator must manually make the change after the transaction has been approved.
When you configure a guided self-service transaction, you choose whether to enable transaction attachments.
File Storage
PeopleTools manages the physical storage locations of file attachments using the URL Maintenance page (PeopleTools, Utilities, Administration, URLs). All guided self-service transactions use the delivered URL Identifier HR_MSS_CT_FILES.
As delivered, the HR_MSS_CT_FILES URL Identifier is configured to store attachments in a database record. Modify the settings to store attachments on a file server instead.
File Type Restrictions
On the URL Maintenance page in PeopleTools, click the URL Properties link to open a page where you can choose a file extension list that controls the allowable file types. File extension lists are managed on the File Extension List page (PeopleTools, Utilities, Administration, Administer File Processing, File Extension List).
As delivered, the HR_MSS_CT_FILES URL Identifier references the delivered GSS_EXTENSION_LIST. Note that on phones and tablets, the mobile operating system can additionally restrict user’s ability to attach certain types of files. For example, iOS phones allow users to attach photos or videos, but they do not provide access to a full file system where users can select other types of attachments
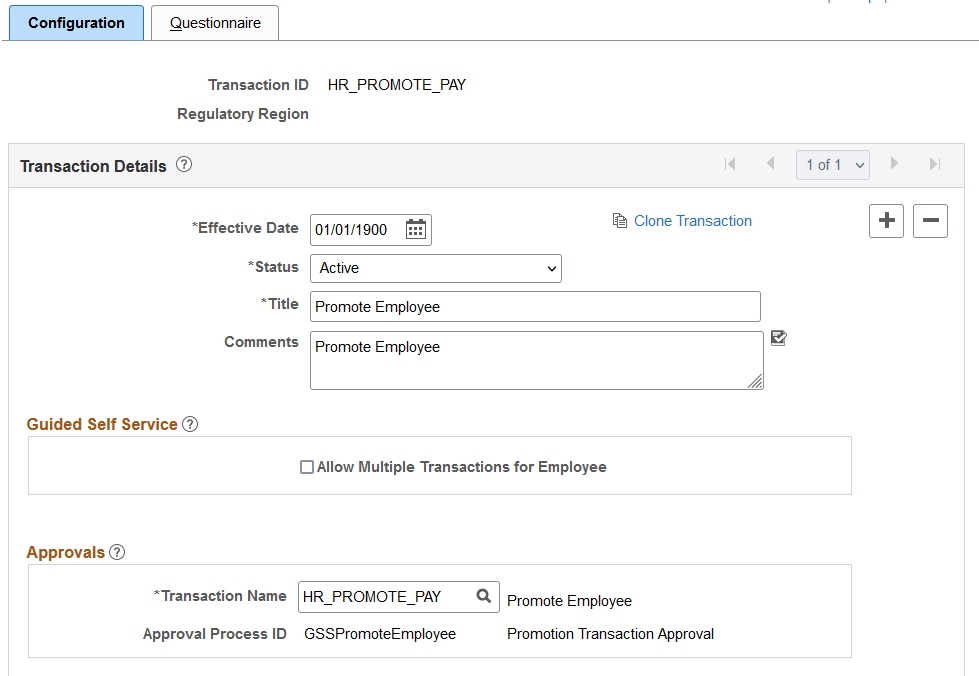
Use the Transaction Configuration - Configuration page (HR_MSS_CT_CFG) to configure guided self-service transactions for managers.
Navigation:
This example illustrates the Transaction Configuration - Configuration page (1 of 2).
This example illustrates the Transaction Configuration - Configuration page (2 of 2).
Field or Control |
Description |
|---|---|
Transaction ID |
Configuration settings are keyed by effective date and regulatory region as well as by transaction ID, but the transaction ID is the field that identifies the transaction. For example, all settings with the transaction ID HR_PROMOTE_PAY are for the Promote Employee transaction. At runtime, when a manager initiates a Promote Employee transaction, the system looks at the effective date and regulatory region values to select the correct row for the HR_PROMOTE_PAY transaction. |
Regulatory Region |
Displays the regulatory region that you are configuring. For every Transaction ID, there must be a configuration record with no regulatory region defined. This is the default configuration that system uses for employees in regulatory regions that do not have region-specific settings. |
Transaction Details
Field or Control |
Description |
|---|---|
Clone Transaction |
Click to copy the current transaction to create a new configuration row for the transaction. The newly created row retains the current Transaction ID, but you can enter a new effective date and / or regulatory region to create a modified configuration to support requirements that have changed or that are different for different regulatory regions. |
Status |
Keep the default value of Active for configurations that are currently in use. Select Inactive to remove a configuration from use. You cannot inactivate all effective-dated rows for a transaction’s default configuration (the configuration with no regulatory region). |
Title |
Enter a short description for this transaction. At runtime, the system will display this title at the top of the guided self-service pages. |
Comments |
Enter any additional descriptive information about the transaction. |
Guided Self Service
Use this section to override the default setting that prevents a manager from submitting more than one transaction request for an employee at a time.
For more detailed information on enabling multiple transaction for an employee, see the "Allowing Multiple Guided Self Service Transactions for an Employee" subtopic under the Understanding Guided Self-Service Transactions discussion.
|
Field or Control |
Description |
|---|---|
|
Allow Multiple Transactions for Employee |
Select this option for individual transactions to override the delivered Guided Self Service setting that prevents managers from entering multiple job transactions for an employee. Enabling this option at the transaction configuration level allows a manager to initiate a request for this specific transaction even though another transaction may be in progress for the employee. The system sees the transaction as an exception and allows it. You will need to enable this option for each transaction that should be an exception. Important! Organizations can enable this functionality at a global level by selecting the Allow Multiple Transactions for Employee option in the Guided Self Service section of the Installation Table - HCM Options Page. When this option is selected on the Installation Table, the system will allow multiple job requests for all transactions and effective dates. The system does not look at the individual transaction configuration settings. Note that you cannot disable a transaction when this functionality is enabled on the Installation Table. Oracle recommends that you do NOT enable multiple transactions at the global (Installation Table) level. When deselected here and on the Installation Table, the manager cannot initiate a request if an employee already has a job transaction in progress. |
Approvals
Field or Control |
Description |
|---|---|
Transaction Name and Approval Process ID |
Enter the workflow transaction name to be used. The system displays the approval process ID that is related to the specified workflow transaction. The delivered transactions all include delivered approval processes. For a list of the delivered approval processes, see Understanding Delivered Approval Process IDs for Guided Self-Service Transactions. |
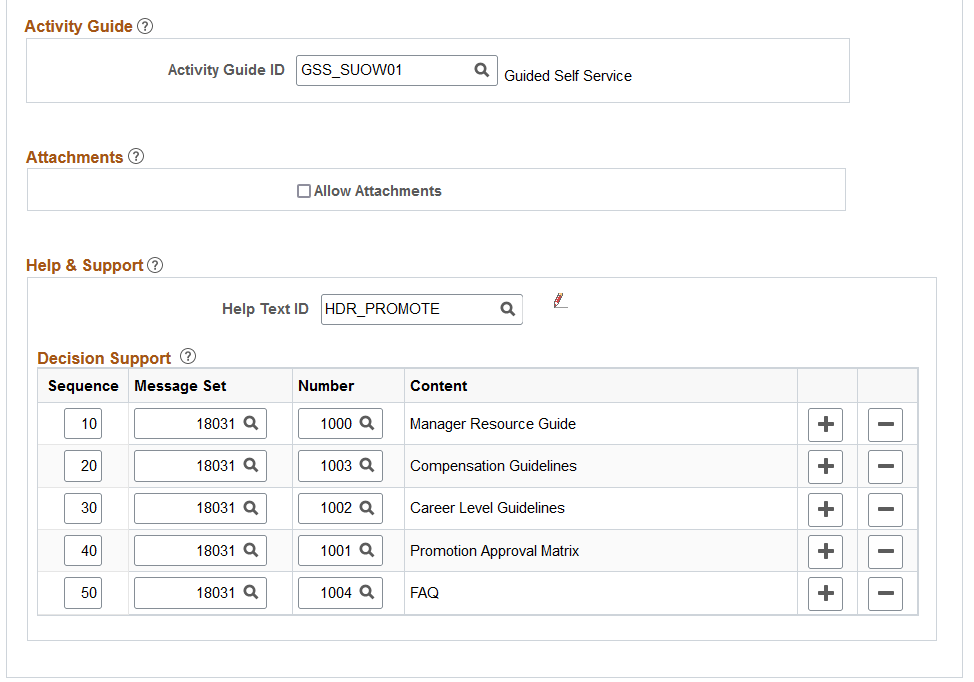
Activity Guide
Note: This section appears only if you use PeopleTools 8.55 or above. In earlier versions of PeopleTools, guided self-service transactions do not use the Activity Guide framework.
Field or Control |
Description |
|---|---|
Activity Guide ID |
Select the activity guide that renders the transaction steps to end users. Guided self-service transactions that Oracle delivers already include an activity guide ID. Activity Guides have their own security setup. In the delivered activity guides, the eProfile Manager Fluid role has access to guided self-service transactions. If you set up your own activity guides, or if you use other roles for guided self-service users, use the activity guide security settings to ensure all users have proper access. The delivered activity guides are GSS_POSN1L for the Clone Position transaction and GSS_SUOW01 for all other delivered transactions. Do not modify these activity guides except to update security. If you need to change other areas of the activity guide configuration, clone the delivered activity guide, make your changes, and then update the transaction to reference the modified activity guide. |
Attachments
Field or Control |
Description |
|---|---|
Allow Attachments |
Select this check box to enable requestors to attach supporting documents for this transaction. When this check box is selected, the Review and Submit page for the transaction includes an attachments section where the requestor can upload attachments related to the request. Approvers using classic approval pages or Fluid Approvals can review these attachments during the approval process. (Attachments are not supported by the Mobile Approvals Platform (MAP). If you still use MAP, consider switching to Fluid Approvals so that approvers can see attachments.) For information on configuring attachment storage and allowable file types, see Understanding URL Definitions for Guided Self-Service Attachments. |
Help & Support
Field or Control |
Description |
|---|---|
Help Text ID |
Enter the message catalog text ID for the introductory text that appears before the questions on the Questionnaire Page of the guided transaction. This text gives the user instructions or guidance for answering the questionnaire. |
|
If a Help Text ID has been entered, you can click the Edit Help Text pencil icon to open a dialog box that displays the specified text catalog entry on the Maintain Text Catalog Page. Use the dialog box to view or modify the text catalog entry. |

Decision Support
Use this section to list the decision support topics that appear within the Decision Support tab on the Questionnaire page. This information should provide guidance and assist the user in completing the transaction.
Field or Control |
Description |
|---|---|
Sequence |
Enter the order in which the Decision Support tab should display the help topics. |
Message Set and Number |
Select the message set and number associated with the text that you want to display for Decision Support. The messages will appear as links and text on the Decision Support tab on the Questionnaire Page. Use the PeopleTools message catalog (not the HCM Text Catalog) to define additional decision support content for your organization. |
Content |
Displays the message text from the specified message catalog entry. |
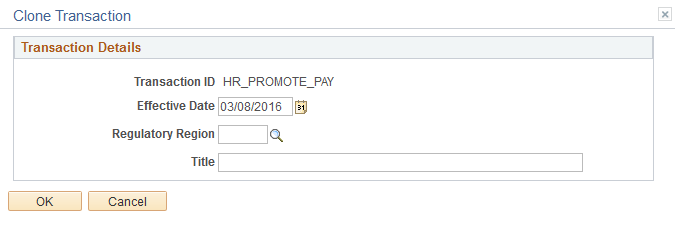
Use the Clone Transaction secondary page (HR_MSS_CT_CLNE_SEC) to create a new row for an existing transaction ID, and specify the effective date and regulatory region for the new row.
Navigation:
Click the Clone Transaction link on the Transaction Configuration - Configuration page.
This example illustrates the Clone Transaction secondary page.
Field or Control |
Description |
|---|---|
Regulatory Region |
Enter the regulatory region for the new row to be created. When a transaction has different configurations for different regulatory regions, the system uses the configuration for the employee who is being processed. If there is not a row for the employee’s regulatory region, the system uses the default configuration (the one that does not have any regulatory region specified). |
Title |
The title for the new row appears as the transaction title at runtime. |
Use the Transaction Configuration - Questionnaire page (HR_MSS_CT_SEQ) to add questions for guided self-service transactions.
Navigation:
This example illustrates the Transaction Configuration - Questionnaire page.
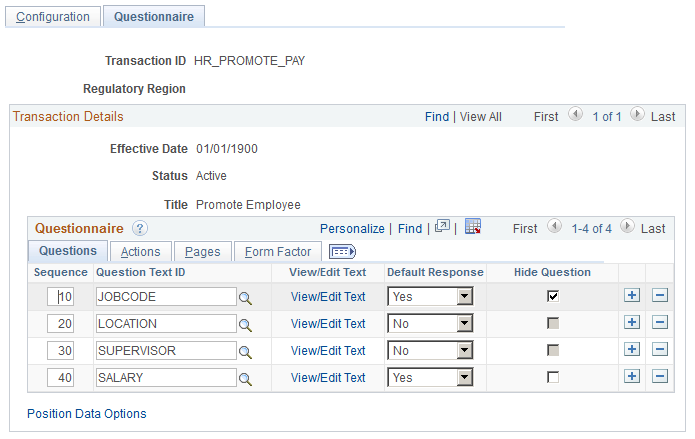
The pages and fields that appear in a guided self-service transaction depend on the answers to the questions listed in the Questionnaire grid. All transactions must have at least one question, even if that question is hidden and the end-user never sees it. Questions that are not hidden appear on the Questionnaire Page, which is presented to the end user when the transaction is first invoked.
Questions Tab
Field or Control |
Description |
|---|---|
Sequence |
Enter a sequence number to determine order in which the questions are presented to the end-user on the Questionnaire page. For the Hide Action/Reason setting on the Actions tab, the sequence also determines which setting is used if different rows have different settings. Specifically, the system uses the settings from the first question that has a Yes answer. |
Question Text ID |
Enter the text catalog ID for the text of the question. Valid text catalog IDs are those that have the object owner ID of HELM (eProfile Manager Desktop) and the sub ID of CT. On the Form Factor tab, you can enter a different text catalog ID for small form factor devices such as phones. |
View/Edit Text |
If a Question Text ID has been entered, you can click this link to open a dialog box that displays the text catalog entry on the Maintain Text Catalog page. Use the dialog box to view or modify the text catalog entry. |
Default Response |
Select a default response of Yes or No to this question. The field defaults to No. |
Hide Question |
Select this check box to hide this question from the end user on the Questionnaire page. This check box is enabled only when the Default Response value is Yes. If all the questions defined for a transaction are hidden, the Questionnaire page is not displayed as part of the guided self-service transaction. Note: Any fields that are essential to a transaction should be associated with a hidden question. Because this question always has a Yes answer, the fields are always included in the transaction, even if the user answers No to all other questions. |
Actions Tab
This example illustrates the Actions tab from the Questionnaire grid on the Transaction Configuration - Questionnaire page.
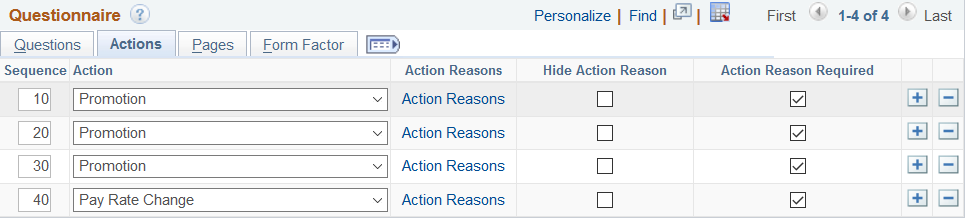
Note: The fields on this tab relate to the actions and action reasons on the employee’s job record. They are not relevant to the delivered Clone Position transaction, which does not affect employee job records.
Field or Control |
Description |
|---|---|
Action |
Select the personnel action code to associate with this question. You can select any active action that is defined on the Actions Page, with the exception of these actions:
The system uses this action code in the new Job record row that is created when the transaction is approved. If the same action code is specified for all of the transaction’s questions, then the system writes one row to the Job record. If different questions have different action codes, then the system creates multiple rows in the Job record, but the same data, except for the action and action reason, is written to each row. Note: The manager will not see the Action field on the guided self-service transaction page. |
Action Reasons |
Click to access the Action Reasons Page, where you can choose valid action reasons for the job data row that the transaction creates and you can choose a default action reason. Note: Rows that have the same action must also have the same action reason settings. If you change the action reason settings for a row, your changes are automatically applied to any other rows with the same action. |
Hide Action Reason |
Select this check box to hide the Reason field on the guided self-service transaction pages. This configuration prevents the manager from overriding the default reason. If you select this check box for some questions but not for others, at runtime the system uses the setting from the first question that has a Yes answer. Typically this is the first question in the transaction, which is normally configured as a hidden question with a Yes answer. When you select the Hide Action Reason check box, the Action Reasons link on this configuration page becomes read-only. Therefore, if you want a default action reason that cannot be changed, click the Action Reasons link and choose a default action reason before you select the Hide Action Reason check box. |
Action Reason Required |
Select this check box if an action reason is required for the transaction. This check box is available only if the Reason field is visible in the transaction (that is, the Hide Action Reason check box is not selected). |
Pages Tab
This example illustrates the Pages tab from the Questionnaire grid on the Transaction Configuration - Questionnaire page.

Field or Control |
Description |
|---|---|
Page Name |
Select the page that contains the record and field definitions that are associated with this question. You can associate the same page with more than one question. After choosing a page, click the Page Fields link to access a secondary page where you choose which fields on the page to show to the end user when this question is answered Yes. These are the supported pages:
Oracle also delivers an additional job data subpage, HR_MSS_CT_JOBC_SBF that your organization can modify if you need to add additional fields for guided self-service. As delivered, this page does not include any fields. For a detailed list of the fields on each page, see Understanding Delivered Transactions and Fields for Guided Self-Service. |
Page Fields |
Click to access the Page Fields Page where you choose which fields to show to the end user when this question is answered Yes. |
Form Factor Tab
This example illustrates the Form Factor tab from the Questionnaire grid on the Transaction Configuration - Questionnaire page.

Field or Control |
Description |
|---|---|
Small Form Factor Text ID |
Use this field to define alternate question text for small form factors such as phones. This option enables you to shorten questions for the smaller screen. To choose the alternate text, enter the ID of the Text Catalog entry with the appropriate text. When this field is blank, the regular question text appears on all devices. |
View/Edit Text |
If a small form factor text ID has been entered, you can click this link to open a dialog box that displays the text catalog entry on the Maintain Text Catalog page. Use the dialog box to view or modify the text catalog entry. |
Position Data Options
Field or Control |
Description |
|---|---|
Position Data Options |
If you use position management, click this link to access the Transaction Configuration - Position Data Options Page, where you configure options related to updating the employee’s position data. Note: Position Data settings are valid only for the delivered transactions Change Full/Part Time or Hours, Request Location Change, Request Reporting Change, and Update Job Details for Group. Do not set up position options for any other transactions. This link is not visible for the Clone Position transaction, which creates a new position but does not affect existing positions. |
Use the Action Reasons page (HR_MSS_CT_RSN_SEC) to choose the valid action reasons for the job data row that the transaction creates and to choose a default action reason.
This page is not relevant to the delivered Clone Position transaction.
Navigation:
Click the Page Fields link on the Actions tab of the Transaction Configuration - Questionnaire page.
This example illustrates the Action Reasons page.
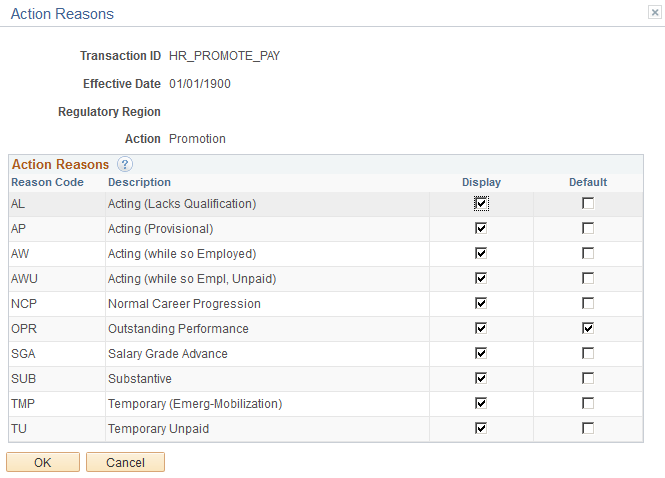
Important! Rows that have the same action must also have the same action reason settings. If you change the action reason settings for a row, your changes are automatically applied to any other rows with the same action.
The fields at the top of the page identify the transaction and regulatory region you are configuring and the action code for which you are configuring action reasons.
Action Reasons Grid
Field or Control |
Description |
|---|---|
Reason Code and Description |
These fields identify the action reasons that are associated with the action you are configuring. The grid lists all available reasons for the specified action. |
Display |
Select this check box to make an action reason available for the job data row that gets created for this action. You must select this check box for the default action reason. Also select this check box for all values that you want managers to be able choose manually. If you configure the transaction to hide the Action Reason field from end users, then the end user cannot override the default and there is no reason to select any rows other than the default. |
Default |
Select this check box for one row only. The selected reason becomes the default reason for the job row that is created with the specified action. The end user will be able to override the default reason unless you select the Hide Action Reason check box for this action. If multiple questions have the same action code but different reasons, the system uses the default reason for the first question that has a Yes answer. Typically this is the first question in the transaction, which is normally configured as a hidden question with a Yes answer. |
Use the Page Fields page (HR_MSS_CT_FLDS_SEC) to choose which fields to display on the guided self-service transaction and to choose whether those fields are display-only.
Navigation:
Click the Page Fields link on the Pages tab of the Transaction Configuration - Questionnaire page.
This example illustrates the Page Fields page.
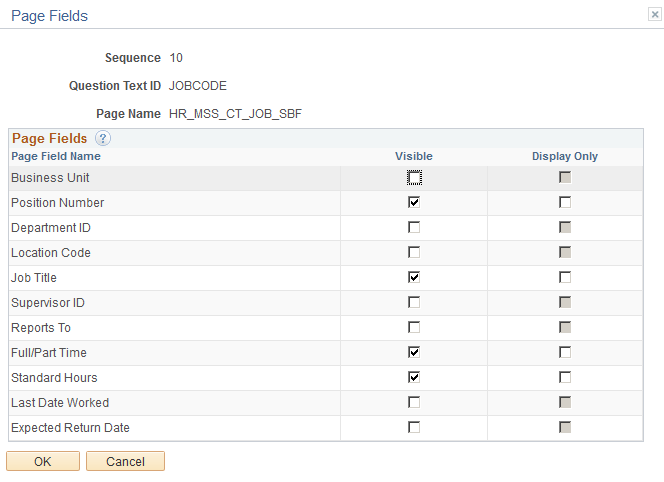
The fields at the top of the page identify the question you are configuring and the page that you associated with the question.
Page Fields Grid
Field or Control |
Description |
|---|---|
Page Field Name |
Displays a list of fields that are associated with the Page Name shown at the top of the page. For a list of the fields that are available for selection, see Understanding Delivered Transactions and Fields for Guided Self-Service at the beginning of this topic. When you configure job data fields, use the same settings for the Reports To and Supervisor ID fields. The guided self-service transaction and approval pages include logic to display the correct field depending on the employee data. For employees in positions, the Reports To field displays the position to which the employee reports rather than the person to whom the employee reports, so if this field is shown, the transaction and approval pages also display a read-only Manager Name field. |
Visible |
Select this check box to make a specific field visible to the end user on the guided self-service pages. Note: The Clone Position transaction clones data from all of the available fields, including those that are not visible to end users. Different fields are appropriate for different transactions. For example, the Last Date Worked field is used so that a manager can enter an employee’s actual last work day, so this field is appropriate for the Terminate and Retire transactions. The field is visible if it is marked visible for at least one question with a Yes answer, regardless of whether it is marked visible for other questions. Even if a field is marked as visible for multiple questions, it appears only once on the guided self-service pages. Visible fields are enterable unless you also select the Display Only check box. Note: If you make the Business Unit field enterable in a guided self-service transaction, you should also make the Location Code, Department ID, and Job Code fields enterable. This is necessary because if the end user changes the business unit, the system will clear the values for Department, Location and Job Code, and the end user will need to enter new values in those fields. |
Display Only |
Select this check box if you want a visible field to be read-only on the guided self-service pages. Only fields that are already marked as visible can be made read-only. If a particular field is marked as read-only for at least one question with a Yes answer, the field will be read-only regardless of whether the field is configured as read-only for other questions. |
Use the Transaction Configuration - Position Data Options page (HR_MSS_CT_POSN_SEC) to configure position data updates based on guided self-service updates to incumbent data.
Important! Position Data settings are for changing the data associated with a position. The only delivered transactions that support this option are Change Full/Part Time or Hours, Request Location Change, Request Reporting Change, and Update Job Details for Group.
This page is not applicable to the Demote Employee, Promote Employee, and Transfer Employee transactions, which assign employees to new positions. Nor is it applicable to the Clone Position transaction, which creates a new position without affecting existing position data.
Navigation:
Click the Position Data Options link on the Questionnaire page. This link is not available for the Clone Position transaction, which never updates an employee’s position data.
This example illustrates the Transaction Configuration - Position Data Options page.
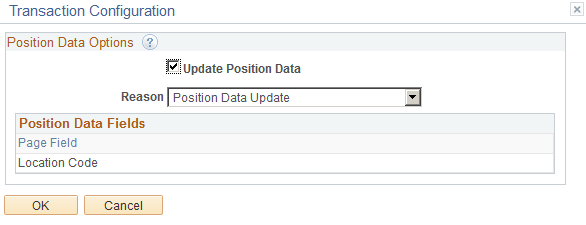
Field or Control |
Description |
|---|---|
Update Position Data |
Select this check box to allow the system to make automatic updates to position data. The position data change occurs only if both of these conditions are met:
|
Reason |
Select the reason for the position data change. This reason is entered into the new effective-dated row that the system creates in the position data record. |
Position Data Fields |
This read-only list shows which fields from the guided self-service transaction are included in position data updates:
If you inadvertently access this page for other transactions, additional fields can appear in the list. However, because those other transactions do not support position data updates, you can ignore the field list. |
Use the Clone Transaction page (HR_MSS_CT_CLONE) to clone guided self-service transactions for manager self-service.
Navigation:
This example illustrates the Clone Transaction page.
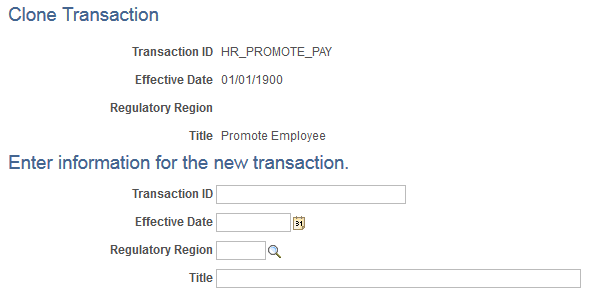
Select an existing transaction configuration and enter the new transaction ID, effective date, regulatory region, and title. Upon saving, the system will take you to the Transaction Configuration - Configuration Page where you can modify your newly copied transaction.