Defining System Settings
To define system settings for ePerformance, use the ePerformance (EP_INSTALLATION) component.
This topic provides an overview of system settings in ePerformance and discusses how to define system settings.
|
Page Name |
Definition Name |
Usage |
|---|---|---|
|
EP_INSTALLATION |
Define system settings for ePerformance. |
|
|
EP_INSTALL_OBJ |
Configure system settings and email notification setup for business objectives. |
|
|
EP_PMENU_SETUP |
Configure actions for the More Actions menu in Fluid ePerformance. |
System settings control certain processing options. You can modify these delivered system settings to meet your business needs:
Whether users can generate documents in languages other than the base language.
Debug settings.
Starting number for document ID generation.
Fields that appear on the page from which users select documents.
Email notifications for ePerformance process steps that occur.
Note: Oracle PeopleSoft delivers Notification Composer Framework to manage the setup and administration of all notifications in one central location.
Once you have adopted the Notification Composer feature, you must use it to create new notifications and manage your existing notifications.
Notifications delivered with HCM Image 47 or later must use Notification Composer.
For more information about Notification Composer Framework, see Understanding Notification Composer.
The More Actions icon appears in multiple locations of documents in Fluid.
When selected, it opens a popup menu to provide relevant actions to the part of the page that you are working on. For example, select the More Actions menu from a document’s section to see the actions that you can perform in that section, such as reordering items, copy items from another document, and defining item weights.
The setup on the Fluid Popup Menu Setup Page determines the actions supported in each placement of the More Actions icon. Some of these actions may not be available to users based on their role access in the template setup.
See Also
(Fluid ePerformance) Understanding the More Actions menu
(Fluid Business Objectives) Understanding the More Actions Menu
Use the ePerformance Installation - ePerformance page (EP_INSTALLATION) to define system settings.
Navigation:
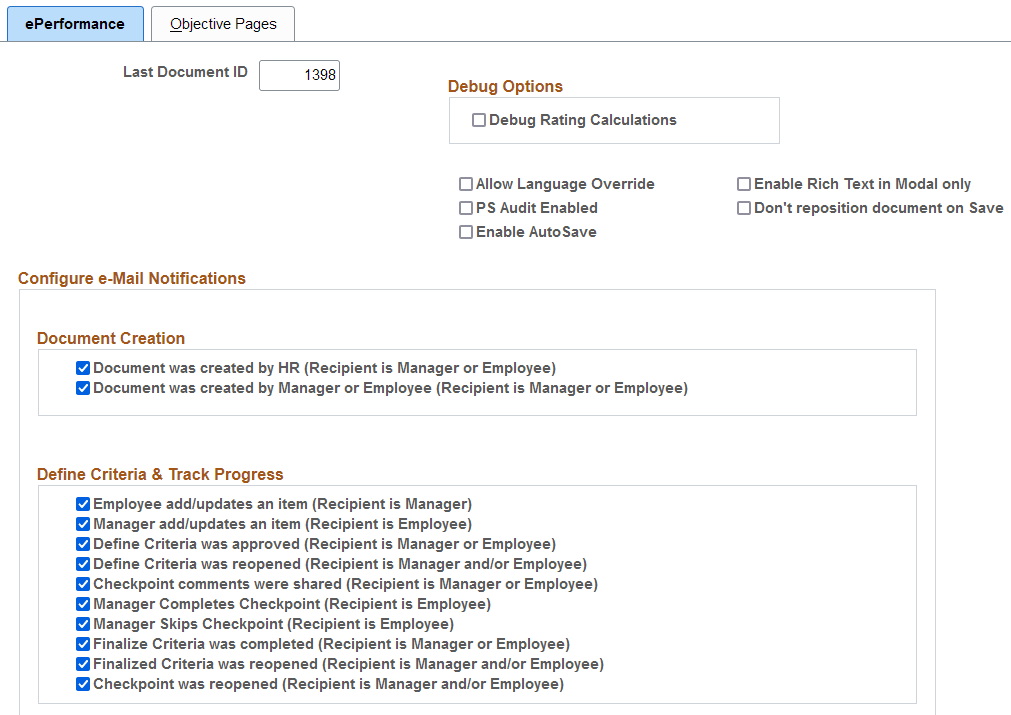
This example illustrates the fields and controls on the ePerformance Installation - ePerformance page (1 of 5).
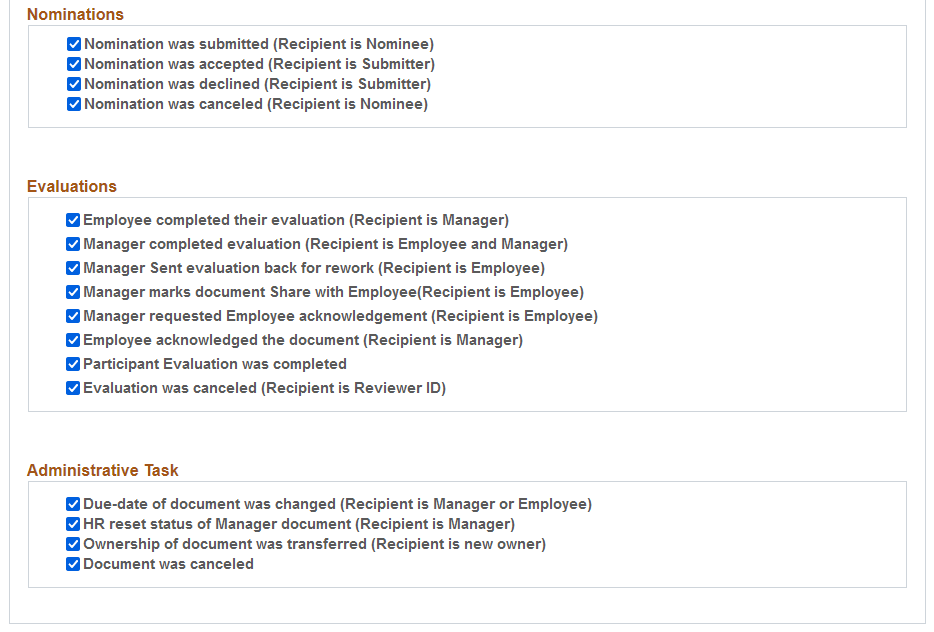
This example illustrates the fields and controls on the ePerformance Installation - ePerformance page (2 of 5).
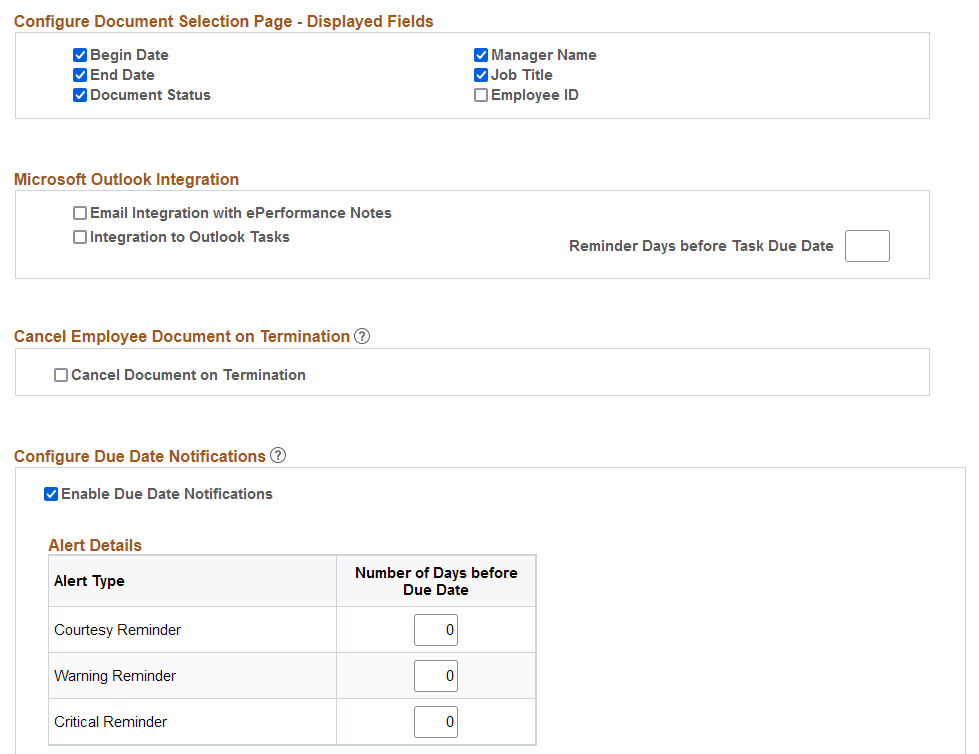
This example illustrates the fields and controls on the ePerformance Installation - ePerformance page (3 of 5).
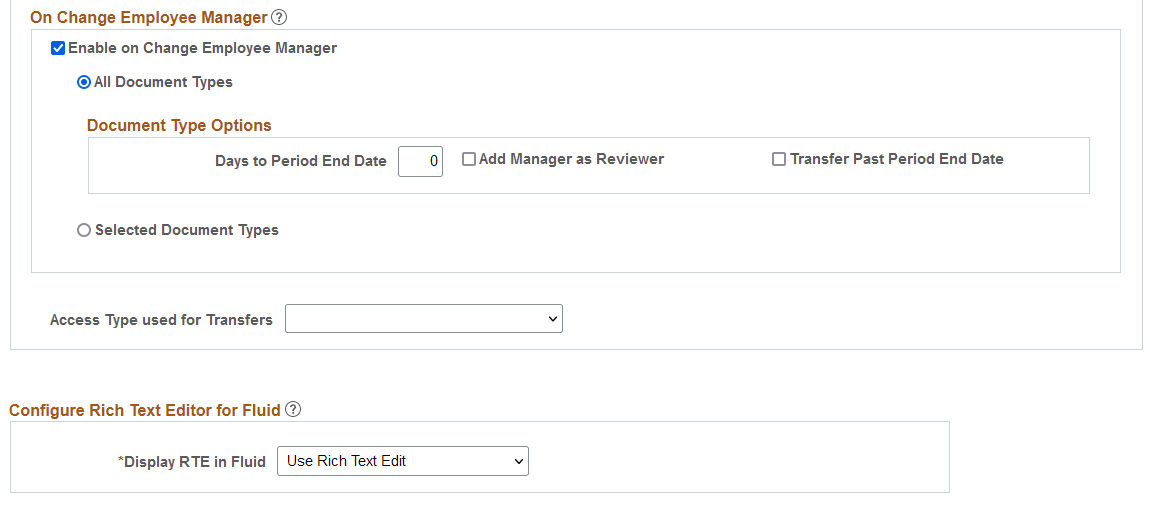
This example illustrates the fields and controls on the ePerformance Installation - ePerformance page (4 of 5).

This example illustrates the fields and controls on the ePerformance Installation - ePerformance page (5 of 5).
|
Field or Control |
Description |
|---|---|
|
Last Document ID |
Enter the number from which the system begins generating document IDs. The system automatically generates the document ID by adding 1 to the Last Document ID. Warning! Entering a value that is lower than the value that appears can cause unpredictable results. |
|
Debug Rating Calculations |
Select this check box to have the system generate a debug/trace log every time it calculates the ratings in an evaluation. HR ePerformance administrators use the Debug/Trace Results page to review the results of each calculation performed for an evaluation. This helps track down any unexpected results when you build templates and test the configuration. Warning! Producing the debug/trace log can have a significant impact on system performance. Select this option only if you are testing the ePerformance configuration or debugging a suspected calculation problem. |
|
Allow Language Override |
Select this check box to enable document generation in a language other than the system base language. If this check box is deselected, the system generates all documents in the system base language. The base language is defined using the Manage Installed Languages page in PeopleTools. |
|
PS Audit Enabled |
Select this check box to enable Detailed Item History audits. In addition to selecting this check box, you must also use Application Designer to turn on the audits that you want to use. Select the Audit fields in the Record Field Properties dialog box for the EP_APPR_B_ITEM object. When this audit is enabled, the system displays the Modification History link on document pages used for establishing criteria data. Users can click this link to access the Modification History page (EP_ITEM_MOD_HISTRY), which displays before and after values by field name. The Detailed Item History audit is delivered turned off. This audit is controlled by a database trigger. See the topic on Setting Record Field Use Properties in the PeopleTools: Application Designer Developer's Guide. |
|
Enable AutoSave |
Select this check box to enable the AutoSave feature in ePerformance. Note: Be sure to disable the popup blocker feature in your browser for the AutoSave feature to work properly. For security purposes, you can set up in PeopleTools the ability to display inactivity warnings to users, and time out their browser sessions if they don't respond to the warning messages within a specific timeframe. When the AutoSave feature is selected, the system automatically saves documents before browser sessions are timed out, preventing users' unsaved data from being lost due to inactivity. When enabled, the AutoSave feature applies to all performance and development document pages (including modal pages) in the EP_APPR_BASE and EP_APPR_MAIN components, which are used for defining evaluation criteria, tracking mid-period progress, and entering self, manager, as well as peer (or other role-based) evaluations. This feature is not supported in performance notes. |
|
Enable Rich Text in Modal only |
Select this check box for users to enter evaluation comments in a modal window. By default, this feature is disabled. Enable this option if you experience performance issues when entering comments in rich-text fields on main document pages. When enabled, comments fields are displayed as read-only on documents. To enter comments, users click either the Edit Comments link or Writing Tools link to open a modal page, where they compose comments in plain or rich text. When disabled, users enter comments (plain or rich text) in comments fields directly. Note: This option does not apply to Fluid ePerformance. |
|
Don’t reposition document on Save |
Select this check box for the page to remain in the same position and not return to the top when documents are saved. Clear this check box for the system to reposition to the top of the page when documents are saved. By default, this option is cleared. |
Configure e-Mail Notifications
Select the check box next to each event type for which you want the system to automatically generate and send notifications. Event types are grouped into these categories for better organization: Document Creation, Define Criteria & Track Progress, Nominations, Evaluations, and Administrative Task.
Several event types have the notification recipient set as manager or employee. What it means is that the recipient will be determined by the role performing the event. For example, if the manager approves the evaluation criteria document and the Evaluation Criteria is Approved event type is enabled, the system sends a notification to the employee of the document.
Configure Document Selection Page - Displayed Fields
Select the fields that you want to appear in the document list from which self service users select documents.
Microsoft Outlook Integration
This integration is no longer supported.
Cancel Employee Document on Termination
|
Field or Control |
Description |
|---|---|
|
Cancel Document on Termination |
Select to enable the functionality to automatically cancel in-progress documents for employees who have been terminated in the HR system. By default, this option is not selected and subsequent fields are not visible. |
|
All Document Types |
Select for the process to cancel current documents of all document types for terminated employees. |
|
Selected Document Types and Document Types |
Select for the process to cancel current documents that are associated with specific document types. When selected, add the document types in the Document Types section. |
Configure Due Date Notifications
|
Field or Control |
Description |
|---|---|
|
Enable Due Date Notifications |
Click to activate the Due Date Notifications feature that sends automatic email reminders to users when their documents are due for updates. When this feature is enabled, be sure to specify the scheduling options in the Alert Details and Notification Details sections accordingly. |
|
Alert Type |
Displays the types of reminders that the Due Date Notifications feature supports. Values are Courtesy Reminder, Warning Reminder, and Critical Reminder. |
|
Number of Days before Due Date |
Enter the number of days before the due date that email notifications for the corresponding alert type should be sent. The value for courtesy reminder must be greater than the one for warning reminder, which must be greater than the one for critical reminder. For example, the courtesy reminder option is enabled for the Define Criteria Approval due date type, and reminders are set to be sent 60 days before the due date. If the Define Criteria step due date of a document is on April 1, the systems sends a courtesy reminder for it on February 1 of the same year. |
|
Due Date Type |
Displays the steps in an evaluation cycle for which due date notifications can be sent. |
|
Send Courtesy Reminder, Send Warning Reminder, and Send Critical Reminder |
Select the check boxes for the system to send a combination of courtesy reminders, warning reminders, and critical reminders for the corresponding evaluation step in documents, based on the specified alert type values. |
|
Notification Schedule created on |
Displays the date and time that the initialization process was run. The initialization process extracts the due date information of all Evaluation In Progress evaluation documents, and loads it into the schedule table (EP_NOTIFY_TBL) to be used to generate due date notifications for steps that are not completed or canceled. In addition to specifying the alert and notification details, you also need to run the initialization process as part of the setup for the Due Date Notifications feature, if there are evaluation documents in the system that are still in progress. The initialization process is not necessary, if there are no in-progress documents in the system (for example, at the end of an evaluation cycle). See Also Setting Up Due Date Notifications |
Configure Automatic Transfers - On Manager Termination
|
Field or Control |
Description |
|---|---|
|
Enable on Manager Termination |
Click to activate the Automatic Document Transfer feature that, upon the termination of managers, automatically transfers in progress documents that they own to their next-level-up managers. |
|
All Document Types |
Select for the process to transfer in progress documents of all document types for terminated managers. |
|
Selected Document Types and Document Type |
Select for the process to transfer in progress documents that are associated with specific document types. When selected, add the document types in the Document Types section. |
Configure Automatic Transfers - On Change Employee Manager
|
Field or Control |
Description |
|---|---|
|
Enable on Change Employee Manager |
Click to activate the Automatic Document Transfer feature that, upon changes in employee managers, automatically transfers in progress documents from current to new managers. |
|
All Document Types |
Select for the process to transfer in progress documents of all document types in case of employee manager change. |
|
Selected Document Types and Document Type |
Select for the process to transfer in progress documents that are associated with specific document types. When selected, add the document types in the Document Types section. |
|
Days to Period End Date |
Enter the number of days until the document end date when documents are eligible for automatic transfer as a result of an employee manager change. If the current date of when the manager change occurs (for example, October 1) is greater than the number of the days (for example, 30 days) before the end date of a document (for example, December 31), the document is transferred automatically to the new manager. If the current date is equal to or less than the number of days specified in this field prior to the period end date, the document is not transferred automatically and stays with the current manager. This option becomes editable when the Enable on Change Employee Manager field is selected. |
|
Add Manager as Reviewer |
Select to add current managers as peer reviewers when documents are transferred to new managers. The system adds current managers as nominees in respective documents, and they need to accept the evaluation requests on the Evaluations of Others Page to provide review feedback. This option becomes editable when the Enable on Change Employee Manager field is selected. Note: The Add Manager as Reviewer option is only applicable to documents created from templates that include Previous Manager as a participant role in the Evaluations section on the Template Definition - General Page. Be sure to include the correct participant role to templates to leverage this functionality. Without proper template setup, the system will not add managers to documents as reviewers even if the option is enabled, and the information will not be available on the Document Transfer Status page for administrators to review. |
|
Transfer Past Period End Date |
Select to automatically transfer documents as a result of an employee manager change when the change occurs after the period end date. Clear this option for documents to not transfer automatically and stay with current managers. This option becomes editable when the Enable on Change Employee Manager field is selected. |
|
Access Type used for Transfers |
Select the access type that the Direct Reports functionality uses to identify the next-level-up (in case of manager termination) or new (in case of employee manager change) manager for each document in the automatic transfer. Values are: By Department Manager ID By Part Posn Mgmt Dept Mgr ID By Part Posn Mgmt Supervisor By Reports To Position By Supervisor ID For more information about access types, see Understanding Direct Reports Functionality. |
Configure Rich Text Editor for Fluid
|
Field or Control |
Description |
|---|---|
|
Display RTE in Fluid (display rich text edit in fluid) |
Select Long Edit Box Only to use plain text for fields such as comments and other long fields. Rich text formatting is not supported. Select Use Rich Text Edit to support rich text formatting for fields such as comments and other long fields. This option is available to PeopleTools 8.59 and higher. This option is Fluid ePerformance only. |
Use the Fluid Popup Menu Setup page (EP_PMENU_SETUP) to configure actions for the More Actions menu in Fluid ePerformance.
Navigation:
This example illustrates the fields and controls on the Fluid Popup Menu Setup page.
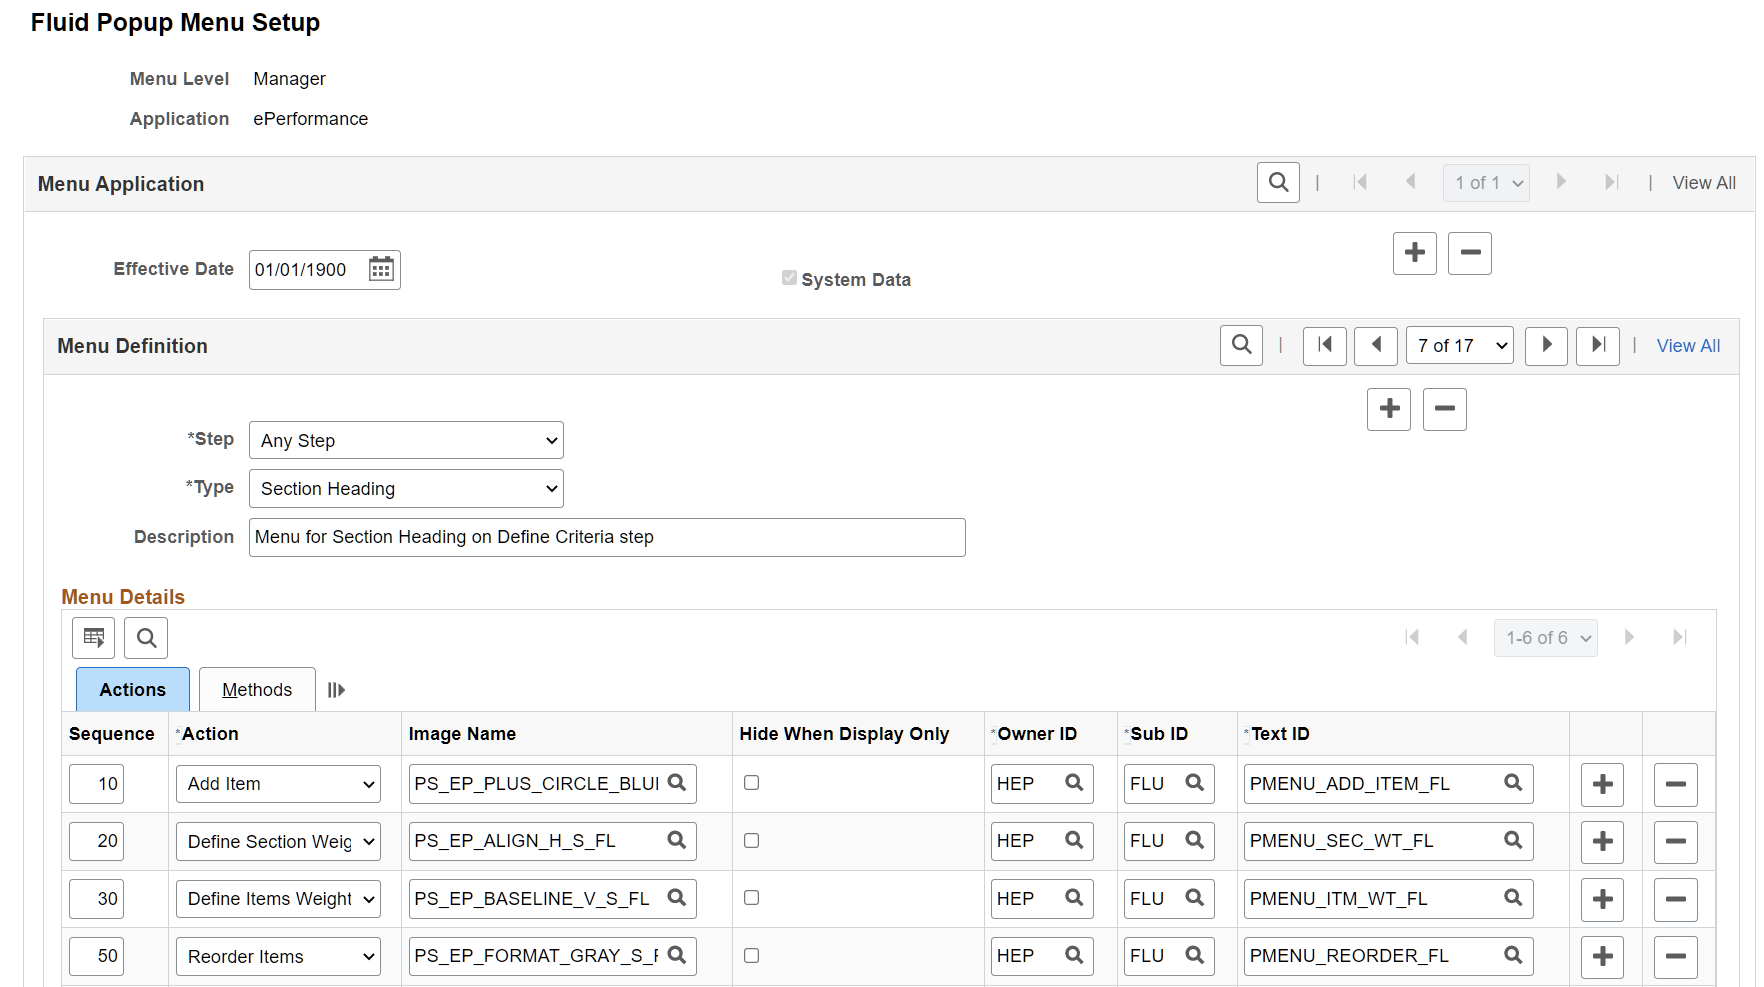
Menu Definition
|
Field or Control |
Description |
|---|---|
|
Menu Level |
The system delivers menu levels for these user roles: Manager and Employee. |
|
Application |
Select the application or feature to which this popup menu definition applies. System-delivered values include: Business Objectives ePerformance |
|
Step and Type |
Specify the document status and type to which this popup menu definition applies. A type refers to the placement of the More Actions menu. Valid values include: Document Heading: the right hand side of the document header on the Performance Document page. See Document-Level More Actions. Document List: the right hand side of the document card on a document list. See Document-Level More Actions. Document Step: the right hand side of the step drop-down field on the Performance Document page. See Step-Level More Actions. Item Detail: the right hand side of the item header on the Performance Document Item page. See Item-Level More Actions. Objective: the right hand side of the business objective document card on a document list, or the right hand side of the business objective document header. See Document-Level More Actions. Objective Item: the right hand side of the objective row in a business objective document section, or the right hand side of the Edit Items page header. See Item-Level More Actions. Participant List: the right hand side of the participant row on the Add/Review Participants page. See More Actions for Participant Reviews. Section Heading: the right hand side of the section title in a document. See Section-Level More Actions (performance documents) and Section-Level More Actions (business objective documents). Section Item: the right hand side of the item row in a document section. See Item-Level More Actions. Subitem: the Add link on the right hand side of the sub-item's section title. |
|
Description |
Enter a description for the popup menu definition. |
Menu Details
|
Field or Control |
Description |
|---|---|
|
Sequence |
Enter the order in which the selected action appears in the popup menu. The action with the lowest number appears at the top of the list. |
|
Action |
Select the action to appear in the popup menu. |
|
Image Name |
Select the image to display for the action in the popup menu. |
|
Hide When Display Only |
Select to not show this action in the menu when the document is read-only. |
|
Owner ID, Sub ID, and Text ID |
Select the text to display for the action in the popup menu. Choose the object owner ID first, followed by the sub ID, then the text ID from the Text Catalog. The system delivers text IDs that begin with PMENU_ for popup menu actions. |
|
Root Package ID, Path, Class ID, and Method |
Specify the application package information for the action. The specified application package is used to determine whether to show or hide this action from the menu at runtime. The method must return a boolean (true or false) value. |