
 Understanding HR Information Used in the Payroll Process
This chapter provides overviews of human resources (HR) information used in the payroll process, tables that support the payroll process, pay calendar date fields, and discusses how to:
Set up forms for printing checks and advices.
Edit account codes.
Set up holiday schedules.
Establish shifts.
Set up rapid entry paysheet templates.
Establish retroactive (retro) pay programs.
Establish special accumulator codes.
Define the Final Check process.
Review and modify payroll messages.
Handle employees with multiple jobs in the same organization.
Note. Many other setup steps are covered in other chapters of this PeopleBook and the PeopleSoft Application Fundamentals for HRMS PeopleBook.
See Also
Getting Started with Payroll for North America
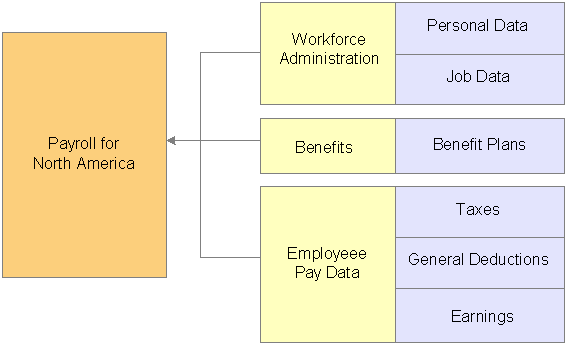
Understanding HR Information Used in the Payroll ProcessMuch of the employee information required to process a payroll resides in tables common to all PeopleSoft Human Resources Management (PeopleSoft HRMS) applications. Employee workforce and benefits information (such as name, address, social security number or social insurance number, rate of pay, department, medical and savings plans, and so on) works in conjunction with payroll data that you provide.
Relationship Between PeopleSoft Human Resources and Payroll for North America Pages
Depending on how your company is organized, you might be responsible for entering all payroll-related information. In many companies, the human resources department enters general company and benefit data, but only the payroll department is authorized to enter data specific to payroll.
This diagram illustrates the flow of employee data from the PeopleSoft HRMS system for payroll processing:
Setting up employees
See Also
Understanding Tables That Support the Payroll ProcessMany tables supply information for the primary payroll process tables. For example:
The Pay Group table uses the information from the Source Bank table and Form table to verify the bank account from which to draw funds and the form on which to print paychecks or advice.
The Pay Calendar table extracts information from the Holiday Schedule table to determine the valid holidays for the organization to which you assign various pay groups.
See Also
Getting Started with Payroll for North America
Understanding Pay Calendar Date FieldsThis section discusses:
Interactions with general deductions.
Interactions with additional pay.
Interactions with benefit deductions.
Interactions with job data.
Interactions with the Deduction table.
Note. The examples in this section use a pay period that starts on February 15, 2002, ends on February 28, 2002, and has a check date of March 1, 2002.
Note. Because Payroll for North America balance records have effective dates, you do not have to clear balance accumulators before you begin processing payrolls for a new calendar month, quarter, or year.
Interactions with General DeductionsTo process a general deduction for an employee, the system uses two dates from the General Deduction Data page:
Effective date.
(optional) Deduction end date.
If the effective date of the deduction is before, or on, the pay period end date, the system takes the deduction.
If you specify a deduction end date, the system takes the deduction only if the deduction end date is after, or on, the pay period end date.
The following tables display examples of how the system uses dates in processing general deductions:
|
Deduction Effective Date |
Deduction Taken? |
Reason |
|
February 15, 2002 |
Yes |
Effective date is before, or on, the pay period end date. |
|
February 16, 2002 |
Yes |
Effective date is before, or on, the pay period end date. |
|
February 28, 2002 |
Yes |
Effective date is before, or on, the pay period end date. |
|
March 1, 2002 |
No |
Effective date is not before, or on, the pay period end date. |
|
Deduction End Date |
Deduction Taken? |
Reason |
|
February 15, 2002 |
No |
Deduction end date is not after, or on, the pay period end date. |
|
February 16, 2002 |
No |
Deduction end date is not after, or on, the pay period end date. |
|
February 28, 2002 |
Yes |
Deduction end date is after, or on, the pay period end date. |
|
March 1, 2002 |
Yes |
Deduction end date is after, or on, the pay period end date. |
See Also
Setting Up Employee General Deductions
Interactions with Additional PayTo process additional pay for an employee, the system uses two dates from the Additional Pay page:
Effective date.
(optional) Earnings end date.
If the effective date of the additional pay is before, or on, the pay period end date, the system pays the additional pay.
If you specify an earnings end date, the system pays the additional pay only if the end date is after the pay period begin date.
The following tables display examples of how the system uses dates in processing additional pay:
|
Additional Pay Effective Date |
Additional Pay Paid? |
Reason |
|
February 15, 2002 |
Yes |
Effective date is before, or on, the pay period end date. |
|
February 16, 2002 |
Yes |
Effective date is before, or on, the pay period end date. |
|
February 28, 2002 |
Yes |
Effective date is before, or on, the pay period end date. |
|
March 1, 2002 |
No |
Effective date is not before, or on, the pay period end date. |
|
Earnings End Date |
Additional Pay Paid? |
Reason |
|
February 14, 2002 |
No |
Earnings end date is not after the pay period begin date. |
|
February 15, 2002 |
No |
Earnings end date is not after the pay period begin date. |
|
February 16, 2002 |
Yes |
Earnings end date is after the pay period begin date. |
|
March 1, 2002 |
Yes |
Earnings end date is after the pay period begin date. |
See Also
PeopleSoft Enterprise Human Resources 8.9 PeopleBook: Manage Base Benefits
Interactions with Benefit DeductionsThe following table displays examples of how the system uses dates in processing benefit deductions:
|
Deduction Begin Date (Effective Date) |
Benefit Deduction Taken? |
Reason |
|
February 15, 2002 |
Yes |
Deduction begin date is before, or on, the pay period end date. |
|
February 16, 2002 |
Yes |
Deduction begin date is before, or on, the pay period end date. |
|
February 28, 2002 |
Yes |
Deduction begin date is before, or on, the pay period end date. |
|
March 1, 2002 |
No |
Deduction begin date is not before, or on, the pay period end date. |
See Also
PeopleSoft Enterprise Human Resources 8.9 PeopleBook: Manage Base Benefits
Interactions with Job DataThe effective date on the Job Data - Work Location page, together with the action that you select, determines whether the system processes an employee during a payroll run.
The effective date on an employee’s Job record represents the first day that a change takes place. For example, if an employee has a Job record with an action of termination and an effective date of January 15, 2002, then January 15, 2002 represents the first day that the employee is no longer working. Therefore, the system does not pay the employee for that day.
Note. (USF) PeopleSoft HRMS for U.S. federal government accommodates statutory and regulatory requirements. Personnel actions that begin new stages of employment (hire, promotion, reassignment, transfer, disciplinary action, and pay rate changes) are effective at the beginning of the business day. Personnel actions such as removal and termination are effective at the end of the business day.
The following tables display examples of how the system uses the effective dates from the job data:
|
Hire Effective Date |
Employee Active on Paysheets? |
Resulting Paysheet Proration |
Reason |
|
February 15, 2002 |
Yes |
Full pay. |
Hire effective date is before, or on, the pay period begin date. |
|
February 16, 2002 |
Yes |
Prorated February 16−February 28. |
Hire effective date is after the pay period begin date. |
|
February 28, 2002 |
Yes |
Prorated February 28 only. |
Hire effective date is after the pay period begin date. |
|
March 1, 2002 |
No |
Not on paysheet. |
Hire effective date is not before, or on, the pay period end date. |
|
Termination Effective Date |
Employee Active on Paysheets |
Resulting Paysheet Proration |
Reason |
|
February 15, 2002 |
No |
Not on paysheet. |
Termination effective date is before, or on, the pay period begin date. |
|
February 16, 2002 |
Yes |
Prorated February 15 only |
Termination effective date is after the pay period begin date. |
|
February 28, 2002 |
Yes |
Prorated February 15–February 27. |
Termination effective date is after the pay period begin date. |
|
March 1, 2002 |
Yes |
Full pay. |
Termination effective date is after the pay period end date. |
Interactions with the Deduction TableDepending on the employee status on the Job Data - Work Location page (for example, if the employee has been terminated), there is another field that determines whether the system takes benefit and general deductions: the Stop Deduction at Termination field on the Deduction Table - Process page.
If the Stop Deduction at Termination check box is selected, an employee must have an active employee status during the entire pay period for the system to take the deduction.
The following table displays whether the system would take the deduction for employees who were terminated on different days of a pay period:
|
Termination Effective Date |
Deduction Taken? |
Reason |
|
February 15, 2002 |
No |
Employee is not on the paysheet. If paid, the deduction is still not taken. |
|
February 16, 2002 |
No |
Employee is not active for the entire period. |
|
February 28, 2002 |
No |
Employee is not active for the entire period. |
|
March 1, 2002 |
Yes |
Employee is active for the entire period. |
See Also
Setting Up Forms for Printing Checks and AdvicesThis section provides an overview of the Form table and discusses how to set up forms for printing checks and advice.
Understanding the Form Table
You must establish a form ID for every check or advice form that you plan to use. To run Payroll for North America, you must have at least one entry in the Form table to specify check or advice forms for a pay group. Use form IDs to enable the system to print checks or advices for employees—enter the form IDs on the Source Bank table and the source bank ID on the Pay Group table.
Page Used to Set Up Print Forms
|
Page Name |
Object Name |
Navigation |
Usage |
|
PAY_FORM_TABLE |
|
Identify the type of forms that you use to print checks and advice, and track form numbers. |
Setting Up Forms for Printing Checks and AdviceAccess the Form Table page.
|
Last Form Number Used |
The Pay Confirmation COBOL SQL process (PSPCNFRM) and Check Reprint COBOL SQL process (PSPRPRNT) use this number. Each time you run the Pay Confirmation process, the system automatically updates this field with the appropriate check or advice number, reflecting the last number used in the payroll process. You can change this number manually if you have a discrepancy in form numbers (for example, if someone spills coffee on the forms you were planning to use for the next pay run). However, normally you do not change this number. If you use the Check Reprint process, the paychecks that you use on form alignment are saved as dead paychecks. |
See Also
Setting Up Holiday SchedulesThis section provides an overview of holiday schedules and lists the page used to set them up.
Understanding Holiday Schedules
Because holidays might vary for different segments of the employee population (depending on location, work schedules, or other factors), you can define as many holiday schedules as you need. For example, if you pay some employees based on an eight-hour day and others on a 7.5-hour day, you must define a separate holiday schedule for each. The same applies if some employees recognize a holiday on the actual day itself and others on a different date. To add holiday schedules, complete the Holiday Schedule page for each schedule:
The system automatically establishes an employee’s holiday earnings based on the scheduled holidays in the Holiday Schedule table.
Do not include floating holidays on this list.
If a defined holiday occurs within the pay period during the Create Paysheet COBOL SQL process (PSPPYBLD), the system automatically creates a holiday earnings code on the paysheet for the number of hours that are indicated in the Holiday Schedule table.
If you selected the Hours Only (Reduce from Reg Pay) (hours only [reduce from regular pay]) option on the Earnings Table - Taxes page, the system reduces the number of regular hours by the number of holiday hours during the Pay Calculation COBOL SQL process (PSPPYRUN).
Specify the holiday earnings code in the Pay Group table.
The system also uses the default holiday schedule from the Pay Group table during the Calendar Build COBOL SQL process (PSPCLBLD) to ensure that check issue dates do not fall on weekends or holidays.
Note. After you define all of your holiday schedules, you can specify a default holiday schedule for the location on the Location Profile page or for the pay group on the Pay Group Table - Calc Parameters page. You can override this default on any employee’s Job Data record.
Page Used to Set Up Holiday Schedules
|
Page Name |
Object Name |
Navigation |
Usage |
|
HOLIDAY_SCHED_TBL |
Set Up HRMS, Common Definitions, Holiday Schedule, Holiday Schedule |
Designate holidays for payroll processing. |
Establishing ShiftsThis section provides an overview of shifts and discusses how to define a shift.
Understanding Shifts
When you designate an hourly earnings code as eligible for shift differential, the system checks:
Employees’ Job records and paylines to see if you have assigned each of them to a shift.
The Shift table to determine how you’ve defined each shift and if there are any associated shift differentials that affect earnings.
The Earnings table to see whether the earnings are eligible for shift differential.
You define shifts in two places:
In the Shift table, which the system checks during batch processes.
If you don’t have shifts, you must still define at least one shift, such as N/A, in the Shift table.
In a series of values in the Translate table, which you use when performing online edits on pages, such as paysheets.
PeopleSoft delivers the following basic shift values in the Translate table:
First
Second
Third
N/A (for no shift)
Note. The values in the Shift table and Translate table must match. You must add new shift values to the Translate table using PeopleSoft Application Designer before adding them to the Shift table. If you don’t have multiple shifts, deactivate all shift values in the Translate table (except for the N/A shift value), and define the N/A shift in the Shift table.
Note. Shift earnings are not currently broken out on reports, such as paychecks and payroll registers. To review shift earnings separately, set them up as earnings codes in the Earnings table.
Calculating Shift Differentials
There are two parts to calculating shift differentials. The system:
Determines the shift premium using this formula:
shift rate + (shift factor × pay rate) = shift premium.
Shift rate is the shift differential rate.
Shift factor is the shift differential factor.
Pay rate is the hourly rate in the Pay Earnings record.
Adjusts the total earnings eligible for shift differential using this calculation:
(pay rate + shift premium) × hours worked = adjusted earnings.
Pay rate is the hourly rate in the Pay Earnings record.
Hours worked are the number of hours associated with the earnings code for that pay period.
For example, suppose the company CCB has three shifts and shift differentials as follows:
|
First Shift |
0.50 USD per hour for eligible earnings |
|
Second Shift |
10 percent |
|
Third Shift |
1 USD per hour plus 15 percent |
When Andrew joined CCB as an hourly employee, he earned 10 USD an hour and worked 40 hours of eligible shift earnings. His pay would obviously varied, depending on which shift he worked.
During his first six months with CCB, Andrew worked the first shift, and his weekly earnings were:
0.50 USD + (0 × 10 USD) = 0.50 USD.
(10 USD + 0.50 USD) × 40 = 420 USD.
A few months later, Andrew transferred to the second shift. His pay rate remained the same, but his shift differential was calculated a little differently:
0 USD + (0.10 × 10 USD) = 1 USD.
(10 USD + 1 USD) × 40 = 440 USD.
After a while, he decided to move to the third shift. His shift pay was calculated as:
1 USD + (0.15 × 10) = 2.50 USD.
(10 USD + 2.50 USD) × 40 = 500 USD.
One morning, a little over a year after Andrew first started working for CCB, he was offered a position with no shift differential, but his hourly rate made up the difference:
20 USD per hour × 40 hours = 800 USD
Pages Used to Establish and Report on Shifts
|
Page Name |
Object Name |
Navigation |
Usage |
|
SHIFT_TABLE |
Set Up HRMS, Product Related, Payroll for North America, Compensation and Earnings, Shift Table, Shift Table |
Define a shift. Note. If you don’t have shifts, you must still define at least one shift, such as N/A, in the Shift table. |
|
|
PRCSRUNCNTL |
Set Up HRMS, Product Related, Payroll for North America, Comp/Earnings Table Reports, Shift, Shift Report |
Run PAY708, which generate a report that lists information from the Shift table. |
Defining a ShiftAccess the Shift Table page.
Shift Table Information
|
Time In Hour, Time In Minute, Time Out Hour, and Time Out Minute |
The time format uses a 24-hour clock. To define a second shift from 4 p.m. to 11:59 p.m., enter 16, 00, 23, and 59. These fields are for your information only. |
Employee Shift Differential?
|
Specified at Employee level, Rate, and Factor |
Select this check box if shift premiums vary from employee to employee. This option enables you to define the shift premium rate or factor for any employee assigned to the shift at the employee level. If you clear the check box, enter a rate or factor for the shift differential in the appropriate field. Note. If you enter a rate or factor, it applies to all employees assigned to that shift. You cannot override these definitions at the employee level. |
Setting Up Rapid Entry Paysheet TemplatesThis section provides an overview of rapid entry paysheet templates and discusses how to define rapid entry paysheet templates.
See Also
Entering Hours or Amounts Using Rapid Entry Paysheets
Understanding Rapid Entry Paysheet Templates
Payroll for North America enables you to create rapid entry paysheet templates that are used as a basis for rapid entry paysheets. You can create three types of templates:
Hours.
Use this template type to set up a template for earnings codes based on hours with no associated dollar amounts.
Amounts.
Use this template type to set up a template for earnings codes based on amounts with no associated hours.
Hours or Amounts.
Use this template type to set up a template for both earnings codes that accept hours and earnings codes that accept amounts.
You can create as many templates as required for each template type. In each template you specify the preset earnings codes that appear on rapid entry paysheets that are based on the template. For Hours and Amounts type templates, you can also select an additional (not preset on the template) earnings code on the rapid entry paysheet.
Fields Available by Template Type
The fields that are available on the Rapid Entry Template page vary according to the template type that you enter when you access the page. The template type determines the type of earnings code that can be specified in the template. This table describes the available fields for each template type:
|
Template Type |
Fields on Template |
|
Hours |
Three fields for specifying earnings codes. When the template type is Hours, only the earnings codes on the Earnings table with a payment type of Either Hours or Amount OK, Both Hours and Amount OK, Hours Only, or Unit/Override Rate are available for selection. |
|
Amounts |
Two fields for specifying earnings codes. When the template type is Amounts, only earnings codes on the Earnings table with a payment type of Either Hours or Amount OK, Both Hours and Amount OK, or Amounts Only are available for selection. |
|
Hours or Amounts |
Three fields for specifying earnings codes and three fields for the corresponding earnings code types. When the template type is Hours or Amounts, you can select earnings codes that accept hours and earnings codes that accept amounts. Note. You cannot add an additional earnings code to a rapid entry paysheet that is based on an Hours or Amounts type template. |
Page Used to Set Up Rapid Entry Paysheet Templates
|
Page Name |
Object Name |
Navigation |
Usage |
|
PYRE_TEMPLATE |
Set Up HRMS, Product Related, Payroll for North America, Payroll Processing Controls, Rapid Entry Paysheet Template, Rapid Entry Paysheet Template |
Define the type of earnings and earnings codes to be used in the Rapid Entry Paysheet component (PYRE_DATA_ENTRY). You can define templates based on hours, amounts, or a combination of hours and amounts. |
Defining Rapid Entry Paysheet TemplatesAccess the Rapid Entry Paysheet Template page.
Note. You cannot change the template type after the template is created.
|
Earnings Code |
Select the earnings codes that you want to preset for the template. Available earnings codes are determined by the template type. |
|
Earnings Code Type |
This field is only available if the template type is Hours or Amounts. Select an earnings code type for each earnings code that identifies whether hours or an amount will be entered on the rapid entry paysheet for the earnings. |
Establishing Retro Pay ProgramsThis section provides an overview of retro pay programs and discusses how to define retro pay programs.
Understanding Retro Pay Programs
Define retro pay programs to identify sets of earnings codes for calculating and paying retroactive earnings. You can assign these programs to specific pay groups to establish the earnings codes for which you pay employees retroactively.
For example, in a retro pay program, you can specify any number of earnings codes as earnings for which the system can calculate retro pay. For each of these earnings codes, you can specify an earnings code to use for paying the retro pay earnings.
Note. You must designate an earnings code for retro pay in the Earnings table before specifying that earnings code in a retro pay program.
See Also
Pages Used to Establish Retro Pay Programs
|
Page Name |
Object Name |
Navigation |
Usage |
|
RETROPAY_PGM_TBL |
Set Up HRMS, Product Related, Payroll for North America, Retroactive Payroll, Retroactive Pay Program, Program Table |
Describe a retro pay program and specify paysheet processing options. |
|
|
RETROPAY_PGM_DEF |
Set Up HRMS, Product Related, Payroll for North America, Retroactive Payroll, Retroactive Pay Program, Program Definition |
Establish the earnings codes for which the retro pay program calculates retro pay and those used for paying retro pay earnings. Note. Valid earnings codes for these fields are only those that you specified as eligible for retro pay on the Earnings Table - General page. |
Defining Retro Pay ProgramsAccess the Program Table page.
|
Retro Pay Program ID |
This ID links the earnings codes for this program to the pay groups that you assign to this program. |
|
Offset Earnings Type |
Select an offset earnings type for any negative earnings that are generated by the retro pay calculation. To avoid negative checks, link this earnings code to a payback deduction code. The system deducts the amount from subsequent paychecks of applicable employees. |
Off Cycle?
|
Off Cycle |
Select to create retroactive pay that is associated with this program as off-cycle earnings. If you clear this check box, the system creates retroactive pay that is associated with this program as on-cycle earnings. After the system creates earnings, you can change this setting before the retro pay calculation on the Retro Pay Review and Update page under Retroactive Payroll. |
|
Sep Check (separate check) |
Select to load the earnings that are associated with this program to a separate check on the paysheets. |
|
Tax Method |
Select a tax method to load to the paysheet line to associate with the earnings that you load for this program. |
|
Tax Periods |
Enter the number of tax periods to load to the paysheet line to associate with the earnings that you load for this program. |
Establishing Special Accumulator CodesThis section provides an overview of special accumulators and lists the pages used to establish special accumulator codes.
Understanding Special Accumulators
The Savings Plan table and the General Deduction table use special accumulator codes in calculation routines.
Here's how to set up special accumulator codes:
Define special accumulator codes on the Special Accumulator Table page.
Use the Earnings Table - Special Process page to assign earnings codes to add to or subtract from the accumulator balances.
Use the Deduction Table - Tax Class page to assign deduction codes to add to or subtract from accumulator balances.
Special Accumulator Example
To understand special accumulators, consider this example of setting up a 401(k) retirement savings plan to calculate the 401(k) deduction as a percentage of regular, overtime, holiday, vacation, and sick earnings:
Create a three-character code for the Special Accumulator table, such as 401.
This code accumulates all earnings that affect 401(k).
For each valid earnings code (such as regular or overtime), enter the 401 special accumulator code on the Earnings Table - Special Process page, and select Adds to Special Balance in the Effect on Special Balance field.
This tells the system to add these earnings to the 401 special accumulator.
Define the 401(k) calculation in the Savings Plan table, and specify Use 401 Special Accumulator Instead of Total Gross.
The system now calculates 401(k) deduction amounts based on the total amount of earnings designated with the 401 special accumulation code.
Pages Used to Establish Special Accumulator Codes
|
Page Name |
Object Name |
Navigation |
Usage |
|
SPCL_EARNS_TABLE |
Set Up HRMS, Product Related, Payroll for North America, Compensation and Earnings, Special Accumulator Table, Special Accumulator Table |
Define accumulators for deduction calculation. |
|
|
SPCL_ACCUM_EARNS |
Set Up HRMS, Product Related, Payroll for North America, Compensation and Earnings, Review Special Accumulators, Earnings |
Display the earnings codes that you specified in the Earnings table as having an effect on this special accumulator. This page is display-only. |
|
|
PRCSRUNCNTL |
Set Up HRMS, Product Related, Payroll for North America, Comp/Earnings Table Reports, Special Accumulator, Special Accumulator Report |
Run PAY713, which lists information from the Special Accumulator table. It contains codes that isolate earnings for deductions that are stated as a percent of gross such as 401(k). |
Defining the Final Check ProcessThis section provides an overview of the Final Check process and discusses how to:
Define final check action and action reason code combinations.
Establish a final check program.
Define final check earnings.
Define final check leave accrual rules.
Define final check deductions.
Clone a final check program.
See Also
Creating Final Check Paysheets
Processing a Final Check Request
Understanding the Final Check ProcessEmployee terminations occur for various reasons: some are initiated by the employee, others by the employer. When employment is terminated, regardless of the reason, the law requires employers to give employees their final wages. Some states require that the employee receives final wages before leaving the premises.
The Final Check process enables you to:
Define a set of termination rules as a final check program that identifies the earnings, deductions, and leave plans to process when creating a final check.
Automate the application of these rules to provide a clean, quick way of creating final checks.
Create a final check for a terminated employee whether or not the termination has been processed through PeopleSoft Human Resources.
To process final checks for an employee whose termination has not been processed through PeopleSoft Human Resources, enter the employee ID, termination date, and final check program ID on the Final Check Request page.
Note. Because this process is workflow-enabled, the system automatically generates a worklist item to notify the personnel administrator that a final check request has been created for an employee who is not yet terminated on the Job page.
Assign a final check program to each pay group using a final check program ID that you identify.
The pay group’s final check program becomes the default for final check requests of terminated employees in that pay group. However, you can override the default final check program for any employee on the Final Check Request page.
Define a set of rules in each program for processing deductions or refunds on an employee’s final check.
For example, you might refund or override a general or benefit deduction on a final check.
The system adds deductions and refunds to an employee’s paysheet as one-time deductions. This enables a payroll administrator to further override any values on collections or refunds by deduction class, if there are any additional rules that are outside the scope of final checks.
Pages Used to Define the Final Check Process
|
Page Name |
Object Name |
Navigation |
Usage |
|
TERM_ACTN_RSN |
Set Up HRMS, Product Related, Payroll for North America, Payroll Processing Controls, Final Check Action/Reason, Final Check Action/Reason |
Define the action and action reason code combinations that automatically trigger a final check request when an employee termination Job record enters the system. |
|
|
TERM_PGM_TBL |
|
Establish a final check program ID description. |
|
|
TERM_PGM_DEFERN |
|
Define earnings for the final check program. |
|
|
TERM_PGM_DEFLVE |
|
Define rules that apply to paying leave accruals to employees for whom you decide to pay earned or prorated accruals. |
|
|
TERM_PGM_DEFDED |
|
Define which deductions to include in a final check and which limits and special rules to use when calculating the deduction. |
|
|
RUNCTL_PAY751 |
Set Up HRMS, Product Related, Payroll for North America, Comp/Earnings Table Reports, Final Check Program, Final Check Program Report |
Generate the PAY751 report. The report lists information from the Final Check Program table, which contains final check processing rule definitions for earnings, leave accruals, and deductions. |
|
|
RUNCTL_FCXCLONE |
Set Up HRMS, Product Related, Payroll for North America, Payroll Processing Controls, Clone Final Check Program, Final Check Program Clone |
Run the Final Check Pgm Clone Utility (final check program clone utility) SQR Report process (FCXCLONE). |
Defining Final Check Action and Action Reason Code CombinationsAccess the Final Check Action/Reason page.
|
Reason Code |
Select an action reason to associate with the action code. Maintain action codes and reasons on the Action Reason Table page. |
Establishing a Final Check ProgramAccess the Final Check Program Table - Program Definition page.
|
Include T&L Payable Time (include time and labor payable time) |
Select this check box if you have an interface with PeopleSoft Time and Labor. If you select this check box, the system uses the time from PeopleSoft Time and Labor to create the paysheet for the final check and marks the time and labor paysheet as processed by final check. |
Defining Final Check EarningsAccess the Final Check Program Table - Earnings Definition page.
|
Payout Option |
Select: Earns Amt (earnings amount): Select this value if the Final Check process uses the regular earnings amount to pay the earnings for the earnings code. Goal Dif (goal difference): Select this value if the Final Check process searches for a corresponding Additional Pay record for the earnings code and calculates the remaining balance on the employee’s goal amount. |
Note. The final check includes only earnings that you identify here. For example, to include additional pay earnings for a car, you must include the appropriate earnings code for those earnings on this page. Otherwise it is not included in employees’ final checks.
Defining Final Check Leave Accrual RulesAccess the Final Check Program Table - Leave Accrual Definition page.
Leave
|
Override Limit Hours |
To apply an override when the payout earned and prorated hours exceed the limit, enter the number of hours. |
|
Payout EarnCd (payout earnings code) |
Select a payout earnings code to use for paying the accruals that are earned and awarded for the benefit plan. You can pay only the earned and awarded accruals, only the prorated portion, or both. Define the earnings code that you use for paying the earned and awarded accruals in the Earnings table as earnings that do not reduce regular pay but do add to hours taken. This ensures the integrity of the Accrual Balance records when you pay employee leave accruals upon termination. |
|
Process Negative |
Select this check box to pay negative accruals. |
|
Prorated ErnCd (prorated earnings code) |
Select a prorated earnings code to use for paying the prorated portion of accruals for the benefit plan. You can pay either:
Define the earnings code that you use for paying prorated accruals as earnings that do not reduce regular pay, but do add to hours taken and hours adjusted. This ensures the integrity of the Accrual Balance records when you pay employee leave accruals upon termination. |
Accrual Proration
If you prorate accruals for the benefit plan, use this group box to establish the proration rules.
|
Months of Service |
To prorate accruals by months of service, enter the monthly increments. For example, less than or equal to 1 month of service, 2 months of service, and so on. The system computes the months of service based on the employee’s termination date and the last date on which you ran the Run Leave Accruals COBOL SQL process (FGPACCRL). |
|
Hours of Service |
To prorate accruals by hours of service, enter the hourly increments. For example, less than or equal to 160 hours of service, 320 hours of service, and so on. |
Defining Final Check DeductionsAccess the Final Check Program Table - Deduction Definition page.
|
Deduction Code |
Select the deduction code that identifies the deduction in the Deduction table. |
|
Processing Rule |
Select a processing rule for each deduction code: Col GolDif (collect goal difference): Select this value to collect general deductions only. You collect the amount of the general deduction data goal amount minus the goal balance. Col PerDed (collect pay period deduction): Select this value to collect general deductions and benefit deductions. You collect the amount of the scheduled pay period deduction. Ref ESPP (refund employee stock purchase plan balance): This value is reserved for future use. Ref GolBal (refund goal balance): Select this option to refund general deductions only. You refund the amount of the general deduction data goal balance. Ref LstDed (refund last deduction): Select this value to refund general deductions and benefit deductions. You refund the amount of the pay deduction data current deduction, which represents the amount deducted at the last time the deduction was taken. Ref MTDBal (refund month-to-date balance): Select this value to refund general deductions and benefit deductions. You refund the amount of the deduction balance data MTD deduction. Ref QTDBal (refund quarter-to-date balance): Select this value to refund general deductions and benefit deductions. You refund the amount of the deduction balance data QTD deduction. Ref YTDBal (refund year-to-date balance): Select this value to refund general deductions and benefit deductions. You refund the amount of the deduction balance data YTD deduction. Ref SBBal (refund savings bond balance): Select this value to refund U.S. Savings Bond deductions. The amount that you refund depends on the status of each bond. You refund the bond log data accumulated amount when the bond log status is Not Ready to Disburse (N) or Funds Disbursed (D). You refund the accumulated amount when the bond log status is Ready to Disburse (R). Ref SBBRTD (refund savings bond balance and disburse amount): Select this value to refund U.S. Savings Bond deductions. The amount that you refund depends on the status of each bond. You refund the bond log data accumulated amount when the bond log status is Not Ready to Disburse (N) or Funds Disbursed (D). You refund the accumulated amount and disburse amount when the bond log status is Ready to Disburse (R). |
Important! The Final Check process performs normal payroll arrears processing whether or not you include the deduction in the final check program.
Cloning a Final Check Program
Access the Final Check Program Clone page.
Identify the final check program that you’re cloning, specify a final check program ID and the effective date for the new program, and indicate which program elements to copy to the new final check program.
Click Run to run this request. PeopleSoft Process Scheduler runs the Check Pgm Clone Utility process at user-defined intervals.
See Also
PeopleTools PeopleBook: Using PeopleSoft Applications
Reviewing and Modifying Payroll MessagesThis section provides an overview of payroll messages and discusses how to add and modify payroll messages.
Understanding Payroll Messages
The Pay Message table identifies all the error messages that can occur during the batch payroll processes. Each error message has a message ID number and a complete description. PeopleSoft maintains this table.
If you modify the system and your changes include new error messages, you can add new error message codes and text. When you add a new message code, use a number greater than 90,000 to avoid conflict with message codes that are provided by PeopleSoft. You can also modify the error message descriptions to include procedures unique to your environment. For example, you might add:
Call Pat Jones at extension 23, and ask her to run the Pay Calculation process in Final mode.
You can also specify how to proceed when the system encounters each error.
Page Used to Review and Modify Payroll Messages
|
Page Name |
Object Name |
Navigation |
Usage |
|
PAY_MESSAGE_TABLE |
Set Up HRMS, Product Related, Payroll for North America, Payroll Processing Controls, Pay Message Table, Pay Message Table |
Add new error messages, modify message descriptions, and specify nonfatal system messages to bypass during pay calculation. |
Adding and Modifying Payroll MessagesAccess the Pay Message Table page.
|
Continue With This Error |
Specify how to proceed when the system encounters this error that would otherwise cause the payroll process to stop: Yes: Select this value to continue with payroll processing after encountering this error. The Maximum Errors field becomes available for entry. No: Select this value to stop payroll processing after encountering this error. System: This value appears for errors for which you cannot select a Continue With This Error value. The entire Continue With This Error group box becomes unavailable for entry. |
|
Maximum Errors |
Enter a numerical value to limit the number of times the system bypasses the error message. Note. When the number of occurrences of the message equals this value, the system bypasses none of the errors. You must correct the errors before continuing the payroll process. |
|
Distribute With This Error |
Select this check box to let the Actuals Distribution COBOL SQL process (PSPPFUND) continue when it encounters this error. |
Handling Employees with Multiple Jobs in the Same OrganizationThis section provides an overview of multiple job considerations and discusses how to:
Issue a single check.
Set up direct deposit for paychecks.
Take general deductions.
Set up deduction subsets.
Set up union dues deductions.
Set up multiple benefits programs.
Set limits for general deductions and benefits deductions.
Note. The content of this section is only part of what you must know about multiple jobs. Other relevant information appears in the PeopleSoft Application Fundamentals PeopleBook.
See Also
PeopleSoft Application Fundamentals for HRMS PeopleBook
Understanding Multiple Job ConsiderationsIn many medical, academic, and industrial settings, employees hold more than one job in the same organization. A professor might double as a dean or a doctor as a professor of medicine. Following are some of the considerations to keep in mind when employees hold more than one job in the same organization.
(USA) FLSA Overtime Requirements for Multiple Jobs
The Fair Labor Standards Act (FLSA) of 1937 requires that you pay overtime to nonexempt employees who work more than 40 hours in a week. When an employee has multiple nonexempt jobs in the same organization, Payroll for North America applies the overtime rule to the total hours for all jobs with the same FLSA period.
For example, suppose an employee has two nonexempt jobs:
Data entry clerk for 22.5 hours.
Receptionist for 20 hours.
The system adds together the hours and pays overtime for 2.5 hours at the FLSA rate.
An employee who holds multiple jobs might be exempt from the Federal Insurance Contributions Act (FICA) in one job, while eligible for FICA in another job. Designate the FICA status of each job on the Job Data - Payroll page in the Job Data component (JOB_DATA).
If an employee has multiple jobs with different pay frequencies (weekly, biweekly, and monthly), Payroll for North America calculates the taxes for each job separately, based on the pay frequency. This ensures that you tax an employee’s earnings according to the appropriate tax bracket.
When processing an off-cycle payroll using the right-hand side of the run control page (Off-Cycle group box), do not include multiple-job employees in the same calculation as the single-job employees. You must process the two separately.
Issuing a Single CheckPayroll for North America can issue a single check that covers all of an employee’s FLSA calculations, taxes, benefits, and general deductions for multiple jobs in the same organization.
To issue a single check:
Select the Single Chk for Multiple Jobs (single check for multiple jobs) option on the Company - Default Settings page.
Designate a primary pay group for the employee on the Payroll Data 2 page.
The primary pay group identifies which pay group the system uses when creating consolidated paysheets. It also determines whether the system should take general deductions for a pay period.
PeopleSoft recommends that you select the pay group in which the payee is paid most often. If you do not select a primary pay group, the system uses the pay group that is associated with the first job into which you hired the employee.
When you run the Create Paysheet process, the system combines the paysheets for all jobs into the paysheet for the primary pay group. When you view the individual paysheets online, they appear as OK to Pay, signifying that they are paid through the consolidated paysheet. The system combines paysheets only when they have the same period end date, check date, FLSA period definition, FLSA calendar ID, FLSA salaried hours used (if subject to FLSA rules), and payroll cycle (on-cycle or off-cycle). The pay frequencies of the paysheets do not have to be the same.
A simple rule of thumb is that all calculations need to be completed on all outstanding paysheets prior to the confirm. If an employee has outstanding paysheets in pay group X and Y, all of his paysheets need to be calculated before any of those pay groups can be confirmed. The single check will be created under the employee's primary pay group.
To change paysheets after running the Create Paysheet process:
Enter changes on the individual paysheets (you can’t see the collective paysheet).
Run the Create Paysheet process again.
Setting Up Direct Deposit for PaychecksRegardless of how many jobs an employee has, create only one set of direct deposit instructions on the Direct Deposit page.
Taking General DeductionsHow you take general deductions is influenced by whether you select the Single Chk for Multiple Jobs option on the Company - Default Settings page.
When the Single Check Feature is Enabled
The following describes processing when you select the Single Chk for Multiple Jobs option:
The system takes general deductions based on earnings from the total earnings that it calculates for all jobs paid in the same check.
The system always takes general deductions that are scheduled for the current period when paying the job in the primary pay group.
To have the system take a deduction every time it issues a check for the employee—even when not paying the employee’s job in the primary pay group—select the Take on All Paygroups option on the General Deduction Data page. For example, suppose an employee has a weekly job and a biweekly job. The pay group for the weekly job is the primary pay group, because it is the one that the system pays most frequently. Normally, when the system pays the biweekly job, it also pays the weekly job, so it issues a single check. If the system processes the biweekly job at a different time than the weekly job, it takes the deduction only if the Take on all Paygroups check box is selected.
The system automatically takes general deductions in the appropriate pay periods when an employee receives a single check for jobs that the system pays at different frequencies and deductions have different frequencies.
For example, suppose an employee receives a single check, which includes compensation for a semimonthly pay period and a monthly pay period. The system takes a United Way deduction only in the first pay period of each month. When the system issues a check for the second pay period (the check that covers both the second semimonthly period and the monthly period), the system does not take the United Way deduction.
To override a deduction for an employee who has jobs in different pay groups (that is, to override the deduction schedule or change the amount), enter the override instructions for the primary pay group on the General Ded Code Override (general deduction code override) page.
The system ignores override instructions for the employee’s other pay groups. To identify an employee’s primary pay group, check the Payroll Data 2 page.
When the Single Check Feature is Not Enabled
If the Take on All Paygroups option is not selected on the General Deduction Data page, the system uses the Priority Number field on the Pay Group Table - Definition page to determine whether to take a general deduction. It takes the deduction only when processing the job in the pay group with the lowest priority number.
Setting Up Deduction SubsetsFor employees who receive additional pay:
Select a deduction subset on the Additional Pay page.
Request that the system issue a separate check using the Sep Chk # (separate check number) field on the Additional Pay page.
The deduction subset overrides other deduction instructions elsewhere in the system.
If you do not request a separate check, the system ignores the deduction subset and follows the deduction instructions from the calendar, the employee's Job record, or payroll data.
If an employee has multiple Additional Pay records with the same separate check indicator, select the same deduction subset for each record. If you select different subsets, the system applies the deduction subset that is associated with the last Additional Pay record that it processes.
Use deduction subsets to process only a selected set of deductions for a pay run. For example, for a bonus run, you might deduct only one or two of the deductions that you process during the regular monthly pay run.
Select a deduction subset on any of the following pages:
Pay Calendar Table
Payroll Data 2
Additional Pay
When you select subsets on more than one page, the system uses a hierarchy to determine which deductions to process. If you pay an employee for multiple jobs, the system also considers the employee's primary pay group and primary job when making this determination.
See the following scenarios and examples of the processing rules that apply. If you do not use the single check option, the term primary pay group used in the scenarios refers to the pay group for the job that the system is processing.
Scenario 1: Deduction Subset on Calendars
The system processes:
General deductions in the subset attached to the calendar for the primary pay group.
Benefit deductions in the subset attached to the calendar associated with the primary job.
Scenario 2: Deduction Subset on Calendars and the Benefit Ded Proc Override Page
The system processes:
General deductions included in the subset attached to the calendar for the primary pay group.
Benefit deductions included in the subset selected on the Benefit Ded Proc Override (benefit deduction processing override) page.
Scenario 3: Deduction Subset on Calendars and the Payroll Data 2 Page
The system processes:
General deductions in the subset on the Payroll Data 2 page.
Benefit deductions in the subset specified on calendar for the primary job.
Scenario 4: Deduction Subset on Calendars and Benefit Ded Proc Override Page and Payroll Data 2 Page
The system processes:
General deductions in the subset on the Payroll Data 2 page.
Benefit deductions in the subset on the employee's Benefit Ded Proc Override page.
The system ignores the subsets on the calendars because employee-level instructions take precedence.
Example
This table displays the five deduction subsets for the example. All of these deductions have been assigned to the employee on the General Deduction Data page and Benefits Program Participation page.
Note the following:
(B) indicates a benefit deduction.
(G) indicates a general deduction.
The following table indicates where the deduction subset is selected:
|
Additional Pay |
Calendar for Primary Pay Group |
Job (Benefits Ded Proc Override page) |
Calendar (not primary pay group) |
Payroll Data |
|
None |
401K (B) GARN (G) |
FSA-H (B) Bond (G) |
FSA-D (B) MISC (G) |
401K (B) Garn (G) Bond (G) Charity (G) |
This table displays the deductions taken in the following scenarios:
Scenario 1: Subset defined on calendars.
Scenario 2: Subset defined on calendars and Job data.
Scenario 3: Subset defined on calendars and Payroll Data 2.
Scenario 4: Subset defined on calendars and Job Data and Payroll Data 2.
|
Scenario and Deductions Processed |
401(k) |
FSA-H |
FSA-D |
Garn |
Bond |
Charity |
|
Scenario 1 |
||||||
|
Primary job in primary pay group |
X |
|
|
X |
|
|
|
Primary job not in primary pay group |
|
|
X |
X |
|
|
|
Scenario 2 |
||||||
|
Primary job in primary pay group |
|
X |
|
X |
|
|
|
Primary job not in primary pay group |
|
X |
|
X |
|
|
|
Scenario 3 |
||||||
|
Primary job in primary pay group |
X |
|
|
X |
X |
X |
|
Primary job not in primary pay group |
|
|
X |
X |
X |
X |
|
Scenario 4 |
||||||
|
Primary job in primary pay group |
|
X |
|
X |
X |
X |
|
Primary job not in primary pay group |
|
X |
|
X |
X |
X |
Setting Up Union Dues DeductionsSet up union dues as general deductions. The system takes these deductions only when paying a job that is affiliated with the union code. Therefore, if an employee is a member of a union, but one job does not qualify for union membership, the system does not take dues for that job.
If the system calculates union dues as a percentage of earnings, PeopleSoft recommends that you:
Assign a unique earnings code to each job that is associated with the union.
Create a special accumulator to track the total earnings for jobs with that earnings code.
Consequently, when calculating the union dues, the system considers only the earnings from jobs enrolled in the corresponding union.
Setting Up Multiple Benefits ProgramsIf an employee has multiple jobs that are covered by different benefits programs, and you select the Single Chk for Multiple Jobs option on the Company - Default Settings page, the system breaks down all benefits deductions by benefit record number during processing and stores the balances by benefit record number. For example, if an employee has two jobs that are covered by two separate benefits programs, and both programs include a 401(k) deduction or a Registered Pension Plan deduction for Canada, the system calculates two deductions and displays both on the paychecks.
Setting Limits for General Deductions and Benefits DeductionsEmployees can have different deduction limits for different jobs. When an employee has multiple jobs with multiple benefit programs (Ben_Rcd#s), and each program has the same deduction, the system adjusts each current goal balance (from the Benefits Program Table page) by the appropriate amount. Because you assign a general deduction at the company level, you can have only a single limit per company for those deductions.
For example, suppose an employee's two jobs are covered by different benefit programs, each with an individual retirement account deduction. The deductions are as follows:
|
Empl_Rcd# |
Ben_Rcd# |
Contribution Amount (% of gross) |
Goal Balance |
|
0 |
0 |
5% |
1000 USD |
|
1 |
1 |
2% |
500 USD |
The system issues a check that includes:
500 USD gross pay for Empl_Rcd#0, Ben_Rcd#0.
1000 USD gross pay for Empl_Rcd#1, Ben_Rcd#1.
The total deduction amount is (500 USD × 5%) + (1000 USD × 2%) = 45 USD. The current goal balance for Ben_Rcd#0 increases by 25 USD and the current goal balance for Ben_Rcd#1 increases by 20 USD.