
 Understanding the Global Payroll Utilities
This chapter provides an overview of the Global Payroll utilities and discusses how to:
Define element relationships.
Add records to an element map.
View element relationships.
Create and export rule packages.
View the status of packages.
Compare and upgrade rule packages.
Rename elements.
Create and export nonrule packages.
Compare and upgrade nonrule packages.
Copy packages.
Stamp and package elements by version.
Understanding the Global Payroll UtilitiesThis section discusses:
Utility usage guidelines.
The packaging and upgrading processes.
Base and related languages.
The versioning functions.
The delete functions.
The process of connecting UNIX and NT directories.
Common Elements Used in This Chapter
|
Depicts the relationships between the elements in your database. For example, if you have an earnings element with a calculation rule of rate × units, where the number of units is returned by a formula, you can use the element map to see how the components and formula elements are connected to your earnings element. The element map plays a critical role in packaging and moving elements and data to other databases. Because the map must be current and accurate when you create packages, the system rebuilds it when you start the process that creates rule packages. During mapping, the system validates that the defined fields exist in the records. Note. Mapping includes PIN-level records only. You must include those records that don’t have a PIN number as the primary key in order to use the nonrule packager. |
|
|
Focus Element |
The focal point of a process or action. |
|
Nonrule |
Nonrule data includes processing results, payee data, setup definitions, and other data where PIN_NUM isn’t the primary key. |
|
Package Status |
Click this link to access the Package Status page. |
|
The only element attribute that must be unique across databases. Like a PIN number, it’s automatically assigned to every element, those delivered by PeopleSoft and those that you create. The Code consists of the element name plus the suffix ALL, if the element is used by all countries, or a three-character country code, if the element is used by one country—for example, BASE ALL or BASE ITA. When you move elements between databases, the system compares the elements that you’re exporting with those in the target database. PIN code is one of the attributes that the system checks when comparing elements. |
|
|
This number is a pointer back to a PIN name, related data in GP_PIN, and other tables. It is generated and assigned to every element, those delivered by PeopleSoft and those that you create. Global Payroll programs access and process elements by referring to their PIN numbers (PIN_NUM), not their names. PIN numbers are assigned sequentially in a given database, meaning that the same element can have different PIN numbers in different databases. So when you move elements between databases, the utilities don’t rely on the PIN number to determine if the source elements that you’re copying exist in the target database. |
|
|
Rule |
One or more elements that define a business rule applicable to your payroll system, such as an earning or deduction rule or a count or rounding rule. The primary key for a rule is PIN_NUM. |
|
Target PIN Number (target pay item name number) |
The element's PIN number in the target database. |
|
Upgrading |
This process is composed of: copying items from a source database to a target database; comparing the copied items with the target database; overlaying items in the target database or adding new items, depending on the comparison results; and deleting selected items from the target database. |
See Also
Why the Core Application Uses Pay Item Name (PIN) Processing
Utility Usage Guidelines
Global Payroll provides a suite of integrated tools for implementing and maintaining the elements that define your payroll rules. You can use these utilities to view the relationships between elements, package and move elements and data between databases, and delete elements. When implementing your payroll system, you can use the utilities to move all or selected rules that you’ve created and tested into your production database. In an existing system, these utilities streamline the process of introducing new rules, installing system updates, and moving processing results and payroll data to other databases.
Here are some guidelines for using the utilities:
Operations involving the utilities can have a significant impact on the system, so anyone using these tools must be very familiar with Global Payroll.
Source and target databases must use the same PeopleTools release.
The source and target databases used by the nonrule packager must also share the same base language.
Do not change the PIN_CODE in the Global Payroll language table (GP_PIN_LANG).
Doing so can affect the movement of this table.
The utilities shouldn’t be used during a pay run or while online work is being performed, but rather after business hours.
You should import only one package at a time.
The Packaging and Upgrading ProcessesTo move rules and data between databases, you use several utilities in a specific sequence. This illustration shows the typical sequence for using the utilities to move rules and data between databases:
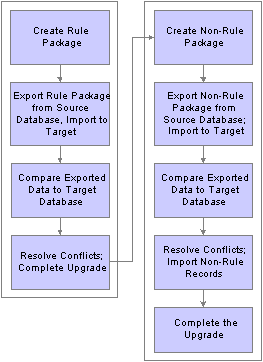
Moving rules and data between databases
To move rules and data between databases:
Create and upgrade a rule package.
A rule package contains elements that are defined in records with PIN_NUM as the primary key. You use the Create Rule Package utility to package the elements being moved. You can select individual elements by name, specify the attributes of the elements to include in the package, or both. You tell the system whether you want to include only the focus elements or the focus elements plus the elements the focus elements use, based on the element map.
You can direct the system to delete or upgrade elements in the target database. A batch process creates a package of elements that you can view online.
After creating a package, you export it from the source database and import it into the target database; the system adds 50 000 000 to the value of each PIN number in the package to avoid overwriting elements in the target database that have matching PIN numbers.
An online compare process follows, where the system compares the packaged elements with those in the target base. The goal is to determine which elements are new to the target database, which match elements that exist in the database, and which need deleting according to your instructions. Elements that are new to the target database are assigned the next PIN number.
After reviewing the results of the comparison and resolving conflicts, you complete the upgrade process.
Create and upgrade a nonrule package.
Nonrule packages contain data from records where PIN_NUM is not the primary key—plus information about related elements.
To create a nonrule package:
Define the criteria for creating the package of data to move.
Export the nonrule data and element information from the source database.
Import information for the elements (not the elements themselves) into the target database.
Run a compare process that compares the packaged elements with those in the target database and identifies conflicts to address before importing nonrule data.
Import the nonrule data and start an upgrade process that renumbers the PINs in the nonrule data records that were moved to the target database.
For example, imagine that the absence results record (GP RSLT ABS) contains a take element with a PIN number of 1333 on the source database. The element was moved to the target database, and because it matches (based on PIN code) an element in the target database with PIN number 3453, the nonrule packager renumbers the PIN number in the absence results record.
Base and Related LanguagesThe source and target database need not have the same base language. The rule packager, using Data Mover functionality, can change the data to the target's base language, if that base language is a related language in the source database. Additionally, the feature also creates a related language entry on the target database for the source database's base language. Consider the following example:
A German (DEU) target database contains the following data:
Base Data
|
PIN_NUM |
PIN_CODE |
Translatable Data |
Nontranslatable Data |
|
701 |
GP_TEMP001_DEU |
Current German Text content |
Current values on the target database |
You create a package from an English (ENG) source database copying PIN_CODE GP_TEMP001 for base language only. The system:
Exports a data file containing information for PIN_CODE GP_TEMP001 from the ENG database.
The data file contains the new PIN_NUM of 50 000 701.
Imports the data file to the target database.
Upon import, DataMover automatically creates a related language row with a language code of ENG.
The German target database now looks like this:
|
PIN_NUM |
PIN_CODE |
Translatable Data |
Nontranslatable Data |
|
701 |
GP_TEMP001_DEU |
CONTENT |
Current values on the target database |
|
50 000 701 |
GP_TEMP001_DEU |
SALARY |
New values from the source database |
Related Language Data
|
PIN_NUM |
PIN_CODE |
LANGUAGE_CD |
Translatable Data |
|
50 000 701 |
GP_TEMP001_DEU |
ENG |
SALARY |
The system then:
Connects 50 000 701 with 701 using the PIN_CODE.
Copies the DEU translatable fields from 701 to 50 000 701.
Deletes the original PIN_NUM 701.
Renumbers the new rows with the PIN_NUM of the target database.
The result of the process is updated information on the base table and a new ENG entry on the related language table, as shown below.
Base Table
|
PIN_NUM |
PIN_CODE |
Translatable Data |
Nontranslatable Data |
|
701 |
GP_TEMP001 DEU |
CONTENT |
New values from the source database |
Related Language Table
|
PIN_NUM |
PIN_CODE |
LANGUAGE_CD |
Translatable Data |
|
701 |
GP_TEMP001 DEU |
ENG |
SALARY |
Had the package been defined as both base and related languages, the swapping of languages to some extent would already have been completed by datamover during the package import (if a related language row for the language of the target database was part of the package.) This would result in overlaying translatable fields of the base row with the contents of the copied language row. If only the related language was copied with the package, the process is the same as described above, except for translatable fields of the base row of the target database, which would be updated to contain the values of the moved language row.
The Versioning FunctionsYou can use the versioning utilities of Global Payroll to assign a version number to an element and to package elements by multiple versions. Having created a package, you can move it to another database. In this case, the system moves changes from element definitions or component records (for example, if you change only earning calculation, the element definition itself is not moved).
Version-based packages only pull data from the database base language table, not from the Pay Item Names — Related Language table (GP_PIN_LANG). The only way to move related language information from GP_PIN_LANG is to use a regular rule package.
The Delete FunctionsTo delete rules from the target or source database, you can enter instructions for deleting elements when defining the selection criteria for a package. To preserve the integrity of your data, you can delete an element only if it’s not associated with other data. That is, the element being deleted must meet all the following conditions:
Not used in a result table.
Not associated with payee data.
Not linked to a nonrule table.
Not used by another element.
Not created by the PeopleSoft system.
See Also
Selecting Elements for a Rule Package
Selecting Elements for a Rule Package by Attribute
The Process of Connecting UNIX and NT DirectoriesIf your application runs on UNIX, exporting and importing packages requires additional consideration. You can create scripts on the UNIX machine, but the importing and exporting of packages occurs on the NT system, where Process Scheduler is located. Of course, this means that you must have NT Process Scheduler to run the rule packager.
Because UNIX and NT reference directories differently, you must define a shared directory that can be accessed by both platforms. In order to do so, the same paths must be mounted on both platforms. The path name must be defined identically on both machines. For example, we have defined the following directory structure to store datamover files:
NT system: \\tl-nfs\dsapps\hcm890\datamover\
UNIX system: /tl-nfs/dsapps/hcm890/datamover/
When you specify the path names before creating scripts or exporting, you must always use the NT notation including the double backslash. PeopleCode automatically transcribes the pathname to the appropriate platform notation when needed.
Defining Element RelationshipsTo define element relationships, use the Define Element Relationships (GP_PIN_FLD_MAP1) component.
The Define Element Relationships utility builds an element map that shows how elements with PIN numbers are related. It defines the relationship between elements, it also enables packager to define if elements are used in nonrule data, which is important when deleting elements and packaging nonrule data.
Although the system rebuilds the map when you create a rule package, we recommend that you rebuild the map when defining new elements, changing existing elements, or deleting elements. It’s also advisable to rebuild the map for the target database after completing an upgrade. This ensures that the map is current when displayed.
This section discusses how to:
Rebuild element maps.
Review for errors.
See Also
Adding Records to an Element Map
Pages Used to Define Element Relationships
|
Page Name |
Object Name |
Navigation |
Usage |
|
GP_PIN_FLD_MAP |
Set Up HRMS, Product Related, Global Payroll & Absence Mgmt, Elements, Define Element Relationships, Define/Build |
Start the GP_PINMAP process, which rebuilds element maps. View which records contain fields that store PIN numbers. You can add and delete records that you’ve created to the rule map. |
|
|
GP_PIN_FLD_MAP_ERR |
Set Up HRMS, Product Related, Global Payroll & Absence Mgmt, Elements, Define Element Relationships, Validation |
Review for errors after rebuilding the element map. |
Rebuilding Element MapsAccess the Define/Build page.
This page only lists those records that contain elements (which store PIN numbers). PIN NUM is often the key to these records, though this is not always the case.
Note. You cannot edit this page if it displays information for a PeopleSoft-delivered object.
See Adding Records to an Element Map.
|
Record Type |
Select a record type, which is the type of record that contains elements. Values are: Element Definition: Records of this type define elements with a primary key of PIN_NUM. Examples: GP_ERN_DED (earnings and deductions), GP_ABS_TAKE (absence takes), GP_ARRAY arrays and GP_FORMULA (formulas). Records that contain elements but don’t define elements have one of the following record types: Set-up Definition: These are records you define when you implement Global Payroll. Examples: GP_ELIG_GRP_MBR (eligibility group member) and GP_RUN_TYPE_DTL (run type detail). Output Result Data: These records contain calculation results. Examples: GP_RSLT_ACUM (accumulator results) and GP_RSLT_PIN. Payee Data: These records contain payee-specific data. Examples: GP_ABS_EVENT (absence events) or GP_PYE_OVRD (payee overrides). |
|
Record |
Displays the name of the record, containing one or more elements. |
|
Export Record |
Displays the name of the record that the system uses when exporting this data to another database. |
|
Effective Date Type |
Identifies whether the record is effective-dated. If this field is set incorrectly, the packager may fail. Effdt (effective date): This is the default value. Indicates that the record is effective-dated. Example: GP_BRACKET. Note. If you include in a package an element that has more than one effective-dated row, the system tries to match each row when comparing the source elements with the target database. If it finds a match, it replaces the row in the target database; if it doesn’t find a match, it adds the row to the target database. No Effdt (not effective-dated): Indicates that the record doesn’t have an effective date. Example: GP_ARRAY. Note. If you include in a package an element with no effective date, the system replaces all data for that element in the target database when you start the upgrade process. Begin − End: Indicates that the record isn’t effective-dated but contains begin and end dates. Example: GP_ACM_MBR. Note. If you include in a package an element with begin and end dates, the system replaces all data for that element in the target database when you start the upgrade process. |
|
Field Name |
Displays the name of the field in the record that contains other PIN number elements. For a record type of Element Definition, the system displays the name of the key field (PIN_NUM). |
Fields Referencing Other Elements
This group box displays all fields that store the PIN numbers of (member) elements that are used by the record/field combination at the top of the page.
The sample page displays information for GP_ERN_DED, the record that defines earning and deduction elements. This record can use up to 17 elements. PIN_AMT_NUM and PIN_BASE_NUM are some of the fields that store PIN numbers of member elements. For example, PIN_BASE_NUM identifies the element that returns the base amount. To resolve an earning or deduction element, the system must know the PIN numbers of elements that store the amount, base, generation control instructions, and so on.
|
Field Name |
Displays the name of the field that stores a member element’s PIN number. |
|
Field Long Name |
Displays the long name of the field. |
|
Field Status |
Displays the field’s status. Values are: Valid: Indicates that the field existed in the record when the element map was last rebuilt. Invalid: Indicates that the field on the record did not exist when the element map was last rebuilt. The system flags invalid fields when you rebuild the element map. |
Applicable Element Types
When the record type is Element Definition, this group box identifies the corresponding element types. For example, the element types that apply to GP_ERN_DED are Earnings and Deductions.
|
Element Type |
Important when packaging elements. The element type that you select when creating a package gives the system information for selecting rows from the appropriate record. |
|
Rebuild Effdt Element Map (rebuild effective-dated element map) |
Click to start the rebuild process. If the system cannot build the element map because of errors, this message appears on the page: “Effdt Element Map hasn’t been built. Please check Validation page for errors.” |
Reviewing for ErrorsAccess the Validation page.
Review this page for errors generated by the rebuild process.
|
Status |
Displays Invalid if an error occurred. Usually means that a field has been renamed or removed from the record, or that the record no longer exists. If this is a PS Delivered/Maintained (PeopleSoft delivered/maintained) record, contact the PeopleSoft Global Support Center. If the error involves a record that you created, check the record to make sure all the fields are still valid. |
|
Record (Table) Name |
Identifies the record that contained the invalid field. |
|
PIN Num Fieldname (pay item name number field name) |
Displays the name of the field that appears in the Field Name field at the top of the Define/Build page. |
|
Field Name |
Displays the field name that no longer exists in the record but appears on the Define/Build page. |
|
Message |
Displays an error message pertaining to the specific field. |
Adding Records to an Element MapThe procedure of adding records to an element map depends on the record’s main (first) key:
If the main key is PIN_NUM, the record type is Element Definition, also called Rule Definition.
If the main key is not PIN_NUM, the record type is Output Result Data, Payee Data, or Set Up Definition, depending on its purpose.
This section discusses how to:
Add rule definitions to an element map.
Add nonrules to an element map.
Page Used to Add Records to an Element Map
|
Page Name |
Object Name |
Navigation |
Usage |
|
GP_PIN_FLD_MAP |
Set Up HRMS, Product Related, Global Payroll & Absence Mgmt, Elements, Define Element Relationships, Define/Build |
Start the GP_PINMAP process, which rebuilds element maps. View which records contain fields that store PIN numbers. You can add and delete records that you’ve created to the rule map. |
See Also
Pages Used to Define Element Relationships
Adding Rule Definitions to an Element MapThis section describes the procedure for adding rule definitions to an element map, where the record’s main key is PIN_NUM.
To add a rule definition to an element map:
Use PeopleTools to create a Structured Query Language (SQL) view for the record.
The view must have the same structure as your new record, as illustrated in the following example.
The first line of the Select statement must read:
SELECT PIN_NUM + 50000000
On the Define/Build page, add a row for the new record.
Complete these fields on the Define/Build page:
For Record Type, select Element Definition.
For Record, select your new record.
For Export Record, select the view that you created in step 1.
For Effective Date Type, select the appropriate value for the record.
For Field Name, select PIN_NUM.
In the Fields Referencing Other Elements group box, list each field in your record that contains a PIN number.
This includes the field name defined in step c. You can select only PIN_NUM.
If you selected Element Definition for the record type, identify the element types in the Applicable Element Types group box.
Click Rebuild Effdt Element Map to start the Rebuild process.
Important! After adding an element definition record to the element map, follow the rules for defining version relationships.
Example
This illustration shows how your SQL statement should match the record structure:
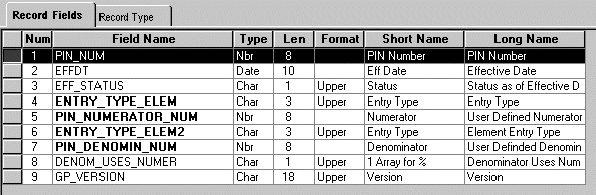
Record definition for GP_PRORATION
SELECT PIN_NUM + 50000000
,EFFTDT
,EFF_STATUS
,ENTRY_TYPE ELEM
,PIN_NUMERATOR_NUM
,ENTRY_TYPE_ELEM2
,PIN_DENOMIN_NUM
,DENOM_USES_NUMER
,GP_VERSION
 FROM PS_GP_PRORATION
Adding Nonrules to an Element MapThis section describes the procedure for adding rule definitions to an element map, where the record’s main key is not PIN_NUM.
To add a nonrule to an element map:
Use PeopleTools to create a SQL view for the record.
The view must have the same structure as your new record, as illustrated in the following example.
In the Select statement, enter + 50 000 000 after each field in the record that references a PIN number.
On the Define/Build page, add a row for the new record.
Complete these fields on the Define/Build page:
For Record Type, select Output Result Data, Payee Data, or Set up Definition.
For Record, select your new record.
For Export Record, select the view that you created in step 1.
For Effective Date Type, select the appropriate value for the record.
For Field Name, select any field in the record that references PIN_NUM.
In the Fields Referencing Other Elements group box, list each field within your record that contains a PIN number.
This includes the field name defined in step d. You can select only PIN_NUM.
Click Rebuild Effdt Element Map to start the Rebuild process.
Example
This illustration shows how your SQL statement should match the record structure:
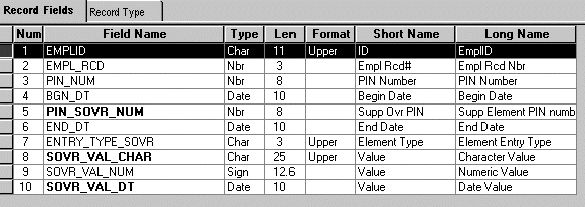
Record definition for GP_ PYE_OVR_SOVR
SELECT EMPLID
,EMPL_RCD
,PIN_NUM + 50000000
,BGN_DT
,PIN_SOVR_NUM + 50000000
,END_DT
,ENTRY_TYPE_SOVR
,SOVR_VAL_CHAR
,SOVR_VAL_NUM
,SOVR_VAL_DT
  FROM PS_GP_PYE_OVR_SOVR
Viewing Element RelationshipsYou can use the View Element Relationships utility to view hierarchical maps, including a map that existed as of a specific date.
This section discusses how to:
View elements used by a focus element.
View elements that use a focus element.
Pages Used to View Element Relationships
|
Page Name |
Object Name |
Navigation |
Usage |
|
GP_PINTREE_EFFDT |
Set Up HRMS, Product Related, Global Payroll & Absence Mgmt, Elements, View Element Relationships, Uses |
View a map of elements that a focus element uses. The element relationship map must be built before the data is displayed. |
|
|
GP_PINTREE_EFFDT2 |
Set Up HRMS, Product Related, Global Payroll & Absence Mgmt, Elements, View Element Relationships, Used By |
View elements that use the focus element. |
Viewing Elements Used by a Focus ElementAccess the Uses page.
Element maps include fields that contain PIN_NUM only. So, when looking at the map for an earnings element, you don’t see fields for frequency, currency, and other non-element information.
|
Element Name |
Displays the name of the element that you selected on the search page. This is the focus element. |
|
Type |
Displays the element type of the focus element. |
|
As Of Date |
To see the relationship map that was in effect on a specific date, enter the date in this field. |
|
Element Uses |
Click the element name to view its member elements. This information appears in a tree structure that expands or collapses as you click the + or − folder before an element name. |
Perspective
To see additional information on a related element, click the element name in the Element Uses group box and select a view in the Perspective field.
|
Perspective |
Select the format for the data in this group box. Values are: Functional: Displays descriptive names of the data. Technical: Displays technical names for the data. |
|
Type |
Displays the element type of the selected element. |
|
Name |
Displays the name of the selected element. (The name is the same for the functional and technical views.) |
|
Description |
Displays the description of the selected element. (The description is the same for the functional and technical views.) |
|
Record |
Displays the name of the record in which the selected element resides. |
|
Field |
Displays the name of the field that stores an element’s value. |
Viewing Elements That Use a Focus ElementAccess the Used By page.
This page resembles the Uses page but shows all elements that use the focus element.
See Also
Viewing Elements Used by a Focus Element
Creating and Exporting Rule PackagesThis section provides overviews of how to move rules packages, define and create rule packages and discusses how to:
Name rule packages.
Select elements for a rule package.
Select elements for a rule package by attribute.
Modify the SQL Where clause for selection criteria.
Display the elements in a rule package.
Export packages of elements.
View scripts.
Understanding How to Move Rule Packages
Rule packages include elements that are defined in records where PIN_NUM is the key. You can create a rule package and move its elements to a target database. This diagram displays the process:
Moving rule packages
To move rules from one database to another:
Define and create a rule package using the Create Rule Package component.
Export and import the rule package using PIA.
Compare and upgrade the elements in the package, using the Compare and Upgrade Package component.
Understanding How to Define and Create Rule PackagesUse the Create Rule Package component to define the selection criteria for the elements to include in your package and to specify the action the system takes for each element: upgrade (copy) the element to the target database or delete the element from the target database.
You can define two sets of selection criteria:
Use the Create Rule Package - Packaging Criteria 1 page to select elements by name.
Use the Create Rule Package - Packaging Criteria 2 page to select elements by attribute (element type, owner, used by, class, category, country).
You can modify the SQL code that the system uses when it selects elements that meet your Criteria 2 parameters.
If you complete both pages, the system selects all elements that meet the criteria defined on the Create Rule Package - Packaging Criteria 1 page or the Create Rule Package - Packaging Criteria 2 page.
You can start the package creation process from either page.
To define and create the rule package using the Create Rule Package component:
Define the selection criteria for the elements to move and delete from the target database.
Run the Create Package process.
View the package.
Cancel any elements that you’re not moving.
Warning! If you add or change an element after creating a package, you must recreate the package to include the element.
Pages Used to Create and Export Rule Packages
|
Page Name |
Object Name |
Navigation |
Usage |
|
GP_PKG_DFN |
|
Name a rule package and enter a description and comments. |
|
|
GP_PKG_CRITERIA1 |
Set Up HRMS, Product Related, Global Payroll & Absence Mgmt, Elements, Manage Global Payroll Packages, Create Rule Package, Packaging Criteria 1 |
Select specific elements for a rule package. Start the batch process that creates the package. |
|
|
GP_PKG_CRITERIA2 |
Set Up HRMS, Product Related, Global Payroll & Absence Mgmt, Elements, Manage Global Payroll Packages, Create Rule Package, Packaging Criteria 2 |
Select elements for a rule package by attribute (element type, owner, used by, class, category, country). Modify the SQL code that the system uses to select elements that meet the Criteria 2 parameters. |
|
|
GP_PKG_CRIT2_SEC |
Click the Show Where Clause link on the Packaging Criteria 2 page. |
View and modify the SQL Where clause for the selection criteria defined on the Packaging Criteria 2 page. |
|
|
GP_PKG_VIEW |
Set Up HRMS, Product Related, Global Payroll & Absence Mgmt, Elements, Manage Global Payroll Packages, Create Rule Package, View Package |
View the elements in a rule package. View the action (upgrade or delete) that the system takes when you copy the package. You can cancel elements in the package. |
|
|
GP_PKG_ELEM_EXP |
Set Up HRMS, Product Related, Global Payroll & Absence Mgmt, Elements, Manage Global Payroll Packages, Export Rule Package, Element Export |
Export a package of elements. You must create a package before you can export it. |
|
|
GP_PKG_EXPIMP |
Set Up HRMS, Product Related, Global Payroll & Absence Mgmt, Elements, Manage Global Payroll Packages, Export Rule Package, View Scripts |
View export, import, and cleanup scripts. |
Naming Rule PackagesAccess the Package Definition page.
Enter a description of the package and comments.
Selecting Elements for a Rule PackageAccess the Packaging Criteria 1 page.
Packaging Criteria - Element List
|
Entry Type |
Select the entry type for the element to include in the package. This determines which elements you can select in the Element Name field. |
|
Element Name |
In this required field, select the name of the element to include in the package, the focus element. |
|
Element Owner |
Identifies who created the element that you selected in the Element Name field and who’s responsible for maintaining it. Valid values are Customer, Modified, PS Mnt (PeopleSoft Maintained), PS NonMnt, and PS Secure. |
|
Include |
This required field defines what the package includes. Values are: Focus Element + Members: Selects these elements in the order listed: the focus element (in the Element Name field); and member elements that the focus element uses (as depicted on the Uses page). Focus Element Only (default): Selects these elements in the order listed: the focus element; its autogenerated components and autogenerated accumulators. First level elements are selected as information only elements. Warning! Select Focus Element Only only if you know that the target database contains all the member elements. If it doesn’t, the system reports an error during the compare process. Note. The system always includes information for the member elements in the package—even when you select Focus Element Only. Although the member elements aren’t copied to the target database, the system uses the information to perform the Compare process described later in this chapter. |
|
Language |
Specify how or whether to copy language information to the target database. Language information pertains to fields on GP_PIN that are translatable. This data is stored on the related-language table for GP_PIN, GP_PIN_LANG. Note. If you select All or Related, the system deletes all existing languages and inserts data in the Related Language table for elements that you’re moving, including any language records that you’ve added if the base language in the target database is included in the package. Values are: All: Adds all language information to the package. Base: Select to get only the base language data. Related: Copies all language data related to the element but not the element itself. |
|
Action |
In this required field, select the action the system should take with this element when upgrading the target database. Values are: Upgrade (default): Adds the element to the target database or updates a matching element that’s in the target database. Delete: Deletes the element from the target database after copying it to the target database. (One database can be used as both the source and target database.) You cannot delete elements that meet any of the following conditions:
Note. You can delete the related language or all language information but not the base language alone. |
|
Create Package |
Click to start the Create Package program (GP_PKG_CR). You can view the process status through the Process Monitor. Wait until the program has finished before opening a page that’s associated with the package. If the process fails due to mapping errors, the Process Monitor indicates “No Success,” and the log file notifies you that the map wasn’t built. This message appears on the View Package page above Element List: “Package not created - there are errors in Element Relationship.” If the process fails for any other reason check any SQL code that you created using the where clause on the Packaging Criteria 2 page. If the problem persists, contact PeopleSoft’s Global Support Center. |
See Also
Selecting Elements for a Rule Package by AttributeAccess the Packaging Criteria 2 page.
Attribute Set1
Select the Attribute Set1 tab.
|
Include |
In this required field, specify whether the package includes only focus elements (which meet the selection criteria on the Attribute Set1 tab) or also includes elements that are used by the focus elements. Values are Focus Element + Members and Focus Element Only. Focus Element + Members: Selects these elements in the order listed: the focus element (in the Element Name field); and member elements that the focus element uses (as depicted on the Uses page). Focus Element Only (default): Selects these elements in the order listed: the focus element; its autogenerated components and autogenerated accumulators. First level elements are selected as information only elements. Information only elements are used by the focus element and its immediate children (if this information has not been previously selected). Warning! Select Focus Element Only only if you know that the target database contains all the member elements. If it doesn’t, the system reports an error during the compare process. Note. The system always includes information for the member elements in the package—even when you select Focus Element Only. Although the member elements aren’t copied to the target database, the system uses the information to perform the compare process described later in this chapter. |
|
Language |
Specify how or whether to copy language information to the target database. Language information pertains to fields on GP_PIN that are translatable. This data is stored on the related-language table for GP_PIN, GP_PIN_LANG. Note. If you select All or Related, the system overwrites data in the Related Language table for elements that you’re moving, including any language records that you’ve added if the base language in the target database is included in the package. Values are: All: Adds all language information to the package. Base: Select to get only the base language data. Related: Copies all language data related to the element but not the element itself. To load translated data into your database after installing Global Payroll, select Related to copy the language data associated with the elements. |
|
Action |
In this required field, select the action the system should take with this element when upgrading the target database. Values are: Upgrade (default): Adds the element to the target database or updates a matching element that’s in the target database. Delete: Deletes the element information from the target database after copying it to the target database. (One database can be used as both the source and target database.) You cannot delete elements that meet any of the following conditions:
Note. You can delete the related language or all language information but not the base language alone. |
|
Element Type |
Select the type. |
|
Element Owner |
Select elements by owner. Valid values are: Customer, Modified, PS Mnt, PS NonMnt, and PS Secure. |
|
Create Package |
Click to start the Create Package program (GP_PKG_CR). The Process Request page appears, so you can monitor the process. Wait until the program finishes before opening a page that’s associated with the package. |
Attribute Set2
Select the Attribute Set2 tab.
|
Used By |
Select where elements are used. Values are All Countries (default) and Specific Country. If you select Specific Country, you must complete the Country field. |
|
Country |
Select the country's three-digit country code if you selected Specific Country in the Used By field. |
|
Category |
To select only elements assigned to a particular category, select the category. (You assign a category to an element on the Element Name page.) |
|
Element Class |
Select the element class to package. (You assign an element class to an element on the Element Name page.) Valid values are: Customary, Not Classified, Sample Data, Statutory, and System Data. |
|
Where Clause Option |
The system converts the criteria entered on the Create Rule Packages - Packaging Criteria 2 page into SQL before it creates the package. The Where Clause is editable. Values are: Use Default WHERE Clause: Tells the system to use the default Where clause and discard SQL code modifications. Change WHERE Clause: Makes the other fields on this page unavailable and puts the SQL code on the Where Clause page in edit mode. Warning! Selecting Use Default WHERE Clause deletes any SQL code you may have entered on the Where Clause page. |
|
Show Where Clause |
Displays the Where Clause page, where you can view and alter the SQL code for your selection criteria. |
See Also
Selecting Elements for a Rule Package
Modifying the SQL Where Clause for Selection CriteriaAccess the Where Clause page.
|
Where Clause Option |
Select Use Default WHERE Clause to use the default clause or revert to it after editing the SQL code. Changes to the Where clause are lost. Select Change WHERE Clause to activate the code on the lower part of the page for editing. |
|
Where Clause |
If you selected Use Default WHERE Clause for Where Clause Option, the system displays the Where clause of the SQL statement that it created based on the selection criteria that you entered for the package on the Packaging Criteria 2 page. If you selected Change Where Clause, you can edit the SQL. The following rules apply:
Note. When you save, the system checks for the use of PIN_NUM, and looks for SQL syntax errors. The fields on the Packaging Criteria 2 page become uneditable. |
Displaying the Elements in a Rule PackageAccess the Create Rule Package - View Package page.
|
Action |
Displays the action applicable to the element in your package. Values are: Upgrade, Delete, and Info Only. |
|
Upgrade |
This check box is selected automatically to include the element in the package for export. Clear it to exclude the element from the export. |
Exporting Packages of ElementsAccess the Element Export page.
Once you have created a package, you can export it. During the export process, the system automatically adds 50 000 000 to the value of the PIN number assigned to each element so that it can distinguish the exported elements from elements that exist in the target database.
To export a rule package:
Select the package ID.
Select a location for the exported files.
The location of scripts and data files should be accessible by both the source and target databases.
When deleting items, the source database and target database can be the same.
Select Create Scripts. This button will create the Packagename_exp.dms and Packagename_imp.dms scripts.
Export the package from the source database, and import it into the target database.
Viewing ScriptsAccess the Export Rule Package - View Scripts page.
|
Script Location |
Displays the script location, which must be accessible by both the import and export databases. The setup must be specific in the Process Scheduler configuration file, and the drives must be mounted on both machines. If the configuration file has changed during the process, the log will not open. |
|
View Package Script |
Select the type of script that you want to view: export, import, or cleanup. The DataMover script appears. Make sure that these scripts are correct. |
Viewing the Status of PackagesThis section discusses how to view the status of a package.
Page Used to View the Status of Packages
|
Page Name |
Object Name |
Navigation |
Usage |
|
GP_PKG_DTTM_SEC |
Click the Package Status link on the Package Definition page. |
View the date and time a package was created, exported, imported, compared, and upgraded. |
Viewing the Status of a Package
Access the Package Status page.
The last completed process determines which process you can run next.
Comparing and Upgrading Rule PackagesThis section provides an overview of rule packages comparisons and upgrades and discusses how to:
Run the Compare Report.
Start the compare and upgrade processes.
Review for upgrade errors.
Understanding Rule Package Comparisons and Upgrades
After you have imported a rule package to the target database use the Compare and Upgrade Package component to compare and upgrade the rule package, as explained in this section.
To compare and upgrade a rule package:
Compare the packaged elements with the elements in the target database.
The system determines which elements are new to the target database, which update existing elements in the target database, and which need deleting from the target database.
Resolve conflicts that are identified during the compare process.
Conflicts can occur for several reasons. For example, the source element could use other elements that don’t exist in the target database and are not included in your package or an element that you want to delete could be used in a results table. The corrective action depends on the type of conflict.
Rerun the compare process after correcting errors or excluding elements from the package.
Run the upgrade process.
The system renumbers the 50,000,000 rows added at import into the target database, renumbers the PINs that already exist in the database, renumbers the new elements by assigning new PIN numbers, and deletes rows according to the option chosen in the package. You can run this process only once.
Note. Before moving multiple elements simultaneously, it is recommended that you back up the target database before starting the process.
What Happens During the Compare Process
For each exported element, the system looks for an element in the target database with the same PIN code, element type, and element owner.
This flowchart shows the logic that the system uses to perform the comparison and generate the resulting warning or error messages:
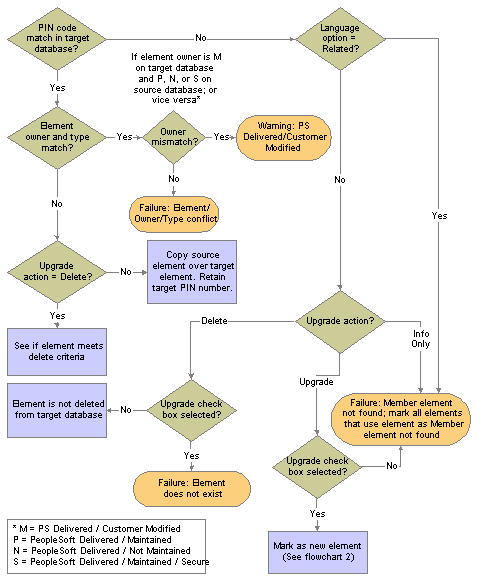
Compare process for rule packages (flowchart 1)
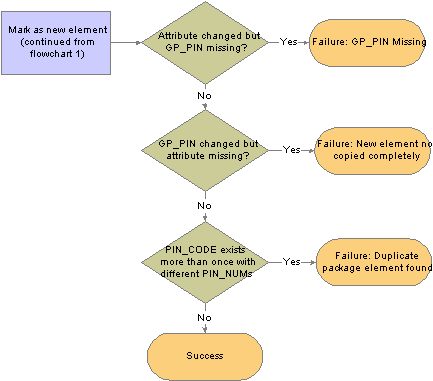
Compare process for rule packages (flowchart 2)
Warning! If you revise an element and export the element to another database that contains that element, the system overwrites that definition if you select the Upgrade check box on the Package Upgrade tab of the Package Elements page.
See Also
Running the Compare ReportYou can create a Compare Report while performing the compare process. The Compare Report enables you to see what elements the Rule Package will change on a field-by-field basis to help you decide whether to upgrade a specific element or not.
The Compare Report creates a report displaying the affected elements and what the differences are between the elements in the Rule Package and the target database. The Compare Report can only be run at the same time as the compare process.
Note. Running the Compare Report will affect the performance of applying a rules package so you should run the Compare Report only when you need a field-by-field comparison of the rules package and the target database.
Compare Report Contents
The Compare Report consists of four columns. The columns and contents are described in the following table:
|
Column |
Contents |
|
Elements |
|
|
Record/Field |
Record or field name for the values contained in the Rule Package and Target Database columns. |
|
Rule Package |
Data values that are moving to the target database as part of the Rule Package for the applicable record or field name. |
|
Target Database |
Data values that are currently in the target database for the applicable record or field name. |
Elements Displayed in the Compare Report
The Compare Report contains details about each of these groups of elements:
Elements with Errors or Warnings—All elements that have an error or warning message appear in this first section with basic information about the element (if it is available). All errors and warnings should be looked into and resolved before continuing the upgrade process.
Modified Elements— The rows (records and fields) that will be changed are displayed. If a new row of data is being added, all fields appear.
New Elements—For new elements that are contained in the Rule Package but not in the target database, the following GP_PIN fields are displayed: PIN Code (as the key field); PIN_NM; DESCR; COMMENTS. From Element Definition Records, only key fields are displayed.
Deleted Elements—The following fields from GP_PIN are displayed: PIN Code (as the key field); PIN_NM; DESCR; COMMENTS. For rows that exist currently in the database, only key fields from Element Definition Records are displayed.
Elements with no changes—No field information is displayed.
Note. For formulas, only the formula text is displayed, rather than details about each individual field.
For all PIN Number fields, the Compare Report displays the corresponding PIN Code instead of the PIN Number.
For translate value fields, both the value itself and the corresponding translate value short description are displayed.
Pages Used to Compare and Upgrade Rule Packages
|
Page Name |
Object Name |
Navigation |
Usage |
|
GP_PKG_ELEM_UPG |
Set Up HRMS, Product Related, Global Payroll & Absence Mgmt, Elements, Manage Global Payroll Packages, Compare/Upgrade Rule Package, Package Elements |
Start the Compare or Upgrade processes. You can access the package only after exporting or importing the package into the target database. |
|
|
GP_PKG_CMP_AUDIT |
Set Up HRMS, Product Related, Global Payroll & Absence Mgmt, Elements, Manage Global Payroll Packages, Compare/Upgrade Rule Package, Package Compare Audit |
Review for errors that occurred during the Compare process. Before continuing with the upgrade process, correct the errors and rerun the Compare process. |
Starting the Compare and Upgrade ProcessesAccess the Package Elements page from the target database.
Use this page to start the Compare process, which compares the data from the source database to the target database. You also use this page to start the Upgrade process, which completes the upgrade, and to exclude elements from the upgrade process.
|
Compare |
This button is available immediately after the import. Click to start the Compare process. The system compares the elements you imported with the ones in the target database. After the compare process is complete, check the Package Upgrade tab and then review the Package Compare Audit page for errors. |
|
Upgrade |
This button becomes available after you run a successful Compare process. See the description of the Package Upgrade tab. Click the button to start the Upgrade process. You can upgrade a package only once. This process upgrades only elements that passed the Compare process without errors. Note. If none of the upgrade elements in a package can be upgraded due to errors or failures, the Upgrade button becomes unavailable. You must resolve the errors and failures to proceed with the upgrade. If you decide to cancel the upgrade, you must run the cleanup.dms script to remove element references from the target database. Note that only one element has to pass the compare process with a status of Success for the Upgrade button to become available; when this element is updated, the system automatically purges all other element references from the database. In this situation, you do not need to run the cleanup.dms script. Important! If possible, run the compare and upgrade processes separately from regular payroll processes to avoid affecting other users. |
|
Create Compare Report |
Select this check box to create the Compare Report to compare the rule package to the target database on a field-by-field basis. This button is available when the Compare button is also available. |
|
Update Statistics |
Select this check box to update statistics on the appropriate tables. |
Package Upgrade
Select the Package Upgrade tab.
This page shows the results of the Compare process. If failures are reported, correct the errors before continuing with the upgrade. The Package Compare Audit page provides additional information about any errors.
Before you can start the Upgrade process, at least one element must have passed the Compare process with no errors (warnings are acceptable). Click the Upgrade button to accept the changes.
|
Source Pin Number (source pay item name number) |
Displays the PIN number of the element from the source database (without an added 50 000 000). |
|
Element Name |
Displays the name of the element in the source database. |
|
Upgrade |
Select this option to overwrite the element with the data from the source database. If you modified the target element then your changes will be lost. To exclude the element from the upgrade process, clear the check box. Excluded elements will retain any changes you may have made. Important! If you exclude an element from the package, you must rerun the Compare process before resuming the upgrade. |
|
Result |
Displays the result of the comparison. Values are: Not Done: You haven’t yet run the Compare process. Success: The Compare process encountered no errors. Failure: The Compare process failed. The Reason field shows why. Warning: The PeopleSoft system has modified the element in the source database or you have taken control of the element ownership. The Reason field shows why. You can accept or ignore the change. Note. Failures are listed first, followed by warnings and then successes, so if the entries on the first page all read Success, you can assume that the entire comparison process succeeded. |
|
Reason |
If the compare process failed or generated a warning, one of the following reasons appears here: New Element Not Copied Completely: You’re trying to copy a new element into the target database but that element has no GP_PIN record—only a definition. (For example, you stamp and package elements by version. Another person modifies the element and clears the version number.) Restamp the element with the appropriate version and export it again. (This error only occurs when exporting elements by version.) Element Owner / Type Conflict: The PIN code for the source element matches a PIN code in the target database, but the owner or element type doesn’t match. Use the Element Rename page to change the PIN code in the target database. If an element is customer-defined, the Element Owner field on the Compare and Upgrade Package - Package Elements page reads Customer. Member Element not found: The source element uses other elements that don’t exist in the target database and aren’t included in the package. Remove the element from the upgrade process by clearing the Upgrade check box, or include the missing elements in the packaging criteria, recreate the package in the source database, and re-import it. Mbr Element Owner/Type Conflict (member element owner/type conflict): This is similar to the Element Owner/Type Conflict message but applies to a member element that’s used by the focus element. Use the Element Rename page to change the PIN code in the target database. Element does not exist: You’re trying to delete an element that’s not in the target database. PS Delivered/Customer Modified: This warning indicates that the element in the source database has been modified and no longer matches the element in the target database. To accept the PeopleSoft or customer modifications and overwrite any changes in the target database, select the Upgrade check box. The element ownership remains PS Delivered/Customer Modified once the check box is selected. PS Delivered/PS Modified: This warning indicates that the PeopleSoft system has changed the ownership of the element in the source database so that it’s no longer PeopleSoft delivered or maintained. To reject the change, clear the Upgrade check box. Cannot delete PS-Owned Element: You’re trying to delete a PeopleSoft-owned element from the target database. You cannot delete such elements. Duplicate Package Element Found: You’re trying to import an element that is in another package that’s being upgraded. Used in Non-Elem Defn (element definition): You are trying to delete an element that is used in a non-element definition. Modify the nonelement definition so that it no longer uses this element. Used in Output Results: You are trying to delete an element that is used in a processing result table. (Results cannot be deleted from the result tables.) Used in Payee Data: You’re trying to delete an element that’s associated with payee data. Modify the payee data so that it no longer uses this element. Used in Rule Defn (definition): You are trying to delete an element that is used by another element. Modify the rule definition so that it is no longer uses this element. Auto-component used in RuleDfn (rule definition): You are trying to delete an element whose component is used by a rule definition. Modify the element definition so that it is no longer uses this component. |
|
New Element |
The check box is selected if the element to be exported isn’t in the target database. |
|
Upgrade Status |
Indicates whether the upgrade process has occurred. Changes from Not Done to Done after you complete the Compare and Upgrade processes. |
Reviewing for Upgrade ErrorsAccess the Package Compare Audit page.
|
Parent |
Displays the name of the erroneous parent element. |
|
Member Element |
Displays the name of the member element that generated the error. |
|
Failure Reason |
Displays the cause of the failure. The same information appears in the Reason field on the Package Elements tab. |
|
Upgrade Action |
Displays the action that the system was trying to take when the error occurred. Values are: Upgrade, Delete, and Info Only. |
Package Upgrade
Select the Package Upgrade tab.
|
Parent |
Displays the name of the parent element that generated the error. |
|
Member Element |
Displays the name of the member element that generated the error. |
|
Record (Table) Name |
Displays the name of the record that stores the parent element and its members. |
|
PIN Num Fieldname (pay item name number field name) |
Displays the name of the field that contains the key field. |
|
Field Name |
Displays the name of the field that contains the member element that created the error. |
Renaming ElementsThis section provides an overview on how to rename elements, and discusses renaming an element.
Understanding How to Rename Elements
Sometimes the Compare process finds an element in the target database whose PIN code is the same as the source element’s, but the two elements have different element types or owners. In this case, you receive one of the following error messages: “Element Owner/Type Conflict” or “Mbr Element Owner/Type Conflict.”
To continue exporting the element, you can use the Element Rename Utility to change the PIN code of the target element. After changing the PIN code, always rerun the Compare process.
When you instruct the system to change an element’s PIN code, it checks the following:
Is the new PIN code already in use?
If yes, the system generates an error.
Is the old PIN code used in PeopleSoft Enterprise Time and Labor?
If yes, the system creates a warning. Remap the element in Time and Labor to reflect the new code.
Is the new PIN code the same as the old PIN code?
If yes, the system issues a warning.
Important! Do not rename an element when you are in the process of creating a package.
Warning! Time and Labor stores PIN code information, so if you make a change, you must update Time and Labor data accordingly.
See Also
Configuring Time and Labor and PeopleSoft Human Resources
Page Used to Rename Elements
|
Page Name |
Object Name |
Navigation |
Usage |
|
GP_PIN_RENAME |
Set Up HRMS, Product Related, Global Payroll & Absence Mgmt, Elements, Rename Element Codes |
Change an element’s PIN code. |
Renaming an ElementAccess the Element Rename page.
|
New PIN Code (new pay item name code) |
Enter the new code. The old PIN code is replaced when you save. |
Creating and Exporting Nonrule PackagesThis section provides an overview of creating and exporting nonrule packages and discusses how to:
Name nonrule packages.
Define selection criteria.
Modify the SQL Where clause for the selection criteria.
Display elements of a nonrule package.
Export and import nonrule packages.
View nonrule package scripts.
Understanding How to Create and Export Nonrule Packages
Nonrule packages contain both nonelements and element information. Nonelements are those that belong to records where PIN_NUM is not the primary key.
Important! To create nonrule packages, you should be very familiar with the structure of the source database. To move a complete set of related data, you need to understand which records are related.
Before moving nonrule data, you must make sure that the elements that are associated with the nonrule data exist in the target database. You can do this by creating a rule package that contains the elements that are associated with the data record that’s being moved and copying (upgrading) the rule package to the target database.
Suppose that you’re moving calendar detail records. Calendar details are associated with the process number PIN (PIN_PRC_NUM), so you create a rule package that contains this element and move it to the target database. The system can assign a new PIN number to the element in the target database, if necessary. Now you can move the calendar details. You create a nonrule package, selecting GP_CAL_RUN_DTL as the record to move.
When the system moves the calendar details, it finds the process number element in the target database, retrieves the new PIN number that was assigned during the rule upgrade process, and renumbers the process number PIN in the calendar detail record. (Without renumbering, the calendar detail would contain PIN numbers that may not exist or are not related the element used by that calendar in the target database.)
To create and export a nonrule package:
Create the nonrule package.
Use the Create Non-Rule Package component to:
Define the selection criteria for the records to move from the source database.
Run the Create Package process.
View the rules that are associated with the data that you’re moving.
Export the nonrule package, and import the element data.
The system exports the nonrule data and the element information contained in the nonrules and imports the element information only.
Pages Used to Create and Export Nonrule Packages
|
Page Name |
Object Name |
Navigation |
Usage |
|
GP_NR_PKG_DFN |
Set Up HRMS, Product Related, Global Payroll & Absence Mgmt, Elements, Manage Global Payroll Packages, Create Non-Rule Package, Package Definition |
Name a nonrule package and enter a description and comments. |
|
|
GP_NR_PKG_CRIT |
Set Up HRMS, Product Related, Global Payroll & Absence Mgmt, Elements, Manage Global Payroll Packages, Create Non-Rule Package, Package Criteria |
Define criteria for selecting items for the nonrule package. |
|
|
GP_NR_PKG_RECS |
Set Up HRMS, Product Related, Global Payroll & Absence Mgmt, Elements, Manage Global Payroll Packages, Create Non-Rule Package, Package Records |
Display, and optionally edit, the Where clause of a SQL statement the system created based on selection criteria that you entered on the Create Non-Rule Package - Package Criteria page. |
|
|
GP_NR_PKG_ELMTS |
Set Up HRMS, Product Related, Global Payroll & Absence Mgmt, Elements, Manage Global Payroll Packages, Create Non-Rule Package, Package Elements |
Display the elements of a nonrule package. Use the Create Non-Rule Package - Package Criteria page to create a package before viewing results here. |
|
|
GP_NR_PKG_DATA |
Set Up HRMS, Product Related, Global Payroll & Absence Mgmt, Elements, Manage Global Payroll Packages, Export Non-Rule Package, Package Records |
Export package records and element information. |
|
|
GP_NR_PKG_EXPIMP |
Set Up HRMS, Product Related, Global Payroll & Absence Mgmt, Elements, Manage Global Payroll Packages, Export Non-Rule Package, View Scripts |
View export, import, and cleanup scripts. |
Naming Nonrule PackagesAccess the Create Non-Rule Package - Package Definition page.
Enter a description of the package and comments.
Defining Selection CriteriaAccess the Create Non-Rule Package - Package Criteria page.
|
Package ID |
Displays the package ID. |
|
Record |
Select the record that contains the data to move. The Data Selection group box becomes available. |
|
Where Clause Option |
The system converts the criteria entered on this page into SQL before creating the package. The Where clause is editable. Values are: Change WHERE Clause: Makes all the fields on package criteria page unavailable and puts the SQL code that appears on the Where Clause page in edit mode. Use Default WHERE Clause: Tells the system to use the default Where clause and discard SQL code modifications on package criteria page. |
Data Selection
Use these fields to indicate which data to move. Selection criteria are optional, but if you don't enter selection criteria, no delete process is performed on the target database before source data importation. This can result in a “Duplicate Record” message from Data Mover during import, or it can cause the Upgrade process to fail.
|
Field Name |
Select the field on which to base the selection criteria. (It is advisable to use a key field, which are identified in the prompt table’s Key Position column.) |
|
Field Format |
Displays the format of the field that you selected. |
|
Operator |
Select the operator that the system uses to select the data to include in the package. Values are <, <=, <>, =, >, >=, and LIKE. If you select LIKE, you can enter a partial value, such as S, in the field to the right. In the field on the right of the Operator field, enter the value the system searches for. (The name of this field varies with field format.) |
|
Create Package |
Click to create the package after defining the selection criteria. The Create Non-Rule Package - Package Records page appears when the package is created. To review the package contents, select the Package Elements tab. |
Modifying the SQL Where Clause for the Selection CriteriaAccess the Create Non-Rule Package - Package Records page.
|
Record |
Displays the record from which fields are selected. |
|
Where Clause Option |
Select a Where clause option. Values are: Change WHERE Clause: Select to enable editing SQL code on the lower part of the page for editing. Use Default WHERE Clause: Select to use the default clause or revert to it after editing the SQL code. Changes that you’ve made to the Where clause are lost. |
|
Where Clause |
If you selected Use Default WHERE Clause in the Where Clause Option field, the system displays the Where clause of the SQL statement it created based on the selection criteria that you entered for the package on the Create Non-Rule Package - Package Criteria page. If you selected Change Where Clause, you can edit the SQL. Do not use PIN_NUM as a selection criterion or any field where PIN_NUM can be stored. (Doing so prevents renumbering during the import process.) |
Displaying Elements of a Nonrule PackageAccess the Create Non-Rule Package - Package Elements page.
Note. This display page lists the elements that are included in the package as informational items. It doesn’t show the nonelement items.
Exporting and Importing Nonrule PackagesAccess the Export Non-Rule Package - Package Records page.
|
Record |
Displays the name of the record that you’re exporting. |
|
Where Clause |
Displays the Where clause of the SQL statement that selects the data to be exported. |
|
Create Scripts |
Click to create the import and export scripts (XXX_elements_imp.dms, XXX_elements_exp.dms, XXX_records_exp.dms and XXX_record_imp.dms, where XXX = name of package) for the non-rule package. The scripts will be created in the script location you specify. |
|
Export |
Click, once you have selected the location. |
Viewing Nonrule Package ScriptsAccess the Export Non-Rule Package - View Scripts page.
Comparing and Upgrading Nonrule PackagesThis section provides and overview of comparing and upgrading nonrule packages and discusses how to:
Import nonrule element information.
Compare nonrule packages with a target database.
Import nonrule records.
Upgrade nonrule packages.
Understanding How to Compare and Upgrade Nonrule Packages
After exporting a nonrule package:
Import the nonrule elements.
This pertains to information about the elements, not the elements themselves.
Compare and upgrade the elements in the package to ensure that the rules are in the target database.
Use the Compare Non-Rule Package component to:
Compare the element information in the package with the target database.
Identify any missing elements that need to be moved into the target database.
Use the Import Non-Rule Records component to import the nonrule records.
Use the Upgrade Non-Rule Package component to complete the upgrade.
Pages Used to Compare and Upgrade Nonrule Packages
|
Page Name |
Object Name |
Navigation |
Usage |
|
GP_NR_PKG_DATA |
Set Up HRMS, Product Related, Global Payroll & Absence Mgmt, Elements, Manage Global Payroll Packages, Import Non-Rule Elements, Package Records |
Import nonrule element information into a target database. |
|
|
GP_NR_PKG_ELMTS |
Set Up HRMS, Product Related, Global Payroll & Absence Mgmt, Elements, Manage Global Payroll Packages, Import Non-Rule Elements, Package Elements |
View the element information that the system will import. |
|
|
GP_NR_PKG_EXPIMP |
Set Up HRMS, Product Related, Global Payroll & Absence Mgmt, Elements, Manage Global Payroll Packages, Import Non-Rule Elements, View Script |
View import scripts. |
|
|
GP_NR_PKG_DFN |
Set Up HRMS, Product Related, Global Payroll & Absence Mgmt, Elements, Manage Global Payroll Packages, Compare Non-Rule Package, Package Definition |
View the package definition. |
|
|
GP_NR_PKG_ELMTS |
Set Up HRMS, Product Related, Global Payroll & Absence Mgmt, Elements, Manage Global Payroll Packages, Compare Non-Rule Package, Package Elements |
Compare data from a source database with a target database. View the contents of the imported package. |
|
|
GP_NR_PKG_DFN |
Set Up HRMS, Product Related, Global Payroll & Absence Mgmt, Elements, Manage Global Payroll Packages, Import Non-Rule Records, Package Definition |
View the package definition. |
|
|
GP_NR_PKG_DATA |
Set Up HRMS, Product Related, Global Payroll & Absence Mgmt, Elements, Manage Global Payroll Packages, Import Non-Rule Records, Package Records |
Import nonrule records into the target database. |
|
|
GP_NR_PKG_ELMTS |
Set Up HRMS, Product Related, Global Payroll & Absence Mgmt, Elements, Manage Global Payroll Packages, Import Non-Rule Records, Package Elements |
View the elements that were imported. |
|
|
GP_NR_PKG_EXPIMP |
Set Up HRMS, Product Related, Global Payroll & Absence Mgmt, Elements, Manage Global Payroll Packages, Non-Rule Records, View Script |
View the import script. |
|
|
GP_NR_PKG_RECS |
Set Up HRMS, Product Related, Global Payroll & Absence Mgmt, Elements, Manage Global Payroll Packages, Upgrade Non-Rule Package, Package Records |
Renumber the nonrule data that you’ve imported to a target database. The Compare process must be successfully completed before you can upgrade the package. |
Importing Nonrule Element InformationAccess the Import Non-Rule Elements - Package Records page.
After reviewing the results of the Compare process and moving any missing elements into the target database, you can import the nonrule records into the target database.
|
Script Location |
Enter the name of the directory where the Data Mover scripts are stored. |
|
Import Package |
If the button is available, click to start the Import process. |
Comparing Nonrule Packages with a Target DatabaseAccess the Compare Non-Rule Package - Package Elements page.
After completing the first part of the export and import process, log onto the target database and perform the Compare process, which verifies that the elements needed by the data you’re moving exist in the target database. The Compare process checks PIN code and PIN type.
If the elements don’t exist or if the element types do not match, the Compare process fails and you must create a rule package and move the package to the target database before continuing with the nonrule upgrade.
Element List
This group box shows the results of the comparison of the source and target databases. If the compare process reports failures, correct the errors before continuing with the Upgrade process.
|
Source PIN (source pay item name) |
Displays the PIN number of the element from the source database (without 50000000 added). |
|
Element Name |
Displays the name of the element in the source database. |
|
PIN Code (pay item name code) |
Displays the element’s PIN code. |
|
Element Type |
Displays the element’s type. |
|
Element Owner |
Identifies who created the element and who’s responsible for maintaining it. Valid values are: Customer, Modified, PS Mnt, PS NonMnt, and PS Secure. |
|
Result |
Displays the results of the comparison: Not Done: You haven’t yet run the Compare process. Success: The Compare process didn’t encounter any errors. Failure: The Compare process failed. The Reason field shows why. |
|
Reason |
If the Compare process failed, displays one of the following values: Not Found: Create a new rule package that includes the missing elements and move the package to the target database before continuing with the nonrule upgrade. Type Cnflt (type conflict): The element types do not match. Most likely this error occurred because you created an element that has the same PIN code, but a different type. Rename your element and create a new rule package that includes the element that is being used. |
|
Compare |
Click to start the comparison process. Once the process is complete, the Element List group box shows, element by element, whether a match was found. If the process generates no errors, the following message appears: “Compare process completed successfully. You can now import nonrule records from the source database.” |
Importing Nonrule Records
Access the Import Non-Rule Records - Package Records page.
Click Record Import to import the records.
Upgrading Nonrule PackagesAccess the Upgrade Non-Rule Package - Package Records page.
The final step is to renumber the elements on the nonrule data that you’ve imported so that they have the same PIN numbers as the matching elements in the target database, using the Upgrade Non-Rule Package component.
|
Upgrade |
Click to start the renumbering process. A message tells you when the process is complete. Thereafter, you cannot compare or upgrade the package unless you re-import records and elements into the target database. |
Copying PackagesThis section discusses how to:
Copy a rule package and its selection criteria.
Copy a nonrule package and its selection criteria.
Note. Copying packages alone does not prepare the package for export. You must also run the create rule or non-rule process, which attaches all elements to the package.
Pages Used to Copy Packages
|
Page Name |
Object Name |
Navigation |
Usage |
|
GP_PKG_COPY |
Set Up HRMS, Product Related, Global Payroll & Absence Mgmt, Elements, Manage Global Payroll Packages, Copy Rule Package, Copy Rule Package |
Copy an existing rule package and its selection criteria. This does not copy the element information. |
|
|
GP_NR_PKG_COPY |
Set Up HRMS, Product Related, Global Payroll & Absence Mgmt, Elements, Manage Global Payroll Packages, Copy Non-Rule Package, Copy Non-Rule Package |
Copy an existing nonrule package and its selection criteria. This does not copy the element information. |
Copying a Rule Package and Its Selection CriteriaAccess the Copy Rule Package page.
|
Copy To Package ID |
Enter up to eight alphanumeric characters for the new package ID. |
|
Copy Package Definition |
Click to copy the package. |
Copying a Nonrule Package and Its Selection CriteriaAccess the Copy Non-Rule Package page.
See the field descriptions for the Copy Rule Package page.
See Also
Copying a Rule Package and Its Selection Criteria
Stamping and Packaging Elements by VersionThis section provides an overview of stamping and packaging elements by version and discusses how to:
Stamp elements with a new version number.
Define version relationships.
Identify elements to package.
View version details.
Understanding How to Stamp and Package Elements by Version
Versioning is a way to track the elements that were delivered for each release or update and to package elements by version. For example, elements delivered with Global Payroll 8.9 are labeled 8.90.00. Major releases, updates, and hot fixes typically require a new version of all or some previously delivered rules.
You can assign a version number (or label) to multiple elements and use the versioning utilities to package elements by version so that they can be moved to another database.
When you package elements by version, the system pulls the rows associated with the version that you specify. Once the elements are packaged, you can move them across databases, using the same procedures that apply to rule packages; you export the elements, compare them with existing elements in the database, and complete the upgrade.
To package rules by version:
Use the Create Package by Version component to:
Define the selection criteria for elements being packaged.
Create the package.
View the package to confirm that it includes the intended data, including effective-dated data, as applicable.
Follow the procedures presented earlier in this chapter for exporting rule packages.
Follow the procedures presented earlier in this chapter for comparing and upgrading rule packages.
See Also
Creating and Exporting Rule Packages
Comparing and Upgrading Rule Packages
Pages Used to Stamp and Package Elements by Version
|
Page Name |
Object Name |
Navigation |
Usage |
|
GP_STAMPING |
Set Up HRMS, Product Related, Global Payroll & Absence Mgmt, Elements, Manage Global Payroll Packages, Version Stamping, Version Stamping |
Stamp elements with a new version number, and initiate the stamping process. |
|
|
GP_VER_RULE_DFN |
Set Up HRMS, Product Related, Global Payroll & Absence Mgmt, Elements, Manage Global Payroll Packages, Define Version Relationships, Define Version Relationships |
View version relationships between element definition records. Displays the Rule Definition record and the corresponding child records. |
|
|
GP_PKG_DFN |
Set Up HRMS, Product Related, Global Payroll & Absence Mgmt, Elements, Manage Global Payroll Packages, Create Version Rule Package, Package Definition |
Enter a description of the package that you’re creating. You can enter comments. |
|
|
GP_PKG_VERSION |
Set Up HRMS, Product Related, Global Payroll & Absence Mgmt, Elements, Manage Global Payroll Packages, Create Version Rule Package, Packaging Criteria - Version |
Identify, by country and version, elements to package. |
|
|
GP_PKG_VER_VIEW |
Set Up HRMS, Product Related, Global Payroll & Absence Mgmt, Elements, Manage Global Payroll Packages, Create Version Rule Package, View Package Elements |
View the elements in the package. The page displays the action that the system takes when you copy the package. |
|
|
GP_PKG_VER_DTL |
Set Up HRMS, Product Related, Global Payroll & Absence Mgmt, Elements, Manage Global Payroll Packages, Create Version Rule Package, View Version Details |
View the list of elements that are included in a package that was created with the Create Package by Version - Packaging Criteria-Version page. Ensure that the package includes the effective-dated versions of the elements that you intended to package. |
Stamping Elements with a New Version NumberAccess the Version Stamping page.
Use this page to stamp a version on elements that you add or modify or to restamp an existing version of an element.
|
Used By |
You can stamp elements that are applicable to all countries or limit the stamping to one country. If you select Specific Country, select the country code in the Country field. |
|
Stamp Type |
Indicate the elements to stamp: Blank: Elements that have no existing version. Existing Version: Elements whose version is what you specified in the Existing Version field. Blank and Existing Version: Elements with no existing version and elements associated with the version that you specified in the Existing Version field. |
|
Existing Version |
Becomes available when you select Existing Version or Blank and Existing Version as the stamp type. Select from any existing version. The system looks for all elements associated with the version that you select. |
|
New Version |
Enter up to 16 alphanumeric characters for the name of the new version. The system adds the prefix C_ to the name if this is a customer installation. A package coming from the PeopleSoft system would have version numbers, preceded by P_. When using the User Version functionality provided on the Element Name page, the system adds the prefix INT_ to those versions. The Element name page is documented in another section of this PeopleBook. |
|
Stamp Global Payroll Records |
Click to initiate the stamping process. The system stamps the selected elements with the new version after clearing the existing Version entries, if any. |
Note. Versioning occurs in element definition records (records with a primary key of PIN_NUM).
Defining Version RelationshipsAccess the Define Version Relationships page.
|
Rule Definition Record |
Displays the name of the parent record that contains the field GP_VERSION. |
|
Child Record |
Displays the child record whose data when changed causes GP_VERSION to be cleared from the corresponding row in parent record. (The name of the parent record is displayed here if there are no children.) |
|
Export Record |
Selected if the child record is to be included in the version package for export and import. For example, when an accumulator element changes, only data in GP_ACCUMULATOR and GP_ACM_MBR needs to be moved. The child record, GP_ACM_MBR_VW, does not need to be exported and imported because it is used only to associate accumulators with earnings and deductions in the Earnings and Deductions components. |
|
Rule Record in Buffer |
Applicable to accumulators only. Selected if the record that has GP_VERSION is in the component buffer (for example, when an earnings accumulator is changed, and needs GP_VERSION cleared). Record GP_ACCUMULATOR is not in the component buffer. Select this check box to prevent the system from looking for the record in RECNAME_RULE_DFN in the component buffer and issue a SQLEXEC instead. The child record that exists in the earnings component is GP_ACM_MBR_VW. |
|
PIN Number Field |
Displays the name of the PIN_NUM field on the record that needs GP_VERSION cleared. Using the earlier example, the earnings accumulator PIN_NUM is contained as PIN_MBR_NUM in the earnings component buffer and PIN_NUM itself contains the earnings PIN. So, when updating data for GP_ACCUMULATOR, data for PIN_MBR_NUM value and not PIN_NUM value from the earnings component must be updated. |
Identifying Elements to PackageAccess the Packaging Criteria - Version page.
|
Language |
Display-only. Indicates that base language information associated with the selected elements is to be copied to the target database. |
|
Used By |
Select where elements are used. Values are All Countries (default) and Specific Country. If you select Specific Country, you must complete the Country field. |
|
Version |
Select the version of elements to include in the package. You can select multiple versions if they are from the same country. |
|
Create Package |
Click this button to start the batch process that creates the package. |
Viewing Version DetailsAccess the View Version Details page.
This page provides information about the elements that have been packaged by version, including effective dates.