Processing Internal Express Issues Using the PeopleSoft Fluid User Interface on a Mobile Device
This topic discusses how to process internal express issues using the PeopleSoft Fluid User Interface.
Use these pages to process express issues.
|
Page Name |
Definition Name |
Usage |
|---|---|---|
|
MIN_EXP_ISS_SRH_FL |
Enter Fluid Express Issue header details. |
|
|
MIN_EXP_ISS_ORD_FL |
Define Fluid line information for express issues. |
|
|
MIN_HD_CMNTATT_SCF MIN_LN_CMNTATT_SCF |
Upload the header and line level attachments. |
|
|
MIN_CF_GRID_TM_SCF |
Enter appropriate chartfield override values. |
|
|
MIN_OPTION_SCF |
Define or modify processing and display options for Express Issue transactions. |
Note: Lot and serial capability is available for express issue transactions.
Use the Express Issue - Fluid page to enter Fluid Express Issue header details.
Navigation:
This example illustrates the fields and controls on the Express Issue - Fluid Page. You can find definitions for the fields and controls later on this page.
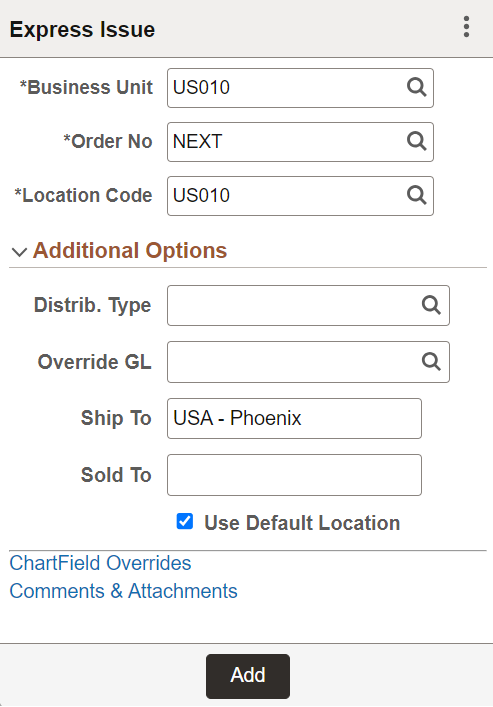
When you access the Express Issue page, the system provides default values from the PeopleSoft Inventory system installation or user preferences set up pages.
Use the Express Issue page to initiate an internal express issue. After you add an item to the issue, the Prior Entry table appears on the page for informational purposes.
Field or Control |
Description |
|---|---|
Business Unit |
Displays the default business unit established for the user. You can select another business unit in which to create an internal express issue. After you enter add a line, the Business Unit field becomes a display only field. |
|
Click the Lookup icon to access the Look Up Business Unit page where you can search for a business unit. |
Order No. |
Enter an order number. If you're using auto numbering, the order number is either NEXT or the starting sequence that you entered. The combination of inventory business unit, demand source, source business unit, and order number will identify a specific order in fulfillment. |
Location Code |
Displays the location associated with the user's default business unit as defined in the PeopleSoft Inventory user preferences. If you change the business unit in the header information, the system changes the location to that business unit's location. |
Additional Options (link) |
Click to access more options to define for use with Express Issue pages. |
Distrib. Type (distribution type) |
Displays the distribution type if a default value is available. The distribution type is based on the transaction type. You can override the value. |
Override GL |
If this is an interunit expensed issue, you can enter a new General Ledger business unit against which the transaction is costed. The system validates the destination business unit's ChartFields against the new value and costs the issue using the defined interunit transfer price. |
Ship To(ship to customer) |
Enter a ship-to customer. |
Sold To (sold to customer) |
Enter a sold-to customer. The field is used with the Ship To Cust field to define the correct shipping information. |
Use Default Location |
Select this check box to enable the system to select a Storage Location field value when you do not enter a value. The system attempts to pick from the item's default putaway location. |

Use the Express Issue Fluid page with line information to define fluid line information for express issues.
Navigation:
This example illustrates the fields and controls on the Express Issue with line information Fluid Page. You can find definitions for the fields and controls later on this page.
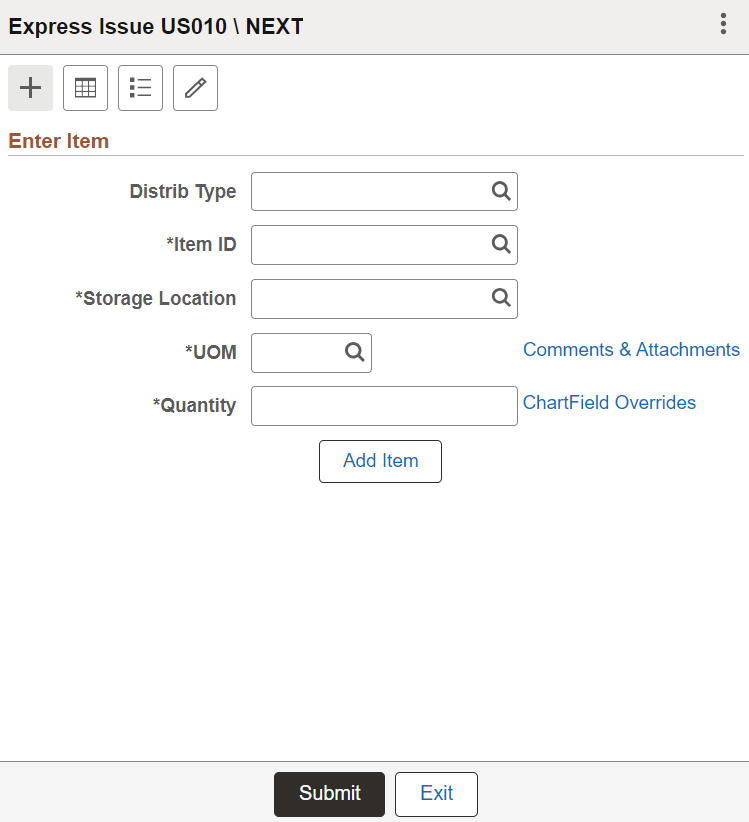
Use the Line Information table to enter express issue order and item information.
Note: This page appears in Grid and List mode as set under display options.
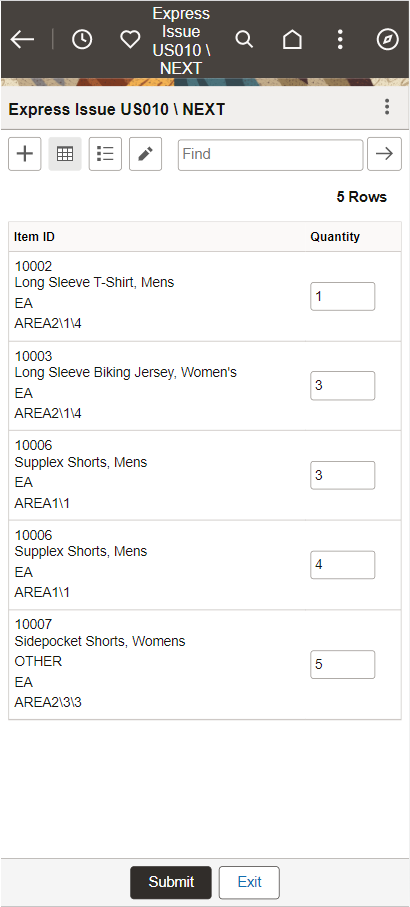
This example illustrates the fields and controls on the Express Issue - Grid View Page.
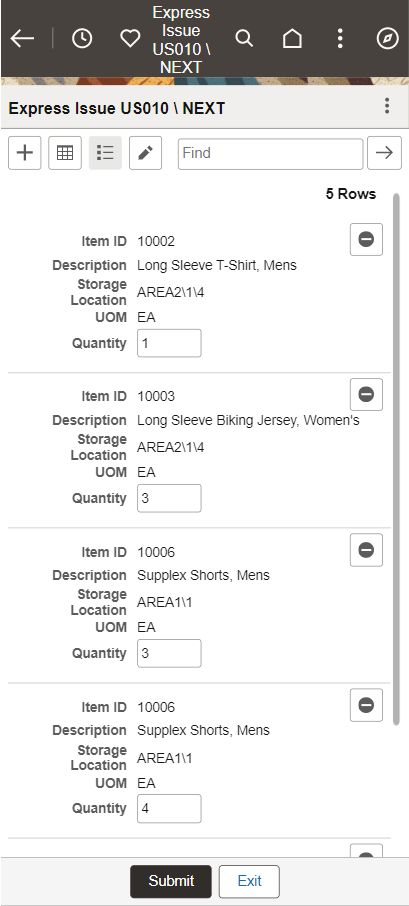
This example illustrates the fields and controls on the Express Issue - List View page.
Field or Control |
Description |
|---|---|
|
Select to enter items. |
|
Displays information in a grid. |
|
Displays information in a list. |
|
Select to edit header information. |
Distrib Type (distribution type) |
Enter a distribution type if you want to override the distribution type header-level value, otherwise, the system automatically tabs past this field. If a distribution type value does not exist in the header, this field appears blank. |
Item ID |
Select or enter an item ID for which you want to create an internal express issue. The item's description appears below the item. When you deselect the Display Description check box on the Options page for the task flow, the item's description does not appear. Also, if an item's description is blank, a description does not appear. After entering an alternate identifier in this field, the system may change the value depending on the option selected in the Alternate Item Display field on the Options page for the task flow. See Setting Up Alternative Item Identifiers. Note: The Item ID field and associated filters support GSI barcode parsing on the Enter Item page such that the system automatically populates the Item ID when a barcode is scanned. |
Find |
Enter to search for item information in List or Grid view. Note: The Find field and associated filters support GSI barcode parsing such that the system automatically populates the Item ID when a barcode is scanned. |
|
Click the Lookup icon to access the Look Up Item ID page where you can locate and select an item to include in the express issue. |
Serial ID |
Select or enter a serial ID for which you want to create an internal express issue. Note: This field is available only for serial, or serial and lot controlled items. Once you enter an item, the serial ID displays on page and the lot ID appears by default automatically if applicable. Note: The Serial ID field and associated filters support GSI barcode parsing on the Enter Item page such that the system automatically populates the Serial ID when a barcode is scanned. |
Lot ID |
Select or enter a lot ID for which you want to create an internal express issue. Note: This field is available only for lot, or serial and lot controlled items. When you enter an item, the lot ID or the serial ID option is displayed. Note: The Lot ID field and associated filters support GSI barcode parsing on the Enter Item page such that the system automatically populates the Lot ID when a barcode is scanned. |
Expiration Date |
Displays expiration date of the lot ID. |
Storage Location (storage location) |
Enter a storage location or use the Lookup icon to select a location. You can select different storage locations for an express issue. This is a required field. |
UOM (unit of measure) |
Enter the unit of measure for the item that is being express issued. The system populates this field with the standard UOM if a standard UOM is defined for the item and storage location. You can change the value in this field by entering a new value or using the lookup icon. |
Quantity |
Enter the amount that you want to issue. |
|
Comments & Attachments |
Click this link to enter Express Issue line comments and upload attachments. For more details, see Express Issue Comments & Attachments - Fluid Page. |
|
ChartField Overrides |
Click this link to override the ChartField values. Select an Accounting Tag. All the chartfields values will be populated from the accounting tag. For Inventory and Mobile Inventory Express Issue, delivered Accounting Tag is DEMO_EXPRESS_ISSUE. To select the Accounting Tag on the Express Issue page, enable Inventory and Mobile Inventory check boxes on the Accounting Tag Products page for DEMO_EXPRESS_ISSUE Accounting Tag. By default, these check boxes are enabled. To know more about configuring Accounting Tags and Accounting Tag Products, see Accounting Tags - ChartFields Page and Accounting Tag Products Page. Note: After overriding the chartfields, run the Cost Accounting Creation process. Once the process is complete, whatever overridden at the mobile inventory line level those will get copied to the Unposted to GL and the remaining entries which were not there in the accounting tag level, these will get from the transaction accounting rules. |
Add Item |
Click to add another item to this express issue. When you click the button, the system verifies and adds the current item to the internal issue, updates the Prior Entry table with the current item, and displays a new page where you can enter another item ID to this order. The add line feature is also initiated when you tab out of the Quantity field. When adding a line with the same item as the previous line, the previous UOM and storage location are automatically applied as default values to the new line. See PeopleSoft Mobile Inventory Management, Using Mobile Express Issue, Processing Internal Express Issues on a Mobile Device, Adding Lines to Express Issues |
Submit |
Click to submit entered order details. |
Exit |
Click to exit and return to the previous page. |


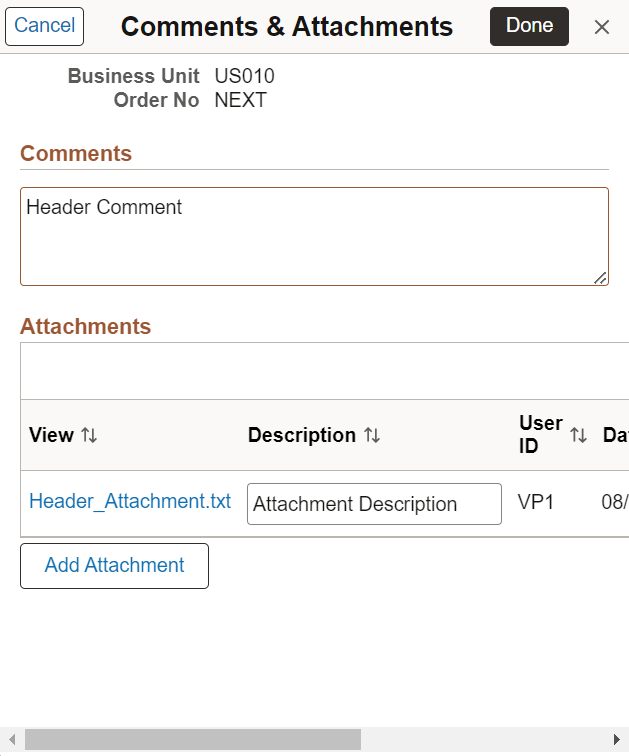
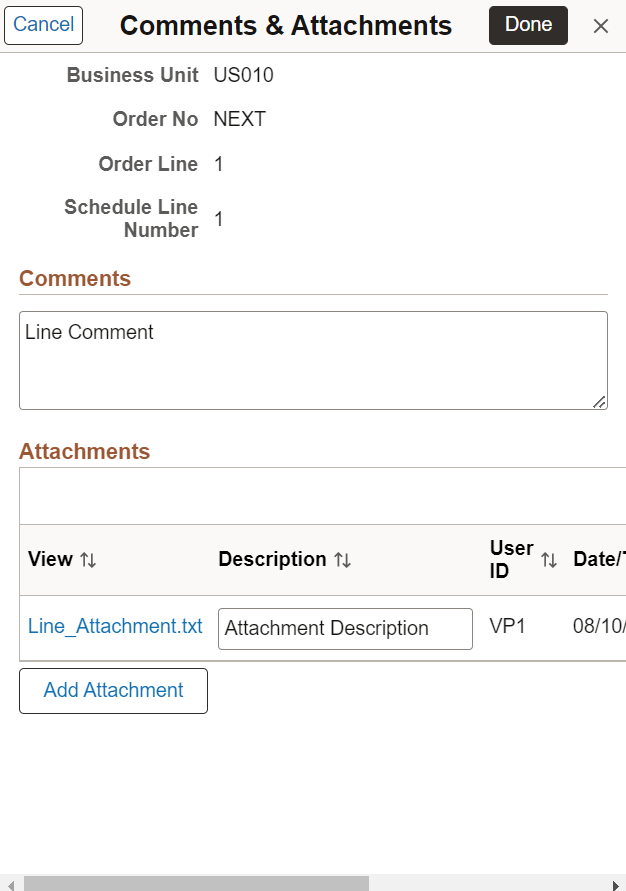
Use the Express Issue Comments and Attachments - Fluid Page to enter header and line level comments and upload the attachments.
Navigation:
This example illustrates the fields and controls on the Express Issue - Header Comments & Attachments Page. You can find definitions for the fields and controls later on this page.
This example illustrates the fields and controls on the Express Issue - Line Comments & Attachments Page. You can find definitions for the fields and controls later on this page.
|
Field or Control |
Description |
|---|---|
|
Comments |
Enter the comments for Express Issue Header and Line. |
|
Attachments |
Displays the list of added attachments along with upload date and time, user id, and name of the up-loader. Click the attachment file name link to view or download the attachments. You can also enter description for the added attachments. |
|
Add Attachment |
Click Add Attachment button to select and upload the attachments. You can upload multiple files at a time depending on configured attachment upload limit. To configure attachment upload limit, see Installation Options - Multiple Attachments Page. |
 (Delete) |
Click Delete to remove that attachment from the list. |
Note: You can add, view, and delete the attachments in Mobile Inventory Express Issue only before Save.
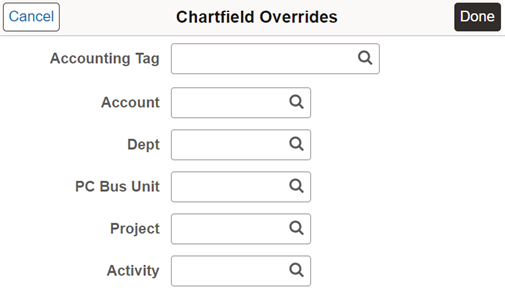
Use the Express Issue Chartfield Overrides - Fluid page to enter appropriate chartfield values.
Navigation:
This example illustrates the fields and controls on the Express Issue - Chartfield Overrides Page (Mobile View). You can find definitions for the fields and controls later on this page.
Once you enter values and click the Done button. The Override GL business unit then, also becomes the associated driving value.
All the chartfields displayed on the Express Issue - Chartfield Overrides Page (Mobile View) are also available on the desktop view under different tabs. Account and Dept fields are displayed under Chartfield1 tab, PC Business Unit is under Chartfield2, and Project and Activity fields are displayed under Chartfield3 tab. Click Show All tab to view all five default chartfields on the same tab.
This example illustrates the fields and controls on the Express Issue - Chartfield Overrides Chartfield1 tab (Desktop View).

This example illustrates the fields and controls on the Express Issue - Chartfield Overrides Show All tab (Desktop View).

Chartfield tab sequence number always starts from 1 (Chartfield1) and continues. If all the fields under any chartfield tab are hidden as per the CF Display template and to maintain the Chatfield sequence number, fields from other set of chartfields will be moved to the preceding tab.
The Chartfields displayed in the above screenshots are based on the CF Display template: MIN_EXPR_ISSUE. To know more about chartfield display options and assign CF Display Templates, see ChartField Display Template Page and Assign CF Display Templates Page.
Note: ChartField values entered at the header level are applicable across all the lines in the express issue.
Field or Control |
Description |
|---|---|
|
Accounting Tag |
Select an Accounting Tag. All the chartfields values will be populated from the accounting tag. For Inventory and Mobile Inventory Express Issue, delivered Accounting Tag is DEMO_EXPRESS_ISSUE. To select the Accounting Tag on the Express Issue page, enable Inventory and Mobile Inventory check boxes on the Accounting Tag Products page for DEMO_EXPRESS_ISSUE Accounting Tag. By default, these check boxes are enabled. To know more about configuring Accounting Tags and Accounting Tag Products, see Accounting Tags - ChartFields Page and Accounting Tag Products Page. |
Account |
Select or enter an account number as a chartfield value to override. |
|
Click the Lookup icon to access the Look Up Item ID page where you can locate and select an item to include in the express issue. |
Department |
Select or enter a department as a chartfield value to override. |
PC Business Unit |
Select or enter a PC business unit as a chartfield value to override. |
Project |
Select or enter a project as a chartfield value to override. |
Activity |
Select or enter an activity as a chartfield value to override. |

Use the Express Issue - Display Options page to define or modify processing and display options for Express Issue transactions.
Navigation:
This example illustrates the fields and controls on the Express Issue - Display Options Fluid Page. You can find definitions for the fields and controls later on this page.
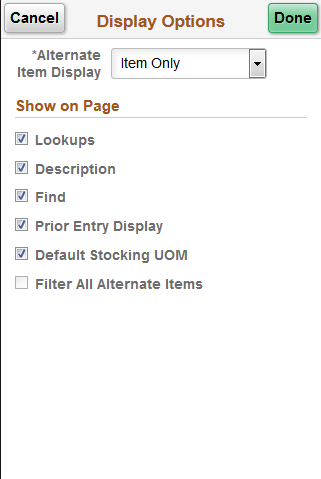
Use this page to change processing and display options for count by item transactions. The settings on this page are as set on the Installation Options - Mobile Inventory or the User Preferences - Mobile Inventory page for the task flow. Most fields can be changed for the session.
Field or Control |
Description |
|---|---|
Alternate Item Display |
Select an option that indicates how an item, alternate item, or both are displayed when an alternate item is specified for the transaction. Options include: Alternate Only, Alternate as Primary, Item Only, and Item as Primary. |
Lookups |
Select provide Lookup icons for fields that are available for searches. |
Description |
Select to display item descriptions in the search results on Grid, List, Single Item view or Item Entry pages. |
Find |
Select to enable the Go or Search button. |
Prior Entry Display |
Select to enable the display of the last item counted. When you count or update an item count, the system provides the last item and count value in a table at the bottom of the count page. |
Default Stocking UOM |
Select to populate the unit of measure (UOM) for an item as defined on the Unit of Measure page for the stocking UOM. |
Filter All Alternate Items |
Displays the option selected on the Installation Options – Mobile Inventory page or the User Preferences – Mobile Inventory page. If this option is selected, then the system searches through all possible alternate item identifiers when filtering a table. If an alternate item identifier is entered in the Filter field, then the item ID that matches the alternate is displayed in the table. If this option is not selected, then the system does not use alternate item identifiers to filter the table. This can improve system performance for the task flow. |