Setting Up Installation Options and User Preferences
PeopleSoft Mobile Inventory Management uses many of the fields within the PeopleSoft system to determine the default values or features available on a mobile page. These options and default setting are entered at the installation level or the individual user level.
|
Page Name |
Definition Name |
Usage |
|---|---|---|
|
INSTALLATION_MIN_N |
Define default values or features available on a Fluid mobile page at the installation level, |
|
|
OPR_DEF_TABLE_MIN |
Define default values or features available on a Fluid mobile page at the individual user level. These entries override the same fields on the Installation Options - Mobile Inventory - Fluid page. |
|
|
User Preferences - Overall Preferences Page |
OPR_DEF_TABLE_FS1 |
Use the Business Unit field to identify the business unit to be displayed as the default value on the mobile page. |
|
DELIVERY_CART |
Use the Setup Delivery Cart page to define delivery carts in PeopleSoft. |
|
|
MIN_OPTION_SCF |
Modify display options on a Fluid mobile page for Mobile Inventory transactions and a given task flow |
Use the Installation Options - Mobile Inventory page (INSTALLATION_MIN_N) to define default values or features available on a Fluid mobile page at the installation level.
Navigation:
This example illustrates the fields and controls on the Installation Options - Mobile Inventory Fluid Page. You can find definitions for the fields and controls later on this page.
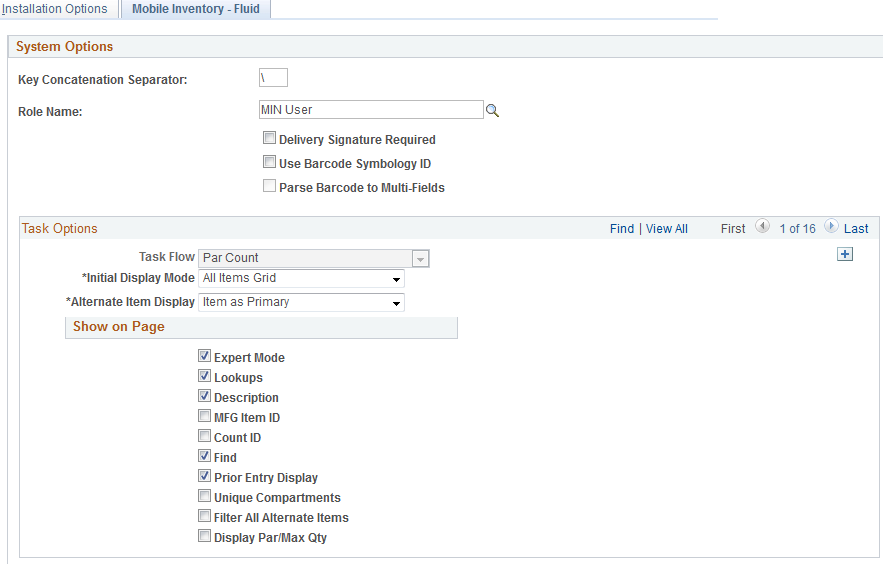
This page enables you to customize PeopleSoft Mobile Inventory Management to your specific needs at the installation level for a particular transaction.
Field or Control |
Description |
|---|---|
Key Concatenation Separator |
Defines the symbol used to separate the values displayed on the mobile device. For example if a "\" is selected in this field then a material storage location consisting of the Zone B storage area and Aisle 2 storage level would display as "Zone B \ Aisle 2". |
Role Name |
Enter a role name. The role name entered here may be used for customization purposes in the Mobile Inventory Management application and may be a layer value that defines a specific user view of certain pages. The use of this value is optional. |
Delivery Signature Required |
Select to indicate that the mobile application requires a signature of the person receiving a delivery. When this option is selected, the Perform Delivery page requires a signature. |
Use Barcode Symbology ID |
Select to indicate use of the GS1 parsing logic in PeopleSoft Mobile Inventory Management. Note: It is mandatory to use this setup configuration to parse a GS1 barcode; the system throws an error else. |
Parse Barcode to Multi-Fields |
Select to populate parsing results to multiple fields on the Mobile Inventory page. |
Task Options (group box) |
Define the define default values or features available for a specific task flow. Use the Next Row icons to view and set up additional task flows. |
Task Flow |
Identifies the business process to be performed on the mobile device; examples include, entering an express issue, receiving stock, or counting inventory in par locations. A task flow can contain one or more mobile pages. The task flow selected in this field determines the additional fields on this page. |
Filter All Alternate Items |
Select this option to enable the system to search for alternate items in theFind and all duplicate alternate items in the Item ID fields respectively, on associated pages. Note: If you do not select this option the system does not search for and identify alternate items in the Find field. Also in such case the system stops when the first alternate item in the Item ID field is identified and does not search further to identify duplicate alternate items. |
Entry UOM Enabled |
Select to indicate that the Entry UOM (entry unit of measure) field is displayed, else you can only use the Stor UOM (storage unit of measure) field. |
MFG Item ID |
The system searches for only a manufacturer's item ID matching the value in this field. |
Supplier Item ID |
The system searches for only a supplier's item ID matching the value in this field. |
Default Stocking UOM |
Select to define one unit of measure as the default stocking UOM. |
Auto Add Search Results |
Select to indicate that all matching receipt distribution lines, from a search performed on a task flow, are automatically added to the delivery. |
Save Delivery Document |
Select to indicate that the Delivery Document field is to remain populated after items are added to a delivery cart. |
Default Delivered To |
Select to indicate that the Mobile Delivery task flow should attempt to provide a default value for the Delivered To field that is based on a hard-coded hierarchy of fields. |
Use Default Delivery Cart |
Select to indicate use of the delivery cart that the system assigns as default. Note: You can define the default delivery cart on the cart definition page. |
Display Show/Hide information |
Select to display additional item information. |
Auto Expand Detail |
Select to automatically expand additional item information and is available when the Display Show/ Hide Information is selected. |
Allow Multiple BUs in Cart |
Select to input multiple receipt data from different business units. |
Demand Source |
Select a demand source. The available options include Material Request, Material Return, Planning Requisition, Purchasing Requisition and Sales order. |
Sched Date Option |
Select a date option from the drop-down list. The available options are Date Range, Specific and Today. |
Sched Days +/- Today |
Select a scheduled day from the drop-down list. |
Ship Date Option |
Select a date option from the drop-down list. The available options are Date Range, Specific and Today. |
Ship Days +/- Today |
Select a ship day from the drop-down list. |
Prior Entry Display |
Select to enable the display of the last item counted. When you count or update an item count, the system provides the last item and count value in a table at the bottom of the count page. |
Count ID |
Select to display the unit of measure used to count event detail line items. When you select the check box, the Count UOM field is enabled on manual count pages. |
Find |
Select this option to allow the cursor to move to the Find field immediately post a count. |
Order UOM Conversion |
Select to indicate conversion of an ordering unit of measure. |
Expand Comments |
Select to expand the comments area. |
Print Delivery Report |
Select to run a Delivery report when you create the receipt. |
Set Select Checkbox |
Select to set the default value to selected when you access the Receiving PO pages. |
Display Storage Location |
Select to control the visibility of the storage location in the distribution line. |
Display Warning Messages |
Select to control the validation of the saving process Note: In case of a Receiving PO transaction, a warning message is triggered when a lot, serial or tag number is missing. This does not block the saving process. |
Note: For the remaining field definitions that are on this page, please see the topic and section in this documentation for the specific task flow.
Use the User Preferences - Mobile Inventory - Fluid page (OPR_DEF_TABLE_MIN) to define default values or features available on a Fluid mobile page at the individual user level.
These entries override the same fields on the Installation Options - Mobile Inventory - Fluid page.
Navigation:
This example illustrates the fields and controls on the User Preferences - Mobile Inventory - Fluid Page.
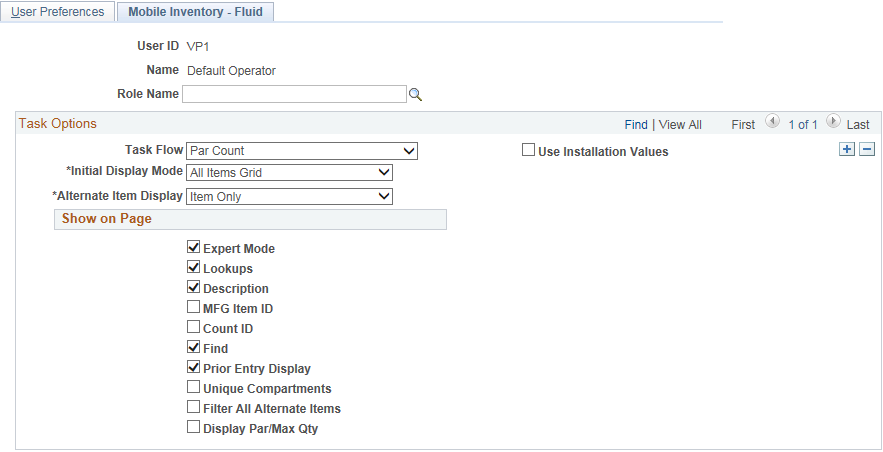
This page enables you to customize PeopleSoft Mobile Inventory page for an individual user. The fields displayed in this component are the same as the Installation Options - Mobile Inventory - Fluid page. This page is optional; the Installation Options - Mobile Inventory - Fluid page is used when a user ID does not have this page defined or when the Use Installation Values check box is selected.
To review field definitions for this page, see the topics in this document for the specific task flow identified in the Task Flow field.
Use the Setup Delivery Cart page (DELIVERY_CART) to define delivery carts in PeopleSoft.
Navigation:
This example illustrates the fields and controls on the Setup Delivery Cart page. You can find definitions for the fields and controls later on this page.
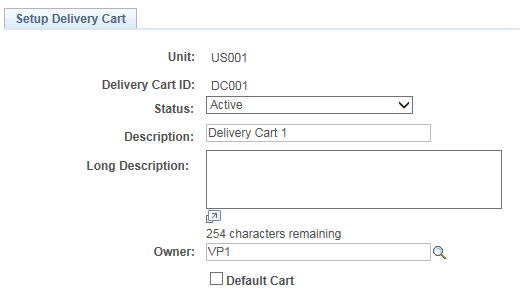
Use this page to define delivery carts for your mobile device. You must setup this page before accessing the delivery cart on your mobile device.
Field or Control |
Description |
|---|---|
Status |
Select a status of Active or Inactive. Active carts can be used with a mobile device. Inactive carts do not appear on mobile devices. When setting up a new delivery care, this field automatically defaults to Active. |
Cart Owner |
Select the User ID of the individual who owns the cart. This field defaults to the user who is signed into the system. |
Default Cart |
Select to mark this delivery cart as default. |
Note: You must setup delivery carts to process deliveries or use delivery carts.
Use the Display Options - Mobile Inventory - Fluid page (MIN_OPTION_SCF) to modify display options on a Fluid mobile page for Mobile Inventory transactions and a given task flow.
Navigation:
Fluid Home, Mobile Inventory, Par Count, Display Options
This example illustrates the fields and controls on the Display Options - Mobile Inventory - Fluid page.
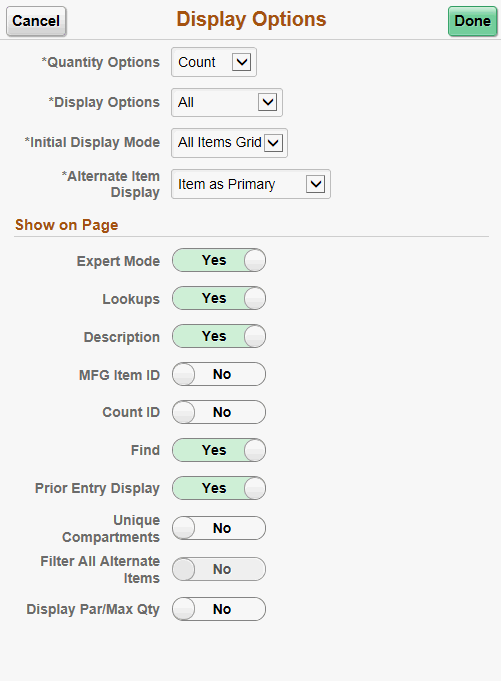
Use this page to change processing and display options for a Mobile Inventory transaction. The settings on this page are provided by default from the Installation Options - Mobile Inventory or the User Preferences - Mobile Inventory—Fluid page for the task flow. Most fields can be changed for the session.
Field or Control |
Description |
|---|---|
Quantity Options |
Select an option to saved in the par location. The available options are :
|
Display Options |
Select an option to indicate which rows appear in grid view. The available options are :
|
Initial Display Mode |
Select a view to indicate how items display immediately after the search page. The available views are:
|
Alternate Item Display |
Select an option that indicates how an item, alternate item, or both are displayed when an alternate item is specified for the transaction. Options include: Alternate Only, Alternate as Primary, Item Only, and Item as Primary. |
Expert Mode |
Select to enable users to have quick access to data and quicker data entry. By not displaying certain fields, the system has to perform minimal page updates resulting in faster processing. |
Lookups |
Select provided Lookup icons for fields that are available for searches. |
Description |
Select whether to display item descriptions in the search results for Grid and List Item page. |
MFG Item ID |
The system searches for only a manufacturer's item ID matching the value in this field. |
Supplier Item ID |
The system searches for only a supplier's item ID matching the value in this field. |
Entry UOM Enabled |
Select to indicate that the Entry UOM (entry unit of measure) field is displayed, else you can only use the Stor UOM (storage unit of measure) field. |
Count ID |
Displays the numerical count value if header selected. |
Find |
Select to enable the Go or Search button. |
Run Close Short |
Select to enable the Go or Search button. |
Expand Comments |
Select to indicate that if comments are entered for a purchase order at the header level, at the line lever, or for the ship to location, then the comments section of the Mobile Inventory - Receiving pages is expanded in the comments section. |
Auto Add Search Results |
Select to indicate that all matching receipt distribution lines, from a search performed on a task flow, are automatically added to the delivery. |
Save Delivery Document |
Select to indicate that the Delivery Document field is to remain populated after items are added to a delivery cart. |
Print Delivery Report |
Select to run a Delivery report when you create the receipt. |
Set Select Checkbox |
Select to set the default value to selected when you access the Receiving PO pages. |
Display Storage Location |
Select to control the visibility of the storage location in the distribution line. |
Display Warning Messages |
Select to control the validation of the saving process. Note: In case of a Receiving PO transaction, a warning message is triggered when a lot, serial or tag number is missing. This does not block the saving process. |
Default Delivered To |
Select to indicate that the Mobile Delivery task flow should attempt to provide a default value for the Delivered To field that is based on a hard-coded hierarchy of fields. |
Use Default Delivery Cart |
Select to indicate use of the delivery cart that the system assigns as default Note: You can define the default delivery cart on the cart definition page. |
Prior Entry Display |
Select to enable the display of the last item counted. When you count or update an item count, the system provides the last item and count value in a table at the bottom of the count page. |
Entry UOM |
Select to indicate that the Entry UOM (entry unit of measure) field is displayed, else you can only use the Stor UOM (storage unit of measure) field. |
Default Stocking UOM |
Select to define one unit of measure as the default stocking UOM. |
Pre-Load Serial IDs |
Select to pre-load serial IDs for a particular item and location when the Serial ID page is displayed. The default value is selected. If the item being counted is a serial-controlled item, then when the item is loaded, the mobile application disables the Count Quantity field and adds a field from which to add serials. The Count Quantity field is automatically set to display the number of serials that are counted and places the cursor in the Serial field. Note: The existing serials in the count are loaded automatically if the Pre-Load Serials check box is selected. If the Pre-Load Serials check box is selected, then the Serials table appears with the serial ID populated in the Serials table. The system only loads the serials that already exist in the counting event. If you do not select the check box, the Serials table does not appear until a serial is manually added. |
Count UOM Enabled |
Select to display the unit of measure used to count event detail line items. When you select the check box, the Count UOM field is enabled on manual count pages. |
Unique Compartments |
Select to display one item per compartment only in Single Item Enter mode of the current Par Location. If a single item is present in multiple compartments, they do not display |
Filter All Alternate Items |
Select this option to enable the system to search for alternate items in theFind and all duplicate alternate items in the Item ID fields respectively, on associated pages. Note: If you do not select this option the system does not search for and identify alternate items in the Find field. Also in such case the system stops when the first alternate item in the Item ID field is identified and does not search further to identify duplicate alternate items. |
Order UOM Conversion |
Select to indicate conversion of an ordering unit of measure. |
Display Par/ Max Qty |
Select to display or hide an optimized or maximum quantity in Grid mode. |
Set Cursor on Find Box |
Select this option to allow the cursor to move to the Find field immediately post a count. |
Display Show/Hide information |
Select to display the Show/Hide icon on Par Count pages. You can use this icon to manually expand and collapse additional line information. Note: When not selected the system only displays basic information for each row in the table. |
Auto Expand Detail |
Select to automatically expand additional item information and is available when the Display Show/ Hide Information is selected. |
Allow Multiple BUs in Cart |
Select to input multiple receipt data from different business units. |
Signature Required |
Select to indicate that the mobile application requires a signature of the person receiving a delivery. |