Creating Online Orders Using Express Issue in PeopleSoft Inventory
Use the Express Issue page to create an order online and reserve, pick, and ship the stock in one step. You can create internal orders, external orders, interunit transfers, and RTV orders from this page. There are significant advantages to using express issues. Because of the amount of automatic processing involved, however, this fulfillment method is not appropriate for high-volume environments. In addition, you cannot enter product kits on the Express Issue page.
A few notes about using the Express Issue page:
Use this page in Add mode only.
The entire fulfillment process (reserving, picking, and issuing) occurs automatically for the items on the order after you save. If you change your mind, cancel the page without saving the changes. For RTV express issues only, you can cancel the order after saving the page and before the issue is depleted.
To ensure that you can fulfill the order, PeopleSoft Inventory limits the display of storage locations and lots under the following circumstances:
When you enter an item that is not lot- or serial-controlled, only storage locations that have quantity greater than 0 appear, unless negative inventory is enabled in the business unit.
When you enter a lot-controlled item, only lots with available quantity greater than 0 appear, unless negative inventory is enabled in the business unit.
If negative inventory is enabled, all eligible storage locations and lots appear, regardless of quantity. You can use multiple lots to fulfill a single order line when you click the Add button.
The schedule date and time apply to the entire order.
Because PeopleSoft Inventory decreases storage location balances immediately after you save the page, you cannot enter a future schedule date and time; you can, however, enter a past date and time.
If you run the Deplete On Hand Qty (Depletion) process (IN_FUL_DPL) immediately by:
Clicking the Deplete On Hand Qty link on the Express Issue page.
Selecting the Auto Process at Save check box on the Auto-Processing Options tab of the Setup Fulfillment-Fulfillment Task Options page. When you save the Express Issue page, the Deplete On Hand Qty process is launched.
Selecting the Request Type for an Express Issue
When you add an express issue in PeopleSoft Inventory, the system presents you with a search dialog in which you must specify the type of order that you are entering. Your selection determines which fields appear on the Express Issue page. Values are:
External Order: Select to enter an express issue for an external order. While this request type enables you to identify the individual receiving the stock by using a ship to customer rather than a location, it is not intended to replace the features of a sales order. To complete a full billing and invoice transaction, create a sales order in PeopleSoft Order Management.
InterUnit Transfer: Select to enter an express issue that transfers stock from one PeopleSoft Inventory business unit to another.
Internal Issue: Select to enter an express issue for an internal order (an order for a department or location within your organization).
Supplier Returns: Select to enter an express issue for a return-to-vendor (RTV) order.
|
Page Name |
Definition Name |
Usage |
|---|---|---|
|
EXPRESS_ISSUE1_INV |
Record express issue stock requests. |
|
|
EXPRESS_ISSUE_RTV |
Select RTV orders to issue. This page is available only for supplier return requests. |
|
|
INV_ADDRESS |
View and modify the ship to address for the order or order line. |
|
|
EXPRESS_ISSUE6_INV EXPRESS_ISSUE8_INV |
Override the debit ChartFields defined for the distribution type for the order or order line. |
|
|
IN_HD_CMNT_ATT_SEC IN_LN_CMNT_ATT_SEC |
Add comments and upload the attachments for Express Issue header and line. |
|
|
EXPRESS_ISSUE5_INV |
Enter specific attributes for an order line or override shipping information and (for non-RTV orders) ChartField accounting information. You can also enter a configuration code for configured items. |
|
|
RTV Pro Numbers (return-to-vendor pro numbers) Page |
EXPR_ISS_RTV_PRO |
Capture multiple pro numbers for an RTV line being shipped from the Express Issue page. When the Express Issue component is saved, the system updates the RTV Line Shipped (RTV_LN_SHIP) table in PeopleSoft Purchasing with the updated pro number information. |
|
Serial ID Page |
SHIP_SERIAL_INV |
Enter ship serial IDs for items using ship serial control. |
|
EXPRESS_ISSUE4_INV |
Select storage containers to issue. |
|
|
Express Issue Detail Page |
EXPRESS_ISSUE2_INV |
If you are shipping an item with staged-date tracking, select the staged-dated quantity to ship. |
Use the Express Issue page (EXPRESS_ISSUE1_INV) to record express issue stock requests.
Navigation:
This example illustrates the fields and controls on the Express Issue page using the request type of external order. You can find definitions for the fields and controls later on this page.
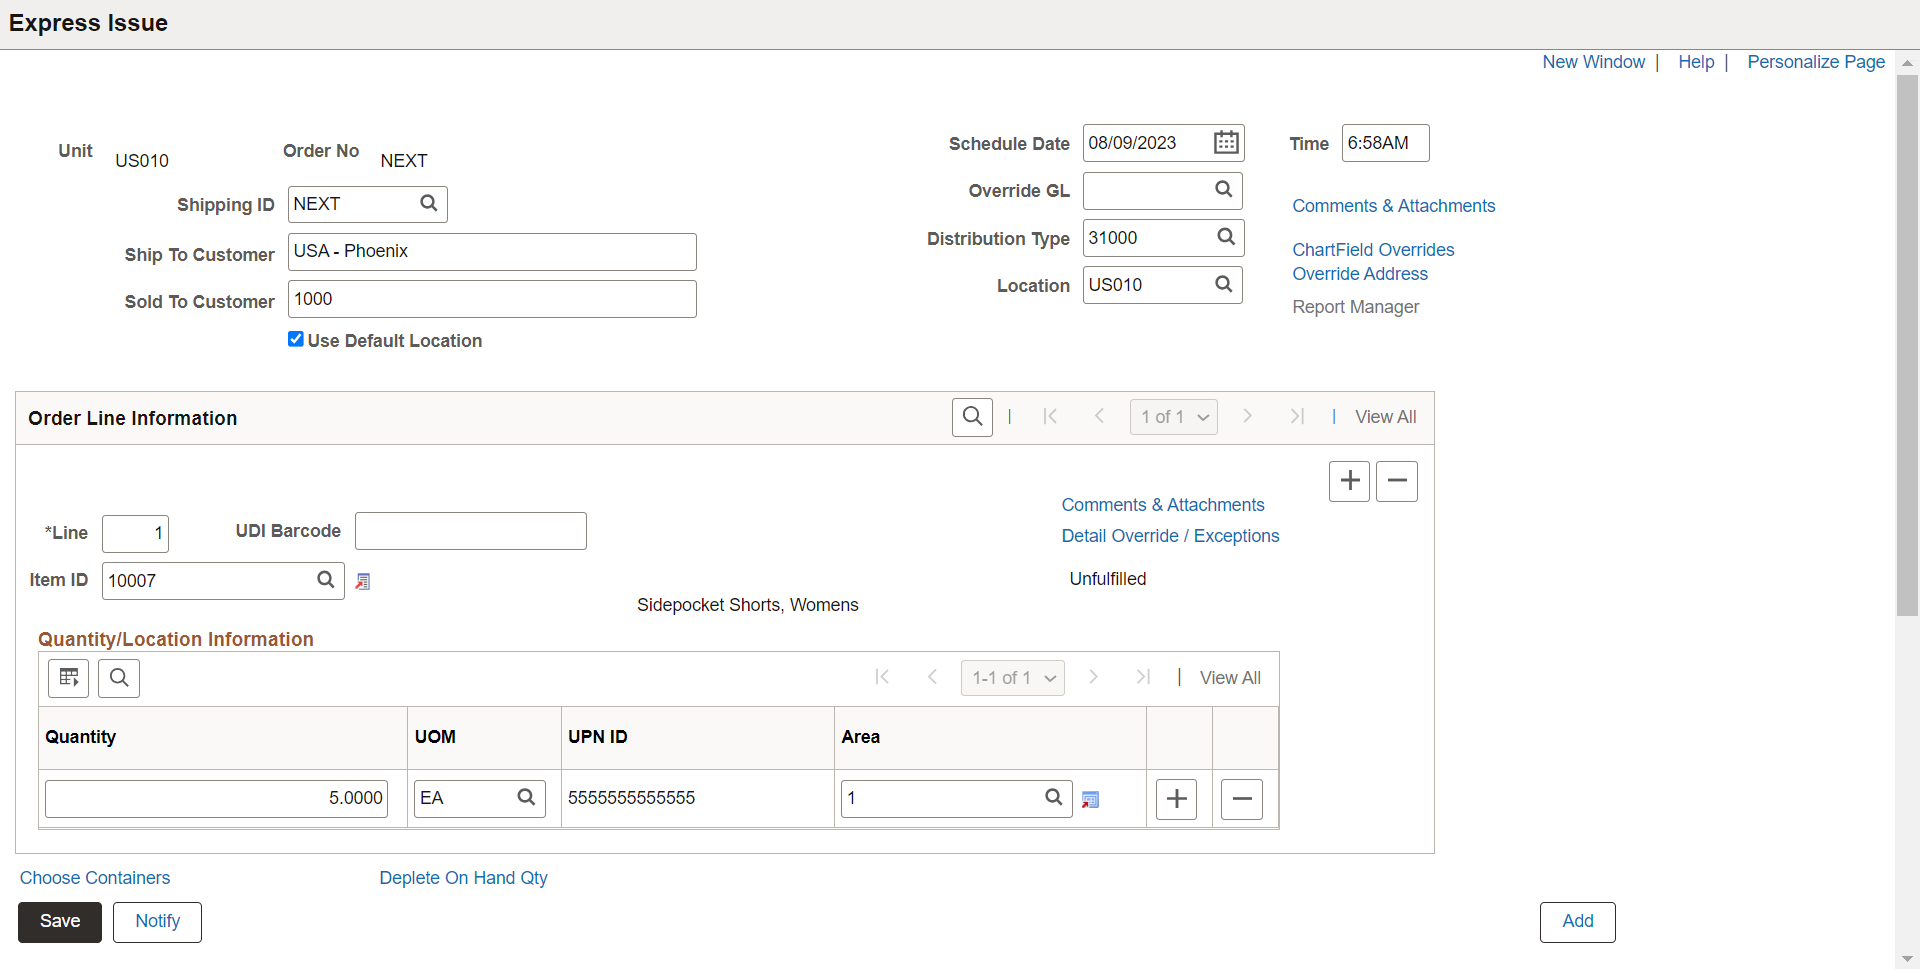
Field or Control |
Description |
|---|---|
Unit |
The inventory business unit issuing the stock request. |
Order No |
If you're using auto-numbering, the order number is either NEXT or the starting sequence that you entered. The combination of inventory business unit, demand source, source business unit, and order number will identify a specific order in fulfillment. For express issues, the demand source is IN except for return to vendor issues that use RT. |
Shipping ID |
Select a shipping ID or select NEXT to generate a new ID automatically. |
Schedule Date and Schedule Time |
Displays the date and time the order is due to ship. The default is the current date and time, but you can change this to another date. Note: If the business unit requires closure-calendar validation and processing for shipping operations as defined on the Closure Calendar page, and if the scheduled shipment date is a closure date, the system uses the first valid future shipping date. |
Override GL |
If this is an interunit expensed issue, you can override the PeopleSoft General Ledger business unit against which the transaction is costed. The system validates the destination business unit's ChartFields against the new value, costs the issue using the defined interunit transfer price, and records interunit accounting entries for an interunit expensed issue. Note: This field is displayed or hidden based on your selection in the Display GL BU Override check box on the Inventory Display Options page. This field is available only for internal requests, not for interunit transfers or external requests. |
Dest Unit (destination business unit) |
If the stock request is for an interunit transfer, select the destination business unit. Note: An interunit transfer can only go to one destination business unit. You cannot assign different destination business units at the line level. If you change the destination unit and the new unit requires closure-calendar validation and processing for receiving activities as defined on the Closure Calendar page, the recalculated scheduled arrival date and time are validated against the calendar. If the system encounters a closure date, you receive a warning message. Either accept the exception by selecting No, or reschedule by selecting Yes. If you select Yes, the system returns the first future valid scheduled arrival date and time. |
Distribution Type |
Enter or change the distribution type used to create accounting entries for this transaction. A default value displays if you have defined one on the Default Distribution Type page. The default value is based on the request type that you selected when creating this order:
|
Ship To Customer, Sold To Customer, and Location |
These fields are available if the express issue is for an external order or an internal issue. These three fields work together to define the correct shipping information. If the express issue is an interunit transfer requiring intercompany processing, these fields are populated from the ship to customer assigned to the destination business unit and are unavailable for entry. |
|
Comments & Attachments |
Click to add comments and upload attachments for Express Issue header and line. For more details, see Comments & Attachments Page. |
InterUnit ID |
If this is an interunit transfer, select an existing interunit ID, or select NEXT to generate a new one automatically. |
Export |
Indicates that the order is an intercompany transfer requiring export documentation. This field value appears by default from the order header level (on the Additional Ship To Options page) for the ship to customer defined for the destination business unit. If you override the setting here, the system transfers the selection to the line level, where you cannot change it. Note: You cannot override the ship to customer address if the Intercompany Processing option is selected on the Interunit Ownership page. |
Direct Invoicing |
Indicates that an intercompany transfer requires direct invoicing. The system automatically creates an invoice for the order when PeopleSoft Inventory sends accounting information to the PeopleSoft Billing business unit defined on the Inventory Definition-Business Unit Definition page or on the Order Management Definition - Order Management Setup page in PeopleSoft Order Management. |
Fetch RTV (fetch return to vendor) |
Click to access the RTV Selection page, where you can select RTV IDs for processing. |
Use Default Location |
Select to have PeopleSoft Inventory enter the default putaway storage location automatically for any items that are not lot- or serial-controlled. If there is not quantity available in the default putaway location, the system prompts you to enter another storage location. To enter the storage location as you enter order lines, leave this check box clear. |
|
In the Express Issue component, click this button to print the Shipping Document report (INC6503) for the entered order. This report is written in Oracle BI Publisher using the XMLP report name INX6503. |
|
Report Manager |
Select this link to access the Report Manager page where you can view the status of processes and reports that you have launched using the Deplete On Hand Qty link. |
Add |
For internal issues, external orders, and interunit transfers, click this button to add order lines. For supplier returns, select only lines that appear on the RTV Selection page. All lines selected must be from the same RTV ID. |
UDI Barcode |
Displays the Universal Device Identifier barcode. You can scan and parse the data represented in the barcode. Note: UDI barcodes may contain GTIN, Lot/Serial information, creation and expiration dates. |
Item ID |
Enter the item for this order line. |
Item Search/Item Links |
Click the button located next to the Item ID field to access a transfer page of item-related links. On the transfer page, click the various links to search for items, select item substitutes, or change item definitions. Note: Link options on transfer pages vary depending on the component and the item with which you are working. Note: Only items with a status of Active or Discontinue are valid options. |
Quantity |
Enter the item quantity for this schedule line. You can add additional schedule lines to this same order line by using the Add button within this group box (Quantity/Location Information group box). |
UOM |
Enter a unit of measure defined as a shipping UOM for this item ID on the Units of Measure page (Items, Define Items and Attributes, Units of Measure). A default value can populate this field using the following default hierarchy:
|
GTIN |
Displays the Global Trade Item Number of the associated item. |
Area, Lev 1, Lev 2, Lev 3, and Lev 4 |
Enter the material storage location (MSL) identifying the picking location for the stock. |
Lot ID |
Select a lot ID instead of a material storage location for lot-controlled items. Note: If the scheduled ship date for an order line is before the lot becomes available or after it expires, a warning message appears upon entry of the lot ID. |
Serial ID |
For serial-controlled items, indicate which serial ID you are issuing. Because serial-controlled items are already uniquely identified, no further information is needed for the order line. |
Deplete On Hand Qty |
Click this link to save this page and to run the Deplete On Hand Qty (Depletion) process. After saving the page, you cannot continue to add lines to the order. For interunit transfers, this link also initiates auto-putaway processing in the destination business unit if you also selected the Flag Items for Auto-Putaway option on the Interunit Ownership page. For intercompany transfers that are set up for direct invoicing, this link also initiates the Interunit Transfer Billing job (BIINIU). |
Select the storage location information for non-lot-controlled and non-serial-controlled items, if appropriate. If you specified that default locations are to be used for this order, PeopleSoft Inventory automatically enters the default putaway location for the item's storage location information for items that are not lot- or serial-controlled.
Note: If you selected the Auto Process at Save check box on the Auto-Processing Options tab of the Setup Fulfillment-Fulfillment Task Options page, then saving the Express Issue page initiates the Deplete On Hand Qty (Depletion) process as well as direct invoicing for any order lines requiring this option. Be aware, however, that clicking the Deplete On Hand Qty link disables the auto-process option for the current issue. Similarly, saving an issue with the auto-process option selected and then subsequently clicking the Deplete On Hand Qty link does not schedule a new depletion.
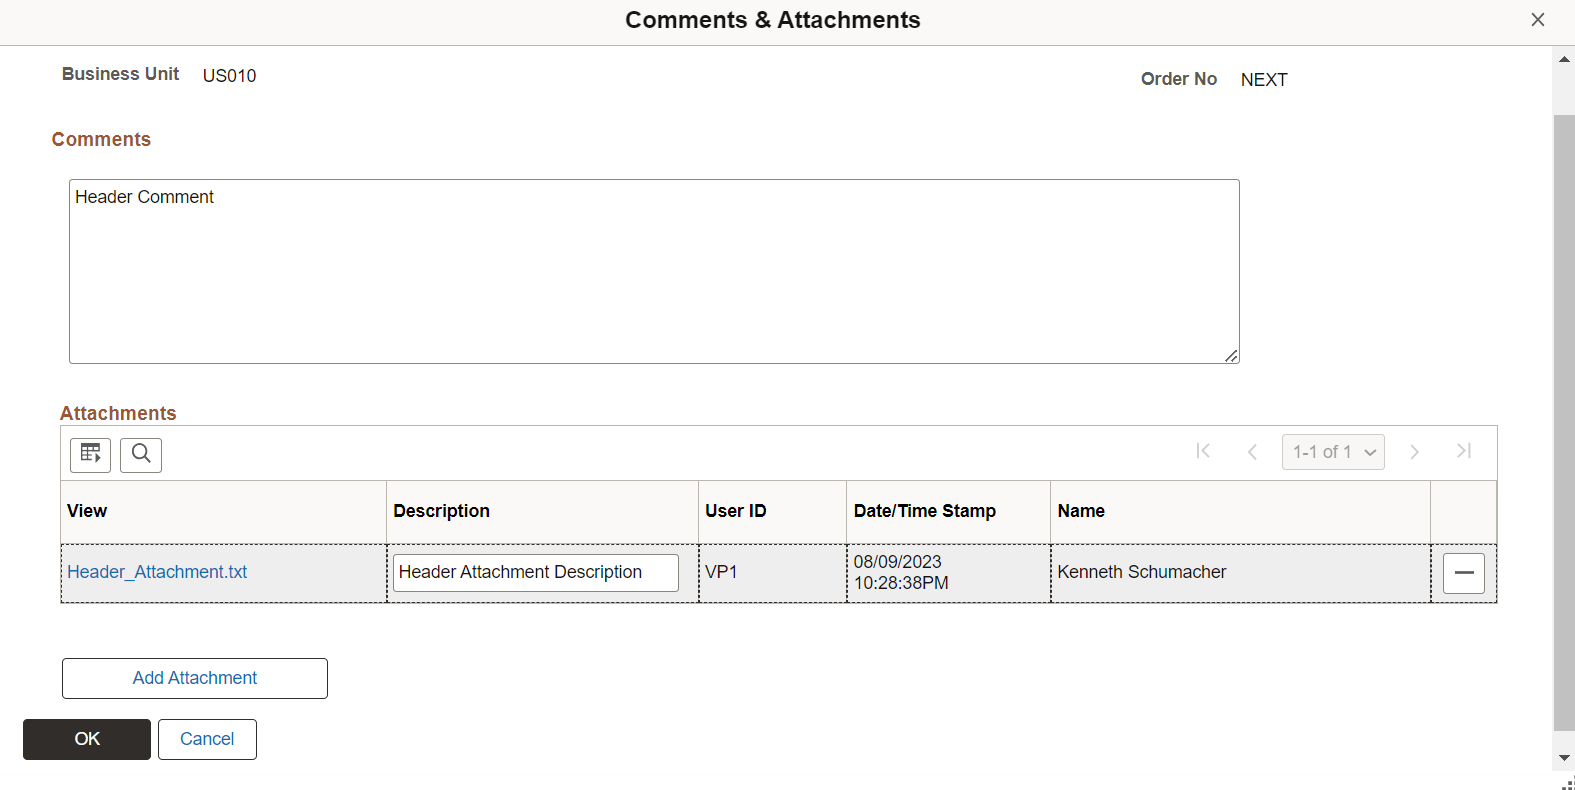
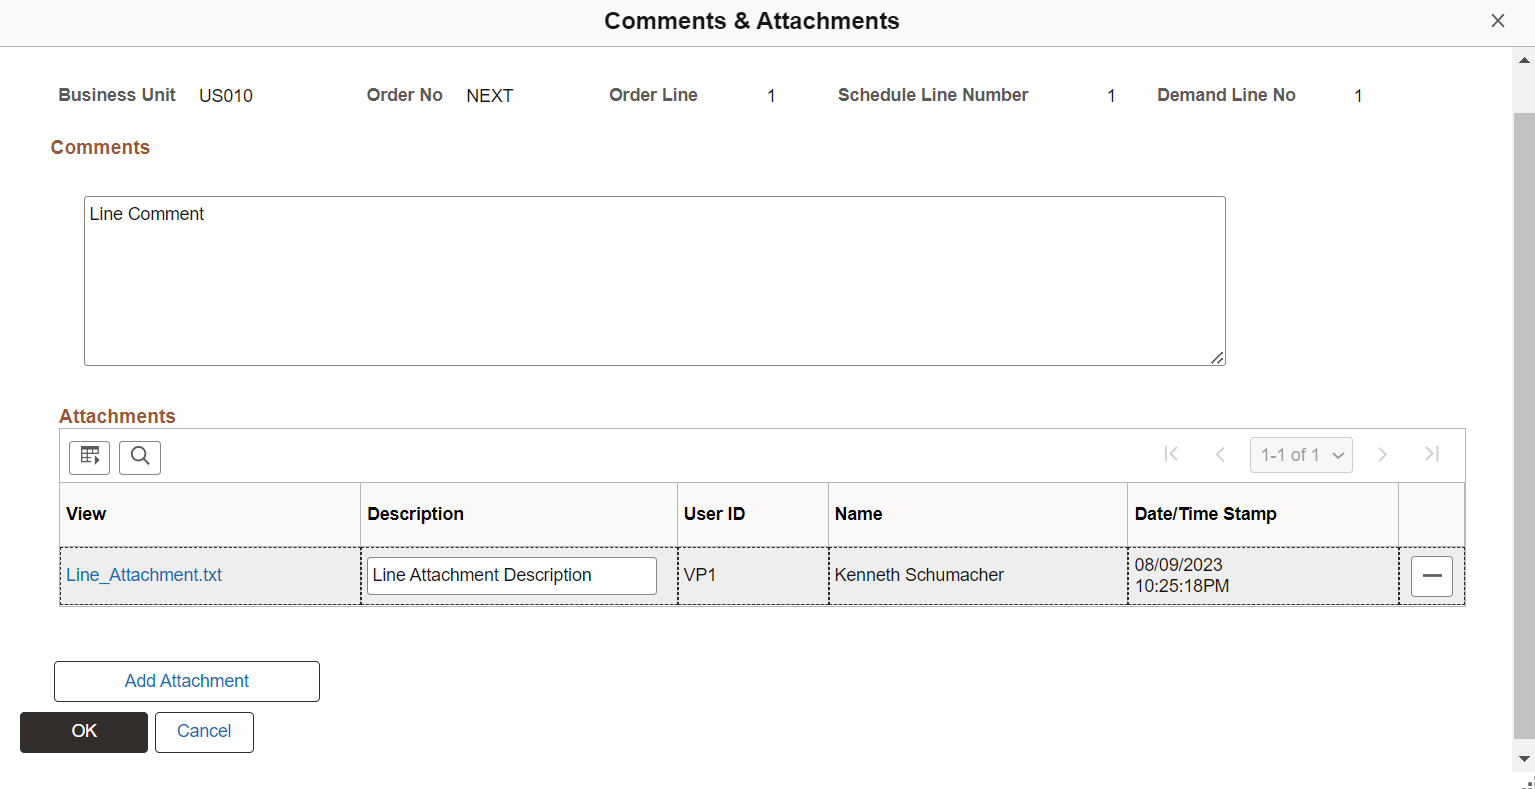
Use the Comments and Attachments page (IN_HD_CMNT_ATT_SEC and IN_LN_CMNT_ATT_SEC) to add comments and upload the attachments for Express Issue header and line.
Navigation:
Click the Comments & Attachments link on the Express Issue header and Order Line Information.
This example illustrates the fields and controls on the Express Issue - Header Comments & Attachments Page. You can find definitions for the fields and controls later on this page.
This example illustrates the fields and controls on the Express Issue - Line Comments & Attachments Page. You can find definitions for the fields and controls later on this page.
|
Field or Control |
Description |
|---|---|
|
Comments |
Enter the comments for Express Issue Header and Line. |
|
Attachments |
Displays the List of added attachments along with upload date and time, user id, and name of the up-loader. Click the attachment file name link to view or download the attachments. You can also enter description for the added attachments. |
|
Add Attachment |
Click Add Attachment button to select and upload the attachments. You can upload multiple files at a time depending on configured attachment upload limit. To configure attachment upload limit, see Installation Options - Multiple Attachments Page. |
 (Delete) |
Click Delete to remove that attachment from the list. |
Note: User can add, view, and delete the comments and attachments before Save. After Save, user can only view the comments and attachments.
Use the Detail Override/Exceptions page (EXPRESS_ISSUE5_INV) to enter specific attributes for an order line or override shipping information and (for non-RTV orders) ChartField accounting information.
You can also enter a configuration code for configured items.
Navigation:
Click the Detail Override/Exceptions link on the Express Issue page.
This example illustrates the fields and controls on the Detail Override/Exceptions page. You can find definitions for the fields and controls later on this page.

Field or Control |
Description |
|---|---|
Distrib Type (distribution type) |
Select if you want the order line to have a different distribution type than that specified for the order. |
Packaging Code |
Define any specific packaging requirements for the item. Packaging codes are established on the Packing Codes page. This information appears on the Packing Instructions page when packing shipping containers. |
Reason Code |
Displays a user-defined reason code selected from the values that have a reason type of Shipments. |
Export |
Indicates that the order is an intercompany transfer requiring export documentation. This field is populated at the order header level for the ship to customer defined for the destination business unit. If you override the setting here, the system transfers the selection to the line level, where you cannot change it. |
Schedule Arrival |
Displays the date that the order should arrive at its destination. The scheduled arrival is linked to the scheduled shipment date. If the transfer is an interunit transfer and the user adds intransit time for the appropriate source business unit, destination business unit, and ship via, then this extra time is added to the scheduled shipment date to determine the scheduled arrival date. In the Shipping/Issues component, the arrival date is linked to the actual shipment date and time. Note: For interunit transfers, if you change the scheduled arrival date and time, and if the destination business unit requires closure-calendar validation and processing for receiving operations as defined on the Closure Calendar page, the system validates the new scheduled arrival date and time against the closure calendar. If the arrival date coincides with a receiving closure date at the destination business unit, the system issues a warning and provides the option to keep the date or move the scheduled arrival date to the next valid date. |
Ship Serial ID |
Click to access the Serial ID page, where you can enter shipping serial numbers. |
Defer Depletions |
Select an option to override the default value for the Defer Depletions field on the demand line. The Defer Depletions value is applied when the demand line is successfully placed in the Shipped fulfillment state. The options are:
When this field is left blank, the default value is derived from the Carrier page; if there is no default value on the Carrier page then the system uses the default value on the Setup Fulfillment-Shipping page. For a complete discussion of the Defer Depletions feature, go to the "Shipping Inventory" topic, "Delaying the Billing and Costing of Inventory Shipments" section. See Delaying the Billing and Costing of Inventory Shipments. |
Note: If you override the ship via or carrier, PeopleSoft Inventory cancels any existing transportation route assignment for the demand line.
The Intrastat Interunit Returns and Replacement fields are only available for intrastat interunit transfers. If both the source and destination business units are members of the European Union and require intrastat reporting, mark the interunit receipt as a replacement or a return. Your selections populate the Receipt Line page when the destination business unit receives the transfer order.
Field or Control |
Description |
|---|---|
Replacement |
This field works in conjunction with the Intrastat InterUnit Returns field. Values are: NA: The interunit transfer is a normal transfer order or a return. This is the default value when the Intrastat InterUnit Returns option is selected. RN (replacement of goods not returned): The transfer replaces an order that had been previously received but was scrapped or otherwise disposed of. The transfer order is reported on the intrastat return with a Nature of Transaction code indicating that it is a replacement of goods that have not been returned. RR (replacement of returned goods): The transfer replaces an order that was returned to the source business unit. The transfer order is reported on the intrastat return with a Nature of Transaction code indicating that it is a replacement of goods that have been returned. |
Intrastat InterUnit Returns |
The interunit or intercompany transfer contains goods that were previously sent to another business unit but are now being returned. The transfer is reported on the intrastat return with a Nature of Transaction code indicating that it is a return. (If you clear this option, the transfer is a normal transfer and is reported on the intrastat return with a Nature of Transaction code indicating that it is a purchase. If you select this option, the Replacement field value is NA (not applicable). A transfer can be a return or a replacement, but not both. |
Transfer Price Overrides group box
The Transfer Price Overrides group box applies to an interunit MSR or an interunit expensed issue. The transfer price defaults to the material stock request using the transfer pricing default hierarchy. If you have selected the Allow Price/Markup Overrides check box on the Setup Fulfillment page of the source business unit, you can change the transfer price here. To display the current estimated transfer price, click the Estimate Transfer Price button on this page.
Field or Control |
Description |
|---|---|
Transfer Price Override |
Enter an override value for the transfer price. This value is stored in the IN_DEMAND table in the TRANSFER_COST field. The override transfer price is not stored in the IN_DEMAND_TRPC table until after the Depletion process has been run. |
Price Markup % Override |
Enter an override markup percentage to be used instead of the markup percentage defined in the transfer pricing default hierarchy. Define the percentage increase to the item's transfer price (or cost) in order to create a new transfer price. For example if you enter a value of 25 in this field and the item cost is 100 USD, then the transfer price is 125 USD. Be sure to enter a 25% markup as 25, not .25. Note: Both a transfer price override and a price markup percentage override can be applied to the same demand line. The markup percentage is applied on top of the transfer price. When you enter an override value in this field, the system records the markup using the cost element in the Default Markup Cost Element field in the Setup Fulfillment page. |
Transfer at Zero Price Over. |
Select to ship interunit transfers at zero cost. The source business unit records a loss for the entire cost of the shipped items. This feature enables you to ship promotional or sample items at no cost to the destination business unit. The default value comes from the transfer pricing default hierarchy, but you can override the returned value for each line of the material stock request. |
Total Price |
Displays the transfer price calculated for the overrides entered in this group box. |
Estimated Transfer Price group box
The Estimated Transfer Price group box applies to an interunit MSR or an interunit expensed issue. Any value displayed here is an estimate, since the transfer price is calculated during the Deplete On Hand Qty (Depletion) process.
Field or Control |
Description |
|---|---|
Estimate Transfer Price |
Click this button to calculate the current estimated transfer price based on the transfer pricing default hierarchy. |
Estimated Transfer Price |
Displays the estimated transfer price for one unit of the item. This value displays after you have clicked the Estimate Transfer Price button. |
Estimated Total Price |
Displays the estimated total transfer price for this demand line by multiplying the estimated transfer price by the quantity requested. This value displays after you have clicked the Estimate Transfer Price button. |
Transfer Price Details |
Click this link to display the Transfer Price Details page where you can view the estimated transfer price broken out by cost elements. This page is populated after you have clicked the Estimate Transfer Price button. |
Use the Choose Containers page (EXPRESS_ISSUE4_INV) to select storage containers to issue.
Navigation:
Click the Choose Containers link on the Express Issue page.
This example illustrates the fields and controls on the Choose Containers page. You can find definitions for the fields and controls later on this page.
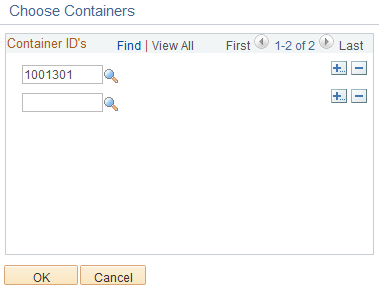
Select a container ID to associate with the order line selected on the Express Issue page. When you return to the Express Issue page, the system automatically determines the items and quantities in each container and creates an order line for each item. If the item exists in more than one container, this information appears on the main page as an additional row.
You cannot ship partial containers using this method. To ship only one item or a partial quantity within the container, use the normal method of entering order lines on the main page.
Note: If you add a container and then decide not to ship it, return to this page to delete the row.